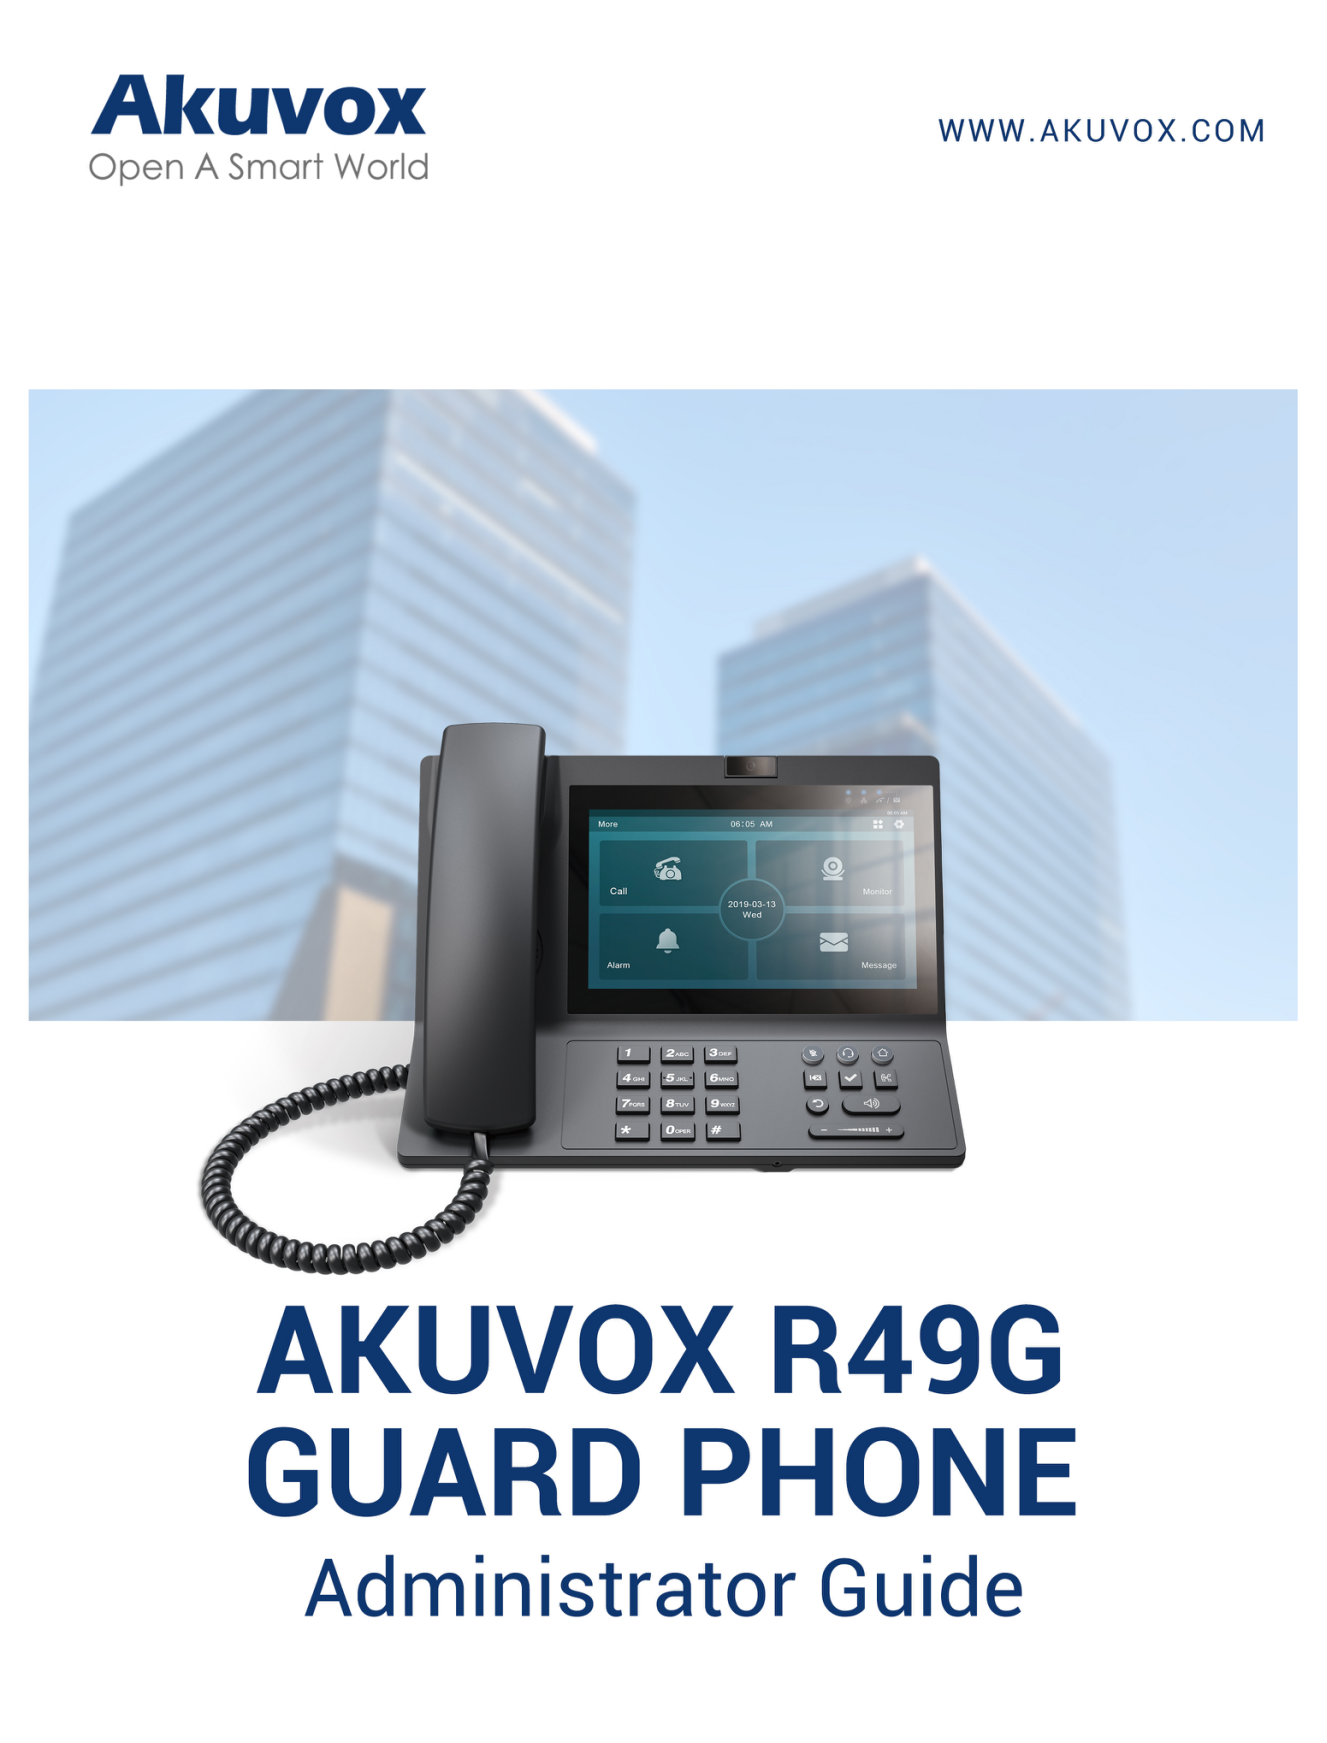
Akuvox R49G Guard Phone Administrator Guide_V1.0
- 24 Feb 2022
- Print
- DarkLight
- PDF
Akuvox R49G Guard Phone Administrator Guide_V1.0
- Updated on 24 Feb 2022
- Print
- DarkLight
- PDF
Article Summary
Share feedback
Thanks for sharing your feedback!
About This Manual
Thank you for choosing the Akuvox R49 guard phone. This manual is intended for the administrators who need to properly configure the R49 guard phone. This manual applies to the 49.30.5.xxx version, and it provides all the configurations for the functions and features of the guard phone. Please visit the Akuvox forum or consult technical support for any new information or the latest firmware
Introduction of Icons and Symbols
Warning
Always abide by this information in order to prevent the persons from injury.
Caution
Always abide by this information in order to prevent the damages to the device.
Note
Informative information and advice from the efficient use of the device.
Blue indicator Light Status
Related Documentation
You are advised to refer to the related documents for more technical information via the link below:
https://knowledge.akuvox.com/
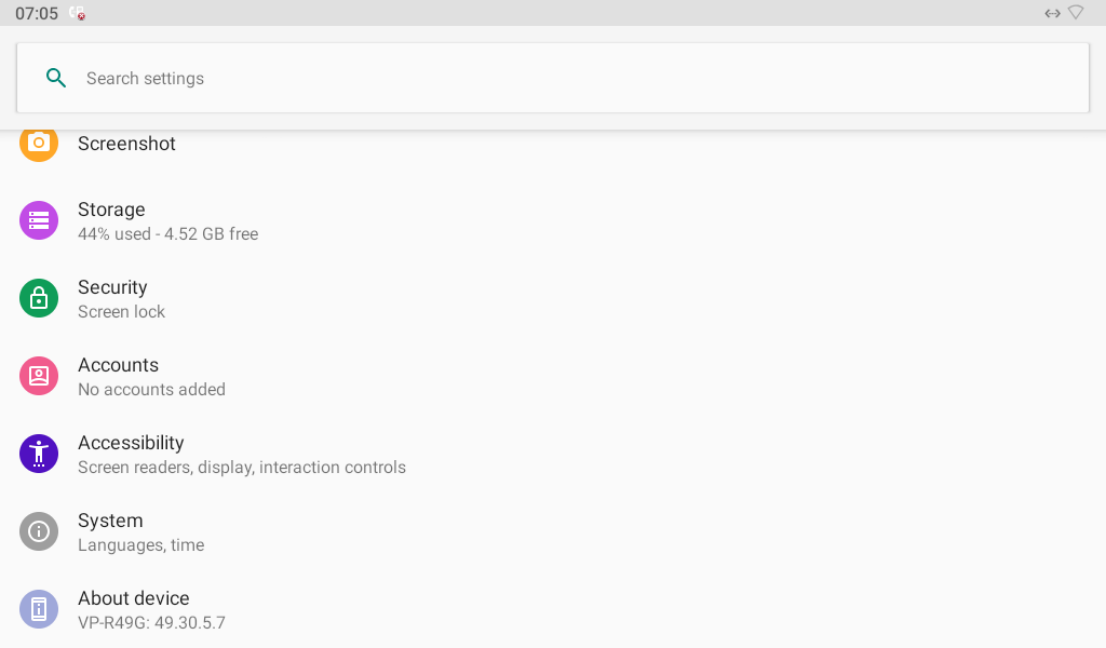
1.Product Overview
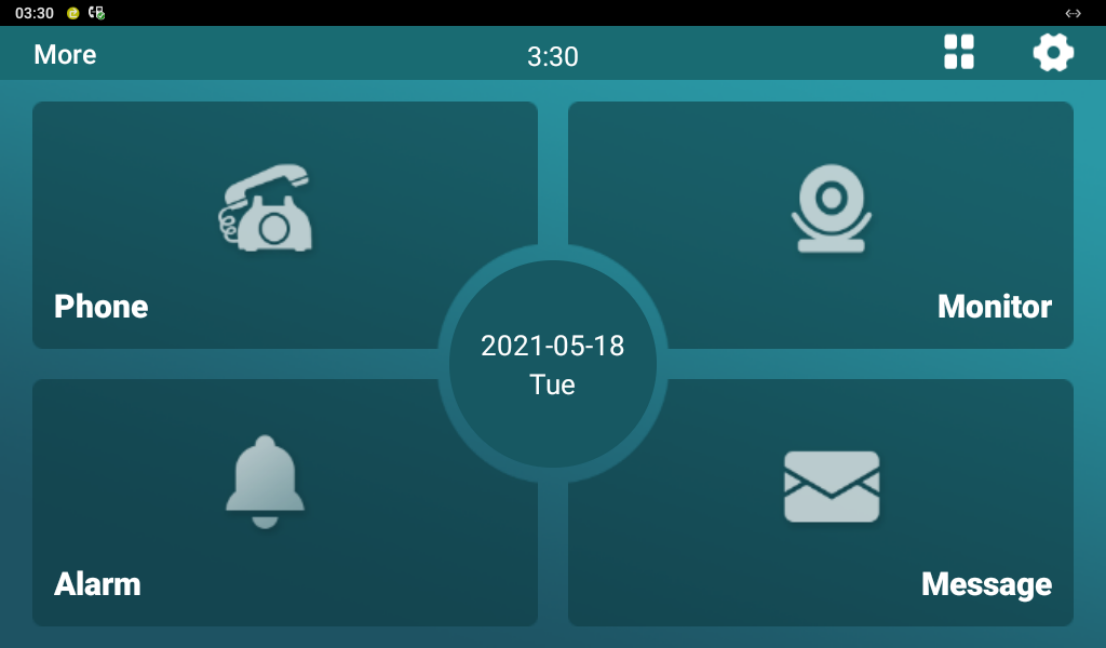
The cloud-based R49G guard phone can be deployed and maintained on the SmartPlus platform along with Akuvox door phones, indoor monitors, SmartPlus app that are incorporated with the guard phone as a whole in the community management. With the R49G guard phone, you will be able to build up the connection with door phone , indoor monitors, Smartplus app in terms of making intercom calls, monitoring door phones, dealing with alarms triggered by the indoor monitors in a community, and receiving SOS messages. More over, R49G allows you to send notifications to the door phones and SmartPlus apps, to create your local contact in the devices, and to set up monitoring locally.
2.Connecting Akuvox Smartplus
Akuvox R49 guard phone is connected to the Akuvox smartPlus platform for the cloud based management in terms of guard phone deployment, remote device configuration, device data transmission type, SIP account information, and time zone etc. And all these settings will be synchronized to the guard phone, prioritizing over the manual settings you conducted on the device. So before using it, please make sure it is already connected with Akuvox SmartPlus. If not, please consult your distributor or Akuvox technical team for help.
3.Network Setting
3.1.Device Network Status
Device network status can be checked on the device and on the device web interface.
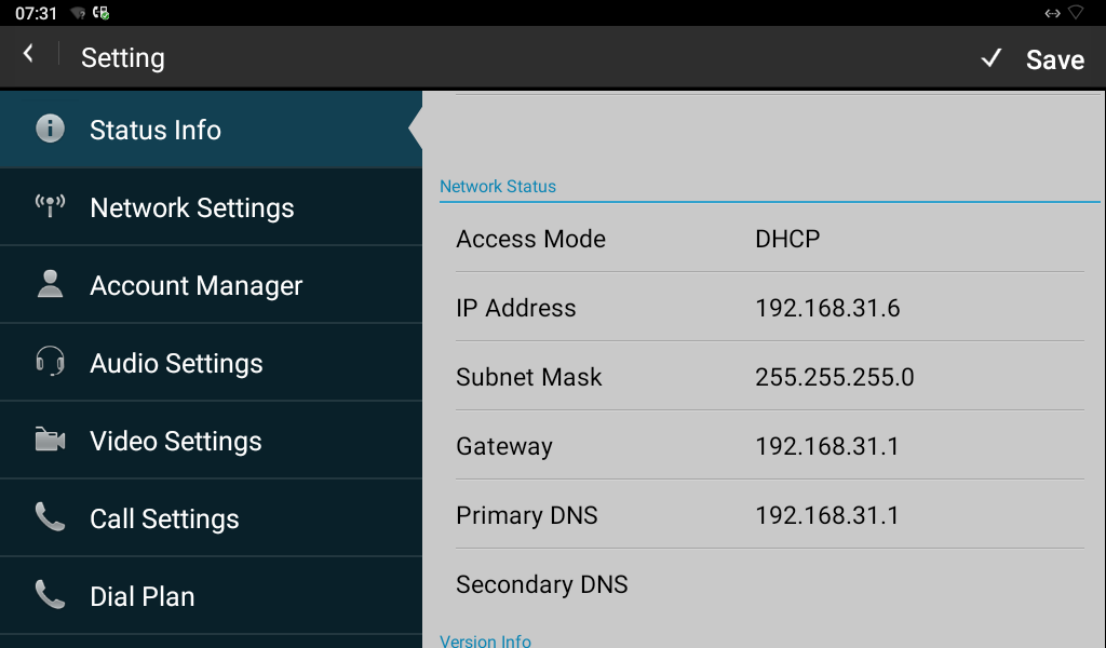
- Check Device Network Status on the Device
Click Setting key on the top right corner on the device home screen and click on Status Info to check the the device network status.
- Check Device Network Status on the Device web
To check the network status on the web Status > Network Information interface.

3.2.Device Network Configuration
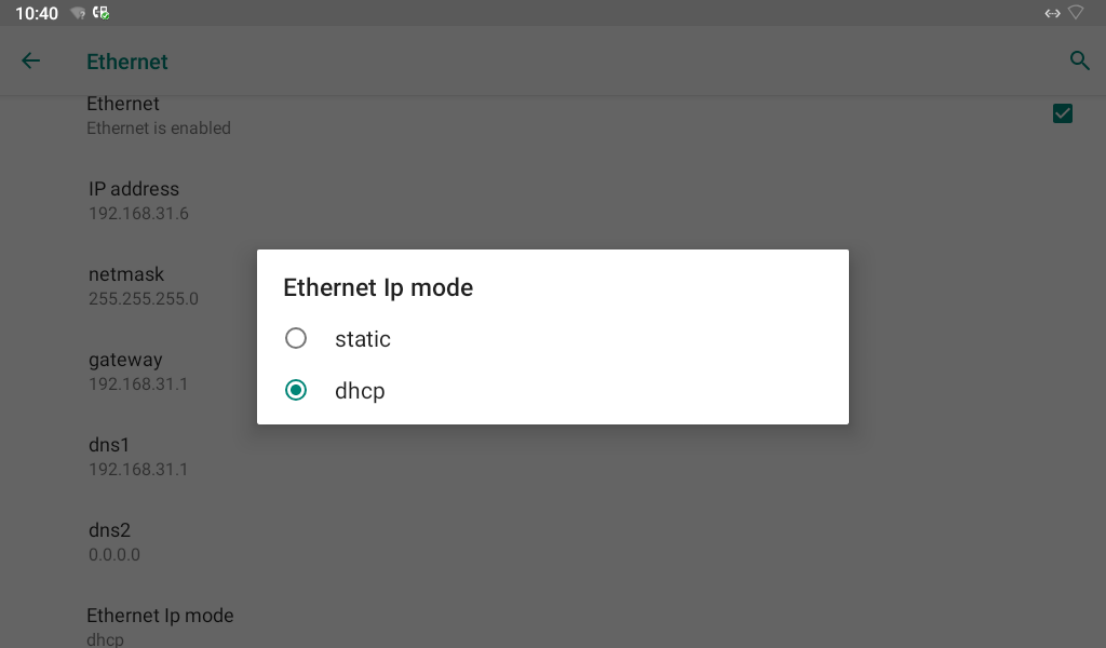
R49G guard phone can be connected to both Ethernet and Wi-Fi network. You can check for the door phone’s network connection info and configure the default DHCP mode (Dynamic Host Configuration Protocol) or static IP mode for the device either on the device or on the device web interface. You can also check and configure the device Wi-Fi connection and Wi-Fi and data usage (both WiFi and Ethernet data) on the device.
3.2.1.Configure Network Connection on the Device
You can check for the door phone’s network connection info and configure the default DHCP mode (Dynamic Host Configuration Protocol) and static IP mode for the device either on the device or on the device web interface.To check and configure the network connection. You can press on Setting key
on the home screen and click on Network Settings> LAN Type, then set up the network connection.

Parameter Set-up:
Access Mode: select DHCP or static IP access mode. DHCP mode is the default network connection. If the DHCP mode is selected, then the guard door phone will be assigned by the DHCP server with IP address, subnet mask,gateway,and primary/ backup DNS server address automatically. If IP mode is selected, then the IP address, subnet mask, default gateway, and DNS server address will have to be manually configured according to your actual network environment.
IP Address: set up the IP Address if the static IP mode is selected.
Subnet Mask: set up the subnet Mask according to your actual network environment.
Gateway: set up the correct gateway according to the IP address of the gateway.
Pri DNS Server: set up the primary and the backup DNS Server address (Domain Name Server)according to your actual network environment. the guard phone will connect to the backup server when the primary DNS server is unavailable .
In addition, you can also check the network setting, enable/disable the Ethernet connection, and configure DHCP or static IP mode the device on the advanced setting on the device . To do so you can slide down your finger twice on device home screen and click on and click on Network&Internet > Ethernet

3.3.Configure Network Connection on the Web Interface
To check or configure network connection on the device web Network > Basic interface.

Parameter Set-up:
IP Address: If the DHCP mode is selected, then the guard door phone will be assigned by the DHCP server with IP address, subnet mask,gateway,and primary/ backup DNS server address automatically.
Subnet Mask:If static IP mode is selected, then the IP address, subnet mask, gateway, and DNS servers address will have to be manually configured according to your actual network environment.
IP Address: set up the IP address if the static IP mode is selected.
Subnet Mask: set up the subnet mask according to your actual network environment.
Default Gateway: set up the correct gateway default gateway according to the IP address of the default gateway.
LAN DNS1/2 Server: set up DNS (Domain Name Server) according to your actual network environment. DNS 1 for primary DNS server while DNS2 fo the back DNS server. The guard phone will connect to the backup server when the primary DNS server is unavailable.
3.4.Configure Device WIFI Connection
R49G guard phone supports Wi-Fi connection, you can configure the Wi-Fi connection on the device. To do so you can slide down your finger twice on device home screen and click on then click on Network&Internet > Ethernet , switch on Wi-Fi and set up the Wi-Fi connection.


3.5.Local RTP Configuration
For the device network data transmission purpose, device needs to be set up with a range of RTP port (Real-time Transport Protocol) for establishing an exclusive range of data transmission in the network. To set up device local RTP on web Network > Advanced > Local RTP interface.

Parameter set-up:
Starting RTP Port: enter the Port value in order to establish the start point for the exclusive data transmission range.
Max RTP port: enter the Port value in order to establish the end point for the exclusive data transmission range.
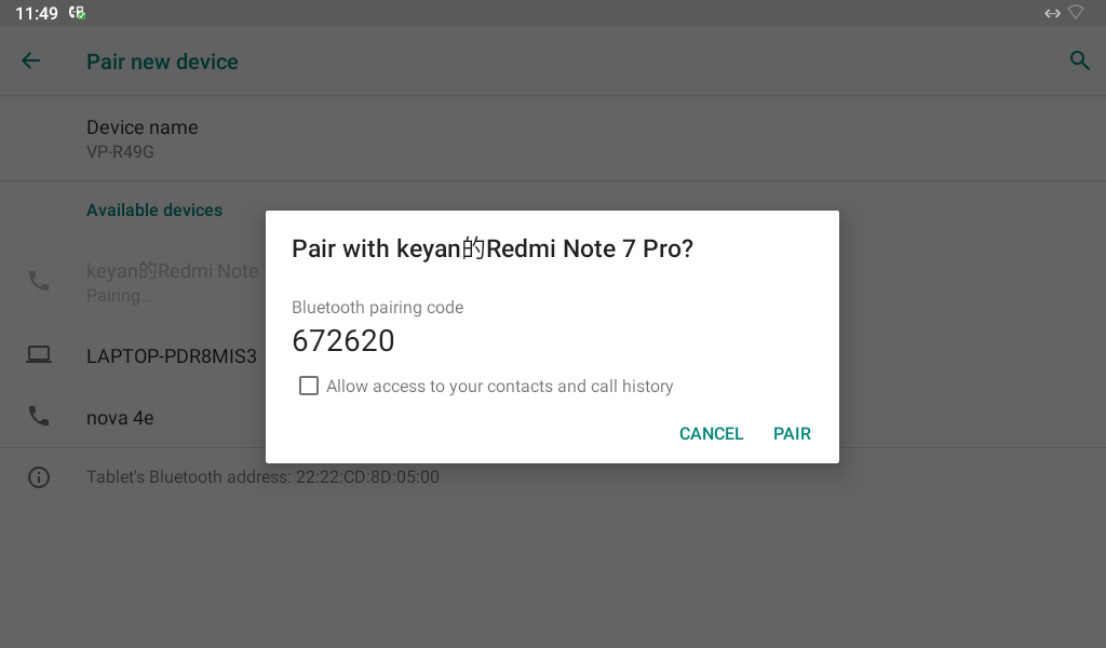
3.6.Device Bluetooth Configuration
You can switch on the Bluetooth function on the device to establish the Bluetooth based connection with devices with the Bluetooth function for files transmission, and making or answering the Bluetooth calls. To pair the guard phone with other Bluetooth device, you can slide down your finger twice on device home screen and click on then click on Connected devices and pair the guard phone with other devices.

3.7.Device VLAN Configuration
Virtual Local Area Network is a logical grouping of two or more nodes which are not necessarily on the same physical network segment but which share the same logical IP domain. To be specify, the purpose of VLAN is to separate layer 2 broadcast domain. Within trunk links, the tagged packet will only be send to those ports with same VLAN ID. This is usually achieved by switch or router.User can benefit from deployed VLAN, such as: Security: if without VLAN, all host will be included in unique broadcast domain. Therefore, the consequence of ARP attack will affect all end devices in the organization.
Performance: The nature of network broadcast is to flood frames among the network. In certain condition, it is unnecessary to receive broadcast frame. To save bandwidth for high efficiency, it will be better to separate broadcast domain by deploy VLAN.
If you want to create a VLAN network in which you only allow the designated number of devices in the same VLAN to be connected with the R49G guard phone for intercom calls, you can slide down your finger twice on the device home screen and press on and go to Network&internet > Advanced for the VLAN configuration.

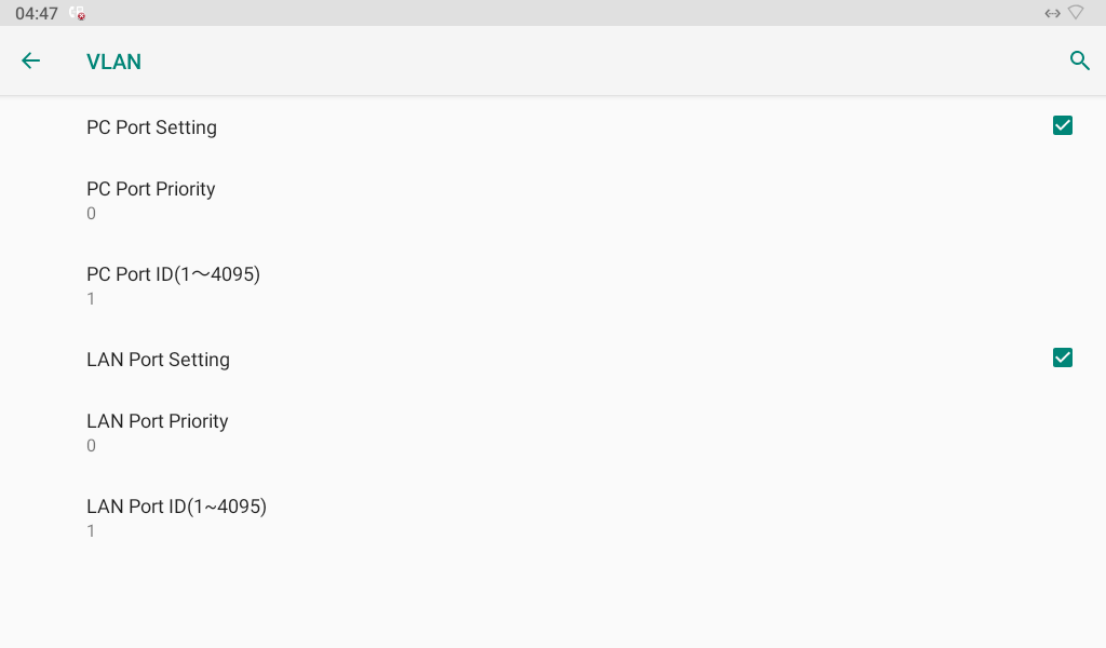
Parameter Set-up:
PC Port Setting:tick the check box to enable the PC port setting, if you want to connect the device to the VLAN network from PC port on the device. R49 has two type of ports for the network connection, one is the PC port and the other is LAN port. If you set PC port for the VLAN network connection and connect the device to the network from the device LAN port, then the setting will not be valid. The value is 0 by default.
PC Port Priority: select the PC port priority from 0-9. The higher the number is, the higher priority will be given to the VLAN in terms of sending out the data packets to the devices in the VLAN when the network congestion occurs.
PC Port ID (1-4095): This parameter does not need to be filled in by the users.The ID is 1 by default.
LAN Port Setting:tick the check box to enable the LAN port setting, if you want to connect the device to the VLAN network from LAN port on the device. R49 has two type of ports for the network connection, one is the PC port and the other is LAN port. If you set LAN port for the VLAN network connection and connect the device to the network from the device PC port, then the setting will not be valid. The value is 0 by default.
LAN Port Priority: select the PC port priority from 0-9. The higher the number is, the higher priority will be given to the VLAN in terms of sending out the data packets to the devices in the VLAN when the network congestion occurs.
LAN Port ID (1-4095): leave this field blank, as this parameter does not need to be filled in by the users. The ID is 1 by default.
4. Access the Device Web Interface
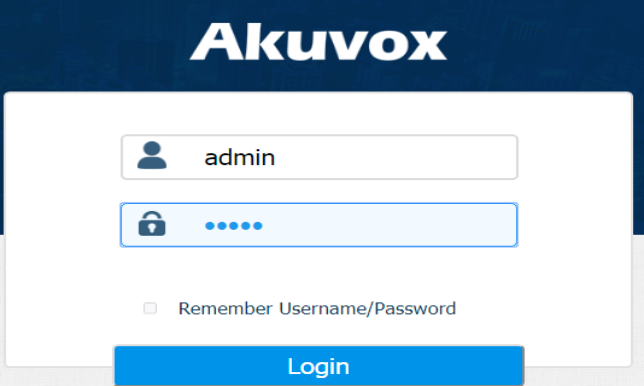
You can enter the device IP address on the web browser in order to log in the device web interface by user name and password admin/admin where you can configure and adjust parameter etc.
5.Language and Time Setting
5.1.Language Setting
When you first set up the device, you might need to set the language to your need or you can do it later . And the language can either be set up directly on the device or on the device web interface according to your preference.
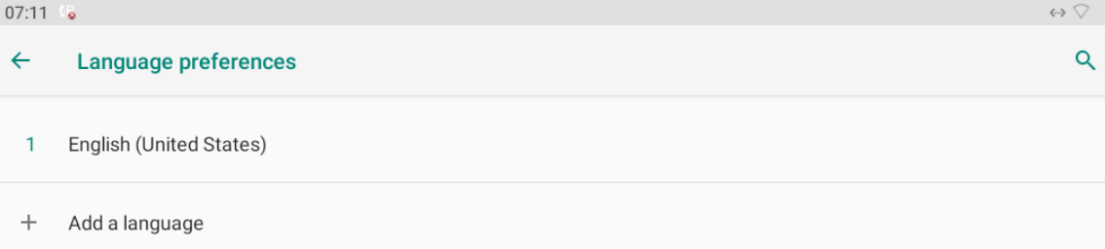
5.1.1.Language Setting on the Device
Language setting can be configured on the device and on the device web interface that allows you to select or change the language for screen display To configure the language display, you can slide down your finger twice on the device home screen and click on and go to Network&internet > System>Languages&input interface.
5.1.2.Language Setting on the Web Interface
You can configure the language display on the device web interface. You can go to Phone >Time/Lang > LCD Language.

5.2.Time Setting
Time setting can be set up on the device and on the device web interface in terms of time zone, date and time format etc.
5.2.1.Time Setting on the Device
To configure the time setting, you can slide down your finger twice on the device home screen and click on and go to Network&internet > System>Date&time.

Parameter Set-up:
Automatic date&time: when you switch on automatic time and date, the time and date will be automatically synchronized with the NTP server (Network Time Protocol. You can switch off the function if you want to set up the time and date manually.
Set date: set up the date manually when the automatic date& time function is switched off. However, the date can not be set up manually when the automatic date&time function is switched on.
Set Time: set up the time manually when the automatic date& time function is switched off. However, the time can not be set up manually when the automatic date&time function is switched on.
Select time zone: select the specific time zone depending on when the device is used. The default time zone is GMT+0.00.
Automatic 24-hour format: switch on this function if you want the time to displayed in 24-hour format.
Use 12-hour format: switch on this function if you want to time to displayed in 12-hour format. However, you cannot set the 12-hour time display if automatic 24 hour format is switched on.
5.2.2.Time Setting on the Web Interface
You can configure the time setting on the web Phone > Time/Lang interface by setting up the NTP server address that you obtained to automatically synchronize your time and date for the device. And when your time zone is selected, the device will automatically notify the NTP server of its time zone so that the NTP server can synchronize the time zone setting in your device.

Parameter Set-up:
- NTP Server: enter the NTP server you obtained in the NTP server field.
6.Screen Display Configuration
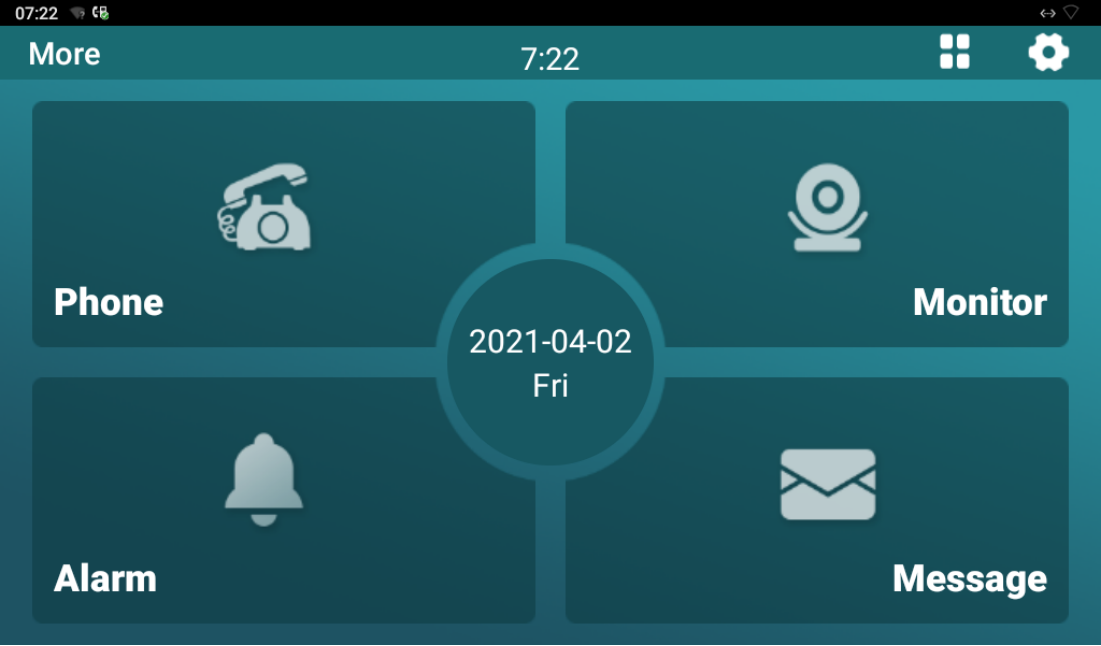
R49G guard phone allows you to enjoy a variety of screen displays to enrich your visual and operational experience through the customized setting to your preference.
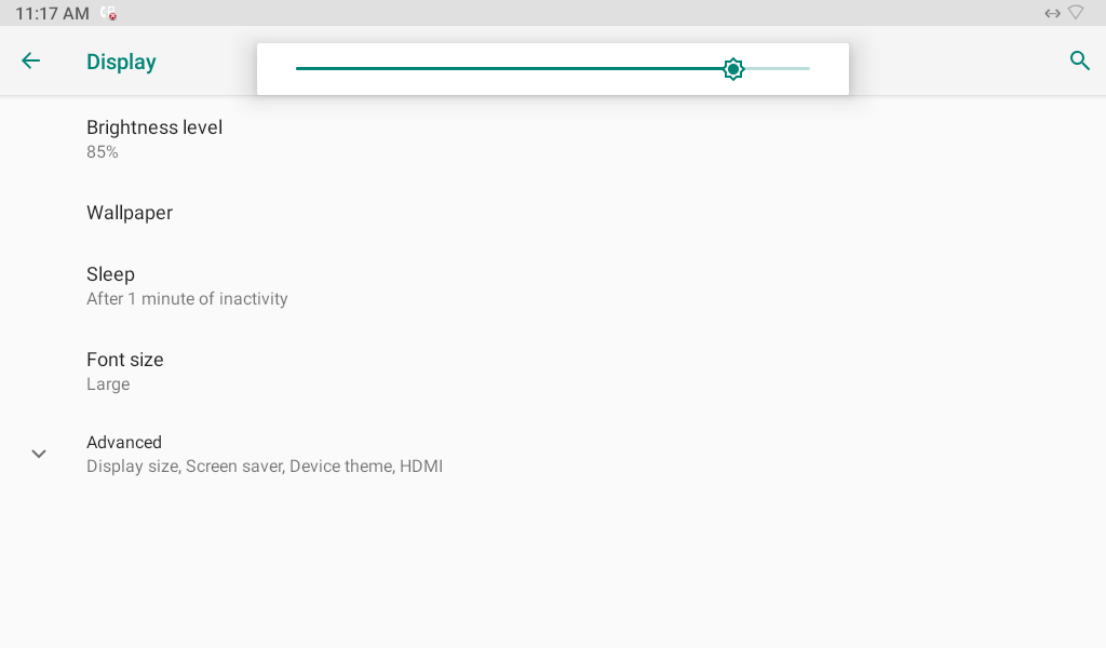
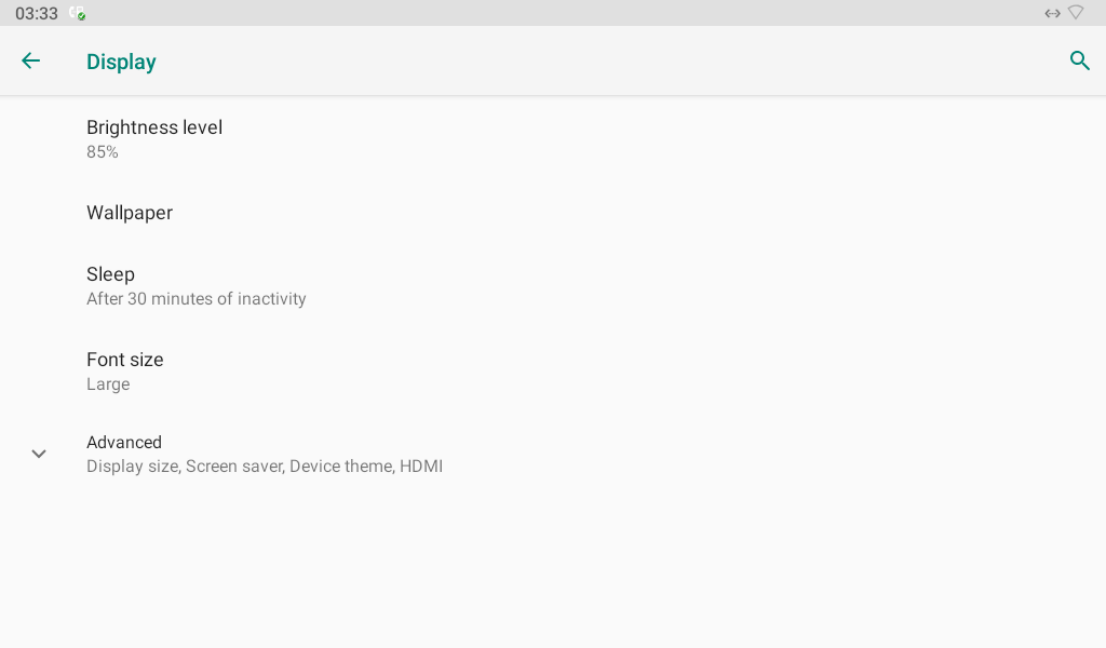
6.1.LCD Screen Brightness Setting
You can adjust the guard phone screen display brightness. To configure the language display, you can slide down your finger twice on the device home screen and click on and go to Display > Brightness Level.

6.2. Wallpaper Setting
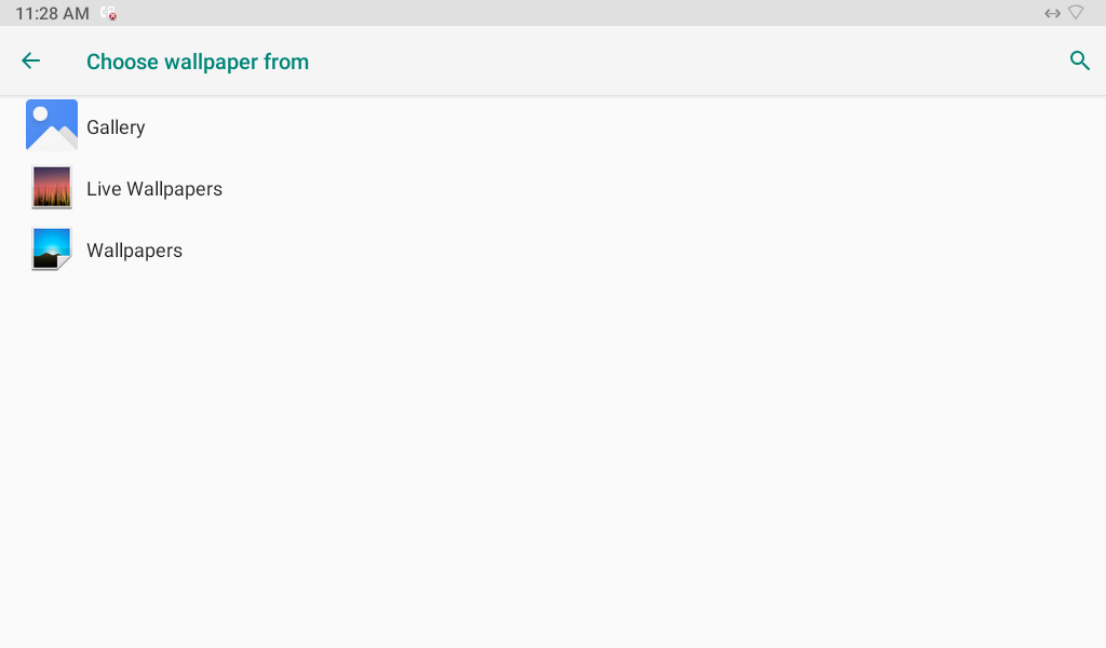
You can customize your wallpaper on the device by selecting the static and dynamic pictures from Gallery, Live Wall papers and Wall papers. Wall paper will appear when the device goes in to sleep mode or in to the lock screen status.To configure the language display, you can slide down your finger twice on the device home screen and click on and go to Display > Wallpaper.

6.3.Sleep Mode Setting
You can set the timing for the device to go in to sleep mode. For example, if you set it as 1 minute then the device will go into sleep mode when there is no operation occurred for 1 minute. However if you set it as Never, then the device will never go into sleep mode. To configure the sleep mode, you can slide down your finger twice on the device home screen and click on and go to Display > Sleep.

6.4.Font size Setting
You can set up the font size for the screen display. To configure the font size, you can slide down your finger twice on the device home screen and click on and go to Display > Font size.

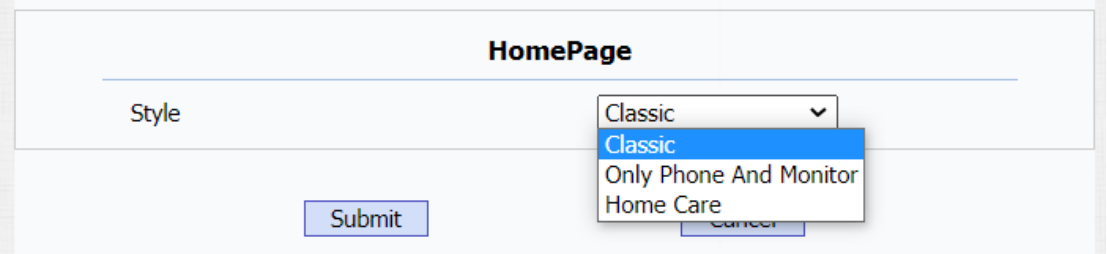
6.5.Home Screen Display Setting
You can choose your home screen display among three options: Classic, Only Phone And Monitor, Home Care. To select the home screen, you can go to Phone > Preference > HomePage on the device web interface.
6.6.Screen Lock Setting
You can set up screen lock on the guard phone for the security purpose. To set up the screen lock, you can slide down your finger twice on the device home screen and click on and go to Security, then click on Screen lock and Lock screen preference to configure the screen lock feature and screen lock message and notification display respectively.
- Configure Screen Lock Type
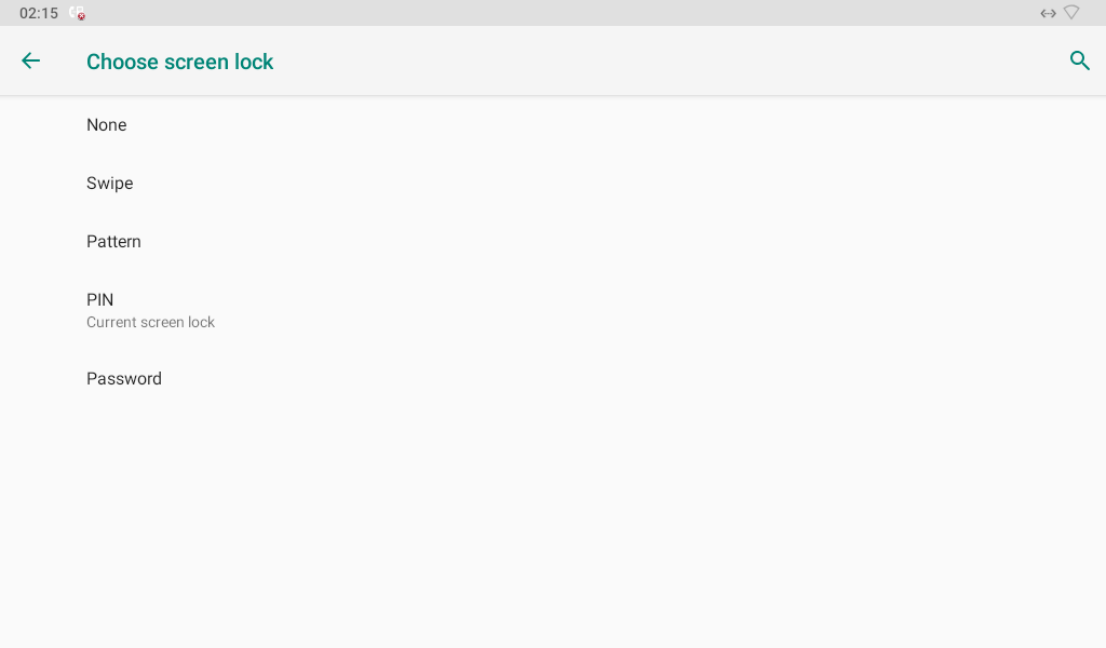
Parameter Set-up:
None: select None if you want to disable the screen lock function.
Swipe: select Swipe if you want to replace other types of screen lock with upward swipe on the screen for the screen unlock.
Patten: set up the patter for the screen unlock.
PIN: set up the screen unlock PIN code.
Password: set up the password for the screen unlock when the device starts up.
.
- Configure Screen Lock Message and Notification
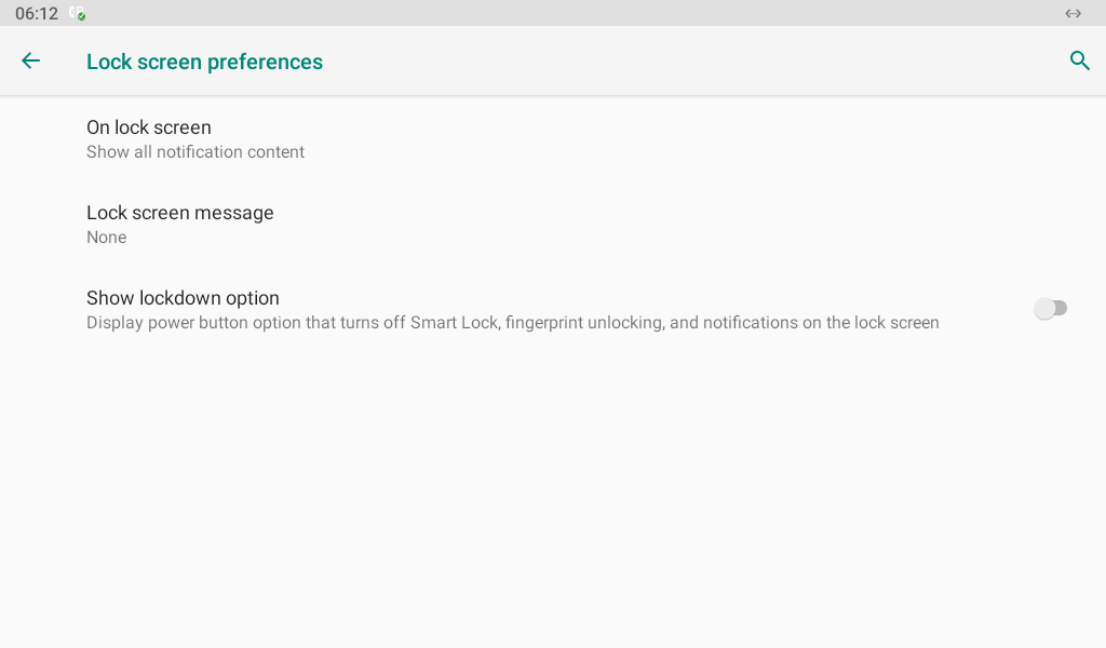
Parameter Set-up:
- On lock screen:select notification display among three options as follows:
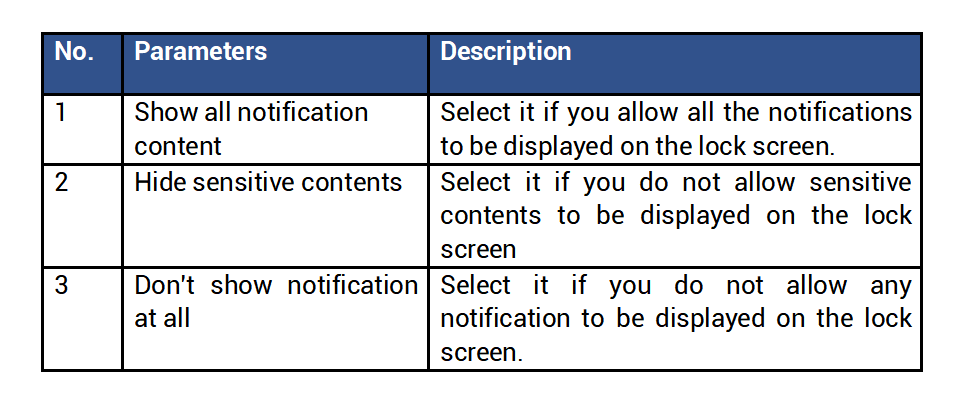
- Lock screen message:enter for example, the person’s name to indicate the owner of the lock screen.
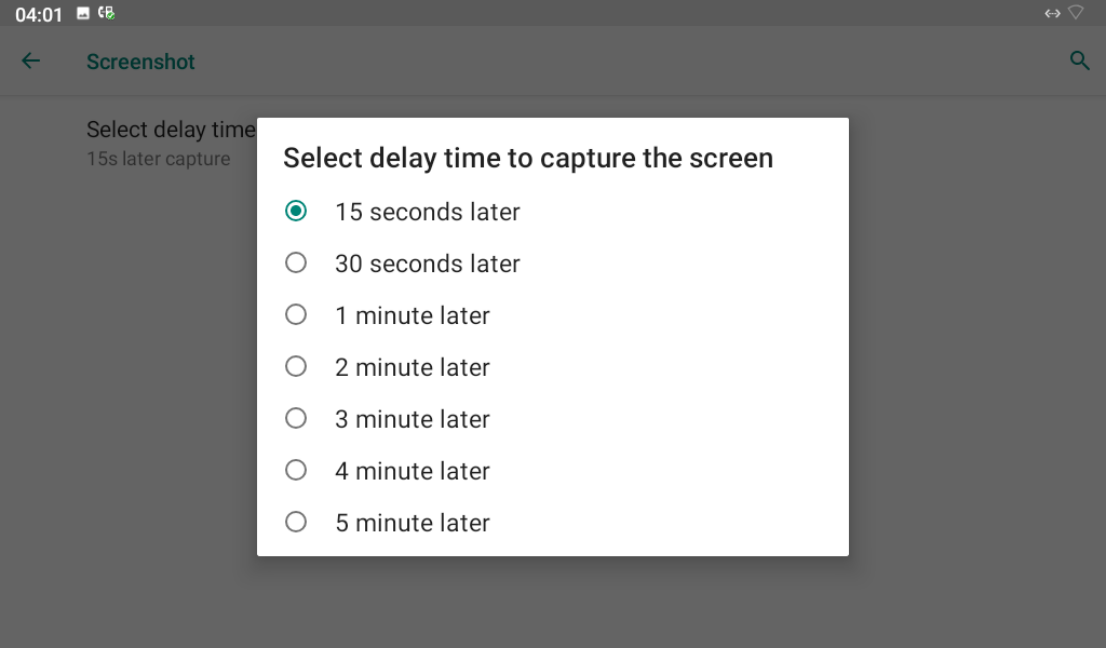
6.7.Screenshot Setting
You can set up delay time for the device screen capturing, for example, if you set it as 30 seconds later, then the device will start the capturing the current device screen automatically for one time. You can slide down your finger twice on the device home screen and click on and go to Screenshot interface.
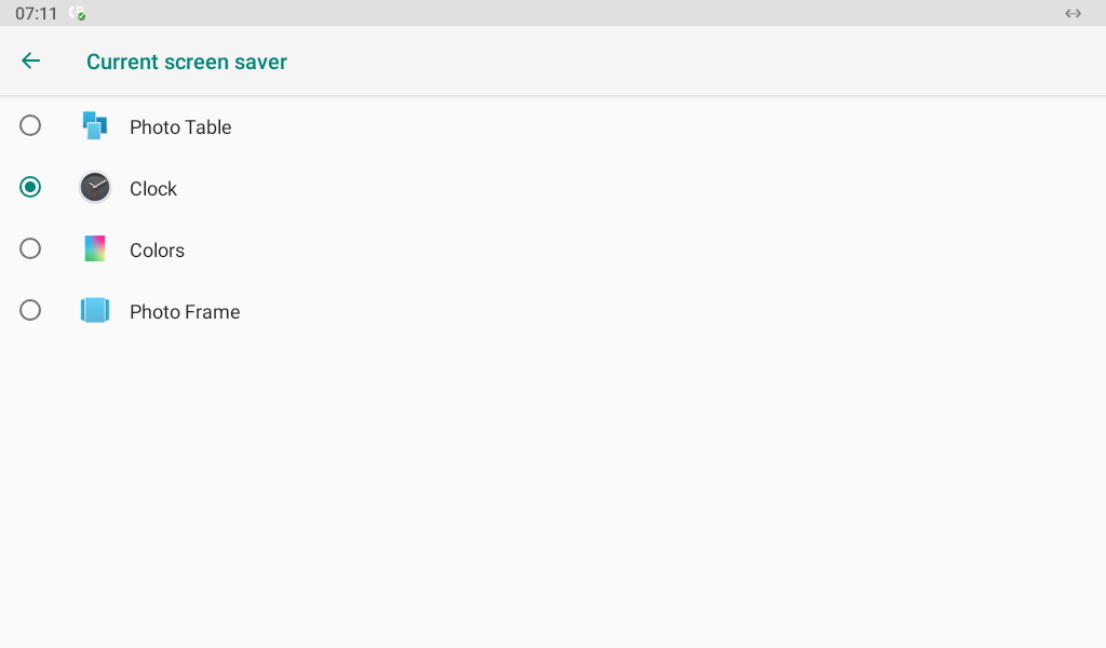
6.8.Screensaver Setting
You can select your screensaver, which will be displayed after the device goes into the sleep mode. To configure the screensaver, you can slide down your finger twice on the device home screen and press on and go to Display > Advanced > Screensaver. You can select four types of screensaver: Photo Table, Clock, Colors, and Photo Frame.

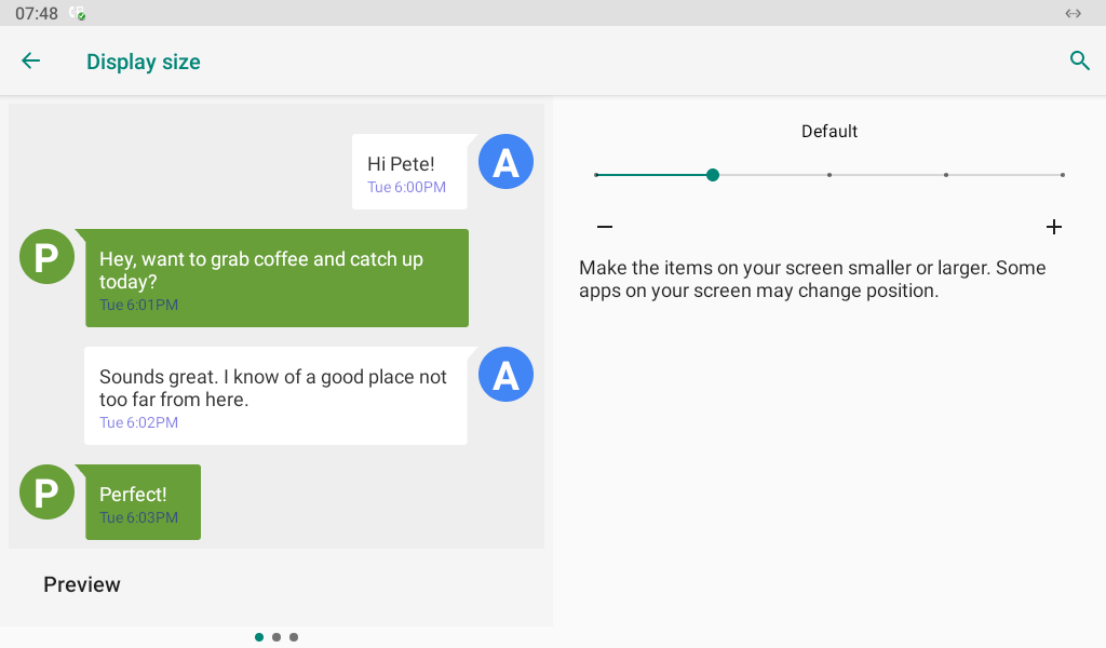
6.9.Large text Setting Screen Display
R49G guard phone allows you to amplify everything shown on the screen so that you see everything on the screen with greater ease. To do it, you can slide down your finger twice on the device home screen and click on and go to Display > Advanced > Display size.
7.Sound and Volume Configuration
R49G door phone provides you with various types of ringtone, volume, to configure sound, volume, and ringtone, you can slide down your finger twice on the device home screen and press and go to Sound.
7.1.Sound and Volume Configuration on the Device
- Configure Basic Sound and Volume Setting
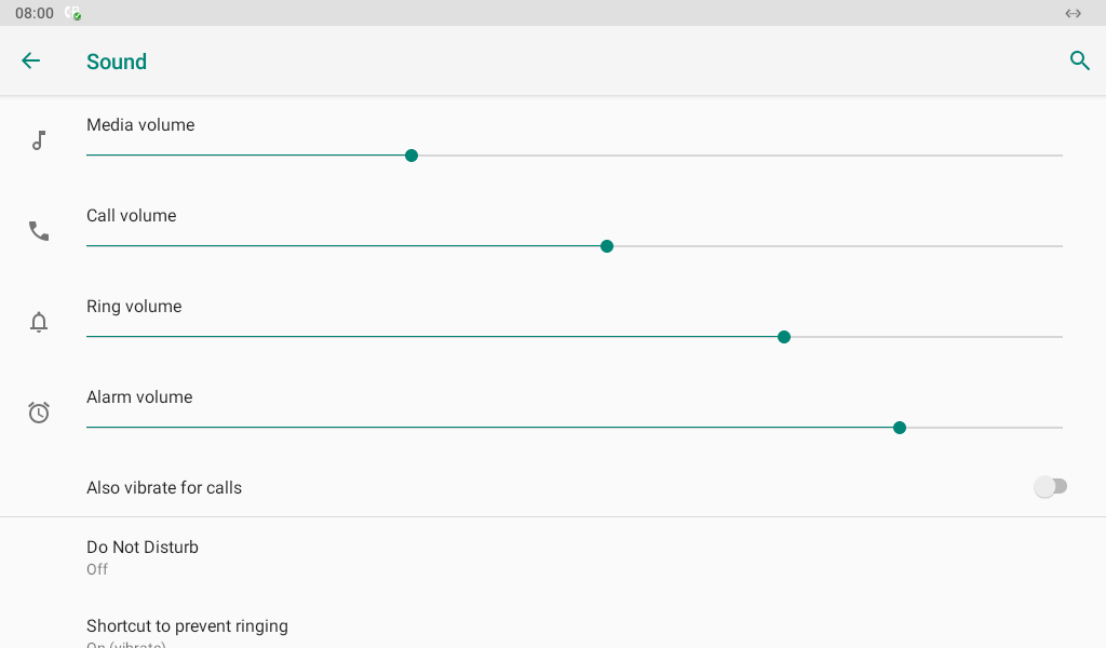
Parameter Set-up:
Media Volume: adjust the media volume by moving the dot.
Call volume: adjust the speaker volume during the call.
Ring Volume: adjust the outgoing call volume.
Alarm Volume: adjust the alarm volume.

Parameter Set-up:
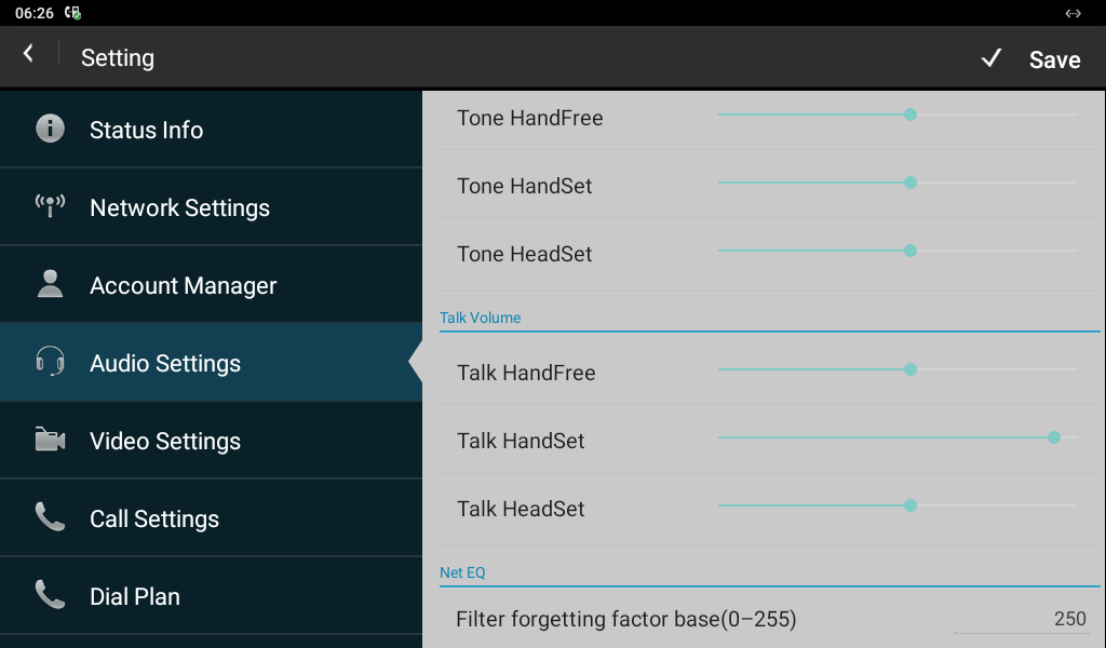
Tone HandFree/HandSet/HeadSet: the volume of ring tone when there is an incoming call with handfree, handset or headset mode.
Talk HandFree/HandSet/HeadSet: the volume during talking of handfree, handset ot headset mode.
7.1.1.Sound and Volume Configuration on the Web Interface.
You can select Ringtone volume for the device on the web interface: Phone > Preference> Ringtone.
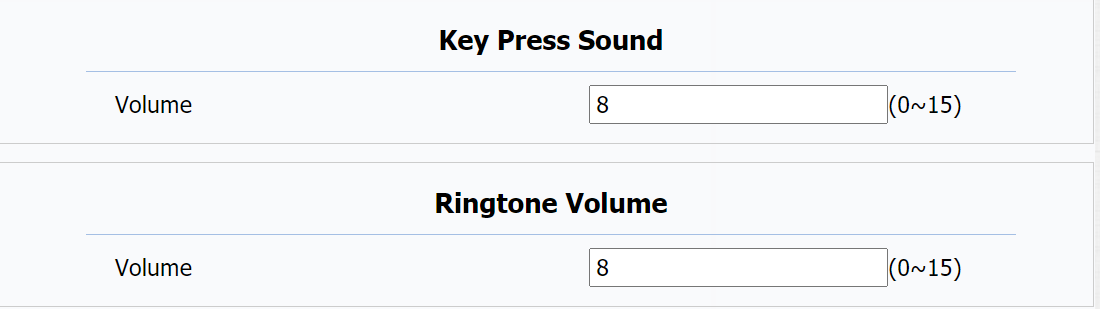
Parameter Set-up:
Keypad Press sound:the volume of pressing key.
Ringtone volume: select ringtone for incoming calls.
8.Call Configuration
8.1.IP call and IP Call Configuration
To configure the IP call feature on the device web Phone > Call Feature > Others interface.
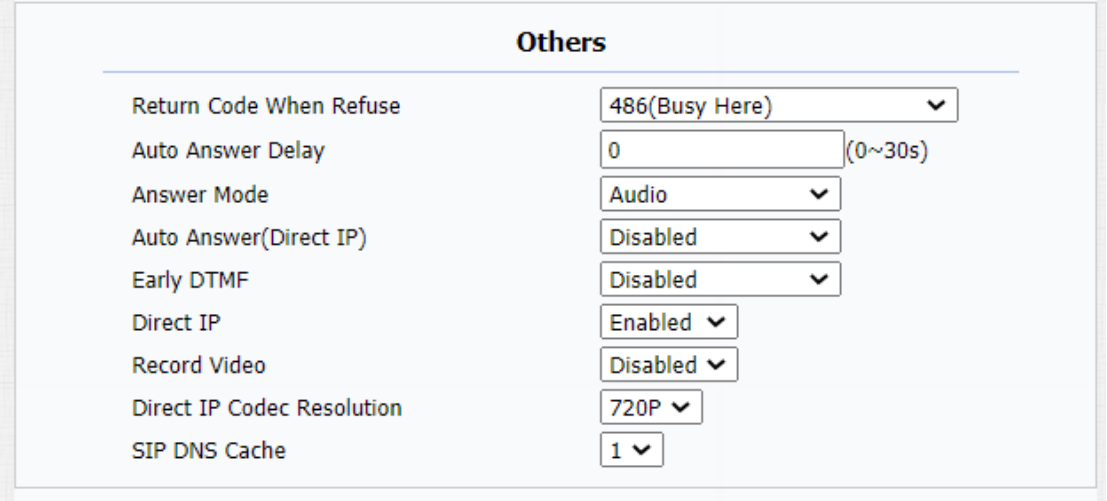
Parameter Set-up:
- Direct IP: enable and disable the IP call according to your need.
8.2.SIP Call and SIP Call Configuration
You can make SIP call ( Session Initiation Protocol ) in the same way as you do for making the IP calls on the device. However, SIP call parameters related to its account, server, and transport type need to configured first before you can make calls on the device.
8.2.1.SIP Account Registration
R49G guard phone supports two SIP accounts that can all be registered according to your applications. For example, you can switch between the two SIP accounts. The SIP account can be configured on the device and on the device interface. To configure the SIP account on the device, you can click on on the home screen and go to Account Manager to register the SIP account.


Parameter Set-up:
Account: select Account1 or Account2 and switch on the two account according to your need.
Register Name: enter the SIP account register Name obtained from the SIP account administrator.
User Name: enter the user name obtained from SIP account administrator.
Password: enter the password obtained from the SIP server.
Display Name: configure the name, for example, the device’s name to be shown on the device being called to.
8.2.2.SIP Server Configuration
SIP server can be set up for device in order to achieve call session through SIP server between intercom devices. SIP server can be configure on the device and on the device web interface.
To perform the SIP account setting on the device:
you can click on on the home screen and go to Account Manager to register the SIP account.

Parameter Set-up:
Reg Server IP: enter the Server’s IP address number or its URL.
Reg Server Port: set up SIP server port for data transmission.
Reg Server IP 2: set up the back IP server.
8.3.Data Transmission Type Configuration
SIP message can be transmitted in three data transmission protocols: UDP (User Datagram Protocol), TCP(Transmission Control Protocol),TLS (Transport Layer Security) and DNS-SRV. In the meantime, you can also identify the server from which the data come from. To do this configuration on web Account > Basic > Transport Type interface.

Parameter Setup:
UDP: select “UDP” for unreliable but very efficient transport layer protocol. UDP is the default transport protocol.
TCP: select “TCP” for Reliable but less-efficient transport layer protocol.
TLS: select “TLS” for Secured and Reliable transport layer protocol.
DNS-SRV: select “DNS-SRV” to obtain DNS record for specifying the location of services. And SRV not only records the server address but also the server port. Moreover, SRV can also be used to configure the priority and the weight of the server address.
8.4.Call Setting
8.4.1.Call Auto-answer Configuration
R49G guard phone will auto answer incoming calls if call auto-answer is enabled and auto answer number is set up . To enable or disable on web Account > Advanced > Call > Auto Answer interface. And set up the corresponding auto answer parameters on web Phone > Call Feature > Others interface.

Parameter Set-up:
Auto Answer (direct IP): turn on the the Auto Answer function by ticking the square box .
Auto Answer Number: the Auto answer whitelist which means you can add some specific numbers here, the call from these numbers will be answered automatically.
Answer Mode: set up the video or audio mode you preferred for answering the call automatically.
Auto Answer Delay: set up the delay time (from 0-30 sec.) before the call can be answered automatically. For example, if you set the delay time as 1 second, then the call will be answered in 1 second automatically.
Auto Answer (Direct IP): auto answer for direct IP call.
8.4.2. Enable SIP-hacking Prevention .
Internet phone eavesdropping is a kind of network attack, which aims to eavesdrop on the communication sessions of others in an unauthorized way. Attackers can use this malicious activity to capture and read content containing sensitive and confidential information. SIP hacking prevents SIP call from hacking in the Internet. To do this configuration on the web Account > Advanced > Call interface.

Parameters Set-up:
- Prevent SIP Hacking: enable to active this feature during using sip call. This feature is only available for SIP call, not IP call.
8.5.Emergency Call Setting
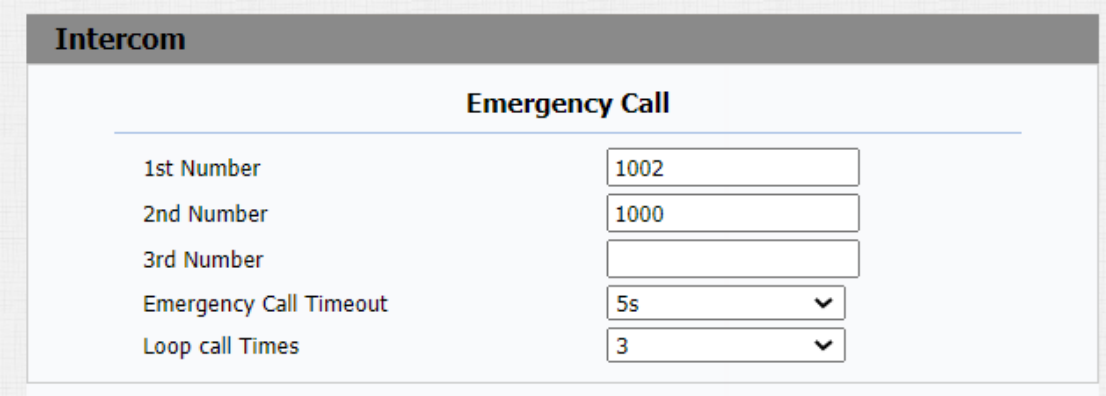
Emergency call is used to initiated emergency calls to the three pre-defined emergency contacts for the urgent help, especially for the elders and children. You can press on SOS on the home screen to initiate emergency calls (SOS number).
8.5.1.SOS Number Setting
SOS numbers need to be set up in the device web interface before you are allowed to make SOS calls. You can set up a maximum of three SOS numbers which can be initiated automatically when press on SOS on the home screen when emergency occurred. To set up SOS number, you can go to Phone > Intercom > Emergency Call.
Parameters Set-up:
Number 1/2/3: set up three SOS numbers, which will be called to when you press SOS on the device home screen.
Emergency Call Timout: Set up the timeout for each number. Once users call out, if the other side does not answer within the timeout, indoor monitors will continue to call the next number.
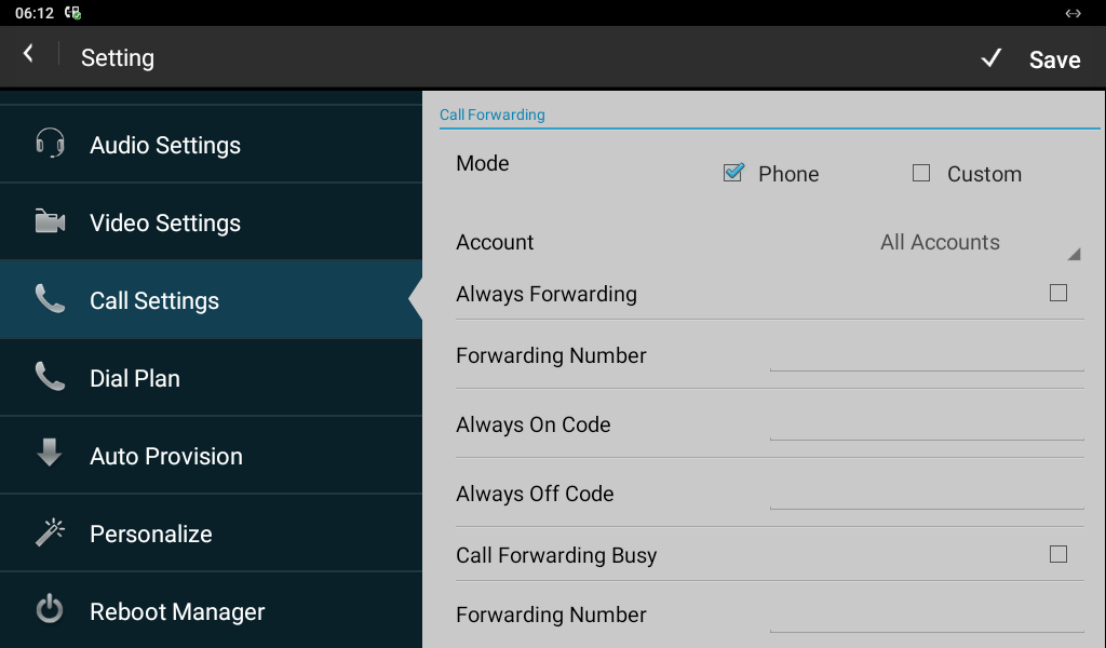
8.6.Call Forwarding Setting
Call Forward is a feature used to redirect an incoming call to the specific third party. Users can redirect the incoming call based on different scenarios. Typically, call forward has three modes: Always Forward/ No Answer Forward/Busy Forward.
8.6.1.Call Forwarding Configuration on the Device
To do the configuration on the device, click on Setting and go to Call Settings.
Parameter Set-up:
Account: To choose which account to implement call forwarding feature.
Always Forwarding: To enable always forwarding function; all incoming calls will be automatically forwarded to a specific number.
Call Forward Busy: To enable busy forwarding function; incoming calls will be forwarded to a specific number if phone is busy.
No Answer Forwarding: To enable no answer forwarding function; incoming calls will be forwarded to a specific number if phone is not picked within no answer ring time.
Forward Number: To enter the specific forward number if R49 guard phone enables always forward / busy forward / no answer forward.
8.6.2.Call Forwarding Configuration on the Web Interface
To set up forward function on web Phone > Call Feature > Forward Transfer interface.

Parameter Set-up:
Account: to choose which account to implement call forwarding feature.
Always Forward: to enable always forwarding function; all incoming calls will be automatically forwarded to a specific number.
Busy Forward: to enable busy forwarding function; incoming calls will be forwarded to a specific number if phone is busy.
No Answer Forward: to enable no answer forwarding function; incoming calls will be forwarded to a specific number if phone is not picked within no answer ring time.
Target Number: to enter the specific forward number if R49 guard phone enables always forward / busy forward / no answer forward.
8.7.Quick Dial By Number Replacement
If you want to replace the long and complex dial number with a shorter number that can be memorized at greater ease and convenience for making calls, you can configure the dial number replacement on the device and on the device web interface. You can replace a multiple device dial numbers such as IP address with only one short number.
You can press Setting and go to Dial Plan on the device screen for the configuration. As well as on the web Phone > Dial Plan interface.


Parameter Set-up:
Account: select the account to which you want to apply dial number replacement. The account is “Auto” by default ( to call out from the account in which the dial number has been registered). You can select either account 1 or account 2 from which the number can be dial out. if you have registered the dial number in both Account 1 and Account 2 , then the number will be called out from Account 1 by default.
Prefix: enter the short number to replace the dial number you wish to replace.
Replace: enter the dial number(s) you wish to replace. For example if you replace five original dial numbers with a common short number such as “ 101” then the five intercom devices with the dial number will be called to at the same time when you dial 101.
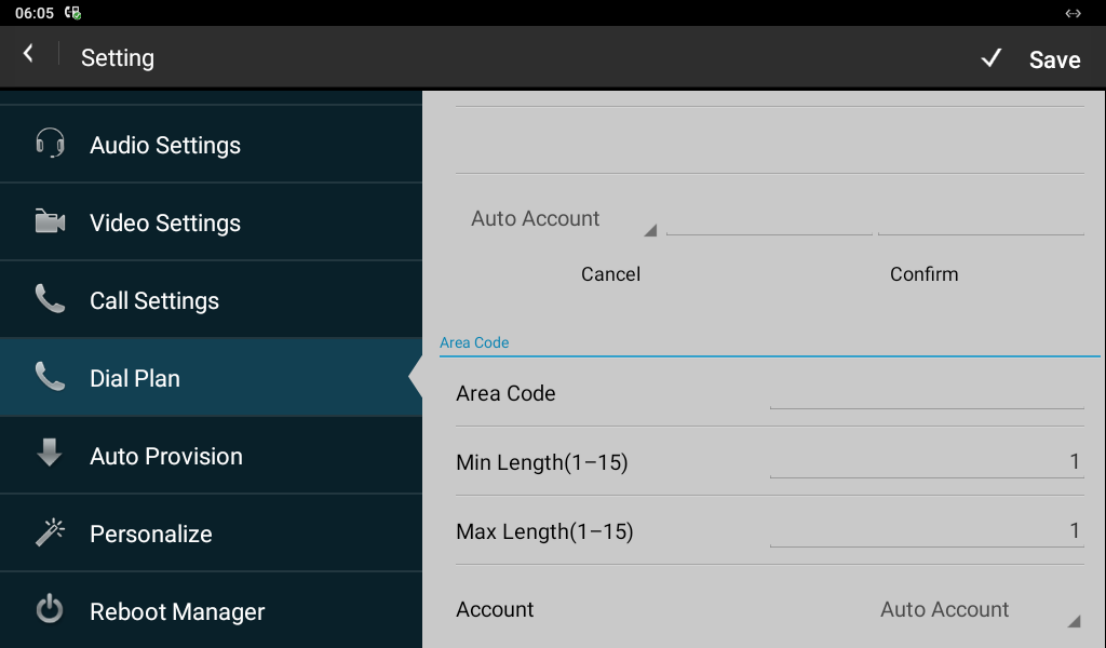
8.8.Area Code
Area codes are also known as NPAs (Numbering Plan Areas). They usually indicate different geographical areas within one country. If entered numbers match the predefined area code rule, the phone will automatically prefix outgoing number with area code. You can press Setting and go to Dial Plan on the device screen for the configuration.
Parameter Set-up:
Min Length (1-15): set the minimum length of the SIP number.
Max Length(1-15):set the maximum length of the SIP number
Account: select the account for which you want to apply the area code function.
8.9.Dial Now
Dial Now is a function that allows you to set up a number that can be automatically dialed out as you enter the number, without pressing the dial button. You can click on Setting and go to Dial Plan and switch from Dial plan to Dial now to do the setting.

Parameter Set-up:
All Dial Delay:Allow user configure dial now delay time for dial now.It means user can configure the IP phone to dial out the phone number automatically after the designated delay time if it match any dial now rule.
Dial Now Delay(0-15):set up the delay time from 0 to 15 seconds.
9.Intercom Message
You can check, create, and clear messages as needed on the Message screen. You can press Message to create a new text message and press Delete to delete the existing messages.

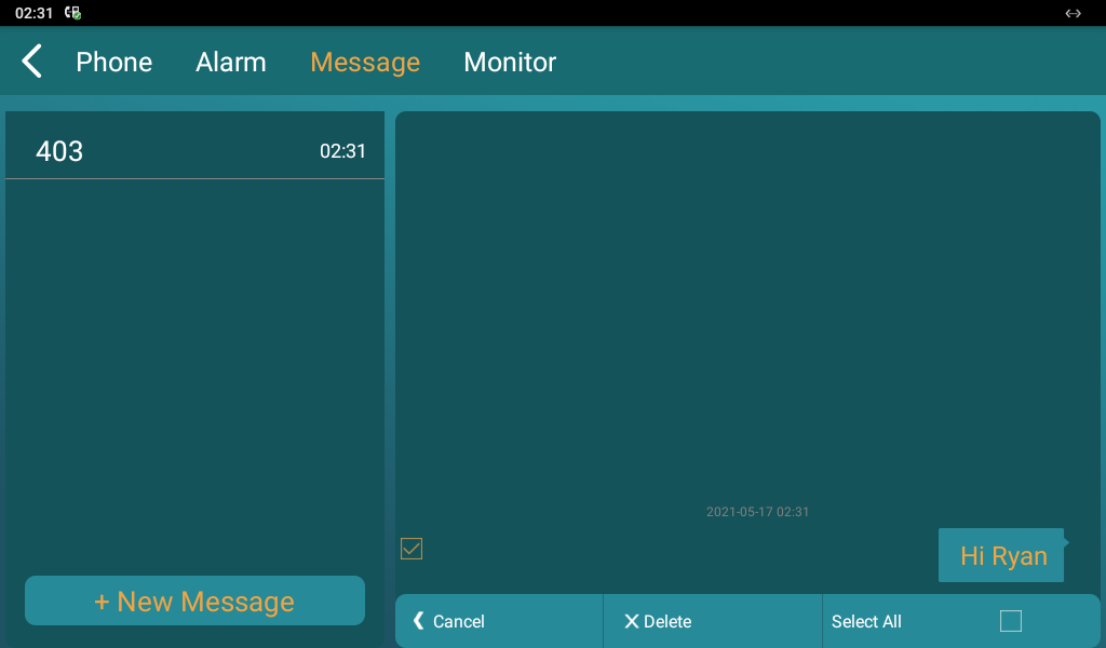
Parameter Set-up:
New Message: press this icon to create a new message.
Delete: press this icon to clear the messages that have been selected.
Cancel: press Cancel for the cancellation.
10.Audio& Video Configuration
10.1.Audio Codec Configuration
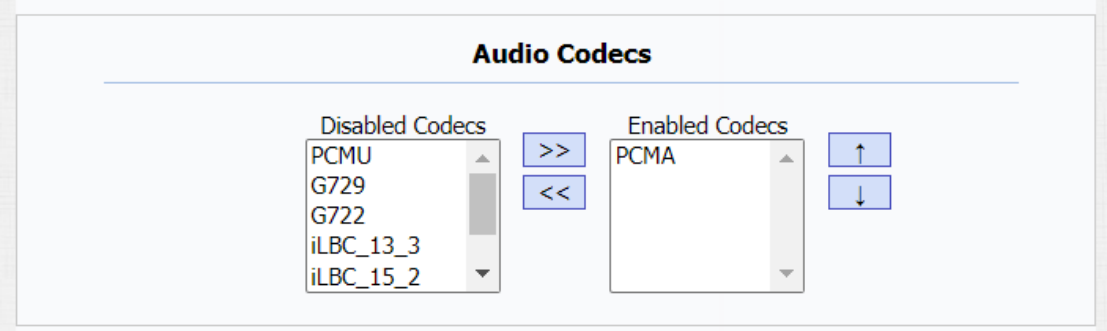
Akuvox R49G supports six types of Audio Codec (iLBC_13_3, iLBC_15_2, PCMU, PCMA, G729, G722) for encoding and decoding the audio data during the call session. Each type of Audio Codec varies in terms of sound quality. You can select the specific codec with different bandwidth and sample rate flexibly according to the actual network environment. To do the configuration on web Account > Advanced > Audio Codecs interface.
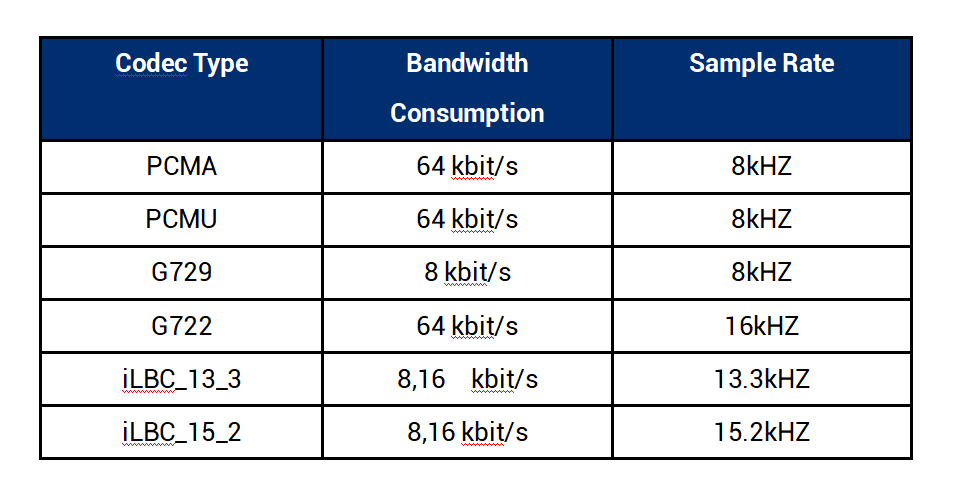
Please refer to the bandwidth consumption and sample rate for the four audio codec types below:
10.2.CNG configuration
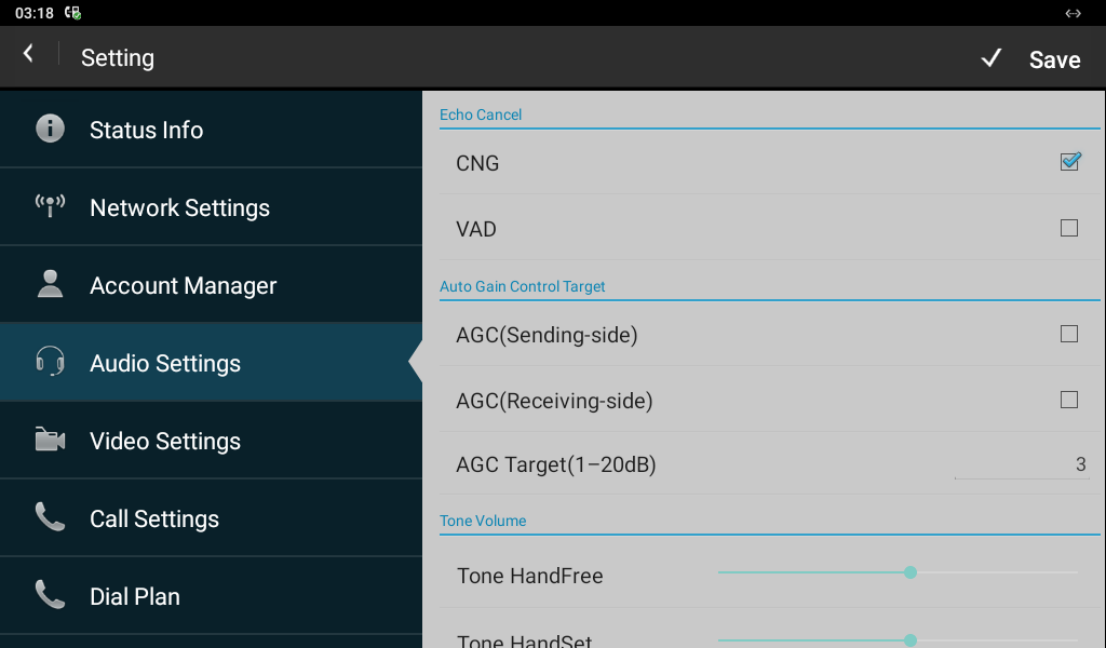
R49G allows you to set up CNG (Comfort Noise Generator)during the call. When CNG function is enabled you will be able to hear a comfortable noise in the moment when both side are not talking during a call. You can press Setting and press Audio Settings, then enable the CNG.

Parameter Set-up:
- CNG(Comfort Noise Generation): Allow R49G to generate comfortable background noise for voice communications during periods of silence in a conversation. It is a part of the silence suppression or VAD (Voice Activity Detection)handling for VoIP technology. CNG, in conjunction with VAD algorithms, quickly responds when periods of silence occur and inserts artificial noise until voice activity resumes. The insertion of artificial noise gives the illusion of a constant transmission stream, so that background sound is consistent throughout the call and the listener does not think the line has released.
10.3.VAD Configuration
VAD(Voice Activity Detection) is a function used for the detection of the existence of the audio signal during the call. When VAD detects a certain interval of silence during the call, then it will replace the bigger audio packets with the smaller packet of CNG packets, thus creating the CNG that you will hear while reducing the data transmission cost and bandwidth consumption. To enable VAD, you can press Setting and go to Audio Settings, then enable the VAD.
Parameter Set-up:
- VAD(Voice Activity Detection): Allow IP phone to detect the presence or absence of human speech during a call. When detecting period of “silence”, VAD replaces that silence efficiently with special packets that indicate silence is occurring. It can facilitate speech processing, and deactivate some processes during non-speech section of an audio session. It can avoid unnecessary coding or transmission of silence packets in VoIP applications, saving on computation and network bandwidth.
10.4.AGC configuration
AGC (Automatic Gain Control) is a function that is used for the acoustic gain control. It is used in the scenario when the smaller audio input will be amplified and compensated automatically for a larger audio volume as speaker on the other side does not speak to the microphone close enough.

Parameter Set-up:
AGC (Sending-side): enable it so that audio output can be automatically amplified before it reaches the receiver side.
AGC(Receiving-side): enable it so that the audio input can be automatically amplified as it accept the audio output.
AGC Target (1-20dB): fill in the audio compensation value from 1-20 dB according to your need.
10.5.Net EQ Configuration
In order to ensure the smooth audio data transmission, you are required to set the audio jitter buffer value according to the actual network jitter value. The audio data packets fall within the jitter butter range will be recovered and be resent for the smooth and continuous audio data transmission. You can press Setting on the home screen and go to** Audio > Net EQ** for the configuration.
Parameter Set-up:
- Filter Forget factor base(0-255): fill in the audio jitter buffer value according to the actual network jitter value.
10.6.Video Codec Configuration for SIP calls
R49G guard phone supports four type of video codces: H265, H264, H263, VP8. you are required to set up a shared video codes between the two sides for the video data transmission and communication. And you can also set up the video codec resolution for the video quality you need.To do the configuration, you can go to on the device web interface.
Parameter Set-up:
Name: check to select the H264 video codec format for the guard phone video stream. H264 is the video codec by default.
Codec Resolution: select the code resolution for the video quality among four options:”QCIF”, “CIF”, “VGA”, “4CIF” and “720P” according to your actual network environment. The default code resolution is 4CIF.
Bitrate: select the video stream bit rate (Ranging from 320-2048). The greater the bitrate, the data transmitted in every second is greater in amount therefore the video will be clearer.. While the default code bitrate is 2048.
Payload: select the payload type (ranging from 90-118) to configure audio/video configuration file. The default payload is 104.
10.7.Video Codec Configuration for IP direct calls
You can select the IP call video quality by selecting the proper codec resolution according to to your actual network condition. To do so , you can go to** Phone>Call Feature > Others**.

Parameter Set-up:
- Direct IP Codec Resolution: select the code resolution for the video quality among four options:”QCIF”, “CIF”, “VGA”, “4CIF” and “720P” according to your actual network environment. The default code resolution is 4CIF.
10.8.Media Feedback
In order to ensure the smooth and continued data transmission for the video call, you are required to set both NACK( Negative Acknowledgement) and Tmmbr (Temporal Max Media Bitrate Request).

Parameter Set-up:
NACK: used to reinforce the data transmission during the video call. It can be used to prevent loosing data packet in the weak network environment when discontinued and mosaic video image occurred.
Tmmbr:used to indicate the maximum bitrate that receiver can take.
10.9.H264 Setting
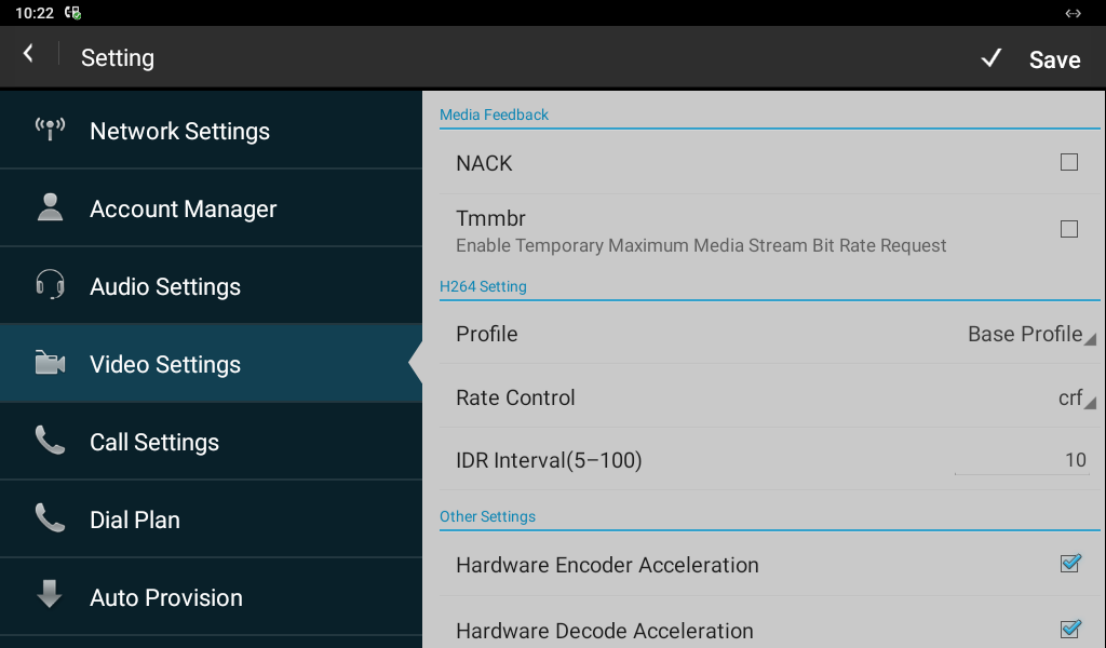
Parameter Set-up:
Profile: select the video code profile level, the higher the profile is, the more complex and efficient the encoding will be. Base profile is the default setting..
Rate Control: used to control the encoding bitrate. CRF ( Choose one H264 video rate.
IDR Intervals(5-100): IDR means Instantaneous Decoding Refresh. It is used to control the process of coding and decoding.
10.10.Other Video Parameters
You can configure other video parameters such for the video encoding acceleration, color enhancement and image quality on the device.

Parameter Set-up:
Hardware Encode Acceleration: enable it to turn on the function to accelerate video encoding on the hardware basis
Hardware Decode Acceleration: enable it to turn on the function to accelerate the video decoding on the hardware basis. This function is disabled by default.
Color Enhancement: To increase the phone display color. Enabled by default.
Image Quality: Users can select Low, Middle or High mode. When you select high, then encoded pictures will be higher in quality and vice versa.
11.Door Access control
11.1.Give Access Permission
R49G will be able to give door access permission by allowing the number of door entry when it is called by the X916 door phone, then temp key will be generated by the SmartPlus platform before its being sent to specific visitor.

12.Security
12.1.Monitor Setting
You can configure the monitor setting on the device You can press Monitor on the home screen then set up monitor. You can enter IP/SIP number of door phone in Device number and fill in device name. Then set up the RTSP address. The RTSP format of the Akuvox door phone is rtsp://deviceIP/live/ch00_0. Enable or disable display in the call. If enabled, when there is an incoming call from the monitor, the video will be displayed.
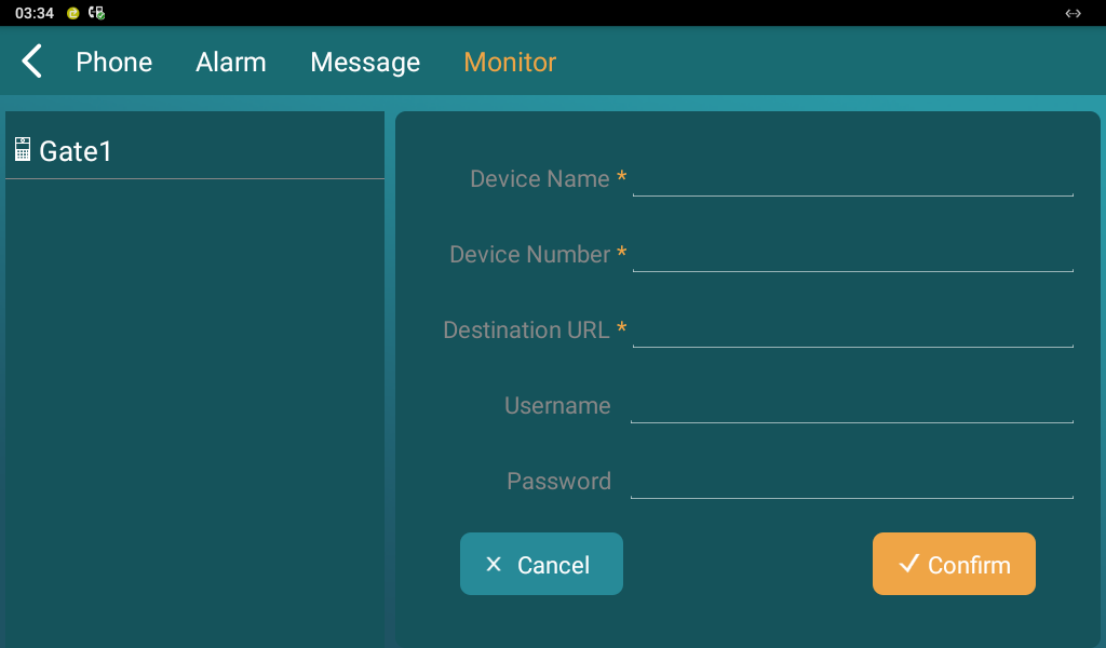
Parameter Set-up:
Device Name: enter the name of the device to be monitored.
Device Number: Enter the device number according to your need.
Destination URL: enter the URL rtsp://deviceIP/live/ch00_0 of the device to be monitored:
Username: enter the user name of the door phone for the authentication .
Password: enter the door phone authentication password.
12.2.Alarm
You can manage the alarm triggered by the indoor monitors by checking and clearing and dealing with the alarms. You can press Alarm on the device home screen.

12.3.Voice Encryption
The encryption function provides you with greater security for the intercom call. And R49G support three modes of voice encryption: SRTP(compulsory), SRTP(Optional), ZRTP(Optional) on web Account > Advanced > Encryption interface.

Parameter Set-up:
- Voice Encryption: select encryption mode from four options. If you select to Disable it, the call will not be encrypted. SRTP(Compulsory), all audio signals (technically speaking it is RTP streams) will be encrypted to improve security. SRTP(Optional), encrypts voice from the called party, if the called party also enables SRTP, the voice signals will also be encrypted. ZRTP(Optional) is the protocol that the two parties use to negotiate the SRTP session key.
13.Application
13.1.Calendar
You can create your account and set up the events and agenda in the calender. You can press Application on the home screen and go to Calender to set up your calender.


13.2.Camera
R49G has installed a camera in the front, which allows you to take pictures as need. You can press on Application on the home screen and go to Camera to take picture and videos as need, and you can also review, edit, delete and share the pictures and videos as needed.

13.3.Gallery
In the Gallery, all the screenshots, pictures, and videos taken can be checked, edited, deleted, and shared shared. You can press on Application on the home screen and go to Gallery for the management.

13.4.Music
R49G guard phone can also serves as a music player. You can press Application and go to Music and then you can play the music by Artist, Album, Songs, Playlist and check on the music being played.

13.5.Video
You can check, delete, and play the the video stored in your guard phone. You can press Application and go to Video to check and play the videos.

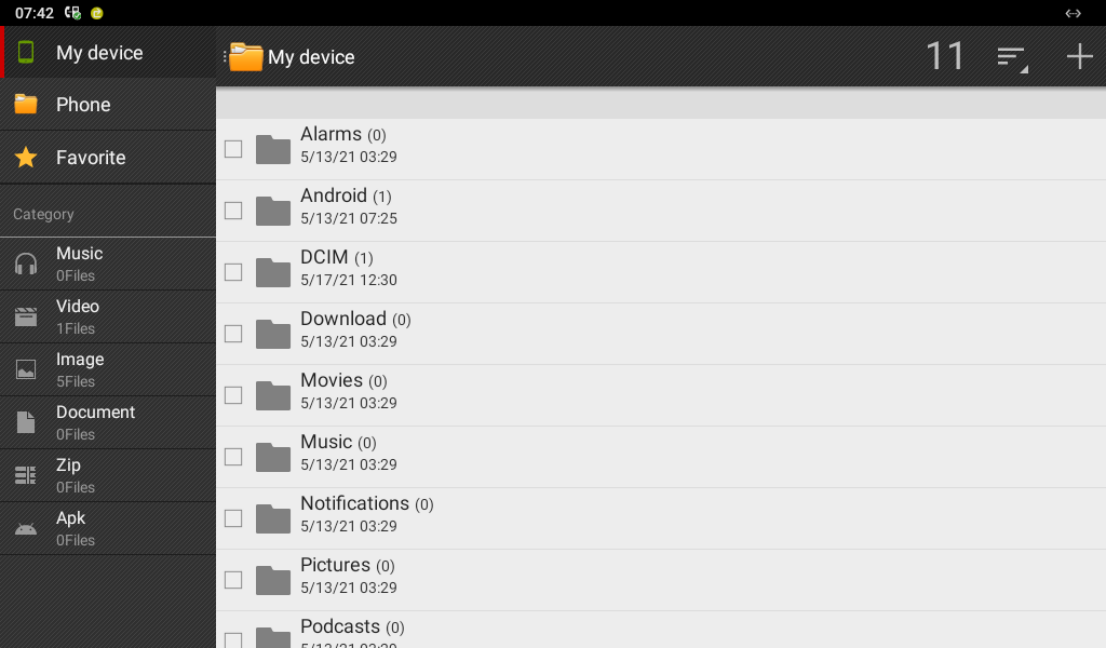
13.6.Explorer
Explorer in the R49G serves as a file manager that allows to mange all types of files stored in the device. You can search, check, sort, delete, copy, paste the files in the explorer as needed. You can press Application and go Explorer.
13.7.Calculator
The calculator in the device allows to do the calculation as needed while you are on the phone etc. You can press Application and go Explorer.

14.Call Log
If you want to check on the calls inclusive of the dial-out calls, received calls, and missed calls in a certain period of time, you can check and search the call log on the device web Contacts > Call Logs interface and export the call log from the device if needed.
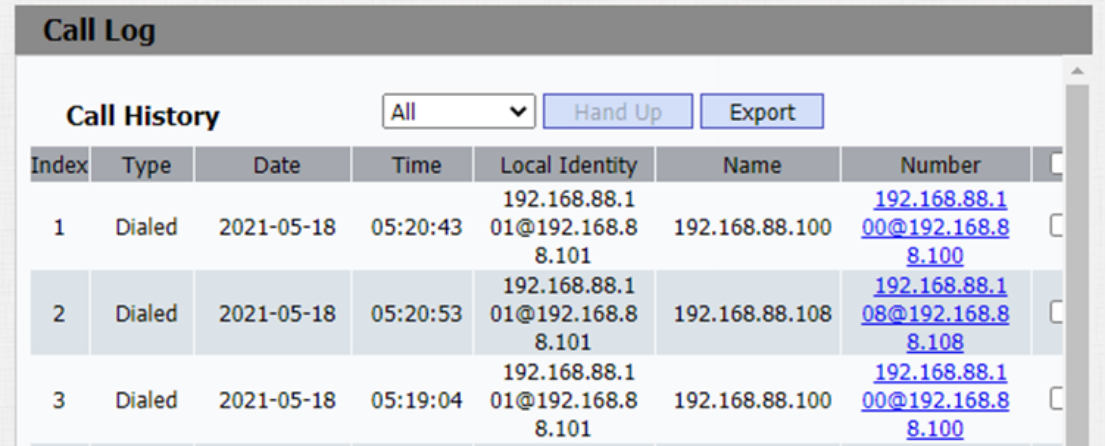
You can check on call log on the device as well, you go to Phone>Call Logs .

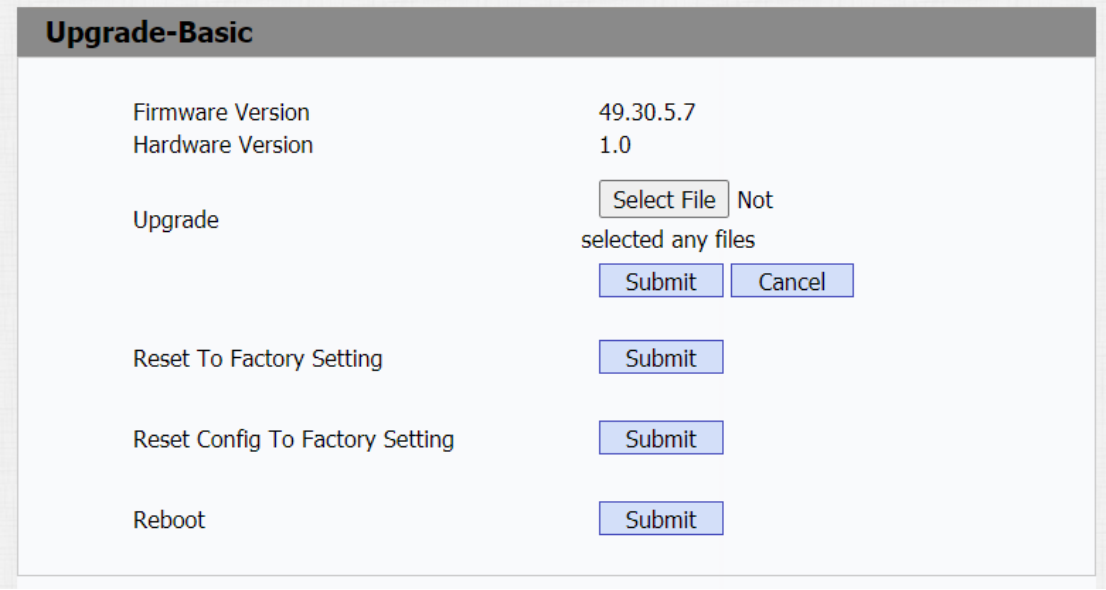
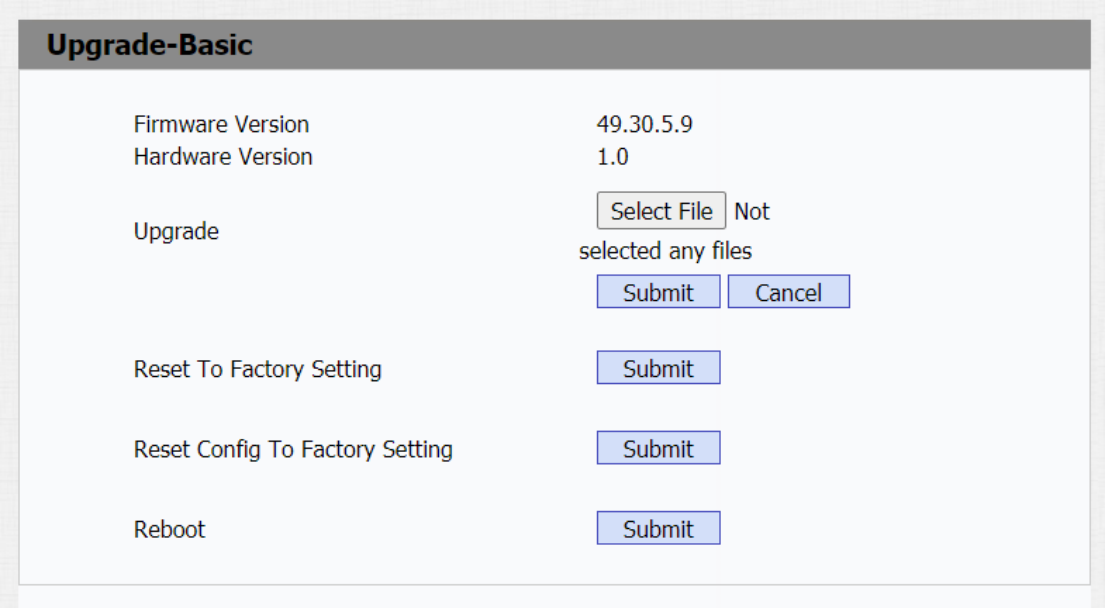
15.Firmware Upgrade
Firmwares of different versions for guard phone can be upgraded on the device web Upgrade > Basic interface.

16.Backup
Configuration files can be imported from your PC or be exported out of the device to your local PC on the device web Upgrade > Advanced > Others interface if needed.

17.Auto-provisioning
17.1.Provisioning Principle
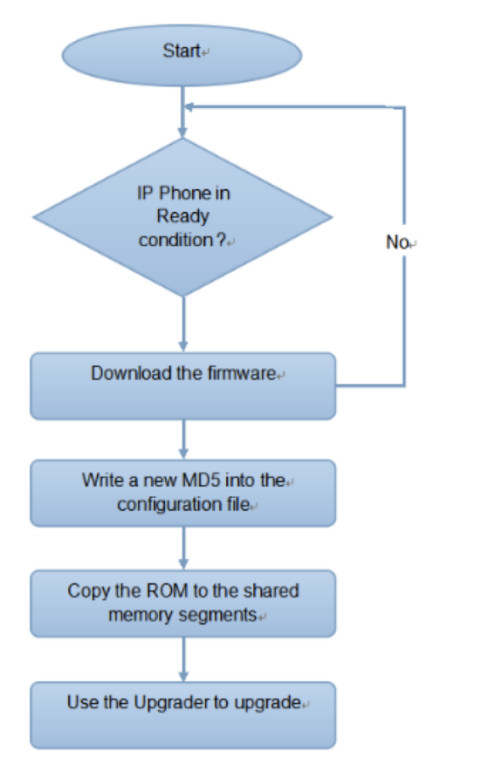
Auto-provisioning is a feature used to configure or upgrade the devices in batch via third party servers. DHCP, PNP, TFTP, FTP, HTTPS are the protocols used by the R49G guard phone to access the URL of the address of the third party server which stores configuration files and firmwares, which will then be used to to update the firmware and the corresponding parameters on the guard phone.
17.2.Introduction to the Configuration Files for Auto-Provisioning
Configuration files have two formats for the auto-provisioning. one is the general configuration files used for the general provisioning and other one is the MAC-based configuration provisioning.
The difference between the two types of configuration files is shown as below:
General configuration provisioning: a general file is stored in a server from which all the related devices will be able to download the sameconfiguration file to update parameters on the devices. For example: cfg.
MAC-based configuration provisioning: MAC-based configuration files is used for the auto-provisioning on a specific device as distinguished by its unique MAC number. And the configuration files named with device MAC number will be matched automatically with the device MAC number before being downloaded for the provisioning on the specific device.
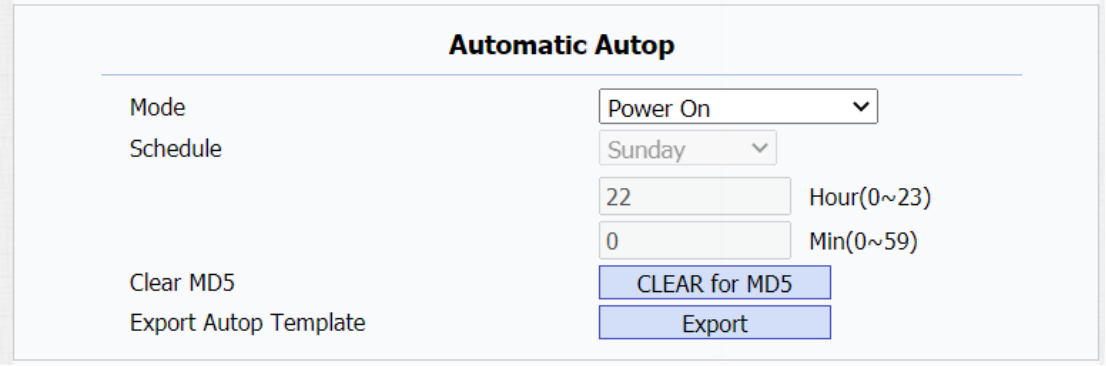
17.3.Autop Schedule
Akuvox provides you with different Autop methods that enable the indoor monitor to perform provisioning for itself in a specific time according to your schedule. To set up the schedule on device web Upgrade > Advanced > Automatic Autop interface.

Parameter Set-up:
Power On: select “Power on”, if you want the device to perform Autop every time it boots up.
Repeatedly: select “ Repeatedly”, if you want the device to perform autop according to the schedule you set up.
Power On + Repeatedly: select “Power On + Repeatedly” if you want to combine Power On Mode and Repeatedly mode that will enable the device to perform Autop every time it boots up or according to the schedule you set up.
Hourly Repeat: select “Hourly Repeat” if you want the device to perform Autop every hour.
17.4.DHCP Provisioning Configuration
Auto-provisioning URL can also be obtained using DHCP option which allows device to send a request to a DHCP server for a specific DHCP option code. If you wan to use Custom Option as defined by users with option code range from 128-255), you are required to configure DHCP Custom Option on the web** Upgrade > Advanced > Automatic Autop** interface.
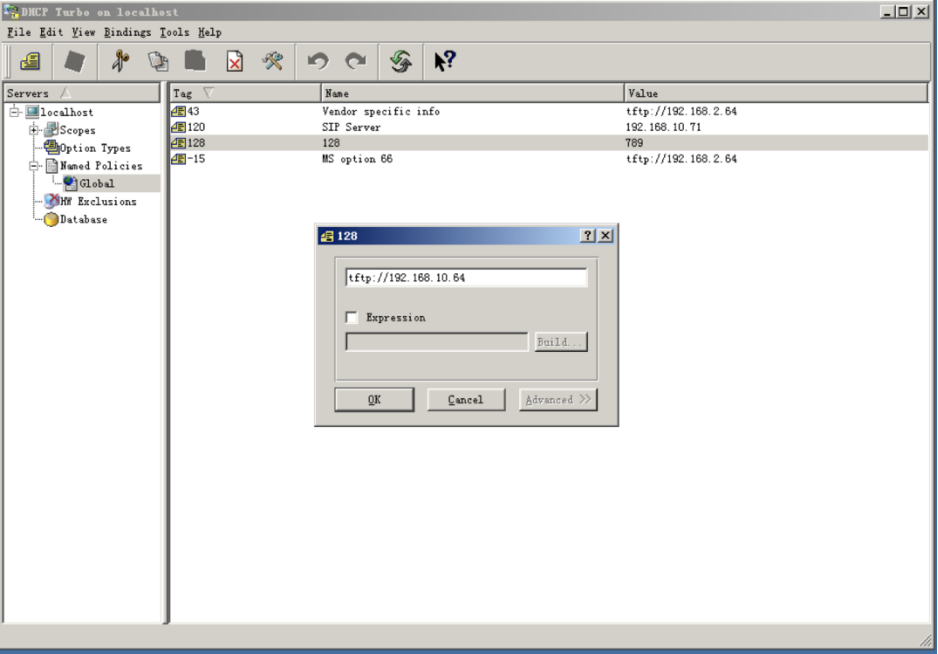

Parameter set-up:
Custom Option: enter the DHCP code that matched with corresponding URL so that device will find the configuration file sever for the configuration or upgrading.
DHCP Option 66: If none of the above is set, the device will automatically use DHCP Option 66 for getting the upgrade server URL. This is done within the software and the user does not need to specify this. To make it work, you need to configure the DHCP server for the option 66 with the update server URL in it.
DHCP Option 43: If the device does not get an URL from DHCP Option 66, it will automatically use DHCP Option 43. This is done within the software and the user does not need to specify this. To make it work, you need to configure the DHCP server for the option 43 with the update server URL in it.
17.5.Static Provisioning Configuration
You can manually set up a specific server URL for downloading the firmware or configuration file on device web Upgrade > Advanced > Automatic Autop interface. If an autop schedule is set up, the indoor monitor will perform the auto provisioning on a specific timing according to autop schedule you set up. In addition,TFTP, FTP, HTTP, and HTTPS are the protocols that can be used for upgrading the device firmware and configuration.

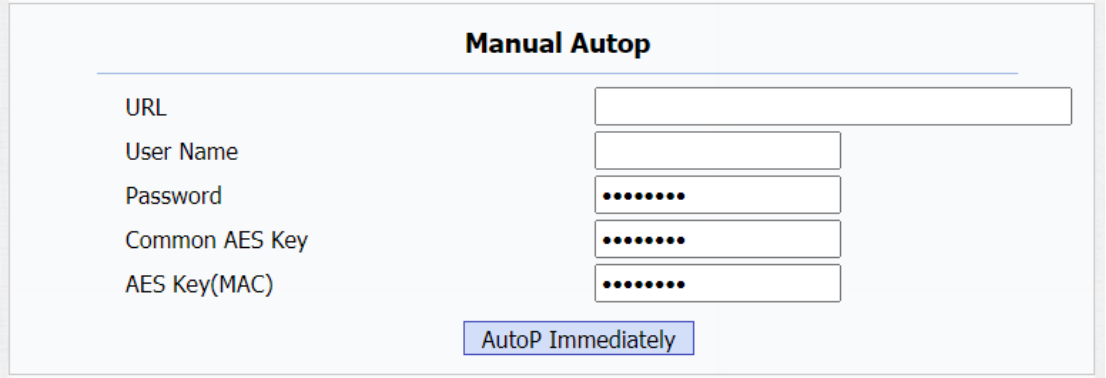
Parameter set-up:
URL: set up tftp,http,https,ftp server address for the provisioning
User Name: set up a user name if the server needs an user name to be accessed to otherwise leave it blank.
Password: set up a password if the server needs a password to be accessed to otherwise leave it blank.
Common AES Key: set up AES code for the intercom to decipher general Auto Provisioning configuration file.
AES Key (MAC): set up AES code for the intercom to decipher the MAC-based auto provisioning configuration file.
18.Debug
18.1.System Log for Debugging
System log in the indoor monitor can be used for debugging purpose. If you want to export the system out to a local PC or to a remote server for debugging , you can set up the function on the web Upgrade > Advanced > System Log interface.

Parameter Set-up:
LogLevel: select log levels from 1 to 7 levels. You will be instructed by Akuvox technical staff about the specific log level to be entered for debugging purpose. The default log level is “3”.the higher the level is, the more complete the log is.
Export Log: click the Export tab to export temporary debug log file to a local PC.
Export Debug Log: click the Export tab to export debug log file to a local PC.
Remote System Log: select “Enable” or “ Disable” if you wan to enable or disable the remote system log.
Remote System Server: enter the remote server address to receive the the device And the remote server address will be provided by Akuvox technical support.
18.2.PCAP for Debugging
PCAP in R49G guard phone is used to capture the data package going in and out of the devices for debugging and troubleshooting purpose. You can set up the PCAP on the device web Upgrade > Advanced > PCAP interface properly before using it.

Parameter Set-up:
PCAP: clickStart tab and Stop tab to capture the a certain range of data packets before clicking Export tab to export the data packets to you Local PC.
PCAP Auto Refresh: select “Enable” or “ Disable” to turn on or turn off the PCAP auto fresh function. If you set it as “Enable” then the PCAP will continue to capture data packet even after the data packets reached its 1M maximum in capacity. If you set it as “ Disable” the PCAP will stop data packet capturing when the data packet captured reaches the maximum capturing capacity of 1MB.
18.3.User Agent
User agent is used for the identification purpose when you are doing analysis on the SIP data packet. To do this configuration on web Account > Advanced interface.

19.Password Modification
19.1.Modify Device Web Interface Password
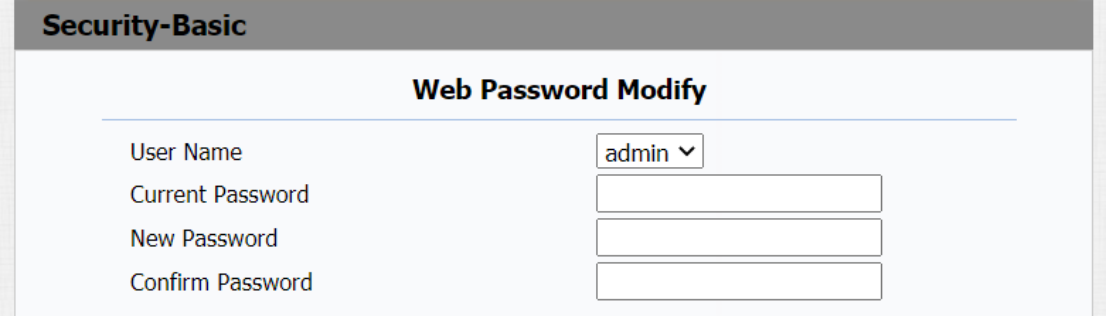
To modify web interface password, you can do it on device web Securtiy > Basic > Web Password Modify interface. Select "Admin" for the administrator account and " User" for the User Account.
19.2.Configure Web Interface Automatic Log-out
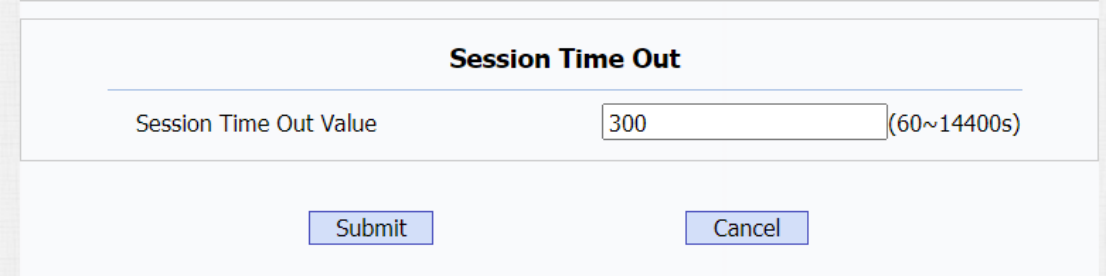
You can set up the web interface automatic log-out timing, requiring re-login by entering the user name and the passwords for the security purpose or for the convenience of operation. You can go to Security > Basic > Session Time Out.
20.System Reboot&Reset
20.1.Reboot
If you want to reboot the device system, you can operate it on the device web Upgrade > Basic interface as well. More over, you can set up schedule for the device to be restarted.
To set up the device reboot schedule on web Upgrade > Advanced > Reboot Schedule interface.

20.2.Reset
Device system can be reset on device web interface and on the device.
20.2.1.Reset on the web interface
You can go to Upgrade > Basic for the configuration.
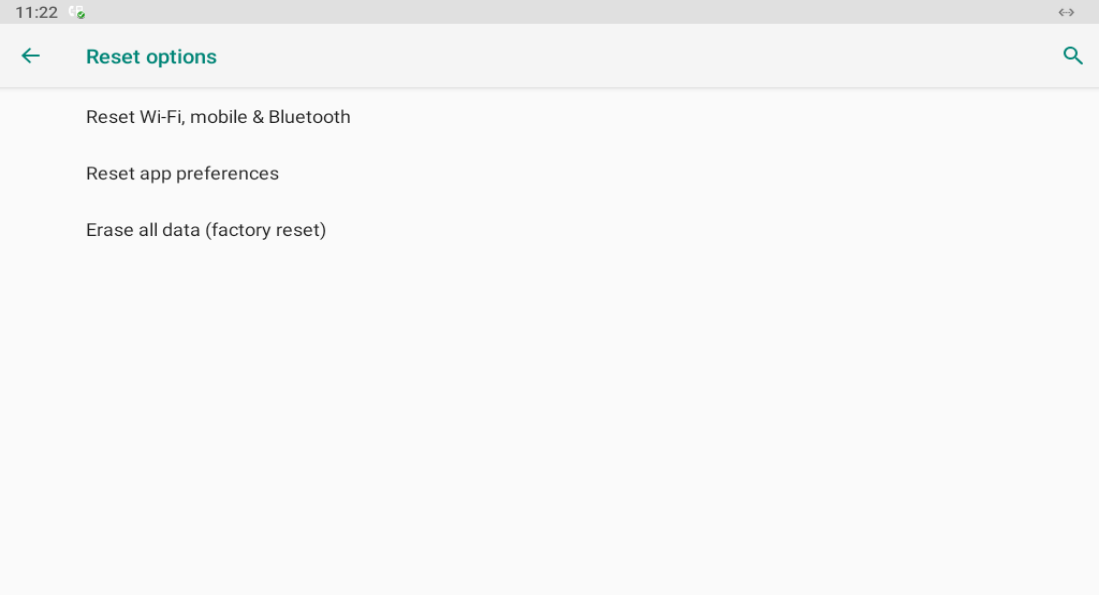
20.2.2.Reset on the device
To reboot the system setting on the device, so you can slide down your finger twice on device home screen and press on Setting and go to system > Reset Options>Erase all data (factory reset).
21.Abbreviations
ACS: Auto Configuration Server
Auto: Automatically
AEC: Configurable Acoustic and Line Echo Cancelers
ACD: Automatic Call Distribution
Autop: Automatical Provisioning
AES: Advanced Encryption Standard
BLF: Busy Lamp Field
COM: Common
CPE: Customer Premise Equipment
CWMP: CPE WAN Management Protocol
DTMF: Dual Tone Multi-Frequency
DHCP: Dynamic Host Configuration Protocol
DNS: Domain Name System
DND: Do Not Disturb
DNS-SRV: Service record in the Domain Name System
FTP: File Transfer Protocol
GND: Ground
HTTP: Hypertext Transfer Protocol
HTTPS: Hypertext Transfer Protocol Secure Socket Layer
IP: Internet Protocol
ID: Identification
IR: Infrared
LCD: Liquid Crystal Display
LED: Light Emitting Diode
MAX: Maximum
POE: Power Over Ethernet
PCMA: Pulse Code Modulation A-Law
PCMU: Pulse Code Modulation µ-Law
PCAP: Packet Capture
PNP: Plug and Play
RFID: Radio Frequency Identification
RTP: Real-time Transport Protocol
RTSP: Real Time Streaming Protocol
MPEG: Moving Picture Experts Group
MWI: Message Waiting Indicator
NO: Normal Opened
NC: Normal Connected
NTP: Network Time Protocol
NAT: Network Address Translation
NVR: Network Video Recorder
ONVIF: Open Network Video Interface Forum
SIP: Session Initiation Protocol
SNMP: Simple Network Management Protocol
STUN: Session Traversal Utilities for NAT
SNMP: Simple Mail Transfer Protocol
SDMC: SIP Devices Management Center
TR069: Technical Report069
TCP: Transmission Control Protocol
TLS: Transport Layer Security
TFTP: Trivial File Transfer Protocol
UDP: User Datagram Protocol
URL: Uniform Resource Locator
VLAN: Virtual Local Area Network
WG: Wiegand
Was this article helpful?
-20190329_%E5%89%AF%E6%9C%AC.png)