Akubela HyPanel User Guide V2.3.3
- 06 Mar 2024
- Print
- DarkLight
- PDF
Akubela HyPanel User Guide V2.3.3
- Updated on 06 Mar 2024
- Print
- DarkLight
- PDF
Article Summary
Share feedback
Thanks for sharing your feedback!

Introduction
This guide provides an overview of the features and functions of Akubela HyPanel (version 51.1.25.10).
What’s New
Multiple home centers can coexist within the same LAN. In this case, family names can be customized for easy distinction, and gateway devices can choose the specific family to which they belong.
Support for adding Akubela IR controllers to control infrared air conditioners.
Compatible with ZigBee smart locks, providing features such as door unlocking, doorbell push notifications, firmware updates, temporary keys, and usage histories.
Supports a wider range of devices, including ZigBee heating thermostats, air detectors, and HVAC central air conditioning gateways.
Before You Start
Akubela allows you to configure and control your home with HyPanel devices, the user web portal and BelaHome app, with or without a cloud connection.
This section clarifies some terms you may encounter in this guide: the home center device, the user web portal, and the Auto Discovery mode.
What the home center is
The home center is the main control hub for all devices in your home. Each home center has an online web interface for advanced settings. When a device is designated as the home center during the initial setup, it becomes your primary controlling center with exclusive capabilities. With the home center and its user web interface, you can tailor your smart home system including but not limited to:
Manage all family members accounts.
Create and personalize your automation scenes.
Configure the default security modes and create custom modes.
Reset arming/disarming code and the PIN password for system lock.
Customize the functions displayed on specific panels.
Identify the designated home center

To see which device is the home center within the family, swipe down from top edge of any HyPanel’s screen, then tap ![]() > System Settings > About > Home Center MAC.
> System Settings > About > Home Center MAC.
Login to user web portal
To log in to the user web portal, do one of the following based on the home center device’s cloud connection status:
When connected to the cloud. Log in to the family’s administrator account at https://my.akubela.com.
How to get the administrator account? Please see here.
When never connected with the cloud.
Make sure your computer and the devices are on the same local network.
Type in the home center device’s IP address into the browser.
Log in with the administrator account whose default username and password are both Admin888.
You can see here to learn more about the user web portal.
Usage modes
You can use devices with or without cloud connectivity, depending on how your service provider sets them up.
Auto Discovery Mode
When the Auto Discovery mode is selected in the initial setups, then the entire system runs on the same local network without a cloud connection. This mode automatically groups all HyPanel devices and door phones in the same network into one family. In this mode, your data remains on the device, not the cloud, for more privacy and security.
Devices in Auto Discovery mode can be connected to the cloud at any time. To do it, please contact your service provider.
Note that if you use the Auto Discovery mode and never establish cloud connection, all devices within your family can not receive updates pushed by the cloud server, and can not be controlled remotely via BelaHome App which, in this case, is restricted to usage within the local network.
Cloud mode
When your service provider connects your devices to an internet network and selects the Installation Code during the initial setup, all your devices will be connected to the cloud. In this case, all devices operate with full functionality, receiving updates pushed by the cloud server and allowing remote control through the BelaHome App.
Please be aware that if cloud-connected devices switch their network connection from the Internet to a local area network, the following functions will become unavailable:
Reset system locks and arming code via registered email;
Use BelaHome app when the phone connected to the Internet.
Get started
Your HyPanel

Quick control
The quick control screen displays every time you wake up HyPanel.
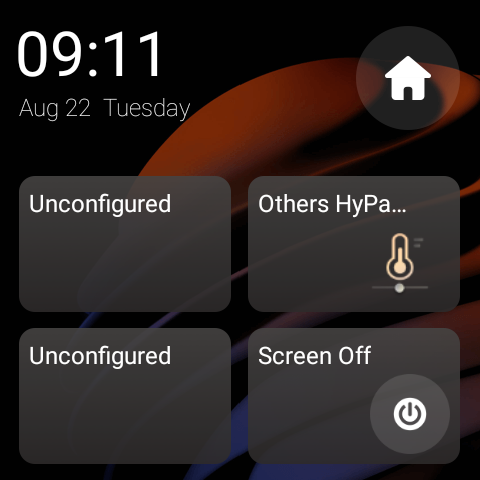
This four-button style is the universal one suitable for all HyPanel models. It enable you to quickly control desired devices, scenes, or turn the screen off.
To customize the buttons, swipe down from top edge of any screen , and tap ![]() > System Settings > Button Control.
> System Settings > Button Control.
For unconfigured buttons, simply tap them to quickly access the button control settings.
To redirect to Home screen, tap the icon ![]() in the upper right corner.
in the upper right corner.
Thermostat style
When your HyPanel is PS51-FANCOIL-EU model, it features an exclusive default thermostat control panel.
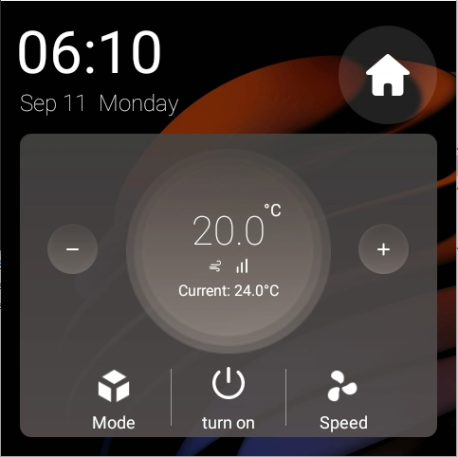
You can change it to button style by tapping ![]() > System Settings > HomePage Settings.
> System Settings > HomePage Settings.

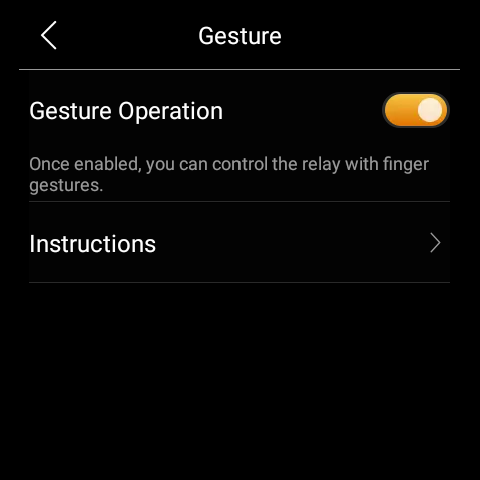
Gesture control
The F51-R2-EU version of HyPanel can connect with two relays, allowing you to use finger gestures for convenient control from any screen:
To open/close relay 1, simply swipe down with 2 fingers.
To open/close relay 2, swipe down with 3 fingers.
NOTE:
This feature cannot work if the connected relays are shades.
Gesture Control with Cooling/Heating Systems.
If Relay 1 is linked to a cooler or heater, use 2 fingers to swipe down for control.
When Relay 2 is connected to the cooler or heater, employ 3 fingers to swipe down for control.
If both Relay 1 and Relay 2 are connected to coolers and heaters, they combine into one thermostat. Swipe down with 2 fingers to open/close the thermostat; the 3-finger gesture is not available in this case.Your content goes here
To disable gesture control, go to ![]() > System Settings > Gesture.
> System Settings > Gesture.
Home screen
By default, all your feature tabs are displayed on the Home screen. You can easily customize the features shown on the user web portal.

Control center
To open the Control Center for quick setting, swipe down from the top edge of any screen.
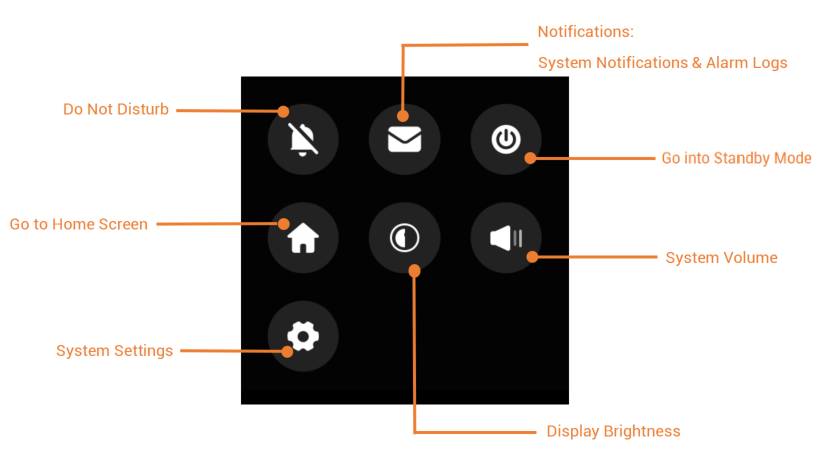
TIP :
To mute notification sounds and prevent pop-ups, simply tap
>
.
 .
.
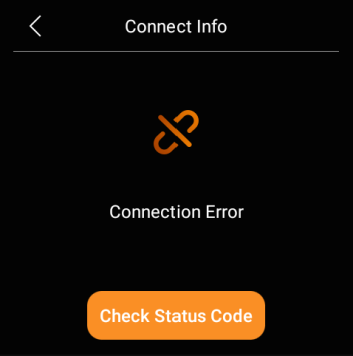
Learn the server status
When you find some features do not work, you can firstly check if the server connection is normal.
Swipe down from the top edge of any screen, and tap
 > System Settings > Connect Status.
The status of your server connection will display in the center.
The screen that displays the icon
 indicates that your device is connected to the server already.
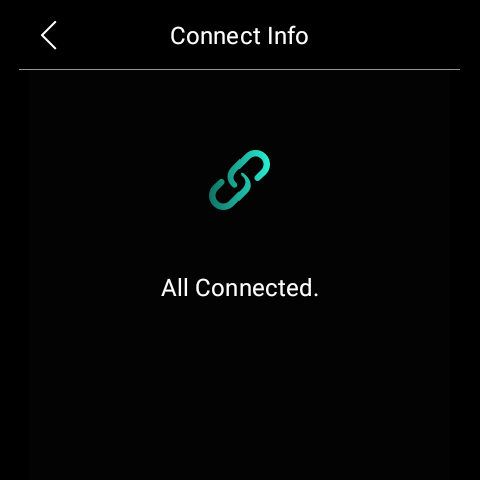
If it shows connection error, contact your service provider or Akubela technical team for help.
Personalize Your System
Connect to the Internet
Typically, the network is configured by your service provider during installation. You can modify the Wi-Fi network or connect the device to a local area network (LAN) anytime, be aware that it may affect certain functions. To ensure continued proper operation, please check with your service provider before making any network changes.
NOTE:
All panels within the family should be in the same local network to ensure the proper communication. If you need to use SIP call and BelaHome app’s remote control function, panels must be connected to the cloud and Internet.
Change your Wi-Fi network
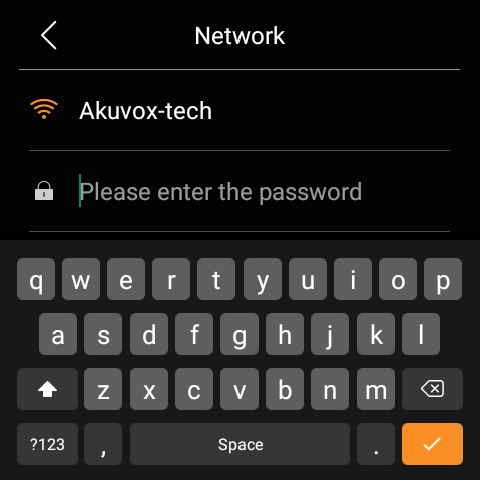
Swipe down from the top edge of any screen to open Control Center, and tap
 > Wi-Fi.
Choose the network you want to join.
Enter the password if required, and tap
 > Connect.
 > Connect.
To see the connected network IP address, click the icon  in the upper right corner.

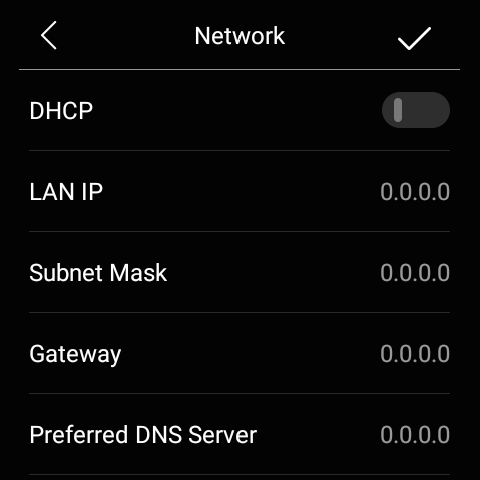
Configure LAN network
You can configure a LAN network if needed.
Swipe down from the top edge of any screen to open Control Center, and tap
 > Ethernet.
On the Network view, do any of the following:
Toggle on DHCP feature, and the device will be assigned IP address automatically.

Toggle off DHCP feature, and enter IP Address, Sub-net Mask, Gateway, Preferred DNS Server, and Alternate DNS Server manually.
Put HyPanel in standby mode
To put HyPanel in standby mode quickly, swipe down from the top edge of any screen to open Control Center, then tap  .
.
You can customize how long the device takes to enter the standby mode by tapping ![]() > Display > Go into Standby. For example, if you choose 1 min, then HyPanel will enter standby mode in 1 minute of inactivity.
> Display > Go into Standby. For example, if you choose 1 min, then HyPanel will enter standby mode in 1 minute of inactivity.
Change screen saver settings
In Display Settings, you can turn the screen saver on or off, and choose the screen saver style.
Swipe down from the top edge of any screen, then tap
 > Display.
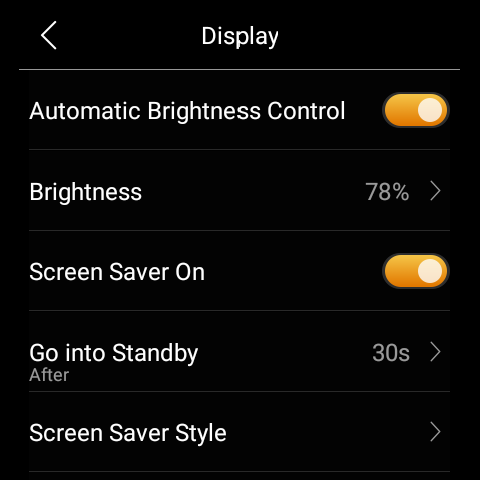
Do any of the following:

Turn on or off the the toggle next to Screen Saver On.
When it is enabled, HyPanel in standby mode will display photos and images; when disabled, the display just stays off.
Choose a screen saver style.
Select Photo Wall from the pull-down menu if you want to play images.
To add your preferred photos, see here.
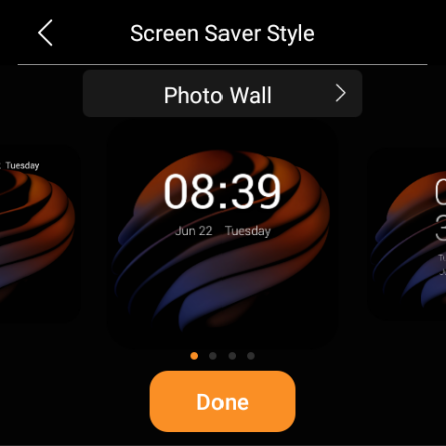
Schedule the screensaver to turn on automatically by selecting Screen Saver Times.
Set up Do Not Disturb
If you do not want to be disturbed by calls, messages, or notifications, you can turn on the Do Not Disturb (DND) feature.
Quickly Turn DND on or off
You can quickly turn the DND feature on by swiping down from the top edge of any screen, and tapping ![]() . The icon will turn to
. The icon will turn to  when the DND is enabled. Tap the icon again to turn the DND off.
This feature can also be set up by going to ![]() > DND > DND.
> DND > DND.
Schedule the DND to turn on automatically
To schedule a DND to turn on automatically at certain times, do as the following:
Swipe down from the top edge of any screen to open Control Center, and tap
 > DND.
Toggle on DND.

Toggle on Specific Time.
Set the DND start time and end time. DND will be activated automatically during the designated period and deactivated outside these hours.
Specifies the number of times the DND schedule will be repeated. The default setting is 1 time.

Once you set the DND, all the calls and notifications will be silenced in this period, while the alarm still rings.
Protect your HyPanel
For better security, use screen lock or settings lock to prevent unintended access to your device or the settings screen.
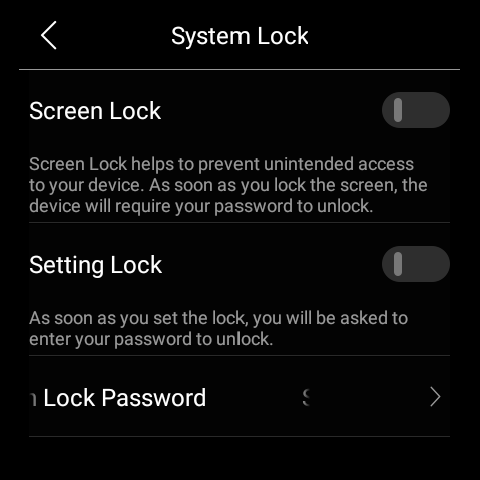
Set up system lock
1. Swipe down from the top edge of any screen to open Control Center, and tap ![]() > System Lock.
> System Lock.
Do any of the following:
Toggle on Screen Lock to set a pattern password to unlock the screen when you wake it, and follow the onscreen instructions.
Toggle on Setting Lock to prevent unwanted access to the Settings screen, and follow the onscreen instructions.
NOTE:
The Screen Lock and the Settings Lock share the same pattern password. When both of the locks are enabled, you only need to draw the pattern password once to access the device and the Settings screen.
To change the pattern password, on this System Lock screen, tap Set Screen Lock Password, draw the current pattern, and then set the new password.
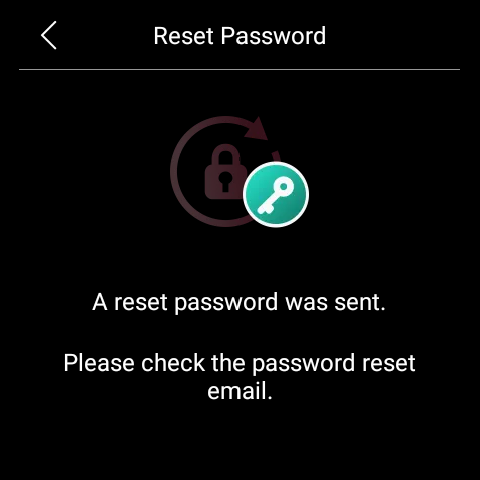
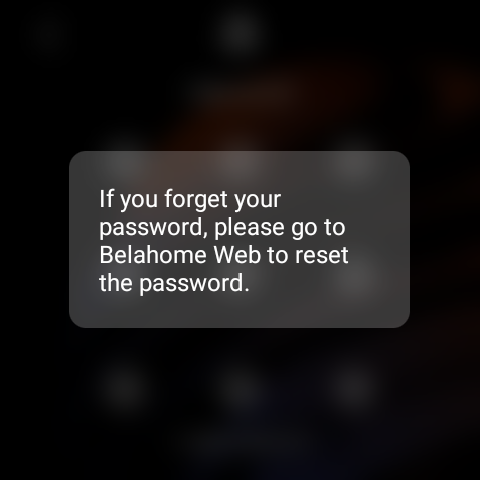
Forgot password
To clear the forgotten current password, tap Forgot Password on the password required screen and follow the onscreen instructions. Two resetting options are provided based on your cloud connection status.

Via reset email
If you’ve registered the administrator account and ensure that the devices are connected to the Internet, a password reset email will be sent to the family’s administrator email address once you tap Forgot Password. Follow the instructions included to clear the password.
On the user web portal
Visit the user web portal, find the specific HyPanel, and click  > Reset > Reset Panel screen lock password.
You can see here for the detailed instructions.
Manage Devices
Add ZigBee Devices
HyPanel can connect to many ZigBee devices, such as sensors, emergency button, IR controller, thermostat, smart switch, and more. For example, you can add and fit a CO sensor in your kitchen to identify carbon monoxide leaks.
NOTE:
The transmission distances of ZigBee signal may vary by environmental characteristics and more. For optimal performance, add ZigBee devices to the HyPanel within the same room.
Put Devices in paring mode
Before pairing the ZigBee devices with the HyPanel, you should know how to put them in the pairing mode. Here are some examples.
To put devices not listed below in paring mode, you can refer to their manuals.
ZigBee device | How to put it to the pairing mode | |
| Insert a pin into the reset hole at its back cover for 5 - 10s until the green light flashes quickly. |
|
| Press and hold the reset button on the front for 5 - 10s until the green light flashes quickly. |
|
Smart Temperature and Humidity sensor
| Press and hold the reset button on the side for 5 - 10s until the signal icon flashes quickly. |
|
Smart Motion Sensor
| 1. Rotate the battery cover anticlockwise to open. 2. Press and hold the reset button for at least 5s until the green light flashes quickly. |
|
Smart Gas Sensor
| Press and hold the reset button on the front for at least 5s until the green light flashes quickly. |
|
Smart Smoke Sensor
| Press and hold the reset button on the front for at least 5s until the green light flashes quickly. |
|
|
|
|
IR Controller
|
included USB cable.
light flashes slowly and a beep sound is heard. |
|
 Smart Emergency Button
 Smart Flood Sensor


.png "企业微信截图_1709714956454(1).png")

Pair devices with HyPanel
Select Devices
 , and tap the add icon
  in the upper right corner. HyPanel will then search for the nearby devices.
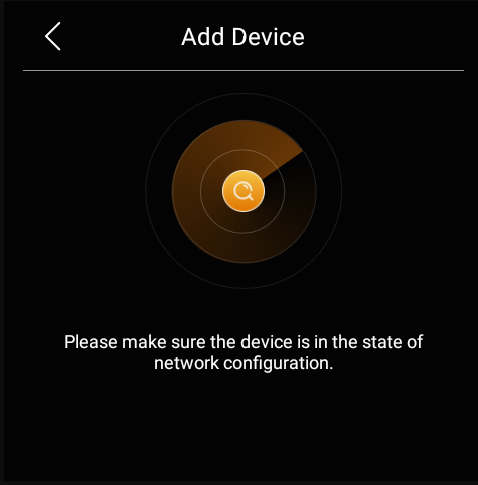
Put the ZigBee device you want to add in pairing mode.
The screen displays the searched device. Select it, and tap Next.
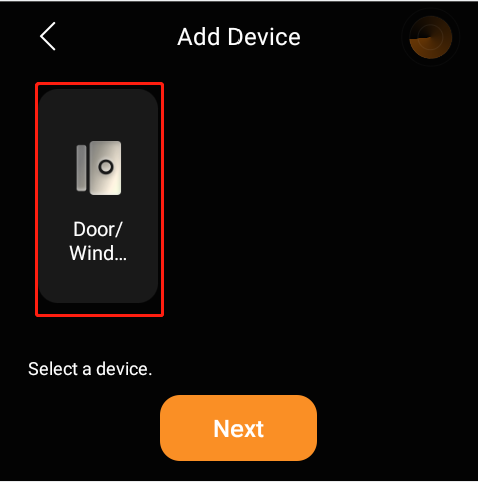
NOTE:
If the device appears as Unknown, you can set its type before proceeding to the next step.

Name the device and choose its location, tap Done > Next.

The newly added device will be shown on both All Devices and specific location screens.
You can also see here to learn more about how to delete added ZigBee devices from the user web portal or BelaHome app.
Add third-party smart home devices
Third-party smart home devices, such as Philips Hue, Ring Video Doorbell, Ecobee thermostat, Lutron Caseta, TP-Link kasa, Sonos, and more, can be added or removed on user web portal, or via BelaHome App.
To add a device, refer to any of the instructions:
Using BelaHome app;
On the user web portal.
To delete a device, refer to any of the following:
Using BelaHome app;
On the user web portal.
Check if the device is connected
You can inspect the device’s connection status if it experiences malfunctions.
Tap Devices
 .
.Check the status icon next to the device name. When you see the icon
 , it means the device is offline and can not function. Connected devices have no such icon.
 , it means the device is offline and can not function. Connected devices have no such icon.
See trigger histories of sensors and hubs
To see trigger histories of sensors, or the operation logs of smart locks, do as the following:
Go to Devices ![]() , tap the desired sensor or hub, and its logs display.
, tap the desired sensor or hub, and its logs display.
To delete specific records, simply tap the icon  in the upper right corner, select the logs you want to remove, and tap Delete.

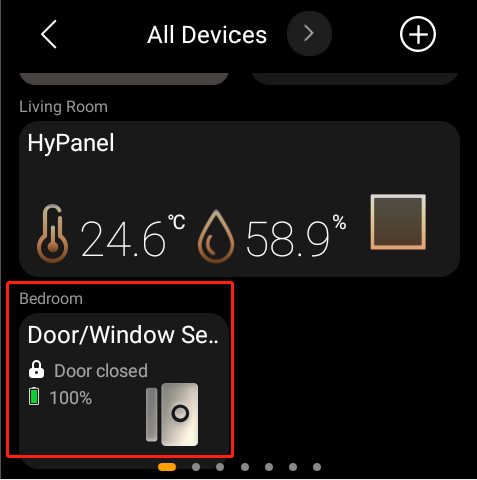
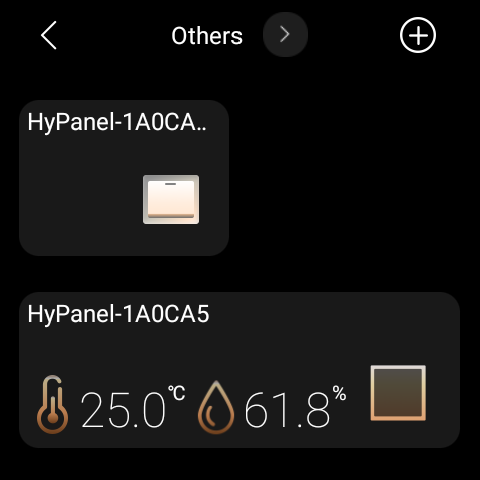
Filter devices by locations
You can see the list of devices in each room easily by using the filter.
Tap Devices
 .
.Tap
 at the top of the screen.
From the drop-down list, select the desired location.
Rearrange the devices
You can rearrange your devices to have them display in the order you want.
Tap Devices
 .
.Touch and hold the desired device, and drag it to the place you want it to be.
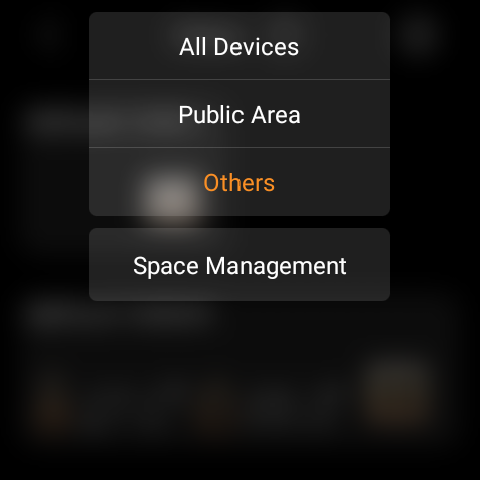
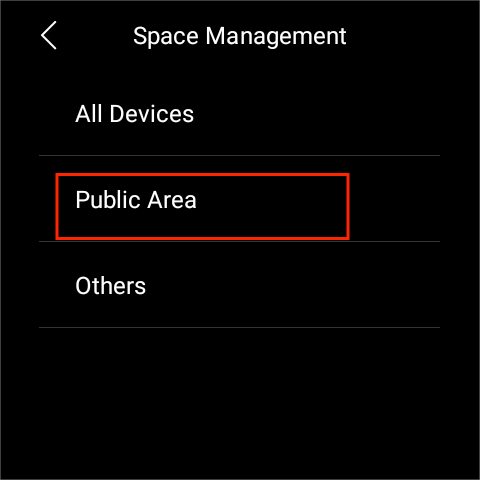
Reorder the room list
If you prefer your rooms in alphabetical order, or in the order you choose them as a routine, do as the following.
Tap Devices
 .
.Tap
 at the top of the screen, and select Space Management from the drop-down list.
Hold, drag, and drop the rooms to reorder them.

Control devices
Relays
The F51-R2-EU version of HyPanel allows direct connection to two relays whose type can be switch, light, fan, heating/cooling system, and shade. You need to change the default relay type to the one you need via BelaHome app. For the detailed instructions, see here.
To open a relay, tap the relay image you want to control. Its background turns to be highlighted, indicating that the relay is opened.

To close the relay, tap it again, and its background dims.
Also, you can control a relay by tapping the button on the Quick Control screen, provided that you have configured it. To see detailed instructions, click here.
Switch, plug, and socket
To turn on your switch, socket, siren or a light, on Devices screen, tap the desired device. Its background becomes highlighted, indicating that it is opened.

Lighting
Some lights can only be turned on or off with a single tap, while others like RGB lights, offer more features such as color adjustment, brightness control, and so on.
To control a RGB light, do the following:

To turn the light on or off, tap
 .
.To adjust its brightness, tap
 , then drag the slider.
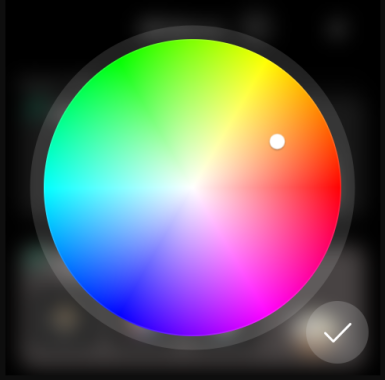
To change the light color, tap
 , pick the desired color from the palette, and tap
  .
.
To make the light color temperature warmer or cooler, tap
 , and adjust the slider.
 , then drag the slider.
 , pick the desired color from the palette, and tap
  .
.
 , and adjust the slider.
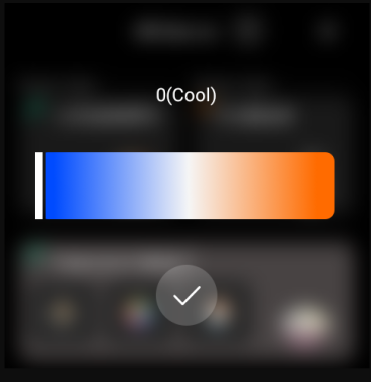
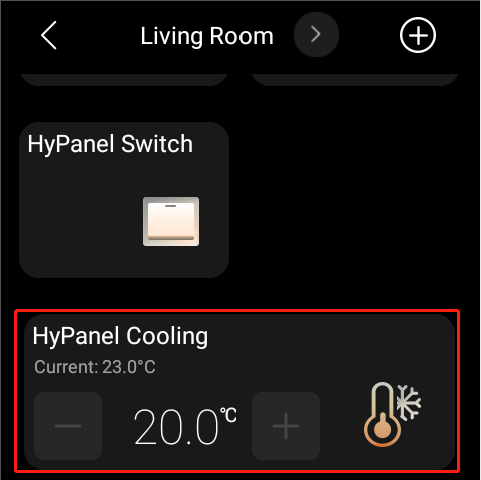
Heating, cooling, and thermostat
Heating and cooling
To adjust the target temperature, simply tap on the add or minus
 icon.
icon.
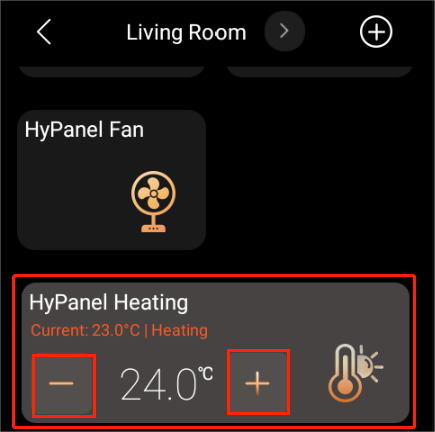
To close the device, tap the desired device again and its background dims.
Thermostat

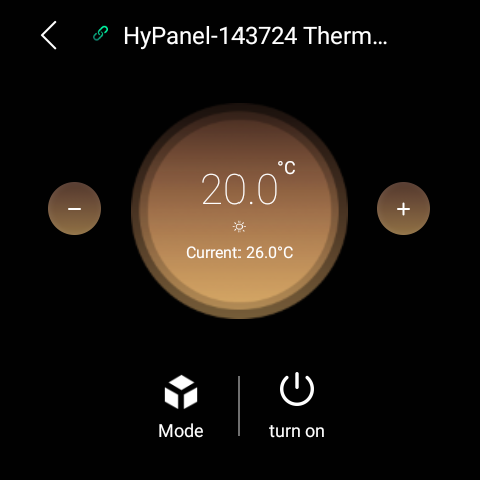
To control the thermostat, tapping ![]() and do any of the following.
and do any of the following.
Tap
 to switch modes.
Tap
 or
or  to adjust the desired temperature which ranges from 5-35℃.
Tap
 to turn the thermostat on or off.
Shade
Go to Devices
 , and find the desired shade.
Do any of the following:
Tap
 to open the shade.
Tap
 to close the shade.
Tap
 to stop the shade when it reaches the desired position.
Tap
 for advanced functions.
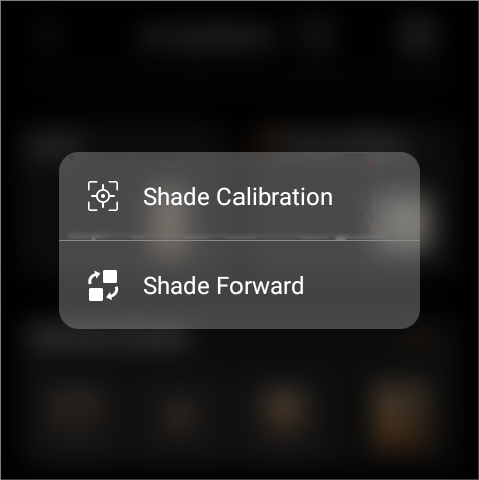
Shade Calibration refers to adjusting the time it takes for the curtain to fully open and close. To do so, select this option and follow onscreen instructions.
Shade Forward refers to reversing the curtain’s movement direction when the close and open buttons operate contrary to the current direction.
Speaker
When speakers such as SONOS are added, a Music feature button will be visible on the Home screen for quick control of the speakers.

IR-based devices
Using the IR controller, the panel can integrate with up to 30 IR-based devices like TV and air conditioner, and function as a remote for them.
NOTE:
The IR-based devices should be added via BelaHome app before you can see them on panels. For detailed instructions, see here.
Here we take AC adding as the example.
Go to Devices
 , and tap the added air conditioner.
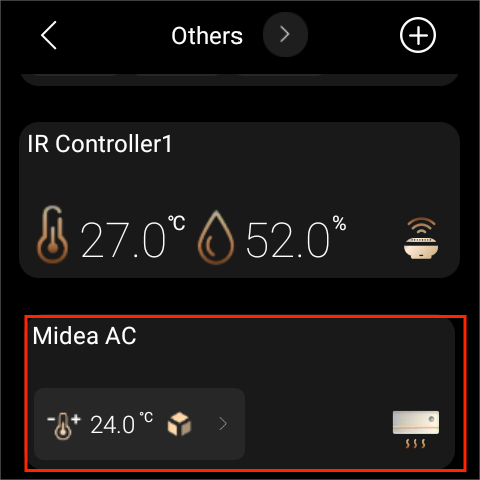

Tap
 to enter its details screen.
Tap
 or
or  to adjust the temperature.
Tap
 to switch the modes.
Tap
 to change the fan’s speed.
Tap
 to turn the device on or off.
 to change the fan’s speed.
Smart lock
Open door with one tap
To open the smart lock with one tap, find the lock on the Device screen, and tap ![]() .
.

Receive doorbell notification
When someone rings the doorbell on the smart lock, HyPanel will display a push notification and play a sound to notify you.
Unlock with temporary key
You can provide visitors with a temporary PIN for self-door unlocking. To issue such keys, refer to the instructions with BelaHome app.
Upgrade lock’s software
To upgrade the lock’s software, select the desired smart lock, and tap ![]() > Update. This update option only shows up when there is a new version.
> Update. This update option only shows up when there is a new version.

Use the intercom
Unlock door remotely
When you know who is at your door, you can open the door directly without communicating with the door phone.

Tap Devices
 on the home screen.
Find the desired door phone, and tap on
 .
.
 .
.If there are multiple doors connected to the door phone, select the desired one from the pop-up list.
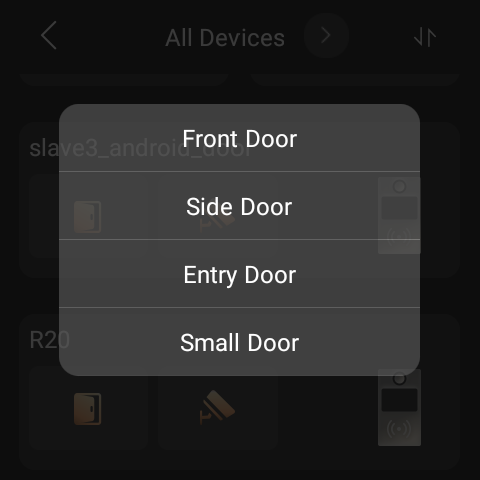
Tap Confirm.
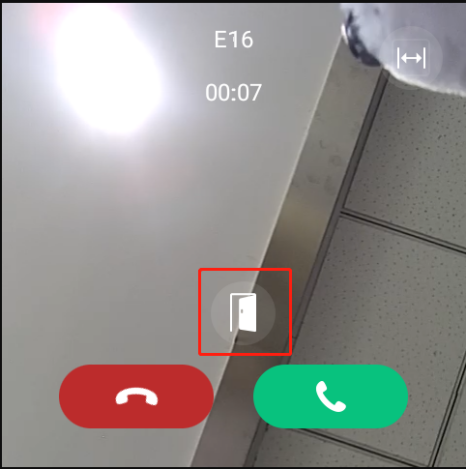
Unlock door before answering a call
When you receive a call from the door phone with a camera, you can preview its monitoring streaming and open the door without answering the call.
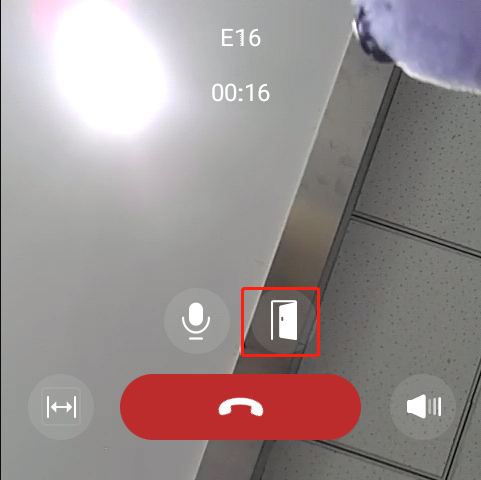
Unlock door during a call
You can answer the door phone call and unlock the door during the call.
On the calling screen, tap ![]() to release the door.
to release the door.
You are also able to call the door phone to see and hear who the visitor is. To do so, see the section Make voice calls in this guide.
See monitoring stream
If the connected door phone has a camera, you can see its monitoring stream on the HyPanel.
To see the monitor stream, find the desired door phone, and tap on the monitor icon![]() .
.

Energy
Use the Energy feature to track the power consumption of your devices, rooms, and whole home.
NOTE:
The Energy feature only applies to smart devices that support energy data collection.
The whole home power usage data showed in the center of the circle.
Top 3 power consumers.
Total energy consumption of the rooms excluding the top 3 (Other).
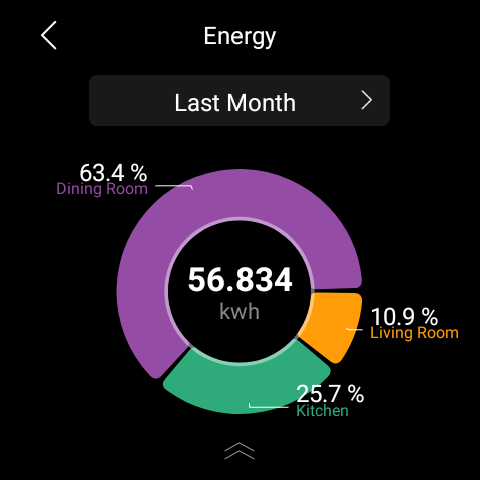
To see energy consumption of last week, or last month, tap
 next to the time period.
 next to the time period.
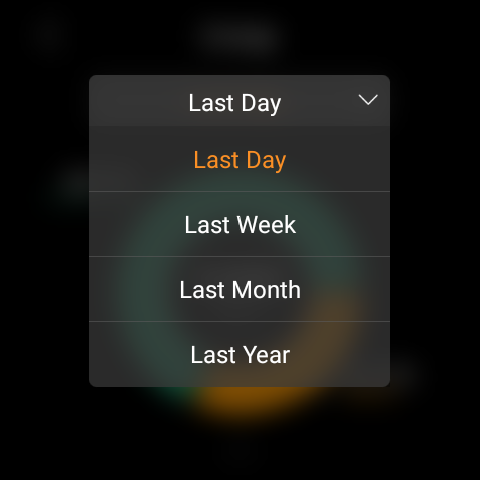
To track each room’s power usage, swipe up from the bottom of the screen. The details screen opens.
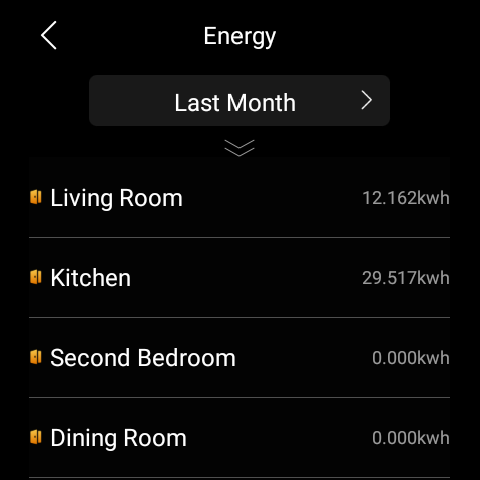
Tap the desired room to see each device’s power usage.

Integration
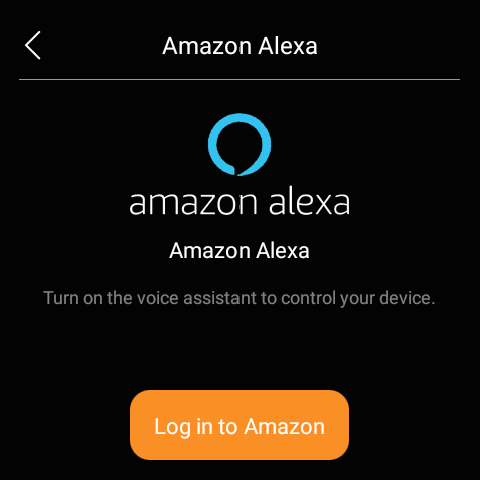
HyPanel can integrate with Apple HomeKit and Amazon Alexa, providing effortless and convenient home control.
Amazon Alexa
By integrating with Alexa, you can voice-control all your Amazon devices by HyPanel.
Swipe down from the top edge of any screen, then tap
 > Integration > Amazon Alexa > Log in to Amazon.
Tap Copy the code and browse after a code is displayed.
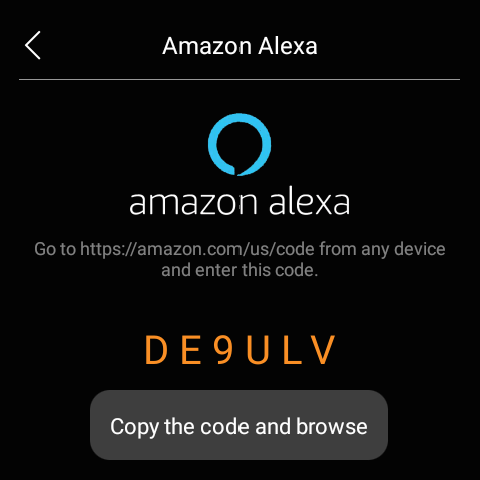
Sign in with your amazon account.

Long press the box to paste the code, and tap Continue.
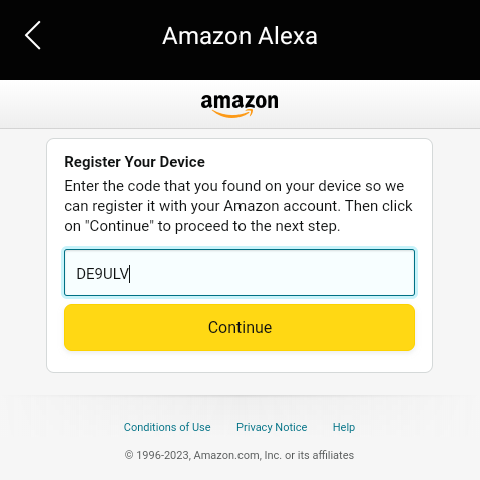
Follow the onscreen instructions until you see the screen below.

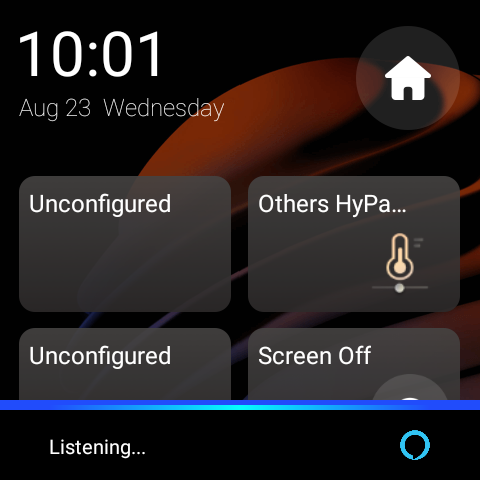
Say “Alexa” and you will hear a sound response and see a blue light bar, which means it heard you and is waiting for your command.

Please follow Alexa command guides when you issue the command.
Apple HomeKit
After integration, you can effectively control all devices connected to HyPanel devices using Apple's Home app.
Make sure your Apple device is on the same network with the HyPanel.
Swipe down from the top edge of any screen, then tap
 > Integration > Apple HomeKit. The following screen displays.

Open the Home app on your Apple device, log in with your iCloud account and continue to tap Add or Scan Accessory.
Scan the QR code using your Apple device. Follow the onscreen instructions to finish the setup.
All devices connected with HyPanel devices are added into your home. You can control on the Home app or through Siri.

Third-party applications
HyPanel allows for installing third-party apps through its engineering web portal. If you need to install any third-party apps, please contact your service provider.
Upon successful installation, the app will be accessible on the Home screen for convenient use.

Home Automation
Scenes let you control your smart devices based on an action, an event, a schedule, or sometimes with a simple tap. For example, automatically turn off the light when you leave, and play music when you’re back home.
NOTE:
Before you can automate your home devices using Scene feature, you need to create scenes on either the user web portal or BelaHome app.
Activate your scene
Automation scene types
The following are three types of automation scene.
A scene only with auto condition(s) is a scene set to be activated based on a schedule or an event.
NOTE:
This type of scenes are not displayed on the HyPanel screen. You can see them on user web portal or BelaHome app.
A scene with the manual condition is a scene set to be activated based on a tap or click on the scene image.
A scene with both auto and manual conditions is a scene based on a schedule, an event, and a tap or click. When any of the conditions is met, the scene will be activated.
Run a scene with manual activation conditions
On the Scenes screen, to activate a scene with manual trigger condition, just tap its image. Its background will be highlighted and then back to be dimmed to show that the scene is activated.

Run a scene with time or action conditions
You do not have to do anything to run an auto scene. Once the preset conditions are met, the scene is activated automatically. You can log into the user web portal or BelaHome app to see auto scenes without a manual trigger condition.
Rearrange the scenes
You can rearrange your scenes to have them display in the order you want.
Tap Scenes
 .
.Tap
 at the top. Select, drag, and drop scenes to the desired place.
Tap the icon
 again once you finish.

Security
Use security modes to easily control and protect your home.
NOTE:
To arm your system, you have to firstly configure three default security modes, or create custom modes on either the user web portal or BelaHome app.
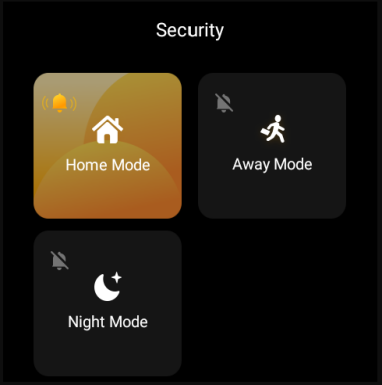
Arm your system
To arm your system after you configure the security modes, do as the following:
Select Security
 .
.Tap the desired mode, and enter the arming code (By default is 000000.)

Wait for the arming count down to the end. Or tap Skip to arm your system right away.

NOTE:
The arming delay time can be modified on the user web portal or BelaHome app.(缺失加个链接到相关文档的相应章节)
Once the system is armed, the selected security mode icon is highlighted.
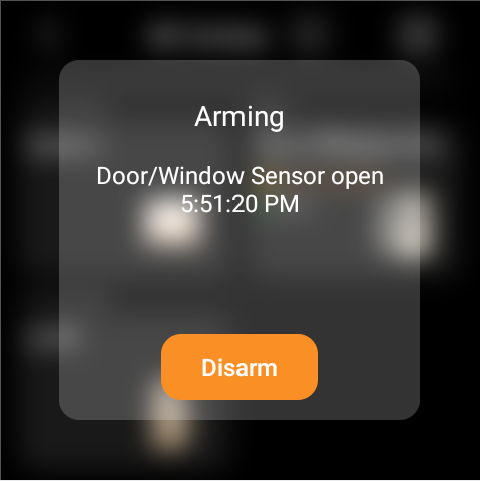
During the arming process, if any associated sensor is detected as abnormal, a prompt will appear.
To identify the malfunctioning sensor, tap Detail.
To proceed with the arming process despite the issue, simply tap Ignore. In this case, even if the bypassed device detects an abnormality, it will not send any alarms.

Disarm your system
To disarm your system, tap the highlighted mode image again, and enter the disarm code which is 000000 by default. You’ll know the system is disarmed when the mode image turns back to be dim.
Deal with an Alert Push
When your system is armed in a security mode and any included sensor triggered(except the bypassed ones), the system will sound an alarm and send a notification to the panel and BelaHome app.
To stop the alarm once you make sure your home and family are safe, tap Disarm and then enter the preset code (By default is 000000). Your system is still armed in the security mode after the alarm is dealt with.
Disable siren and alerts
By default, your device emits a siren and sends a push notification when any sensor is triggered while in the armed mode. You can silence the siren and disable push alerts from the panel.
Select Security
 and tap the bell icon
  at the left corner of the scene image.
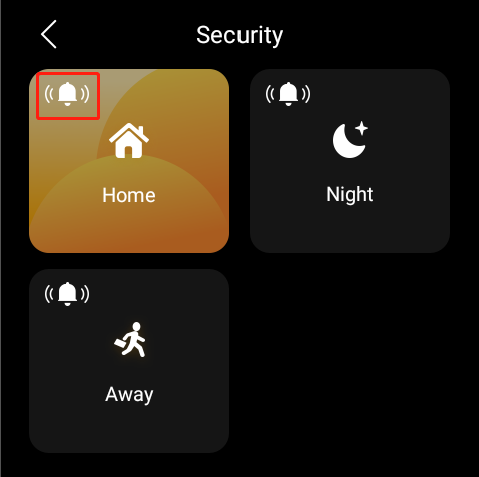
Enter the code which by default is 000000.
The siren feature is disabled when you see the icon turns to
 . Please note that in this case, all panels will not activate a siren and send push alarms.
 . Please note that in this case, all panels will not activate a siren and send push alarms.
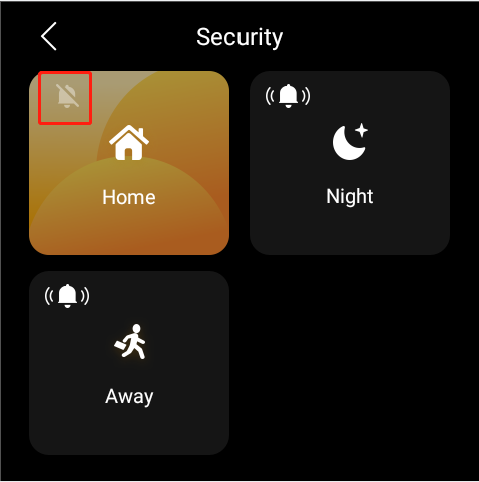
To enable the siren, tap  , and enter the preset code. The icon turns to be
 ![]() indicating that the siren function is on.
indicating that the siren function is on.
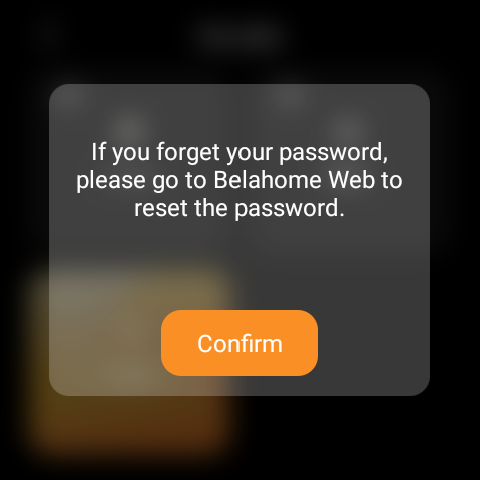
Forgot arming/disarming code
To restore the default password, 000000, tap Forgot Password on the password required screen and follow the onscreen instructions. Two resetting options are provided based on your cloud connection status.
Via reset email
If you’ve registered the administrator account and ensure that the devices are connected to the Internet, a code reset email will be sent to the family’s administrator email address once you tap Forgot Password. Follow the instructions included to restore the default password.

On the user web portal
Visit the user web portal, and click Settings > Change Security Code.
Communication in Family
You and your family members can make calls with each other, and send and receive messages at any time through HyPanel.
Register family administrator account
If you are the first person in your family to register the account, you will be the family administrator. Only the administrator of the family has the permissions to create and manage family member accounts.
NOTE:
Please contact your service provider if you are not sure whether your devices are connected to the cloud.
When devices connected to the cloud
To register the administrator account when the devices within your family are connected to the cloud, do any of the following:
Contact your service provider to have your administrator account registered and activated.
Contact your service provider to have your devices connected to the cloud, and register account yourself by following the below steps.
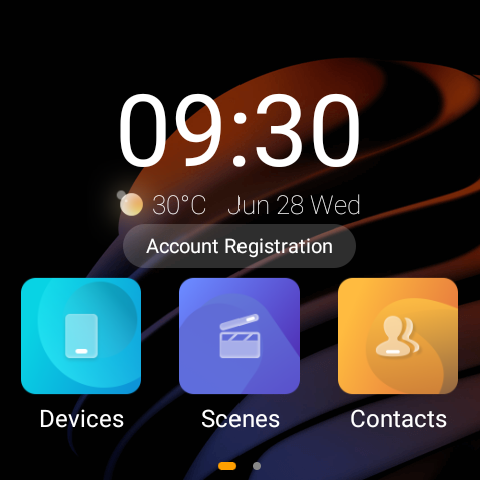
Tap Account Registration on the home screen, or go to
 > System Settings > About > Family Account. A QR code displays on the screen.
Do one of the following:
If you already have an account associated with other families
a. Open BelaHome app, and log into your account.
b. Tap Me > Scan icon, and scan the QR code.

c. Tap Join the Family.
d. You can switch the families on the app’s home screen.
If you are a new user
a. Open BelaHome app, and tap on the scan icon at the upper left.
b. Scan the QR code.
c. Enter a valid email address. The login credential will then be sent to this email.
d. Log into the BelaHome app with the credentials you receive.
When devices running in Auto Discovery mode
When devices are running in Auto Discovery mode and never connected to the cloud, the temporary administrator account has default username and password that are both Admin888.
You can also log into the BelaHome app by scanning QR code:
Ensure that your phone and and devices are in the same local network.
Go to
 > System Settings > About > Family Account. A QR code displays on the screen.
Open BelaHome app, and tap on the scan icon at the upper left.
Scan the QR code.
NOTE:
After setting a new password, scanning the QR code does not work for logging in.
Once the administrator account is created, you can login to BelaHome app and create family member accounts. Click here to see detailed instructions.
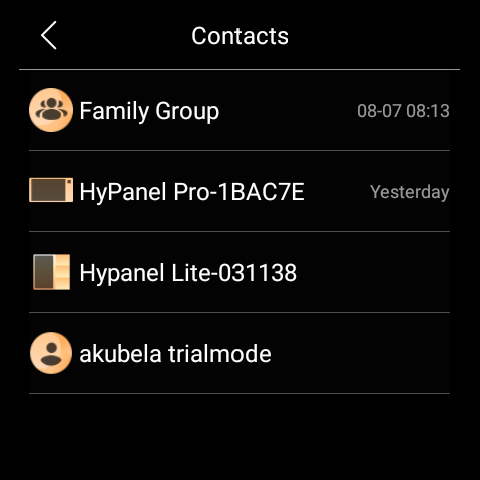
Make voice calls
You can group call or make one-to-one call with any device, including the door phones, in your family, or family member’s through HyPanel. You can also receive their calls on HyPanel.
To make calls, do as the following:
Select Contacts
 on the Home screen.
On the Contacts screen , do any of the following:
Tap Family Group to group call all panels within the family. They will auto-answer the call.
Select the family member or device you want to call.
On the conversation screen, tap
 .
.
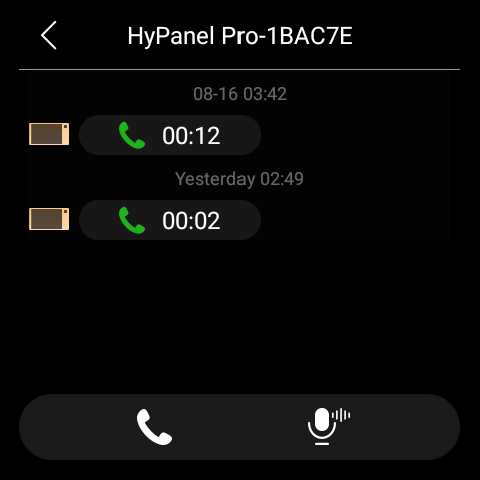
What else you can do on the voice call screen:
Tap
 to silence your microphone. Doing so, the call will not hear your voice.
Tap
 to adjust the volume.
Tap
 to hang up the call.
 to hang up the call.
Send audio messages
HyPanel allows you to send and receive voice messages.
Select Contacts
 on the Home screen.
Tap Family Group to send all contacts a message, or select any desired member or device to sent messages to.
In the conversation, tap and hold
 at the bottom right to record an audio message. Each message should be within 30 seconds. To cancel before sending, slide your finger to the left or upwards while recording.
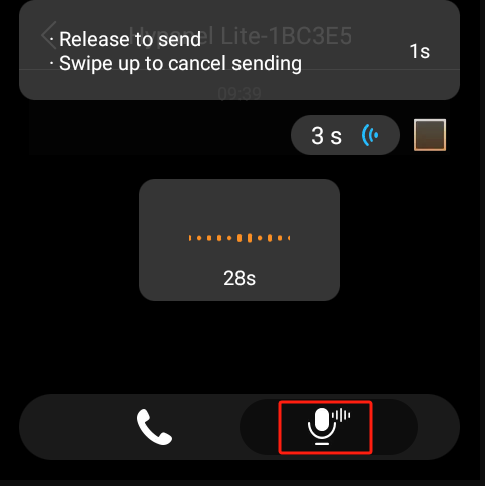
Lift your finger when you’re finished recording.
Update, Restart and Reset
Update the system
Device update requires cloud connection. Alternatively, you can contact your service provider for assistance.
To update the device to the latest version, swipe down from the top edge of any screen, and tap ![]() > System Settings > Update. On the Update screen, do any of the following:
> System Settings > Update. On the Update screen, do any of the following:
To update the firmware automatically, toggle on Auto Update. You can also set a specific update time period for the device to download and install available updates.
NOTE:
To upgrade the device in the preset time, the device must meet below 2 conditions:a)The device must be in standby mode during the previous hour, and b)The device must have no alarm and countdown set for the next hour.
If Auto Update is disabled, any available update must be downloaded and installed manually with your consent. To do this , tap Update.
NOTE:
If your system already installs the latest version, the screen shows no Update button.

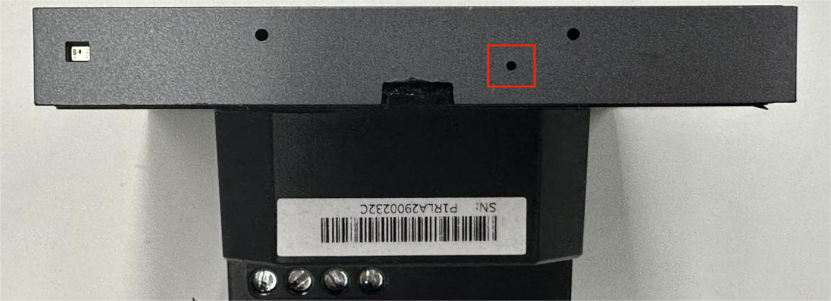
Restart your HyPanel
To restart the system, do any of the following:
Press the restart button at the bottom edge(refer to the picture) using a paperclip or needle until the display turns off.
Swipe down from the top edge of any screen to open Control Center, and tap
 > Reboot.
Restore HyPanel to installer settings
To reset your device, do as the following.
Swipe down from the top edge of any screen to open Control Center.
Tap
 > System Settings > Reset.
NOTE:
The reset results depend on the device’s usage mode your service provider selected in the initial setup.
Choosing the Installation Code option will reset the device to the settings that your installer set up, and remove all user data and subsequently added devices.
Selecting Auto Discovery mode will initiate a reset to factory settings, and delete all user data and devices.
Please consult with your service provider before resetting devices.
Privacy Policy
As you use our services, you trust us with your information. We will keep working hard to protect your data. The Privacy Policy is meant to help you be clear about what information we collect, why we collect it, and how you can protect your privacy.
To read the Privacy Policy, do as the following:
Swipe down from the top edge of any screen to open Control Center.
Tap
 > System Settings > About > Privacy Agreement.
Get Help
For videos and other manuals, visit https://knowledge.akuvox.com.
For help, contact us at https://ticket.akuvox.com/.
Was this article helpful?
-20190329_%E5%89%AF%E6%9C%AC.png)