BelaHome App User Guide V2.3.3
- 11 Jan 2024
- Print
- DarkLight
- PDF
BelaHome App User Guide V2.3.3
- Updated on 11 Jan 2024
- Print
- DarkLight
- PDF
Article Summary
Share feedback
Thanks for sharing your feedback!

This guide is applied to Version 2.33.3 for Android and iOS.
In this guide, you’ll learn about
- User accounts creation and management,
- Managing and controlling devices in your home,
- Making calls, and sending voice and text messages to devices or family members,
- Customizing the photo wall to display your favorite photos;
- Creating automation scenes to control your devices;
- Arming your home in different security modes, and more.
The attached Appendix gives you information about how to add third-party devices, e,g., Somfy shade, SONOS, Phillips Hue lights, etc.
Getting Started
Before you start
To make login and setup as smooth as possible, have the following items available:
- An internet connection through a Wi-Fi network or cellular data service through a carrier.
If your account is created in the Auto Discovery mode, ensure your mobile phone is connected to the same local network as the Akubela home center device.
- BelaHome App. You can download it from Google Play Store or App Store.
- Your BelaHome account.
- If your devices are connected to the cloud, you can register an account by tapping Account Registration on the Home screen. Alternatively, you can provide your email address and required information to your service provider. Upon completion, you'll receive your account credentials in the Welcome to Akubela email.
- If your devices are not connected to the cloud, use the default credentials: username and password both set as Admin888.
- Your home center device. Make sure the home center device in your family is powered on and connected to a network.
Logging In
To sign in to the App, do one of the following:

On the login screen, enter your login credentials, and tap Login.
- Tap scan icon
 at the upper left.
 - Find the QR code.
- If your devices are connected to the cloud, the QR code is included in the Welcome email.
- If your devices are running without cloud connection, ensure your app and home center device are on the same local network. Swipe down from the screen, and tap
 > System Settings > About > Family Account screen.
 - Center the QR code in the camera view. Or select the saved code picture from your album.
 at the upper left.
 > System Settings > About > Family Account screen.
The App will open to the Home screen automatically.

Your Account
The following are the three default types of accounts and their associated permissions:
- Administrator. One and only. Having permissions to login to user web portal, access all features and functions, manage family data, and manage family member accounts.
- Manager. Having permissions to access all available functions, and manage general member accounts.
- General member. Only having permission to access available functions, such as devices and scenes control, but cannot add them or modify their settings.
No matter what type of account you have, you are able to edit your profile, manage your login password, unbind your account with the family, and delete your account.
Edit your profile
To change information for your profile, including the name, photo, and phone number, tap  > [your photo].

Note
You cannot change your photo and name in these situations:
- You join a family that operates without the cloud connection, and you log into the app using a different network than the home center device.
- The home center device is offline.
Manage your password
Reset password

To reset your password, you can either:
- Tap Forgot Password at the bottom right of the login button.
- Go to
 > [your photo] > Account Settings > Change Password, tap Forgot password at the bottom right.
 > [your photo] > Account Settings > Change Password, tap Forgot password at the bottom right.
You will receive a reset email, then follow the instructions included to reset your password.
Note
- If any of the families you join runs without the cloud connection, the password reset feature CANNOT work until all the families have connected to the cloud.
Change a weak or compromised password
If your login password is easily guessed, or has been used for a long time, you can change such a weak and compromised password to a stronger one to secure your account.
- Tap
 > [your photo].
 - On the My Profile screen, tap Account Settings > Change Password.
 > [your photo].
Join other families
You are able to join more than one family and have all the permissions they grant you.
To join a new family, tap  >
>  to scan its QR code, and then follow the onscreen instructions.
Once joined, you can switch families by tapping the current family name on the Home screen or search them directly.
Unbind your account with a family
You can unbind your account with any families you joined.
Note
- If any of the families you join runs without the cloud connection, then the unbinding account feature CANNOT work until all the families have connected to the cloud.
Once your account is unbound, you:
- can log into the BelaHome app,
- cannot access the family you unbind with,
- cannot preserve permissions and chat data associated with this family.
To unbind your account, do as the following:
- Tap
 > Family Management.
 - Select your account from the family member list, and tap Unbind Family. Follow the onscreen instructions.
 > Family Management.
If you are the family administrator and there are other family members, you need to follow the onscreen instructions to transfer the administrator role to another family member before you can unbind the account.
Delete your account
You can cancel your account at any time by going to  > [your photo] > Account Settings > Delete Account.
Once your account is deleted, you will not be able to sign in to BelaHome anymore, and will lose permissions in all families you join.

If you are the family administrator and there are other family members, you need to follow the onscreen instructions to transfer the administrator role to another member account first.
Family Member Management
Administrator has the authority to manage both manager and general members within the family, while managers are allowed to manage general members.
See family info
To see or change the family information, go to  > Family Management. On the Family Management , do any of the following:
- See or modify family name.
- See family address.
- Check family QR code. You can send it to the one you want to invite to your family.
- Manage rooms.
- Manage family members.

Create family member accounts
The administrator and managers can add new family members and grant them different permissions to access the Akubela system.
The specific steps differ by system’s cloud connection modes. Please note that functions including remote control and intercom are excluded when using the account without the cloud connection.
- Go to
 > Family Management. All associated family members are listed on the Family Management screen. Tap to check member’s information and permissions if you are the administrator or managers.
 - Tap
 to go to the Add Family Member screen.
 > Family Management. All associated family members are listed on the Family Management screen. Tap to check member’s information and permissions if you are the administrator or managers.
 to go to the Add Family Member screen.
3. Type in the member’s information and valid email address to receive login username and password, and choose whether to grant her/him the manager’s permissions.

- System running without the cloud
Accounts created when devices are not connected to the cloud must be used in the same local network as the home center device.
- Go to
 > Family Management.
 - Tap
 to go to the Add Family Member screen.
 - Type in the member’s name, and grant him/her the permissions. The login username and the default password Aa123456 displays once you finish the filling.
 > Family Management.
 to go to the Add Family Member screen.

Invite a member to the family
You can invite a new member to a family by sending that member a QR code.
- Go to
 > Family Management.
 - Tap Family QR code. The followed screen displays the code.
 > Family Management.
Note
- The QR code expires after 5 minutes.


Change family member account permissions
To change family member’s account types and intercom permissions, follow these steps:.
- Go to
 > Family Management.
 - Select the desired member account.
- The administrator can tap Authority to change the general account to manager account, or vice versa.
- Both the administrator and managers can grant the member the Intercom Capability (available only with the cloud connection). This feature allows the account to call with door phones via SIP protocol, and to open door in various ways. To know more about Intercom Capability, see the Intercom chapter.
 > Family Management.
Unbind member accounts with the family
Administrator and managers can unbind themselves or member accounts with a family.
Note
- If the family runs without the cloud connection, the unbinding account feature is unavailable.
Once the account is unbound, you or the member can log into the BelaHome app, but
- cannot access the family you unbind with.
- cannot preserve permissions and chat data associated with this family.
Unbind member accounts
To unbind a specific family member account, do as the following:
- Go to
 > Family Management.
 - Select the desired member account.
- Tap Unbind Family, and follow the onscreen instructions.
 > Family Management.
Only the administrator can unbind all accounts in a family including administrator and family member accounts.
- Go to
 > Family Management.
 - Select the administrator account.
- Tap Unbind Whole Family.
 > Family Management.
Note
- Once you select this option, you’ll need to contact your service provider to rebind the accounts with the family when you need.


Transfer administrator role
The administrator role is able to be transferred to another family member.
- Go to
 > Family Management, and tap your family.
 - Select the administrator.
- Tap Transfer Administrator Permissions, and select the member you want to transfer the role. Follow the onscreen instructions to complete the process.
 > Family Management, and tap your family.
Once completed, your account is changed to be a general one.


Spaces and Rooms
The administrator and managers in the family are able to manage all spaces and rooms.
The rooms that are accessible for families are displayed on  screen. You can swipe left or right to scroll through the room list.
Go to Space Management screen
In the Space Management view, you can see all the rooms within the family, along with the number of devices in each room. To access this screen, do any of the following:
- Tap
 in the bottom tab bar, click
  on the upper right side, and select Space Management from the drop-down list.
 in the bottom tab bar, click
  on the upper right side, and select Space Management from the drop-down list.
- Tap
 > Family Management > Space Management.
 > Family Management > Space Management.
Add a new space
A space contains multiple rooms. You can designate each floor of your home as a space and add multiple rooms beneath. This flexible structure enables you to organize and manage your home's layout effectively.
Create a space
- Go to
 > Family Management > Space Management.
- Tap
 at the bottom.
 - Name the space, and make sure it belongs to Whole House.
- Tap Done.
 > Family Management > Space Management.
 at the bottom.
Add rooms within the space
To efficiently manage your home, you can add multiple rooms or zones into the space.
- Go to
 > Family Management > Space Management.
 - Tap
 at the bottom.
 - Name the room, and select the desired space where you want it to belong to.
- Tap Done.
 > Family Management > Space Management.
 at the bottom.
If you want to move existing devices to the new room, please see Change device’s location.
Devices
See device info.png)
.png)
From the  screen, you can see devices’ information including:
- Connection status:
- Offline. The device’s image is gray with the icon
 at its upper left corner. Disconnected devices cannot be controlled via BelaHome.
 - Online. The device’s image is orange without the icon
 . Connected devices can be controlled via BelaHome.
- Offline. The device’s image is gray with the icon
- Setting details: Select the desired device, and tap
 in the upper right corner to see its current settings. Here you can change the device’s name and location.
 at its upper left corner. Disconnected devices cannot be controlled via BelaHome.
 . Connected devices can be controlled via BelaHome.
 in the upper right corner to see its current settings. Here you can change the device’s name and location.
Check device online/offline notifications
When a device connection status changes, you will receive a notification. To see the online/offline notifications, tap  >
>  > Notification.


Check ZigBee device battery status
You can check the battery status of your added devices by going to  > Battery status, after HyPanel devices get their battery data.

Add devices
BelaHome enables you to add ZigBee devices like sensors, smart locks, emergency buttons, as well as third-party smart home devices.
Note
- You cannot add third-party devices with HyPanel Lite.
Add devices by scanning
To add ZigBee devices by scanning feature, do as the following:
- Tap
 on the bottom tab bar, and tap
  at the upper right.
 - The home center will automatically search the nearby devices. Tap the gateway name in the upper left to switch to the desired panel where you can add the device.
 on the bottom tab bar, and tap
  at the upper right.
3. Follow the device manual to put it in pairing mode.
Note
- If you are adding ZigBee devices, make sure the devices and the gateway are as close as possible. We strongly recommend that ZigBee devices and the gateway device should be in the same room, or their distance should be within 10 meters if there is a wall between them.

4. Wait for the search result. Select the device from the search result. Add one device at one time.
5. Select the location, name the device, and tap Finish.

Add devices manually
You can add devices by selecting their types from a list.
Note
- Before adding a third-party device, you should check its integration instruction to have the required preparation steps done.
- Tap
 on the bottom tab bar, and tap
  at the upper right.
 - You can tap the gateway name in the upper left to switch to the desired panel where you wan to add the device.
 on the bottom tab bar, and tap
  at the upper right.
3. Select the device type from the list below.

4. Follow the onscreen instructions and wait for the device to be added successfully.
5. Select the room where the device is located, name the device, and tap Finish.
You can refer to Appendix - Add third-party devices via BelaHome to get more detailed instructions.
Change device’s location
You can now move desired devices to the new room to easily find and manage them.
Note
- Wired sensors cannot be relocated.
- Tap
 in the bottom tab bar.
 - Tap the desired device to go to its details screen.
- Tap
 in the upper right corner.
 - Select Space, and tick on the room.
 in the bottom tab bar.
 in the upper right corner.

5. Tap Save.
You can see from the Device screen that the device is moved into the selected room.

Remove a device
You can remove a malfunctioned, damaged, or disliked device from the system, just note that all the data and configurations associated with the device will be deleted.
To remove a device from your family, do as the following:
- Tap
 on the bottom tab bar, and select the desired device. Its details screen opens.
 - Tap
 in the upper right corner, and tap Delete.
 on the bottom tab bar, and select the desired device. Its details screen opens.
 in the upper right corner, and tap Delete.
Add devices to Favorites
Favorite Device feature enables you to quickly find and control your frequently-used devices. Follow the steps below to access, view, or modify your Favorites for devices:
- Tap
 > Favorite device.
 > Favorite device.
2. Select the desired devices.

3. Tap  at the upper left corner. The favorite devices are automatically displayed on the Home screen.
Note
- Only controllable devices such as relays, smart plugs, and third-party smart home devices are displayed in the adding list.
To remove a device from your Favorites, tap  > Favorite device, and deselect the device.
Control Devices
BelaHome allows you to control devices, such as relays, smart plugs, and third-party smart home devices
Control all devices
You can control all devices or the same type devices with one tap. Also, you can control all devices just within a room or space.
- On the
 screen, select your desired space or room on the upper list.
 screen, select your desired space or room on the upper list.
2. Tap Control All Devices at the screen’s bottom.

3. To turn on all devices in this space, tap  . To turn them off, tap
  .
.

Control a single device
Switches and smart plugs

To turn such a device on or off, simply tap it on the Device screen. The card’s background turns to be orange, indicating that the device is on. To turn it off, tap the card again, and the background becomes gray.
Akubela panels, door phones, and third-party devices
To control such a device, tap it to access its detailed screen. You can then turn the panel’s relays on or off, see monitor stream from the door phone or open the door it controls, play music using SONOS speakers, and more.


Smart locks

To control compatible smart locks, find the desired lock, and tap to enter its details screen. You can do any of the following:
- Tap
 to unlock the door remotely.
 - See the battery status of the lock.
- Tap Device Log to access doorbell ringing logs, check the lock's online/offline status, and view unlock histories, including the use of temporary passwords, fingerprints, PIN codes, and cards.
- Tap Temporary PW to create unlock password for your visitors.
 to unlock the door remotely.
- Set a password manually, or tap Random to generate a password randomly.

- Name this password.

- Set the valid period.

- Select the repeat mode between Never and Weekly.
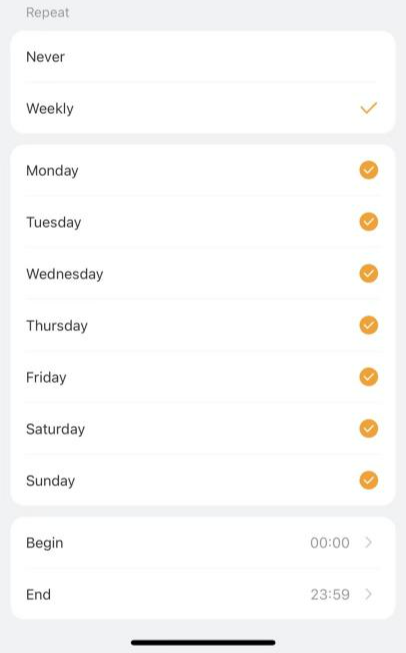

-Never: the password is one-time only during the specific valid period.
-Weekly: the password is reusable within the valid period. Customization options include specifying weekdays and daily time span.
Once created, you can share the password with your visitor for door access.
Akubela IR controller

Add TV and AC directly
You can add up to 30 TVs and ACs with IR controllers, allowing you to control them through the app and panels.
- Tap the IR controller to enter its detail screen.
- Tap
 .
. - Select the device types between Air Conditioner and TV.
- Choose the device’s brand.
- Ensure the status of the device you wish to control matches what indicated in the prompt, then tap Yes to confirm or No to proceed to the next potential device.
 .
.Note
If the device you want to control did not respond, tap  to try again.
 to try again.
6. Name the device and choose its location.
You can see the device listed on both the IR controller’s screen and the Device screen.


To access the control screen of the added IR device, for example, an AC, tap the device on the Device screen. This allows you to turn it on or off, change its mode, fan speed, and more.

Learn functions from other remotes
If adding AC or TV fails, use the IR Controller to add and learn their remote functions. Note that each remote supports up to 100 keys.
- On the IR controller’s detail screen, tap
 .
. - Select Custom Remote Control from the list.
- Name the remote and set its location to distinguish it from others.
 .
.
4. Tap Done. The added remote will be listed on the details screen.

5. Select the desired remote, and tap  .
.


6. Make sure the indicator light of the IR Controller is yellow.
7. Place the head of the original remote to IR controller as close as possible.
8. Press the key you want to learn on your original remote and IR controller’s indicator light will flash once.
9. Name the key. To continue to add keys, tap Next > Add Button.


10. Repeat steps 8 & 9 for other keys you want to learn. Tap Done to finish the adding process.

To add additional keys or delete the remote, tap  at the upper right, and select the desired option.


Change relay type for HyPanel devices
You can change among the six relay types from BelaHome, including switch, light, shade, fan, heating, and cooling.
- On
 screen, tap the desired panel.
 - Tap
 at the top right to go to its settings screen.
 - Tap Relay to and change the relay type.
 screen, tap the desired panel.
 at the top right to go to its settings screen.
Note
- If you set or change the relay type to Shade, relay 1 will open the shade by default, and relay 2 will close it. If you wired the shade in reverse, you can easily fix this by enabling the Shade Reverse feature on the panels.
- If the two relays are used for heating and cooling separately, they will be merged into a single thermostat on the Device screen.
Scenes
Scenes lets you control your smart devices based on an action, an event, a schedule, or sometimes with a simple tap.
Scene types
To access Scenes screen, tap  at the bottom tab bar. The screen displays all scenes within the family.
The following are three types of automation scene and their icon meanings:
- Auto scene
 : A scene that is set to be activated based on a schedule or an event.
 - If the scene icon is orange
 , it means as long as the preset conditions are met, the task will be triggered.
 - If the icon is white
 , it means the task will not be triggered automatically. You can tap it to allow it to auto-run.
 : A scene that is set to be activated based on a schedule or an event.
 , it means as long as the preset conditions are met, the task will be triggered.
 , it means the task will not be triggered automatically. You can tap it to allow it to auto-run.
Note
- This type of scenes are not displayed on HyPanel devices.
- Manual scene
 : A scene that is set to be activated based on a tap or click on the scene image.
 - Auto and manual scene

 : A scene that is based on a schedule, an event, and a tap or click. When any of the conditions are met, the scene will be activated.
 : A scene that is set to be activated based on a tap or click on the scene image.
 : A scene that is based on a schedule, an event, and a tap or click. When any of the conditions are met, the scene will be activated.
Create a scene
A scene consists of condition(s) and task(s). When the conditions are met, the preset tasks or actions could be triggered.
To create a scene, go to  >
>  > Add scene, and do the following.
- Name the scene. You can also chose an image for it.

2. In the When field, tap to select trigger condition(s). If you set multiple trigger conditions, the scene can be triggered when ANY of them are met.


- Manual Click. To trigger task(s) by tapping the scene icon on panels, BelaHome app, or the user web portal.
- Date&Time. To trigger task(s) at a specific time and on certain days.
- Device. To trigger task(s) based on certain device’s action. For example, when a motion detector detects something, or a door lock unlocks.
- Space. To trigger task(s) based on a specific condition or action performed by all devices of the same type within a designated space.
- Scene. To trigger task(s) when a scene’s auto-run feature is enabled or disabled, or when the scene runs.
- Security. To trigger task(s) when the system is armed or disarmed in a certain security mode or an alert is activated.
3. (Optional) In the And filed, select the precondition(s).

Note
If you add conditions in both When and And fields, the scene will be activated when:
- preconditions in And field were already met; and
- any of the trigger condition in When field are satisfied.

For example, when your system is armed in the away mode, and if the motion sensor detects a suspicious, the preset tasks will be activated. Please refer to the image for the configuration.
4. In the Then field, set the tasks to be activated when the conditions are satisfied.

Activate a scene
On  screen, to activate a scene with manual operation, just tap its image.
You do not have to do anything to run an enabled auto scene. Once the preset conditions are met, the scene is activated automatically.
Check Scene logs
To see or manage automation scene activities logs, go to  >
>  > Scene Logs.


Add scenes to Favorites
You can add the scenes you use most to the Favorite Scene on Home screen.
Note
Scenes that can be added to the Favorites vary by home center type.
- When the home center is HyPanel series, e.g., HyPanel, only manual automation scenes are allowed to be added.
- When the home center device is SmartPanel series, only securitymodes are allowed to be favorited.
Do as the following:
- Tap
 > Add Favorite Scene.
 - Select the scenes you like.
- Tap
 at the upper left corner. The scenes are displayed on the Home screen.
 > Add Favorite Scene.
 at the upper left corner. The scenes are displayed on the Home screen.
.png)
With BelaHome, you and your family members can easily make calls and send messages to each other anytime. Plus, create your personalized photo wall to share precious memories with your family.
Note
- You cannot send text messages to or audio/video call with offline devices.
Send and receive messages
Send text messages
- Tap
 at the bottom tab bar.
 - Select the member or device you want to send texts to. Or you can select Family Group to send messages to all family members and devices.
 at the bottom tab bar.
3. Tap the text field at the bottom, type the message, and tap Send.

Send audio messages
- Tap
 at the bottom tab bar.
 - Select the member or device you want to send audio messages to.
- Tap
 and hold
  to record your audio message. Each message should be within 30 seconds.
 - Lift your finger to send the message. To cancel before sending, slide your finger up while you are recording.
 at the bottom tab bar.
 and hold
  to record your audio message. Each message should be within 30 seconds.
Make one-to-one calls
Make a voice call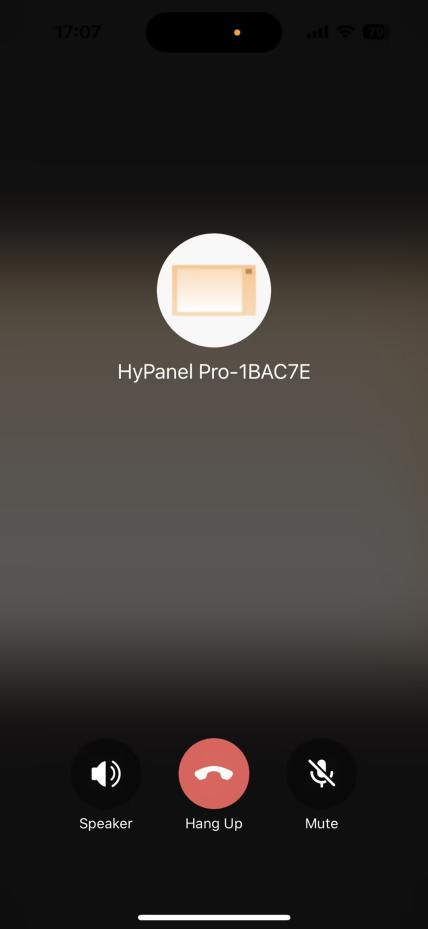

Use BelaHome to make voice calls with your family or HyPanel series devices.
- Tap
 at the bottom tab bar.
 - Select the member or device you want to make a call with.
- In the conversation, tap
 at the upper right to start a call.
 at the bottom tab bar.
 at the upper right to start a call.
What else you can do on the voice call screen:
- Tap
 to turn on your phone’s speaker.
 - Tap
 to silence your microphone. Doing so, the call will not hear your voice.
 - Tap
 to end the call.
 to turn on your phone’s speaker.
 to silence your microphone. Doing so, the call will not hear your voice.
 to end the call.
Make a video call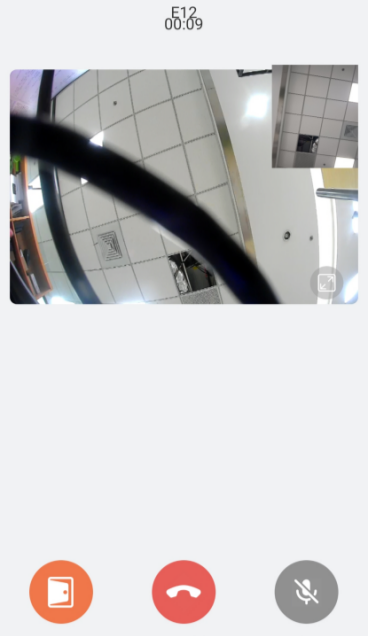

You can make a video call with the door phone to hear and see who the visitor is.
- Tap
 at the bottom tab bar.
 - On the Contacts screen, select the door phone.
- Tap
 at the upper right corner.
 at the bottom tab bar.
 at the upper right corner.
What else you can do on the talking screen:
- Tap Open Door
 to unlock the door
 - Tap
 to enlarge the monitor video.
 - Tap Hang Up
 to end the call.
 - Tap Mute
 to silence your microphone while on the call.
 to unlock the door
 to enlarge the monitor video.
 to end the call.
 to silence your microphone while on the call.
Create your own photo wall
The photo wall is displayed as the screen saver of SmartPanel or HyPanel series devices. Each Panel can show up to 9 photos as its screen savers. The default or preset screen savers can be replaced with uploaded photos.
Note
- If you only have HyPanel Lite devices in your family, the photo wall function is unavailable, and the entrance
 is hidden.
 is hidden.
Add new photos
Use BelaHome to upload your images to the Home Center. These photos will be automatically sent to the selected panels.
- Tap
 , and tap
  in the top right. The Photo Wall screen opens.
 - Select the desired panel to display your photos.
- Tap
 at the upper right.
 - Select either Take a photo or choose existing photos from your Album.
 , and tap
  in the top right. The Photo Wall screen opens.
 at the upper right.
To display images on the selected panel, refer to the user guide of the specific panel to enable the screen saver feature and set the style to Photo Wall.
Share uploaded photos with other panels
Images that uploaded to the Home center can be sent to other panels.
Note
- This function is unavailable when the family is running without the cloud connection.
To use the images stored in the Home Center, do as the following:
- Tap
 , and tap
  in the top-right corner.
 - Select the desired panel.
- Choose images from the available photos stored on the home center device that you want to send to the desired panel.
- On the followed screen, tap
 > Add to be shown on screen.
 , and tap
  in the top-right corner.
 > Add to be shown on screen.

Note
- The second field only displays size-fitted photos for the selected Panel.
- To display images on the selected panel, refer to the user guide of the specific panel to enable the screen saver feature and set the style to Photo Wall.
Delete photos
Deleting a photo from the Home Center or panels does not affect the photos in the other.
- Tap
 >
>  .
. - Select the desired panel.
- Select the photo you want to remove from the panel or Home Center.
- On the followed screen, tap
 > Delete.
 >
>  .
. > Delete.
Security
Akubela enables you to easily arm and disarm your home whenever you need.
Note
- If you only have HyPanel Lite devices in your family, the security feature is not available, and its tab is hidden.
Configure security mode
Akubela has 3 default security modes, Home, Away, and Night. Also, you can create your own modes to meet your needs.
To configure a mode’s conditions and tasks, do as the following.
- Tap
 > Security.
 > Security.
2. To enter the details screen, do any of the following:
- To configure the default security modes, tap
 of the desired mode.
 - To create a new mode, tap
 > Add security.
 of the desired mode.
 > Add security.
3. On the followed screen, complete the below settings:
- Tap
 to select one or more devices to start a task when any of them turns on or off, or any of them detects something.
 - Select one or more tasks the system performs when the conditions are met.
- Enable the Alarm Siren toggle to activate a siren sound when the scene is triggered.
- Make SOS Call to the designated service provider. SOS numbers should be preset on the user web portal or the cloud.
- Defence Delay. Introduce a delay before the changes take effect when switching to a different mode.
- Set the Alarm Delay to let the alarm sound after a specific time period.
- Send Notifications to all panels and family members.
- Send HTTP command to perform specific actions.
 to select one or more devices to start a task when any of them turns on or off, or any of them detects something.
4. Configure the connected relays to activate when security mode is triggered.
Arm your system
To arm your system, tap  > Security, and tap the desired arming mode. The mode image becomes orange when your system is armed.

To disarm the system, simply tap the highlighted mode image again. This image will be blue.

Alarm pop-ups
When a sensor in any security mode is triggered, the system will push a message to your phone. Tap the pop-up and a full-screen detailed notification will open.
To disarm the system, tap the Disarm button.


See security logs
To see security logs including alarms, arm/disarm, bypass, and alert logs, go to  >
>  > Security Logs.


On the screen logs screen, you can see the following types of histories:
- Alarms: Display sensor alarm and alarm-cleared histories triggered in any security mode, including Away, Home, Night, and custom modes.
- Arm/Disarm: Display the system’s arming and disarming histories.
- Bypass: Display histories of sensors being ignored and restored to function.
- Alert: Display all triggered histories associated with sensors, whether they are triggered in security mode or not.
Note
If your home center device is offline, you willnot be able to see any security logs on this screen.
Intercom
When granted intercom permissions, your account can control connected door phones to unlock doors, view monitoring streams, and access doors using temporary keys, PIN codes, QR codes, facial recognition, and more.
Note
Only when your family has the intercom capability enabled, the family members can access the functions mentioned in this chapter.
To enable the intercom capability, please reach out to your
- Service provider, if you are the administrator of the family.
- Family administrator, if you are one of the family members.
Unlock door with app
Open door remotely
You can open the door directly for your visitors just by tapping the specified button.
- Tap
 .
. - Tap the desired door phone to access its details screen.
 .
.
3. Tap Relay.

Open door during a call
You can open the door for your visitors either when answering their calls or initiating calls with them.
Open the door when answering a call
- Tap Open Door
 on the talking page.
 on the talking page.
2. Tap Yes when you are asked.
What else you can do on the talking screen:
- Tap Decline
 to end the call.
 - Tap Accept
 to receive a video call.
 to end the call.
 to receive a video call.
If you want to make a call with the door phone to hear and see who the visitor is, tap  at the bottom tab bar, select the desired door phone, and tap Video Call. You can refer to Make a video call section in this guide for more instructions.
Open door when monitoring
If your door phone has a camera, you can access its live video at any time to see what’s happening in front of your door. You can also open the door while viewing monitor streams.
- Tap
 .
. - Select the door phone. The live video streaming from the device displays here.
 .
.
3. To open the door, tap  .
.


Open door with Temp Keys
A Temp Key consists of a QR code and an 8-bit PIN. You can customize its validity period and time limits, and the key immediately becomes valid upon creation. This feature allows you to issue temporary keys to visitors, housekeepers, delivery person, and more.
Note
The Temp Key feature can only be used on door phones with screens.
Create Temp Keys
Note
If you cannot see the Intercom Permission Management option on  screen , do as the following:
- Contact your service provider to verify if the intercom permission has been enabled for your family.
- If enabled, ask your family administrator to grant your the intercom permissions.
Create a Temp Key for your visitor
- Go to
 > Intercom Permission Management > Temp Keys.
 > Intercom Permission Management > Temp Keys.
2. Select  at the bottom right.
3. Enter the key user's name, and set up Repeat Mode, Doors and Time for use. ID number are optional. According to the Repeat Mode you choose, you may be asked to set up Each Door Counts.
Note
When repeat mode is Never, there is a limit to total times for use. The total times equals each Door Counts * the number of selected doors.
4. Tap Submit. The key will be displayed on the key list.
Share a Temp Key with the visitor
You can share a temp key with the designated user.
- Go to
 > Intercom Permission Management > Temp Keys, and select the desired key.
 - Tap Share Key. Share the key to a contact in your messages, email or WhatsApp.
 > Intercom Permission Management > Temp Keys, and select the desired key.

Create a Delivery Temp Key for a delivery person
The delivery Temp Key is single-use only. You can issue this key to the delivery person.
- Go to
 > Intercom Permission Management > Temp Keys.
 - Tap
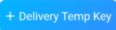 at the bottom left. A key is auto-created.
 > Intercom Permission Management > Temp Keys.
 at the bottom left. A key is auto-created.
You can take a screenshot of the key and share it with the delivery person.

Delete Temp Keys
Keys become invalid immediately after you deleted them. To delete expired or unwanted keys, do as the following:
- Go to
 > Intercom Permission Management > Temp Keys.
 - Find the desired key, and do any of the following:
 > Intercom Permission Management > Temp Keys.
- Swipe left directly on the current screen, and tap
 .
.
 .
.
- Tap the desired key to go to its details screen, and tap
 at the top right.
 at the top right.
Open door with the door release PIN
You can set a PIN code to access doors by entering a password.

Note
- One account is allowed to create only one door release PIN.
- To use the PIN, your door phone has to support password access.
To create a PIN, do as the following:
- Go to
 > Intercom Permission Management > Door Release PIN.
 - Enter a numeric password. It must be 4-8 digit, non-sequential, and non-repeated.
- Tap Submit.
 > Intercom Permission Management > Door Release PIN.
Open door with Face ID
Facial recognition may help you open the door fast.
Note
- One account is allowed to enrolled only one face data.
- To use Face ID, your door phone has to support facial recognition access.
- Go to
 > Intercom Permission Management > Face Recognition.
 > Intercom Permission Management > Face Recognition.
2. Tap Get Started or Choose from Album, then follow onscreen instructions to enroll your face data.

To delete your face data, go to  > Intercom Permission Management > Face Recognition > Delete Face Data. Once deleted, you cannot open doors using this your face ID.
Open door with NFC
Use your phone's NFC feature to easily open the door by holding it near the card reader.

Note
- This method is NOT available on iPhone and Android phones without the NFC feature.
- This method does NOT work if you install both SmartPlus and BelaHome app.
To enable NFC feature, go to  > Intercom Permission Management > NFC Unlock. You can turn off this feature at anytime.
Support
Upload logs for debugging
In case of device malfunctions, you can upload detailed logs to Akubela Cloud for our technical engineers to analyze and address the issues.
The log has 7 levels. The higher the level, the more detailed the log content. The level is 3 by default. To change the log level, do as the following:
- Go to
 > Setting > Export Log.
 - Select a level, and tap Save. You can ask our support team for detailed information on each level.
 > Setting > Export Log.
To send the current logs to the Akubela support team for troubleshooting or other purposes, tap Upload to The Cloud.

Updates
BelaHome App version
To see the current version of BelaHome App in use, go to  > About .

To update the app to the latest version, tap Check for Updates, and follow onscreen instructions. Your settings and data will remain unchanged when you update the app to the latest version.
Device version
To see the current versions of all the devices within your family, go to  > About > Check device updates.

Get Help
If you need help, go to  > Help & Feedback, and do any of the followings:
- Get answers to some frequently-asked questions.
- Tap Feedback to describe and submit your issues.


Privacy Policy
As you use our services, you trust us with your information. We keep working hard to protect your data. The Privacy Policy is meant to help you be clear about what information we collect, why we collect it, and how you can protect your privacy.
For detailed Privacy Policy, go to  > Privacy Policy.
Appendix - Add third-party devices via BelaHome
Philips Hue lights
- Power your light.
- Plug your bridge in and power it up.
- Connect the bridge to the same local network as your home center device.
- Tap
 on the bottom tab bar, and tap
  at the upper right.
 - The selected panel will automatically search the nearby devices.
- Select Philips Hue from the device list.
 on the bottom tab bar, and tap
  at the upper right.
4. Confirm the light and bridge are powered on.

5. Press the button on the bridge, and then tap I have pressed the button.

6. On the add device successfully screen, tap Next.
7. Select the room where the device is located, name the device, and tap Finish.
TP-Link Kasa
- Power your TP-Link Kasa device.
- Set up your TP-Link Kasa device in Kasa Smart app.
- Connect your TP-Link Kasa device to the same local network as your home center device.
- Tap
 on the bottom tab bar, and tap
  at the upper right.
 - The selected panel will automatically search the nearby devices.
- Select TP-Link kasa from the device list.
 on the bottom tab bar, and tap
  at the upper right.
4. Wait for the adding result, and tap Next.
5. Select the room where the device is located, name the device, and tap Finish.
Lutron Caseta
- Make sure your Lutron Caseta switch is installed for the lights you want to control. Power the switch on.
- Use an Ethernet cable connect your Lutron Smart Bridge to an open LAN port on your router. The bridge should be in the same local network as your home center device.
- Add and set up your Lutron Smart Bridge and Lutron Caseta switch in Lutron app.
- Tap
 on the bottom tab bar, and tap
  at the upper right.
 - The selected panel will automatically search the nearby devices.
- Select Lutron Caseta from the device list.
 on the bottom tab bar, and tap
  at the upper right.
4. Wait for the adding result, and tap Next.
5. Select the room where the device is located, name the device, and tap Finish.
Sonos
- Power up your Sonos speaker.
- Add and set up the speaker in Sonos app.
- Connect the speaker to the same local network as your home center device.
- Tap
 on the bottom tab bar, and tap
  at the upper right.
 - The selected panel will automatically search the nearby devices.
- Select SONOS from the device list.
 on the bottom tab bar, and tap
  at the upper right.
4. Wait for the adding result, and tap Next.
5. Select the room where the device is located, name the device, and tap Finish.
Yale locks
- Connect your Yale lock to power.
- Put the lock to pairing mode.
- Tap
 on the bottom tab bar, and tap
  at the upper right.
 - The selected panel will automatically search the nearby devices.
- Select Yale from the device list.
 on the bottom tab bar, and tap
  at the upper right.
4. Make sure the lock is in paring mode. Wait for the adding result, and tap Next.
5. Select the room where the device is located, name the device, and tap Finish.
Ring Video Doorbell
- Connect your Ring video doorbell to power.
- Add and set up the Ring doorbell in Ring app.
- Connect the doorbell to the same local network as your home center device.
- Tap
 on the bottom tab bar, and tap
  at the upper right.
 - The selected panel will automatically search the nearby devices.
- Select Ring Video Doorbell 4 from the device list.
 on the bottom tab bar, and tap
  at the upper right.
4. On the followed screen, enter the username and password of your Ring app. Tap Submit. The system will send a verification email to the associated email address.

5. Enter the verification code you received. Tap Next.

6. Wait for the adding result, and tap Next.
7. Specify the device’s location, name it, and tap Finish.
Ecobee
- Power up your Ecobee4.
- Add and set up Ecobee4 in Ecobee app.
- Obtain an API key from ecobee’s developer site:
- Log at ecobee.com, and click
 at the upper right.
 - Select Developer. On the followed page, you can see the API key. Copy the key.
 at the upper right.
Note
Do NOT leave or close the website. You will need it in the adding process.

- Tap
 on the bottom tab bar, and tap
  at the upper right.
 - The selected panel will automatically search the nearby devices.
- Select Ecobee 4 from the device list.
 on the bottom tab bar, and tap
  at the upper right.
4. Click the discovered Ecobee device. On the followed screen paste its API key to the box, and tap Submit.
5. The followed screen displays a PIN code. Copy the PIN, tap Go to PIN authorization, and login with your Ecobee username and password.


6. Turn to Ecobee web portal, navigate to  > My Apps > Add Application. Paste the PIN code into the box, and click Validate.
7. Tap Confirm on the next page.


8. Go back to BelaHome, and tap Next on the adding result screen.
9. Specify the device’s location, name it, and tap Finish.
Shelly switch
- Connect your Shelly device to power.
- Add the Shelly device in Shelly app.
- Connect Shelly to the same local network as your home center device.
- Tap
 on the bottom tab bar, and tap
  at the upper right.
 - The selected panel will automatically search the nearby devices.
- Select Shelly from the device list.
 on the bottom tab bar, and tap
  at the upper right.
4. Wait for the adding result, and tap Next.
5. Specify the device’s location, name it, and tap Finish.
Yeelight
- Connect your Yeelight to power.
- Add the Yeelight device in Yeelight app.
- Connect Yeelight to the same local network as your home center device.
- Tap
 on the bottom tab bar, and tap
  at the upper right.
 - The selected panel will automatically search the nearby devices.
- Select Yeelight from the device list.
 on the bottom tab bar, and tap
  at the upper right.
4. Wait for the adding result, and tap Next.
5. Specify the device’s location, name it, and tap Finish.
Somfy shade
- Connect your Somfy hub to power.
- Add the Somfy shade motor to its hub.
- Connect Somfy hub to the same local network as your home center device.
- Have the Somfy’s system ID and IP address available. To get the required information, do as the following.
- In Somfy App, tap the menu at the top left, select Integration, tap any ecosystems’ icon, and find the Current System ID.
- In Somfy App, tap the menu at the top left, and go to Info > IP Address;
- Tap
 on the bottom tab bar, and tap
  at the upper right.
 - The selected panel will automatically search the nearby devices.
- Select Somfy-Curtain from the device list.
 on the bottom tab bar, and tap
  at the upper right.
4. Enter the system ID and IP address you get in the Somfy app, and tap Next.

5. Wait for the adding result, and tap Next.
6. Specify the device’s location, name it, and tap Finish.
IKEA shade
- Make sure the battery of IKEA shade is fully charged.
- Put the shade into paring mode. You can refer to its guide for detailed instructions.
- Tap
 on the bottom tab bar, and tap
  at the upper right.
 - The selected panel will automatically search the nearby devices.
- Select IKEA-Curtain from the device list.
 on the bottom tab bar, and tap
  at the upper right.
4. Wait for the adding result, and tap Next.
5. Specify the device’s location, name it, and tap Finish.
Fibaro Hub
- Connect your Fibaro hub to power.
- Check the login credentials for Fibaro hub web interface. The default account and password can be found on the back of the hub.

3. Connect Fibaro hub to the same local network as your home center device. You can go to  > Network on the Fibaro hub web interface to check and change the connected network.
4. On the Fibaro hub web interface’s Network screen, select http or http/https.

- Tap
 on the bottom tab bar, and tap
  at the upper right.
 - The selected panel will automatically search the nearby devices.
- Select Fibaro Center from the device list.
 on the bottom tab bar, and tap
  at the upper right.
4. Enter the required information on the followed screen.
Note
- The URL format is http://IP/api/, e.g., http://192.168.1.102/api/. The IP is Fibaro hub’s current IP address.
- The username and password are the login credentials for Fibaro hub web interface.

5. Wait for the adding result.
6. Specify the device’s location, name it, and tap Finish.
Was this article helpful?
-20190329_%E5%89%AF%E6%9C%AC.png)