Auto-answer Configuration
Auto-answer feature allows the device to automatically pick up incoming calls without any manual intervention.
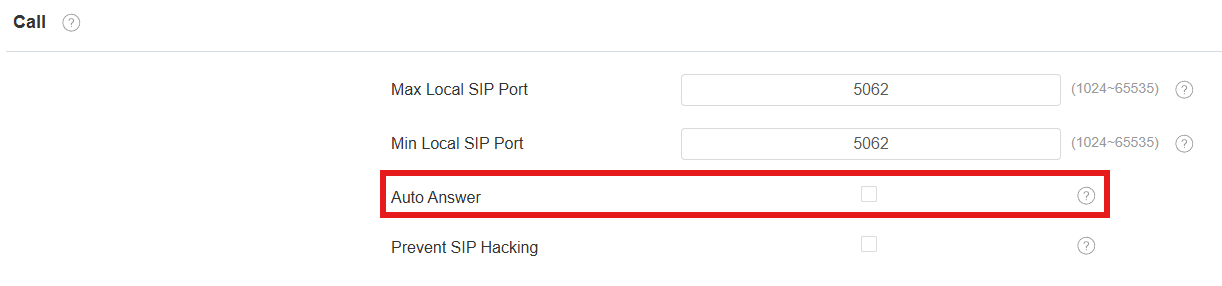
To enable the auto-answer feature, go to the web Account > Advanced > Call interface.
To set it up, go to the web Device > Call Feature > Others interface.
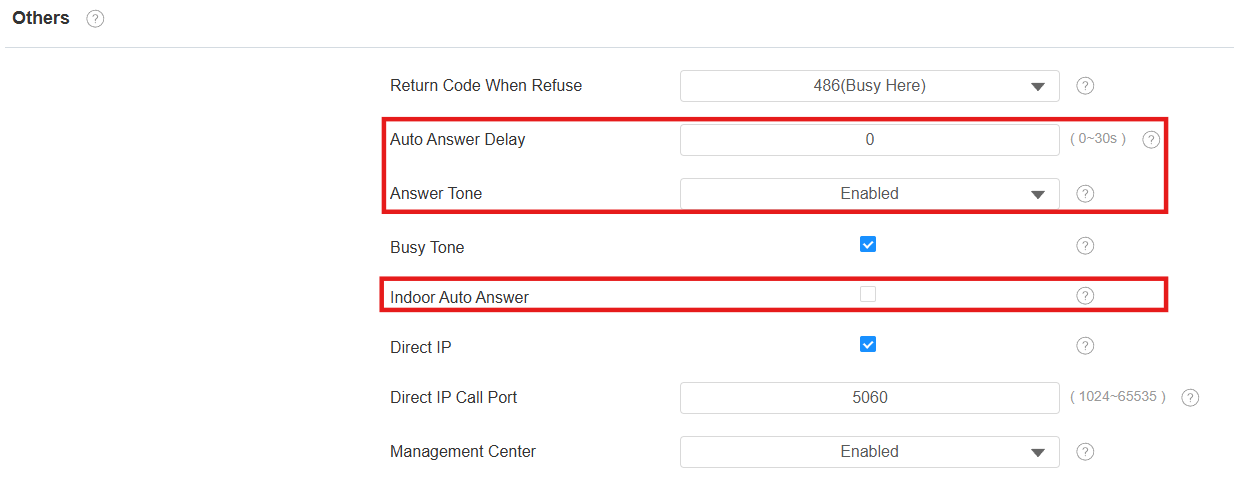
Auto Answer Delay: Set the time interval for the call to be automatically picked up after ringing. For example, if you set the delay time to 5 seconds, the device will answer the call automatically after 5 seconds.
Answer Tone: Select the tone for answering calls automatically.
Indoor Auto Answer: Allow calls from other indoor monitors to be answered by the device automatically.
Other Options:
Return Code When Refuse: Decide the code sent to the caller side via the SIP server when rejecting the incoming call.
Busy Tone: Decide whether to sound a busy tone when a call is hung up by the callee.
Management Center: Decide whether to generate the contact labeled Management Center.
When the device is deployed on the SmartPlus Cloud, the cloud system will issue the SmartPlus Property Manager App and the guard phone R49 as a contact labeled Management Center. When this function is disabled, the PM App and guard phone will be displayed as contacts separately.
When the device is deployed on the SDMC, SDMC is shown as Management Center on the device screen. When the function is disabled, no contacts will be displayed as Management Center.
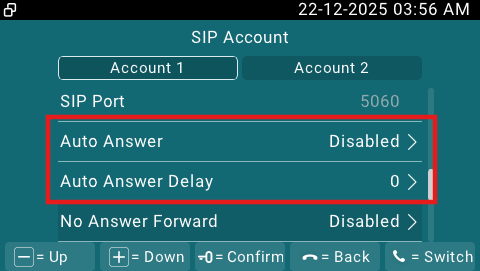
You can also set up the auto-answer feature on the Settings > Advanced > SIP Account screen.
Auto-answer Allowlist Setting
Auto-answer can only be applicable to the SIP or IP numbers that are already added in the auto-answer allow list of your indoor monitor. Therefore, you are required to configure or edit the numbers in the allow list on the web interface.
To set it up, go to the Device > Call Feature > Auto Answer AllowList interface. Click +Add to add the allowed device.
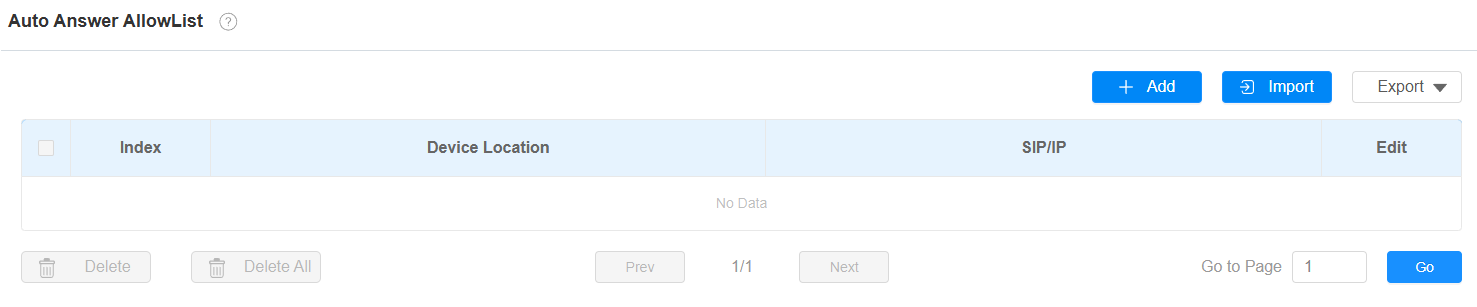

Device Location: Specify the allowed device’s name or location.
SIP/IP: Enter the allowed device’s SIP or IP number.
You can import and export the auto-answer allowlist for quick setup.

Note
SIP/IP number files to be imported or exported must be in either .xml or .csv format.
SIP/IP numbers must be set up in the contacts of the indoor monitor before they can be valid for the auto-answer function.
Intercom Preview
To see the image at the door station before answering the incoming call, you can enable the intercom preview function on the web Device > Intercom > Intercom interface.

Intercom Preview: It is disabled by default. When it is enabled, the group call is not available. Enabling the Intercom Preview option or not depends on whether the other party features RTSP.
For devices without RTSP: Enable this option. The indoor monitor will automatically answer incoming calls and display the live stream on the preview screen.
For devices with RTSP: Disable this option, as RTSP already provides real-time audio and video for intercom preview.
Multicast
The Multicast function allows one-to-many broadcasting for different purposes. For example, it enables the indoor monitor to announce messages from the kitchen to other rooms or to broadcast notifications from the management office to multiple locations. In these scenarios, indoor monitors can listen to or send audio broadcasts.
Click here to watch the demonstration video.
To set it up, go to the web Device > Multicast interface.
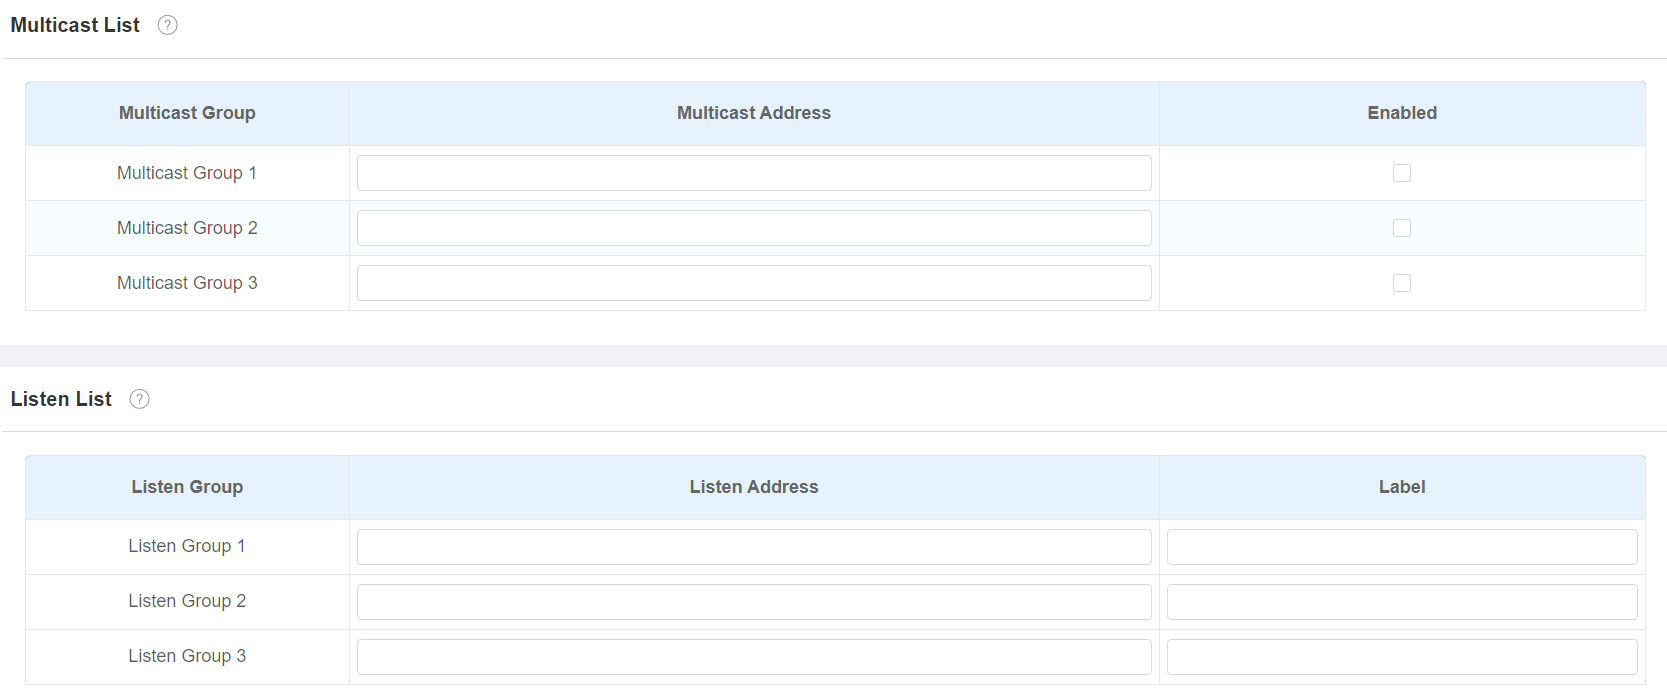
Multicast Address: The multicast IP address is the same as the listen address.
Listen Address: The listen address is the same as the multicast address.
Label: The label name will be shown on the calling screen.
Note
The multicast address entered should be within the specific range and not all multicast IP addresses are valid. Please consult Akuvox tech team for more information.
Call Forwarding
Call Forward is a feature that allows for transferring incoming calls to another number. Users can set up call forwarding according to different situations, such as always forwarding calls, forwarding calls when the indoor monitor is busy, or when it doesn’t pick up the call.
On the Device
To set it up for SIP calls, go to the Settings > Advanced > SIP Account screen.
To set it up for IP calls, go to the Settings > Advanced > Direct IP screen.
You can enable/disable the call forward feature, but not set the target numbers on the device screen.
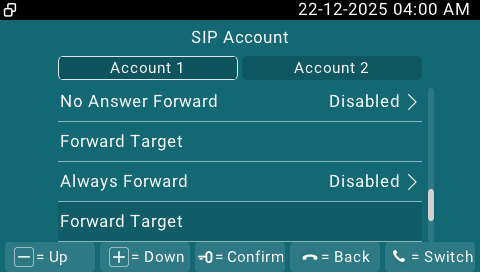
Always Forward: All incoming calls will be automatically forwarded to a specific number.
Busy Forward: Incoming calls will be forwarded to a specific number if the device is busy.
No Answer Forward: Incoming calls will be forwarded to a specific number if the call is not picked up within the no-answer ring time.
Forward Target: Display the forward number that is configured on the web interface.
No Answer Ring Time(Sec): The time ranges from 0-120 seconds. This option is available when No Answer Forward is enabled on the web interface.
On the Web Interface
Set up the forward function on the web Device > Call Feature > Call Forward interface.
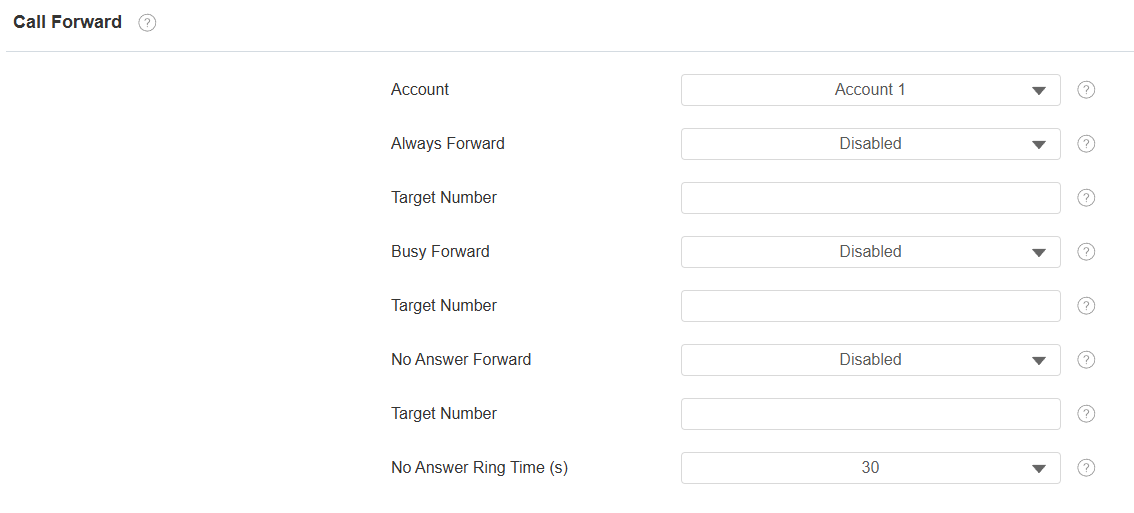
Account: The account or direct IP call to implement the call forwarding feature.
Always Forward: All incoming calls will be automatically forwarded to a specific number.
Busy Forward: Incoming calls will be forwarded to a specific number if the device is busy.
No Answer Forward: Incoming calls will be forwarded to a specific number if the call is not picked up within the no-answer ring time.
Target Number: The specific forward number when Always Forward, Busy Forward, or No Answer Forward is enabled.
No Answer Ring Time(s): The time ranges from 0-120 seconds.