Call Auto-answer Configuration
Auto-answer feature allows the device to automatically pick up incoming calls without any manual intervention. You can also customize this feature by setting the time duration for auto-answering and choosing the communication mode between audio and video.
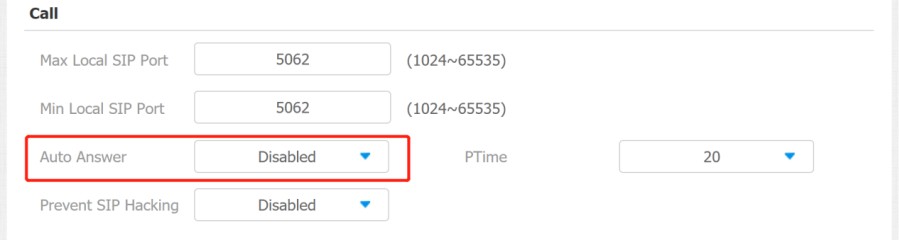
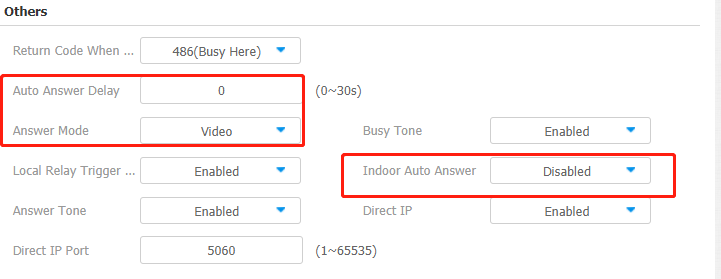
To enable or disable on web Account > Advanced > Call > Auto Answer interface. And set up the corresponding auto-answer parameters on the web Phone > Call Feature > Others interface.
Parameter Set-up:
-
Auto Answer Delay: set up the delay time (from 0-30 sec.) before the call can be answered automatically. For example, if you set the delay time as 1 second, then the call will be answered in 1 second automatically.
-
Answer Mode: set up the video or audio mode you preferred for answering the call automatically.
-
Indoor Auto Answer Mode: turn on the Auto Answer function for calls from other indoor monitors by ticking the check box.
Auto-answer Allow List Setting
Auto-answer can only be applicable to the SIP or IP numbers that are already added in the auto-answer allow list of your indoor monitor. Therefore, you are required to configure or edit the numbers in the allow list on the web interface.
Navigate to Security > Allowlist interface.
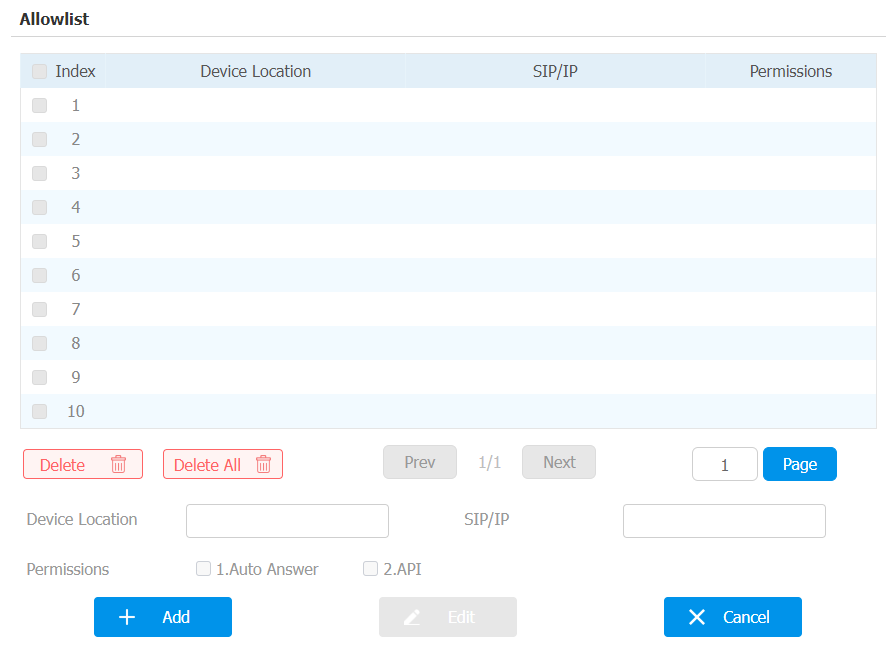
SIP/IP numbers can be imported to or exported out of the indoor monitor in batch on web Security > Allowlist interface.

-
SIP/IP number files to be imported or exported must be in either .xml or .csv format.
-
SIP/IP numbers must be set up in the phone book of the indoor monitor before they can be valid for the auto-answer function.
Live Stream Setting
The Receive Live Stream function enables the indoor monitor to view the one-way video stream from the calling party, regardless of whether the call is audio or video. Meanwhile, the video feed from the indoor monitor is not transmitted to the calling device, protecting the privacy.
To do the configuration on web Phone > Call Feature > Audio Call Settings interface.

When the feature is enabled, once a caller requires a video call:
-
Receive the incoming calls in video call mode so that both sides can see each while talking in the two-way video conversation.
-
Receive the incoming calls in audio call so that you can see the caller in the one-way video conversation while the call can not see you.
- Only devices with camera module will have this feature.
Intercom Call Configuration
If you want to see the image at the door station before answering the incoming call, you can enable the intercom preview function on web Phone > Call Feature > Intercom interface.

Parameter Set-up:
- Intercom Preview: enable the incoming call preview function.
PTime Configuration
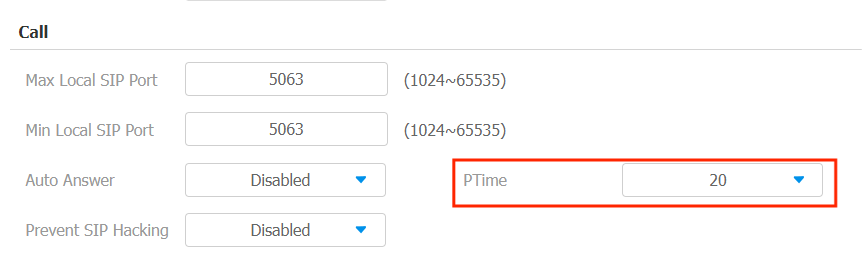
Ptime gives the length of time in milliseconds represented by the media in a packet. The SDP in the INVITE request sent by the calling party carries the Ptime attribute, which indicates that the packing duration of the calling party's media is the value carried by Ptime. After receiving the request message, the server replies with the Ptime attribute in the SDP in 200 OK, indicating that the server-side support for the packaging time of the media is the value carried by Ptime. The caller negotiates according to the Ptime attribute carried in the SDP in the 200 OK, and finally sends the media package time, that is, the Ptime value.
To set it up, go to Account > Advanced > Call interface.
Parameter Set-up:
- PTime: you can disable the PTime feature. Or set up it from 10 to 60 seconds.
SIP Hacking Protection
Internet phone eavesdropping is a network attack that allows unauthorized parties to intercept and access the content of the communication sessions between intercom users. This can expose sensitive and confidential information to the attackers. SIP hacking protection is a technique that secures SIP calls from being compromised on the Internet.
To set it up, go to Account > Advanced > Call interface.
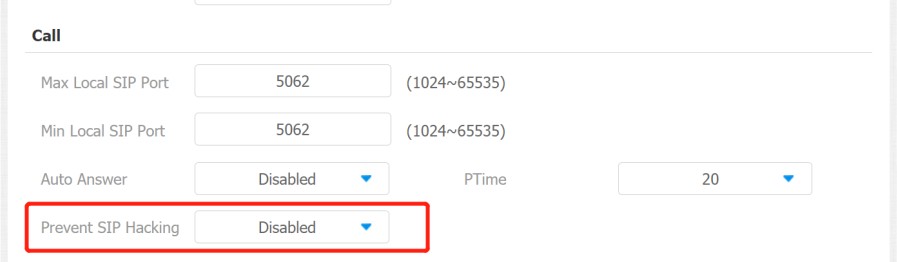
Parameters Set-up:
- Prevent SIP Hacking: enable to activate this feature during using sip call. This feature is only available for SIP calls.
Emergency Call Setting
The Emergency Call function is designed for urgent situations, particularly beneficial for the elderly and children. Users can display the SOS button on the indoor monitor’s screen. When the button is pressed, the device automatically calls the designated emergency contacts, ensuring quick help when needed.
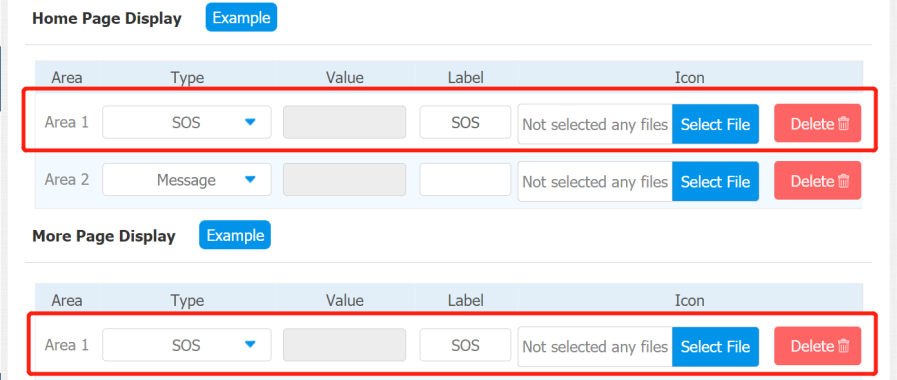
SOS Number Display
To display SOS softkey on web Phone > Key/Display > Home Page Display interface. The icon will be shown in the main interface or more interface after configuring.
SOS Number Settings
To set up SOS numbers on device web Phone > Intercom interface.
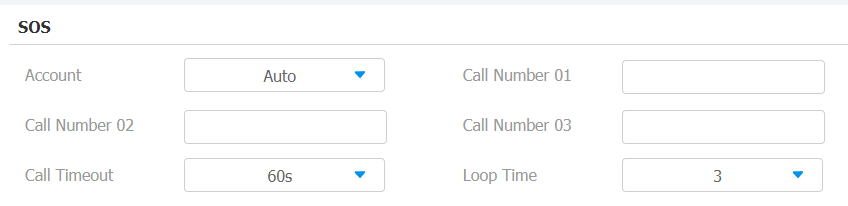
Parameter Set-up:
- Account: Select the account you want to make SOS from account 1 or account 2.
- Call Number: To set up 3 SOS numbers. Once users press SOS key on the home screen (SOS display key shall be set on the web manually), indoor monitors will call out the number in order.
- Call Timeout: Set up the timeout for each number. Once users call out, if the other side does not answer within the timeout, indoor monitors will continue to call the next number.
- Loop Times: To set up times of re-dialing.
RF Setting (Optional)
To set it up on the device Advance Settings > RF Settings screen.

Parameters Set-up:
-
Short Press When Idle: if you choose Assistance Call for short pressing, which means when you press the pendant for about 1s, the indoor monitor will make the pre-configured emergency call. No Action is default.
-
Long Press: if you choose Unlock1/2/3 for long pressing, which means when you press the pendant for about 3s, it will send out an unlocking signal to the door phone during a call.
Multicast Configuration
The Multicast function allows one-to-many broadcasting for different purposes. For example, it enables the indoor monitor to announce messages from the kitchen to other rooms or to broadcast notifications from the management office to multiple locations. In these scenarios, indoor monitors can listen to or send audio broadcasts.
Click here to watch the demonstration video.
To configure it on web Phone > Multicast interface.
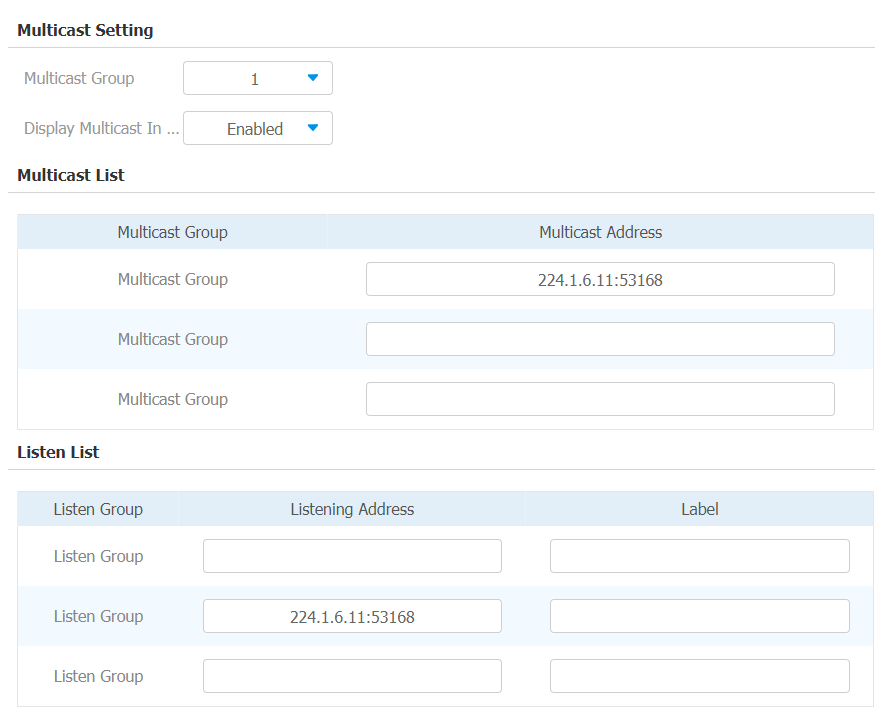
Parameter Set-up:
-
Multicast Group: set the indoor monitor in one of the groups or disable this function.
-
Display Multicast In Homepage: if you disable it, the All Call on the left side of the device screen will be hidden.
-
Multicast List: to fill in the parameters of the multicast group. Indoor monitor will establish multicast calls to other indoor monitors which are set in the multicast group.
-
Listen List: to fill in the parameters of listen group. Indoor monitor will receive multicast calls if some indoor monitors call the listening group.
-
Label: to show the label name on the calling interface if users establish all calls.
Call Forwarding Setting
Call Forward is a feature that allows for transferring incoming calls to another number. Users can set up call forwarding according to different situations, such as always forwarding calls, forwarding calls when the indoor monitor is busy, or when it doesn’t pick up the call.
Call Forwarding Configuration on the Device
To do the configuration on the device Settings > Call Feature interface.
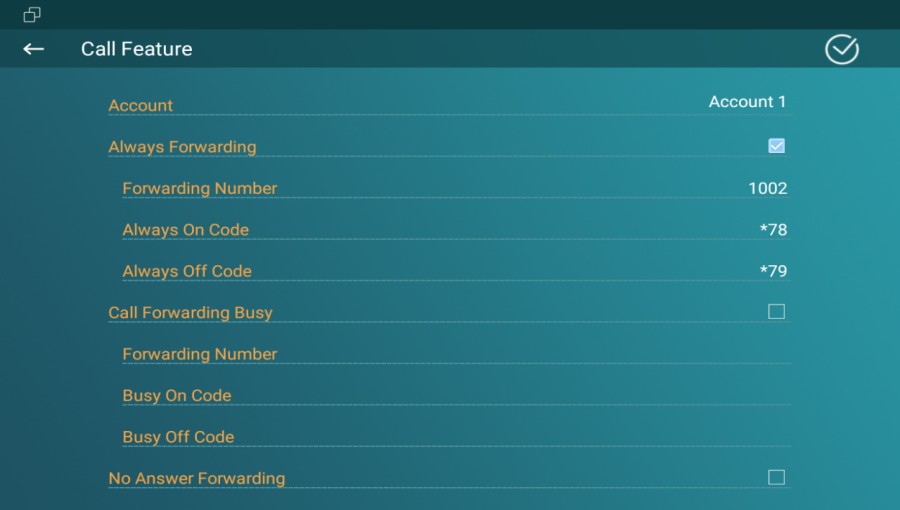
Parameter Set-up:
-
Account: to choose which account to implement the call forwarding feature.
-
Always Forwarding: all incoming calls will be automatically forwarded to a specific number.
-
Call Forwarding Busy: incoming calls will be forwarded to a specific number if the device is busy.
-
No Answer Forwarding: incoming calls will be forwarded to a specific number if the device is not picked up within the no answer ring time.
-
Forwarding Number: To enter the specific forward number if the device enables always forward/busy forward/no answer forward.
-
Capture Path: select the storage location for all the captured pictures.
Call Forwarding Configuration on the Web Interface
To set up forward function on web Phone > Call Feature > Forward Transfer interface.
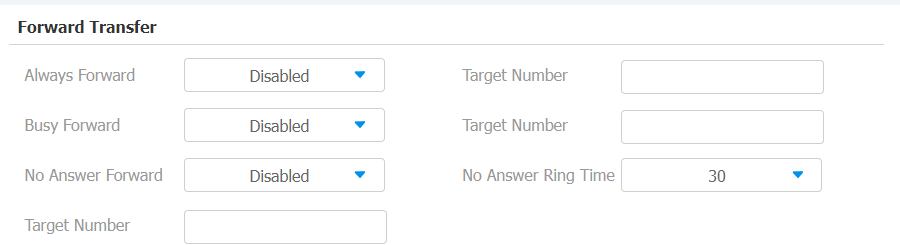
Parameter Set-up:
- Always Forward: all incoming calls will be automatically forwarded to a specific number.
- Busy Forward: incoming calls will be forwarded to a specific number if the device is busy.
- No Answer Forward: incoming calls will be forwarded to a specific number if the device is not picked up within no answer ring time.
- Target Number: to enter the specific forward number if the device enables always forward/busy forward/no answer forward.
- No Answer Ring Time: set the number of seconds to wait for call pick-up before transferring to a designated number (0-120 seconds).