- 08 May 2024
- Print
- DarkLight
- PDF
Akuvox V6.7.3 SmartPlus Installer Guide - Single tenant
- Updated on 08 May 2024
- Print
- DarkLight
- PDF

Date: May. 2024
About This Manual
This manual is intended for installers who need to manage single-family houses, single-tenant residents, devices, remote maintenance services, and more on the Akuvox SmartPlus platform (Version 6.7.3).
For more information, please visit http://www.akuvox.com/ or consult Akuvox technical support.
What's New:
- Support configuring external relays for indoor monitors;
- Support setting residents' permission to view monitoring;
- Support sending e-mails to users in Azerbaijani.
System Overview
Akuvox SmartPlus is a cloud-based platform on which the installer can conduct integrated management of residents, devices, relays, and remote maintenance services both on a single-tenant basis and a community basis (multi-tenant).
- Installers using this platform will be able to:
- Add, edit, and delete the devices and residents in the single-tenant management.
- Add, edit, and delete the communities, buildings, apartments, devices, and residents in the multi-tenant management.
- Deploy and set up devices and relays for access control.
- Check and upgrade device firmware for the residents.
- Check and manage the MAC library.
- Conduct remote operations such as Auto-provisioning, device reboot, transmission type modification, and remote maintenance.
- Download the related technical manual and get access to the Akuvox ticket system for technical support.
- Subscribe and renew Akuvox SmartPlus.
Log into SmartPlus
You can log into the SmartPlus platform using the user account information you obtain from your distributor.
- Open the web browser, enter the address (URL) of the SmartPlus server location in your area, and press Enter.
- Enter your username and password.
- Click on Login to log into the SmartPlus platform.

- You can click on Log out in the upper right corner to log out of the SmartPlus platform.
.png)
Prior to the Management
It is advised that you go through what is listed below before you start your management.
- Check if all of the device MAC addresses have already been registered by your distributor.
- Check if the firmware in your devices supports cloud mode with no connection to SDMC.
- Check if your device is powered on and is connected to the internet and make sure that the network is normal.
- Check and make sure that your resident information and device information are correct.
Single-Tenant Manager Main Interface
The single-tenant manager main interface consists of 9 modules that are incorporated as a whole to allow you to manage single tenants, and devices in terms of adding residents and binding corresponding devices to the residents, etc.

Module Description
No. | Modules | Description |
1 | User | Allows you to add users along with the devices. |
2 | Device | Allows you to search and check the device information. |
3 | Firmware | Allows you to check device firmware information. |
4 | Update | Allows you to update the firmware version for the specific device. |
5 | Message | Allows you to create and send messages or notifications to the targeting users. |
6 | MAC Library | Allows you to manage the MAC in the MAC library. |
7 | Setting | Allows you to select the payer for the Akuvox SmartPlus. |
8 | Subscription | Allows you to pay for the SmartPlus service activation and renewal, pay for the extra family member account, and so on. |
9 | Payments | Allows you to check for the information related to transactions made. |
Single-Tenant Resident Management
The Single-Tenant resident management mainly deals with the addition, deletion, and edition of the user account, the user’s family member account, and devices you added for the residents.
User Account
Add User
The User module is where you can add the resident’s user accounts.
1. Go to the User module and click on New.
.png)
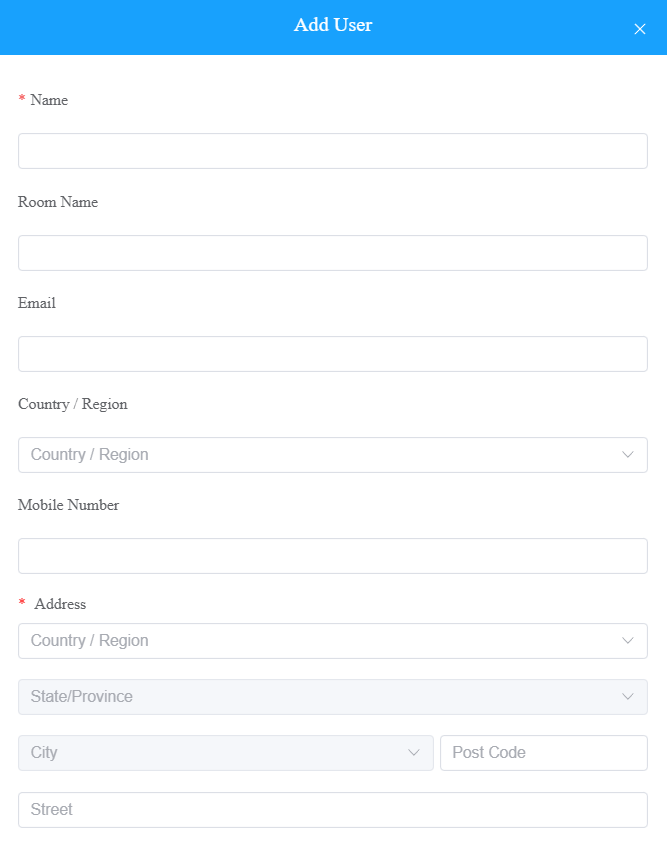
2. Fill in resident information properly.
.png)
User Account Information Description
No. | Filed Name | Description |
1 | Name | Fill in the user name. |
2 | Room Name | Fill in the user’s house name provided by the user, or you can customize the room name eg. “Ryan’s Home” |
3 | Fill in the user’s email address. | |
4 | Country/Region | Select the country or region code of the user. |
5 | Mobile Number | Fill in the user’s mobile phone number. The area code will be displayed before the mobile number. |
6 | Address | Fill in the user’s address based on which the indoor monitor can access local weather conditions. The temperature and weather conditions will be displayed on the device's home screen. The following devices with specific firmware versions support the feature.
|
7 | SIP Call Or IP Call | Select “All my devices were installed in the same place (villa or house)” for IP call if all of the user’s intercom devices are in the same LAN ( Local Area Network). If not, select “Some of my devices were installed in a different place (villa or house)” for the SIP call. |
8 | Time Zone | Select the time zone of the user. |
9 | Language | Select the language of the emails notifying the user of the account information. The following languages are supported: English, Traditional Chinese, Simplified Chinese, Korean, Japanese, Turkish, Polish, Russian, Spanish, Bosnian, Danish, Vietnamese, French, Portuguese, German, Italian, Ukrainian, Hebrew, Persian, and Azerbaijani. |
10 | Landline 1/2/3 | Fill in the user’s landline numbers, e.g. mobile phone numbers or telephone numbers. Three landline numbers are supported. The area code will be displayed before the landline number. |
11 | Home Automation | If you turn this feature on, the Smart Home icon Note: if the home automation is turned on, the premium plan will be dimmed and cannot be selected. |
Premium Plan | Premium Plan includes landline service and third-party camera service. Note: You should turn on the premium plan if you want to add a third-party camera. The Premium plan status and its expiration time are displayed on the User interface. | |
13 | Landline Service | Switch on/off the landline service (communication between telephone/mobile phone and intercom devices). |
Smart home icon:

Add User Family Account
After a user account is created and activated, you can create family accounts at the request of users. In general, one family has one host account and three family accounts.
1. Click  of specific users for whom you want to add a family account.
.png)
2. Click New, and fill in the family member account information.


Edit, Reset, and Delete User
When you are editing the user account information, you can not only search, edit, and delete the user account, but also reset the account password at the request of users.
- Search and find the user by Name, Email, Mobile Phone Number, Family SIP Number, or SIP number.
- Do any of the following:
- Click
 to reset the user's account.
(1).png)
- Click OK to reset the user’s account. Once reset, some data will be deleted while some will not.
- Data to be removed including
- Family member accounts.
- Emails, mobile numbers, country/region, and landlines.
- Logs(audit logs excluded) and histories.
- Messages and alarms; and
- Accessing settings, including PIN, face data, NFC, Bluetooth, and QR Codes.
- Data to be kept including
- Family master account status, such as inactivated, expired, and so on.
- The number of free sub-accounts.
- Audit logs.
- Settings include Call Or IP Cal, time zone, language, home Automation, premium plan, and the With Indoor Monitor feature.
- Other changes including
- The user’s app changes to be unregistered and needs to be re-initialized.
- The user’s login credentials are reset, and the user is not going to receive the reset email.
- Click
 to edit the user’s information, and click on Submit to save the changes.
.png)
- Scroll down the editing page, click on Delete to delete the user's account, and click on Reset Password to reset the account’s password.
(1).png)
- The user time zone will be synchronized with the installer time zone if the time zone is not selected.
- It is free to create a new account in the family after resetting, while it charges after deleting. The resetting feature is suitable for rental scenarios, you can empty the accounts after the tenants move out and create accounts for the new ones.
- You cannot edit the mobile phone number, email number, and area code of user accounts that have linked sites.
Edit and Delete Family Account
1. Search and find the user by Name, Email, Mobile Number, and SIP Number.
2. Click on  of specific users for whom you want to delete a family account.
(1).png)
3. Edit or delete the specific family account by clicking .png) or
or .png) .
.

Device Management
Add Device for Users
After the user account is created, you can start adding the device(s) and third-party camera for the specific user. However, you need to make sure that all the devices have been added to your distributor’s MAC library.
1. Go to User Module.
2. Click on  of the user you want to add an intercom device or third-party camera for.
(1).png)
3. Add a device for the users.
- To add intercom devices, click Intercom Devices, then click New to add the device.

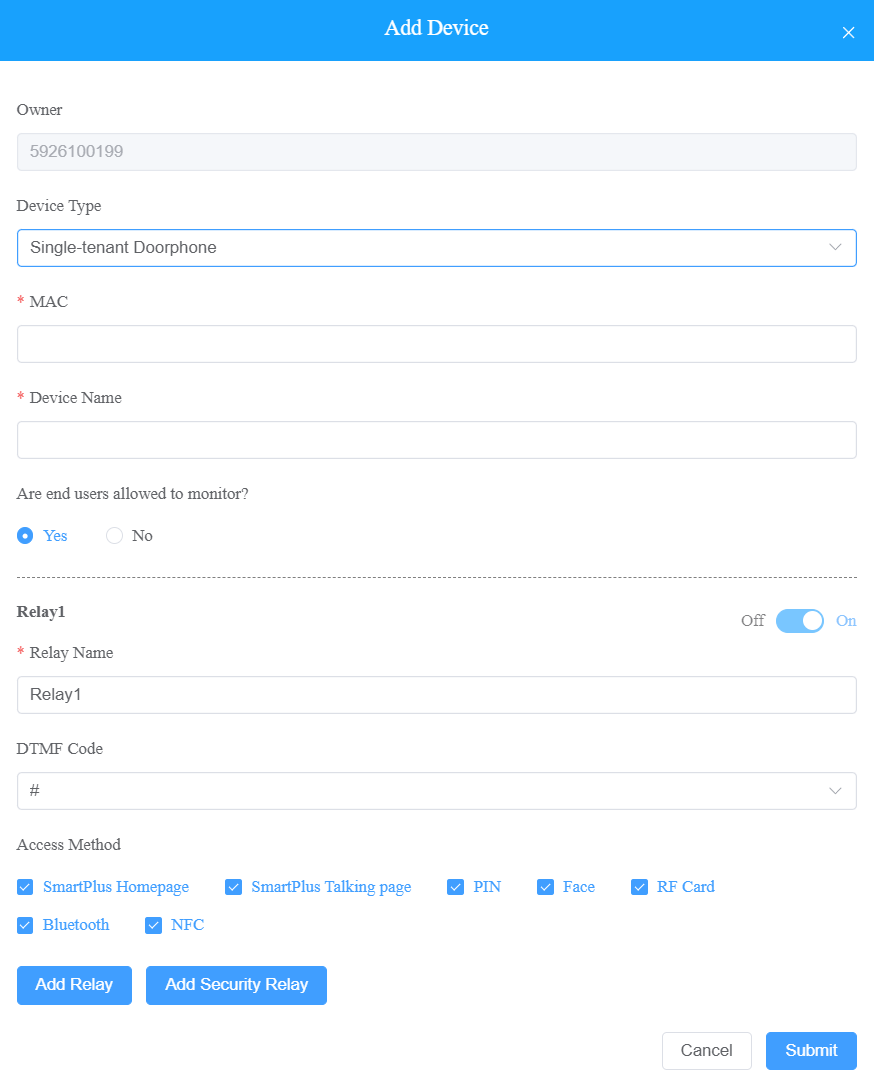
| Regardless of what type of the device is, device type, MAC address, and device name need to be set up. | ||
No. | Field Name | Description |
1 | Device Type | Select the device type. |
2 | MAC | Type in the device's MAC address. |
3 | Device Name | Name the device to distinguish it from others. |
| To add a door phone or an access control terminal, the following options should be additionally configured. | ||
| 1 | Are end users allowed to monitor? |
|
2 | Does the device have internet access? |
|
3 | IP Address | When No is selected in Does the device have internet access, you need to enter the static IP address of the indoor monitor that transfers calls for the door phone. |
4 | Relay Name | Fill in the relay name, which can be the device location. |
5 | DTMF Code | Enter the DTMF code for the door access. |
6 | Access Method | Select specific unlock methods to trigger the desired relay. For example, if you select PIN in Unlock type for Relay1 and select RF Card for Relay2 when users enter PIN codes on the door phone, only Relay1 will be triggered and vice versa. So far, only door phones R28 with firmware version 28.30.10.7 and above and X912 with firmware version 912.30.10.204 and above support this feature.
|
7 | Add Relay | You can add more relays if needed. |
8 | Add Security Relay | Add the security relay if the door phone is connected to an Akuvox SR01 security relay for the door unlock control. |
| To add an indoor monitor, the following options should be additionally configured. | ||
| 1 | Arming Function | When enabled, the arming icon will be available on users' SmartPlus Apps for arming and disarming. |
| 2 | Relay | Turn on or off the device's built-in relay and name the relay. |
| 3 | External Relay | When the device is connected to an external relay, enable this option. Note: So far, ONLY S567 with the firmware version 567.30.12.3 and above supports connecting to external relays. |
| 4 | External Relay Type | Select the relay type between Akuvox-MK485-G2R-8J8C V3.0 and HF-8000. The former supports up to 8 relays and the latter up to 4. |
| 5 | External Relay Mode |
|
| 6 | IP Address | When Ethernet is selected as the external relay mode, enter the IP address. |
| 7 | Port | When Ethernet is selected as the external relay mode, enter the port. |
| 8 | Relay Name | Name the external relay to distinguish it from others. |
| 9 | Relay Function | Define the relay function according to the device connected to the relay. |
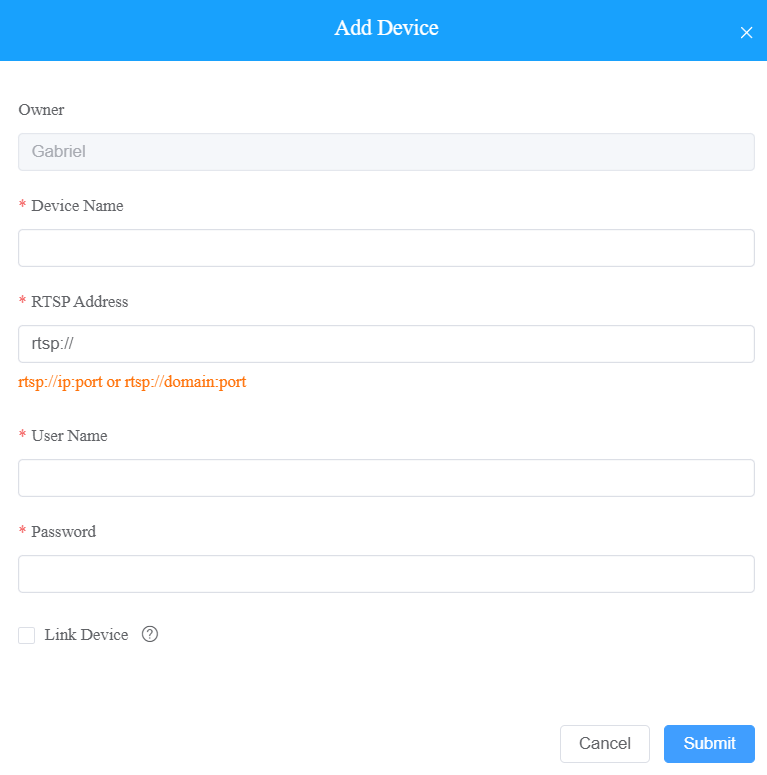
- To add the third-party camera, click Third-party Devices and then New to add the camera.
No. | Field Name | Description |
1 | Owner | Display the owner of the camera. |
2 | Device Name | Name the device to distinguish it from others. |
3 | RTSP Address | Type in the third-party RTSP URL in the Format, e.g., rtsp://ip:port or rtsp://domain:port. It is used to obtain the camera image. Note: RTSP URL formats may vary by third-party camera manufacturers. |
4 | User Name | Enter the authentication username provided by a third-party camera manufacturer. |
5 | Password | Enter the authentication password provided by a third-party camera manufacturer. |
6 | Link Device | You can link third-party cameras with intercom devices. When they are linked, you can tap the door phone camera icon on the SmartPlus app, then you can change between the door phone camera view or third-party camera view. And the third-party camera icon will not be displayed on the app. Note: When linking the camera with door phones, make sure they are in the same local network (LAN). |
Edit and Delete User’s Device
You can edit or delete the user’s intercom device and third-party camera.
Edit or Delete Intercom Devices
1. Go to the User screen.
2. Search and find the user by Name, Email, Mobile Number, and SIP Number if needed.
3. Click the user’s device .
.
.png)
4. Edit or delete the user’s device.

- To delete the user’s device, click
 .
. - To edit the user’s device, click
 .
.
You can also delete the intercom device on the Device module.

Delete Third-Party Camera
- Go to the User module.
- Search and find the camera by device name.
- Click
 or
or to edit or delete the camera.

You can also delete the third-party device on the Device module.

Batch AutoP for Devices
You configure the intercom devices remotely via auto-provisioning. You have two options: Regular auto-provisioning or One Time auto-provisioning.
1. Go to User module, click the user’s device and select Intercom Devices.
2. Click AutoP.
 3. Select your AutoP type.
- If you want the configuration to be always valid, select Regular AutoP.
- If you want the configuration to be valid for one time only, select One Time AutoP.
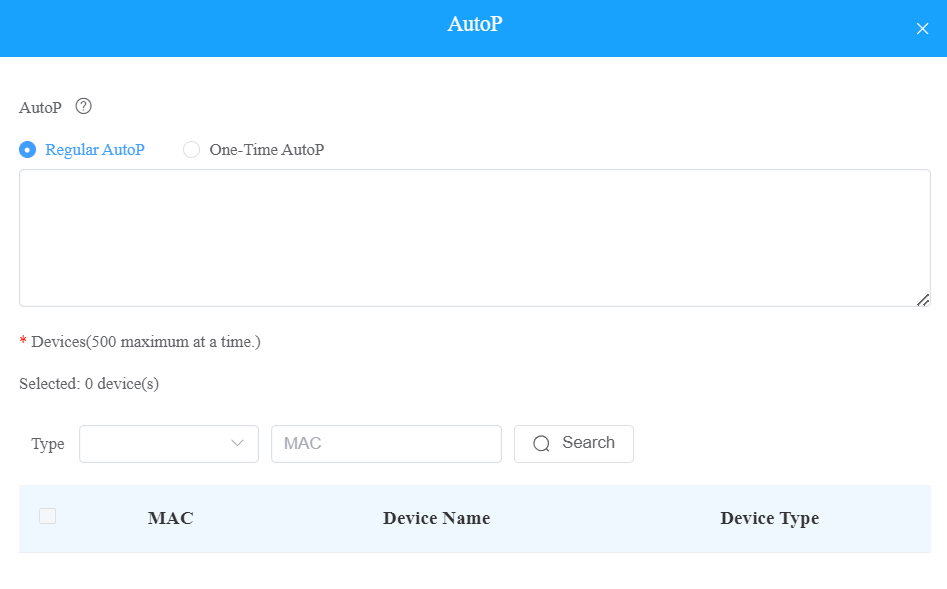
4. Enter the AutoP commands you need.
5. Search and select the devices to be provisioned, then click Submit. You can synchronize the commands to 500 devices maximum at a time.
- Duplicate commands will not be retained.
- One-time AutoP commands will not be valid once you reset the device(s) either for factory reset or configuration reset.
Remote Maintenance
You can provide residents with remote maintenance in terms of device data transmission type configuration, device reboot, device web interface remote control, device provisioning, etc.
1. Click on User module.
2. Click on of the desired user.
(1).png)
3. Click on , then click on Settings.

4. Reboot, reset, or log into the device web interface remotely via remote control.
5. Enter the commands for the Auto-provisioning, then click on Submit.

6. Click on One-Time Autop if only you want the Autop command(s) to be implemented one time.

- One-time Autop allows you to carry out the Autop command(s) only one time with no repetition.
- Duplicate commands will not be retained.
Manage MAC Library
When you obtain the device's MAC address, you need to add and store it in the MAC library as a record. You can also search and check for all the MAC addresses that are bonded or not bonded with the users.
Add MAC to MAC Library
You can add the MAC to the MAC library manually or using a template.
- Add MAC Manually
- Go to MAC Library Module.
- Click on New and fill in the device MAC.

- Add MAC using Template
- Click on Import.
- Select the MAC template from your personal computer and upload it.

- MAC Template

- The MAC Template can be obtained from your distributor.
Remove the MAC from the MAC Library
- Search the device by MAC.
- Remove the device from your MAC library.

- If the device is bound with the user, you are required to unbind them before you are allowed to remove the device MAC from the MAC library.
Firmware Management
You can check and update your device firmware version in the Firmware module and Update module respectively.
Check Firmware List
Before you start updating your device firmware, you can go to Firmware module to check the latest firmware that is available for uploading.

Firmware List Description
No. | Field Name | Description |
1 | Version | Displays the firmware version number. |
2 | Model | Displays the device model. |
3 | Version Log | Generally displays remarks on the version. |
4 | Created Time | Displays when the firmware is uploaded. |
5 | Action | Click to check the detailed firmware information. |
Update Firmware
You can update the device firmware to the firmware version you selected according to the update timing you defined.
1. Go to Update Module.
2. Click on New.

3. Select the device model and the firmware to be upgraded to.
4. Select the specific device(s) and update time.
5. Select Reset After Upgrade if needed.

Check/Edit Firmware Update List
After you update your device firmware, you can not only check your firmware update status but also edit the update setting for devices pending the upgrade. And you can delete the specific record as well.
- Go to the Update module.
- Search the firmware status by All, Pending, Processing, and Executed.
- Edit the update set for the devices pending the update.
- Delete the specific update record if needed.

Update List Description
No. | Field | Description |
1 | Version | Displays the firmware version number in the update list. |
2 | Device | Displays the device model in the update list. |
3 | Status | Displays update status: “Pending” for the firmware that will be updated according to the updating timing. “Executed” for the firmware that has finished updating, and “Processing” for the firmware that is being updated. |
4 | Update Time | Displays when the firmware is updated. |
5 | Created Time | Displays when the update setting is created. |
6 | Action | The action involves the update setting alteration and update record removal. |
- After you initiate the specific firmware update, you need to click
 to update the firmware list.
Message
The message module allows you to send messages to the users (residents) for notifications regarding the device and firmware management etc.
Create and Send Messages
1. Go to the Message module.
2. Click on New.

3. Fill in your message information.
4. Set up your message receiver type (device or apps), and select the users to whom you want to send the message.

Check/Delete Messages
You can search and check messages that have been sent to the residents if needed.
1. Search the message by Message or Receiver.

2. Click on  to see the details of the messages.
3. Delete the messages if needed.

Setting
The subscription fee can either be paid by the end users or the installers, if you select Pay by End User then the user will be allowed to pay for activation and renewal of the Akuvox SmartPlus service. The installer, however, will still be able to pay for the subscription when Pay by End User is selected.
- Go to the Setting module.
- Select the payer between the end user and the installer.
- Select if you want to send a notification email to the users when the service is reaching its expiration.

Subscription
You can pay the subscription fee for the service activation, service renewal, and property manager Smartplus app service.
- Click Subscription module.
- Click Active
 . Then select the desired users.


Billing Information Description
No. | Filed Name | Description |
1 | Company/Family | Fill in the distributor company. |
2 | ATTN | Fill in the name of the distributor. |
3 | Address | Fill in the address of the distributor. |
4 | TEL | Fill in the telephone number of the installer. |
5 | Fax | Fill in the Fax number of the installer. |
6 | Fill in the mail of the distributor. |
Renew Service
To renew services for users.
1. Click Subscription module.
2. Click Renew .
.
3. Select the desired end users.
 4. Choose to renew manually or automatically.
- Renew Manually:
Select Manual and the renewal period with a maximum of 5 years.

- Renew Automatically: Renewal occurs every 30 days and extends the account's upcoming expiration date by 30 days.
Select Auto Renew Monthly(30 days) and the Renew Times that decide how many months the renewal lasts.
 5. Click Next and pay for the bill.

- Coupons are not supported for Auto Renew.
- After two consecutive failed charges, the automatic renewal will be deactivated, and you will be notified by email.
- The expiration email will not be sent to the property managers and end users when the Auto Renew service is activated for their apartments.
Automatic Payment Records
On the Subscription module, you can check the automatic payment records including Auto Renew settings, total prices, etc.

Transaction History
The Payments module allows you to search, check, and delete the transaction history following the user account activation and renewal. You can also download the invoice if needed.
Check and Transaction History
After the payment is made, you can check the details of the transaction if needed.
1. Check the transactions by the service type, status, and order number.

2. Click on  of the transaction you want to check and download the invoice if needed.

3. Delete the specific transaction order if needed.
Search Description
No. | Field Name | Description |
1 | Type | Four types:
|
2 | Status | Seven types of status:
reaching the time out.
|
3 | Order Number | Shows the transaction order number. |
Customer Service Contact Management
Customer service on the SmartPlus web interface involves installer contact information management and technical support service information.
Modify Customer Service Contact
You can create and modify your contact information so that customers can be in contact with you whenever they need it.
1. Click on your installer account in the upper left corner of the interface.

2. On the drop-down menu, select Customer Service, and fill in your phone number and email.
3. Modify the information if needed.
4. Enable Receive Feedback if needed and end users' feedback will be sent to the email address that you fill in.

Set Account Access permission
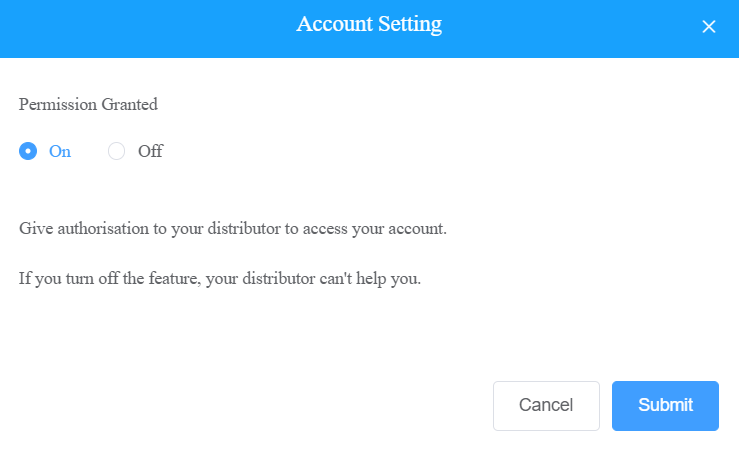
You can grant permission to your distributor to log in to your account without a password. With permission, distributors can switch to your account from their web portal to give you support or assistance. The account setting option will be displayed in the drop-down list once the distributor enables the account access feature. You can turn on or off the permission whenever you need.
- In the upper right corner, click your account. A drop-down list is displayed.
- Click Account Setting.
- Turn on or off the permission based on your need.
- The account setting will only appear once your distributor enables the account access feature. By default, the Permission Granted feature is turned off.

Contact Us
For more information about the product, please visit us at www.akuvox.com or feel free to contact us by
Sales email: sales@akuvox.com
Technical support email: support@akuvox.com
Telephone: +86-592-2133061 ext.7694/8162
We highly appreciate your feedback about our products.


 will be displayed, and you can click the icon to redirect to the smart home web portal from the SmartPlus cloud platform.
 to reset the user's account.
 to edit the user’s information, and click on Submit to save the changes.
 .
. .
. or
or to edit or delete the camera.
 to update the firmware list.
 . Then select the desired users.
-20190329_%E5%89%AF%E6%9C%AC.png)