Ce guide vous guide dans la configuration du Training Kit 009 afin que vous puissiez démontrer à vos clients la capacité de déverrouillage multi-lecteurs d’Akuvox.
Une fois configuré, un utilisateur peut présenter une identifiante valide sur n’importe quel appareil lecteur du kit, et la porte contrôlée par l’A08 se déverrouillera à chaque fois, quel que soit le lecteur utilisé.
Aperçu
Dans cette solution :
A08 fonctionne comme le contrôleur principal de porte connecté à la serrure.
A02/A03, A095 ou E16 fonctionnent comme dispositif d’authentification.
Le périphérique déclencheur envoie une commande HTTP à l’A08 après vérification réussie.
Dispositif de déclenchement A02 / A03 / A095 / E16 | → HTTP → | Contrôleur A08 Relais de verrouillage de porte | → relais → | Serrure de porte Gâche électrique / Maglock |
Avant de commencer
Assurez-vous :
Tous les appareils sont allumés.
Tous les appareils sont connectés au même réseau local.
La serrure de la porte est correctement connectée à la sortie du relais A08.
Étape 1 — Configurer A08 comme contrôleur principal de porte
Ouvrez un navigateur web et naviguez vers l’IP de l’appareil. Connectez-vous avec le nom d’utilisateur et le mot de passe (par défaut : admin/admin).
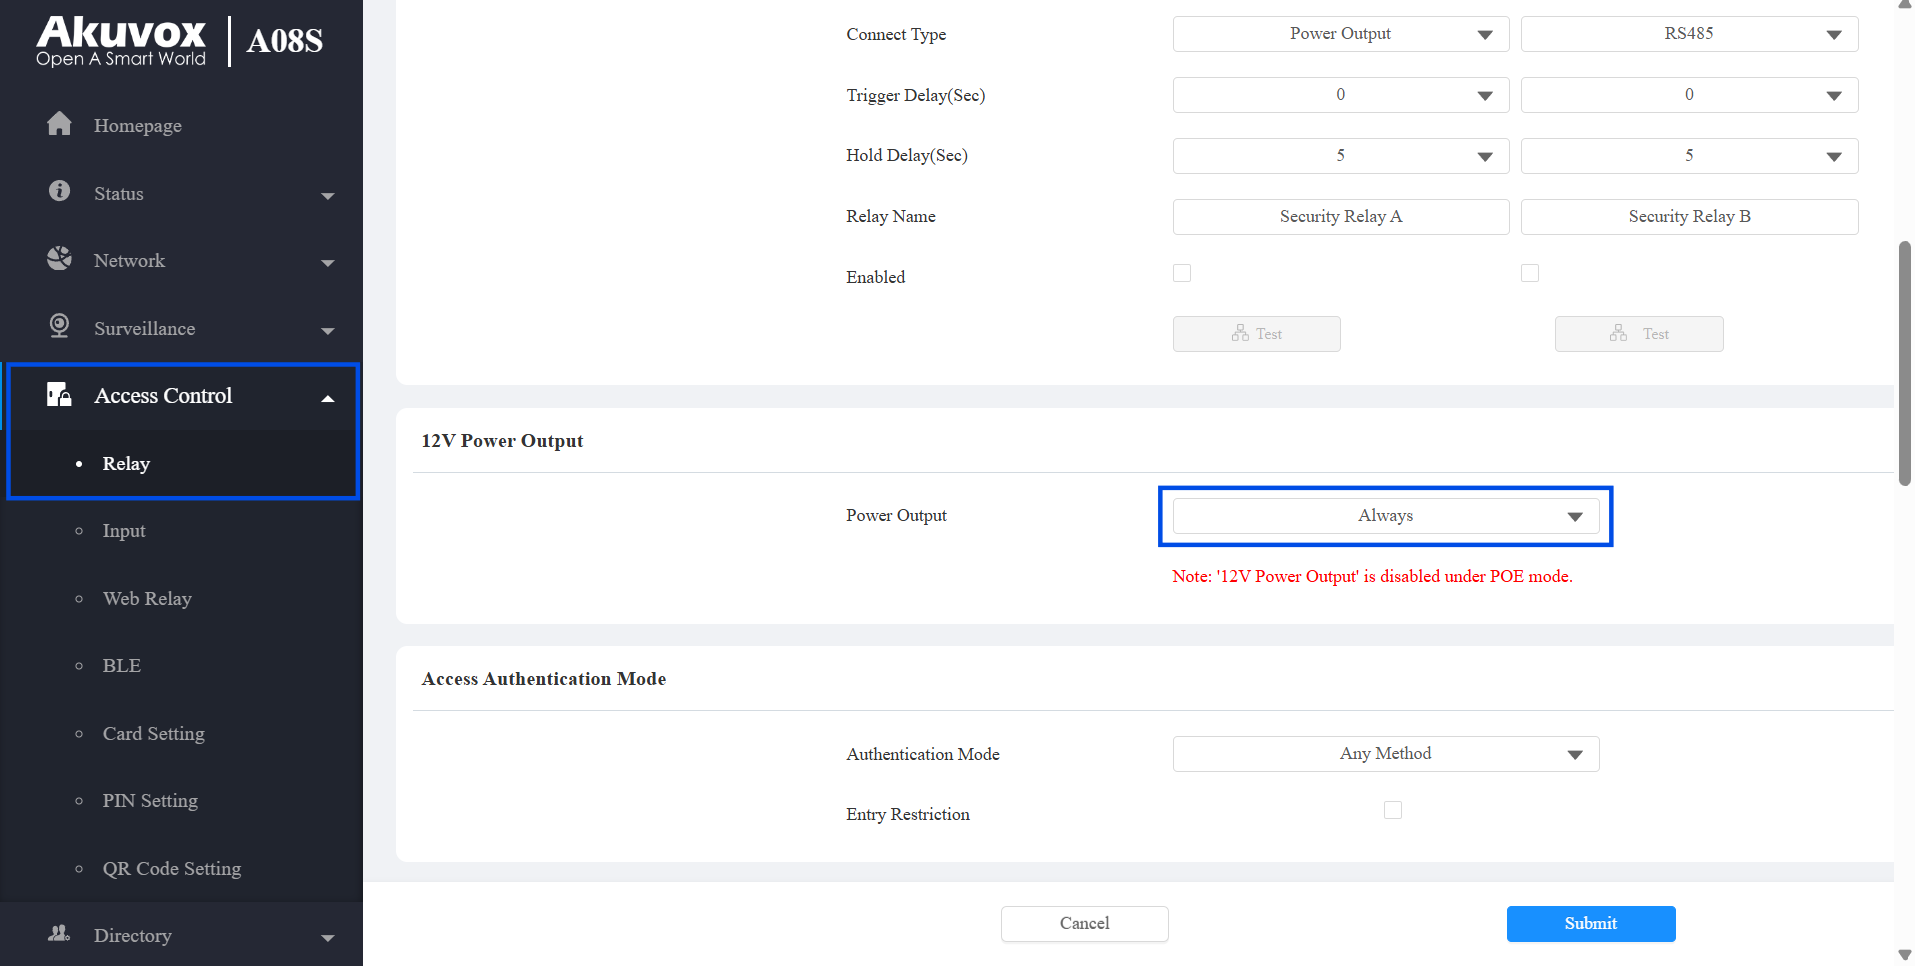
Va dans le contrôle d’accès > relais > 12 V.
Réglez le mode Power Output sur Toujours.
Faites défiler vers le bas jusqu’à la section Open Relay via HTTP .
Activez la fonctionnalité et personnalisez le nom d’utilisateur et le mot de passe de l’authentification.
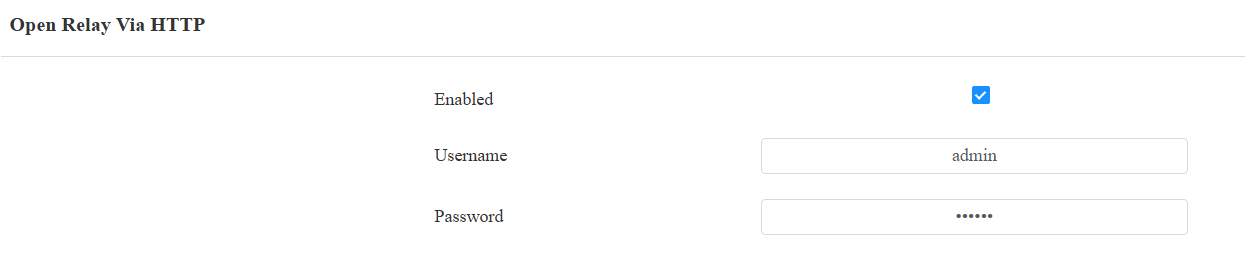
Cliquez sur Envoyer.
Désactiver le mode haute sécurité
À des fins de démonstration, désactivez le mode haute sécurité si les commandes de déverrouillage HTTP sont bloquées.
Va dans Système > Sécurité > Mode Haute Sécurité.
Désactivez le mode haute sécurité.
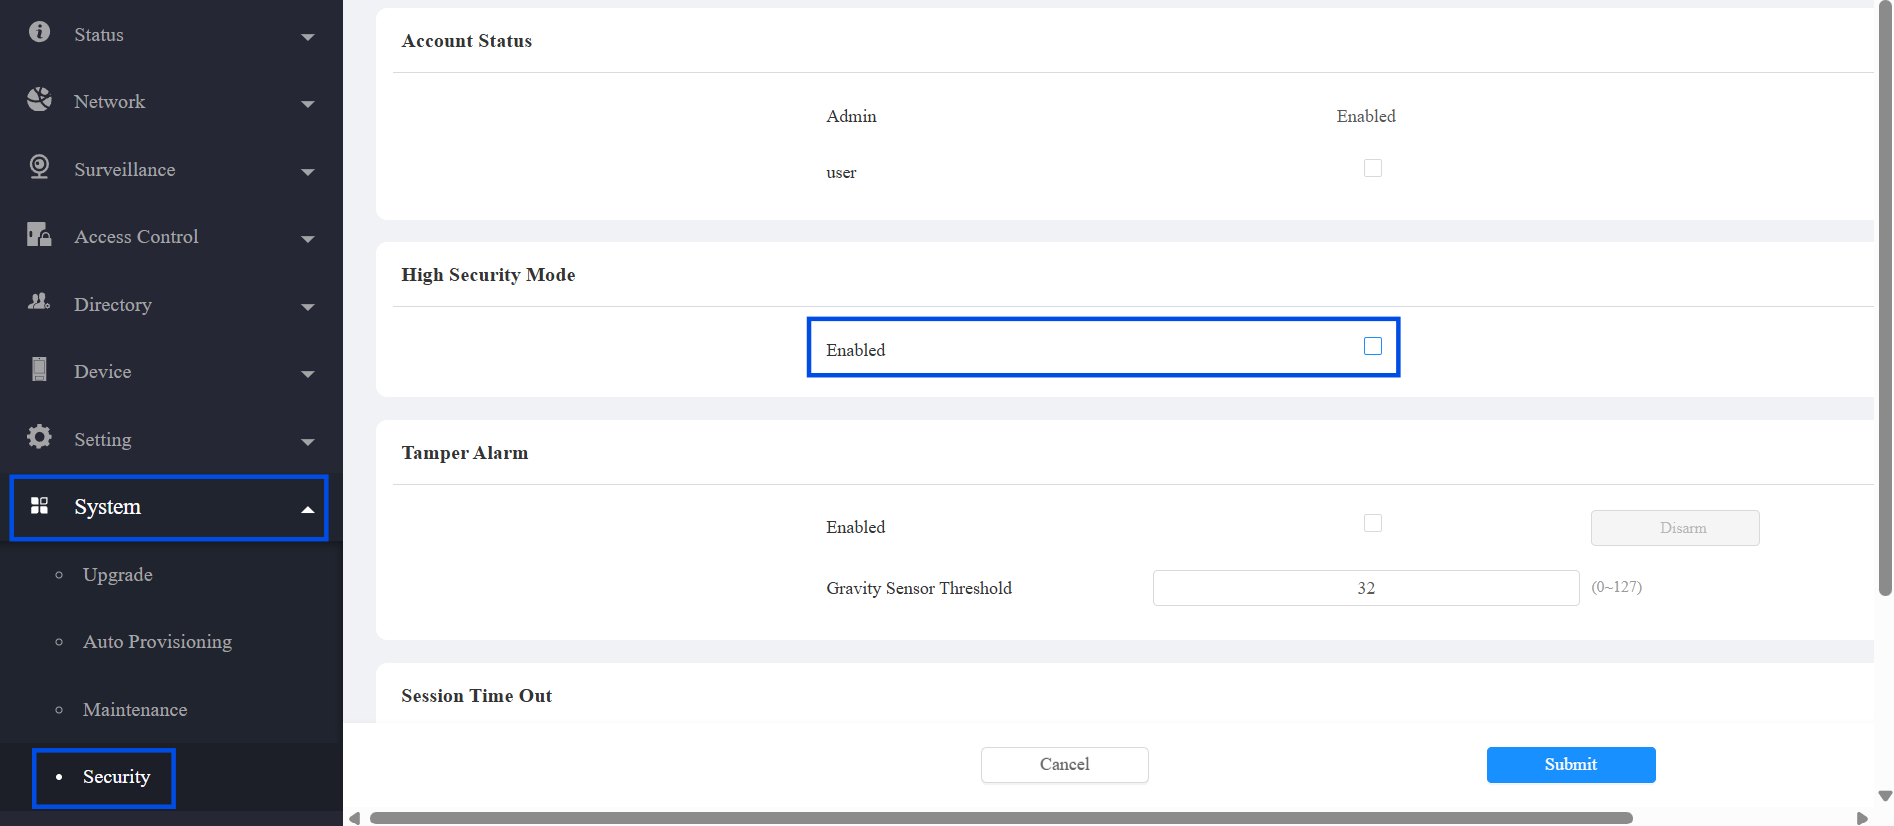
Cliquez sur Envoyer.
Étape 2 — Ajouter des identifiants utilisateur sur l’A08
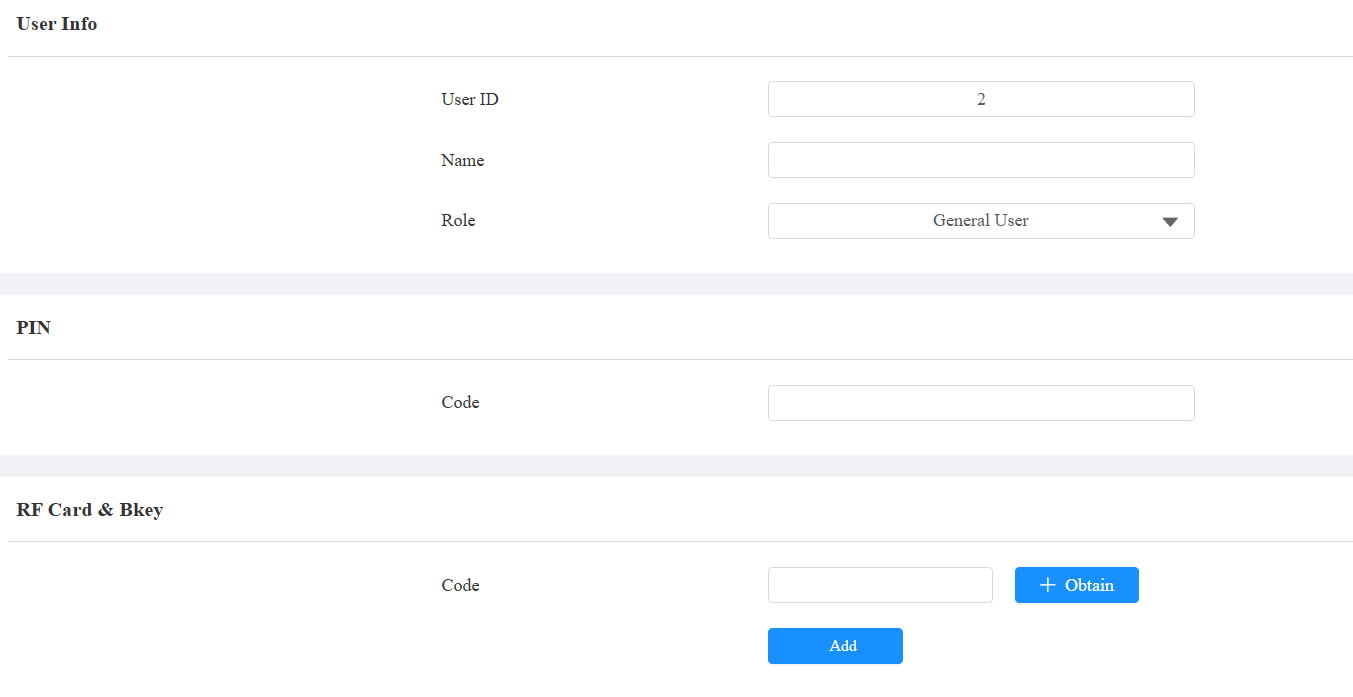
Inscrivez les utilisateurs autorisés à ouvrir la porte. Leurs identifiants (code PIN, carte RFID, etc.) seront authentifiés par l’A08.
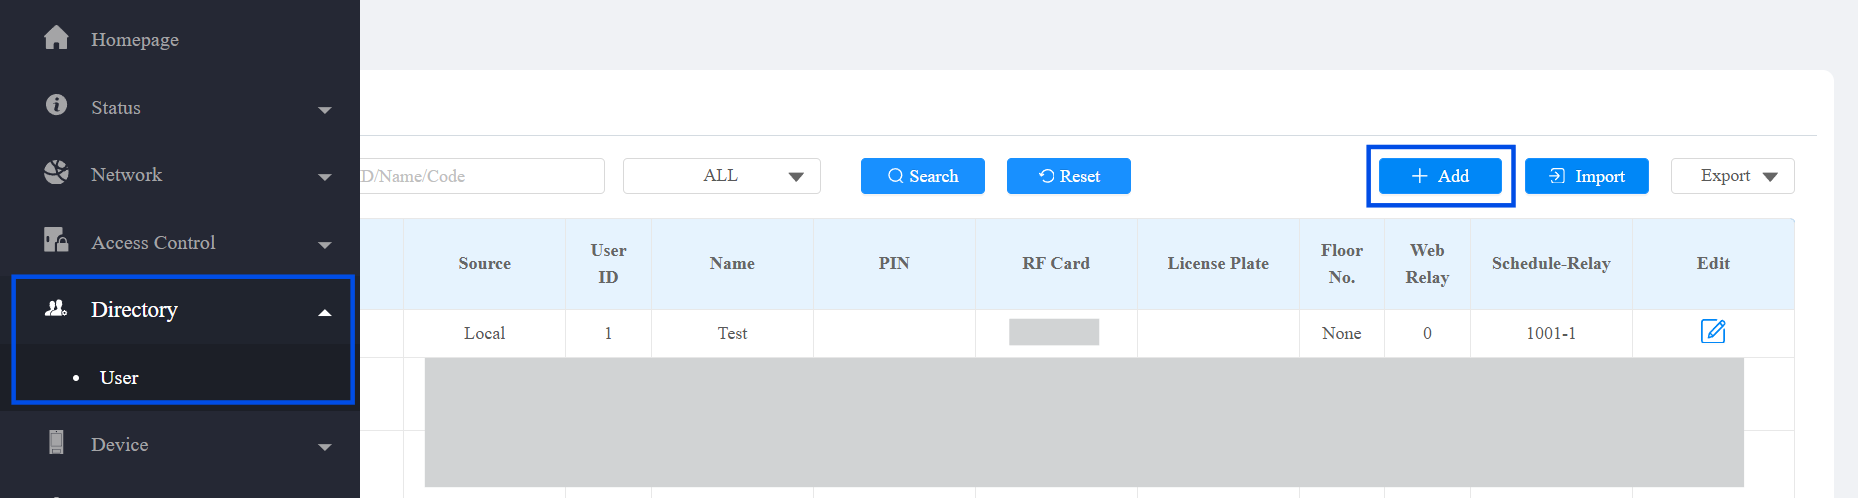
Allez dans l’annuaire > utilisateur.
Cliquez sur Ajouter.
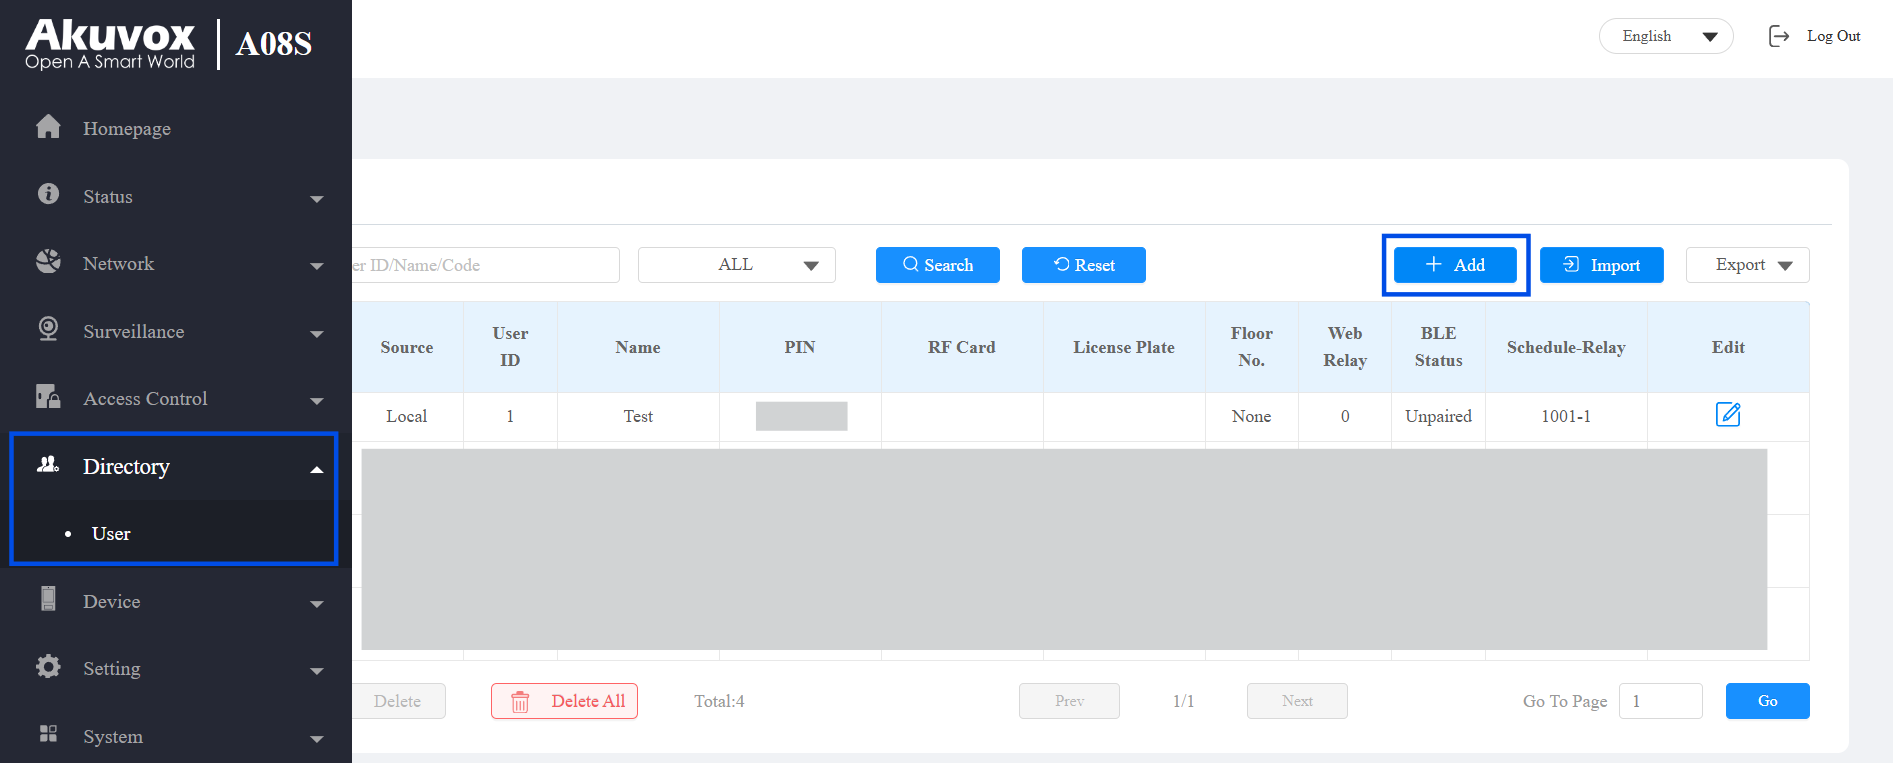
Saisissez le nom d’utilisateur et configurez les méthodes d’accès souhaitées, le code PIN, la carte RF, etc.
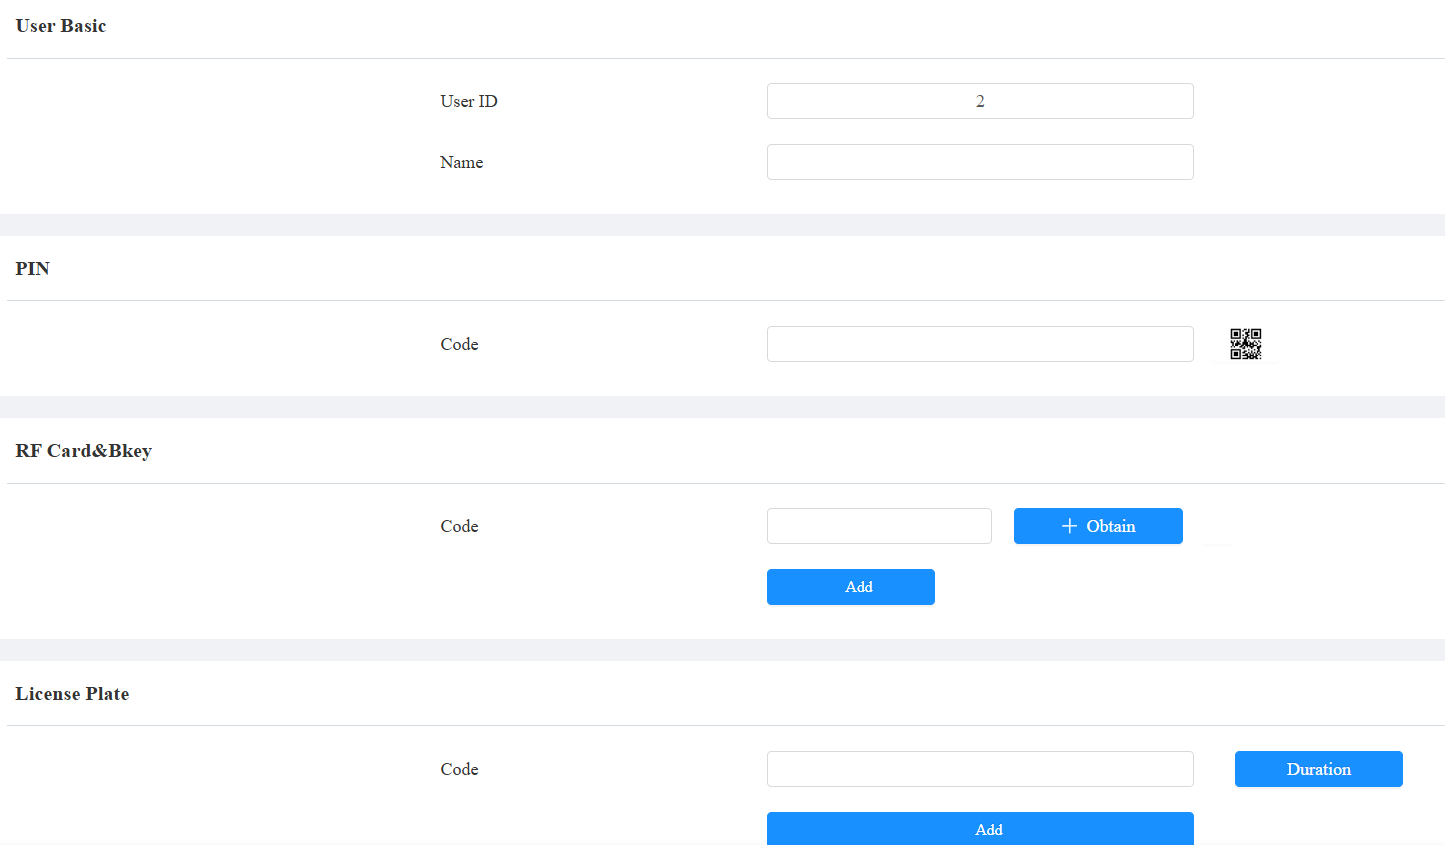
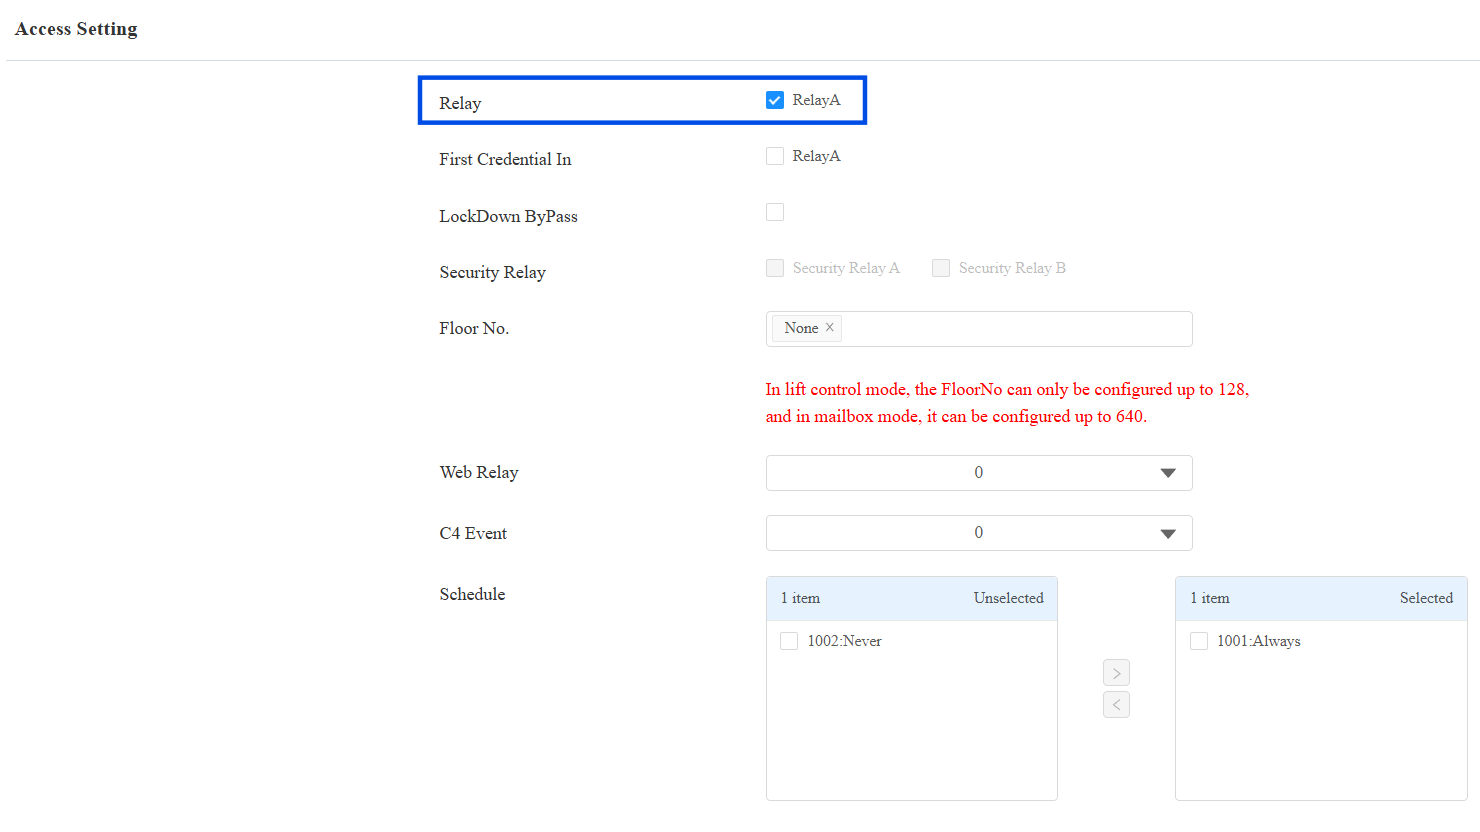
Assurez-vous que la case Relais A est cochée dans la section Paramètres d’accès .
Cliquez sur Envoyer.
Étape 3 — Configurez le dispositif déclencheur (A02/A03/A095/E16)
Configurez la fonction Web Relay sur le dispositif déclencheur afin qu’il envoie une commande HTTP de déverrouillage à l’A08 après une présentation réussie des identifiants.
Ouvrez un navigateur web et naviguez vers l’IP de l’appareil. Connectez-vous avec le nom d’utilisateur et le mot de passe (par défaut : admin/admin).
Allez dans le contrôle d’accès > relais web.
Définir le type sur relais local + relais web.
Dans l’Action 1 du Web Relay, saisissez la commande HTTP suivante :
http://{A08_IP}/fcgi/do?action=OpenDoor&UserName={username}&Password={password}&DoorNum=1Le nom d’utilisateur et le mot de passe sont ce que vous définissez sur l’A08.
Exemple : http://192.168.1.100/fcgi/do?action=OpenDoor&UserName=admin&Password=123456&DoorNum=1
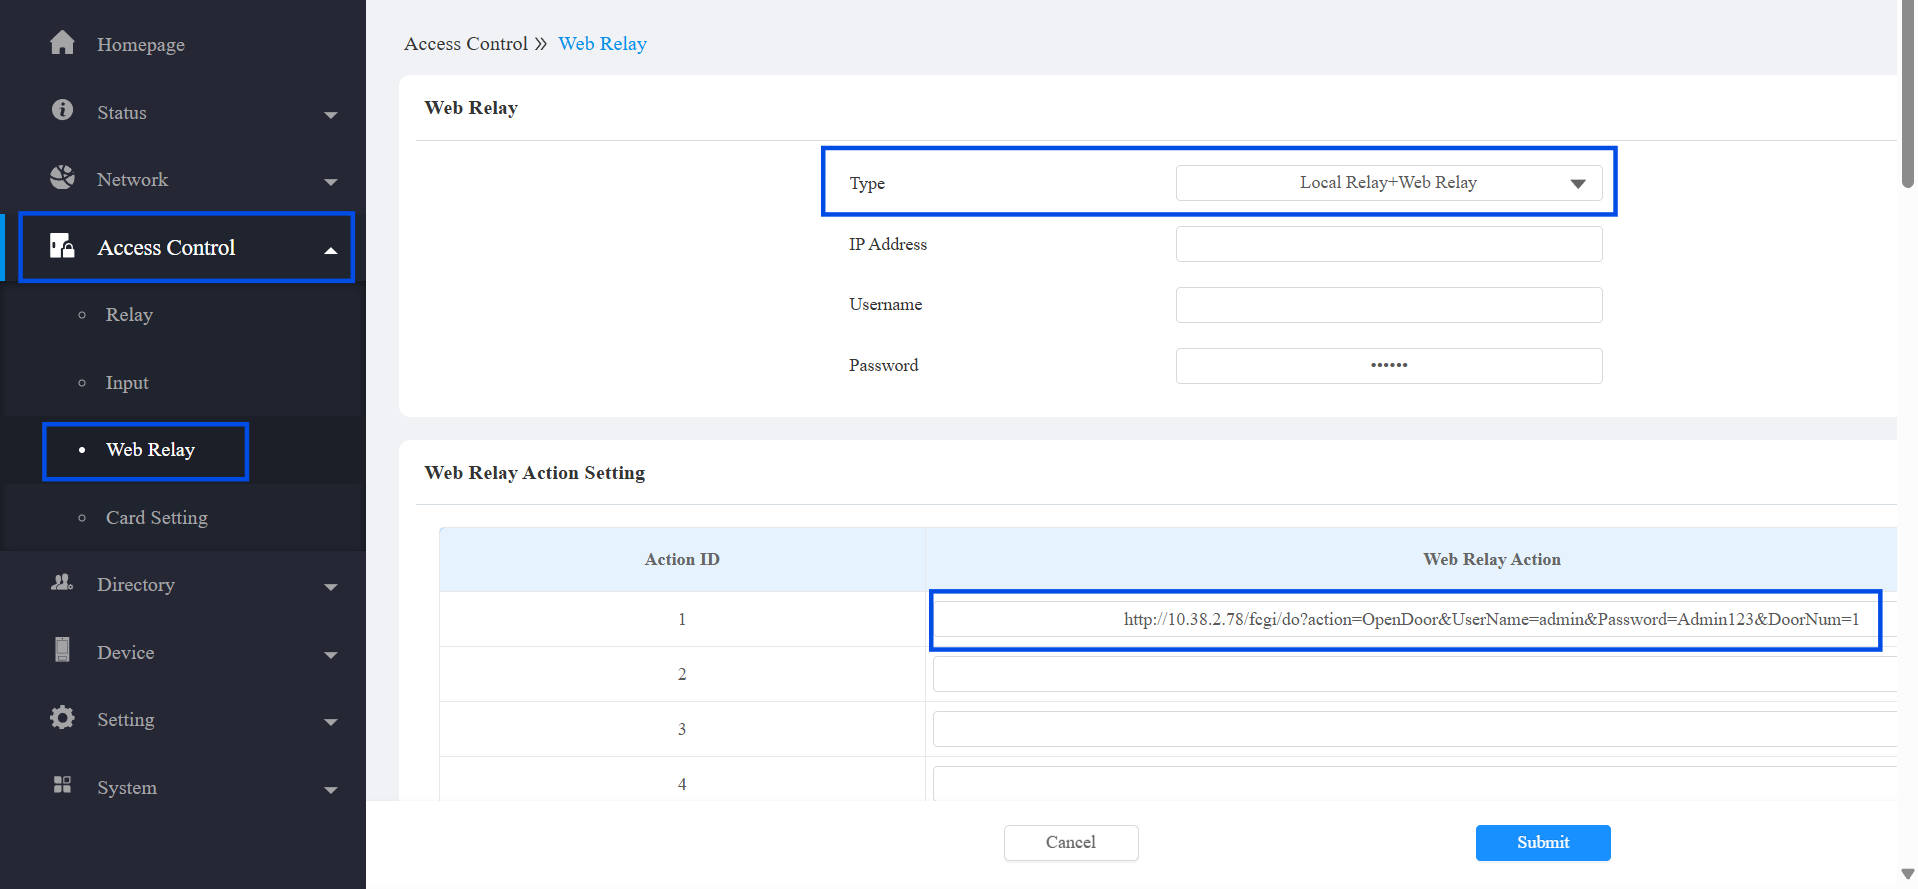
Cliquez sur Envoyer.
Étape 4 — Ajouter des identifiants utilisateur sur le dispositif déclencheur
Enregistrez les utilisateurs sur le dispositif déclencheur. Les identifiants de chaque utilisateur doivent être liés à Web Relay 1 afin que l’appareil envoie la commande HTTP après authentification réussie.
Va dans l’annuaire > utilisateur.
Cliquez sur Ajouter.
Saisissez le nom d’utilisateur et configurez les méthodes d’accès, le code PIN, la carte RF, etc.
Sélectionnez Web Relay 1 dans la section Paramètres d’accès .
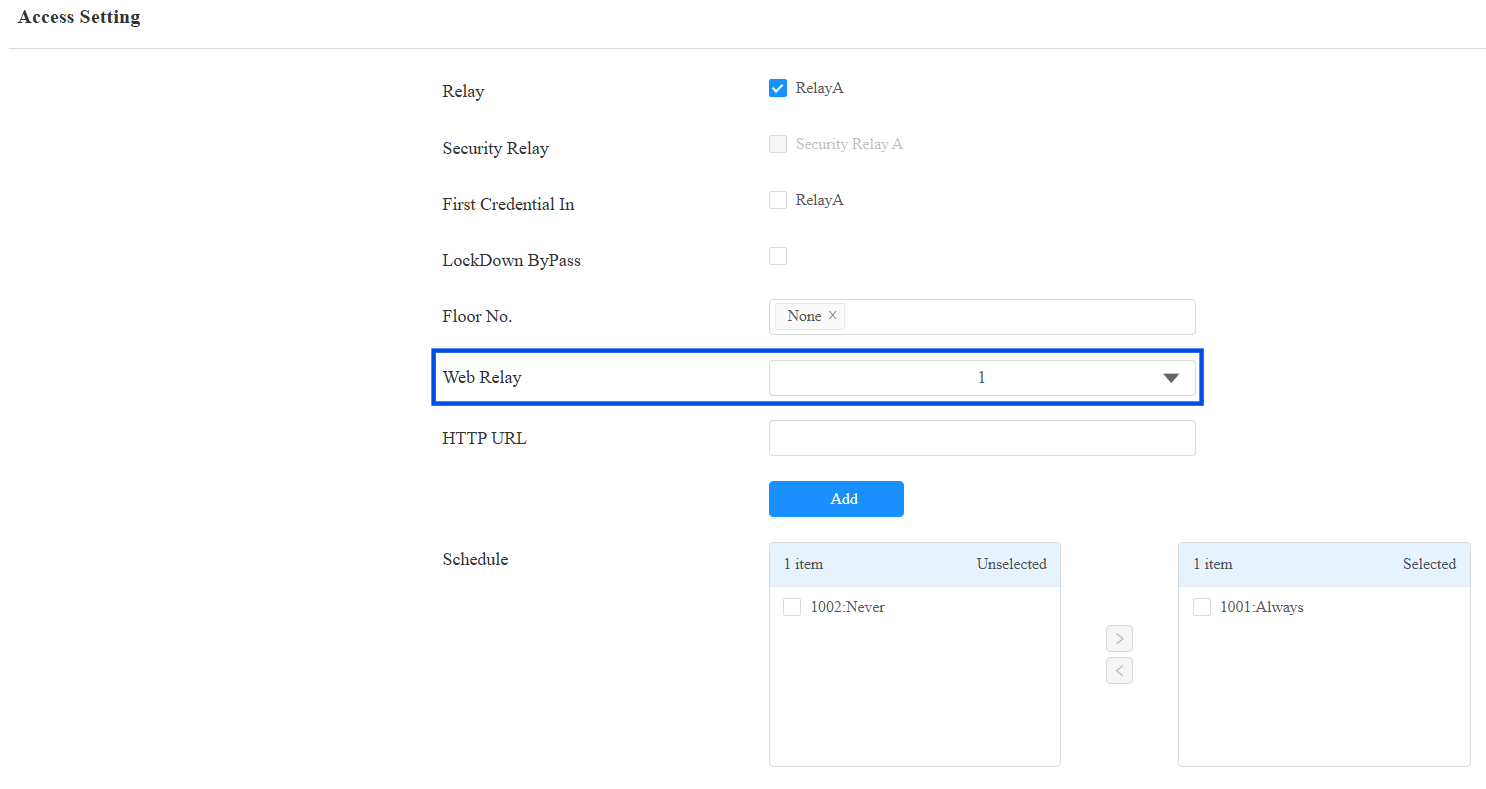
Cliquez sur Envoyer.
Étape 5 — Configurer l’alerte d’expiration de l’ouverture de la porte sur l’E16
L’E16 peut surveiller l’entrée du capteur de porte et déclencher une alerte si la porte reste ouverte au-delà d’un délai d’expiration configuré. Cela nécessite que le capteur de porte soit câblé au port d’entrée de l’E16.
Va dans le contrôle d’accès > entrée.
Réglez le niveau électrique du déclencheur à élevé.
Réglez Exécuter Relais sur aucun.
Activez l’alarme porte ouverte.
Réglez la valeur de délai d’ouverture de la porte à 5.
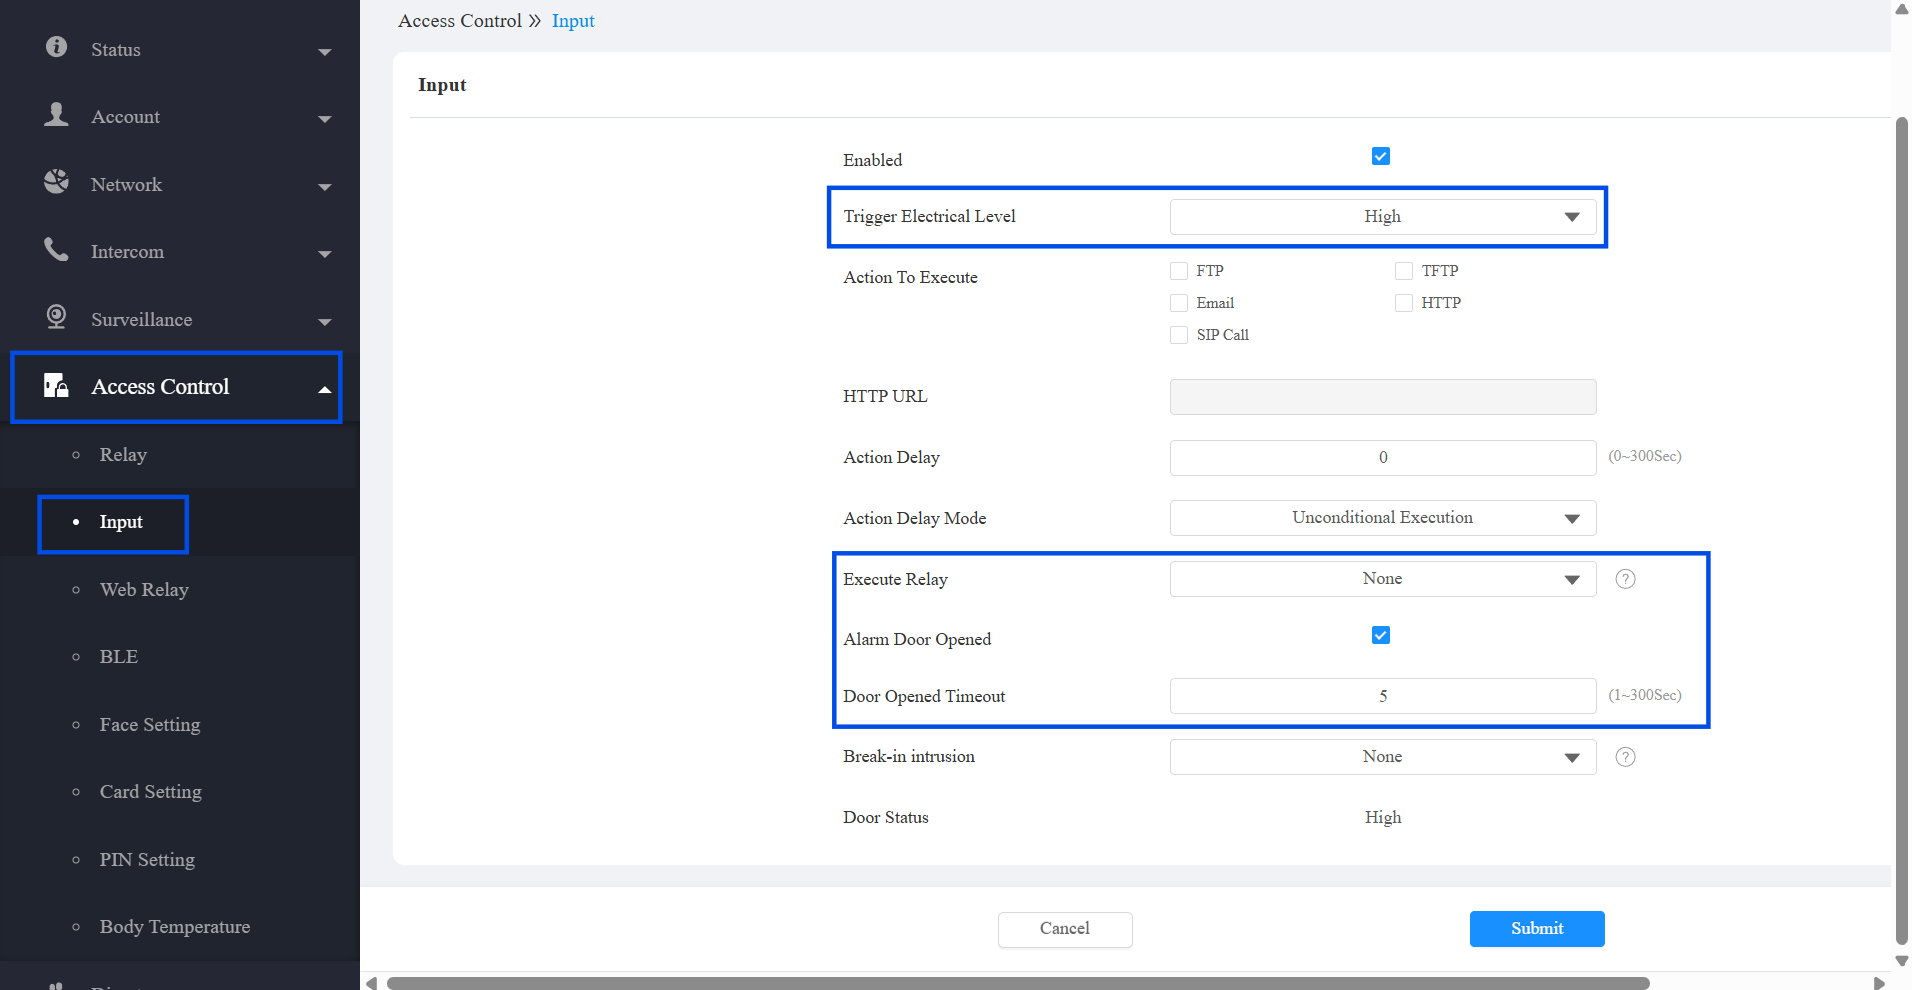
Cliquez sur Envoyer.
Étape 6 — Configurez le lecteur Wiegand sur l’A095
L’A095 prend en charge les lecteurs de cartes Wiegand protocole connectés à ses ports de lecteur. Configurez les lecteurs 1 et 2 qui sont connectés aux lecteurs de cartes Akuvosx.
Aller à Appareil, Lecteur.
Réglez le mode sur Wiegand.
Réglez le mode lecteur de cartes Wiegand sur Wiegand-26.
Activez la porte 1 dans le paramètre Wiegand Open Door .
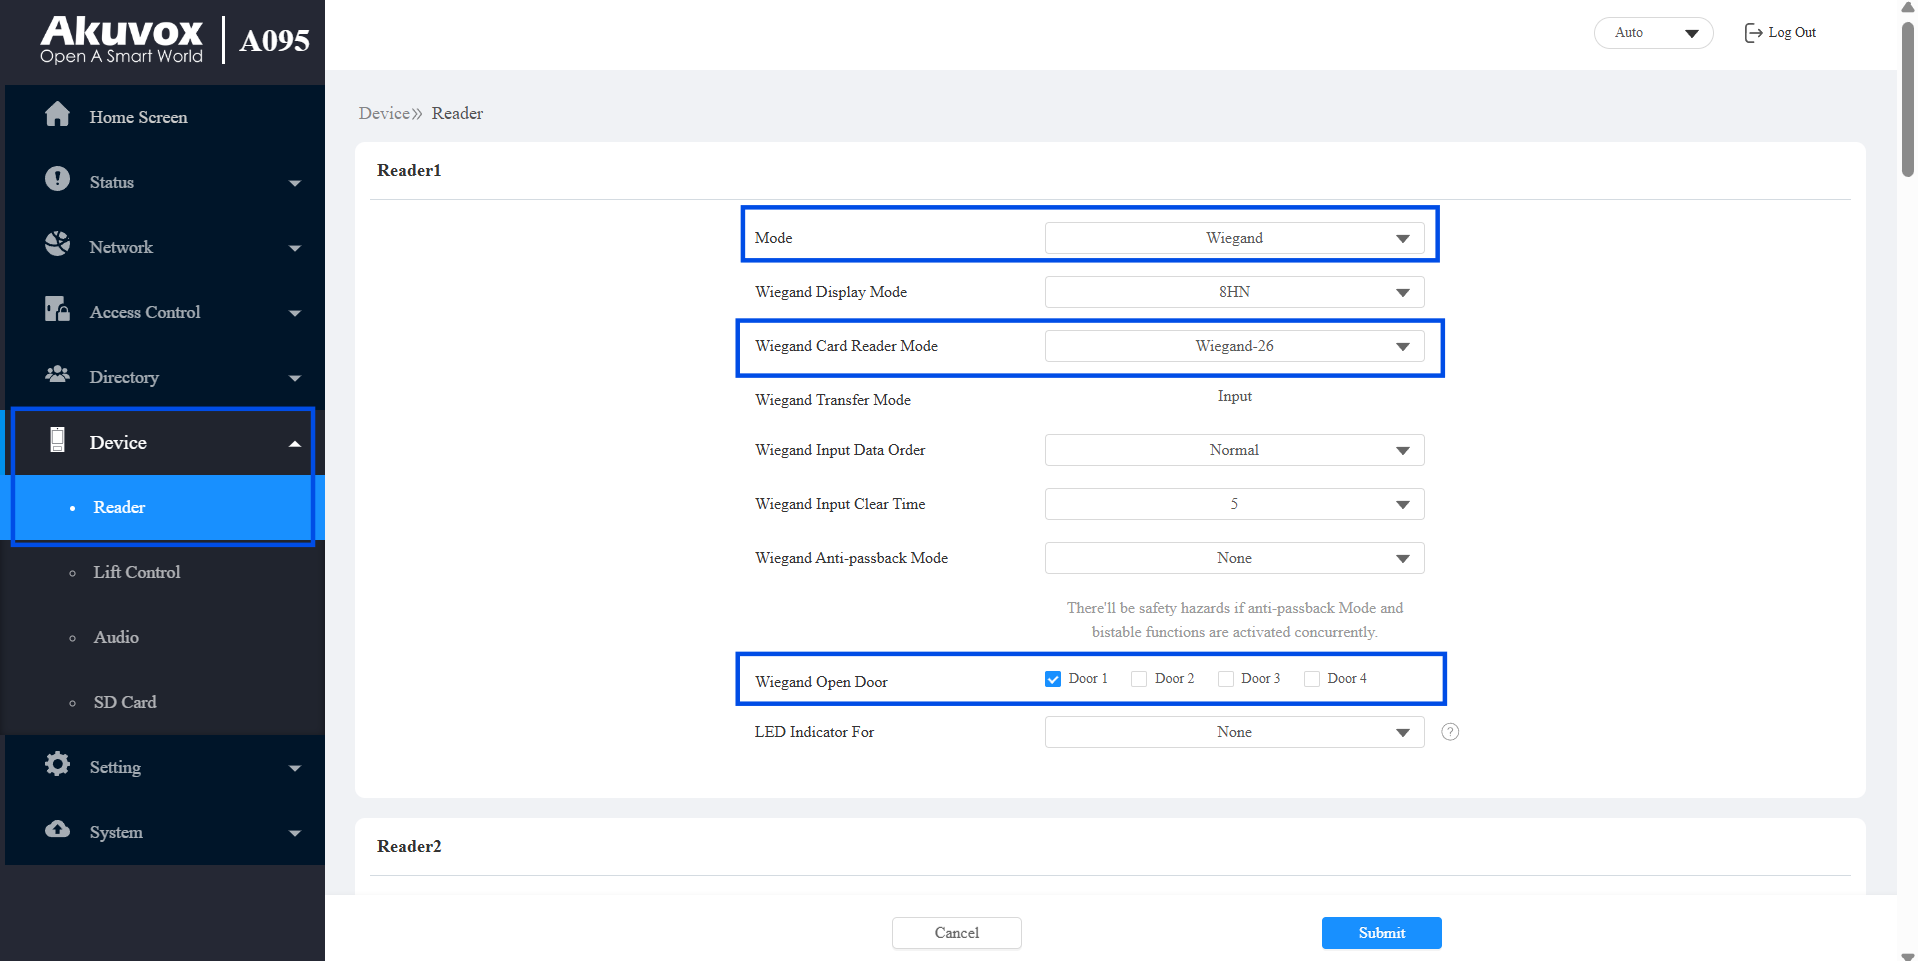
Cliquez sur Envoyer.