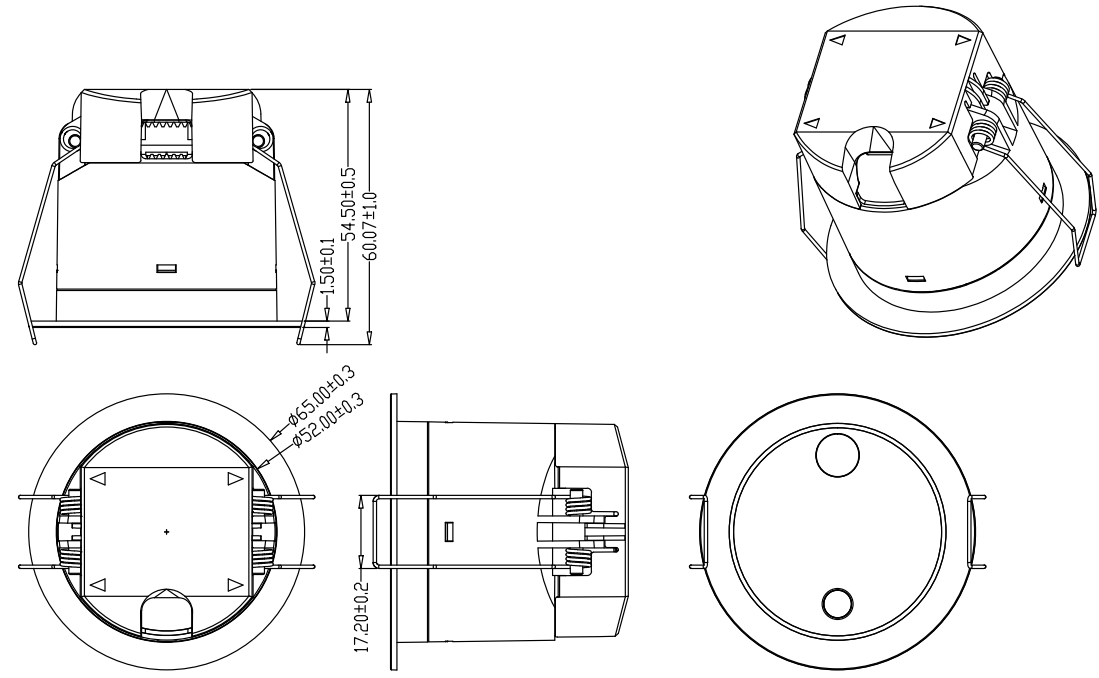
Dimensions
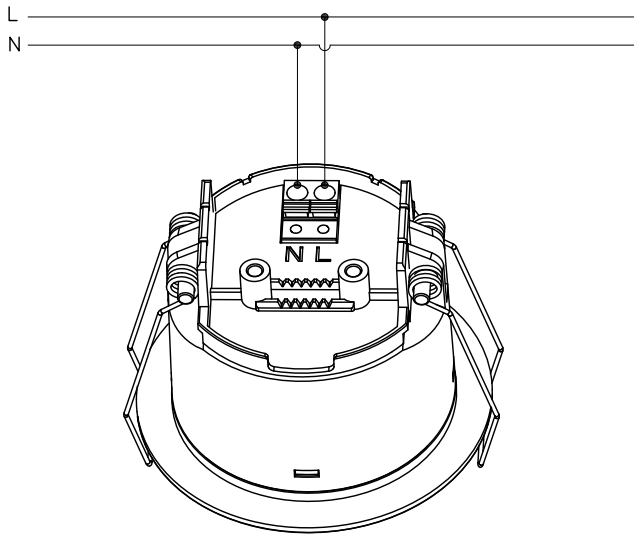
Wiring
Installation
NOTE:
The sensor must be mounted on the ceiling; wall mounting is not recommended.
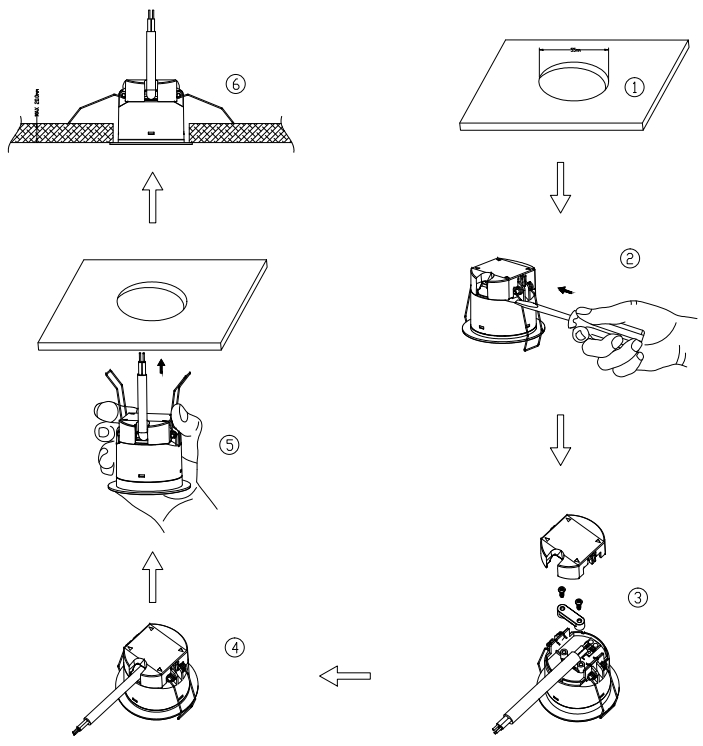
① Cut an opening with a diameter of 55mm in the ceiling.
② Use a flat-head screwdriver to gently pry off the wiring cap.
③ Connect the wires according to the wiring diagram.
④ Secure the wires using the wire clip, press them into place, fasten with screws, and reattach the wiring cap.
⑤ Bend the spring clips backward and push the presence sensor into the ceiling opening.
⑥ Verify that the sensor is securely installed and stable.
Preparation
Collect Project Information
Must have:
Floor plan detailing space dimensions, layout, locations of air conditioning vents and glass walls, ceiling height, and other features.
Recommended:
 High-quality photos of the room or area from various angles.On-site videos that capture the overall layout and potential sources of interference.
TIP:
The more comprehensive the information about the house, the more accurately you can recommend or design the optimal sensor placement and configuration. A detailed floor plan and visual media will help identify potential challenges and ensure a smooth usage experience.
Application Scenario Assessment
This human presence sensor is ideal for hotel rooms and open areas with clear boundaries, allowing it to cover a wide detection area and detect movement from any direction.
Not suitable for:
Small, enclosed spaces, such as cubicles and restrooms
Open-plan zones with glass walls or curtains, as microwave signals can penetrate these materials, potentially leading to false reports.
NOTE:
For specific applications or unique requirements, it’s recommended to consult with the manufacturer or our technical support to determine the sensor's suitability for particular locations and to identify the most appropriate sensor model.
Placement
Recommended Height
.png)
Place Sensors and Configure Parameters
Initial placement
Use the gathered information and specific usage scenarios to create an initial sensor placement diagram. Focus on avoiding interference and ensuring key activity areas are covered.
Different scenarios may require different placement strategies:
Hotels
Priority: Energy saving.
Key Considerations:
Power turns on when someone enters and off automatically when the room is empty.
Full motion-based lighting is typically unnecessary.
Maintain full presence detection throughout all areas to avoid gaps.
Homes:
Priority: Convenience.
Key Considerations:
Prioritize automatic lighting in most spaces when human presence is detected.
Energy saving remains a secondary factor but should not compromise user comfort.
Guidelines for Optimal Sensor Placement
Install sensors away from metal objects such as metal walls. Microwave signals reflect off large metal surfaces, which may cause trigger the false alarm.
Microwaves can penetrate non-metal materials like glass and wood. Place the sensor at least 1.5 meters from doors.
Wireless devices (e.g., routers) can interfere with microwave sensors. Ensure the sensor is positioned over 1.5 meters away from such devices.
Vibrations from HVAC vents can trigger false detections. Keep sensors more than 1.5 meters away from such emission sources, and be mindful that plants moved by airflow can also trigger false alarms.
Ceiling objects like smoke curtains can reduce sensor range. Position sensors at least 1.5 meters away from these objects.
Ensure that key activity areas fall within the sensor’s core detection zone.
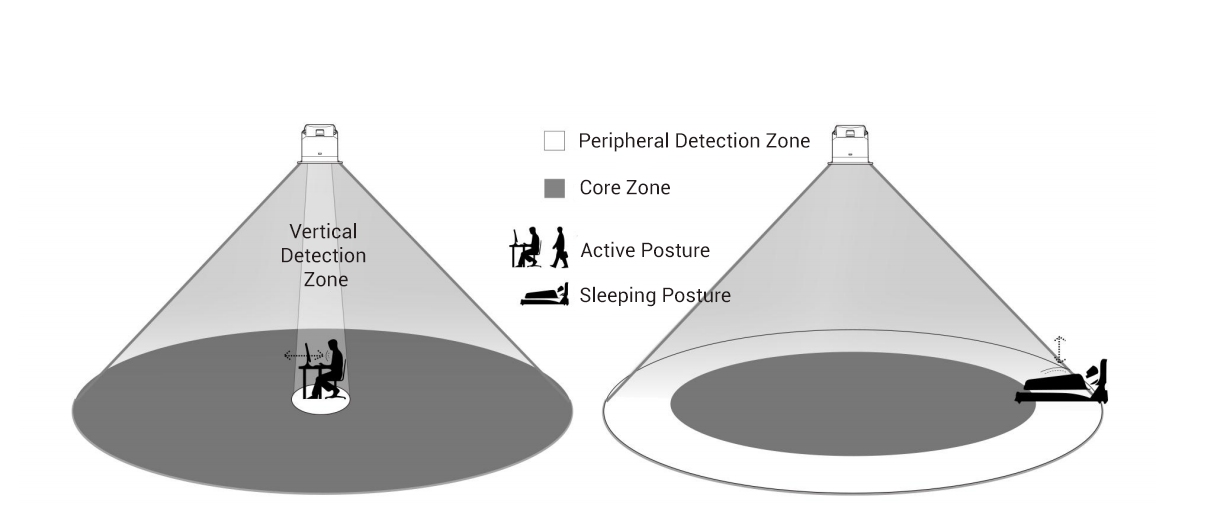
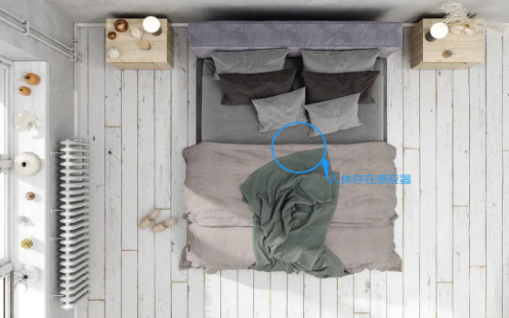
Indoor human activity generally involves two main postures: Active posture (Standing or sitting), and sleeping posture (Lying).
The sensor’s response varies between the core and peripheral detection zones in sleep mode. Therefore, it should be installed to cover the sleeping area without interfering with active mode detection.
 For sleep mode, place the sensor directly above the center of the bed.
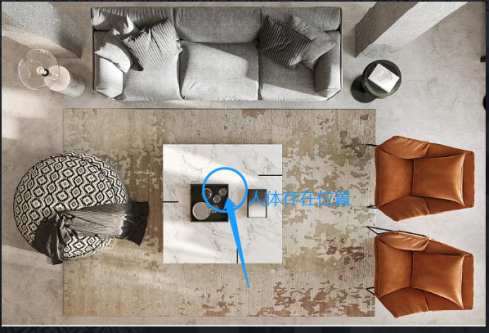
![]() For active mode, install the sensor on the ceiling in front of the primary activity area.
For active mode, install the sensor on the ceiling in front of the primary activity area.
Final Placement determination
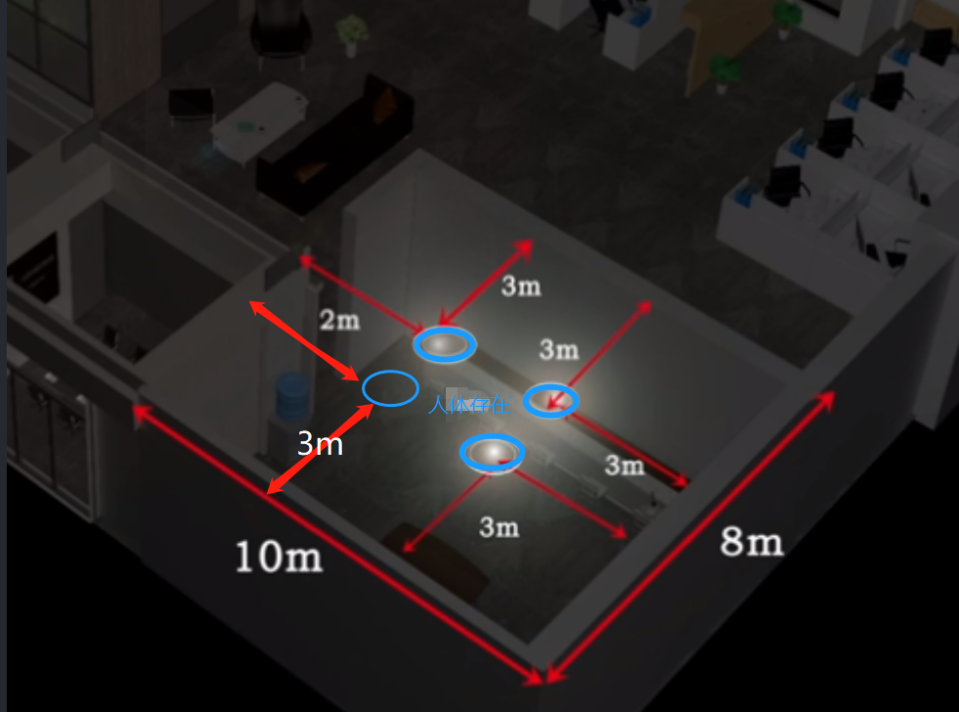
Determine sensor placements based on the size of the room. The detection radius is between 0.5 and 3.5 meters. Use this range to figure out how many sensors you need and where to position them in each area.
Example 1
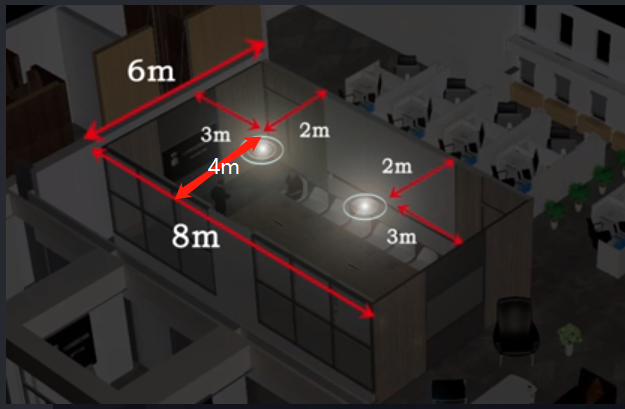
The sensors in this room are placed at 2 meters from the right side and 4 meters from the left to avoids potential interference from the glass walls on the left. The figure shows a recommended installation position, but you can also choose to center the installation and adjust the sensitivity and delay time settings as needed.
Set Sensitivity and Delay Time
Sensitivity is directly related to the detection radius, while delay time is typically set inversely to sensitivity. Higher sensitivity corresponds to a shorter delay time.
Sensitivity Level (%) | Detection Radius (Meters) | Reference Delay Time (Minutes) |
12 | 3-3.5 | 1 |
11 | 3-3.5 | 1 |
10 | 2.5-3 | 1 |
9 | 2.5-3 | 1 |
8 | 2-2.5 | 2 |
7 | 2-2.5 | 2 |
6 | 1.5-2 | 2 |
5 | 1.5-2 | 2 |
4 | 1-1.5 | 3 |
3 | 1-1.5 | 3 |
2 | 0.5-1 | 3 |
1 | 0.5-1 | 3 |
NOTE:
The detection radius may vary by ±0.5 meters; fine-tuning might be required.
The table reflects theoretical performance; real-world installation and calibration may require adjustments.
If no specific requirements are provided, a 1-minute delay is generally optimal. Avoid delays longer than 5 minutes to maintain a good user experience.
For sleep detection scenario, a delay time of 15–20 minutes is recommended for reliable results.
FAQ
1. Why adjust sensitivity, and is higher sensitivity always better?
Sensitivity adjustment prevents false positives caused by vibrations or movement outside the detection area.
Higher sensitivity isn't always better—set it to cover the desired area without unnecessary triggers.
2. What is Delay Time, and how long should it be set?
Delay time avoids false "no presence" reports when movement is minimal near the detection boundary. For example, if you set a 30-second delay and a person makes slight movements at the detection boundary, the system may incorrectly report no presence. By extending the delay to 3 minutes, the system reports no presence only if no activity occurs within that time, reducing false negatives.
Test and Adjust Settings
Once the sensors are installed, it’s important to test and adjust their performance to ensure accurate operation.
Confirm Trigger Distance
Set the delay time to 30 seconds and wait for the sensor to report no presence. Test the trigger distance by having a person enter the detection zone, and adjust sensitivity if needed.
Verify Human Presence Detection
With the delay time still at 30 seconds, test three positions in the core and high-activity areas using different postures—sitting, standing, lying down, and facing away from the sensor—for at least 2 minutes per posture. This helps identify any false absence reports and ensures more reliable results.
Verify Delay Time
Adjust the delay time according to the specific scenario. Observe how long it takes for the sensor to report no presence after detecting no movement.
Account for Reflective Surfaces
If the detection area includes smooth reflective surfaces (e.g., a showroom TV screen), note that signal reflections might enhance sensitivity.