- 27 Feb 2024
- Print
- DarkLight
- PDF
Intercom Call Configuration
- Updated on 27 Feb 2024
- Print
- DarkLight
- PDF
IP Call Configuration
An IP call is a direct call between two intercom devices using their IP addresses, without a server or a PBX. IP calls work when the devices are on the same network.
Navigate to Phone > Call Feature > Direct IP interface.

Port: Set the port for direct IP call. The default is 5060, with a range from 1-65535. If you enter a value within this range other than 5060, ensure consistency with the corresponding device for data transmission.
SIP Call & SIP Call Configuration
Session Initiation Protocol(SIP) is a signaling transmission protocol used for initiating, maintaining, and terminating calls.
A SIP call uses SIP to send and receive data between SIP devices, and can use the internet or a local network to offer high-quality and secure communication. Initiating a SIP call requires a SIP account, a SIP address for each device, and configuring SIP settings on the devices.
SIP Account Registration
Each device needs a SIP account to make and receive SIP calls.
Akuvox intercom devices support the configuration of two SIP accounts, which can be registered under two independent servers.
To configure the SIP account on the device Account screen.
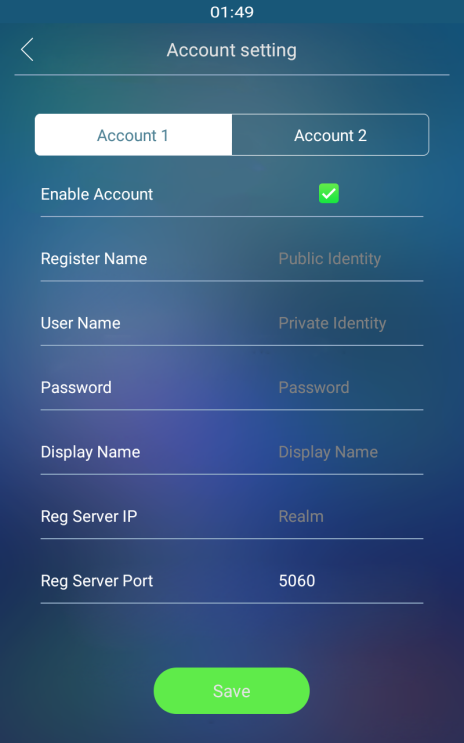
Account 1/Account 2: The door phone supports 2 SIP accounts.
- Account 1 is the default account for call processing. Also, it will be utilized when the Akuvox SmartPlus cloud service is activated.
- The system switches to Account 2 if Account 1 is not registered.
- To designate the account to be used for outgoing calls, select the account number for contacts or dial plan prefixes in their settings.
TipFor configuring contact call and dial plan, see here.
Reg Server port: Specify the SIP account registration server port. The default is 5060. You can find the port information on the indoor monitor’s PBX screen, or from third-party server providers.
Tip
Some SIP account registration settings are only accessible through the device's web interface at Account > Basic > SIP Account.

Status: Indicate whether the SIP account is registered or not.
Account: Choose the account for configuration.
Display Label: The label of the device.
Display Name: The designation for Account 1 or 2 to be shown on the device itself on the calling screen.
Register Name: Same as the username from PBX server.
User Name: Same as the username from PBX server for authentication.
Password: Same as the password from PBX server for authentication.
SIP Call DND&Return Code Configuration
The Do Not Disturb(DND) feature prevents unwanted incoming SIP calls, ensuring uninterrupted focus. It also allows you to set a code to be sent to the SIP server when rejecting a call.
You can set up DND-related parameters properly on the device web Phone > Call Feature > DND interface.

Return Code When DND: specify the code sent to the caller via the SIP server when rejecting an incoming call in DND mode.
SIP Server Configuration
SIP servers enable devices to establish and manage call sessions with other intercom devices using the SIP protocol. They can be third-party servers or built-in PBX in Akuvox indoor monitor.
To configure SIP server, go to Account > Basic > Preferred SIP Server/ Alternate SIP Server.

Server IP: Enter the server’s IP address or its domain name.
Port: Specify the SIP server port for data transmission.
Registration Period: Define the time limit for SIP account registration. Automatic re-registration will initiate if the account registration fails within this specified period.
Outbound Proxy Server configuration
An outbound proxy server receives and forwards all requests the designated server. It is an optional configuration, but if set it up, all future SIP requests get sent there in the first instance.
To configure the outbound proxy server, go to the device web Account > Basic > Outbound Proxy Server interface.

Server IP: Enter the SIP proxy IP address.
Port: Set the port for establishing a call session via the outbound proxy server.
Backup Server IP: Enter the SIP proxy IP address to be used when the main proxy malfunctions.
Port: Set the proxy port for establishing a call session via the backup outbound proxy server.
Data Transmission Type Configuration
Akuvox intercom devices support four data transmission protocols: User Datagram Protocol(UDP), Transmission Control Protocol(TCP), Transport Layer Security(TLS), and DNS-SRV.
To do the configuration on the device web Account > Basic > Transport Type interface.

UDP: An unreliable but very efficient transport layer protocol. It is the default transport protocol.
TCP: A less efficient but reliable transport layer protocol.
TLS: An encrypted and secured transport layer protocol. Select this option if you wish to encrypt the SIP messages for enhanced security or if the other party’s server uses TLS. To use it, you need to upload certificates for authentication.
DNS-SRV: A DNS service record defines the location of servers. This record includes the hostname and port number of the server, as well as the priority and weight values that determine the order and frequency of using the server.
SIP Hacking Protection
Internet phone eavesdropping is a network attack that allows unauthorized parties to intercept and access the content of the communication sessions between intercom users. This can expose sensitive and confidential information to the attackers. SIP hacking protection is a technique that secures SIP calls from being compromised on the Internet.
Navigate to Account > Advanced > Call interface.

Prevent SIP Hacking: Activate this feature to only receive calls from contacts in the whitelist. This protects users private and secret information from potential hackers during SIP calls.
Dial Options Configuration
Quick Dial By Number Replacement
The dial number replacement feature simplifies long and complex dial numbers of the device, providing shorter and more user-friendly alternatives for making calls. It allows the substitution of multiple dial numbers, such as IP addresses or SIP numbers, with a single, simplified number.
To configure the number replacement on the device ReplaceRule screen.

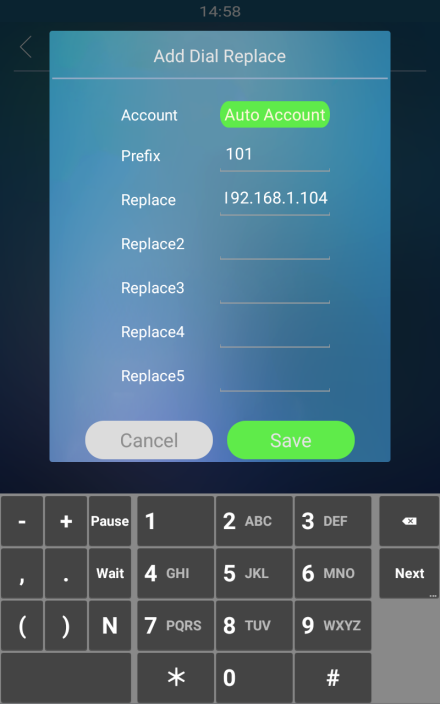
Account: Select the dial-out account.
- Auto: Dial-out using the registered account. When there are 2 registered accounts, Account 1 is the default.
- Account 1/2: Dial-out using the chosen account.
Prefix: Specify a short number to replace the specified dialed numbers.
Replace 1/2/3/4/5: Specify up to 5 numbers, which can be SIP number or IP address, to be replaced by the prefix. All these numbers will be called simultaneously when the caller dials the prefix.
To configure the setting on the web Phone > Dial Plan > Rules Management interface.
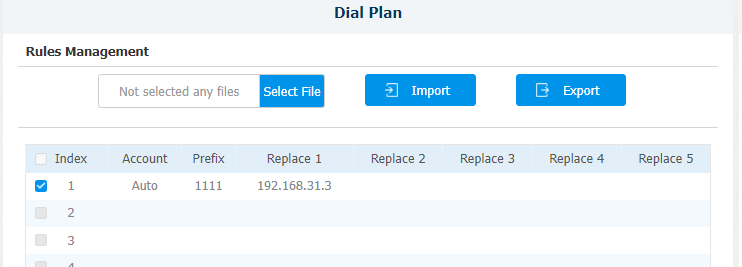
Note:
To modify a dial plan rule, check its box, and the Edit tab will appear.
Quick Dial Using Configured Dial Name
You can create one dial name on the Quick Dial screen in both villa mode and office mode on the device directly. You can press the dial icon by the dial name to make calls.


Show: Displays either the time or speed dial buttons on the dial screen.
Quick Dial Name: The name of the quick-dial contact.
Quick Dial Number: The SIP number or IP address of the contact.
Note:
This function only applies to Villa and Office themes.
TipSee how to configure Quick Dial.
Import/Export the Speed Dial Contacts
To import and export the speed dial contacts, navigate to Phone > Speed Dial > Import/Export Speed Dial Contacts(.xml).

Speed Dial on the Home Screen
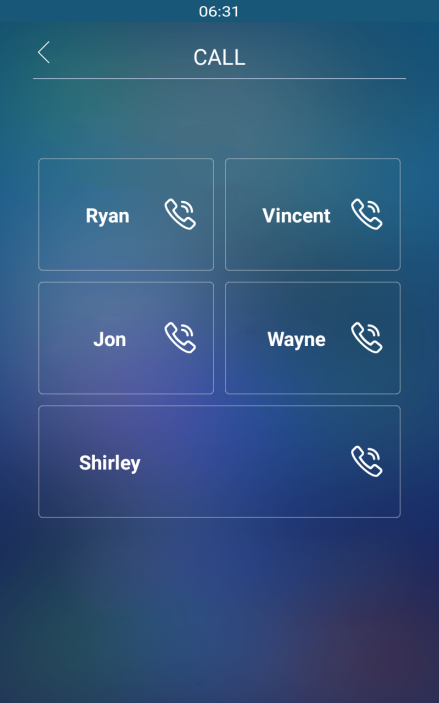
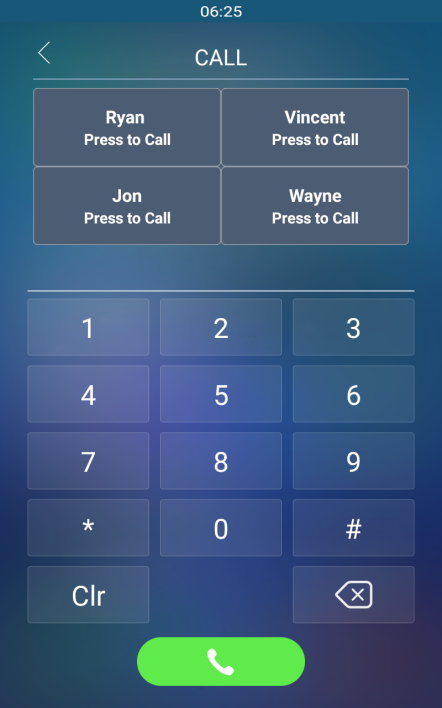
Speed dial is a feature that enables the creation of tabs or organized tab combinations to be displayed on the device's dial screen. By pressing these specific tabs, you can make swift calls without the need to enter any dial numbers.
To configure the speed dial on the web Phone > Speed Dial > Speed Dial Contacts Management interface.
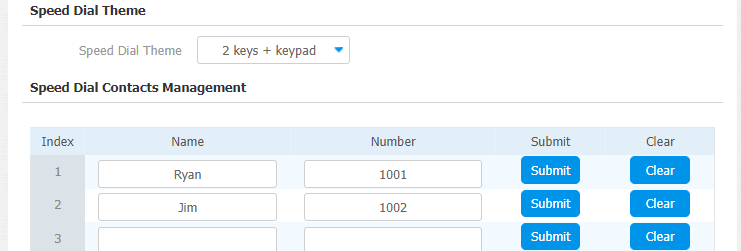
Speed Dial Theme: Define layouts for speed dial buttons and the keypad on the dial screen. The 9 options are explained as follows:
Options | Descriptions |
|---|---|
Standard | Display time and keypad. |
Auto | Display all speed dail buttons set by the users. |
1 Key | Display a single contract without the keypad. |
1 Key + Keypad | Display a single dial button with the keypad. |
2 Keys+ Keypad | Display up to 2 dial buttons with the keypad. |
4 Keys+ Keypad | Display up to 4 dial buttons with the keypad. |
8 Keys | Display up to 8 dial buttons without the keypad. |
16 Keys | Display up to 16 dial buttons without the keypad. |
64 Keys | Display up to 64 dial buttons without the keypad. |
Note:
This function exclusively applies to Villa and Office themes.
Group Speed Dial
R29 allows you to make speed dial to the contacts in one contact group. When you press the Reception icon on the door phone, you can dial all the contact numbers in the group at the same. You can navigate to Intercom > Key/Display > Speed Dial Setting.

Group: Determine whether to disable this function and specify the group to which it should be applied. Once selected, the phone will speed-dial all its included contacts.
Dial Key Order
The door phone provides two keypad key display options: Normal and disordered. Opting for the Disordered setting means that the arrangement of keys is randomized each time, enhancing security by preventing password spying.
You can navigate to Intercom > Key/Display > Keypad Display Mode of PIN Interface.

Display Mode: Determine the layout of the keys in the keypad. Selecting Disorder will randomize the positions of the keys on the device.


-20190329_%E5%89%AF%E6%9C%AC.png)