Device Network Connection
To ensure normal functioning, make sure that the device has its IP address set correctly or obtained automatically from the DHCP server.
Check the network on the web Status > Basic > Network information Interface.

Set up the network connection on the Network > Basic interface.

IP Channel: Select the IP channel from IPv4, IPv6, and IPv4&IPv6.
IPv4/IPv6:
DHCP: DHCP mode is the default network connection. If the DHCP mode is selected, the device will be assigned by the DHCP server with IP address, subnet mask, default gateway, and DNS server address automatically.
Static IP: When static IP mode is selected, the IP address, subnet mask, default gateway, and DNS server address should be configured according to the network environment.
IP Address: Set up the IP address when the static IP mode is selected. To access the device’s web settings with the IP address, your computer should be on the same local network as the device.
Subnet Mask: A subnet mask tells your device which IP addresses are part of your local network and which ones are not. For example, if the subnet mask is 255.255.255.0, it means that devices with similar starting IPs (like 192.168.1.x) are in the same network.
Default Gateway: The gateway is like a bridge between your device and other networks, such as the internet. Usually, it’s the IP address of your router.
Preferred/Alternate DNS Server: Domain Name System(DNS) is the overall system or network that handles the translation of domain names (like www.example.com) into IP addresses (like 192.0.2.1), which computers use to identify each other on a network. The door phone connects to the alternate DNS server when the primary one is unavailable.
Subnet Prefix Length: Indicate how many bits of an IP address are used to identify the network portion.
You can also set up the network on the Setting > Network screen.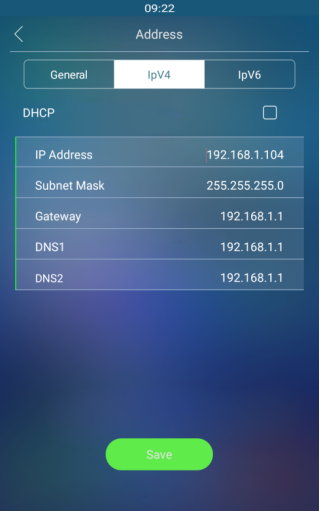
Device Local RTP Configuration
Real-time Transport Protocol(RTP) lets devices stream audio and video data over a network in real time.
To use RTP, devices need a range of ports. A port is like a channel for data on a network. By setting up RTP ports on your device and router, you can avoid network interference and improve audio and video quality.
Set it up on the web Network > Advanced > Local RTP interface.

Starting RTP Port: Set the port value to establish the start point for the exclusive data transmission range.
Max RTP Port: Set the port value to establish the endpoint for the exclusive data transmission range.
Device Deployment in Network
To facilitate device control and management, configure Akuvox intercom devices with details such as location, operation mode, address, and extension numbers.
Set it up on the Network > Advanced > Connect Setting interface.
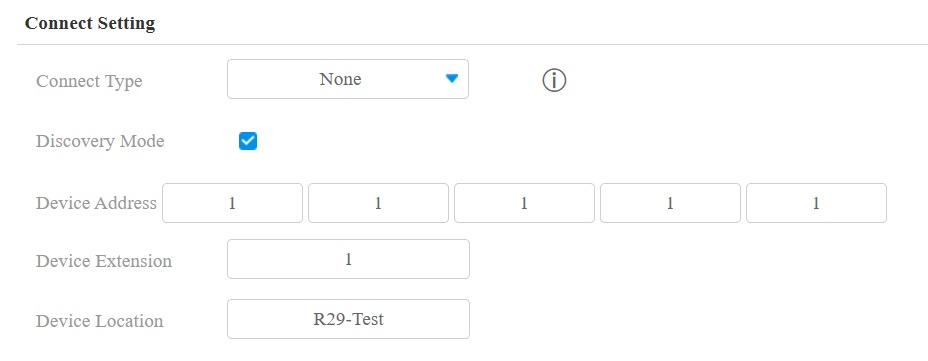
Connect Type: It is automatically set up according to the actual device connection with a specific server in the network, such as SDMC, Cloud, or None. You can also select it manually.
None: None is the default factory setting, indicating the device is not in any server type. Devices connect directly to each other or within a local area network (LAN) without relying on external servers.
Cloud: The device is connected to the SmartPlus Cloud, a cloud-based system simplifying property access management. The Cloud mode allows devices to interact intelligently with one another and the mobile SmartPlus App, backing up data daily and on different hosts. It suits projects requiring smart, flexible, and secure deployment and management.
SDMC: The device is connected to the SDMC, a management platform designed for on-premise projects. The SDMC mode manages and backs up data remotely on a local network. It also boasts many features suitable for projects requiring high privacy, lower cost, and centralized management.
Discovery Mode: Enabled by default. Available for None server mode. The device can be discovered by other devices in the network. When disabled, the device will be concealed and not be discovered by other devices.
Device Address: Available for None server mode. Uneditable in Cloud and SDMC mode. It can be used to call the device. Specify the device address by entering device location information from the left to the right: Community, Building, Unit, Floor, and Room in sequence.
Device Extension: Available for None server mode. Uneditable in Cloud and SDMC mode. The device extension number ranges from 0 to 10.
Device Location: The location in which the device is installed and used. Available for None server mode. Uneditable in Cloud and SDMC mode.
Device Web HTTP Setting
This function manages device website access. The device supports two remote access methods: HTTP and HTTPS (encryption).
Set it up on the Network > Advanced > Web Server interface.

Protocol: HTTP is enabled by default.
NAT Setting
Network Address Translation(NAT) lets devices on a private network use a single public IP address to access the internet or other public networks. NAT saves the limited public IP addresses and hides the internal IP addresses and ports from the outside world.
To register SIP accounts on third-party servers in a Wide Area Network(WAN), you need to enable the RPort feature on the intercom devices to establish a stable connection.
To set it up, go to the Account > Advanced > NAT interface.

UDP Keep Alive Messages: If enabled, the device will send the message to the SIP server, which will recognize whether the device is online.
UDP Alive Messages Interval: Set the message-sending interval from 5-60 seconds. The default is 30 seconds.
RPort: Enable the RPort when the SIP server is in a WAN.
LTE Wireless Connection (Optional)
The LTE module enables cellular network connectivity for the device in areas where wired networks are unavailable, particularly beneficial for installations in older buildings.
Only R29C-L has an LTE module, and the LTE setting can only appear after the SIM card is inserted. Set up the LTE on the device's Settings > Cellular Network screen.
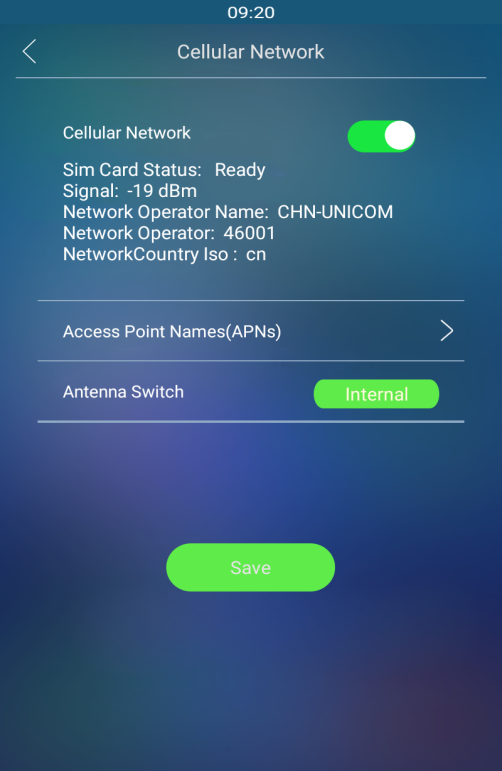
Cellular Network: Move the toggle switch on and off to enable or disable the LTE function.
Access Point Name (APNs): Enter the settings from your network provider. These can be found from the network provider of your SIM Card; you may have different options for PAYG or Contract sims.
Antenna Switch: Select the internal and external antenna for signal transmission. The internal antenna is a built-in antenna in the device, while the external antenna is optional and is used to reinforce the signal in a compromised network environment.
LTE Data Usage Control
LTE data usage can be checked on the device web Network > Data Usage interface.
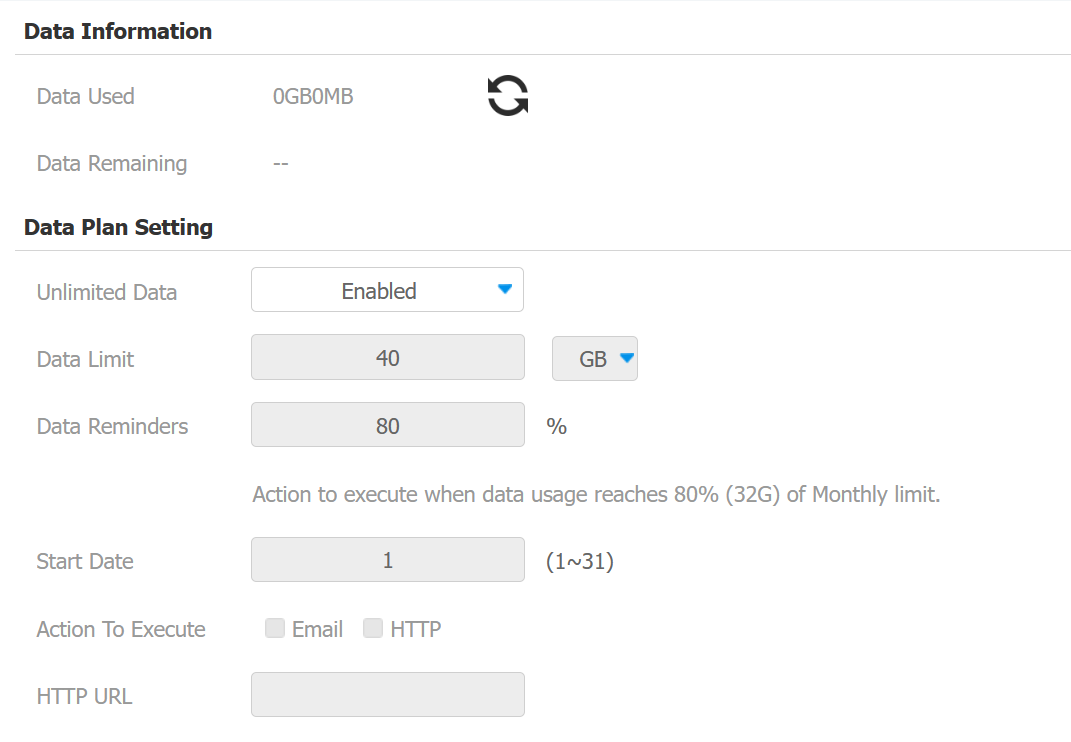
Unlimited Data: Enable this option if you have an unlimited data plan; otherwise, leave it disabled (default).
Data Limit: Set the data limit based on the plan, either 40 GB or MB.
Data Reminders: Choose a percentage to trigger notifications. For example, at the default of 80%, notifications will be sent when this threshold is reached.
Start Date: Specify the start date for monitoring data usage (1-31). The default is 1. If set to 1, monitoring ends on the last day of the month. If set to 2, it ends at 23:59 on the first day of the next month. For months with fewer than 31 days, monitoring ends on the last day of that month.
Action To Execute: Select Email or HTTP URL to receive notifications when data usage reaches the limit.
HTTP URL: Enter the HTTP URL for notifications.