Home Screen Display
You can configure the home screen background and the foreground colors on the web Intercom > Advanced > UI interface.

Foreground Color: Select from Default, Black, White, or Custom. When Custom is selected, click Submit before manually setting the color.
Background Color: Select from Default, Black, White, or Custom. When Custom is selected, click Submit before manually setting the color.
Home Screen Display Theme
The device supports three themes: Intercom, VMS, and Directory. You can apply the desired theme to different scenarios.
Set it up on the Intercom > Key/Display > Theme interface.

Theme:
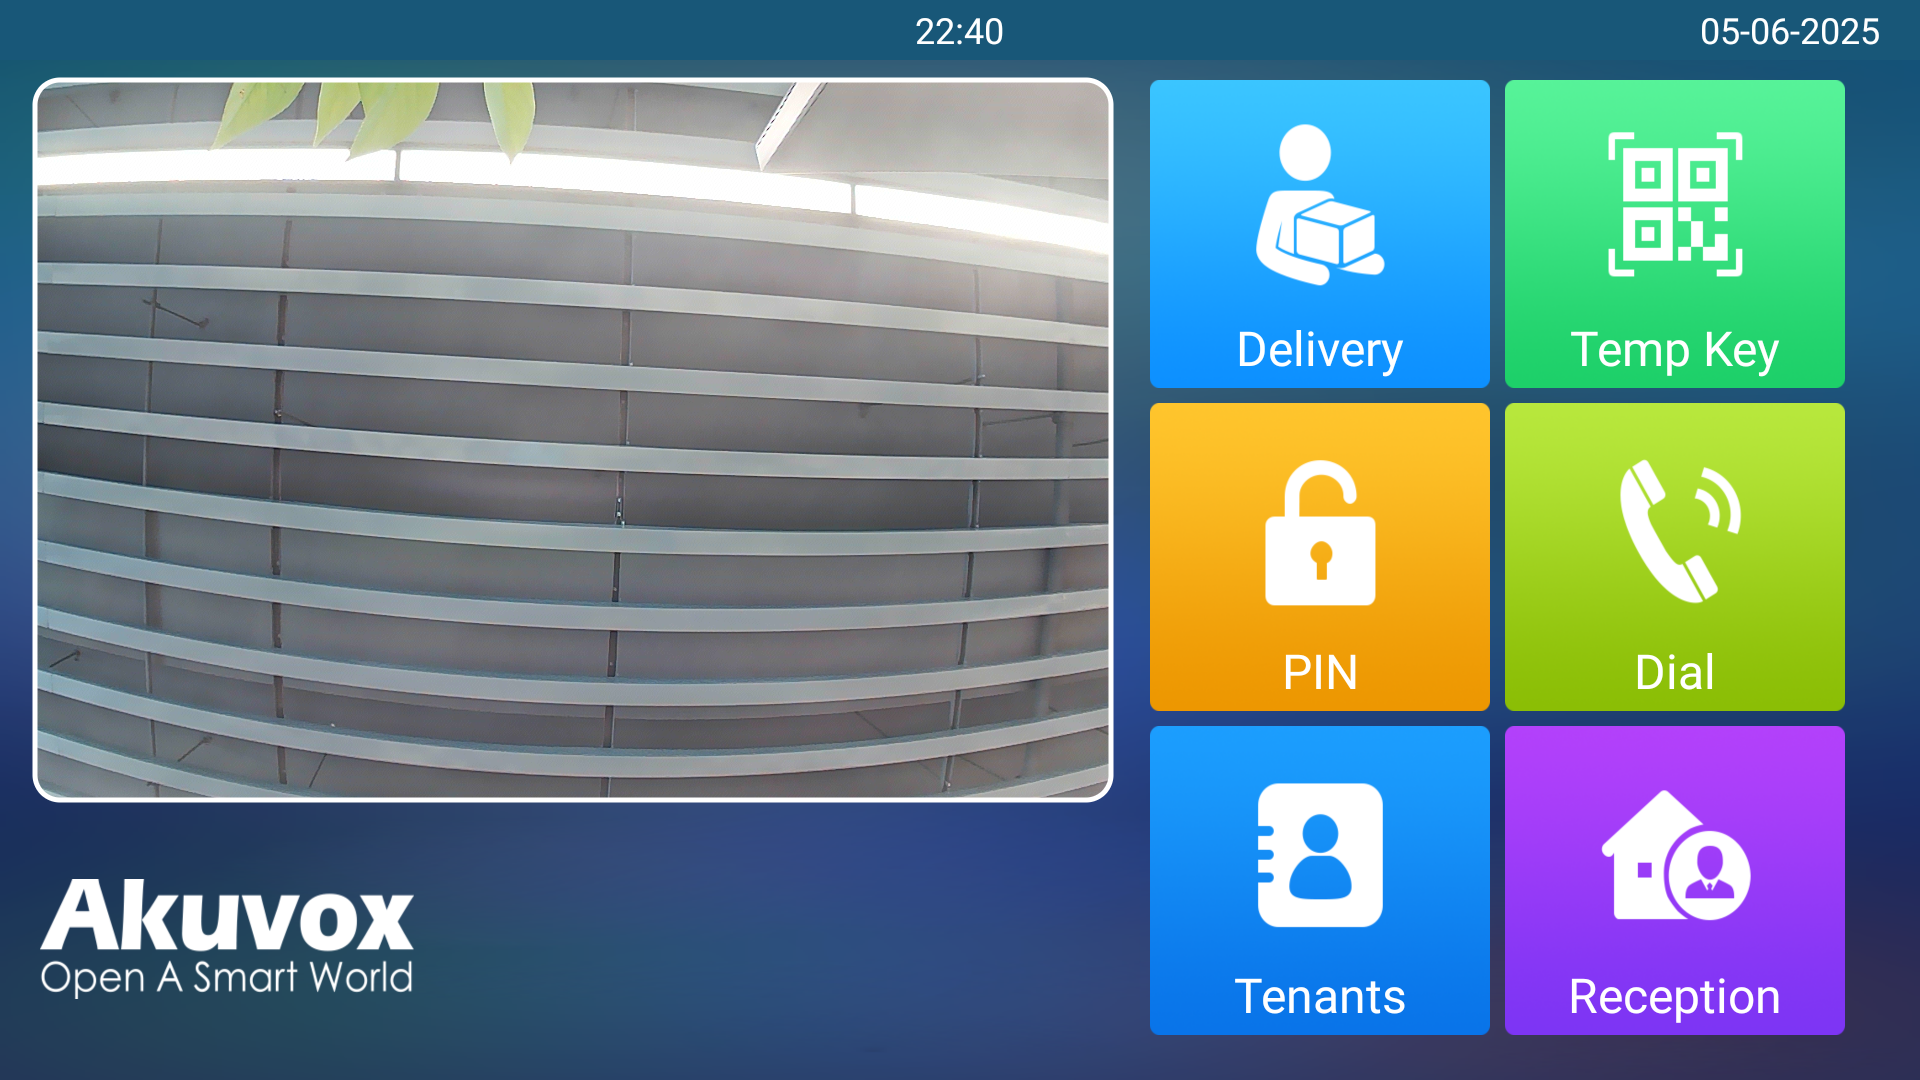
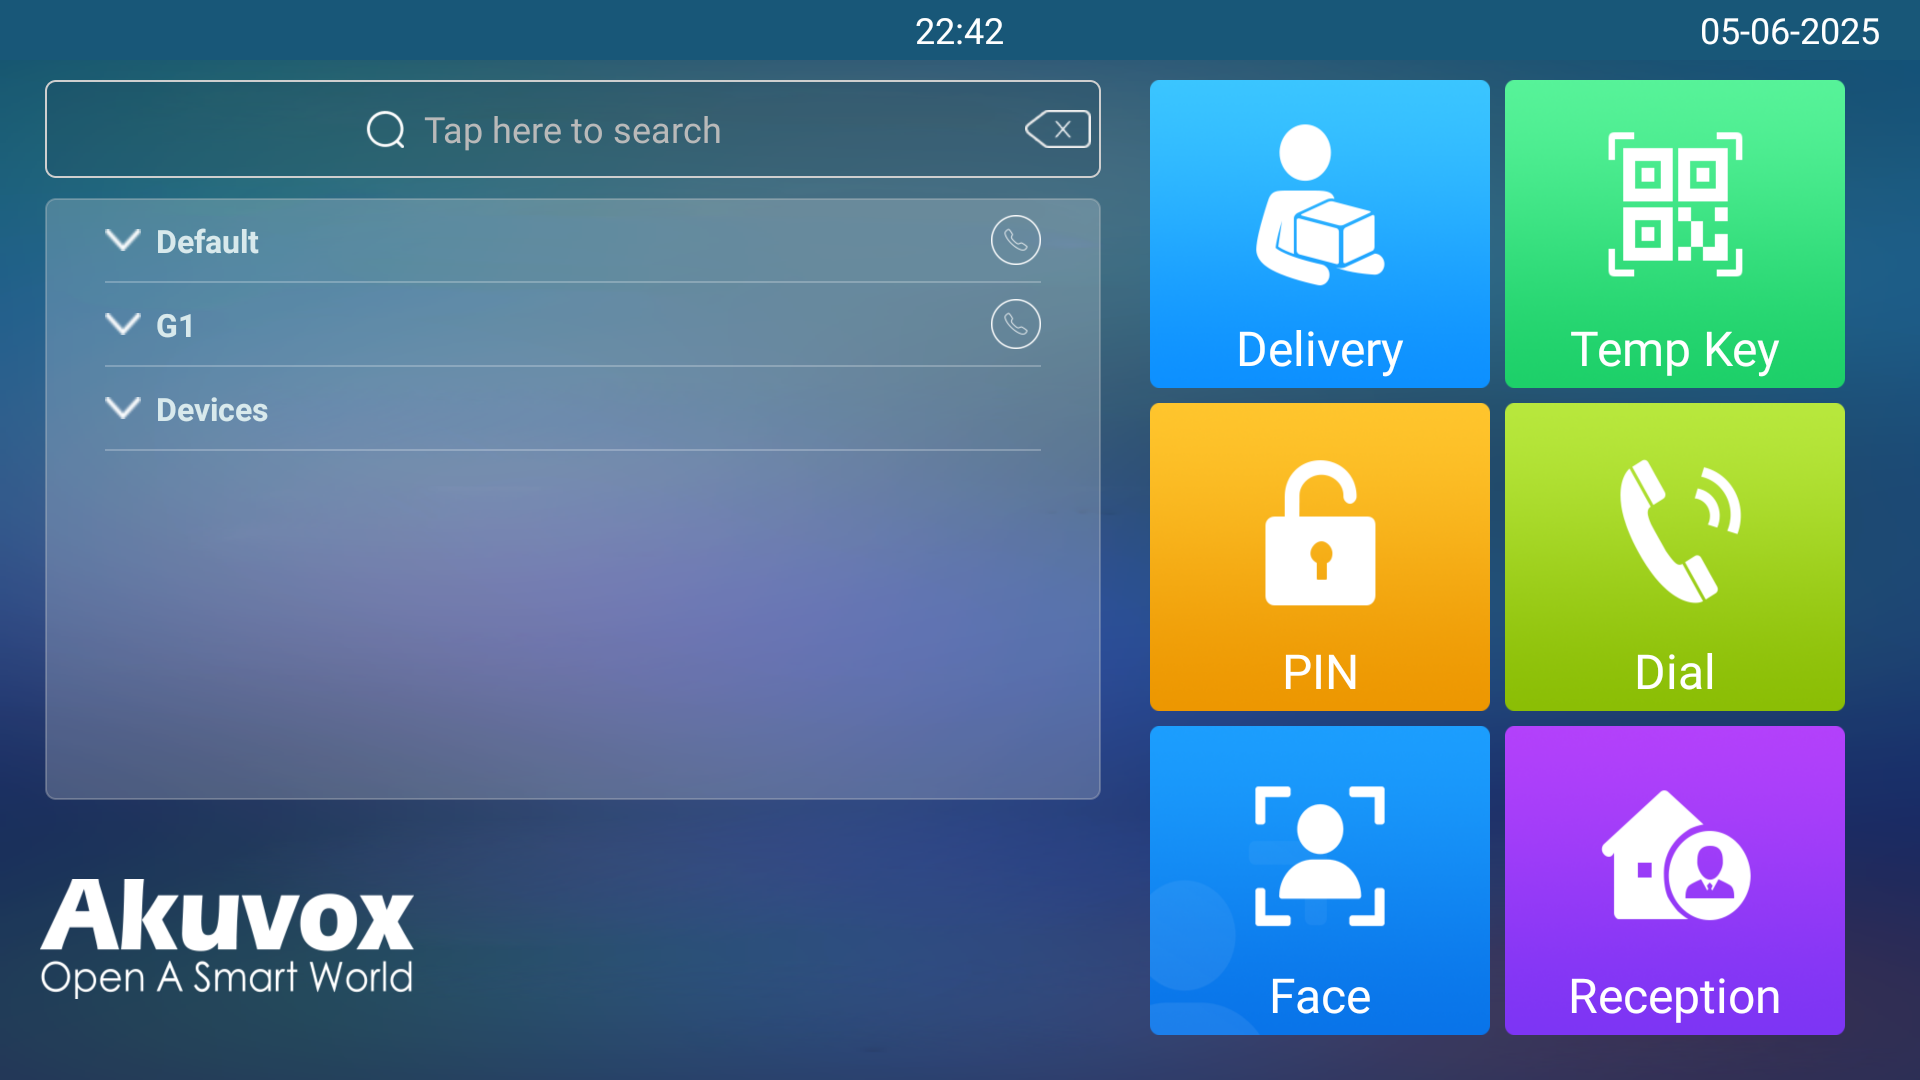
Intercom: The default theme includes six parts - Delivery, Temp Key, PIN, Dial, Tenants, and Reception(Speed Dial).
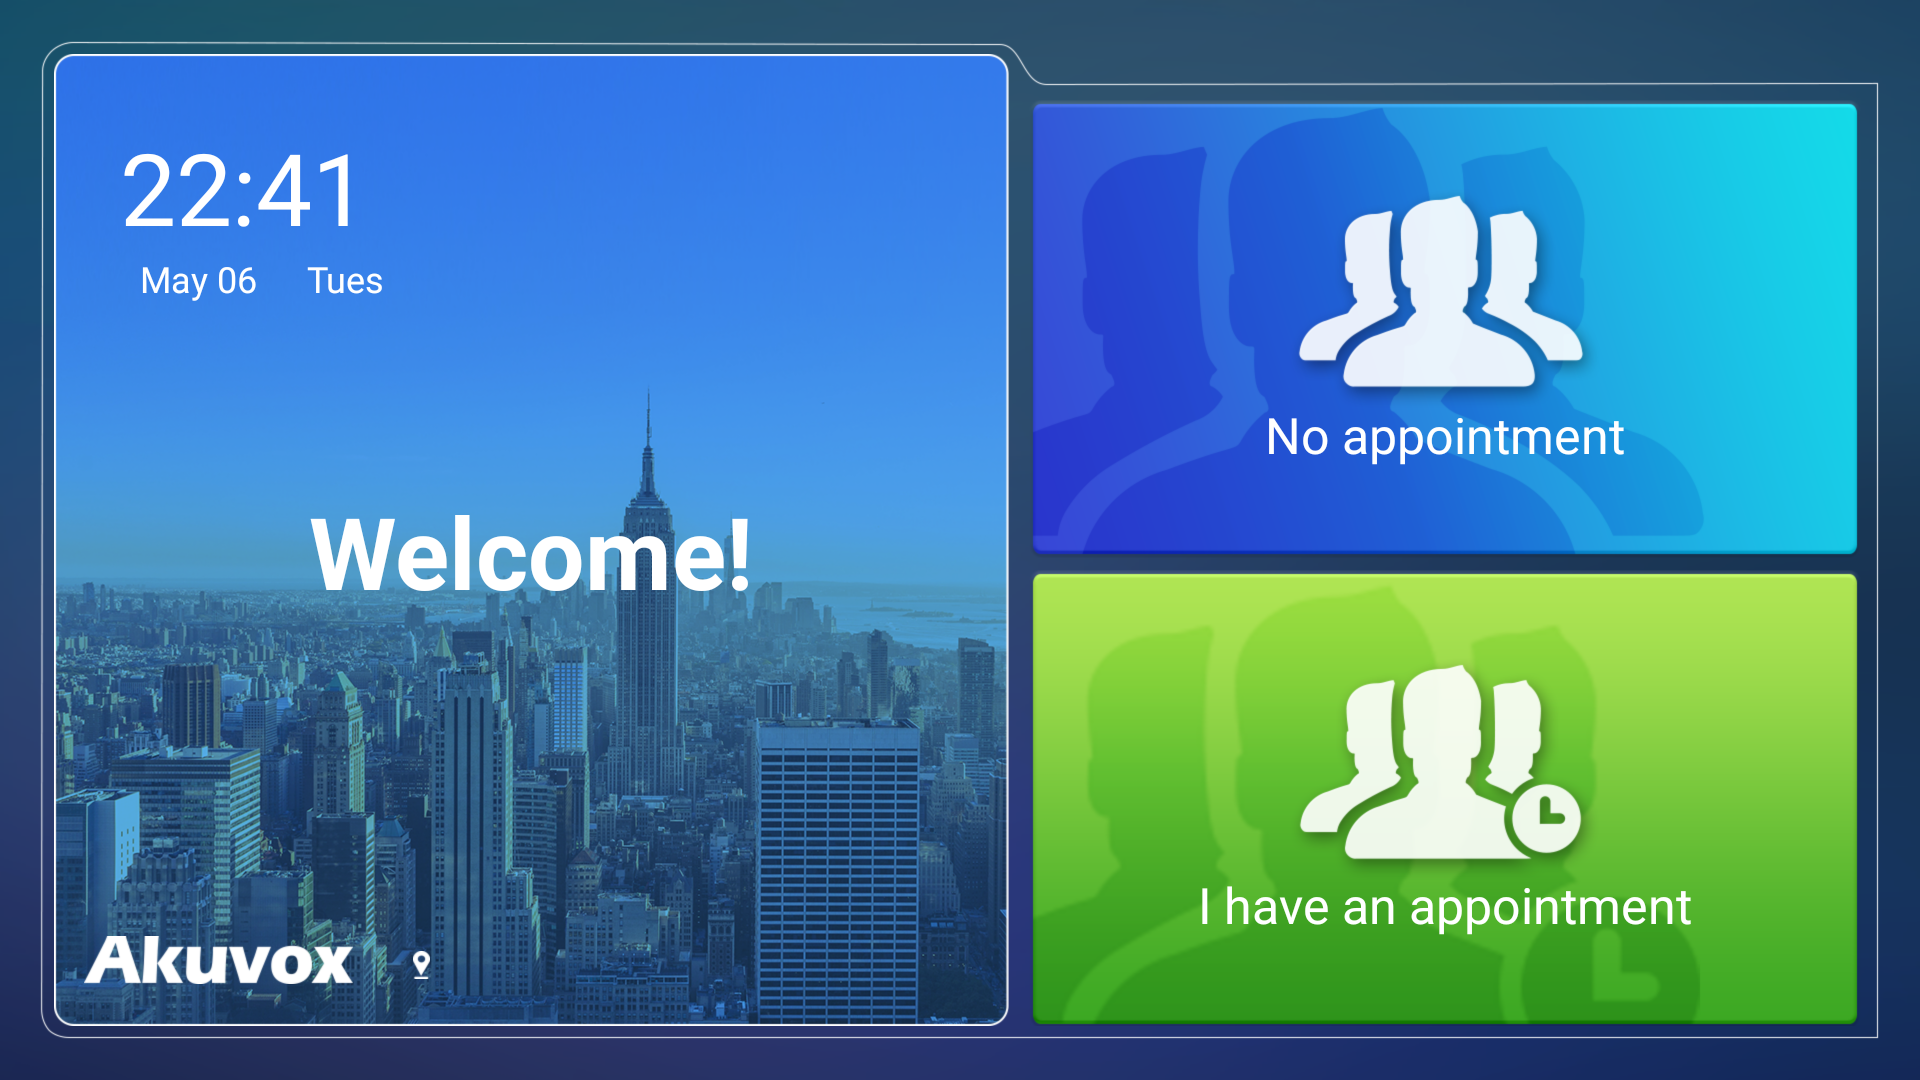
VMS: The theme includes two parts - I have an appointment and No appointment. The latter needs to be used with Akuvox SmartPlus.
Directory: The theme displays contacts on the home screen.
Intercom
VMS
Directory
Intercom Theme
You can set up the key display, including the PIN, Dial, Tenant keys, etc, in the Intercom theme.
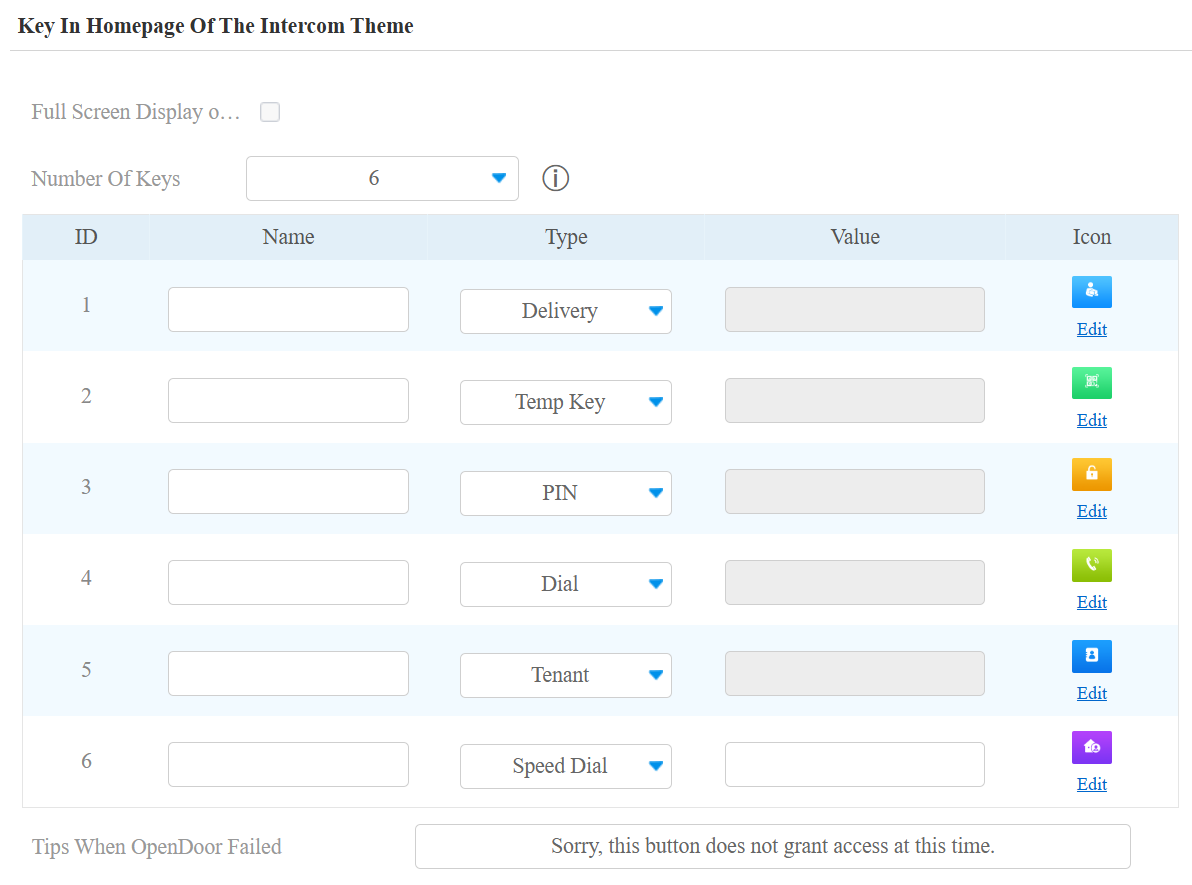
Go to the Intercom > Key/Display > Key In Homepage Of The Intercom Theme interface.
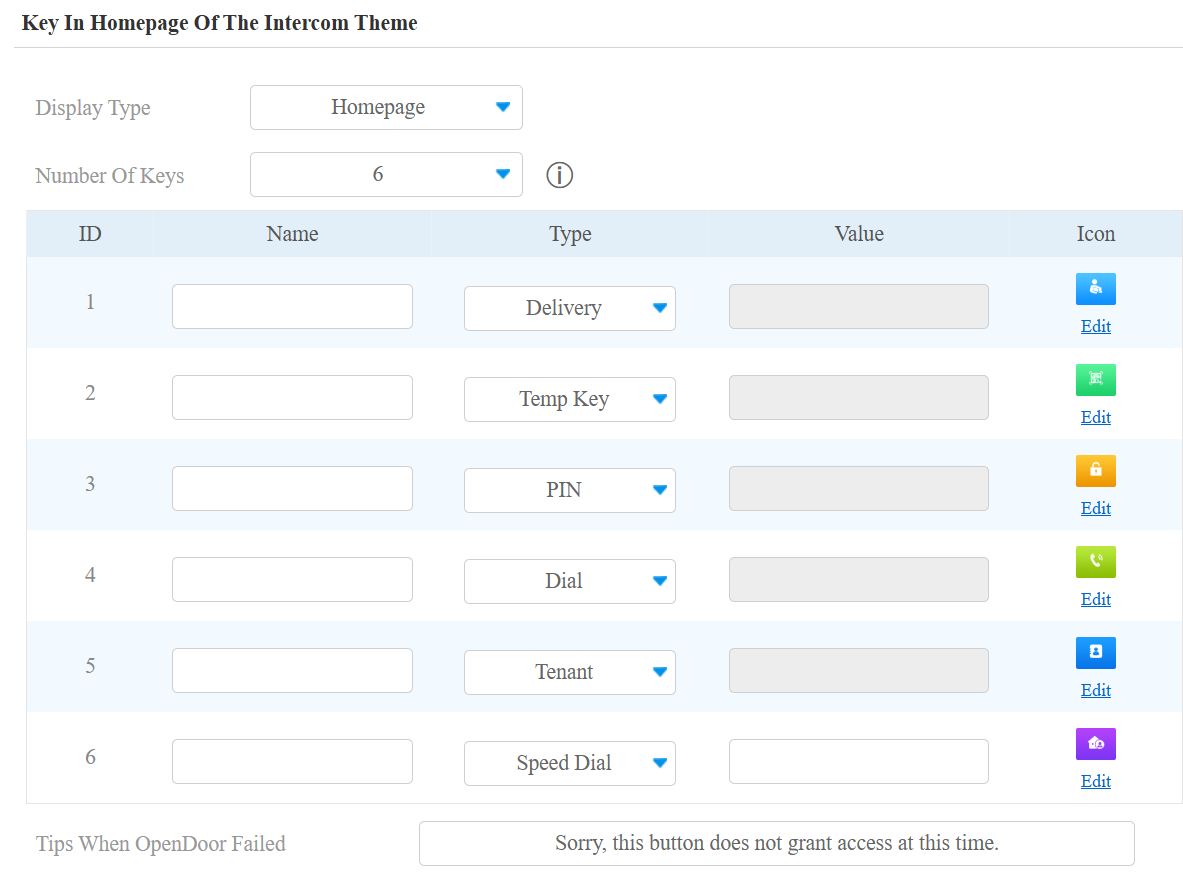
Display Type: Select the homepage display type.
Home Page: The default displays Delivery, Temp Key, PIN, Dial, Contact, and Speed Dial tabs and the facial recognition box.
Delivery: Display the delivery screen.
Temp Key: Display the temp key screen.
PIN: Display the PIN screen.
Dial: Display the Dial screen.
Tenant: Display the Contact screen.
Visitor: Display the visitor welcoming screen.
Number of Keys: Set how many keys(0-16) to be displayed on the home screen. The default is 6.
Name: Name the key. The name will not change the attribute of the key.
Type: Select the key type.
Relay: You can specify which relay to trigger and set up the relay schedule.
Visitor: When visitors press the key, they need to select the person to be visited and enter their basic information before calling the resident. Residents can answer the call and give visitors a temporary key to open the door, or directly open it for them.
Value: It is available for those features that need to be set up with numbers, such as Speed Dial.
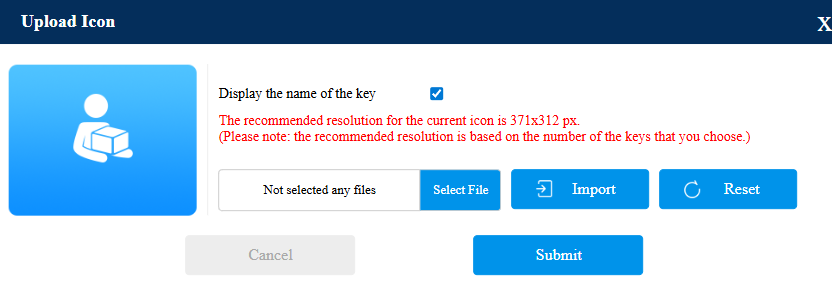
Icon: You can upload the icon picture by clicking Edit. The recommended resolution varies by the key number. Click Import to upload the file.
Language Setting Of The Intercom Theme
You can set up the language display in the Intercom theme on the Intercom > Key/Display > Language Setting of The Intercom Theme interface.
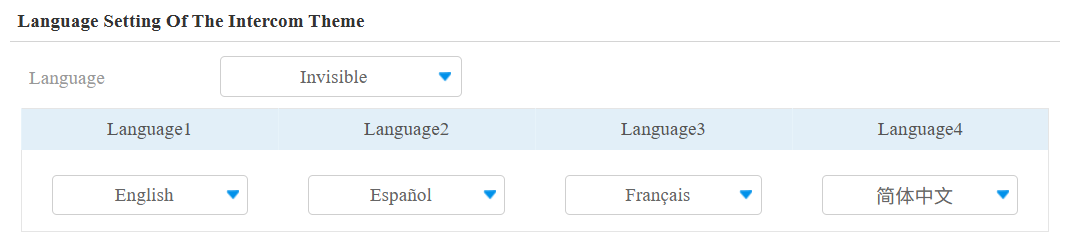
Language: When Invisible is selected, the language options will be hidden on the home screen.
Language 1-4: You can select four languages to be displayed on the home screen.
Reception Tab Setup
You can set up the reception tab in the Building theme, with which users can make a call and open the door.
Set it up on the Intercom > Key/Display > Reception Action In Intercom interface.
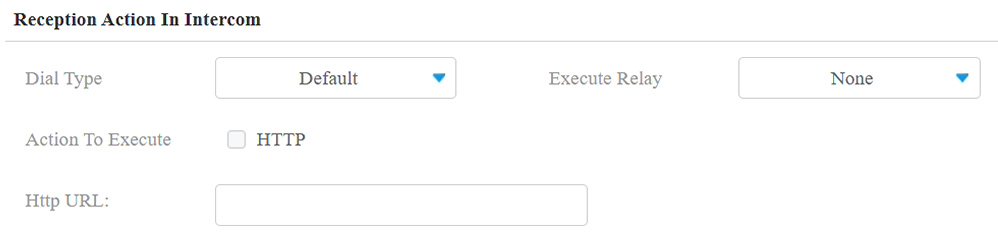
Dial Type: Select the account to make the call. It applies to the registered account. If both accounts are registered, Account1 is used when Default is selected.
Execute Relay: Select the relay to be triggered along with the call.
Action to Execute: Set the action to be triggered with the call. When triggered, the HTTP message can be captured and displayed in the corresponding packets. To utilize this feature, enable the HTTP server and enter the message content in the designated box below.
HTTP URL: Enter the HTTP URL to perform certain actions. The format of sending the message is http://HTTP server’s IP/Message content.
VMS Theme
You can customize the home screen background picture display in the VMS mode on the web Intercom > Key/Display > Homepage Customization (VMS Theme) interface.
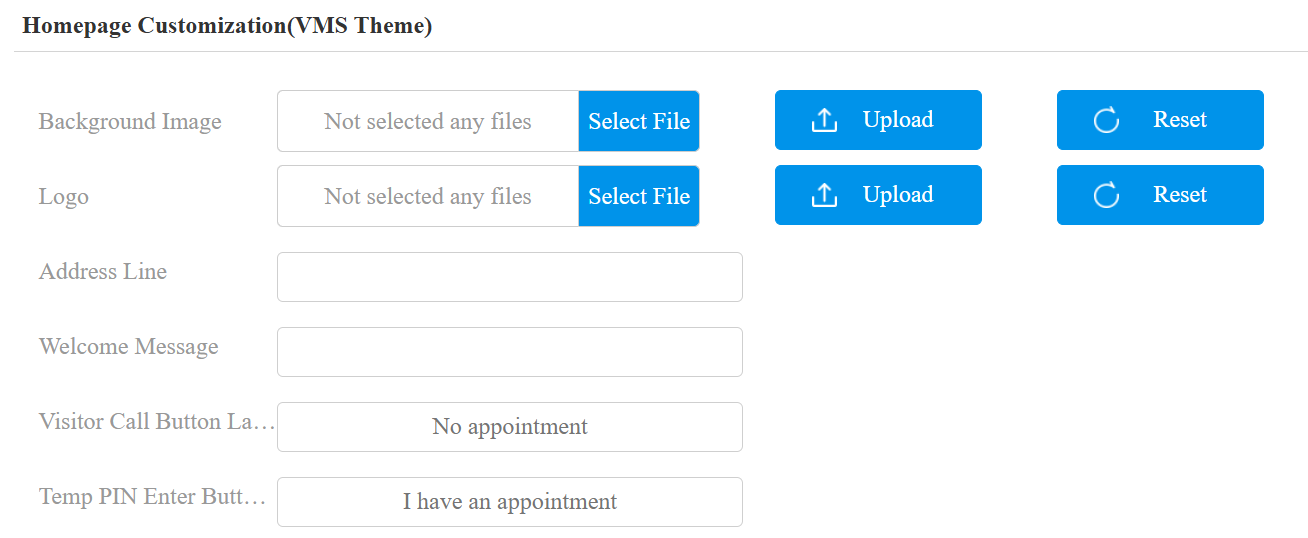

Background Image: The picture on the left of the home screen. Support JPG; no limitation on size.
Logo: The logo is displayed on the left side. Support JPG; no limitation on size.
Address Line: Display the current community address of the device. The default is blank in non-cloud mode, and displays the address issued by the cloud. It supports customization with no more than 128 characters.
Welcome Message: “Welcome!” is the default. It supports up to 128 characters.
Visitor Call Button Label: “No appointment” is the default. Customize the content if needed.
Temp PIN Enter Button Label: “I have an appointment” is the default. Customize the content if needed.
VMS Integration
This feature is available in the VMS theme or when a key type is Visitor in the Intercom theme. It is used to integrate with the third-party system. You can enter an address with a maximum of 255 characters, and Akuvox will send the visitor information to the address.
Set it up on the Intercom > Key/Display > VMS Integration interface.

Directory Theme
You can set up the key display, including the PIN, Dial, Tenant keys, etc, in the Directory theme.
Go to the Intercom > Key/Display > Key In Homepage Of The Intercom Theme interface.
Full Screen Display of Directory: Disabled by default. When checked, the function icons will be hidden to fully display the directory.
Number of Keys: Set how many keys(0-16) to be displayed on the home screen. The default is 6.
Name: Name the key. The name will not change the attribute of the key.
Type: Select the key type.
Relay: You can specify which relay to trigger and set up the relay schedule.
Visitor: When visitors press the key, they need to select the person to be visited and enter their basic information before calling the resident. Residents can answer the call and give visitors a temporary key to open the door, or directly open it for them.
Value: It is available for those features that need to be set up with numbers, such as Speed Dial.
Icon: You can upload the icon picture by clicking Edit. The recommended resolution varies by the key number. Click Import to upload the file.
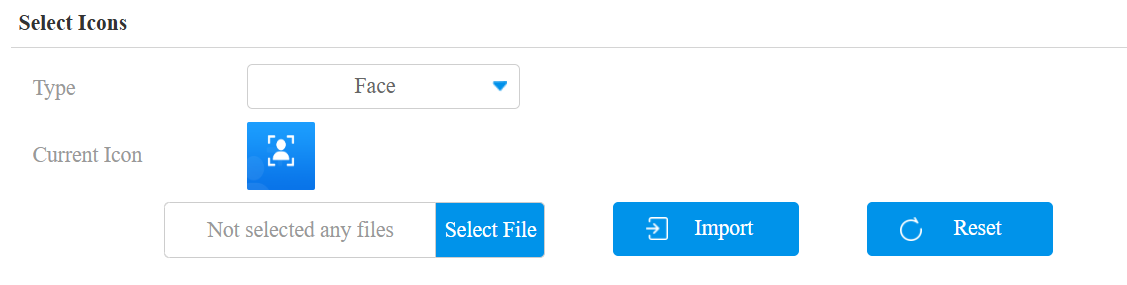
Besides, you can customize the icon picture for the Face key.
Scroll to the Select Icons part.
Click Select File to choose the picture from your drive, and click Import to upload it.
Click Reset to remove the picture.
Type: Select the key type.
Speed Dial Setting
The Speed Dial feature allows users to make speedy calls by pressing a specific tab without entering any numbers.
To set it up, go to the Intercom > Key/Display > Speed Dial Setting interface.
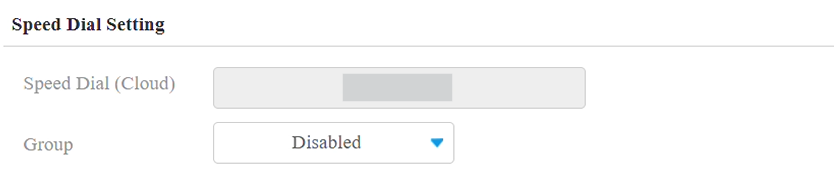
Speed Dial(Cloud): Display the number(s) configured on the SmartPlus Cloud when the device is connected to the Cloud.
Group:
Disabled:
When the device is connected to the Cloud, Disabled means the call will be made to other devices and the SmartPlus App based on where it is installed.
When the device is deployed locally, the call will be made to the number you fill in the value field of the Speed Dial(Reception) key.
[Cloud Group Name]: The call will be made to all contacts in the group. The Cloud group name is the APT name.
PIN Keypad Display
The device provides normal and scrambled keypad display options. Opting for the scrambled setting means that the arrangement of keys is randomized each time, enhancing security by preventing password spying.
Set it up on the Intercom > Key/Display > Keypad Display Mode Of PIN Interface.

Screensaver Settings
You can set the screen saver duration as well as the timing for the screen to be turned off for both screen protection and power reduction.
Set up screensaver on the Intercom > Advanced > Standby interface.

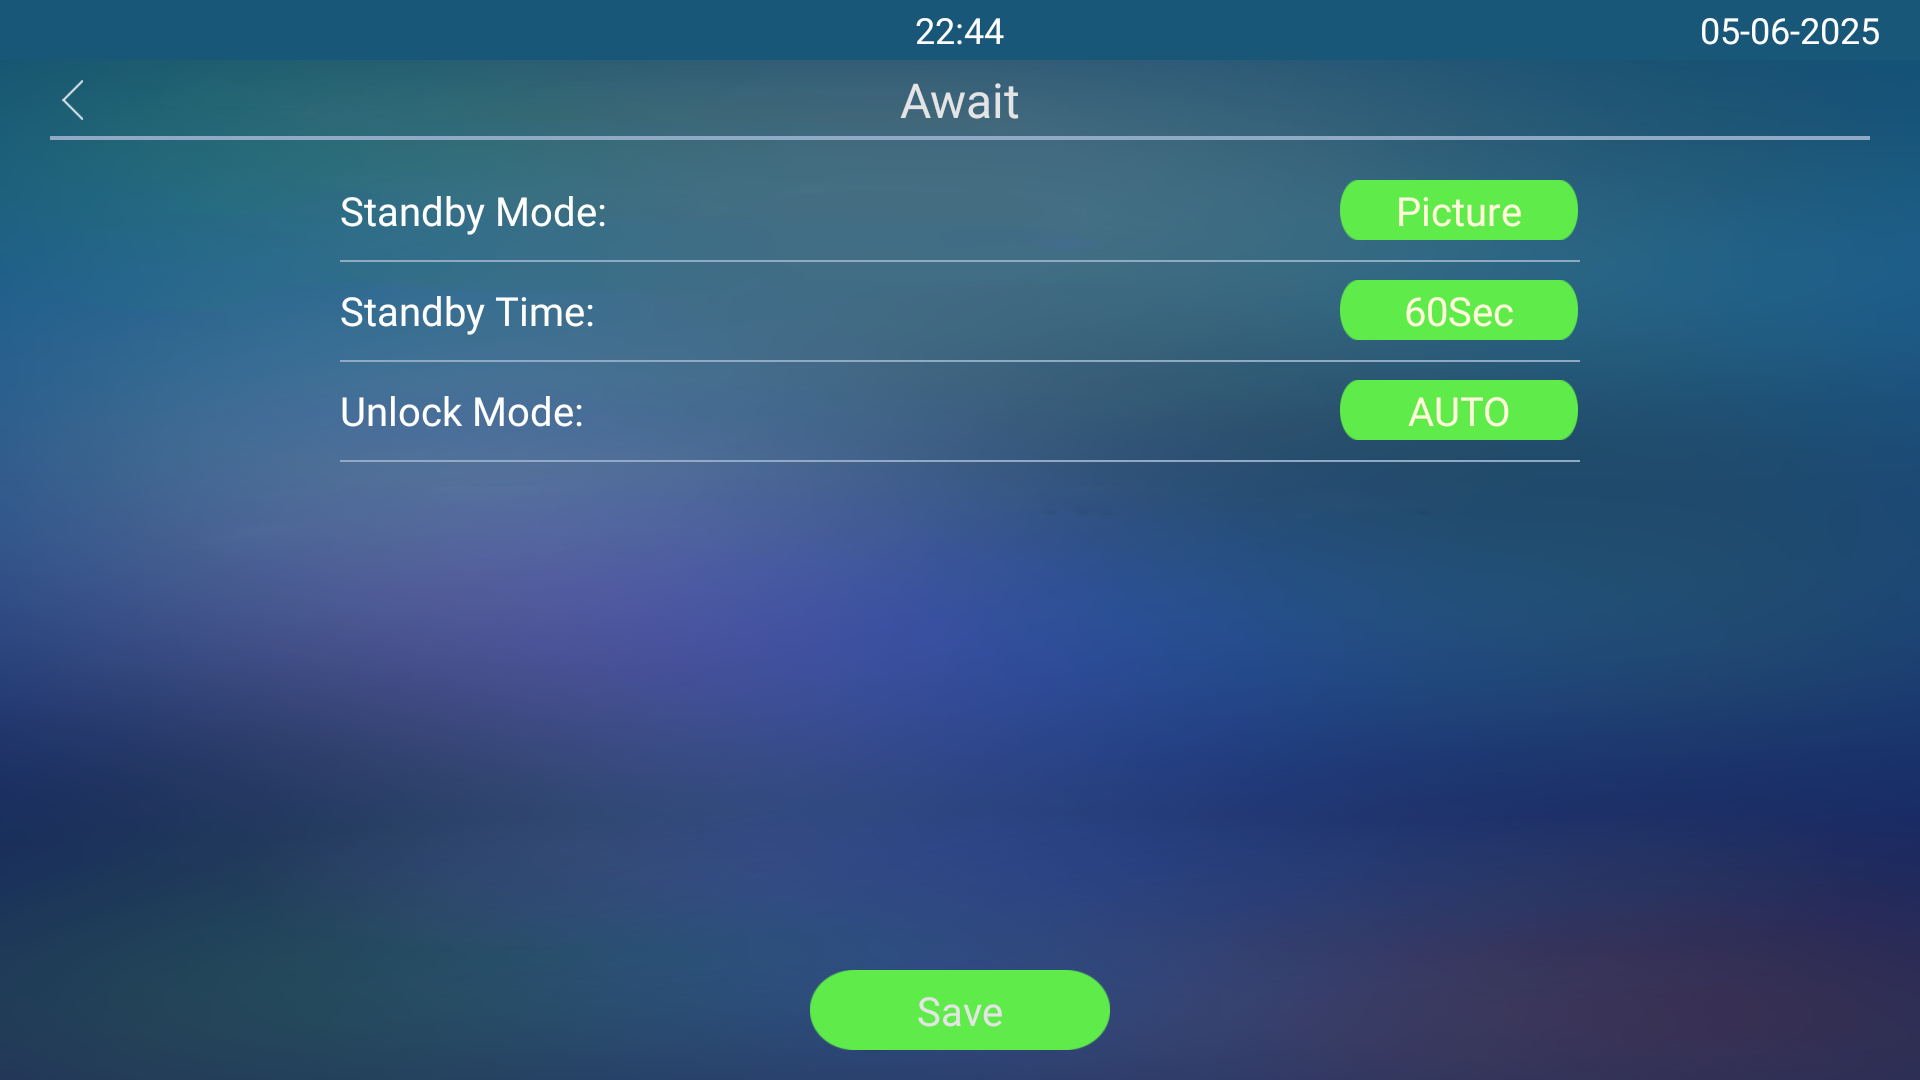
Standby Mode:
None: The screen will stay on without going into the screensaver mode.
Blank: The screen will turn off.
Image: Display the uploaded picture as the screen saver.
Standby Time: Set the screen saver start time from 30 seconds to 180 seconds. The screensaver starts when the device detects no operation or no one is approaching.
Unlocked Mode:
Auto: The screen will be awakened when the device detects someone approaching.
Manual: Wake up the screen by touching it.
Note
Unlocked Mode cannot be changed from Auto to Manual when the Screensaver Mode is set as Blank Screen.
You can also set up the screensaver on the Setting > Await screen.
Upload Screensaver
You can upload screen-saver images individually or in batches to the device via the web interface, enhancing visual experience or serving publicity purposes.
Set it up on the Phone > Import/Export > Upload Screensaver Picture interface. You can upload a maximum of 5 pictures, and each picture will be displayed in rotation according to the ID order with the specific time duration (Interval) you set.
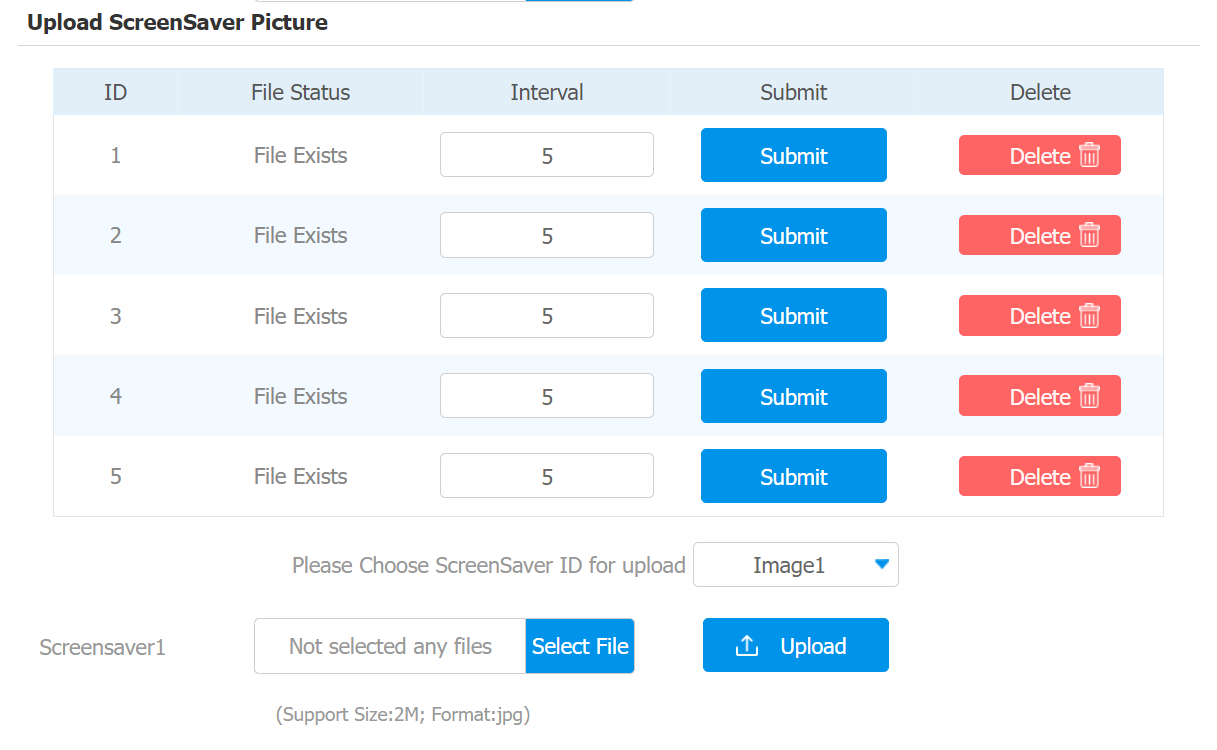
Interval: The time for playing the screensaver picture. The time ranges from 0 to 120 seconds. The picture will not be shown if the time is 0.
Note
The pictures uploaded should be in JPG format with 2M pixels maximum.
The previous picture with a specific ID order will be overwritten when picture with the same ID is uploaded.
Upload Device Booting Image
You can upload the booting image to be displayed during the device’s booting process.
Set it up on the Phone > Import/Export > Boot Animation (.png /.zip) interface.

Note
File format: .png or .zip; Max Size: 20MB for ZIP file, 2MB for PNG picture.
The recommended resolution is 1920×1080.
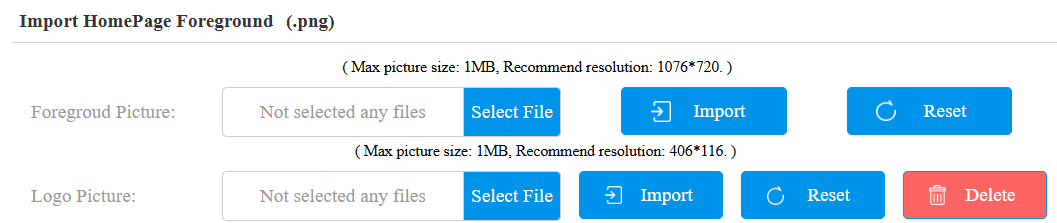
Upload Homepage Foreground
Upload the homepage foreground picture on the Phone > Import/Export > Import HomePage Foreground (.png) interface.
Note
File format: .png; Max Size: 1MB.
The recommended resolution is 1076×720.
Upload Device Logo
Upload the logo on the Phone > Import/Export > Import HomePage Foreground (.png) interface.
Note
File format: .png; Max Size: 1MB.
The recommended resolution is 406×116.
Open Door Text Prompt
You can enable the open door text prompt for both door-opening success and failure.
To set it up, go to the Intercom > Relay > Open Door Text Prompt interface.
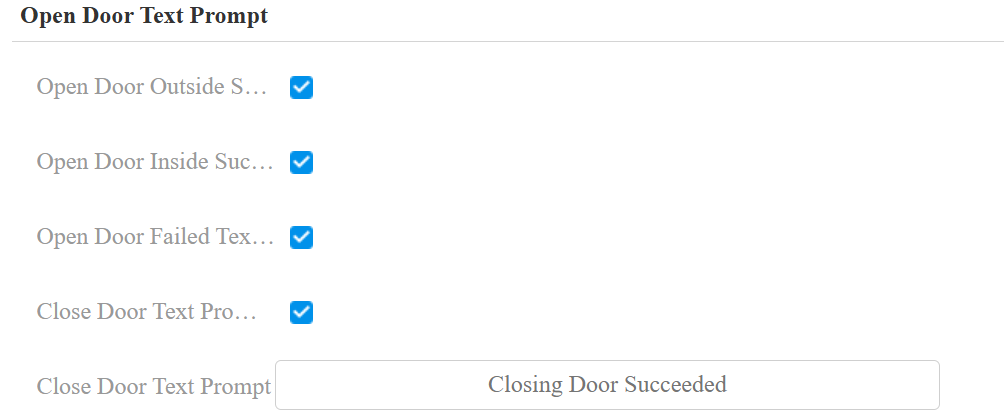
Open Door Outside Succeeded Text Prompt: Display a text prompt after the door is opened by the device-supported access methods except for the exit button.
Open Door Inside Succeeded Text Prompt: Display a text prompt after the door is opened by pressing an exit button(the input is triggered).
Close Door Text Prompt: The door-closing text prompt works for the relay(s) set to the Bistable mode. When users close the door with their credentials, the prompt will be displayed on the device’s screen.
Appearance
In the Intercom theme, the device offers various appearance options, catering to different aesthetic needs and festival atmospheres.
Change the appearance on the Intercom > Key/Display > Appearance interface.
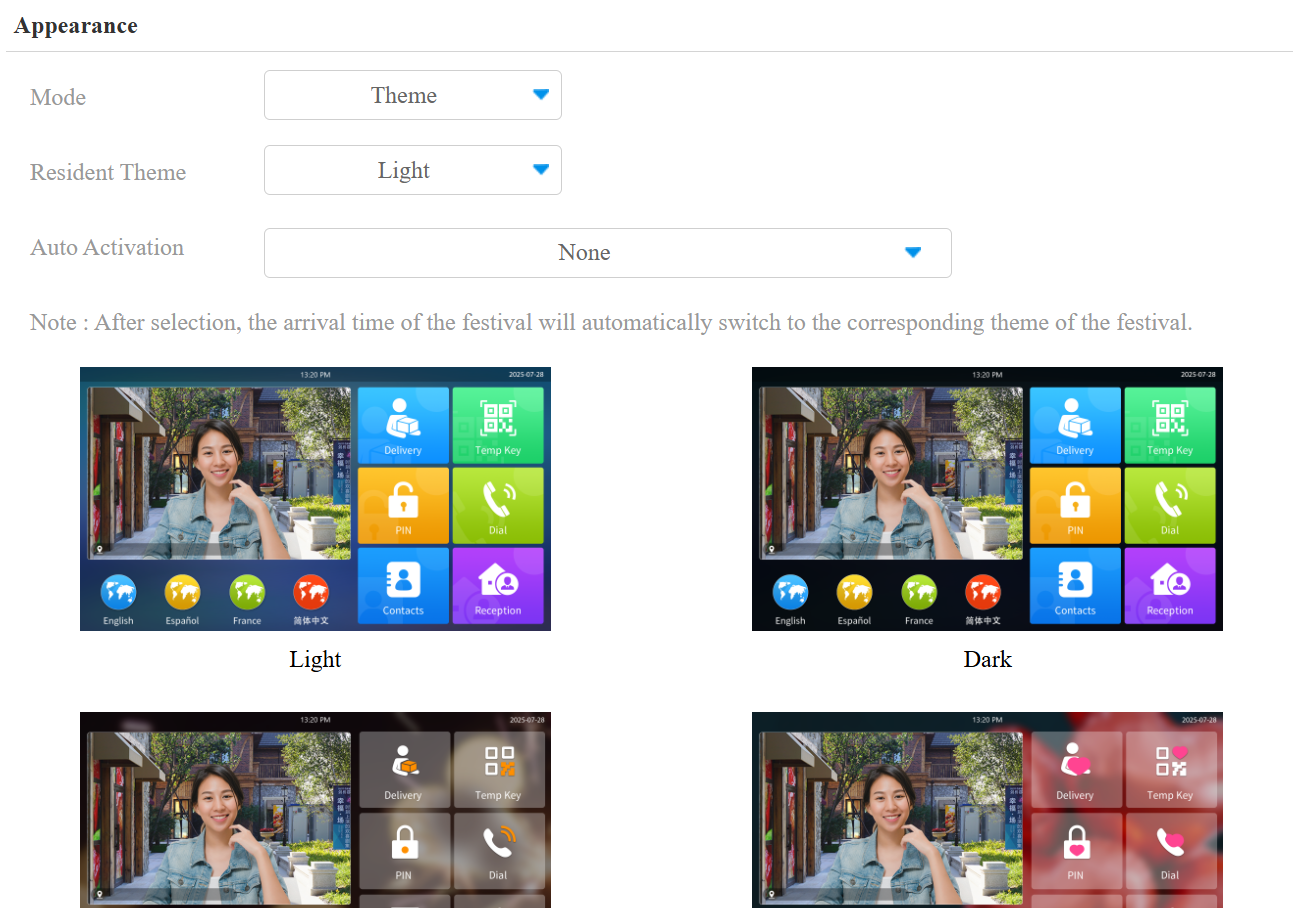
Mode:
Theme: The default option. When selected, you can check the desired appearance option.
Customization: When selected, disable the appearance function.
Resident Theme: Select the desired appearance.
Auto Activation: None by default. Select the desired festival appearance(s). The device will automatically switch to the appearance during the festival.