Screen Display Setting on the Device
You can configure a variety of features of the screen display in terms of brightness, screen saver and font size, etc.
Set up screen display on the Settings > Display screen.
.bmp)
Brightness: Move the bar to adjust the screen brightness. The default brightness is 5.
Screen Saver: Determine whether to display the screensaver when the device goes into sleep mode.
Sleep: Set the sleep timing based on the screen saver (15 seconds to 30 minutes).
If the screen saver is enabled, the sleep time here is the screen saver start time. For example, if you set it as 1 minute, the screen saver will start automatically when the device has no operation for 1 minute.
If the screen saver is disabled, the sleep time here is the screen turn-off time. For example, if you set it as 1 minute, the screen will be turned off automatically when the device has no operation for 1 minute.
Screen Saver Time: The time for displaying the screensaver.
Screen Saver Type:
Local Pictures: Display pictures uploaded to the indoor monitor as the screen saver.
Clock: Display the clock as the screen saver.
Screen Lock: Lock the screen after the screen is turned off(turn dark). You are required to enter the code to unlock the screen. The initial password is empty. Tap ✔ to unlock the screen.
Font Size: Select the font size between Normal and Huge.
Screen Display Setting on the Web Interface
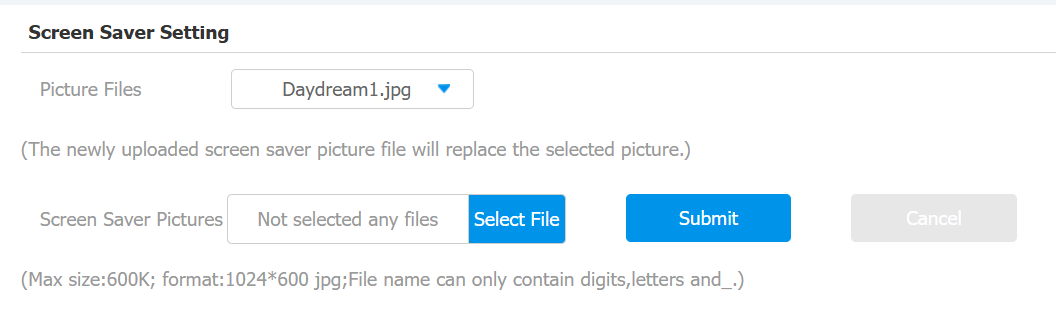
You can configure the screen display on the Device > Display Setting > Screen Saver Setting interface.
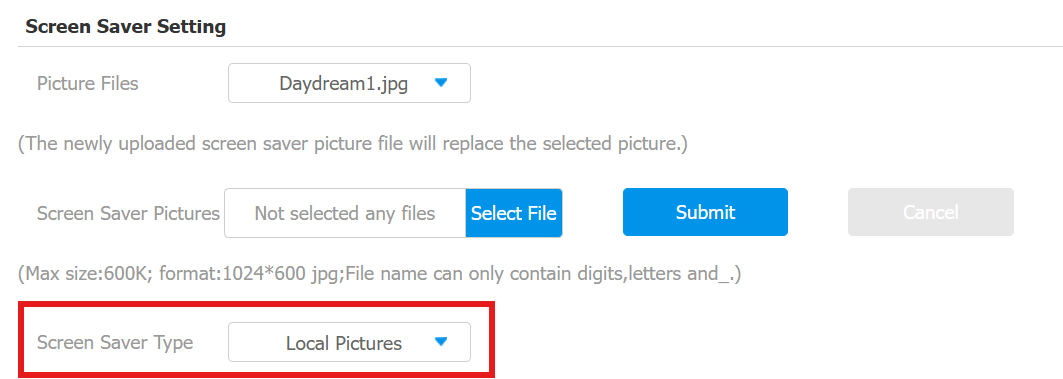
Screen Saver Type:
Local Pictures: Display pictures uploaded to the indoor monitor as the screen saver.
Clock: Display the clock as the screen saver.
Set up the screen brightness and sleep time on the Device > Key/Display interface.

Brightness: The larger the value, the brighter the screen. The default brightness is 5.
Sleep: Set the sleep timing based on the screen saver (15 seconds to 30 minutes).
If the screen saver is enabled, the sleep time here is the screen saver start time. For example, if you set it as 1 minute, the screen saver will start automatically when the device has no operation for 1 minute.
If the screen saver is disabled, the sleep time here is the screen turn-off time. For example, if you set it as 1 minute, the screen will be turned off automatically when the device has no operation for 1 minute.
Upload Screen Saver
You can upload screen-saver images individually or in batches to the device via the web interface, enhancing visual experience or serving publicity purposes.
Set it up on the web Device > Display Setting > Screen Saver Setting interface.
Note
The previous pictures with a specific ID order will be overwritten when the repetitive designation of pictures to the same ID order occurs.
The pictures uploaded should be in .jpg format with 600k maximum.
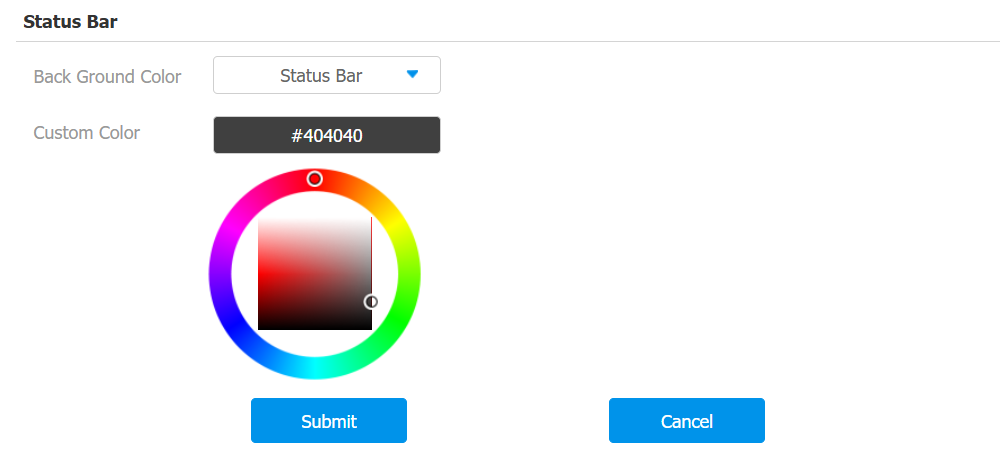
Background Color Setting
You can set the color of the status bar and function area on the Device > Display Setting interface.
The device will reboot to make the setting effective after you set it up.
(1).bmp)
Upload Device Booting Image
You can upload the booting image to be displayed during the device’s booting process.
Navigate to Device > Logo interface.
Upload Web Logo
You can upload the web logo to be displayed in the upper left corner of the device web.
Set it up on the Device > Logo interface.

Home Screen Display
You can select the Classic or Call List Simple home screen display.
Go to Device > Key/Display > Home Page Mode interface.

Call List Simple:
.bmp)
Default:
.bmp)
Home Screen Tab Display
Akuvox indoor monitor allows you to customize icon display on the Home screen and More screen for the convenience of users' operation.
To set it up, navigate to Device > Key/Display interface.
Type: Select the functional icon to be displayed on the home screen.
Smart Lock: This option works for the Call List Simple mode. It is available when the indoor monitor and akubela SL50 are added to the same room in SmartPlus Cloud projects. Users can tap Smart Lock to open the lock.
Label: Name the icon. The DND icon cannot be renamed.
Configure the icons displayed on the More page on the same interface.
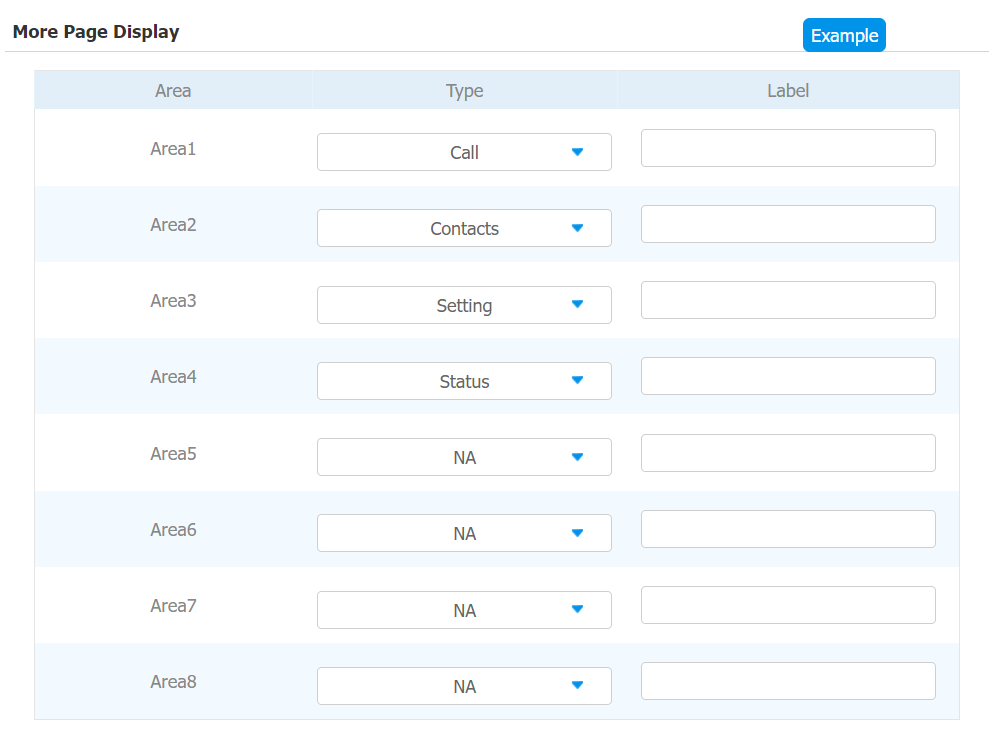
Type: Select the functional icon to be displayed on the home screen.
Smart Lock: This option works for the Call List Simple mode. It is available when the indoor monitor and akubela SL50 are added to the same room in SmartPlus Cloud projects. Users can tap Smart Lock to open the lock.
Label: Name the icon. The DND icon cannot be renamed.
Functional Tabs Display
You can set up the display of functional tabs on the talking, monitor, and call preview screens.
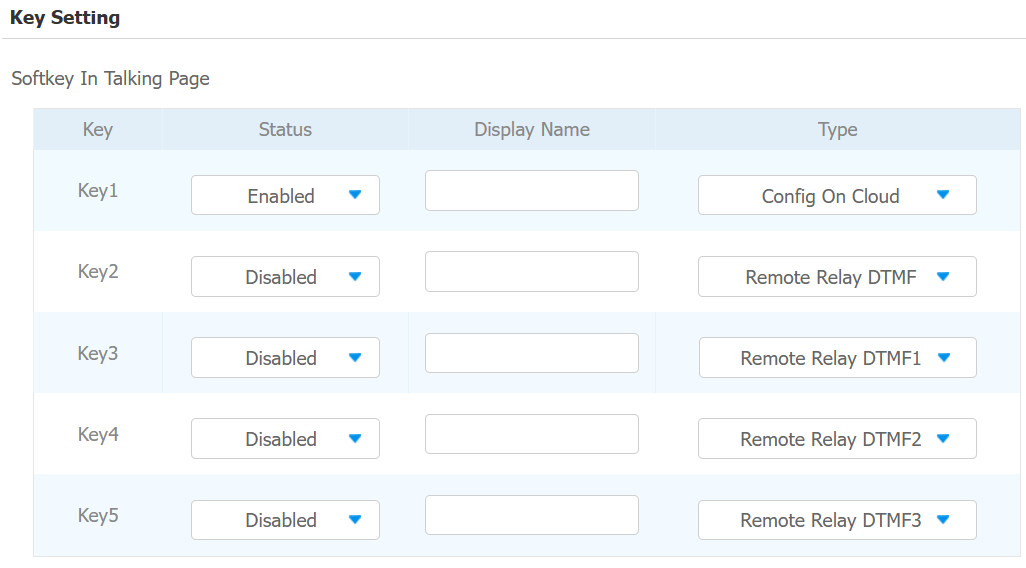
To set up tabs on the Talking screen, go to Device > Key/Display > Softkey in Talking Page interface.
Mute: Tap to mute the talking.
Hold: Tap to hold the call. A video call be switched to an audio call while holding.
New: Tap to initiate a new call.
Capture: Tap to take a screenshot of the talking screen.
Keyboard: Tap to display the keyboard.
Hang Up: Tap to end the call.
To set up tabs on the Call Preview screen, go to Device > Key/Display > Softkey in Preview Page interface.
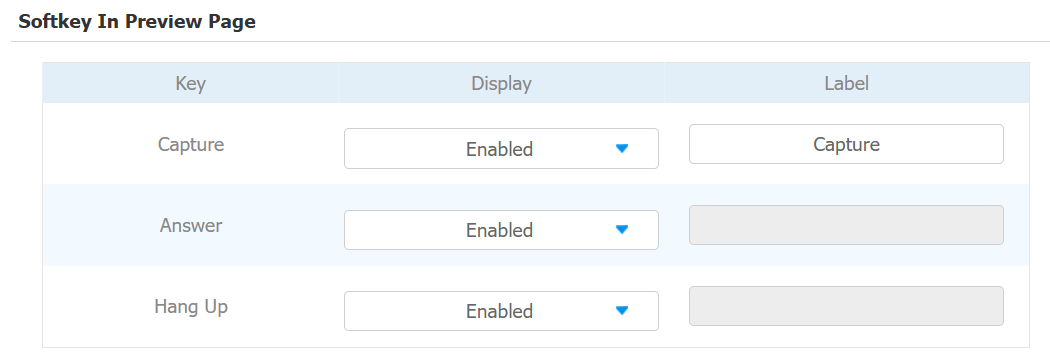
Capture: Tap to take a screenshot of the preview screen.
Answer: Tap to answer the incoming call.
Hang up: Tap to end the call.
To set up tabs on the Monitor screen, go to Device > Key/Display > Softkey in Monitor Page interface.
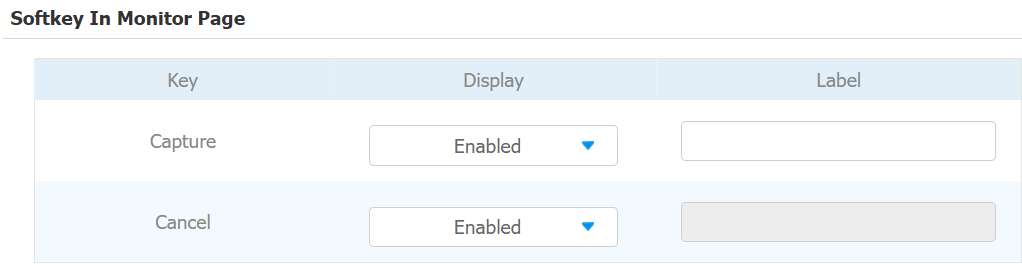
Capture: Tap to take a screenshot of the monitor screen.
Cancel: Tap to exit the monitor screen.
Unlock Tabs Configuration
You can customize the unlock tab and select the relay type on the talking, monitor, and call preview screen for the door opening.
To set up the unlock tab on the talking screen, go to Device > Relay > SoftKey In Talking Page interface.
Status: With it enabled, the unlock tab will be displayed on the talking screen.
Display Name: Name the unlock tab.
Type: Select the relay trigger type according to the actual setup.
Scroll down to set up the unlock tab on the call preview screen on the SoftKey In Call-Preview Page section.

Status: With it enabled, the unlock tab will be displayed on the call preview screen.
Display Name: Name the unlock tab.
Type: Select the relay trigger type according to the actual setup.
Scroll down to set up the unlock tab on the Home or More screen on the SoftKey In Homepage or More Page section.

Status: It is enabled by default.
Display Name: Name the unlock tab.
Type: Select the relay trigger type according to the actual setup.
Scroll down to set up the unlock tab on the Monitor screen on the SoftKey In Monitor Page section.

Status: With it enabled, it will be displayed on the monitor screen.
Display Name: Name the unlock tab.
Type: Select the relay trigger type according to the actual setup.
Note
Please refer to the Access Control Configuration chapter for different unlock types setup.