This guide introduces the basic door access configuration methods on Akuvox door phones, helping installers and property managers quickly understand how users can unlock doors and how to assign access credentials.
Overview
To enable door access, you need to:
Create a user.
Assign one or more access methods.
Specify relay and access permissions.
Supported access methods include:
Private PIN
RF Card
Facial Recognition (model dependent)
DTMF during a call
Exit Button (hardware connection)
…
Note
Supported access methods vary by model.
Add Users on Door Phone Web Interface
All door phones support adding users via their web interface.
You can add a single user or multiple users in a batch on the door phone web interface. In this procedure, you can set up the user's ID and name and door access methods.
This part takes R29 with version 29.30.10.607 as an example.
Add a Single User
Use the device IP to log into its web interface. The initial username and password are admin.
Navigate to Directory > User interface. Click Add.
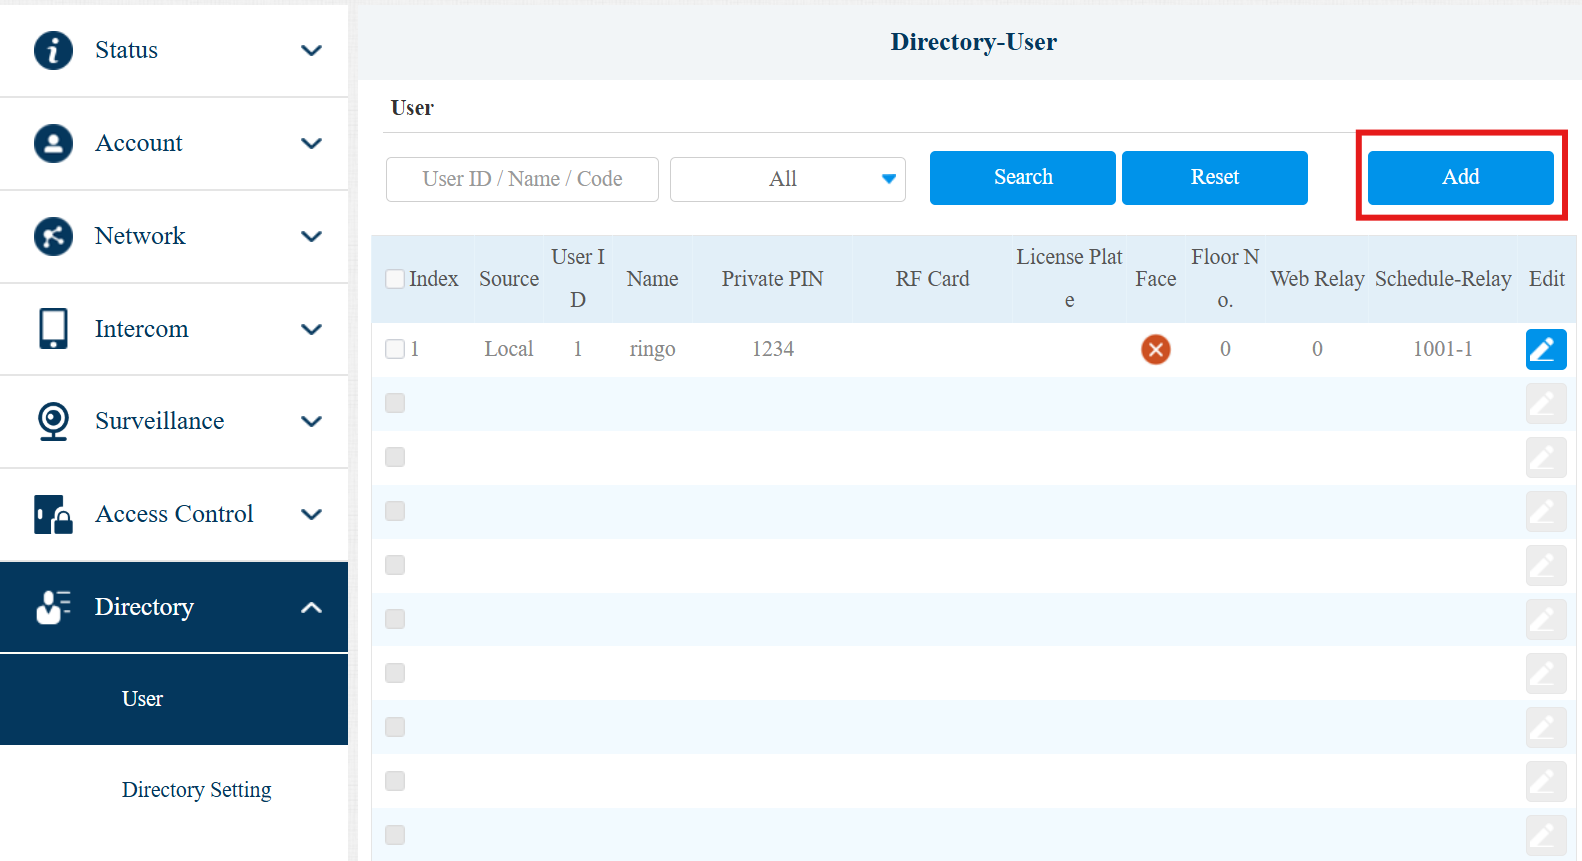
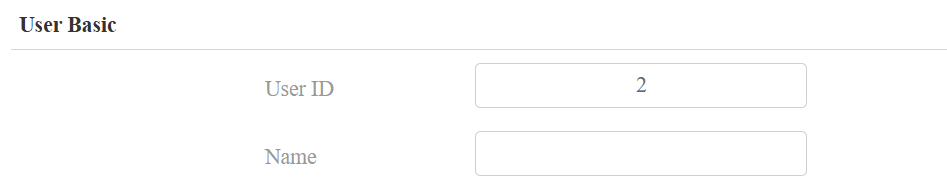
Set the username and assign a unique user ID for identification. The system will generate the user ID automatically.
Set up the desired access methods:
Private PIN: Enter the PIN code within 2-8 digits. Please note that devices without numeric keypads do not support opening doors via private PINs.

RF Card: Click Obtain and place the card on the card reader. The card code will be acquired automatically. Or, you can also enter the card code manually.
To assign more than one card to the user, click +Add. One user can have 5 cards at most.

Note
E12 and E16 only support IC cards.
To learn about the card types supported by specific models, please click here.
Face: Select a full-face photo from your local driver. After adding the user successfully, the status will change from Unregistered to Registered. Click Reset if you want to re-upload the image.
.png)
(1).png)
Set up the access settings before submitting the information.
Relay: Specify the relay to be triggered.
Web Relay: Specify the ID of web relay action commands that you’ve configured.
Building: Optional. The user’s residential building.
Floor No.: Specify the floor(s) that are accessible to the user via the elevator.
Room No.: Optional. The user's room number.
Schedule: Grant the user access to open designated doors during preset periods by relocating the desired schedule(s) from the left box to the right one. Besides custom schedules, there are 2 default options:
- Always: Allows door opening without limitations on door open counts during the valid period.
- Never: Prohibits door opening.
Click Submit.
.png)
Add Users in a Batch
When users become so many that you cannot add them one by one, you can add them in a batch.
1. Use the device IP to log into its web interface. The default username and password are admin.
2. Navigate to Directory > User. Click Export to export the user data.

Note
Add a user first to serve as the template, or the prompt "File not found" will pop up.
Configure AES (Advanced Encryption Standard) only when the config file is encrypted with AES.
3. Extract the .tgz file and open the .csv file in it, and enter the user information(UserID, Name, PIN Code, and Card Code).
4. Save the file and compress it into the .tgz file.

Note
This method does not support for importing face data.
It is recommended using the tool 7-Zip to edit the file if your computer system is Windows.
5. Click Select File, choose the .tgz file from your local driver, and click Import to upload the file.
"File uploaded success" will pop up after importing successfully.

Add Users on Door Phone Screen
Users can also be added directly on the door phone screen.
Please watch the video for detailed steps: [Video]Add Users for Door Opening on Device Screen
Exception
To add cards on X912, R27, and R28, please refer to the article Add Cards on X912, R27, and R28 for detailed steps.
Additional Door Opening Methods
Besides user credentials, doors can also be opened by:
DTMF During a Call
Residents can press a DTMF code during a call to unlock the door.
👉 Watch the configuration video: [Video]Open the Door during a Call using DTMFExit Button Connection
A physical exit button can be connected to the device for indoor unlocking.
👉 Watch the configuration video: [Video]Connect a Push Exit Button to Door Phone for Door Opening