Before Getting Started
The user web portal is intended for family administrators to configure and manage their devices and scenes. Only the administrator account can log in.
NOTE:
The web portal is unavailable when the home center is a HyPanel Lite (KS41), HyPanel Elite 7 (PG42), or G31 Gateway.
Sign in
To login to the user web portal, do one of the following based on device’s cloud connection status.
When not connected with the cloud
Make sure your computer and the devices are on the same local network.
Type in the home center device’s IP address into the browser.

Enter the default username and the password which are both Admin888.
When connected to the cloud
Make sure your computer and the devices are on the same local network.
Enter enter the home center device’s IP address in the browser, or go to https://my.akubela.com.
Log in with the family’s administrator account.

How to Obtain a Family Administrator Account?
Option 1: Request from Your Service Provider
Contact your service provider and provide a valid email address and any required information. A welcome email with your login credentials will be sent to that address.
Option 2: Register on the Panel
After the devices are connected to the cloud, tap Account Registration on the panel to create an administrator account.
Option 3: Register via the BelaHome App
Open the BelaHome app and tap Sign Up in the lower-left corner. After registering, log in and scan the family QR code to become the administrator.
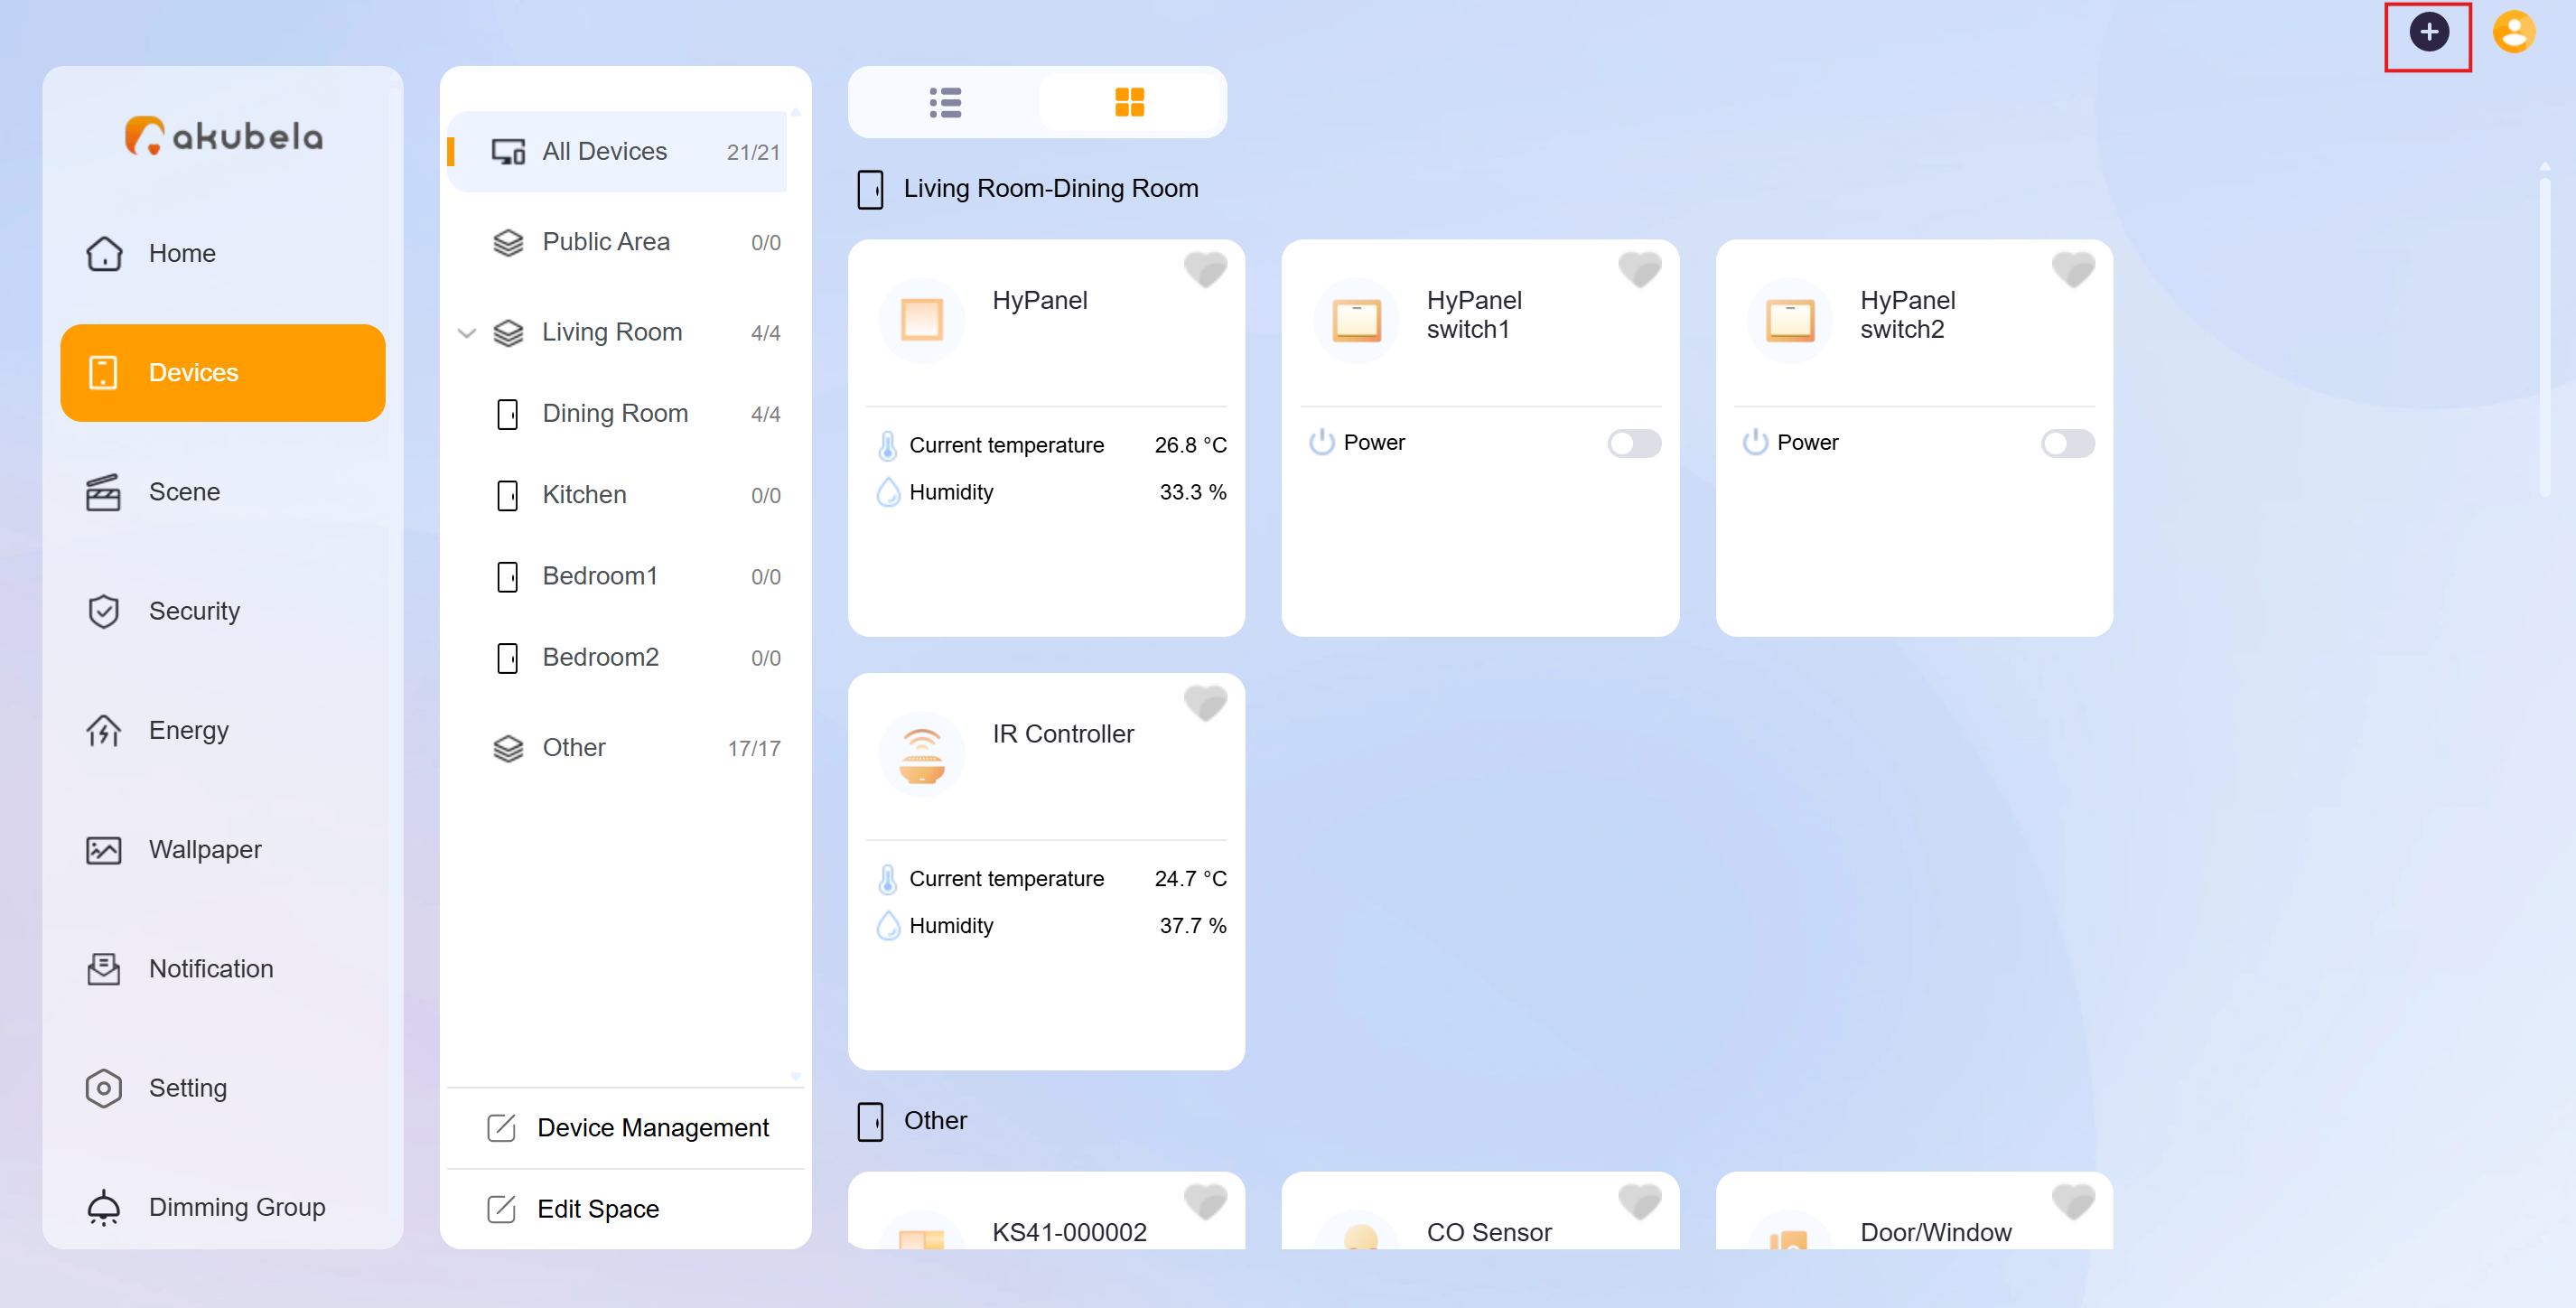
Device Management
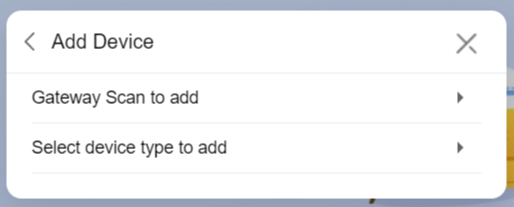
Add Zigbee Devices
Zigbee devices, such as sensors, emergency button, and more, can be added via the user web portal.
Click
 in the upper right corner.

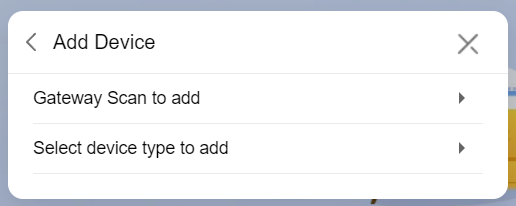
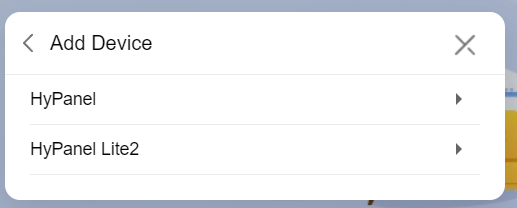
On the pop-up window, select Add Device > Gateway Scan to add.
Select the desired panel to add the device to.

Put the Zigbee device into pairing mode.
TIP
Here are examples of how to put devices into pairing mode. For more devices, see the guide Put Zigbee Devices into Paring Mode, or refer to their manuals.
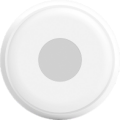
Zigbee device | How to put it to the pairing mode | |
| Insert a pin into the reset hole at its back cover for 5 - 10s until the green light flashes quickly. |
|
| Press and hold the reset button on the front for 5 - 10s until the green light flashes quickly. |
|
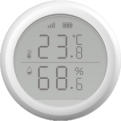
Smart Temperature and Humidity sensor
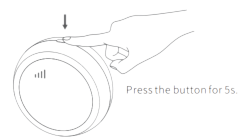
| Press and hold the reset button on the side for 5 - 10s until the signal icon flashes quickly. |
|
Smart Motion Sensor
| 1. Rotate the battery cover anticlockwise to open. 2. Press and hold the reset button for at least 5s until the green light flashes quickly. |
|
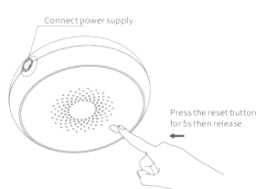
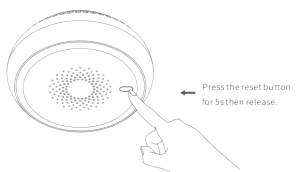
Smart Gas Sensor
| Press and hold the reset button on the front for at least 5s until the green light flashes quickly. |
|
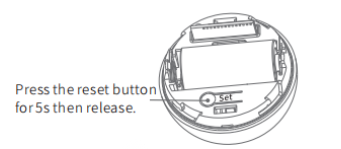
Smart Smoke Sensor
| Press and hold the reset button on the front for at least 5s until the green light flashes quickly. |
|
Smart CO Sensor
|
|
|
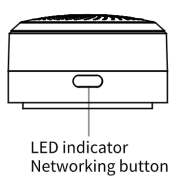
IR Controller
|
|
|
 Smart Emergency Button
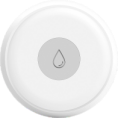 Smart Flood Sensor
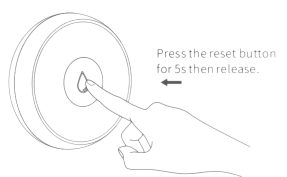


Place the Zigbee device to close to the gateway.
Wait for the device to be discovered. Select it and go to the next step.
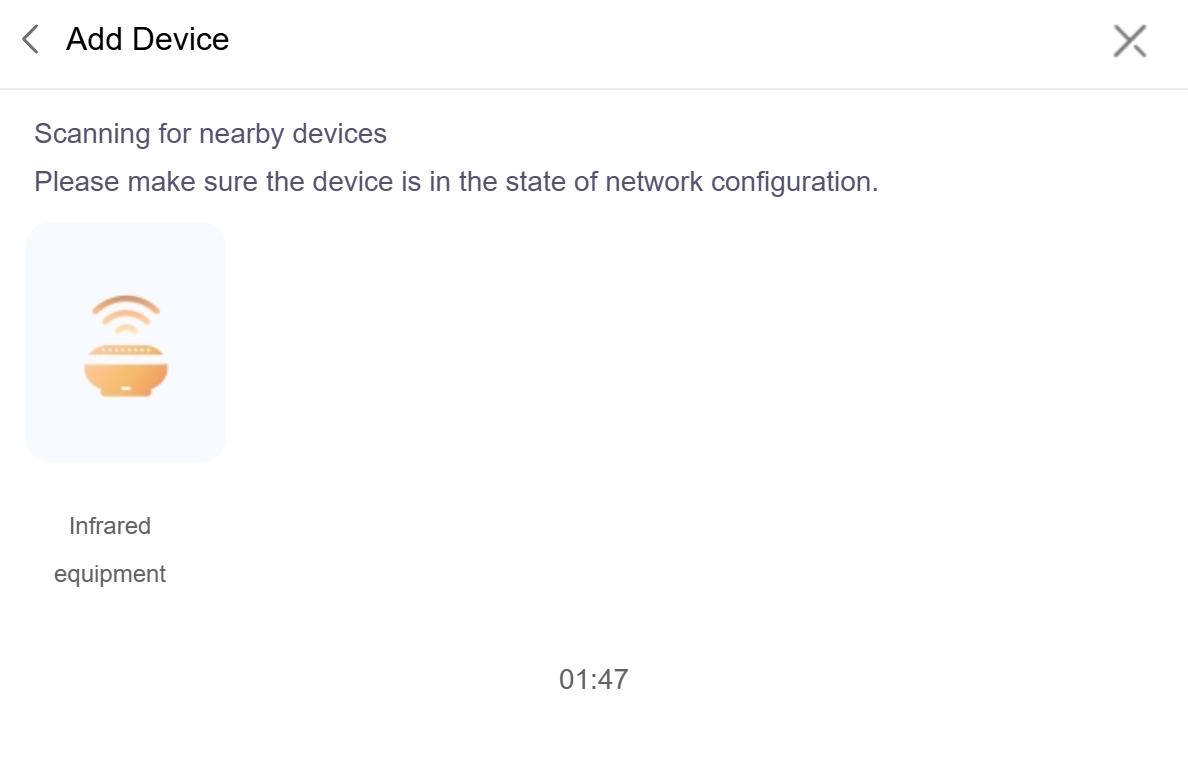
Click Next.
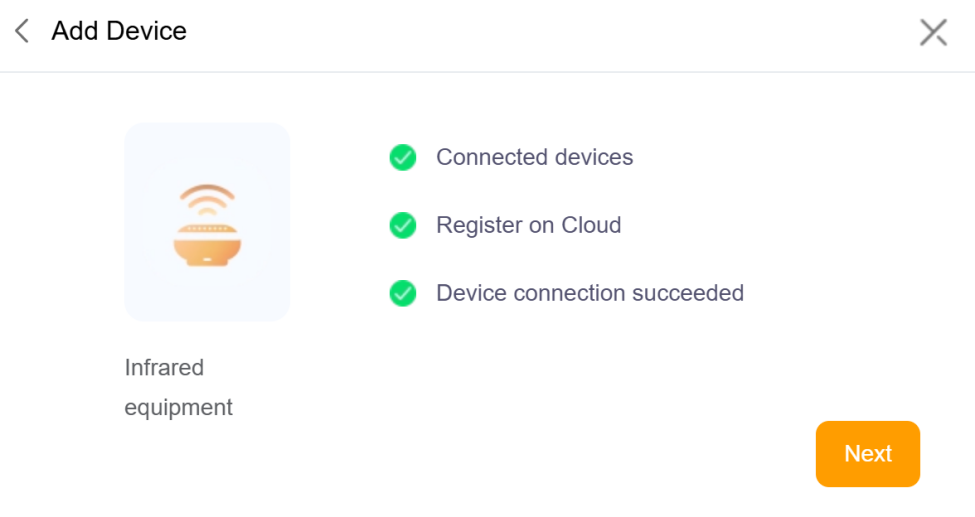
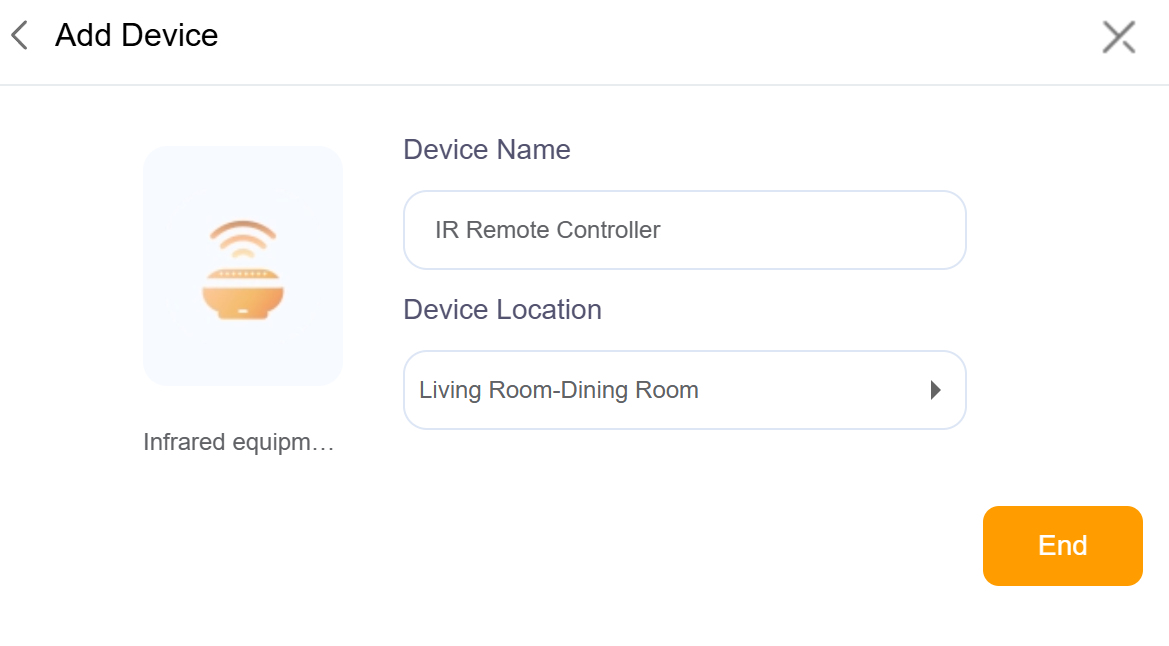
Enter the Device Name and Device Location.
Add Third-Party Devices
Third-party smart home devices, such as Philips Hue, Ring Video Doorbell, Ecobee thermostat, Lutron Caseta, TP-Link kasa, Sonos, and more, can be added via the user web portal.
Click
 in the upper right corner.
From the pop-up window, select Add device > Select device type to add.
Select the desired panel to add the Zigbee device to.
Select the device type from the list.
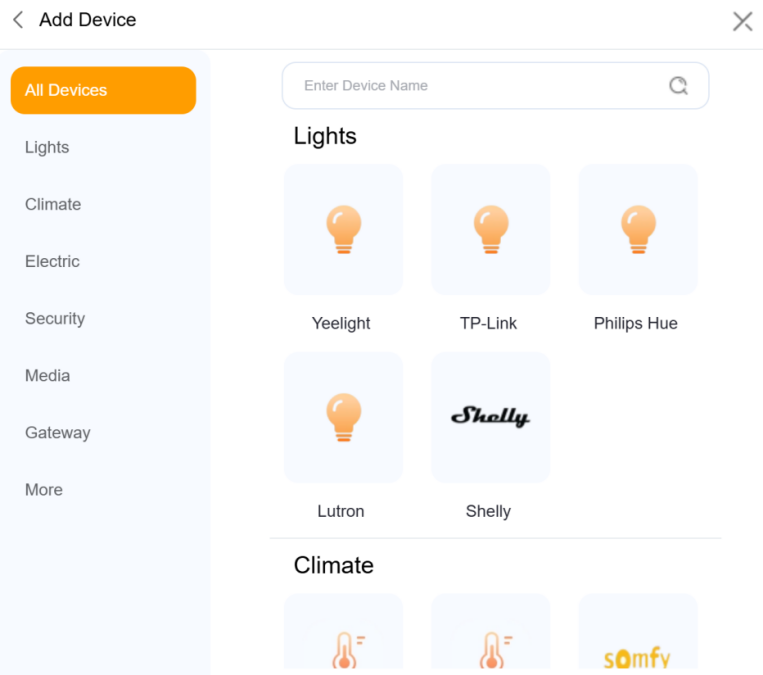
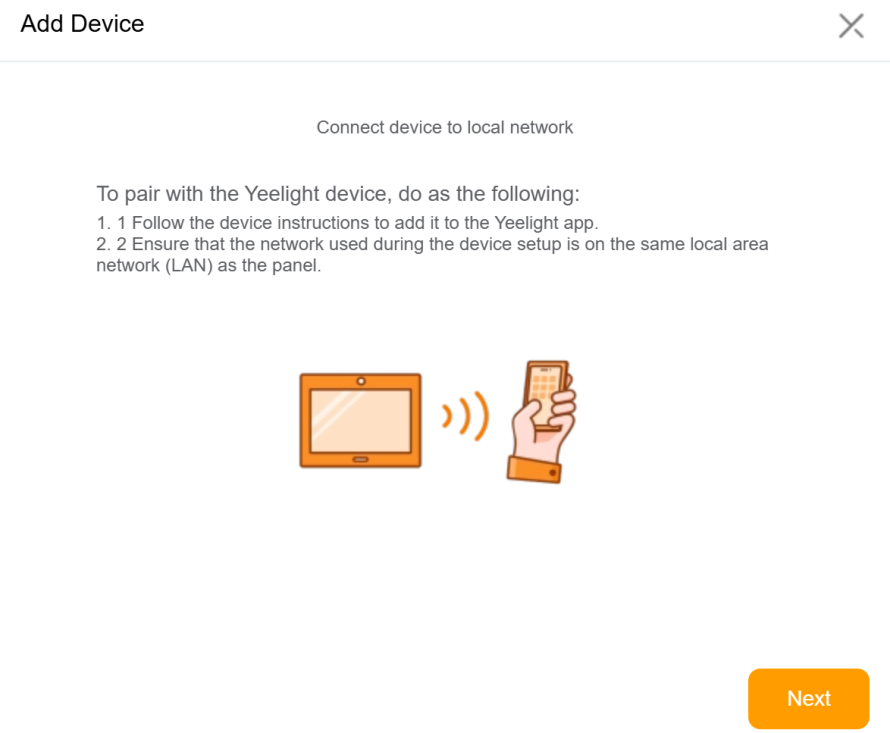
Follow the onscreen instructions to complete the adding.
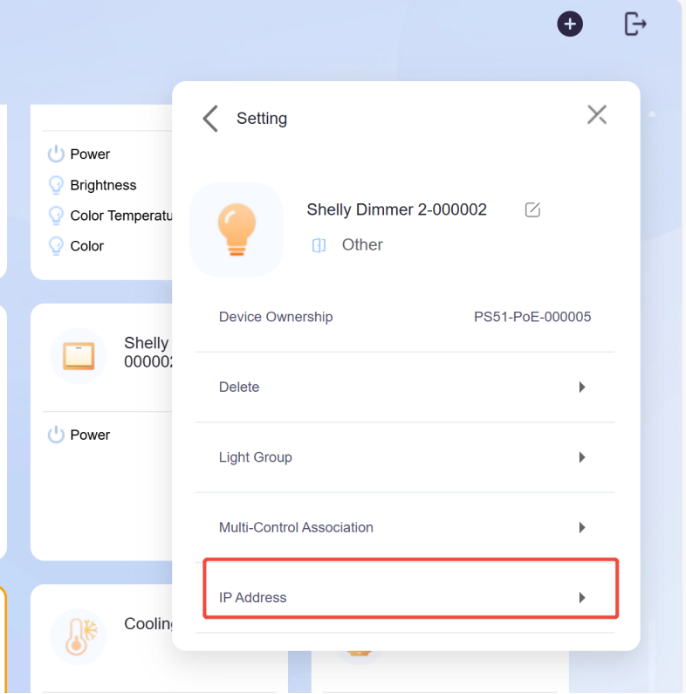
TIP:
After adding a Shelly device, you can quickly access its web page for troubleshooting. Just click the Shelly device card, then select
> IP Address.
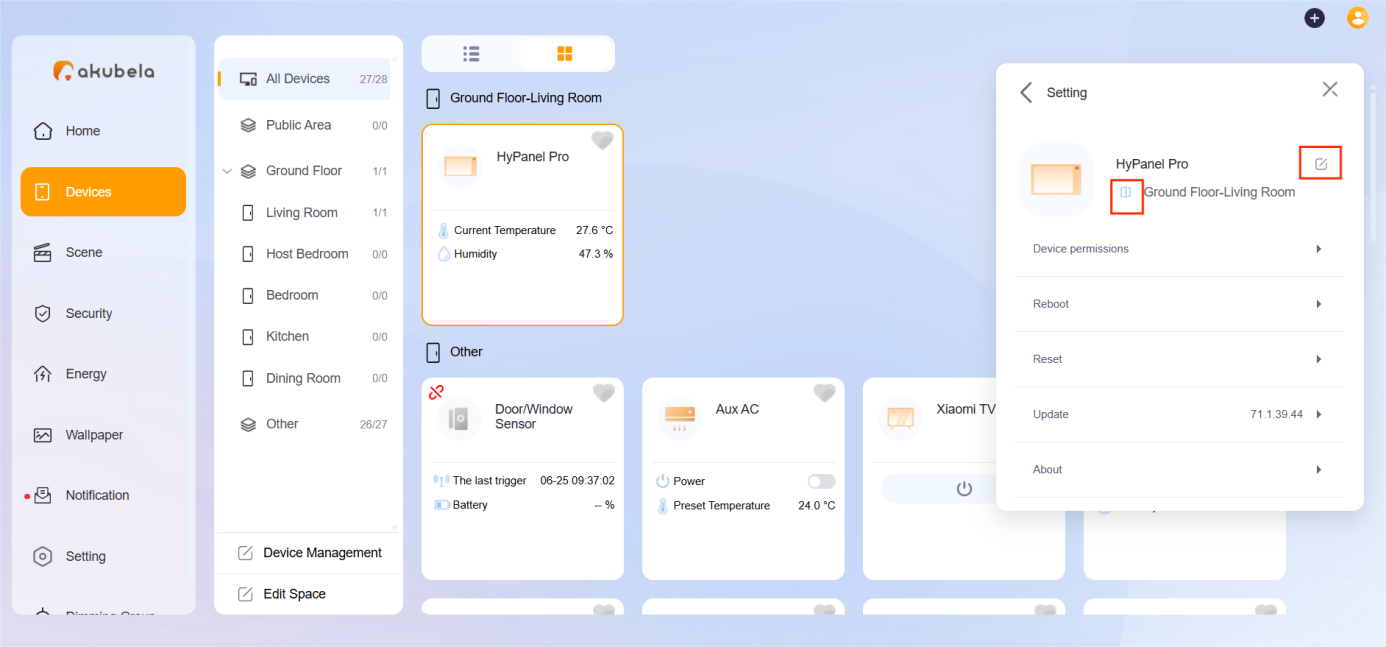
Rename and Relocate Devices
To edit device name and location, do any of the following:
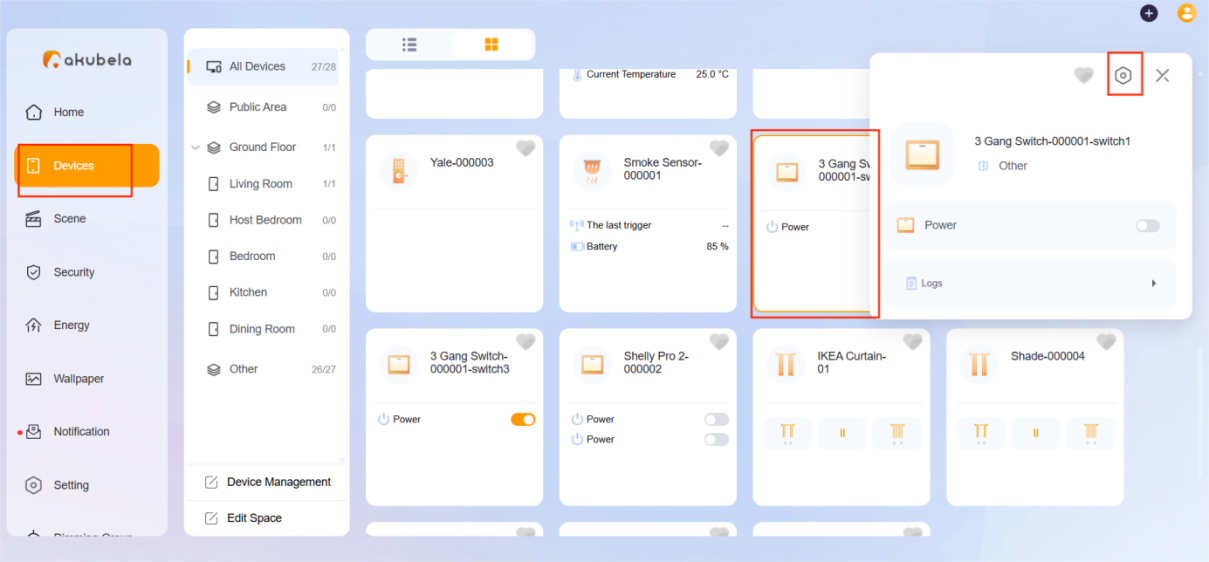
On the Devices screen
Click Devices > [Desired device] >
 .
.

Click
 to rename and
  to change the location.
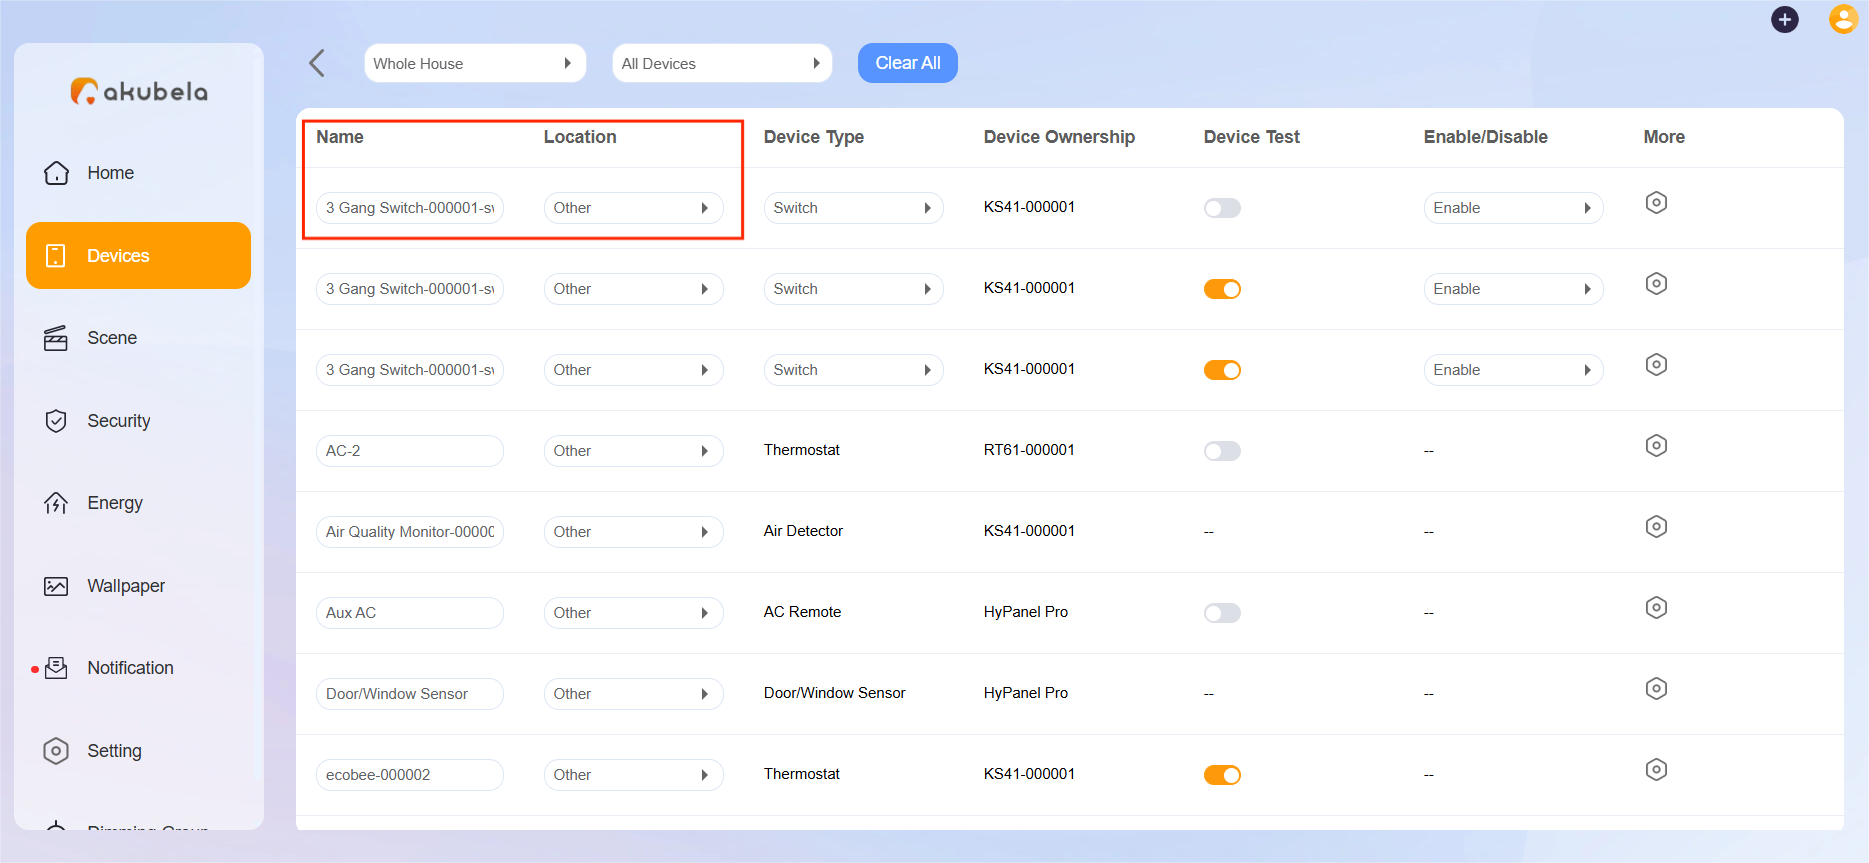
On the Device Management screen
Go to Devices > Device Management.
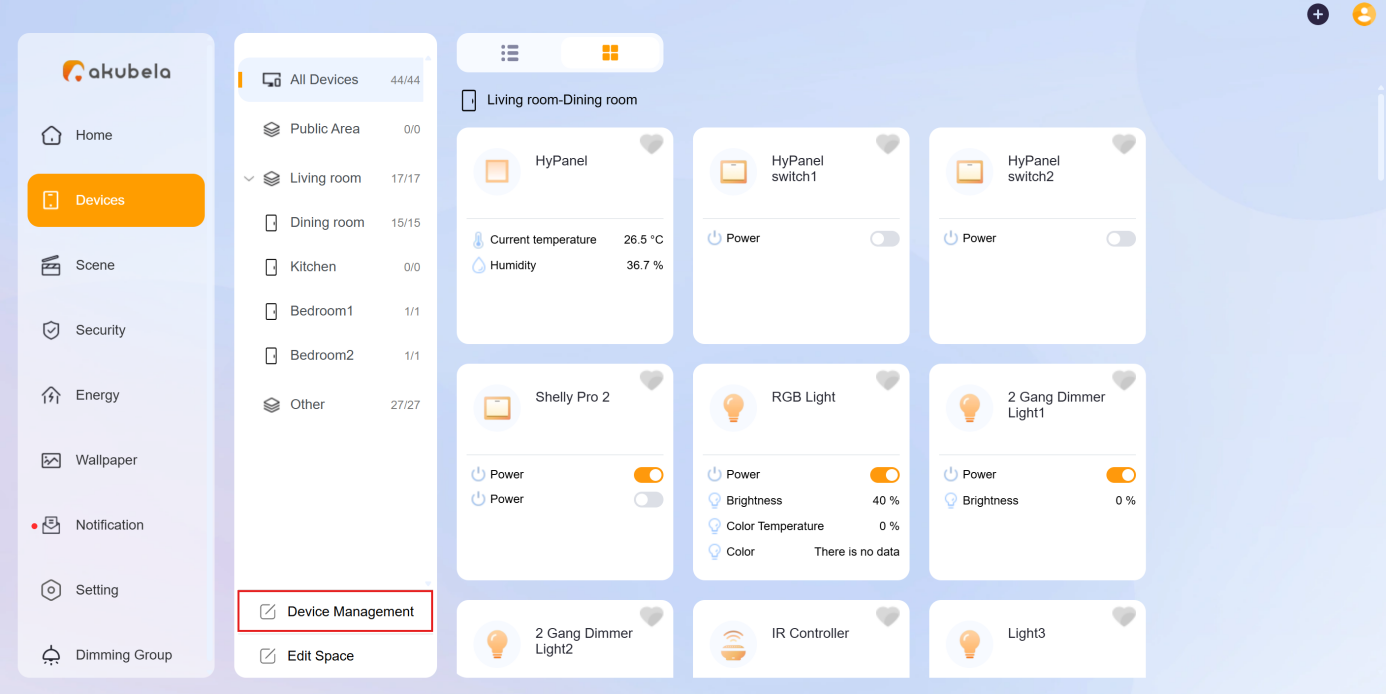
Find the desired device, then edit the name and location.
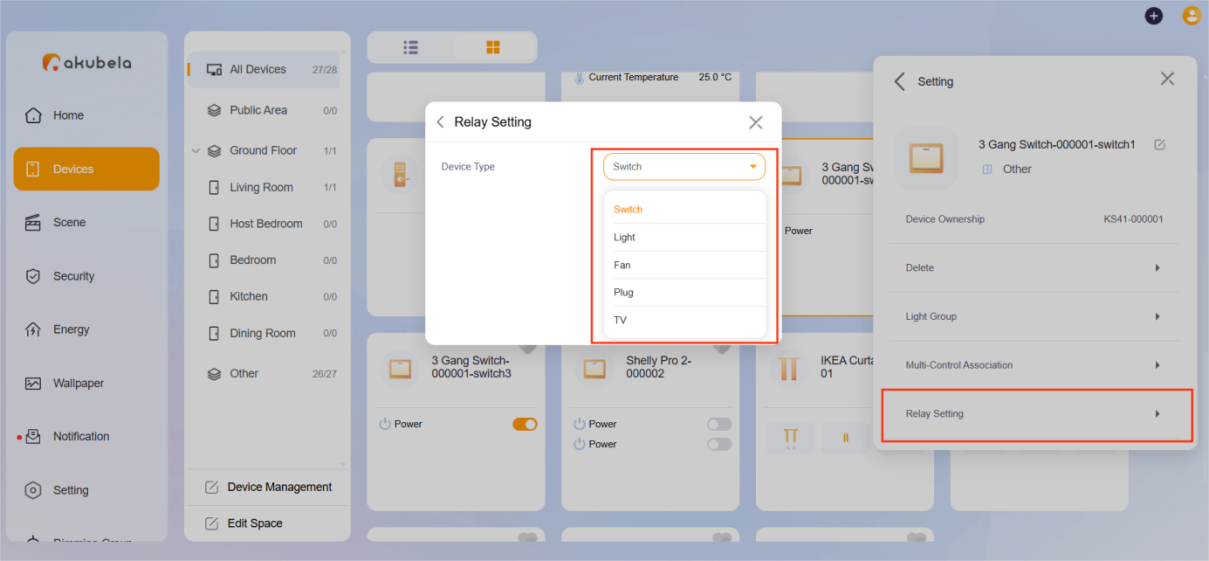
Change Relay Type
You can change the type of a connected relay.
Click on Devices > [Desired device] >
 .
.
Select Relay Setting and change its type.
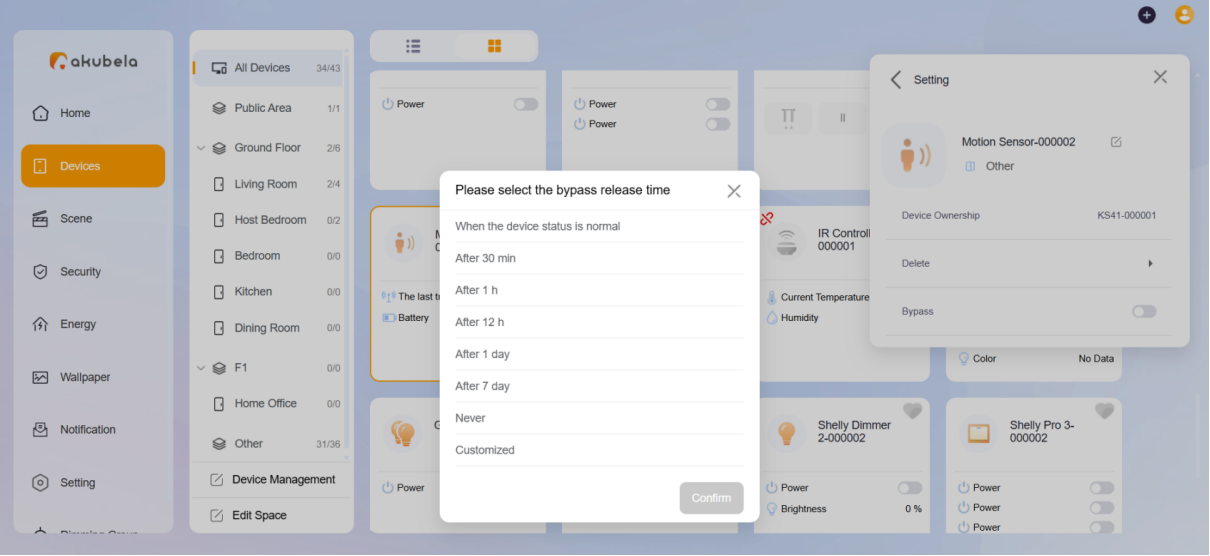
Bypass Sensors
Some sensors can be temporarily bypassed to stop detection, helping prevent false triggers in scenarios such as maintenance.
To bypass a device:
1. Click Devices > [Desired device] >  .
.
2. Enable Bypass, choose a time duration, and click Confirm.
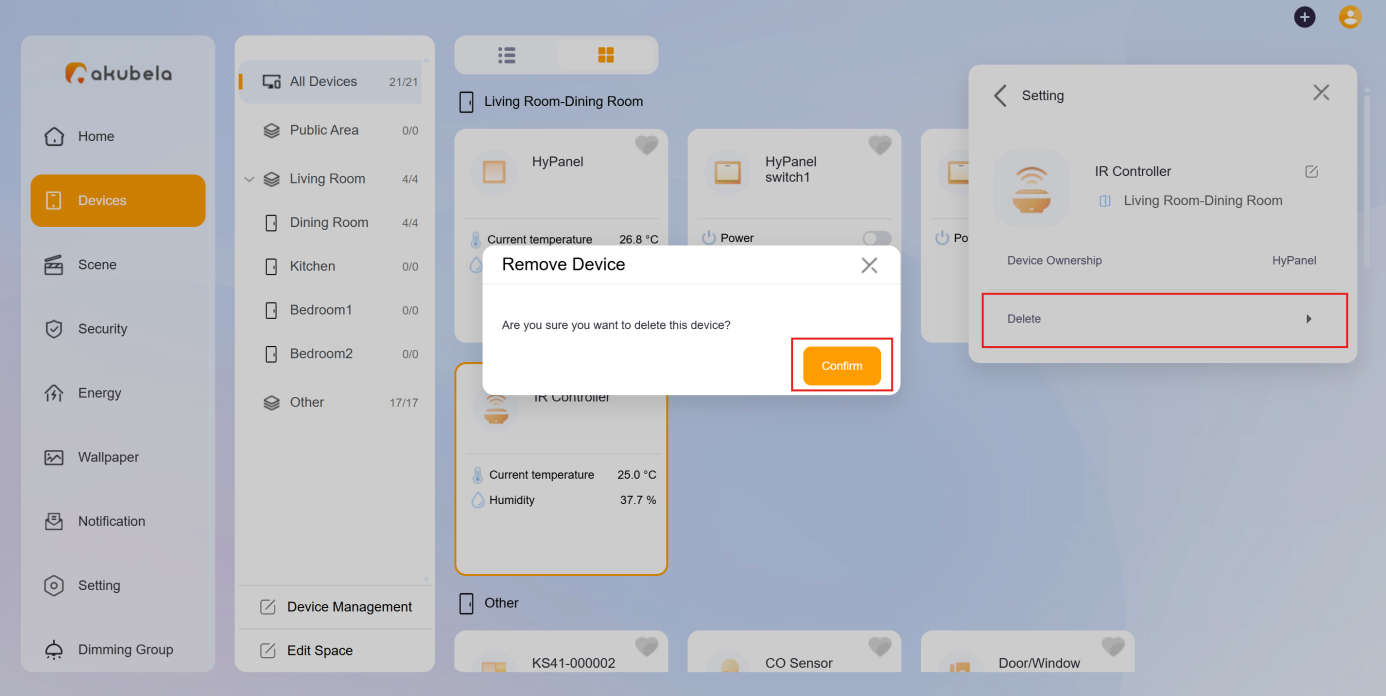
Remove Devices
To remove an added device, do the following:
Click Devices > [Desired device] >
.
Select Delete and then Confirm.
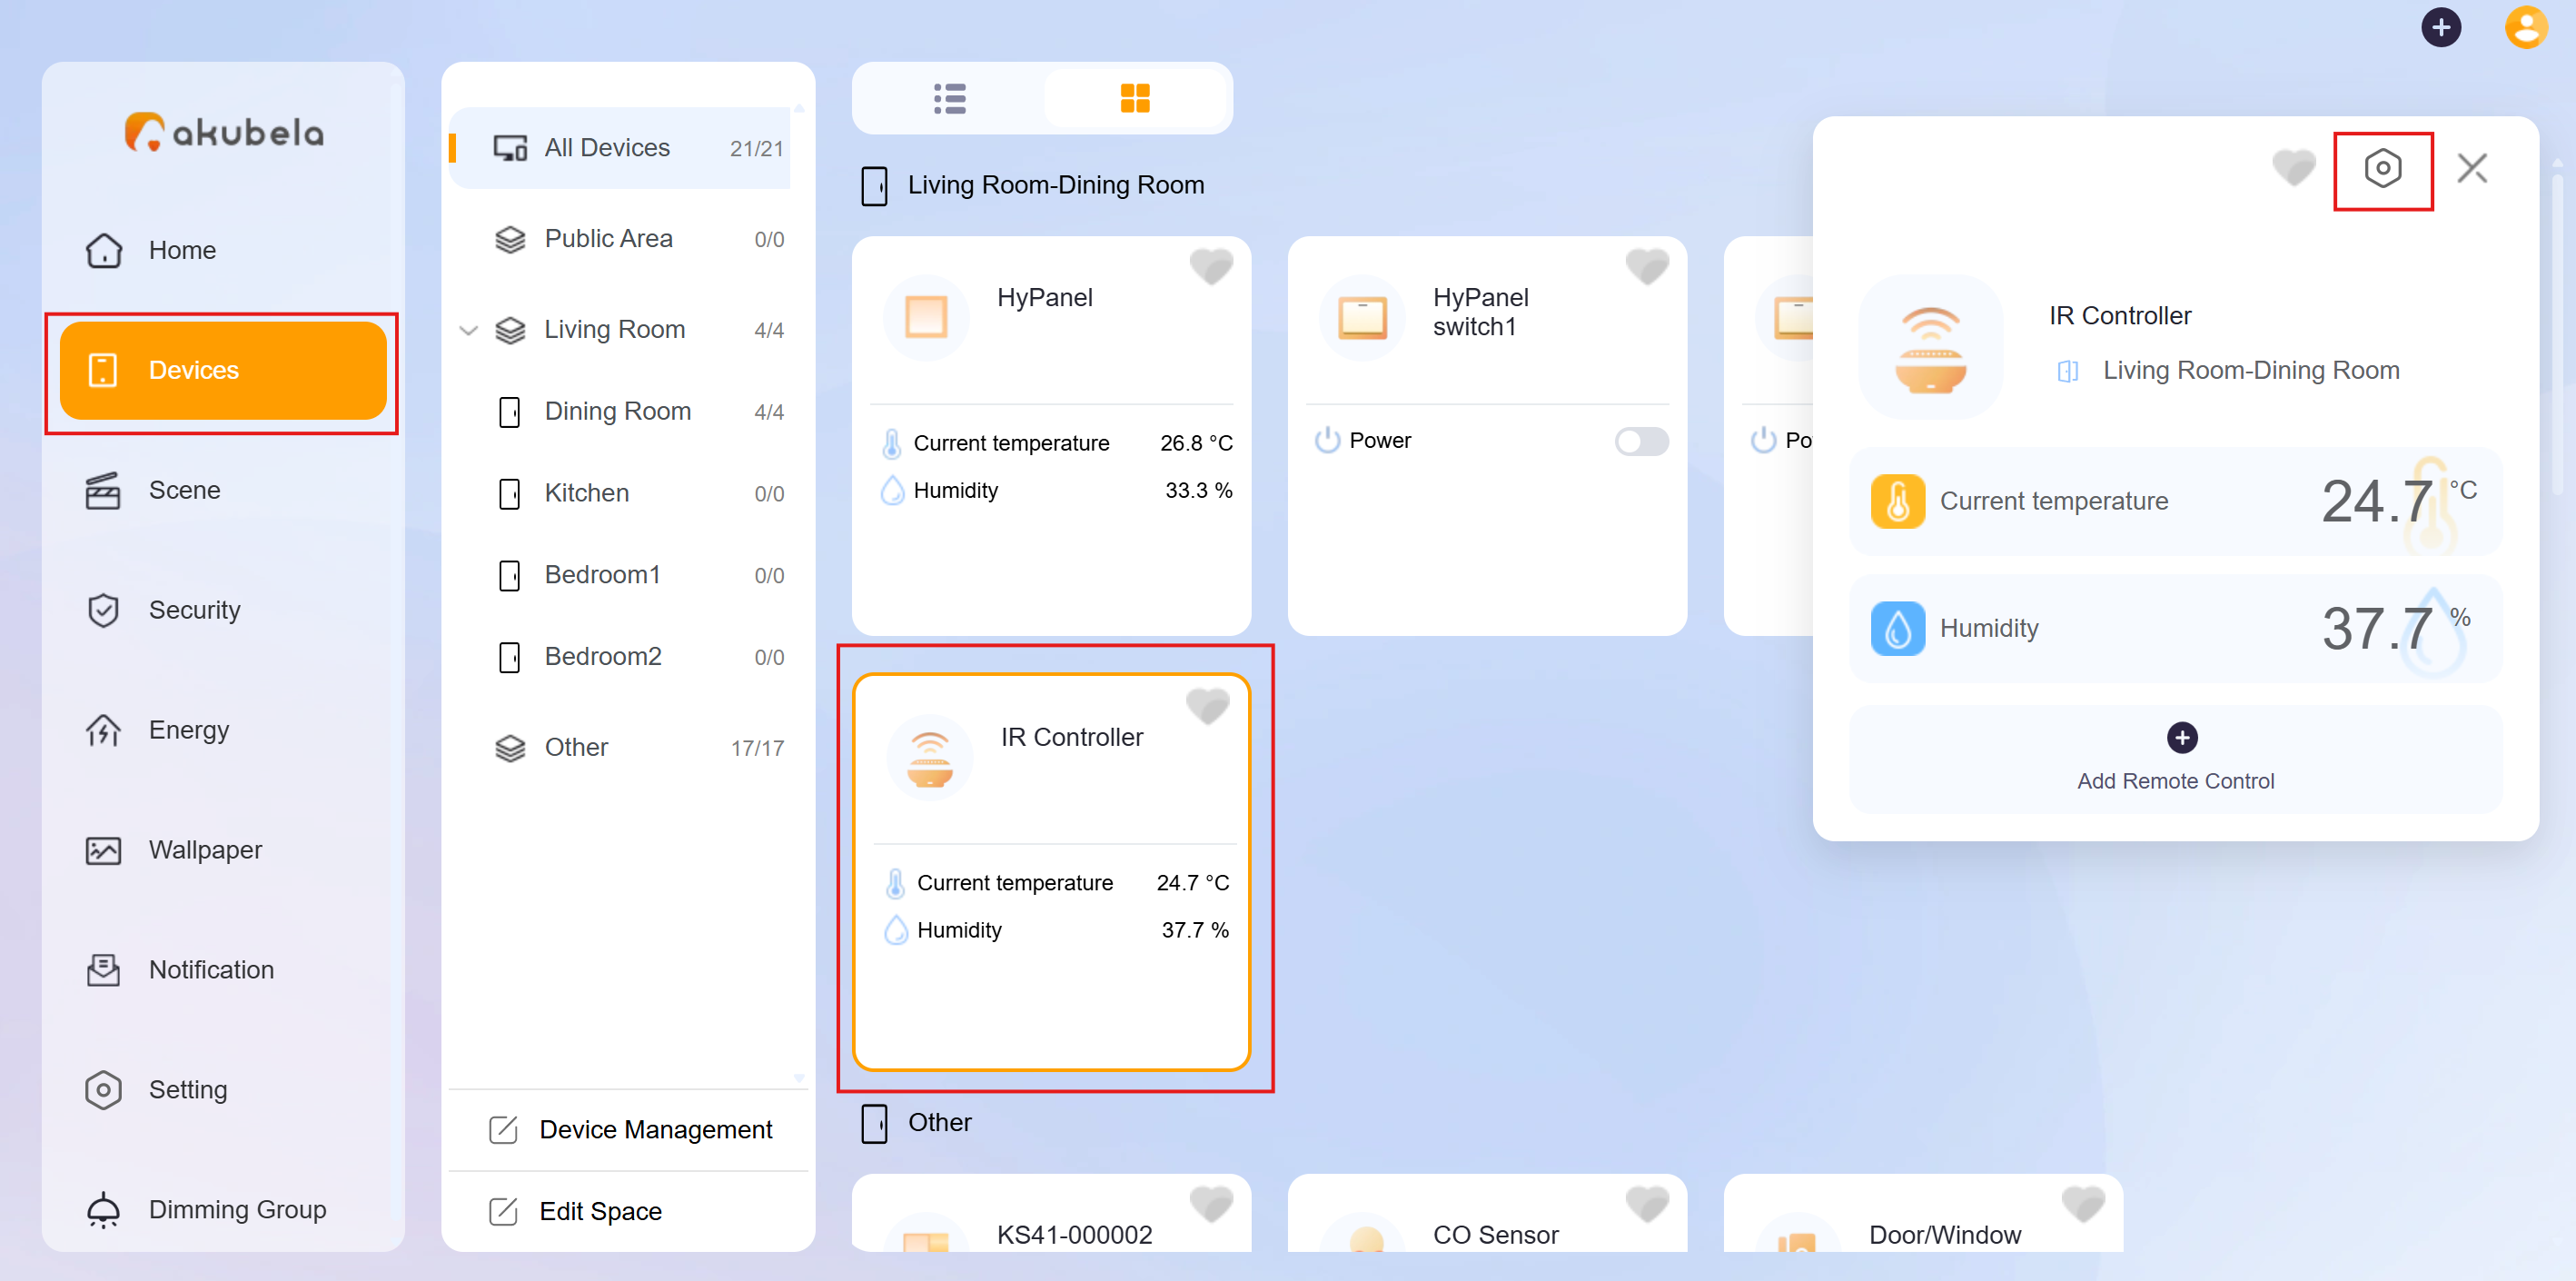
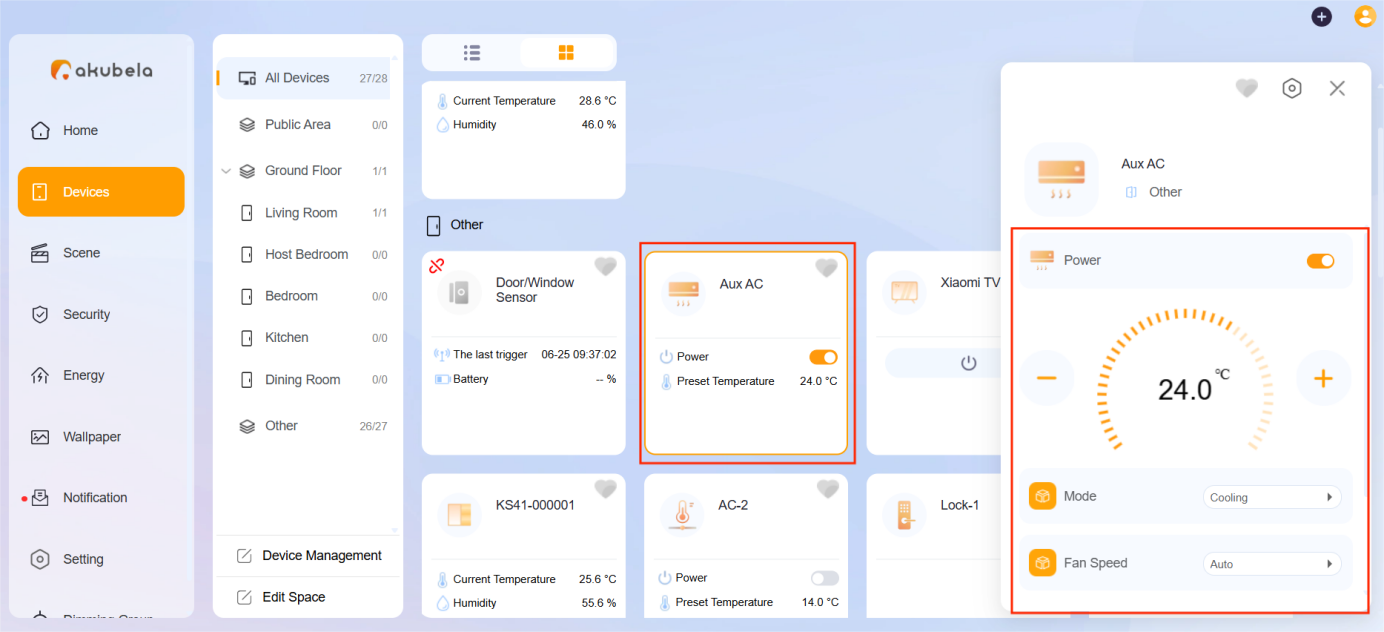
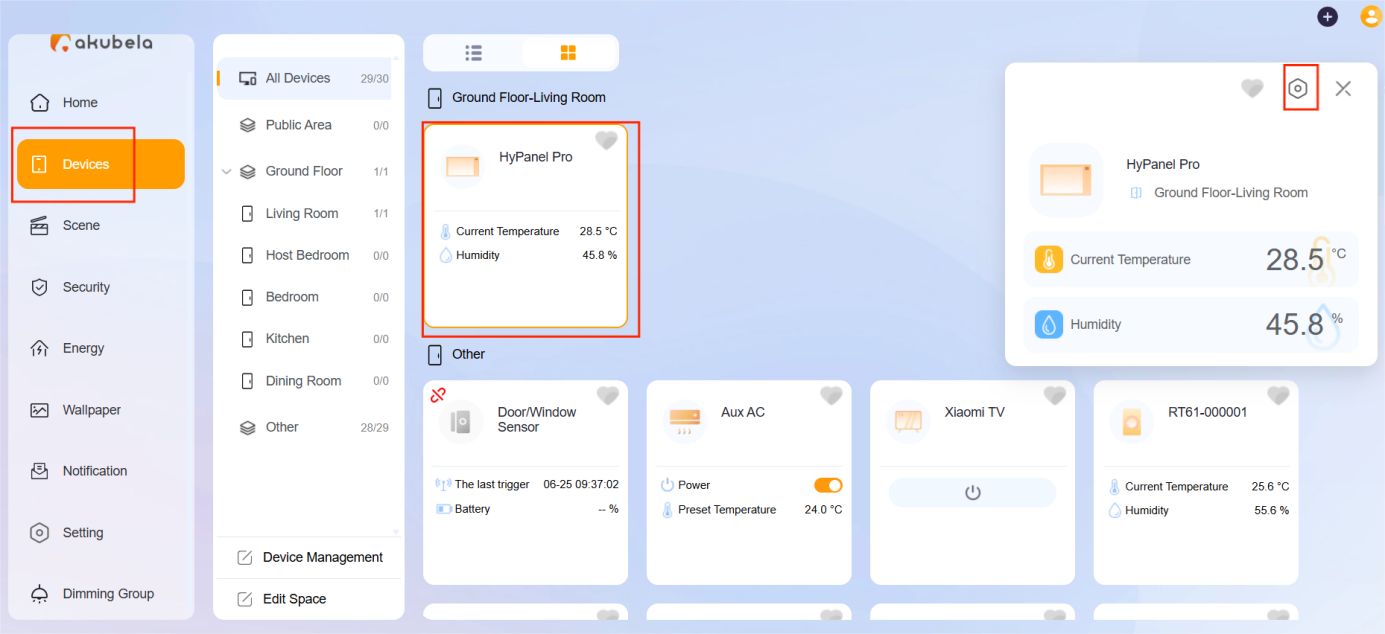
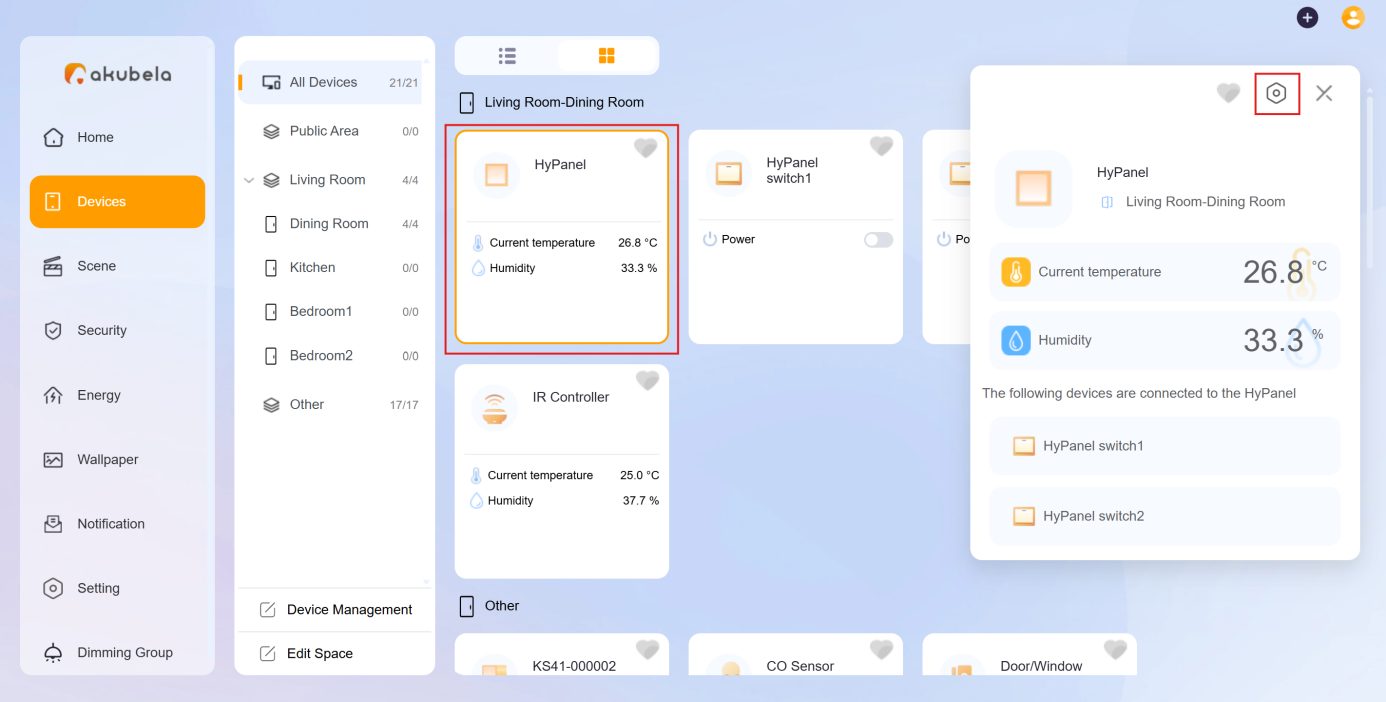
Control a Single Device
To turn a device on or off, locate its card and toggle the Power button. You can also use other available control buttons directly from the card.
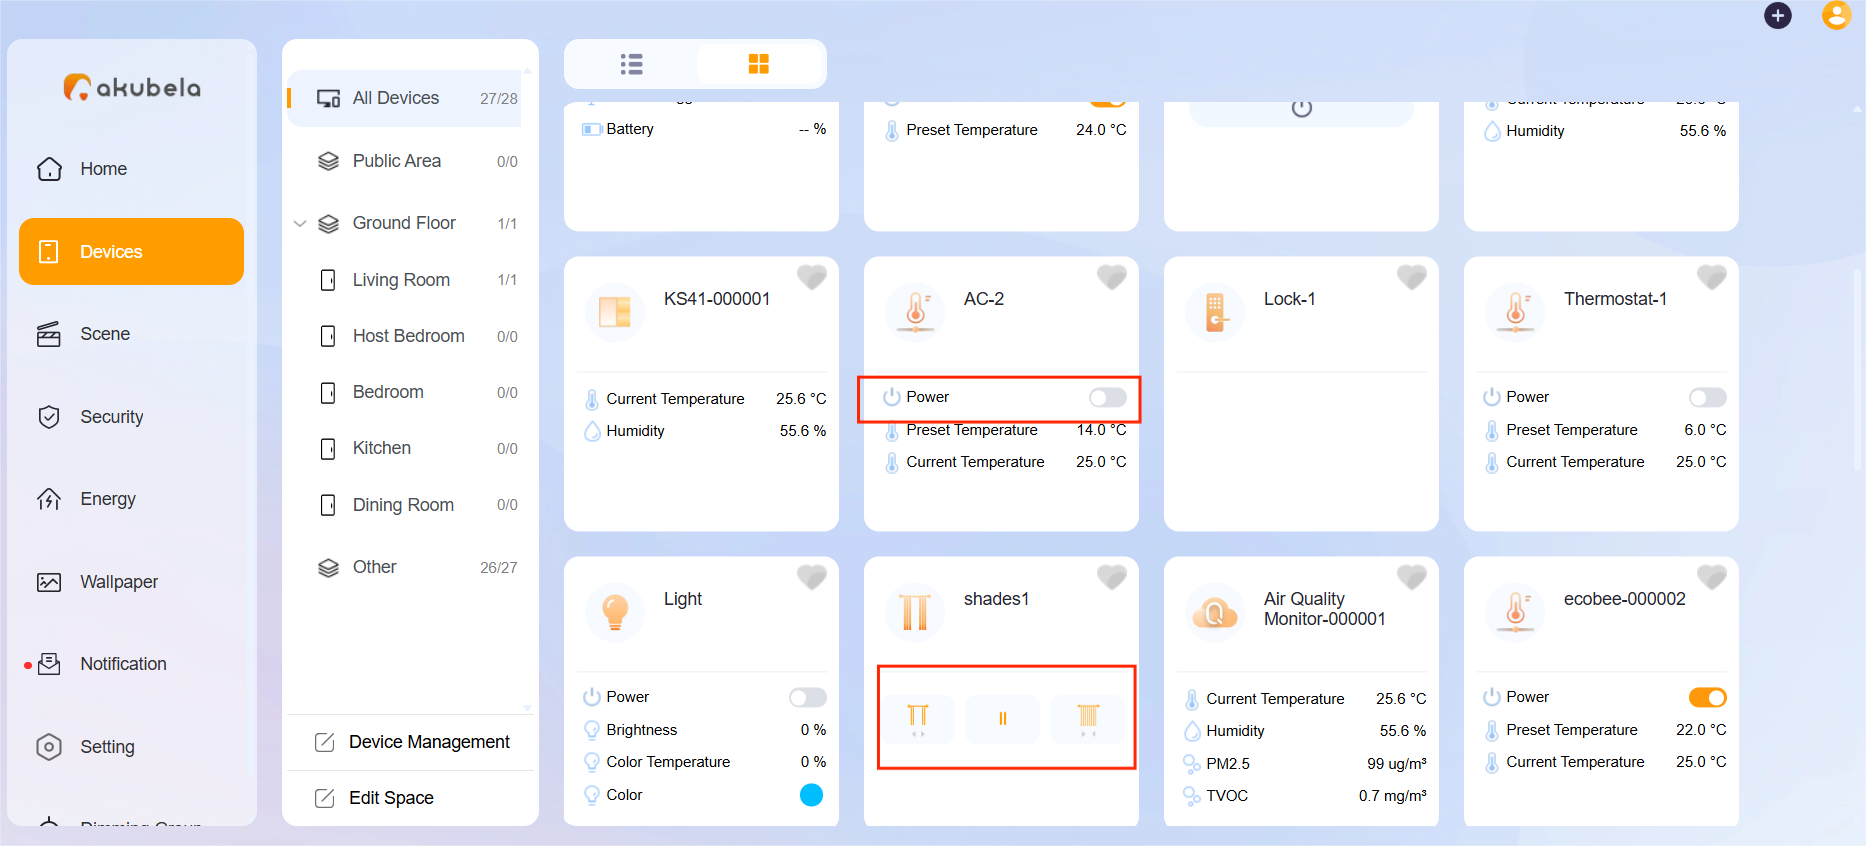
For more control options, click the device card to open the Control menu.
Group Control Devices
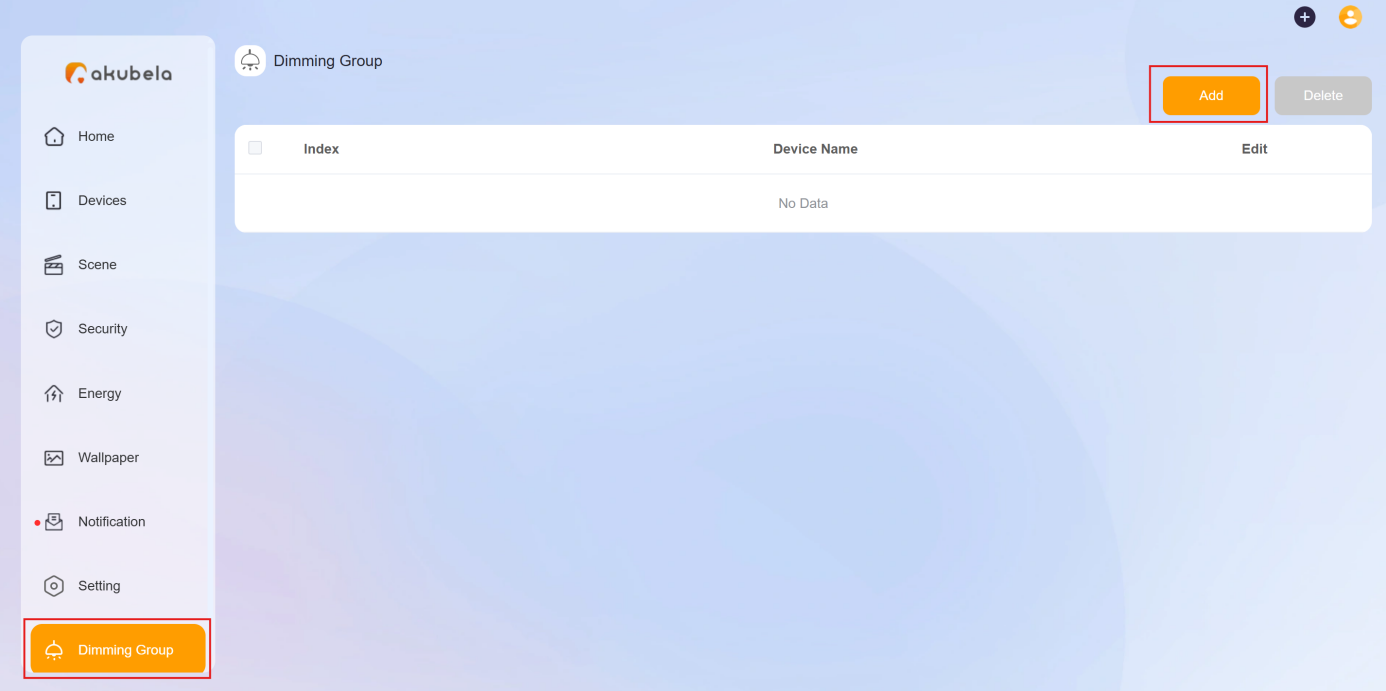
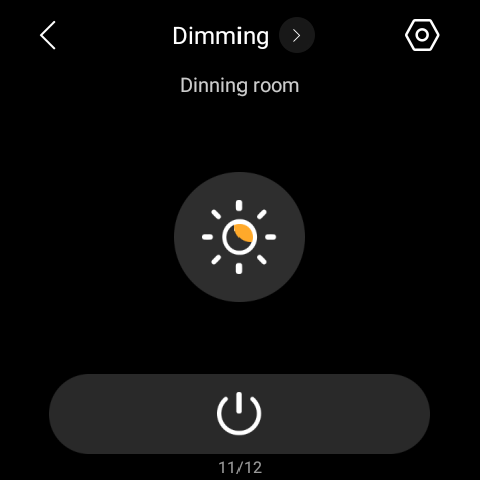
Virtual Three-Level Dimming Group
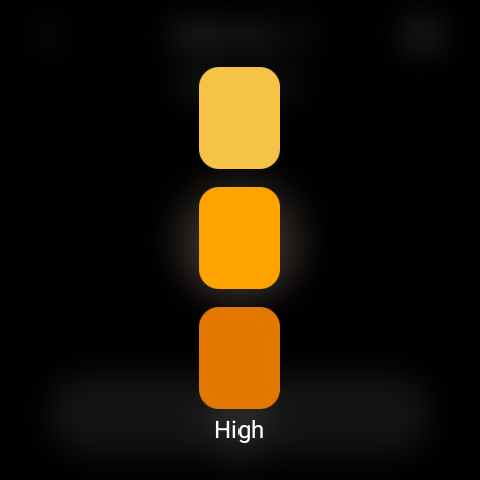
You can create a virtual three-level dimming group to control non-dimmable (on/off) lights as if they support dimming. This feature lets you assign a different number of lights to each brightness level—low, medium, and high—for unified group control.
Click Dimming Group > Add.
Name the group.
Select the space where the group will be used.
Assign lights to each level.
Click Confirm.
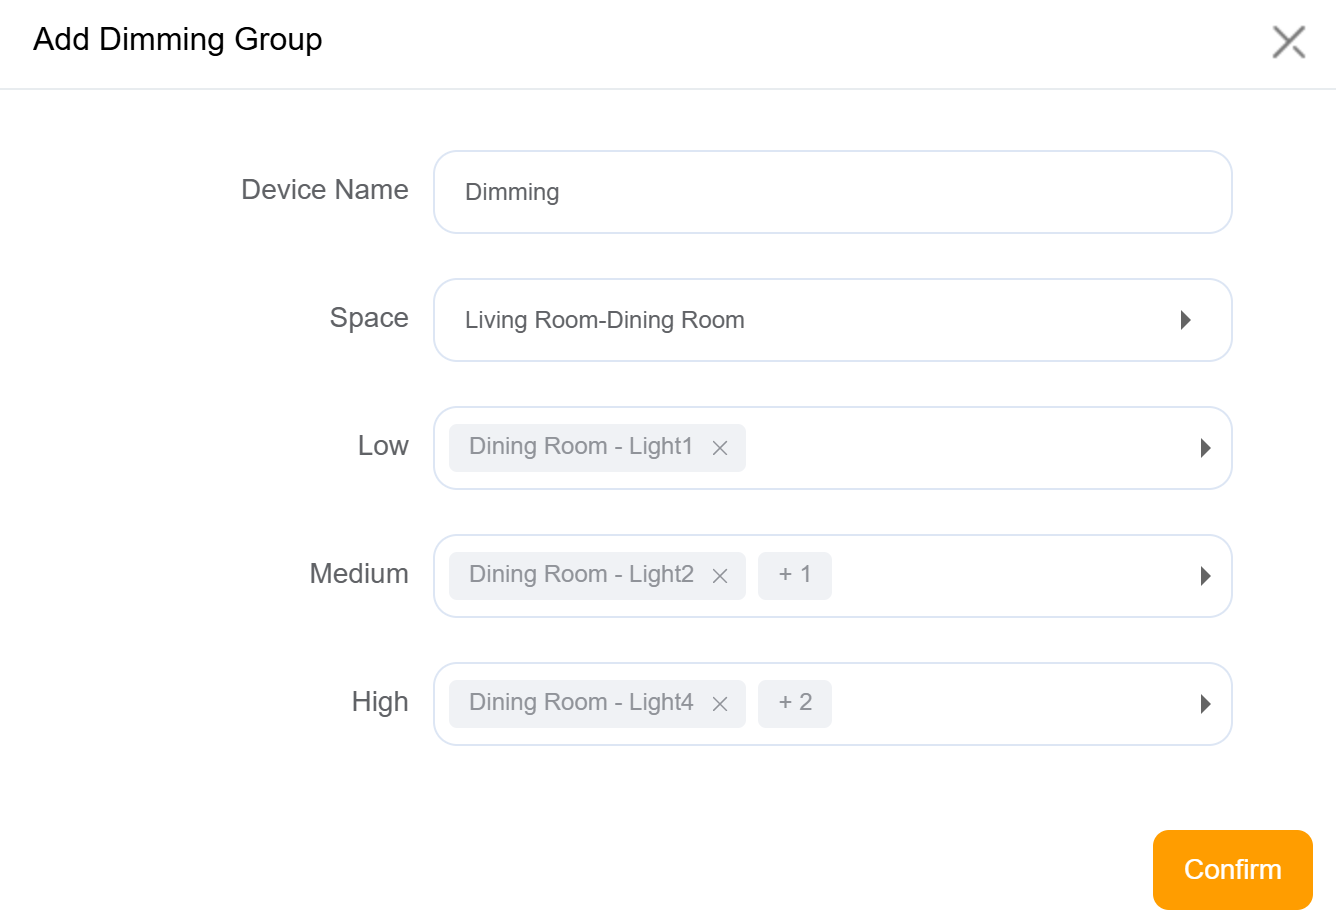
The three-level dimming group will appear on the panels for easy control.
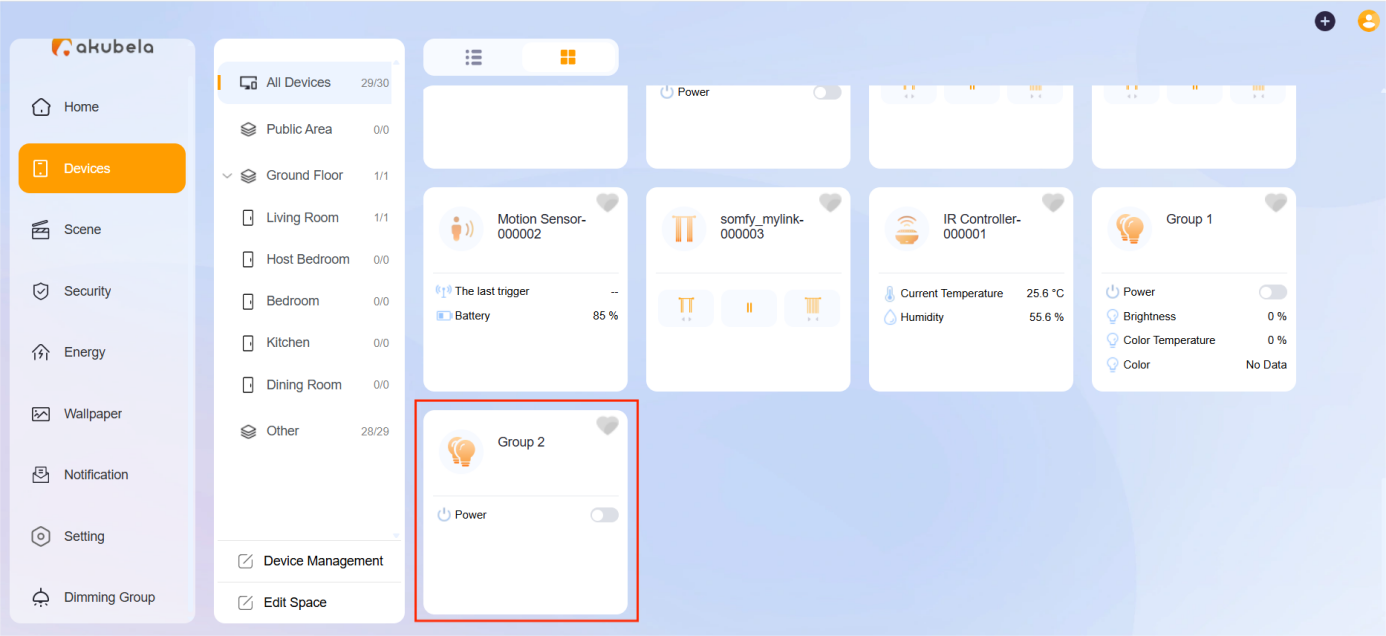
Lighting Group
Group specific devices of the same type (e.g., lights) to control them together.
NOTE:
If grouped devices have different features, only the shared functions will be available. For example, grouping a switch light and a dimmable light will only show the switch function.
To customize a group and manage it:
On the Devices screen, tap the desired lighting device card, then tap
 > Light Group.
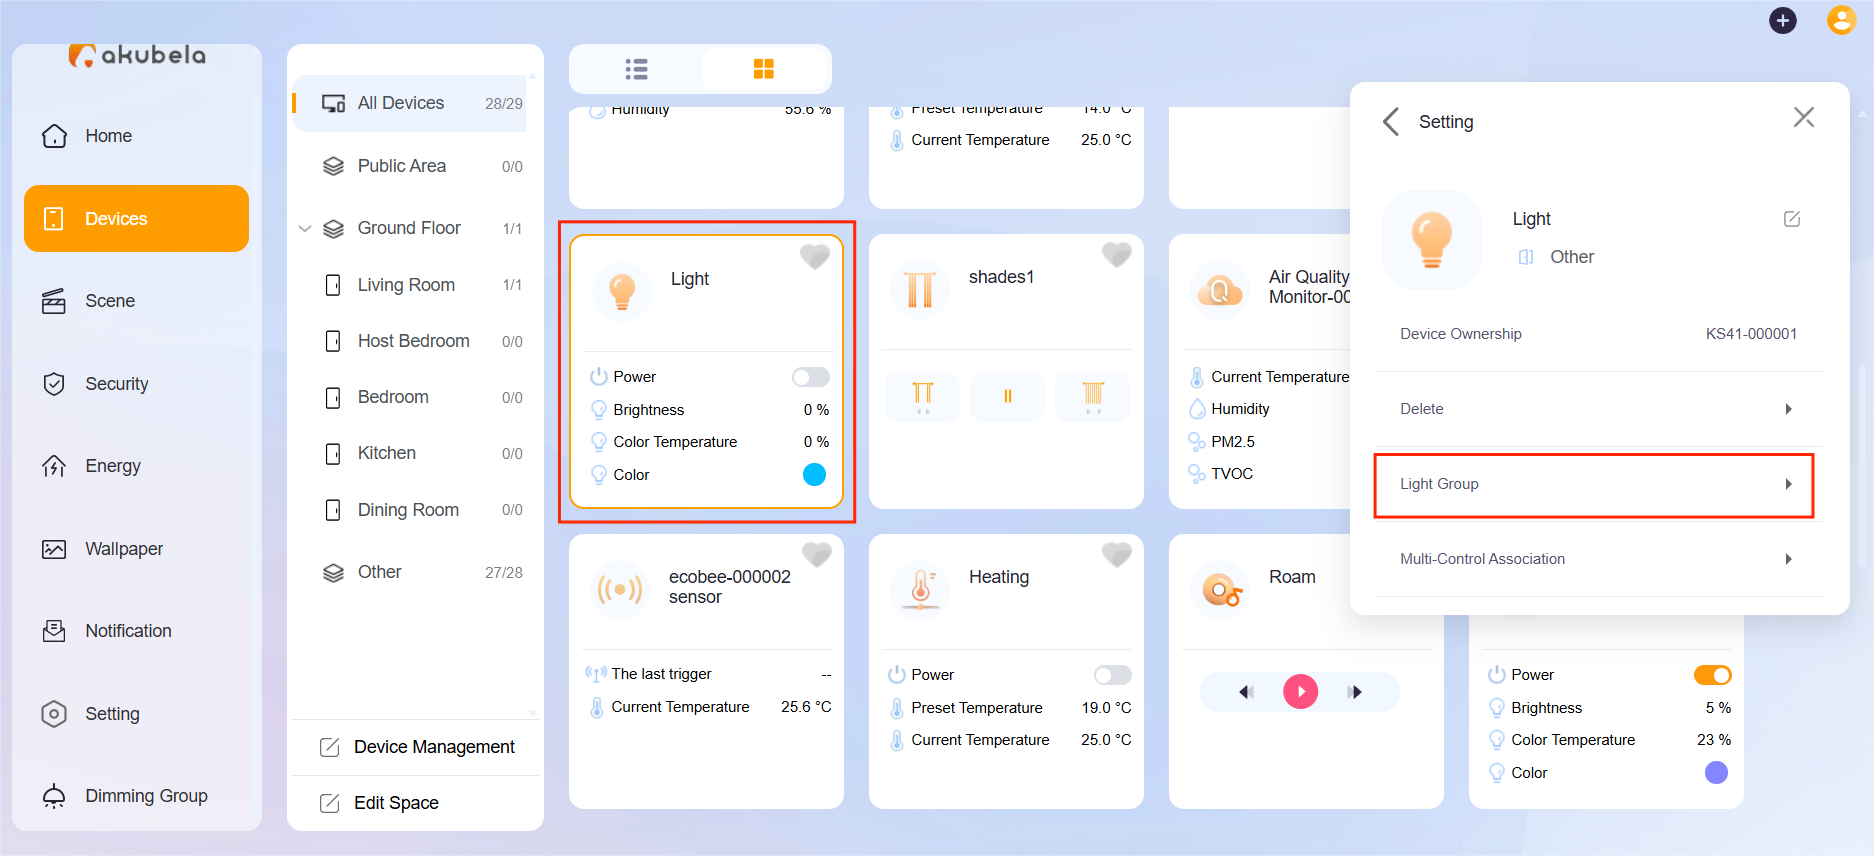
Click Add New Group to create a new group.
Click Link Light/Switch to add devices into this group, then click
 to confirm.
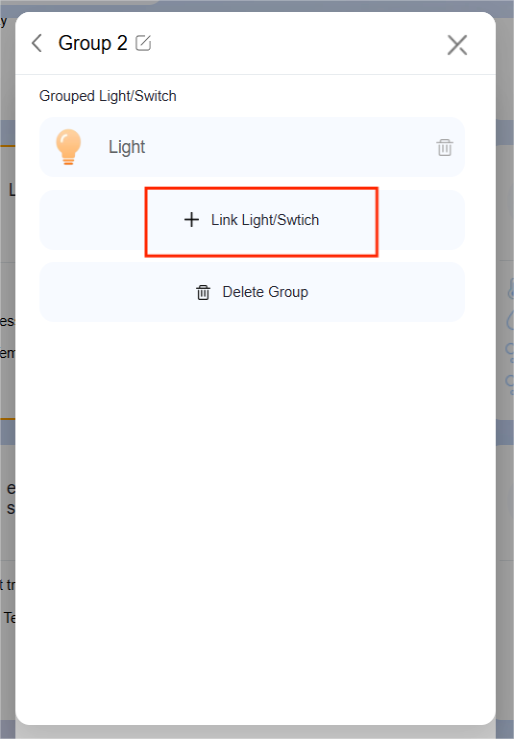
4. Click  to change the group name.

Once completed, the group will appear on the Devices screen in the web portal and the panel’s Lights screen.
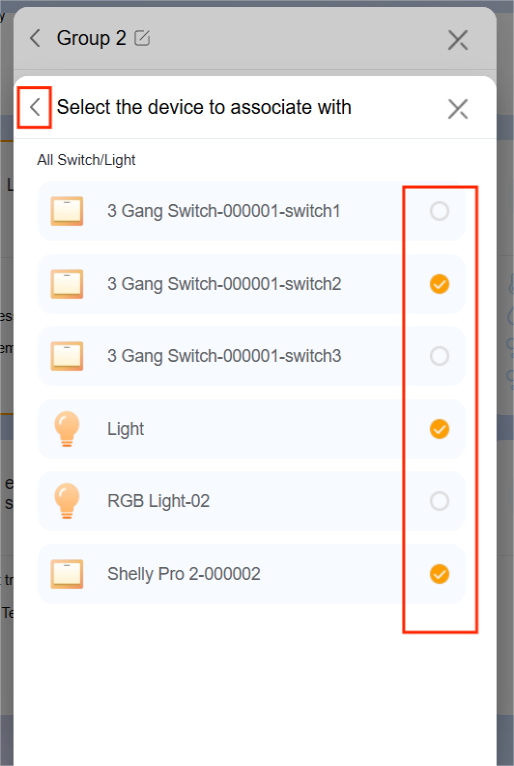
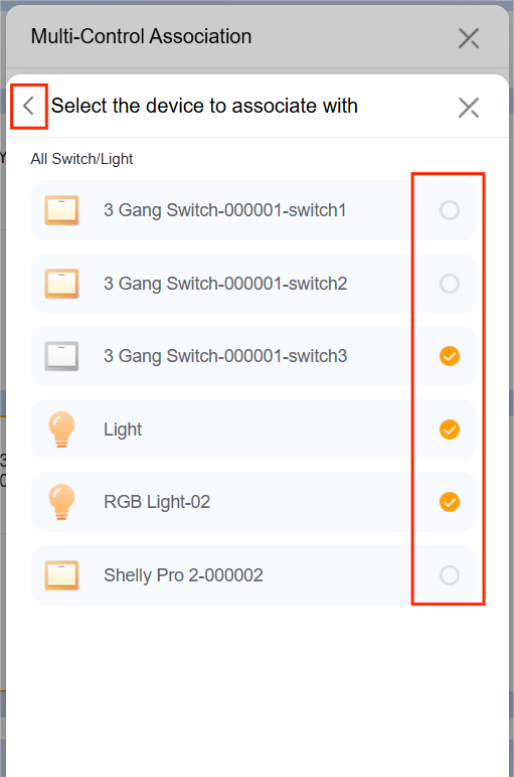
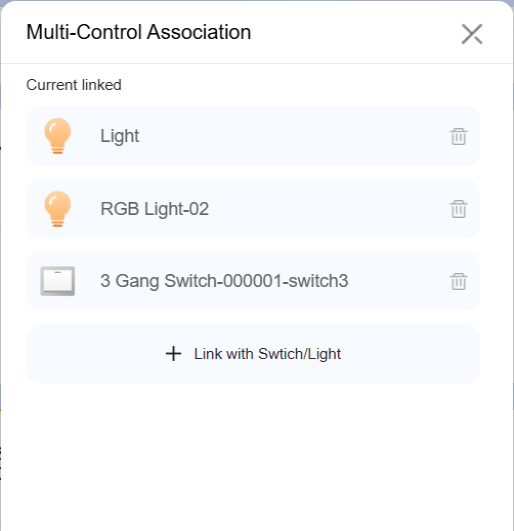
Multi-Control Association
This feature links switches and lights to keep their on/off states synchronized. When one device changes state, all associated devices update accordingly. For example, if multiple switches control the same light, associating them ensures they reflect the same on/off status.
Go to Devices > [Desired device] >
 > Multi-Control Association.

Click Link with Switch/Light.
Select the devices you want to associate, then click
.png) to complete.
to complete.NOTE:
You can link up to eight devices.
The associated devices will appear in the list.
Scene Management
You can create your own automation scenes to automate your home devices to do what you want, when you need. Existing scenes can also be edited or deleted.
Scene Types
According to the conditions you select, there are 3 different types of scenes:
Auto scene
 : A scene that is set to be activated based on a schedule or an event.
 If the scene icon is orange
 , it means as long as the preset conditions are met, the task will be triggered.
If the icon is white
 , it means the task will not be triggered automatically. You can tap it to allow it to auto-run.
NOTE:
This type of scenes is displayed on HyPanel devices.
Manual scene
 : A scene that is set to be activated based on a tap or click on the scene image.
Auto and manual scene
 : A scene that is based on a schedule, an event, and a tap or click. When any of the conditions are met, the scene will be activated.

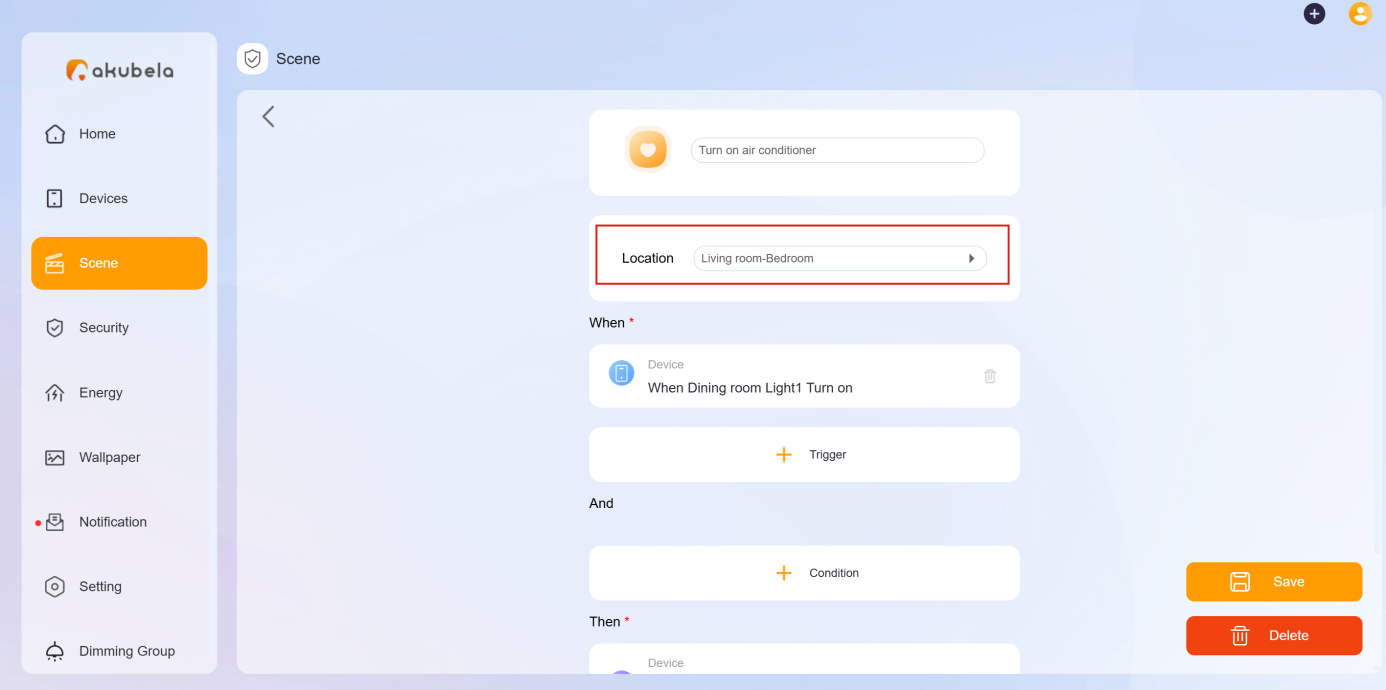
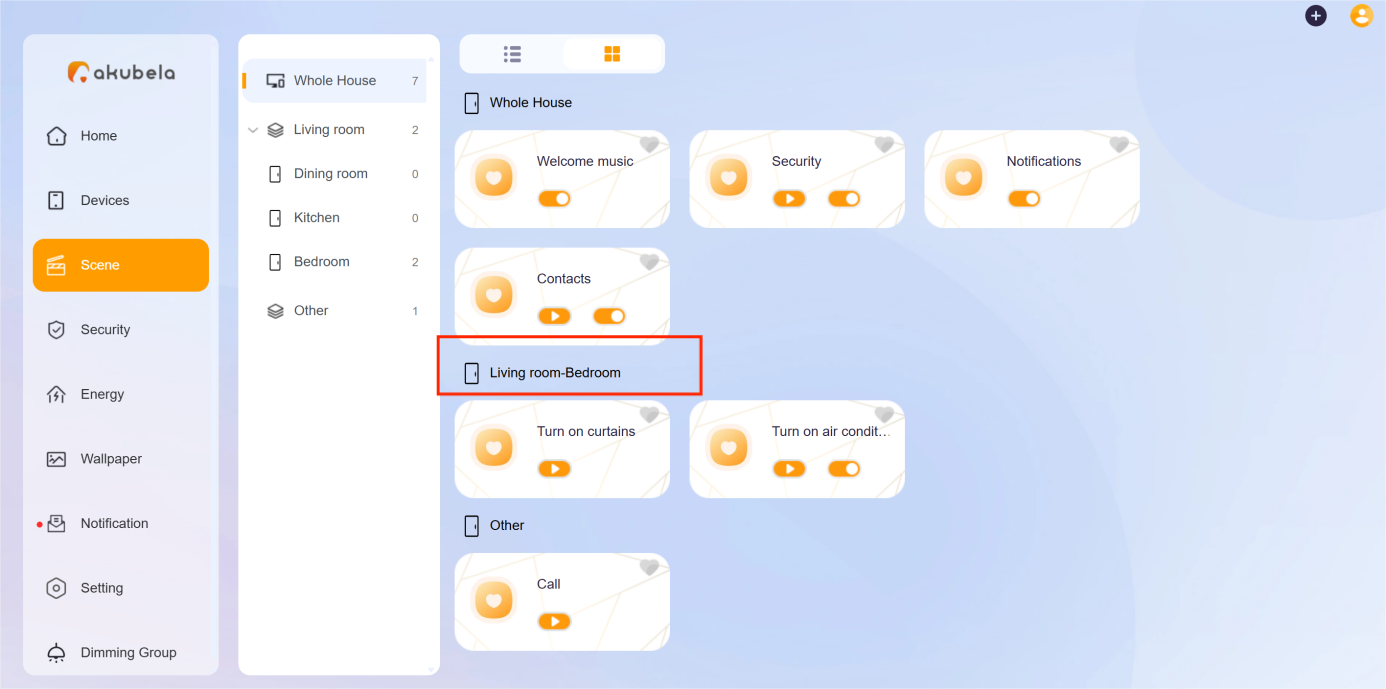
Create a Scene
You can create up to 200 scene cards per home.
A scene consists of condition(s) and task(s). The preset tasks or actions could be triggered when the conditions are met. For example, you can create a scene that turns off lights when you leave.
To create a scene, click + in the upper right corner, and select Add Scene. The scene creating screen opens.
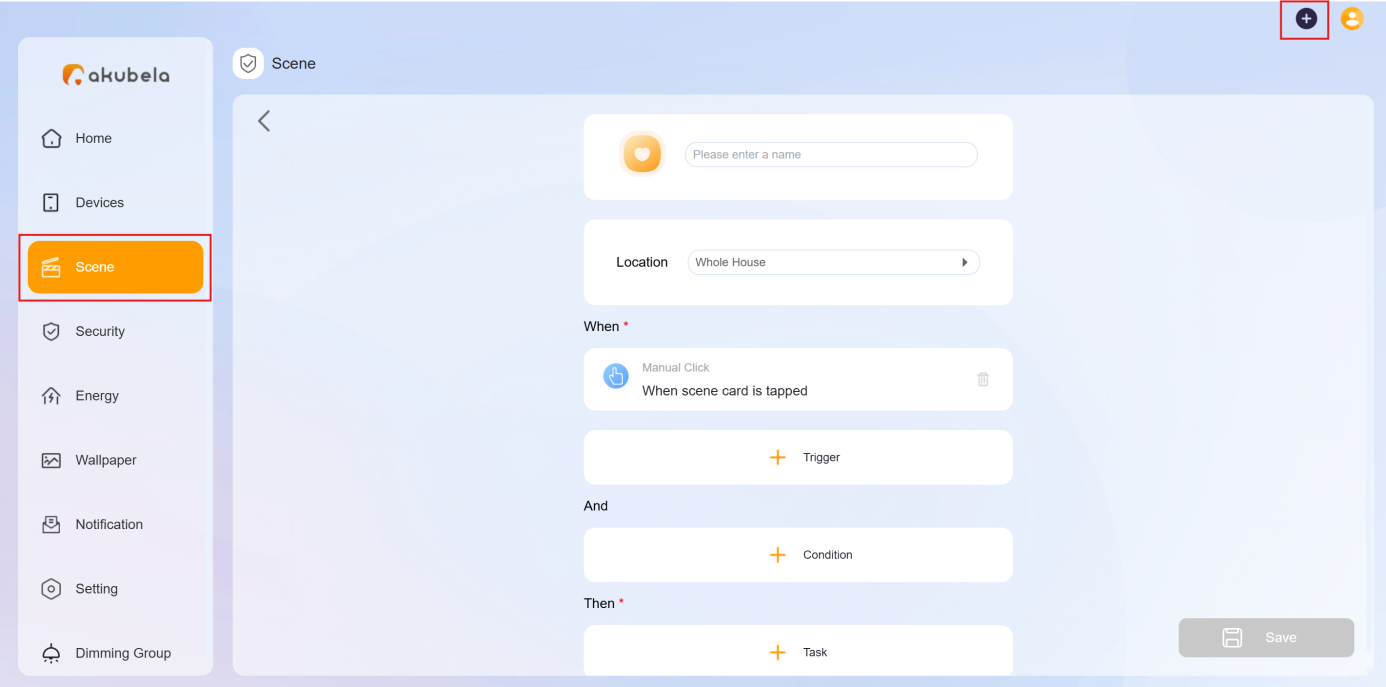
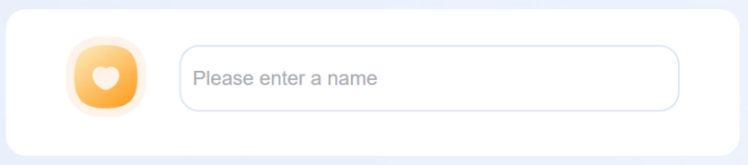
Name your scene
Scenes can have duplicate names.
Click  to choose an image, then enter the scene name.
Select Scene Location
Assign a space to help you quickly find the scene.
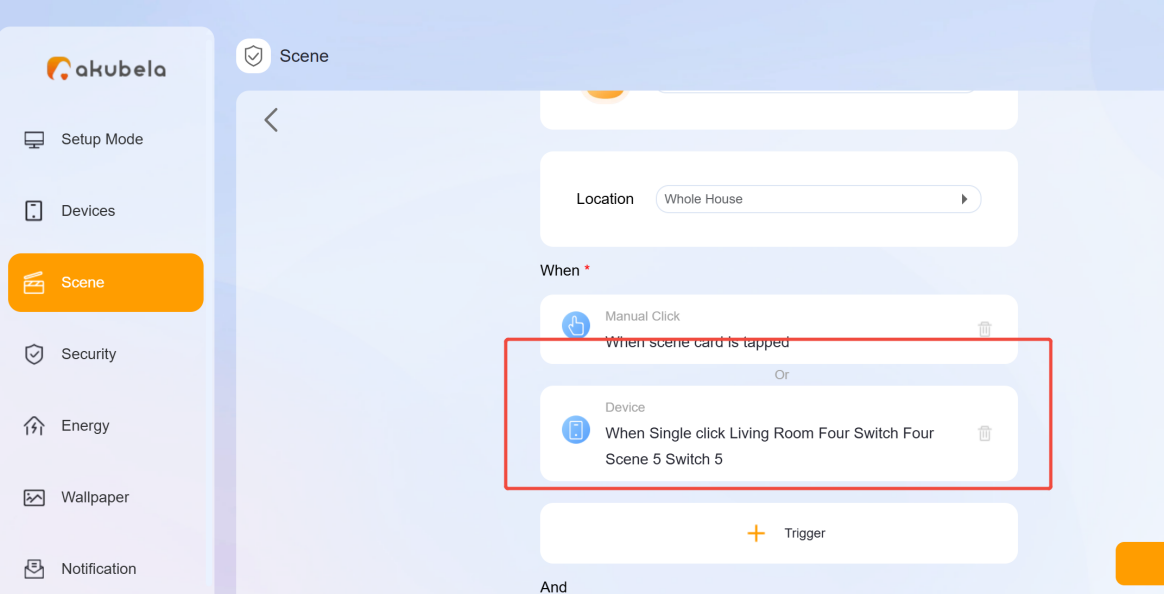
Select Trigger Conditions
Trigger conditions are events that activate your scene, such as time schedules, device actions, or security mode changes. You can set one or more conditions; the scene runs when any condition is met.
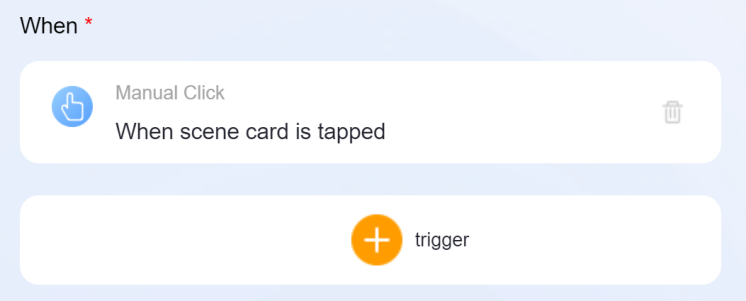
Click in the When filed, then choose from:
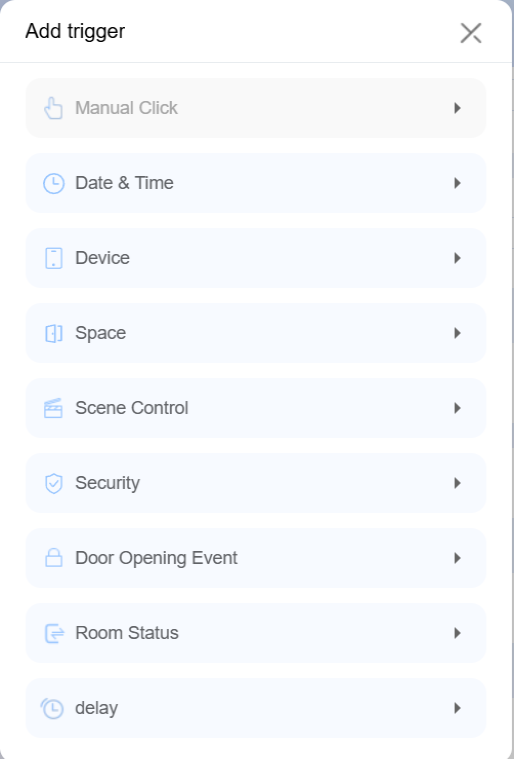
Manual Click: Trigger by tapping the scene card on panels, in the app, or the user web portal.
Date&Time: Trigger at a specific times and days.
Device: Trigger based on device actions (e.g., motion detected, door unlocked).
Space: Trigger when a condition is met across all same-type devices in a room.
Scene Control: Trigger when another scene runs or its auto-run is enabled/disabled.
Security: Trigger when the system is armed/disarmed or an alert is triggered.
Door Opening Event: Trigger when designated users unlock specific intercom devices using selected methods, or when any user unlocks them from inside.
Room Status: (For hotels) Trigger when the room status changes to Checked In or Checked Out.
Delay: Trigger after a specified delay.
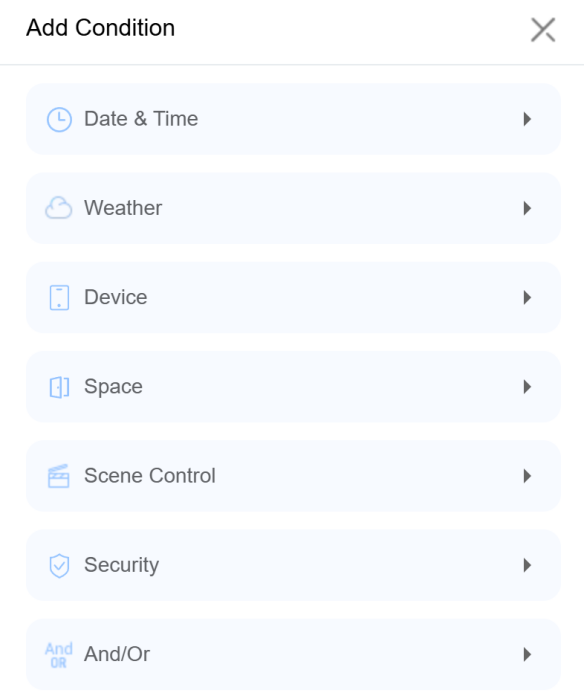
(Optional) Set Preconditions
To add preconditions, click  in the And field. The options here are similar to the trigger conditions but with some differences:
Weather and And/Or are available.
And/Or is used to define how preconditions are evaluated:
And: All selected preconditions must be met.
Or: At least one precondition must be met.
Manual Click, Door Opening Event, and Delay are not supported.
NOTE:
If you add conditions in both When and And fields, the scene will run only if:
a) preconditions in the And field have already been met; and
b) any of the trigger condition in When field are satisfied.
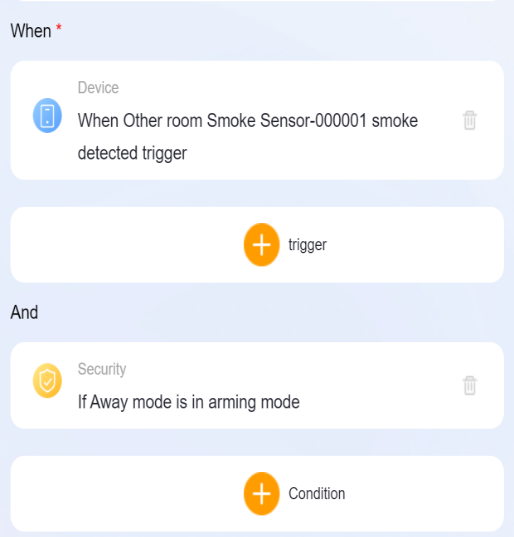
Example:
When your system is armed in the Away mode, and if the smoke sensor detects leakage, the preset tasks will be activated. Please refer to the following for the configuration.
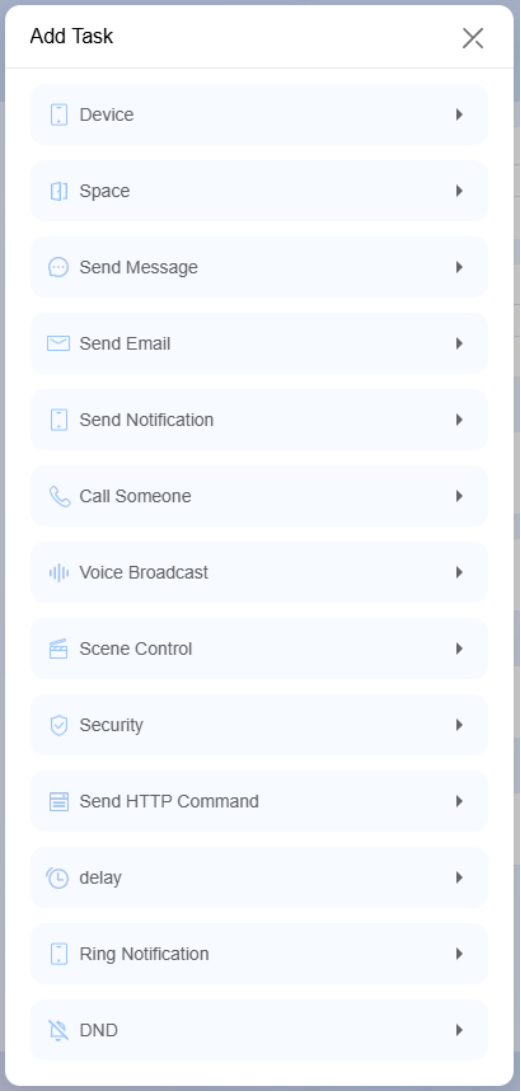
Select Tasks
The task is the action(s) to perform when preset conditions are met.
Click  in the Then filed, and select one or more of the tasks. In addition to those options the same as the conditions, you will find the following new choices:
Device. Turn devices on/off or adjust settings such as light brightness, AC temperature, and more.
Space. Control all devices of the same type within a room or throughout the house. For example, open all curtains in the living room.
Send Message. Send a message to designated smart panels and family members.
Send Email. Send messages to a user’s email address. Note that the user account must be registered with email.
Send Notification. Send a notification to panels and family members.
Call Someone. Select who will make the call, then choose the target family members or panels to call.
Voice Broadcast. Broadcast specific texts or audio content.
Scenes Control. To trigger, enable, or disable other scenes.
Security. Enable the system to be armed or disarmed in a specific security mode.
Send HTTP Command. Send a HTTP command to certain devices.
Delay. Make the system to wait for a period of time before performing the task.
Ring Notification. Send a notification to the designated devices or family members when some rings the door.
DND. Turn on or off the DND function.
Once you’re finished, click Save at the bottom of the screen.
The newly-created scenes(except the scenes without a manual condition) will display on all panels within your family and BelaHome's Scenes screen.
Link a Scene
For scene panels, you can link one or more buttons to existing scenes by going to Device > Device Management > Linked Scenes.
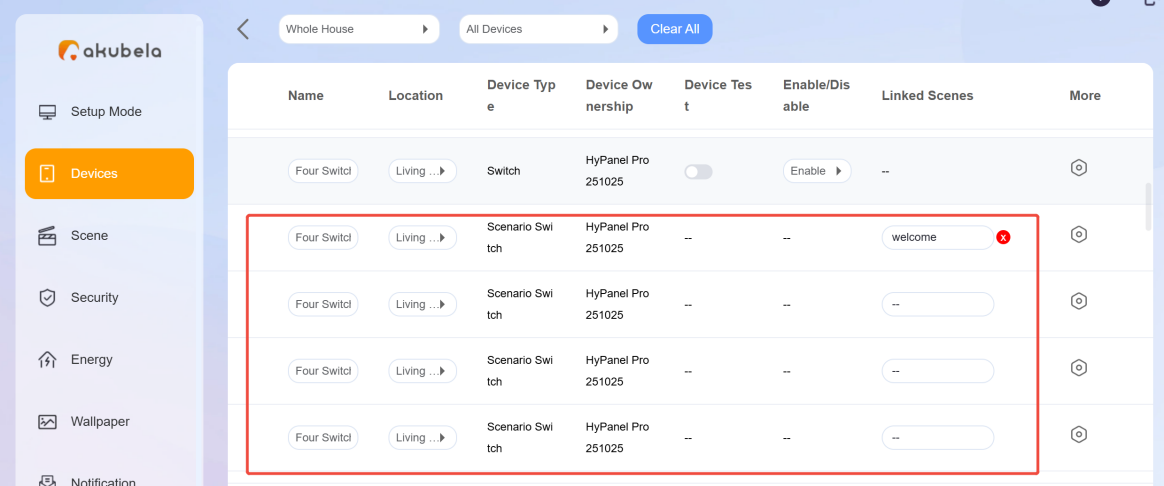
Once linked, pressing the button will automatically trigger the selected scene.
Edit a Scene
To modify the name, image, conditions, or tasks, go to Scene, and click on the desired scene to enter the editing page.
Delete a Scene
To remove a scene, go to Scenes, click on the desired scene to enter the editing page, then click Delete at the bottom right.

Activate Scenes
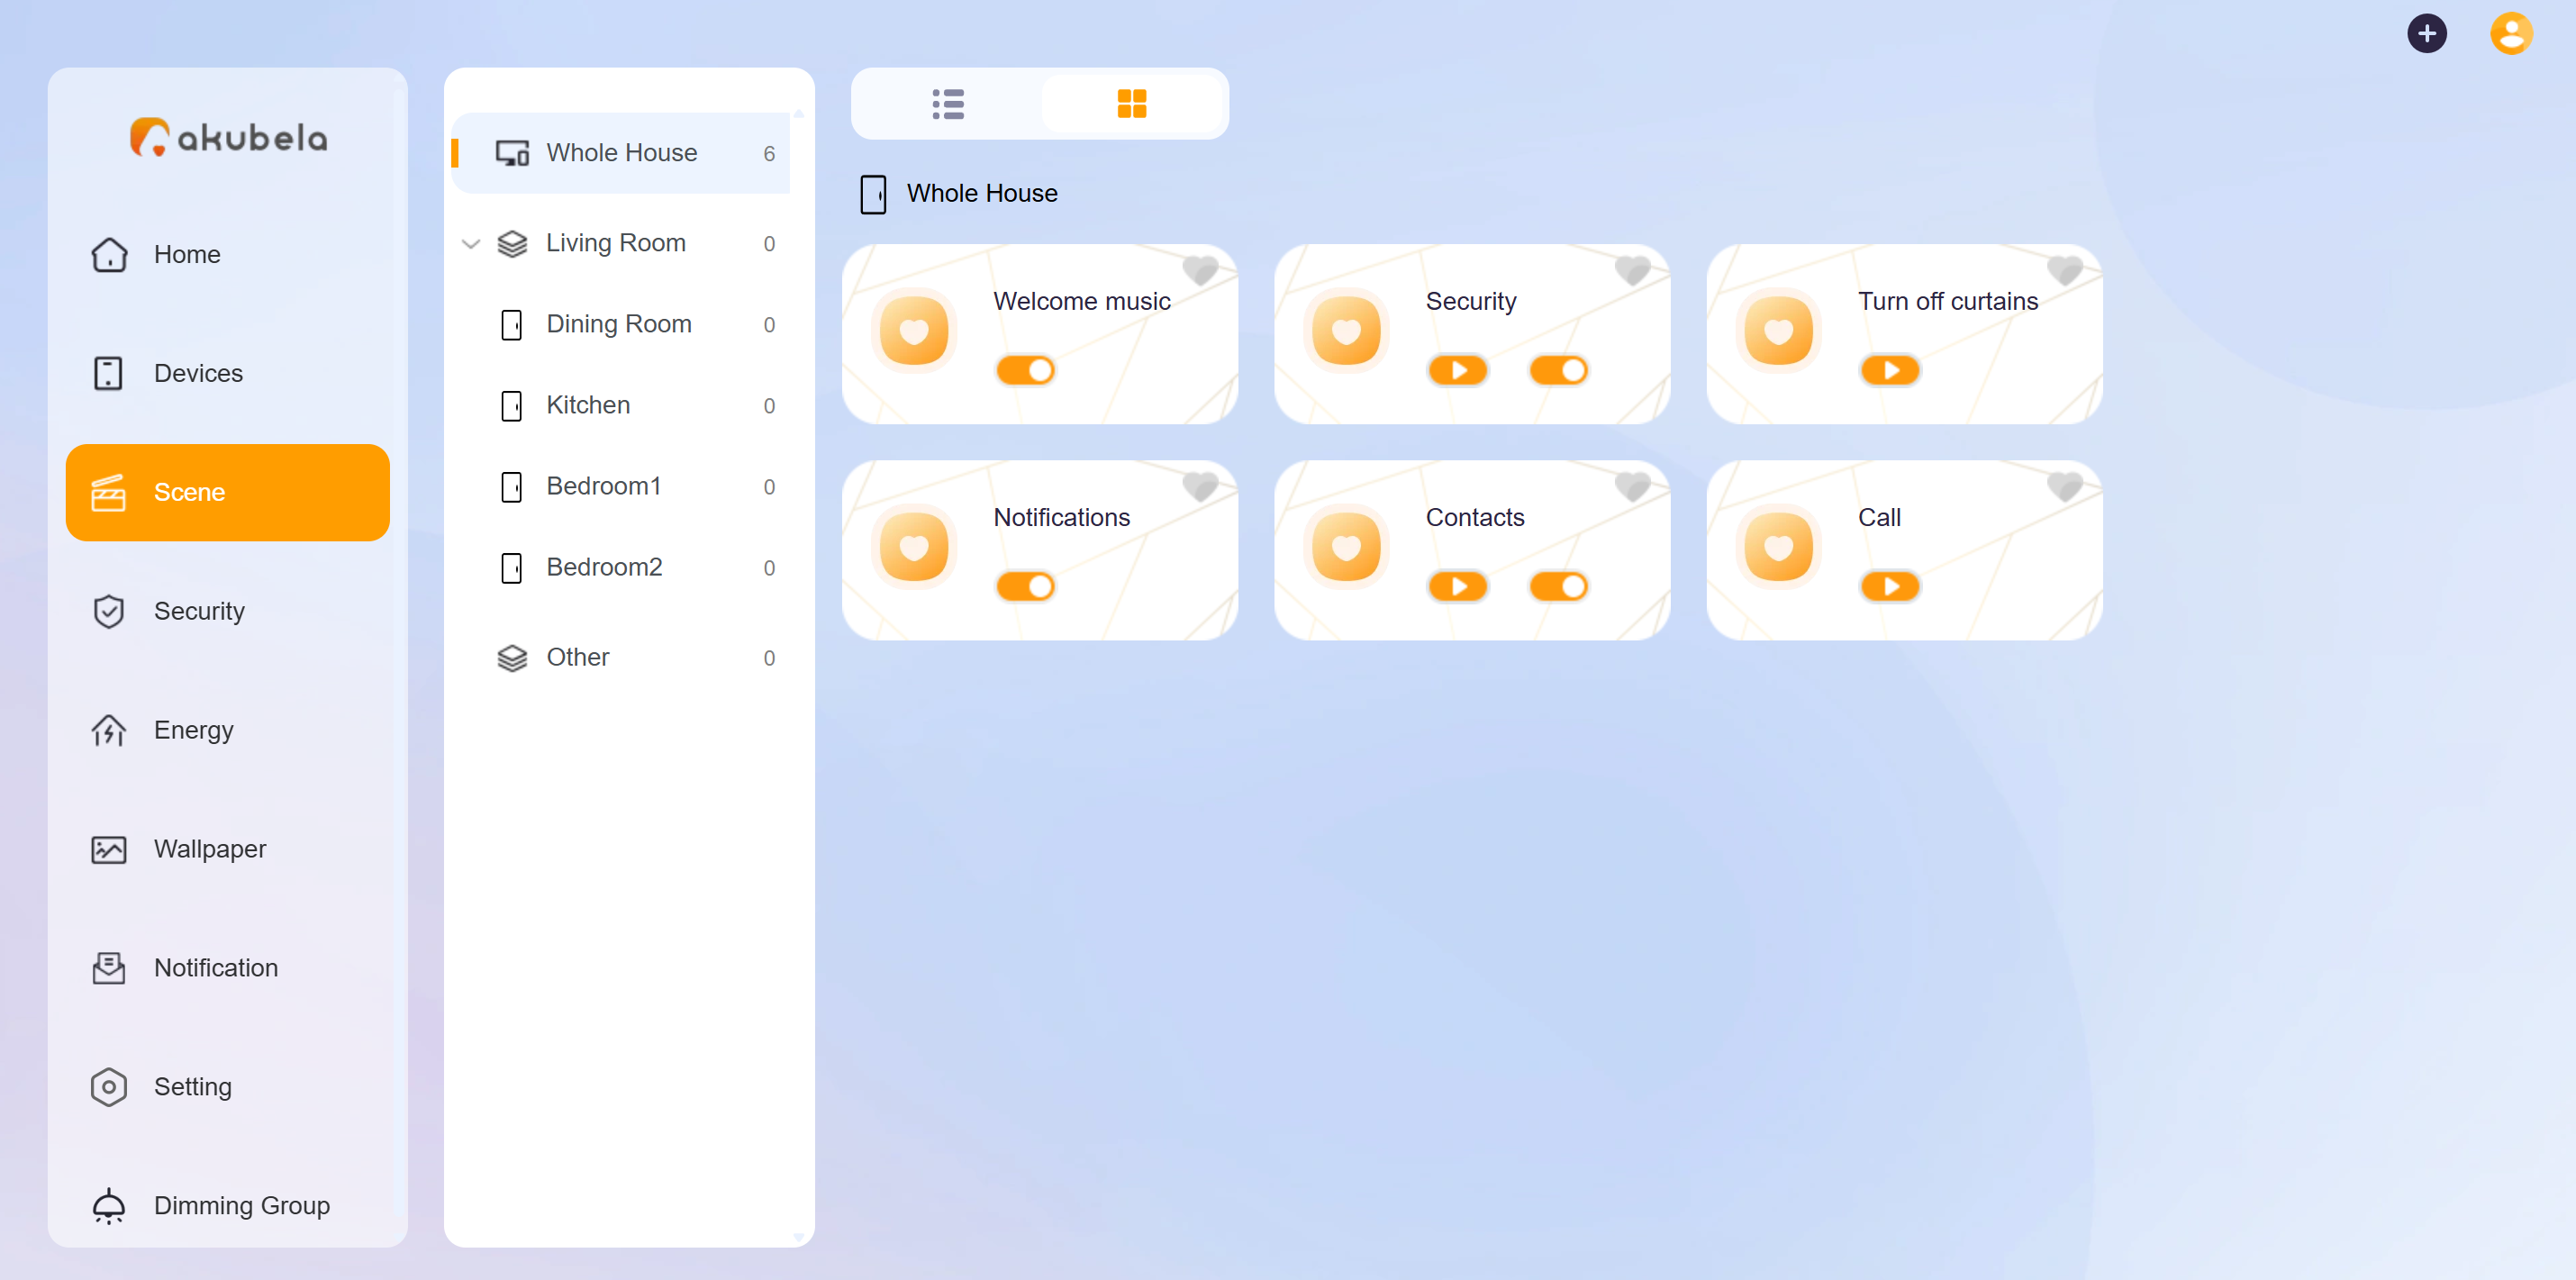
Run a Manual Scene
On the Scenes page, to activate a scene with manual conditions, just click its icon  .
.
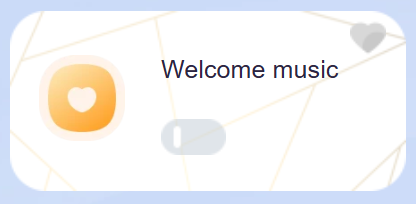
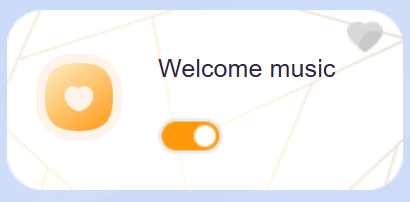
Run an Auto Scene
When auto scenes are enabled (switch is on as the below figure shown), the scene will activate automatically once the preset conditions are met. No further action is needed to run an enabled auto scene.
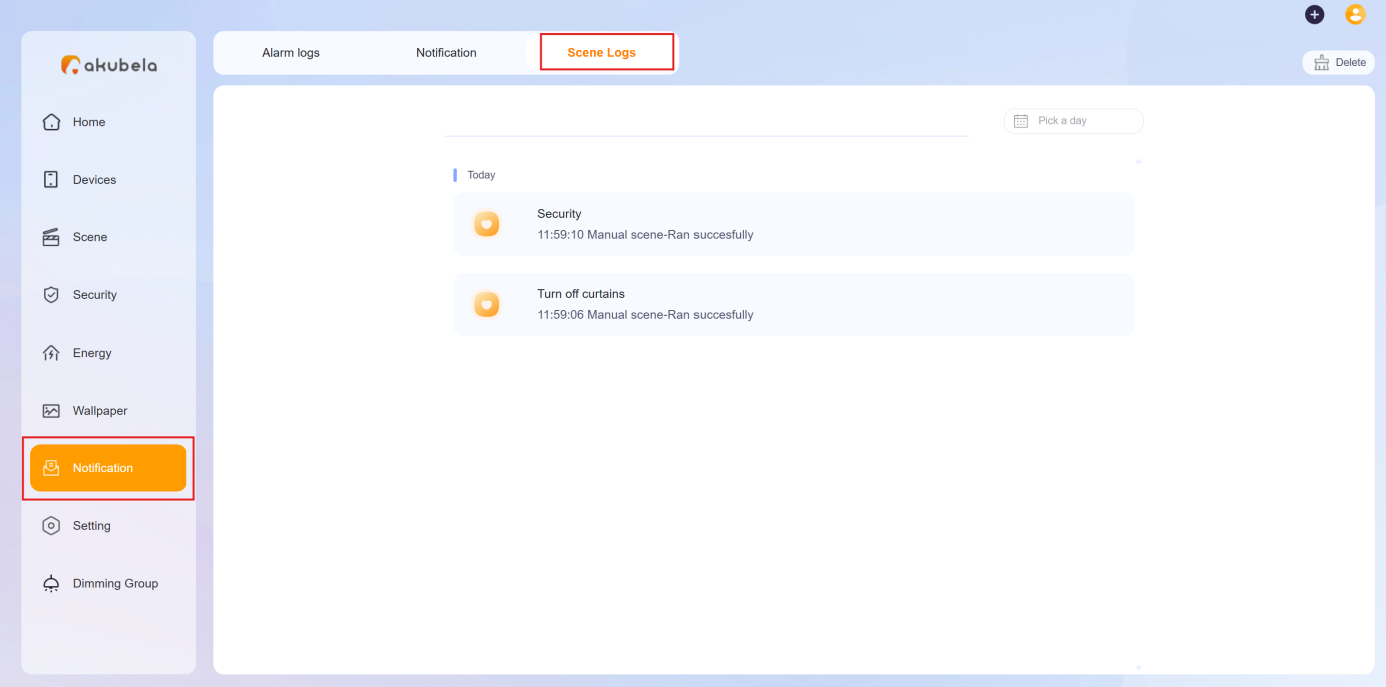
View Scenes Logs
To see or clear scene running logs, go to Notification > Scene Log.
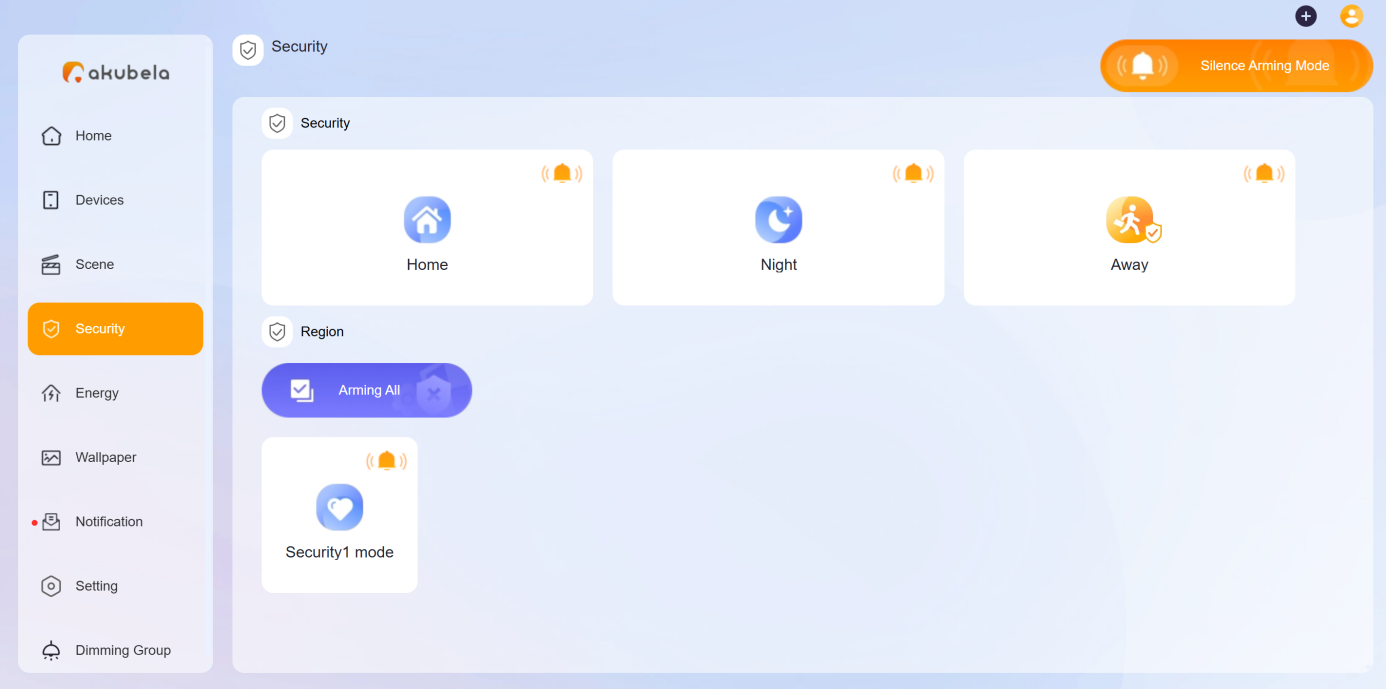
Security Mode Management
You can configure the three default security modes or create custom modes to suit your needs.
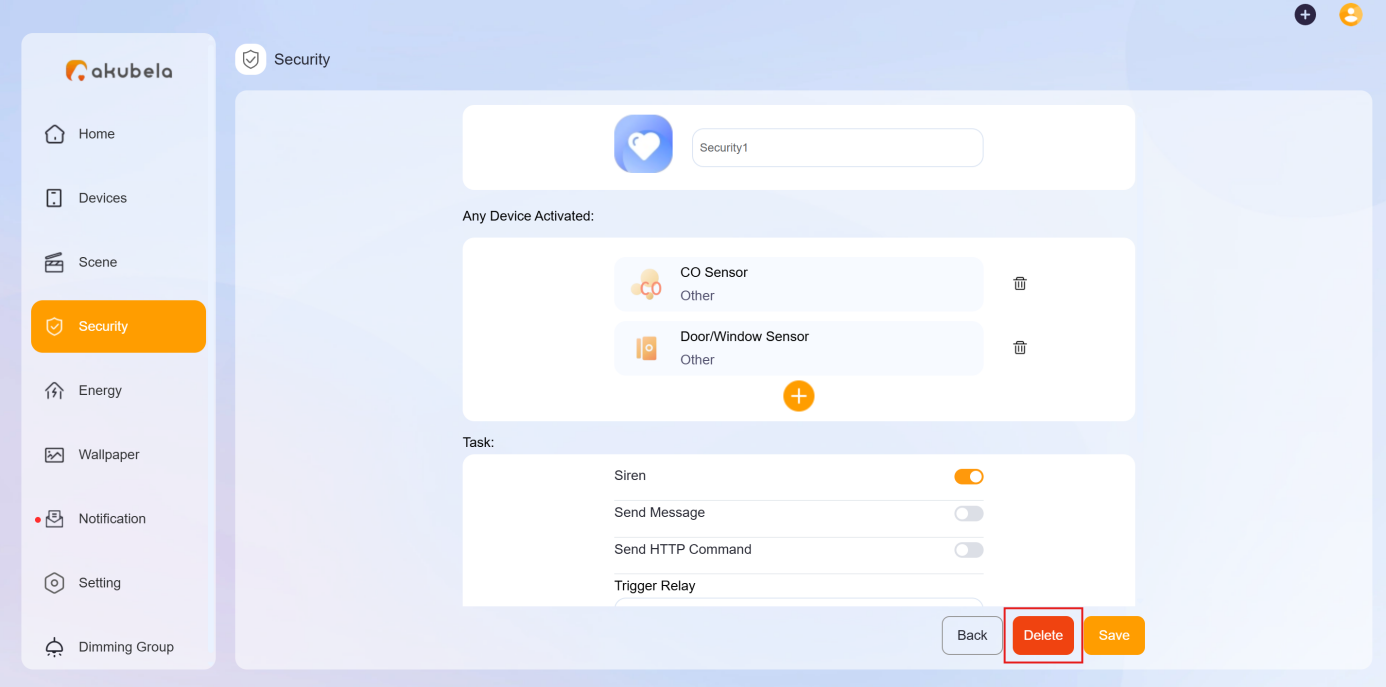
Configure Default Security Modes
akubela provides three default modes: Home, Away, and Night. You should configure them before you can arm your system.
Click Security on the left-side menu, and click
 at the bottom right of the desired mode.
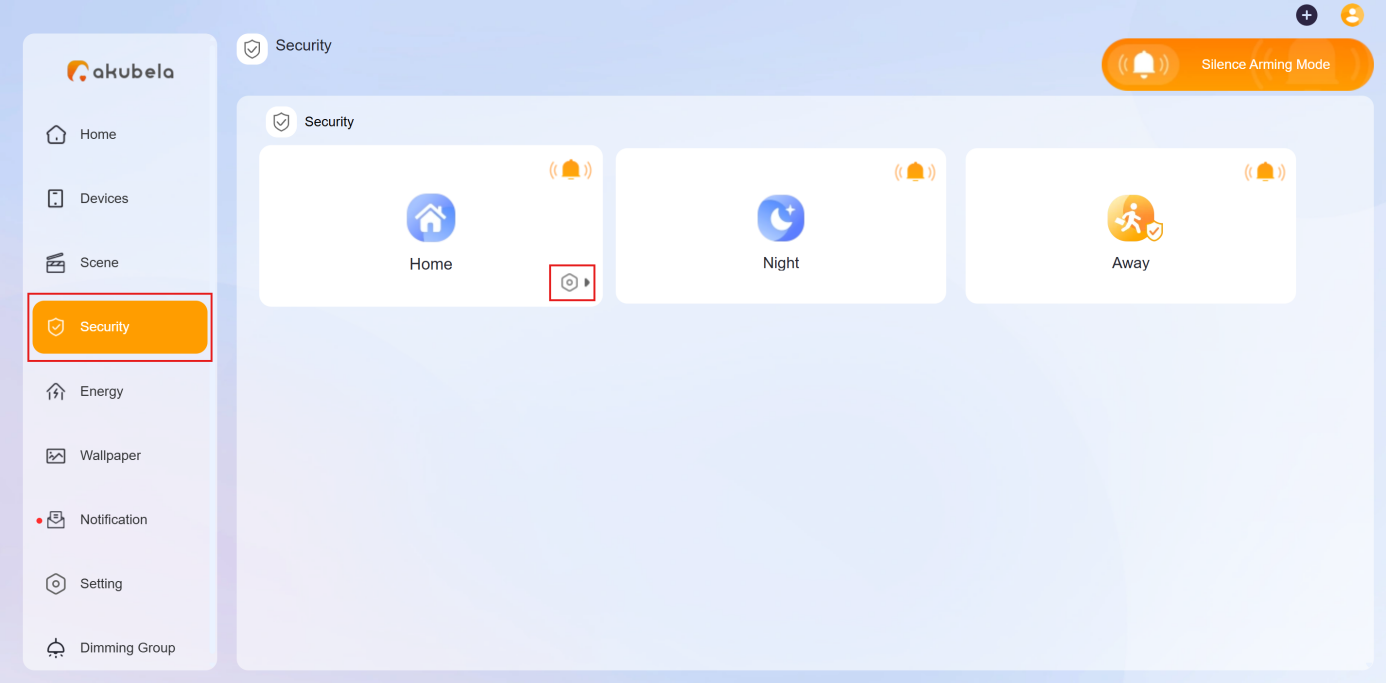
On the followed screen, complete the below settings:
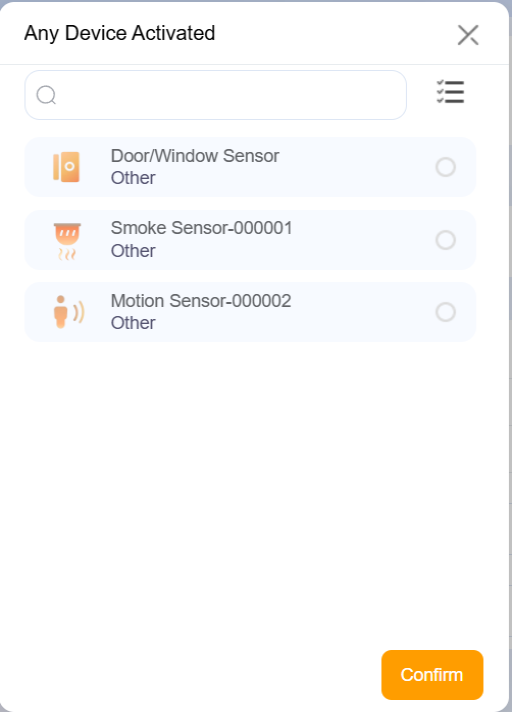
In Any Devices Activated field, click
 to select one or more devices to act as trigger -- for example, when a device is turned on/off or detects motion.
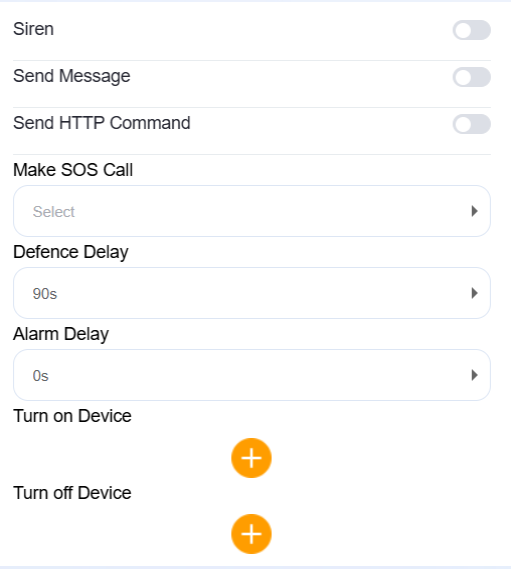
In Task field, do any of the following:
Siren: Enable to trigger a siren sound.
Send Message: Notify all family members and panels.
Send HTTP command: Perform custom actions through HTTP requests.
Make SOS Call: Automatically call a designated emergency number. To add the SOS numbers, see here.
Add a defence delay before the system arms.
Turn on/off devices when the mode is triggered.
Create a Custom Security Mode
You are able to create your own security mode.
Click
 in the upper right corner, and select Add security.
On the creating mode screen, complete the following settings:
Name the mode.
In Any Devices Active field, click
 to select one or more devices to act as trigger.
In Task field, choose the actions that should happen when the condition is met. The options are the same as those in configuring default security mode.
Click Save.
The newly-created modes will be displayed on all the panels’ and BelaHome's Security screen.
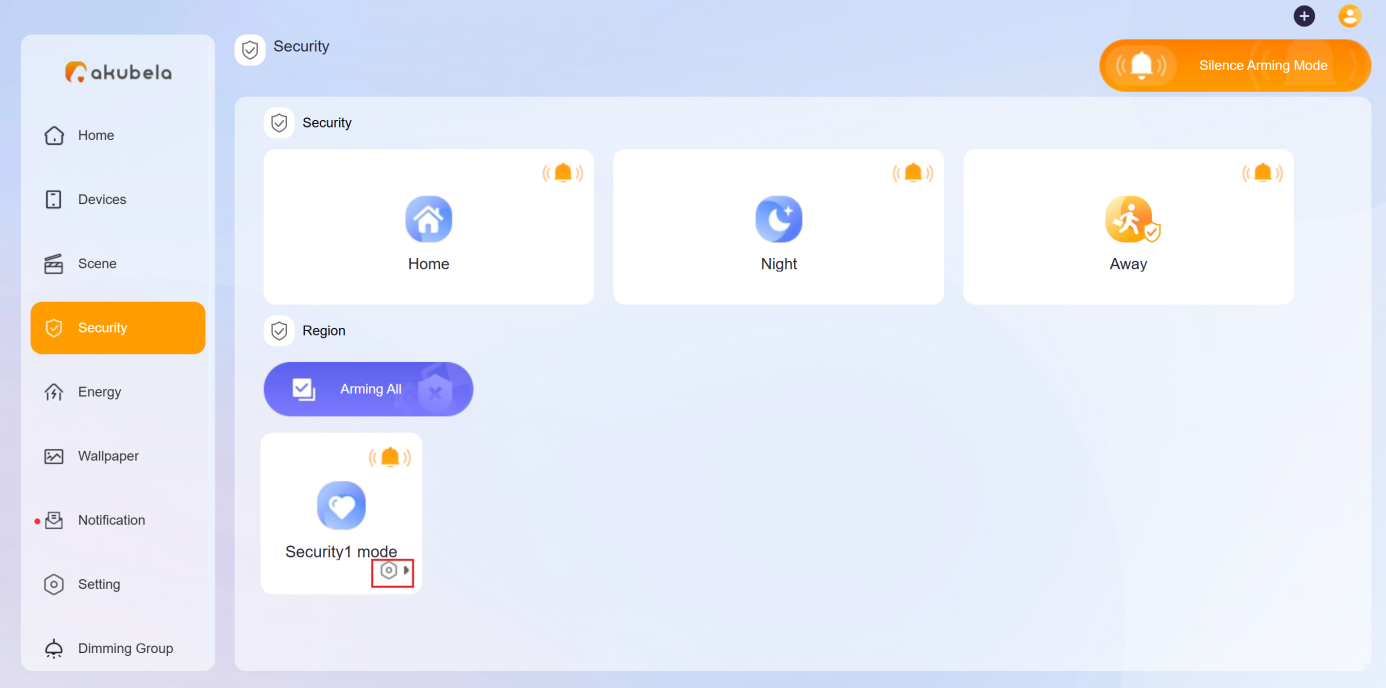
Edit a Security Mode
To change the mode settings, go to Security, and click the mode’s icon  at the bottom right.
Remove a Custom Security Mode
To delete a custom mode, go to Security, click on its  at the bottom right, and click Delete.
Enable Siren and Alert Notifications
When an alarm is triggered, the system can sound a siren and send push notifications.
In the Security section, you’ll find a bell icon in the upper-right corner of each mode.
The orange icon  indicates the siren feature is active. To disable it, click the icon and it will turn blue
 .
.
To manage this setting for all security modes at once, click 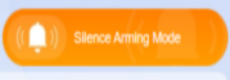 in the upper right corner.
Arm and Disarm the System
To arm the system, click the desired security mode, and its card will change to orange. Custom and default modes can be enabled at the same time, but the default ones cannot.

To disarm the system, simply click the mode again. The color will turn back to blue.
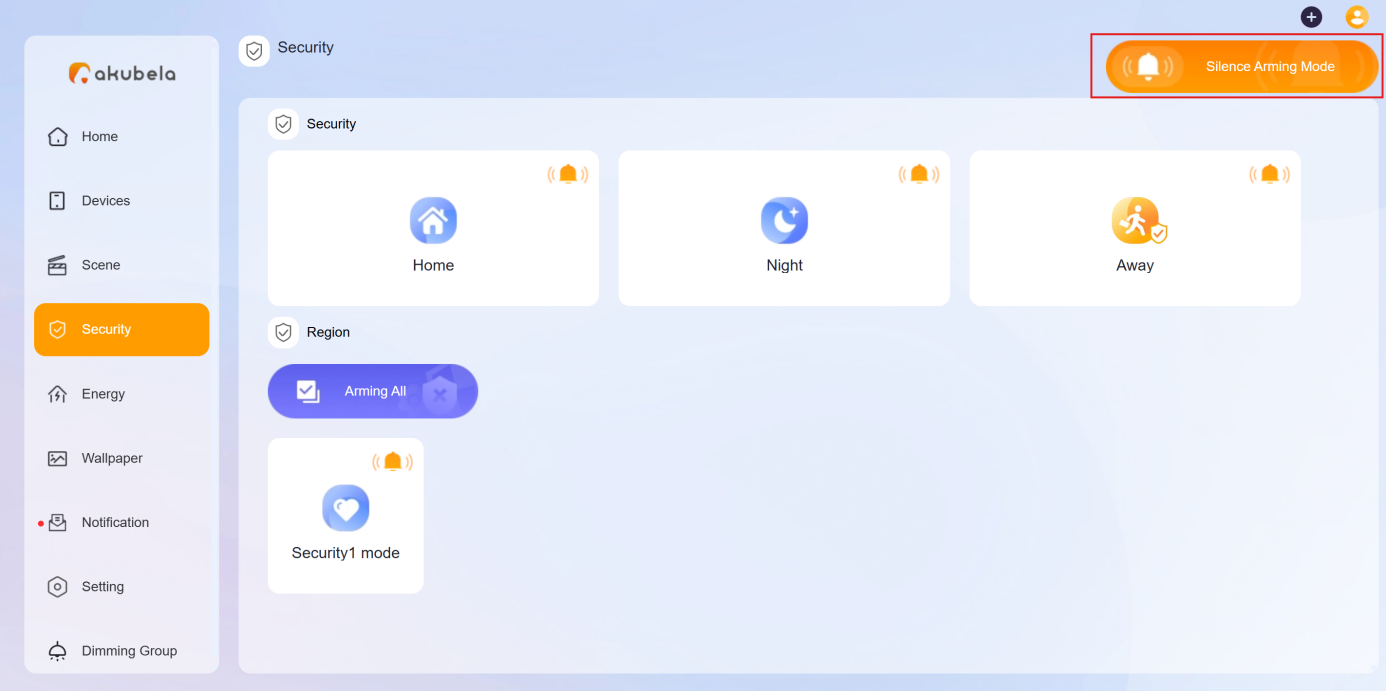
View Security Logs
To view or clear scene-related logs, go to Notification > Alarm Logs.
On this screen, you can see the following types of histories:
Alarm: Display sensor alarm and alarm-cleared histories triggered in any security mode, including Away, Home, Night, and custom modes.
Arm/Disarm: Display the system’s arming and disarming histories.
Alert: Display all triggered histories associated with sensors, whether they are triggered in security mode or not.
Bypass: Display histories of sensors being ignored and restored to function.
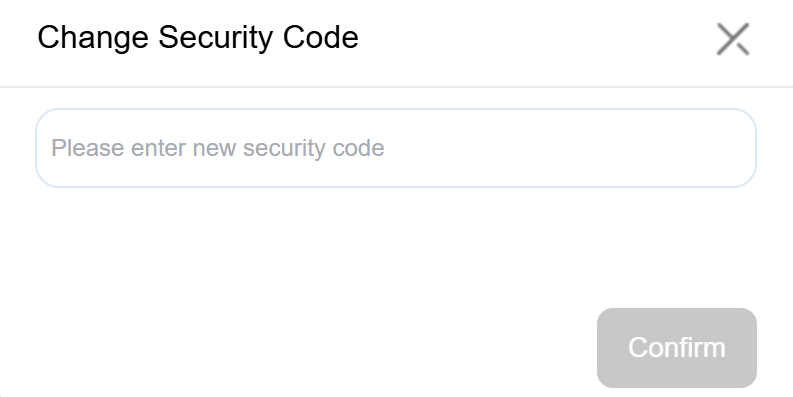
Modify Arming/Disarming Code
If you forget your current security code, you can set a new one.
Click Setting > Change Security Code.
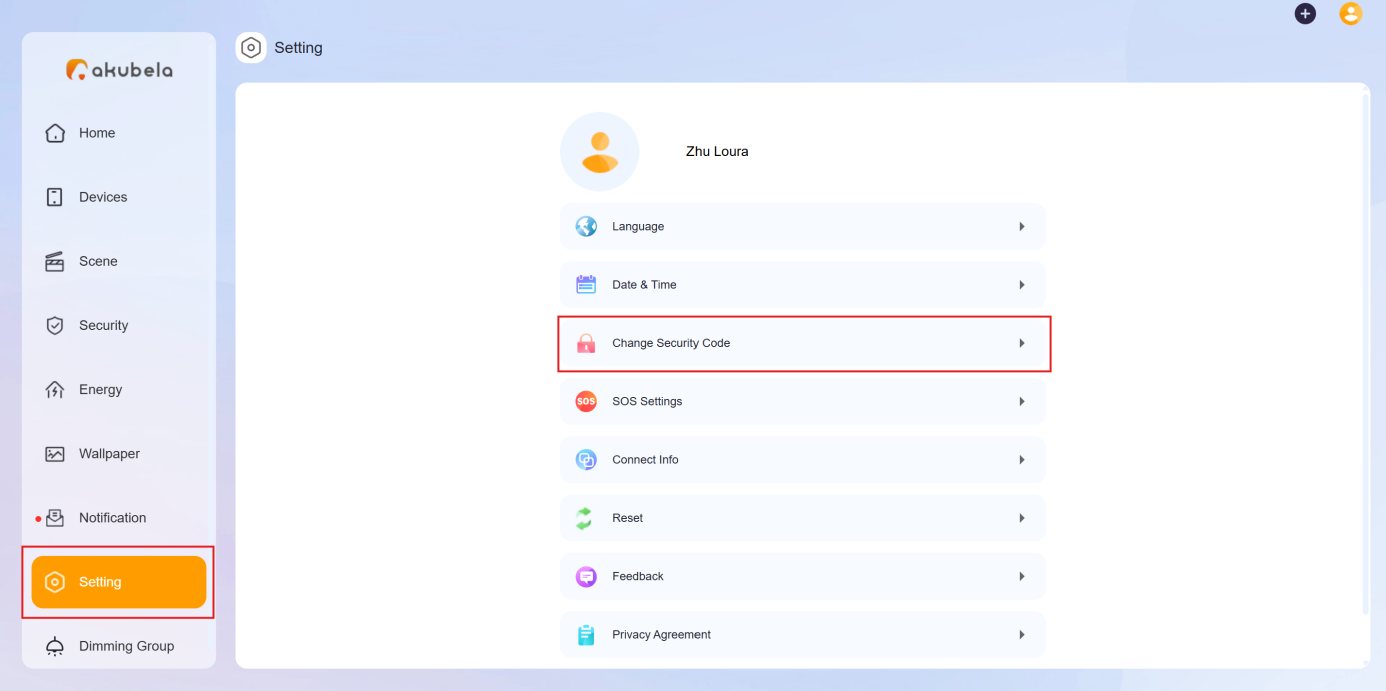
In the pop-up window, enter a new 6-digit code, then click Confirm.
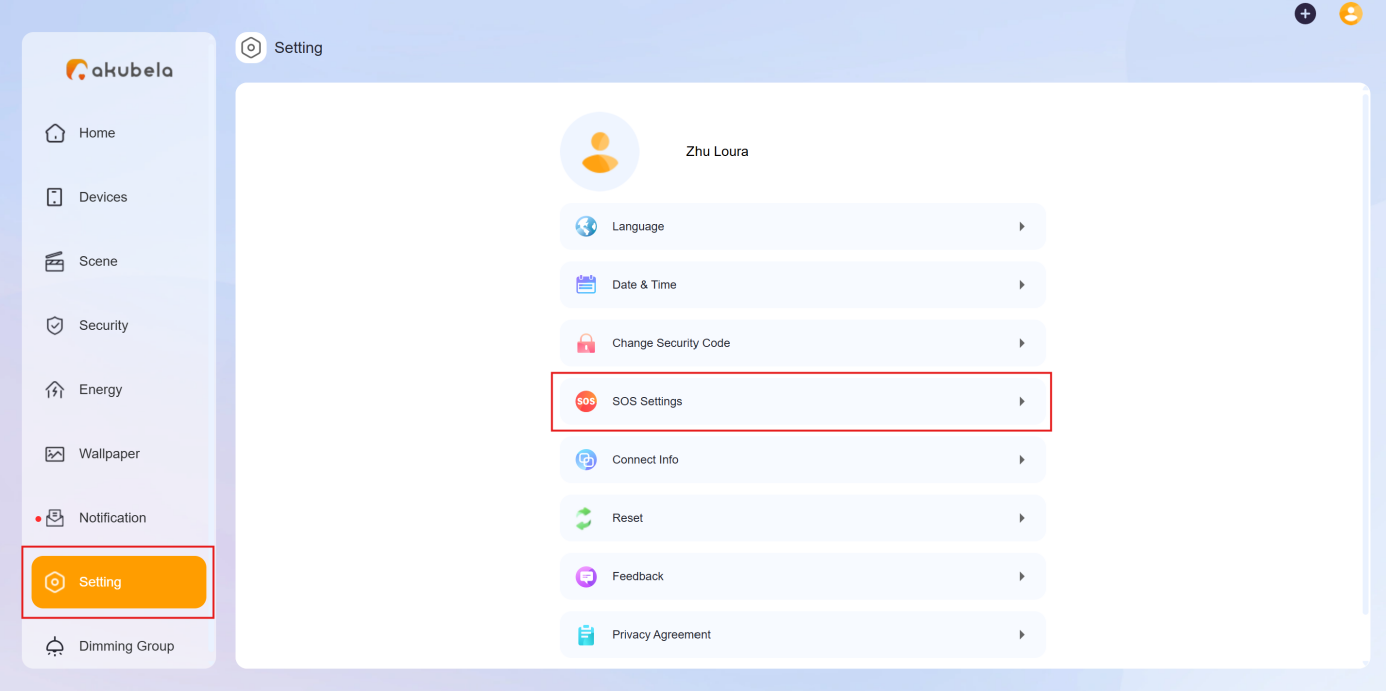
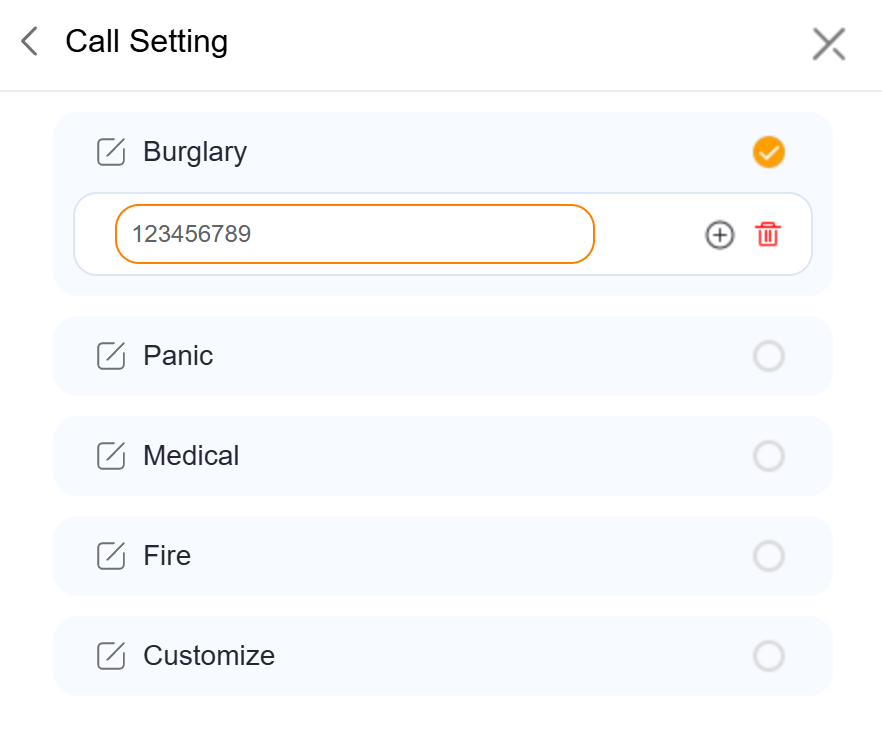
Set SOS numbers
SOS numbers must be set before you can enable 'Make SOS Calls' when configuring security mode tasks.
Click Setting > SOS Settings.
Select Call Setting.
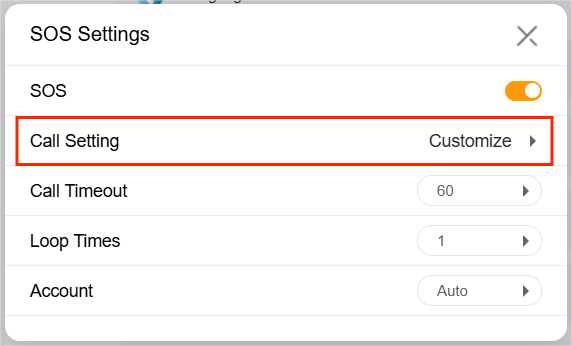
Select the emergency number type and then enter the SIP number.
Click
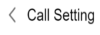 to go back to other settings, including:
Enable SOS function.
Call Timeout: Set how long the call rings before being terminated or forwarded.
Loop Times: Specify how many times the selected SOS numbers will be called.
Call Account: Choose which account to use for making calls:
Account 1: Default cloud SIP account, available when the system is cloud-connected. The SIP number is shown in the panel under System Settings > About and in the device web portal.
Account 2: Third-party SIP account, available after configuration via the device web portal. The configured SIP number also appears in the panel’s About screen.
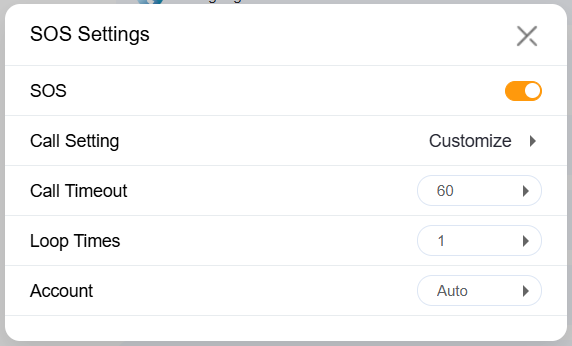
Once configured, a SOS card will appear on the panel. You can press the SOS button to make an emerg
ency call.
Permission Management
The user web portal allows you to select which rooms, devices, scenes, security modes, and function categories are displayed on a specific panel. You can also disable access to security mode settings on the panel if needed.
NOTE
The panel must be online during customization.
To display only specific rooms, devices, and function categories on a selected panel:
Click Devices > [Desired panel] >
 .
.
Select Device permissions, choose the feature to configure, and customize the display options.
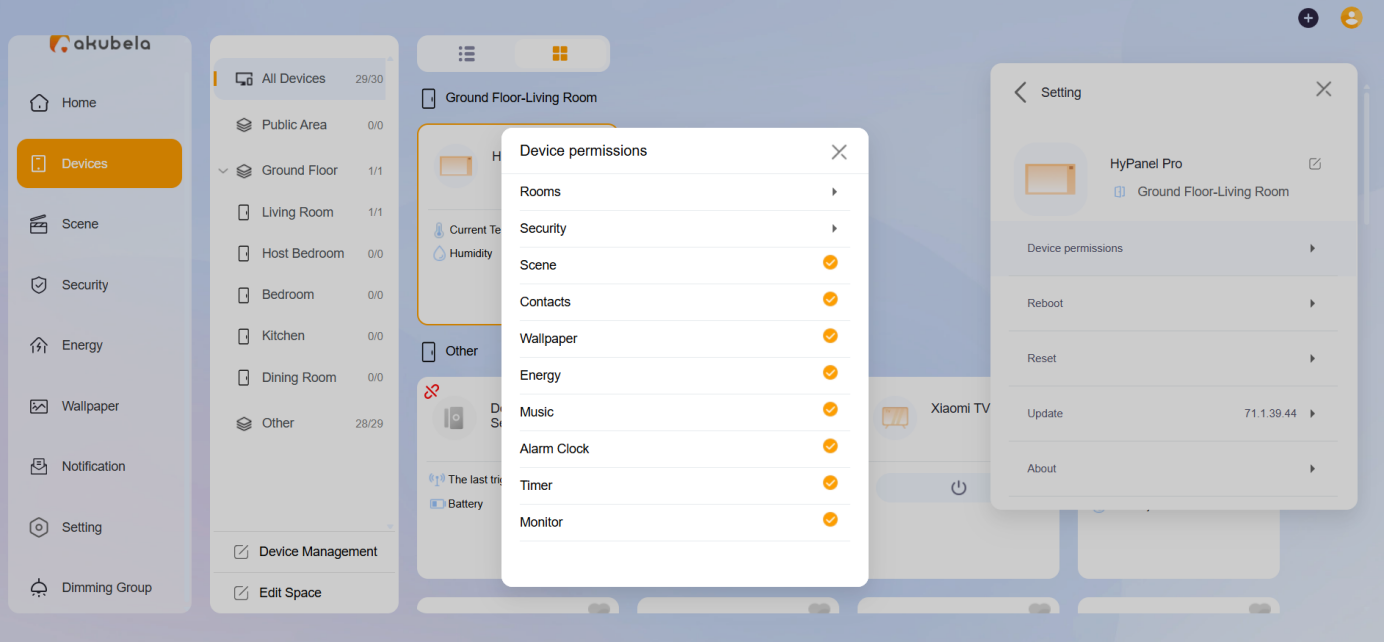
Rooms: Applies only to the selected HyPanels. Settings do not sync to other sub-gateways in the home. Hidden devices will not be available for scenes or security configurations.
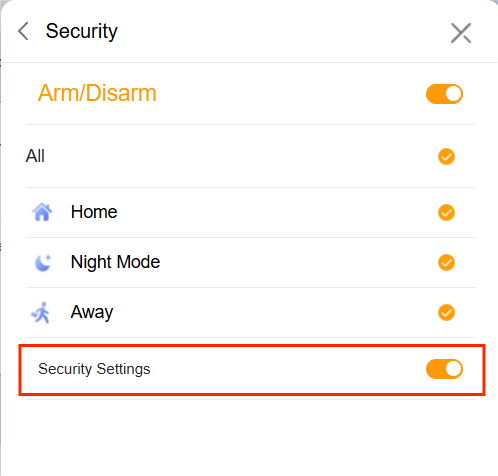
Security: Applies only to the selected panel.
TIP:
To prevent users from editing security modes directly on large-screen panels (e.g., HyPanel Pro), toggle off the Security Settings option to hide the security mode configuration entry.
Scene: Applies only to the selected panel. Scenes will still function if triggered by other conditions.
Contacts: Applies only to the selected panel. Incoming calls can still be answered via the current app account.
Other Features: Choose to display or hide Energy, Alarm Clock, Timer, and Monitor screens.
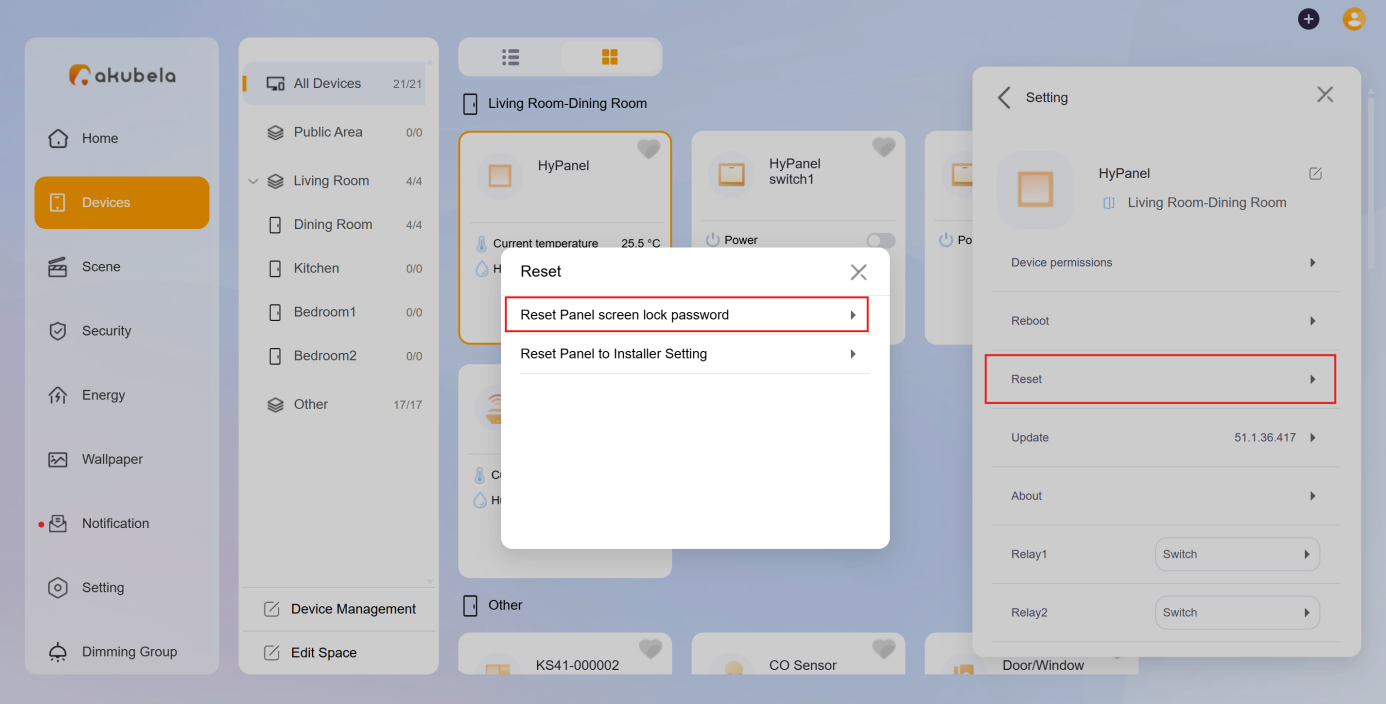
Clear Panel’s Screen Lock
If you forget the panel’s screen lock password, you can clear it to regain access without entering a password.
Go to Devices > [Desired panel] >
 .
.
Select Reset > Reset Panel screen lock password, then confirm.
Grant Remote Maintenance Permissions
If you need help from your service provider to update settings or perform maintenance remotely, you can create a temporary maintenance account that gives them remote access to your device’s web portals and the BelaHome app.
NOTE
Only one temporary account can be valid at a time. If you create a new one, the old one will be invalidated.
To create a temporary maintenance account:
Go to Settings > Maintenance Authorization.
Enable the permission(s) you need:
Local Assistance: For accessing the device web portal when the service provider is on the same local network.
Remote Assistance: For remote access via the app and web portals.
Set the account valid time.
Click Save to generate an account.
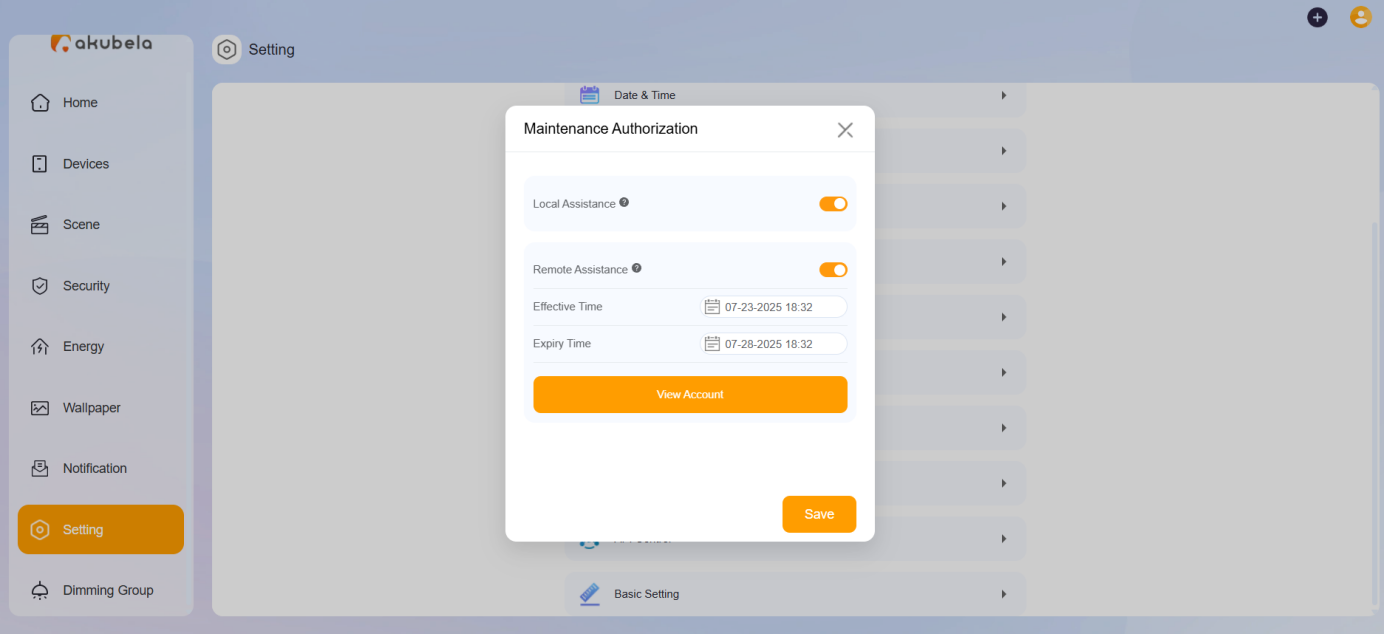
Click View Account to view and share the login credentials.
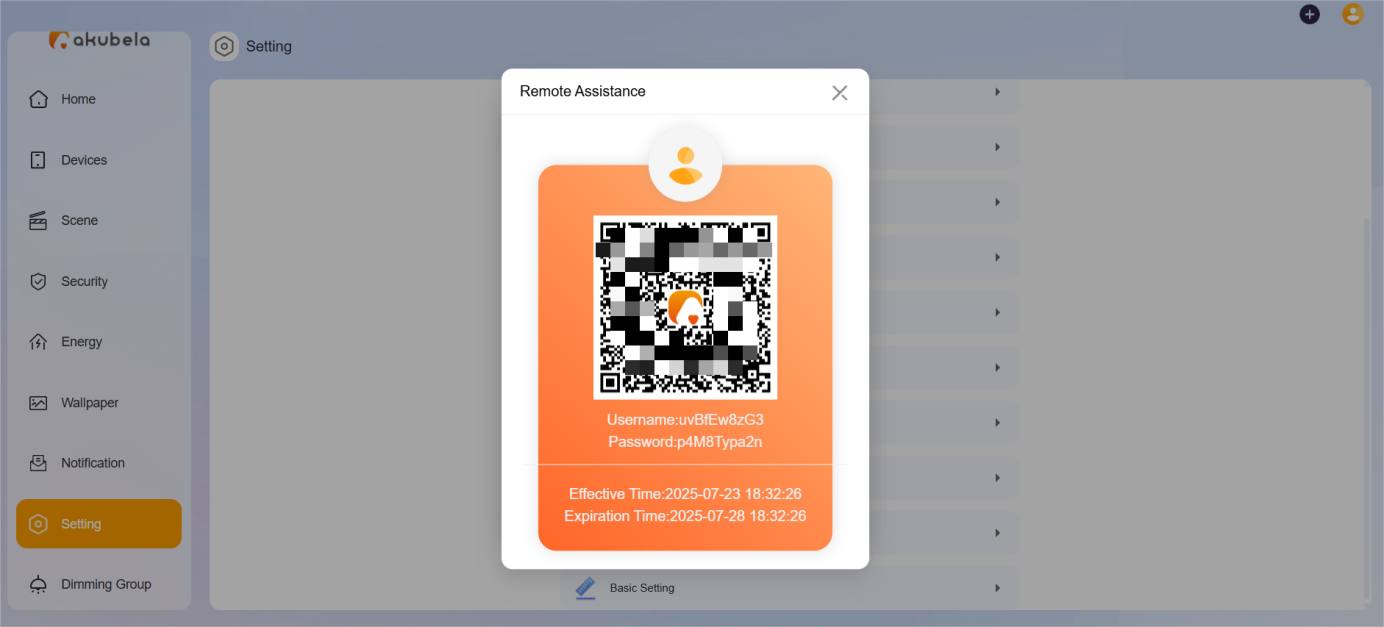
Your service provider can:
Use the BelaHome app with admin-level permissions (except: Family Management, family switching, intercom permissions management, temporary PIN codes for smart lock, and messaging family members).
Log in remotely to the device web portal at my.akubela.com.
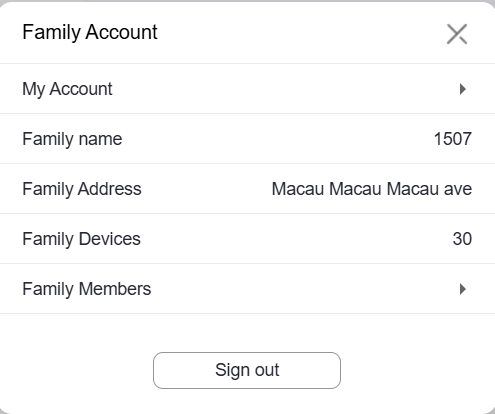
Family Account Management
akubela has three types of user accounts, each with different permission levels:
Administrator: Only one per family.
Can log in to the user web portal
Has full access to all features and functions
Manages family data
Manages family member accounts
Manager
Accesses all available features and functions
Manages general member accounts
General member
Can use available features like controlling devices and scenes
Cannot add new devices or scenes, or change existing settings.
Administrator Account
Only the family administrator can manage member accounts, including updating information, changing permissions, transferring the administrator role, and more.
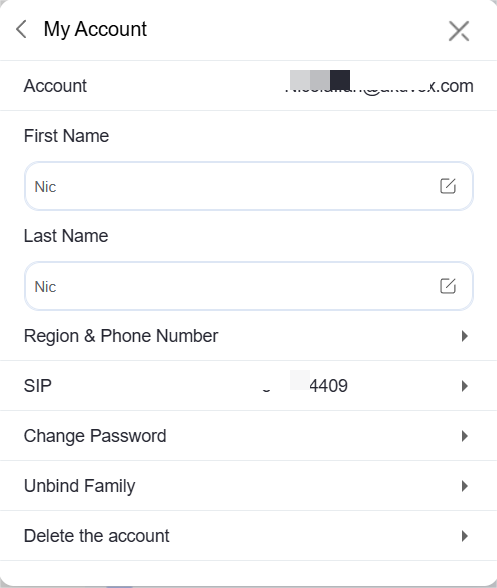
Change Administrator Account Settings
Click
 in the upper right corner, then select My Account.
Do any of the following:
Modify your name.
Add or change your region and phone number.
Change your login password (Not available when the family is running without the cloud connection).
Unbind your account with the family, and give up all family-associated permissions (Not available when the family is running without the cloud connection).
Delete your account (Not available when the family is running without the cloud connection).
NOTE
After you delete your account, you will not be able to sign in to BelaHome, and will lose all associated permissions. Before proceeding, you have to transfer the administrator rights to another family member.
Administrator Role
The administrator role is able to be transferred to another family member only when the family is running with the cloud connection.
To transfer the administrator role to another member, click  > Family Members, and select the member you want it to be the administrator. Click Transfer Master Account Permissions and follow onscreen instructions.

Manage Family Member Accounts
Administrator account is able to create and manage management and general user accounts.
View Family Member Details
Click  in the upper right corner, and select Family Members. All the member accounts are listed here.
Add Family Members
The specific steps differ according to system’s Cloud connection modes.
Go to
 > Family Members >
  .
.
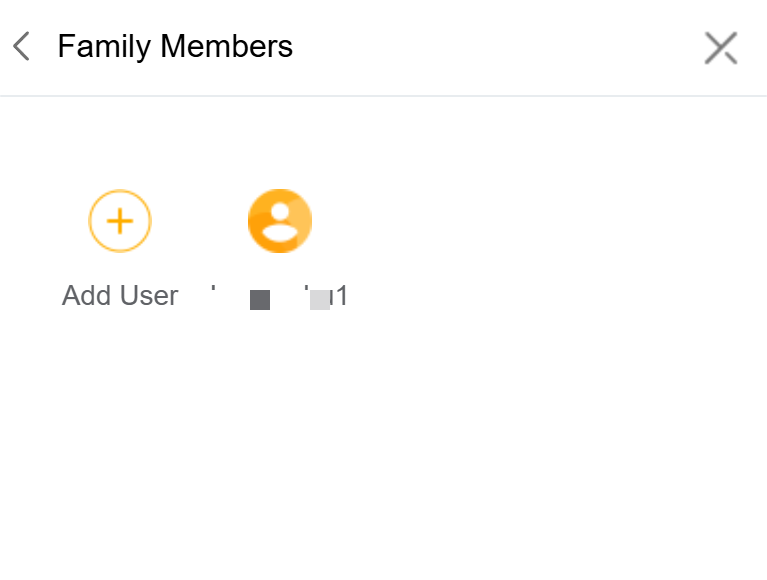
Enter the required information.
The members will receive a confirmation email.
Change Family Member Account Type
Go to
 > Family Members. Select the desired member account.
On the detailed Family Member Info page, do any of the following:
Click
 under the member’s name to change the account type.
Click Unbind Family to unbind the account with the family.
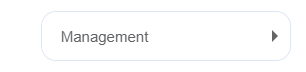
Click Permission Managemen to configure feature permissions for family member accounts. The corresponding features will be unavailable when permissions are disabled.

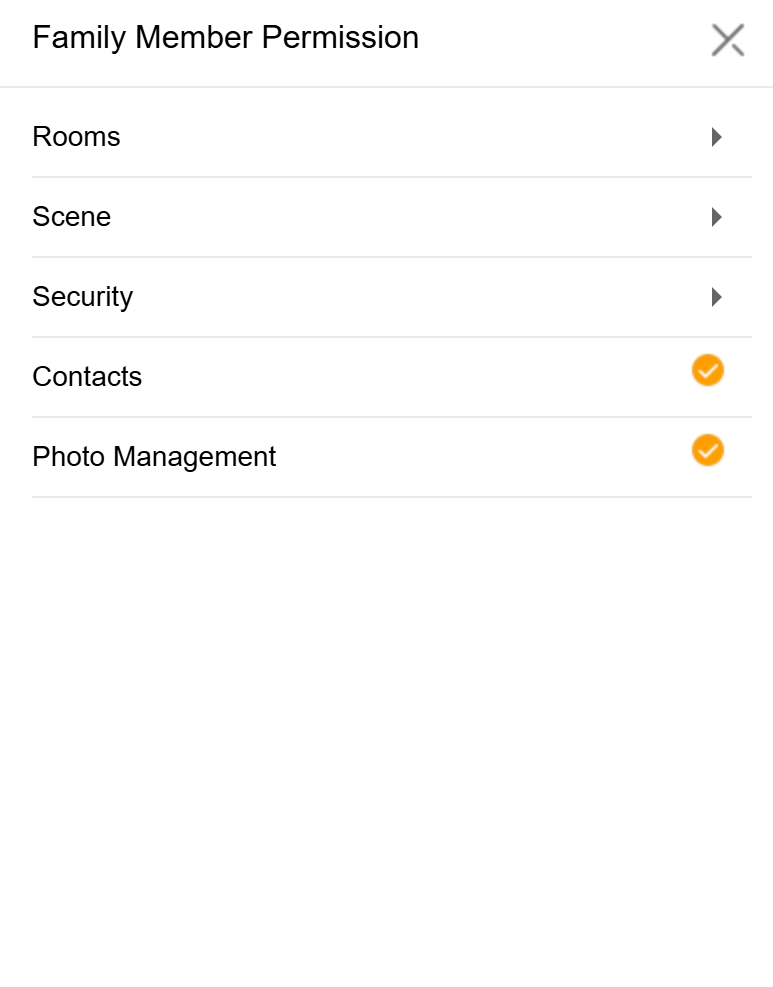
Photo Wall Management
Customize the standby screen of your SmartPanel or HyPanel with up to 9 personal photos, replacing the default screen saver.
Add New Photos
You can easily upload your favorite images.
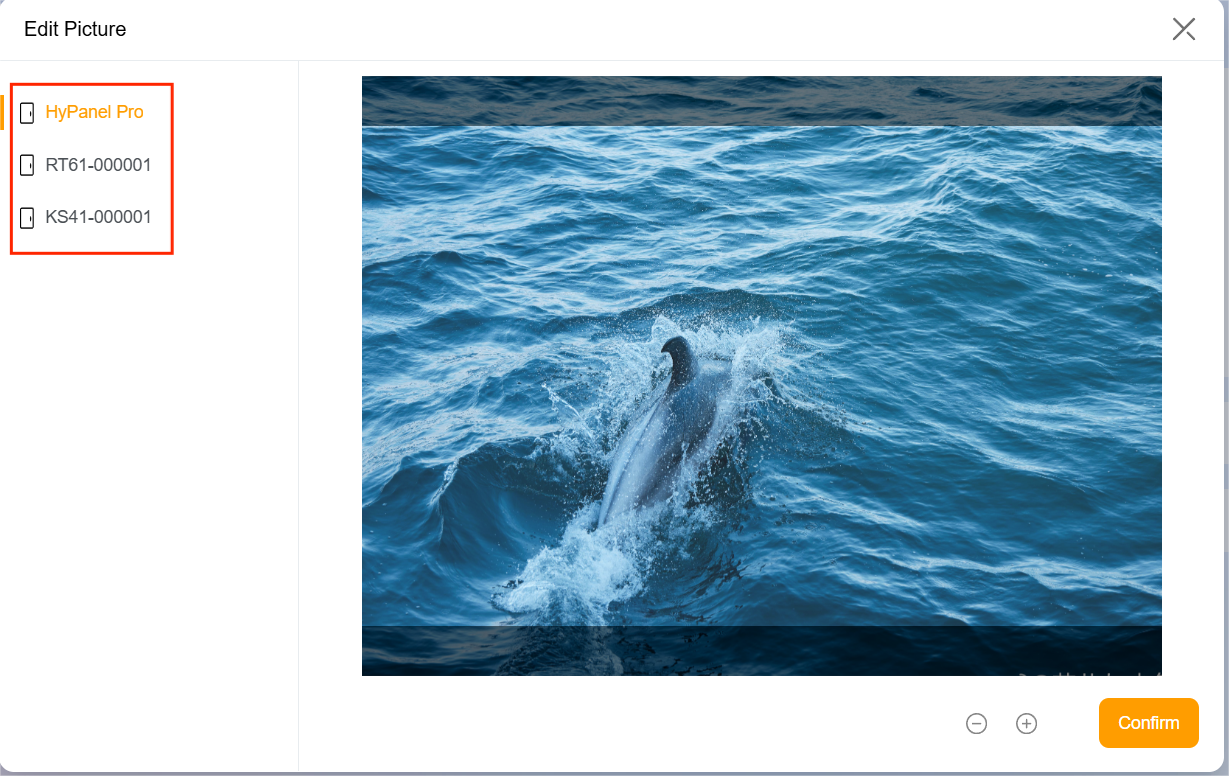
Go to Wallpaper >
 > Add wallpaper.
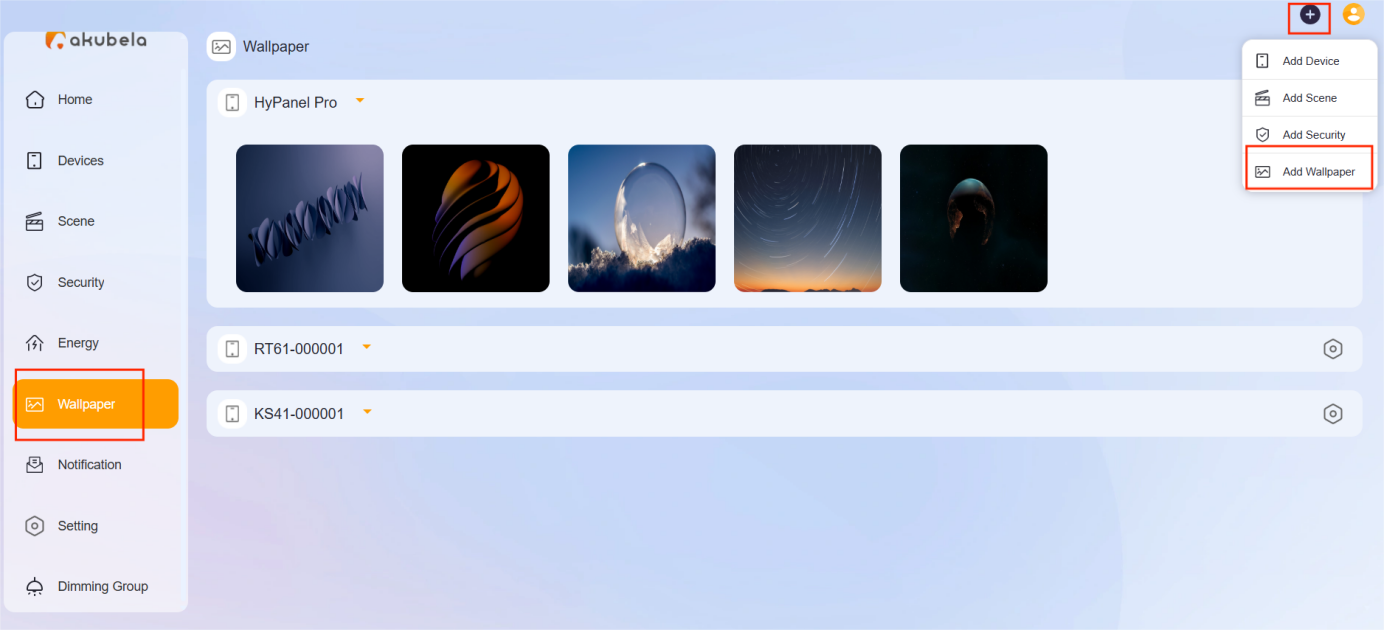
Choose an image from your computer.
Select the panel to display the image, then click Confirm.
TIP
If your HyPanel Pro is installed vertically, the cropping frame will automatically switch to vertical.
To display your uploaded photos, enable the screen saver on the panel and set the display style to Photo Wall.
Share Uploaded Photos with Other Panels
Photos uploaded to the Home Center can be shared with other panels of the same screen size.
NOTE
This feature requires cloud connectivity.
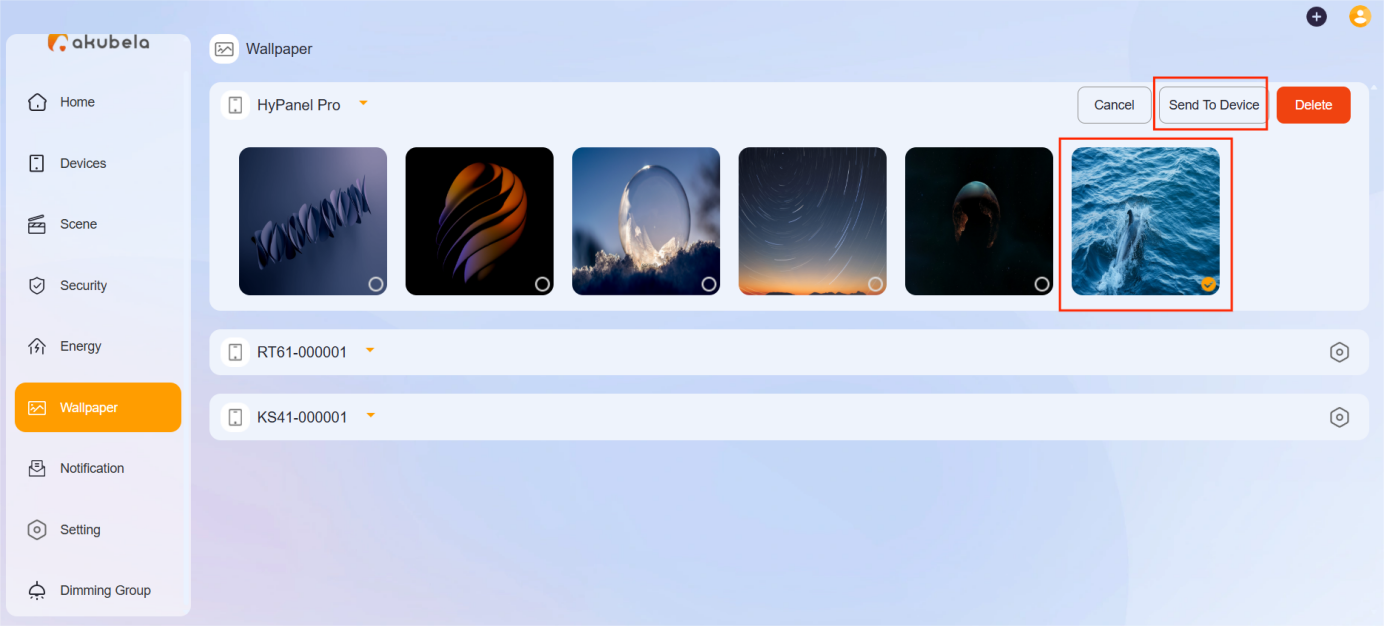
To share photos with other panels:
Go to Wallpaper >
 .
.
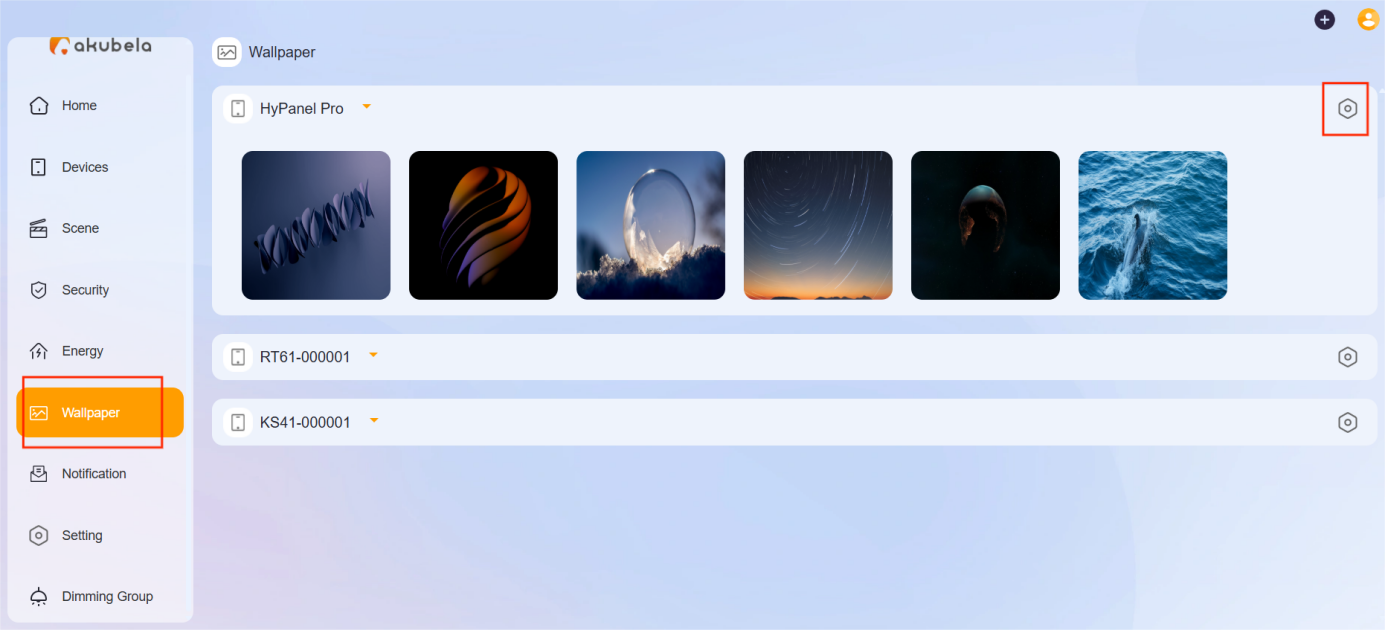
2. Select the desired photo and then click Sent to Device.
NOTE:
Make sure the screen saver is enabled and set to Photo Wall on the target panel.
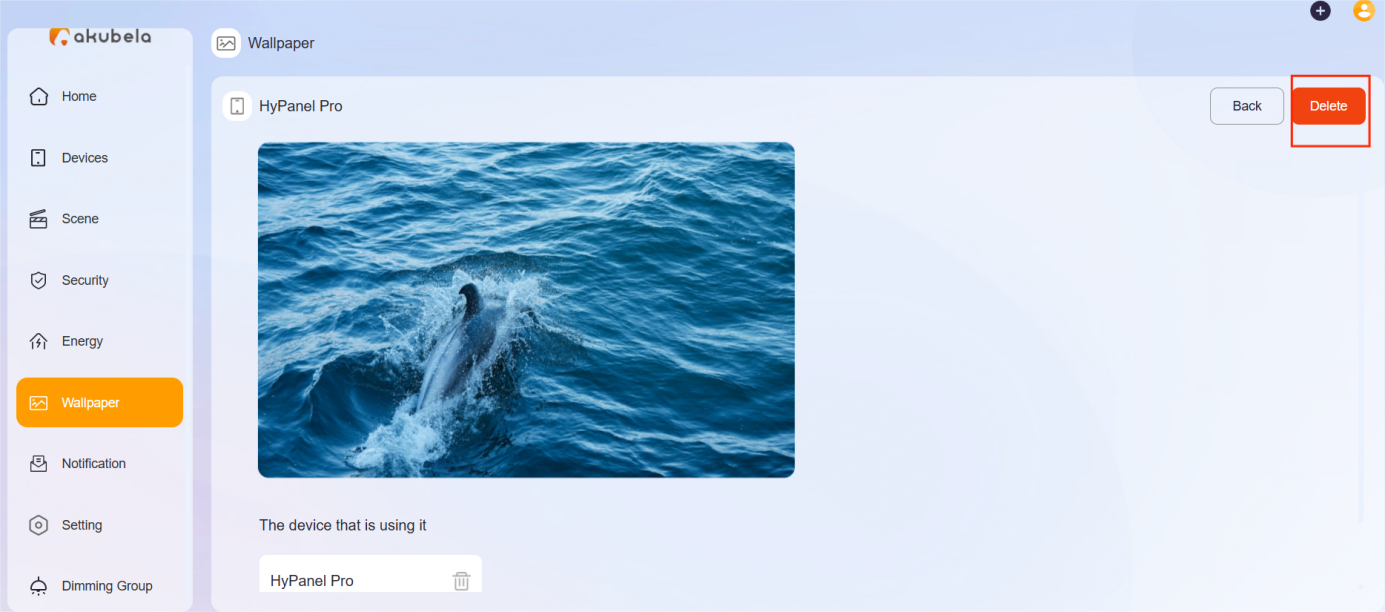
Delete Photos
Deleting a photo from one does not remove it from the other.
Click Wallpaper.
Select the image to be deleted.
Click Delete.