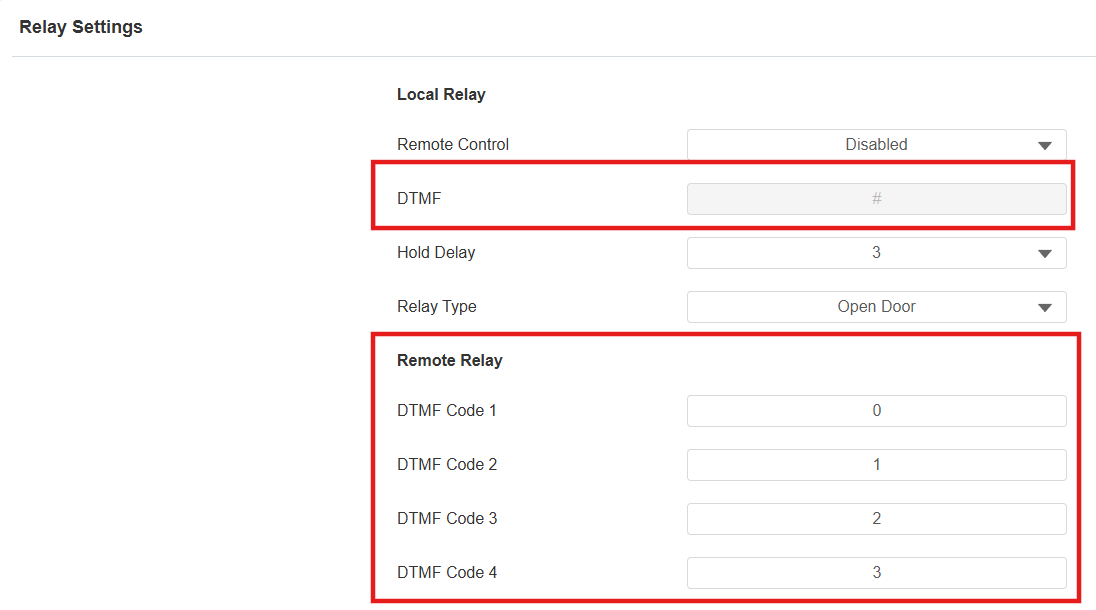
Local Relay
A local relay is an external unit that is physically nearby and directly connected to the intercom device. It allows the intercom system to trigger actions, such as unlocking a door, based on user input or authorization.
To set it up, go to the web Device > Relay > Relay Setting interface.
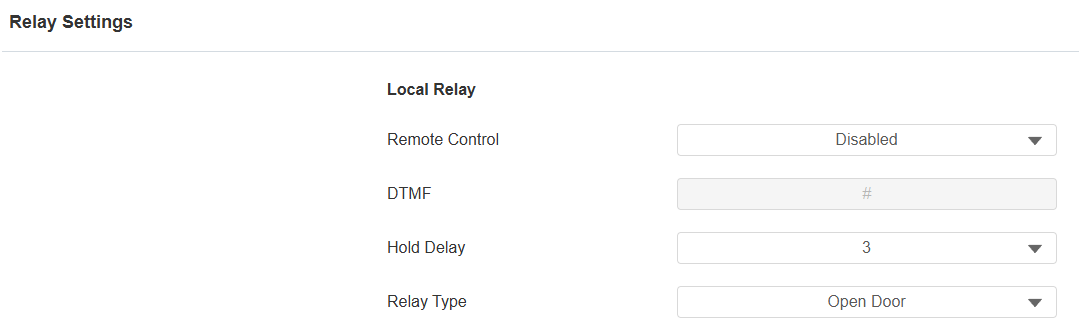
Remote Control: Decide whether to control the indoor monitor’s relay remotely by another intercom device. It is disabled by default.
DTMF: The DTMF code to trigger the local relay.
Hold Delay(Sec): Determine how long the relay stays activated. For example, if set to 5 seconds, the relay remains open for 5 seconds before closing.
Relay Type:
Chime Bell Setting: The relay is triggered when the indoor monitor receives calls, and the doorbell rings.
When the call is picked up, rejected, or hung up, the relay resets.
The relay trigger time is not limited to Hold Delay when the doorbell rings. It follows the settings on the Doorbell screen.
Open Door: The relay is triggered when users open the door, such as by pressing the Unlock key and remotely opening via an HTTP command. In this case, the relay trigger time is not limited to the Hold Delay.
Tip
The relay can be connected to an alarm sensor and triggered alongside it. In this case, Hold Delay takes effect.
If the alarm is cleared before the Hold Delay, the relay resets immediately.
If the alarm is cleared after the Hold Delay, the relay resets based on the Hold Delay time.
If Hold Delay is set to "Never", the relay resets instantly the alarm is cleared.
Remote Relay
The remote relay refers to the relay of another intercom, such as a door phone. During calls, users can enter a DTMF code or press the Unlock tab to unlock the door lock connected to the door phone.
Set it up on the web Device > Relay > Relay Setting > Remote Relay interface.
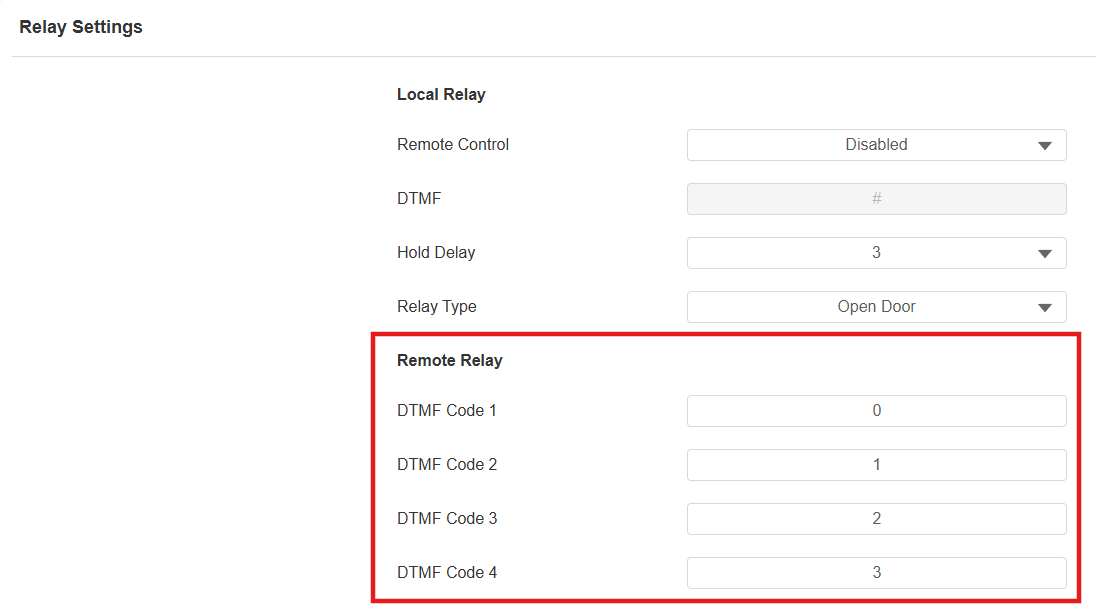
DTMF Code: Define the DTMF code within the range(0-9 and *,#) for the remote relay.
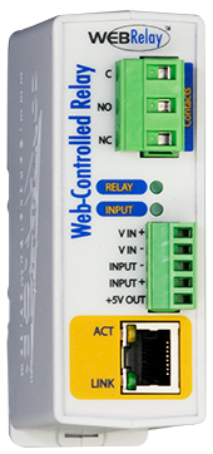
Web Relay
A web relay has a built-in web server and can be controlled via the Internet or a local network. The device can use a web relay to either control a local relay, or a remote relay somewhere else on the network.
Click here to view how to set up web relay.
To set it up, go to the web Device > Relay > Web Relay interface.
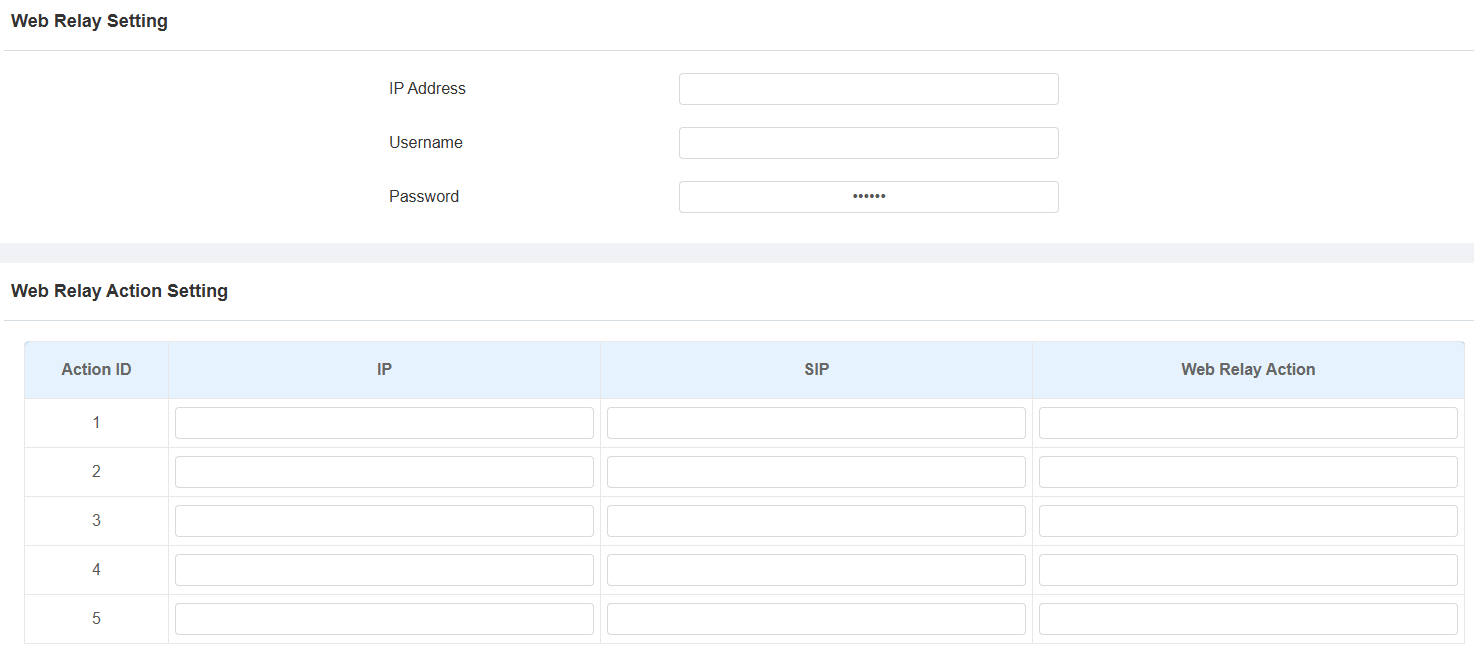
IP Address: The web relay IP address provided by the web relay manufacturer.
Username: The user name provided by the web relay manufacturer.
Password: The manufacturer-provided authentication key for the web relay. Authentication occurs via HTTP. Leaving the Password field blank indicates non-use of HTTP authentication. You can define the password using HTTP GET in the Web Relay Action field.
IP/SIP: The relay extension information, which can be an IP address or SIP account of an intercom device, such as an indoor monitor, so that the specific action command will be sent when unlock is performed on the intercom device. This setting is optional.
Web Relay Action: Configure the actions to be performed by the web relay upon triggering. Enter the manufacturer-provided URLs for various actions.
Note
If the URL includes full HTTP content(e.g., http://admin:admin@192.168.1.2/state.xml?relayState=2), it doesn't rely on the IP address that you entered above. However, if the URL is simpler (e.g., "state.xml?relayState=2"), the relay uses the entered IP address.
Door-opening Configuration
Unlock by DTMF Code
Dual-tone multi-frequency signaling(DTMF) is a way of sending signals over phone lines by using different voice-frequency bands. Users can use the DTMF function to unlock the door for visitors during a call by either typing the DTMF code on the soft keypad, or tapping the unlock tab with the DTMF code on the screen.
To set it up, go to Device > Relay > Relay Setting interface.
DTMF Transport Type
In order to achieve door access via DTMF code or some other applications, you are required to properly configure DTMF in order to establish a DTMF-based data transmission between the device and other intercom devices.
DTMF Type Differences:
Inband | DTMF signals are transmitted within the same audio channel as voice data. Simple implementation but signal distortion may occur with highly compressed codecs (e.g., G.729). |
RFC2833 | Transmits DTMF as special event packets over RTP (Real-Time Transport Protocol), known as out-of-band transmission. Reliable and unaffected by codecs. |
Info | Sends DTMF signals via SIP (Session Initiation Protocol) signaling channel. Separate from voice transmission, ensuring audio quality. |
Info+Inband | Combines Info and Inband methods. |
Info+RFC2833 | Combines both Info and RFC2833 methods. |
Info+Inband+RFC2833 | All three methods are used simultaneously. |
To configure the DTMF code transport format, navigate to the web Account > Advanced > DTMF interface.
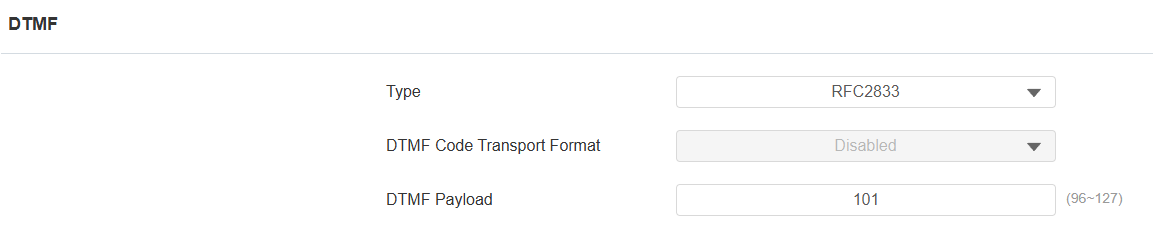
Type: Select from the provided options.
DTMF Code Transport Format: There are four options: Disabled, DTMF, DTMF-Relay, and Telephone-Event. Configure it only when the third-party device that receives the DTMF code adopts the Info transport format. Info transfers the DTMF code via signaling, while other transport format does it via RTP audio packet transmission. Select the DTMF transferring format according to the third-party device.
DTMF Payload: It is for data transmission identification ranging from 96-127.
Note
To open the door with DTMF, the intercom devices that send and receive the unlock command must use the same mode and code. Otherwise, the DTMF unlock may fail. See here for the detailed DTMF configuration steps.
Unlock via HTTP Command
The device supports remote door unlocking via an HTTP command. Simply enable this feature and input the HTTP command (URL) for the device. This will trigger the relay and open the door, even if the users are away from the device.
To set it up, go to the web Device > Relay > Open Relay via HTTP interface.
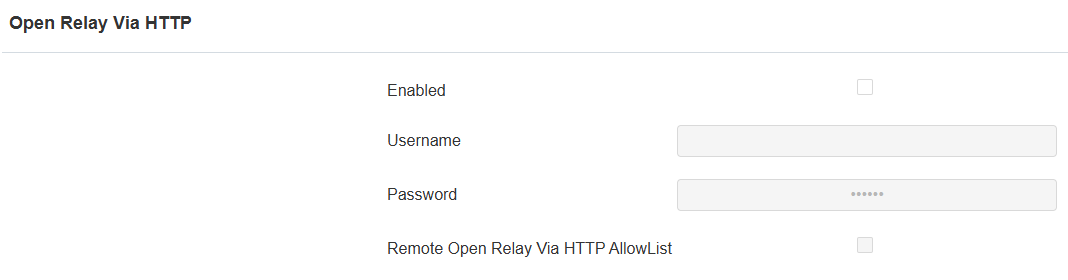
Username: Set a username for authentication in HTTP command URLs.
Password: Set a username for authentication in HTTP command URLs.
Remote Open Relay Via HTTP AllowList: Enable it and type in the IP address of the server that you allow to send the HTTP command to the indoor monitor and trigger the local relay.
Note
If you do not set up the username and password, the remote door phone can trigger the indoor monitor’s relay without authentication.
The URL format is http://{deviceIP}/fcgi/OpenDoor?action=OpenDoor&DoorNum=1.
You can also set up HTTP commands to remotely control relays connected to door phones. Go to the web Device > Relay > Remote Relay By HTTP interface.
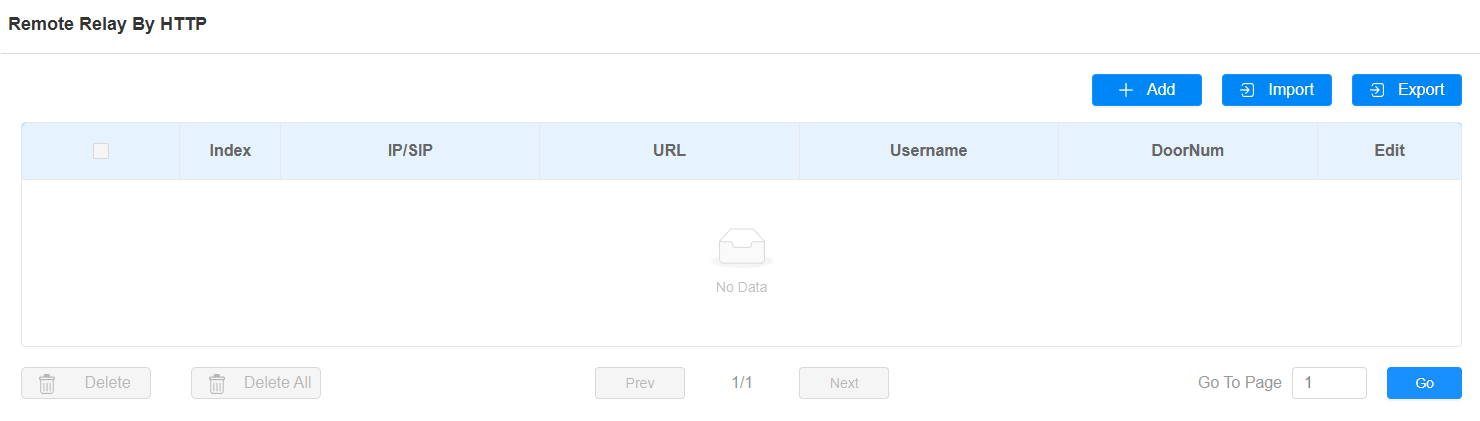
Click Add to add an HTTP command.
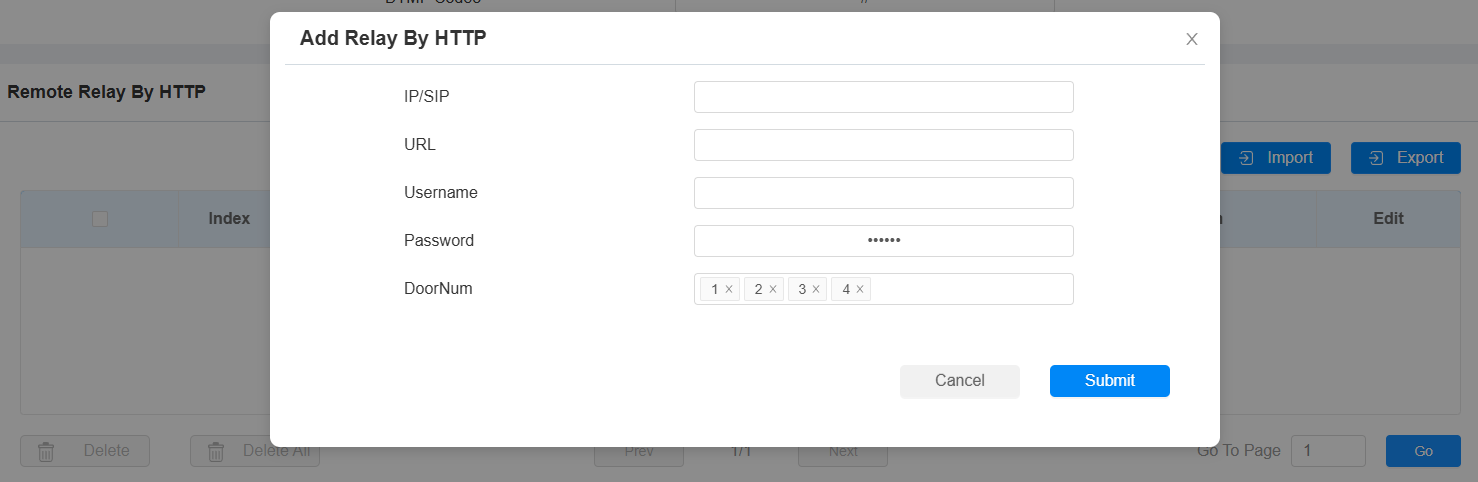
IP/SIP: Specify the IP or SIP number of the door phone.
URL: Enter the HTTP URL.
Username: Enter the username the same as that configured on the door phone’s web interface.
Password: Enter the password the same as that configured on the door phone’s web interface.
DoorNum: Specify the door to be opened.
Tip
Here is an HTTP command URL example for relay triggering.

Note
The HTTP format for relay triggering varies depending on whether the device's high secure mode is enabled. Please refer to this how-to guide Opening the Door via HTTP Command for more information.