Akuvox V7.1.0.1 SmartPlus Property Manager Guide - Community
- 27 Mar 2025
- Print
- DarkLight
- PDF
Akuvox V7.1.0.1 SmartPlus Property Manager Guide - Community
- Updated on 27 Mar 2025
- Print
- DarkLight
- PDF
Article summary
Did you find this summary helpful?
Thank you for your feedback
Update Time: Mar. 2025
About This Manual
This manual is intended for property managers who need to manage residents, office staff, personnel, devices, access control, or remote maintenance on the Akuvox SmartPlus platform (Version: 7.1.0.1).
Note
You can use the SmartPlus property manager web portal for free, but using the app requires a monthly fee.
Please contact the service provider for the pricing details.
Please contact the service provider for the pricing details.
What's New:
- Support integration with iTec locks;
- Support synchronizing user PIN and RF card to open third-party locks;
- Support paying for the third-party locks service.
System Overview
Akuvox SmartPlus property management platform is a cloud-based platform on which property managers can conduct integrated management of community residents, devices, access control, remote maintenance, etc.
Property managers using this platform will be able to:
- Assign the residents to their corresponding buildings and apartments, and check the device MAC, online status, and the device relation with residents.
- Assign office staff and personnel to their corresponding office and department, and check device MAC, online status, and device relation with the staff and personnel.
- Modify the general device setting in terms of device name, relay setting, door unlock, etc.
- Set up multiple types of door access via PIN code and RF card for different purposes and roles and create their corresponding door access control schedule.
- Check and monitor a variety of logs and records including door logs, call logs, call history, temperature logs, captured images, and motion detection images for security purposes.
- Send notifications to the residents in the community.
- Conduct remote operations such as Auto-provisioning, device reboot, transmission type modification, and remote maintenance.
- Modify other settings such as modifying community address, time & date setting, and motion detection delay setting, etc.
- Get a full picture of device deployment, device status, access control & intercom call statistics.
- Subscribe and renew the Akuvox SmartPlus.
Log into SmartPlus
Account Application
You can apply for your property manager account from your installer who will help set up your account. After that, Akuvox SmartPlus will email you the account information (username and password) for you to log into SmartPlus. The web account created after Cloud 6.6.0 shares the same username and password as the app account's. You need to upgrade the app to the latest version to log in.
- User Account Information
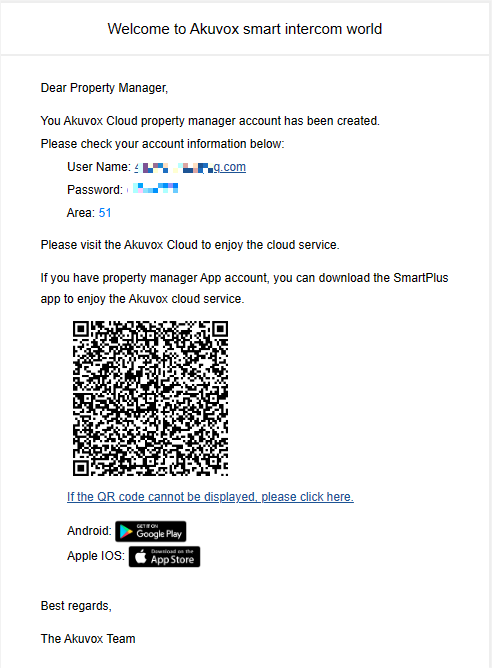
You can log into the SmartPlus platform using the property manager account information in the SmartPlus Welcome email.
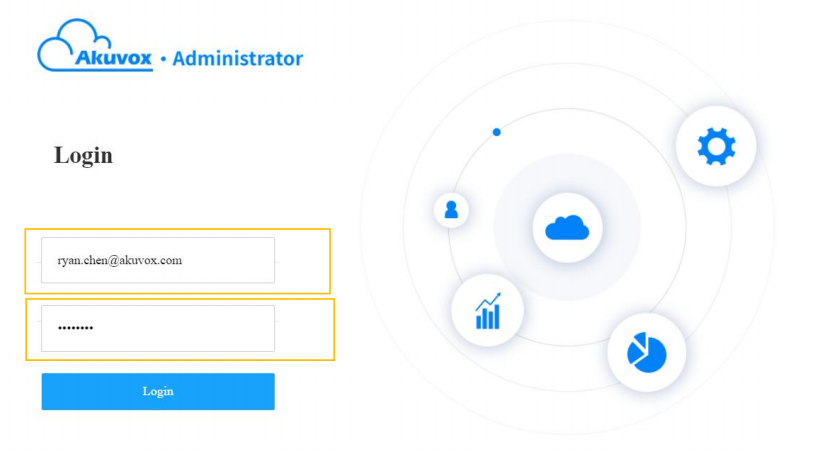
- Open the web browser to enter the address (URL) of the SmartPlus server location in your area, and press Enter.
- Enter your username and password.
- Click on Login to log into the SmartPlus platform.
Two-factor Authentication
Enter the verification code sent to your email address when your installers enable the Two-factor Authentication feature for you.

Click Obtain Code and an email will be sent to you.

Privacy Policy
You will see the Privacy Policy and Terms of Service window when you log into the platform after the SmartPlus Cloud 7.0.0. update.
- The Privacy Policy tells you how the user data is collected, used, and protected.
- The Terms of Service outlines the rules and guidelines for using the SmartPlus service.
Only after you click Agree, can you log into the SmartPlus platform.
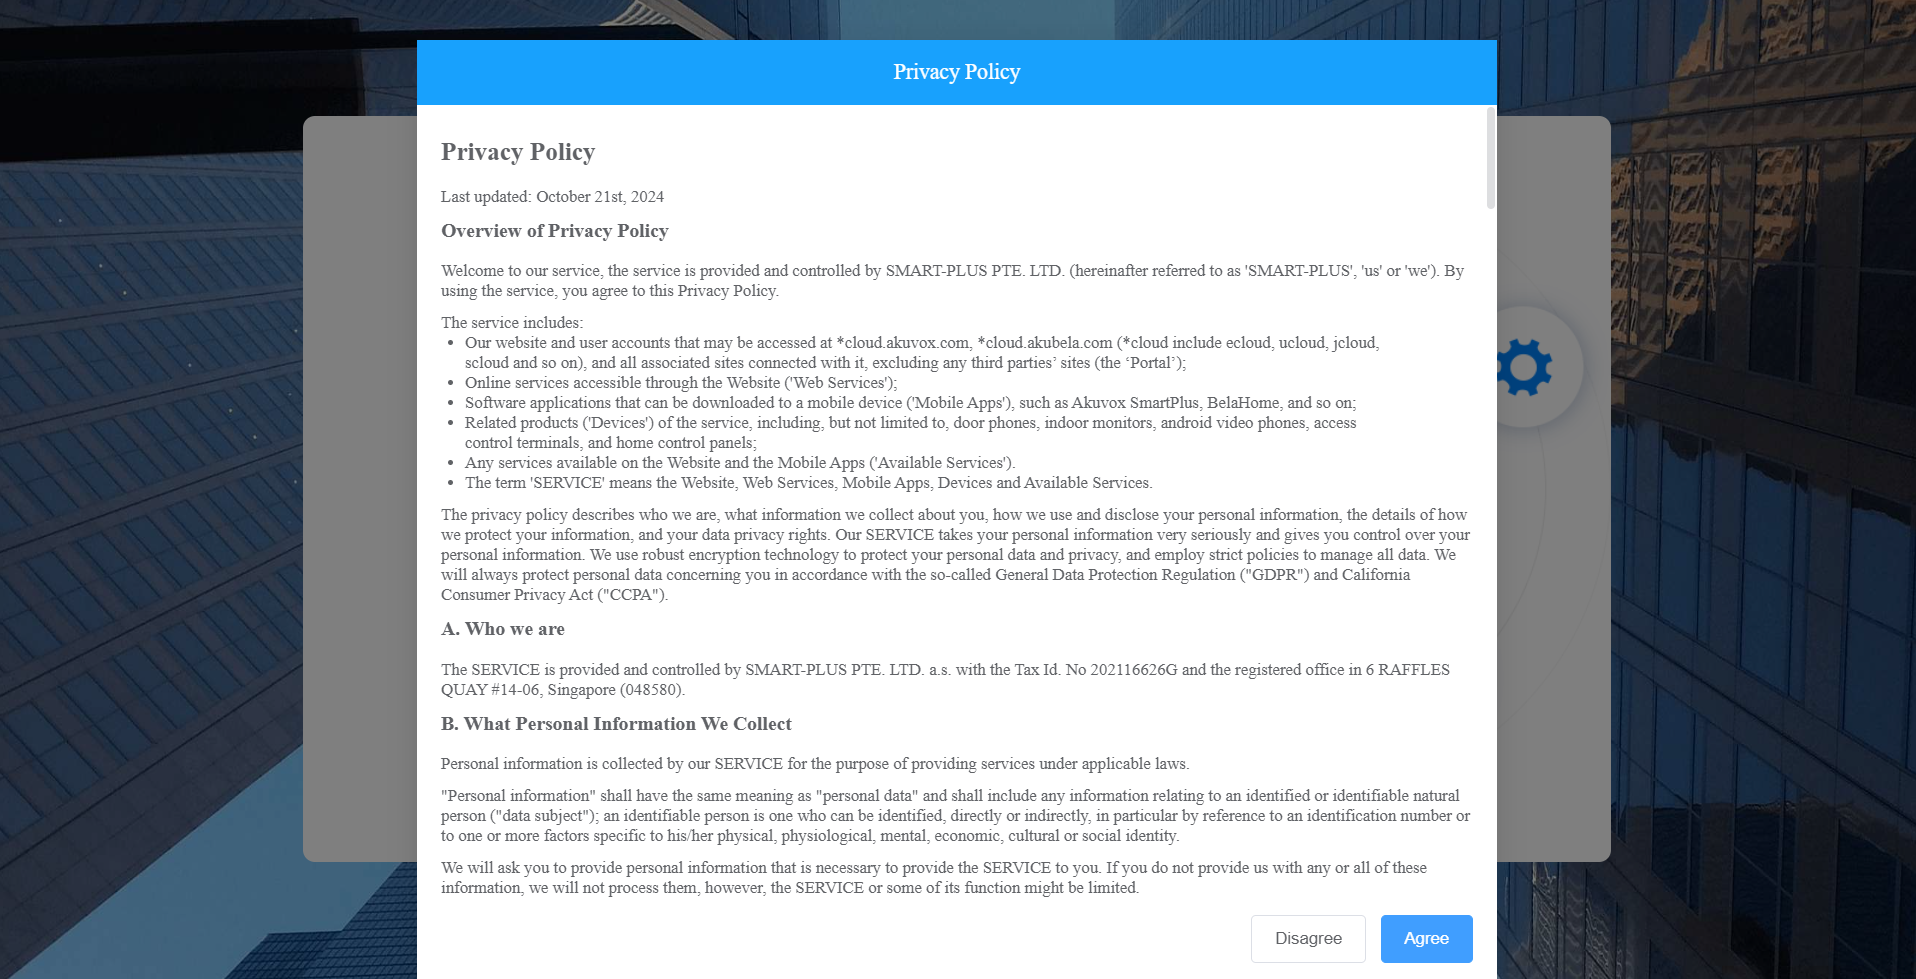
You can also click User Agreement on the left column to check the agreements again.

Akuvox SmartPlus Property Management Interface
Akuvox SmartPlus property management main interface mainly consists of 10 modules that are incorporated as a whole to allow you to manage tenants, devices, the Akuvox SmartPlus app for community-based intercom communication, door access control, monitoring, user account activation, and service subscription & renewal, etc. via the Akuvox SmartPlus platform.
Module Description
No. | Column Name | Description |
1 | Dashboard | Displays information on the community, devices, residents, door access, general statistics, etc., and the number of apartments, and residents, devices. |
2 | Apartment | Allows you to search apartment information indicating which building the apartment belongs to and the number of residents and devices in the department. |
3 | Residents | Allows you to create a resident account, check the resident account and access control information, import residents’ face data and RF card via templates, and edit access type and access group. |
4 | Visitor & Staff | Allows you to set up temporary PIN codes for visitors, delivery PIN codes for delivery staff, and RF cards for the property management staff. |
5 | Access Group | Allows you to create an inventory of access control schedule templates that can be readily applied to specific resident(s), building(s), and device(s). |
| 6 | Alarm Records | Allows you to check and search actions triggered by emergency alarms and arming alarms as well as to export logs. |
7 | Logs | Allows you to check and search door logs, temperature logs, call histories, and captured images. It also allows you to check and delete motion alerts, and to check on the changes made on the apartment and end users and on the RF card, PIN code, face, and temporary PIN code. |
8 | Library | Displays all the PIN Codes and RF cards created by a property manager. |
9 | Messages | Allows you to create and send messages to the users’ indoor monitors and SmartPlus apps, etc. |
10 | Devices | Allows you to check device info related to the building, apartment, status, device type, and to check and edit settings related to relays, call, unlock type, and device name, etc. |
11 | Settings | Displays property manager info, PIN code access type, email notification, time setting, motion setting, visitor setting, etc. |
Dashboard Overview
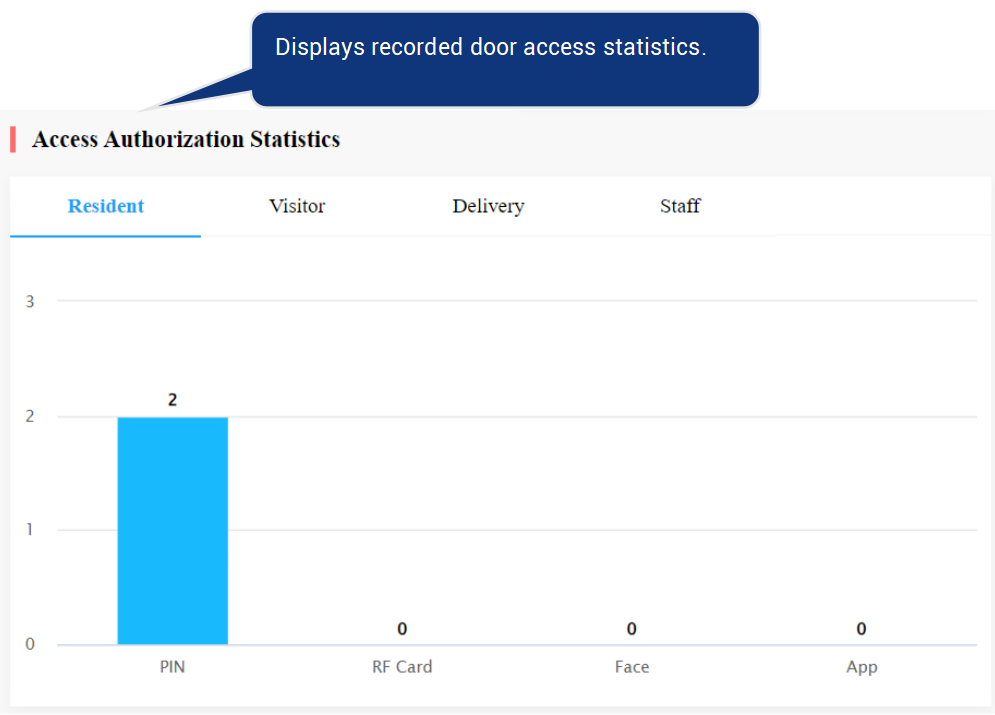
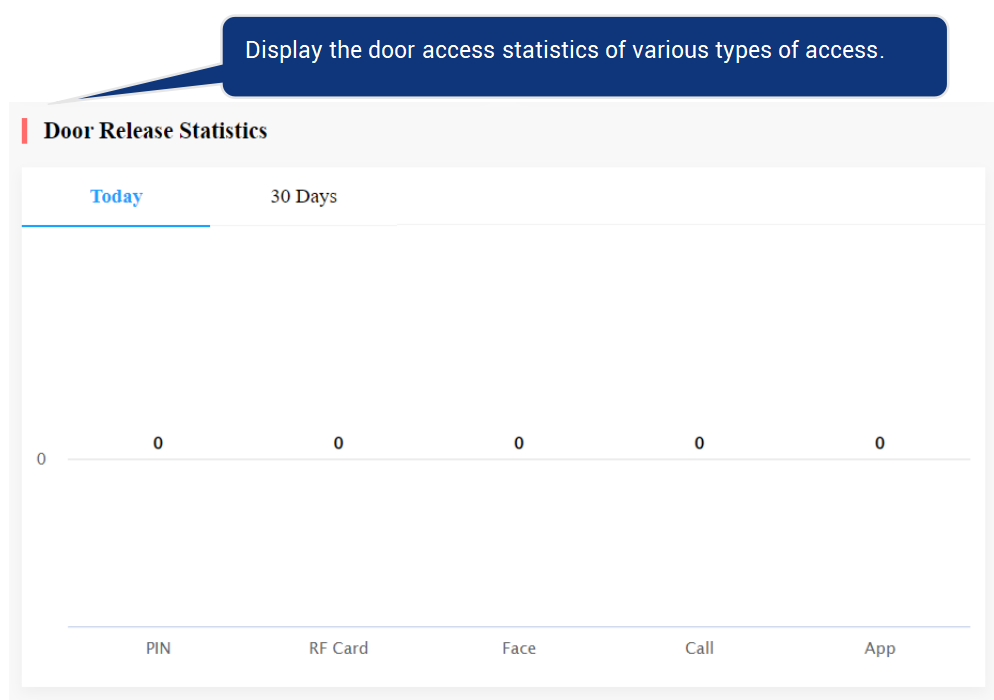
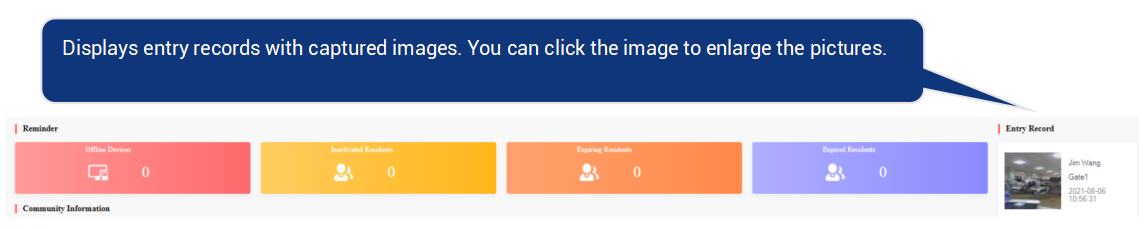
The dashboard displays information on the community, residents, devices, door access records, statistics, etc.


Password Update Reminder
With Monthly Password Update Reminder enabled by your installer, a prompt will pop up to remind you to change the login password every month, which ensures the security of the account.


Link
You can link property manager accounts created by different installer accounts.
1. Click Link Site in the upper right corner.

2. Enter the username and password of the account that you want to link.

Access Group
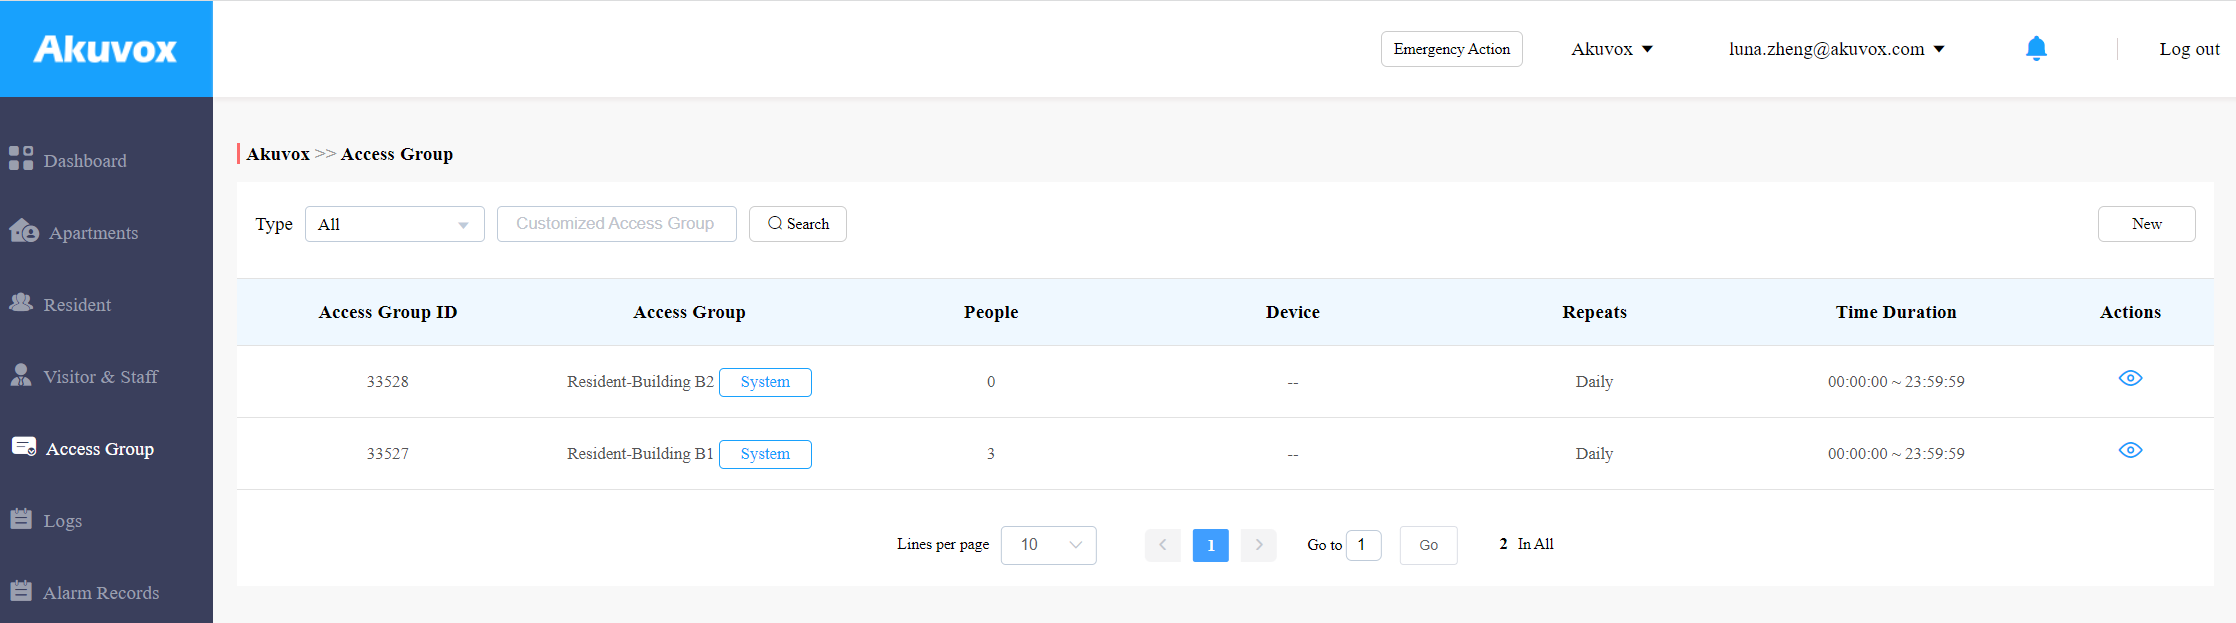
The Access Group module allows you to create an inventory of ready-made access control schedules(access group), which can be readily pulled out and applied for the door access control, targeting specific residents, delivery personnel, staff, buildings, apartments, and relays.
Create Access Group
1. Click Access Group on the left column and click New on the right.
2. Name the access group.
3. Select the access group repeat mode from Never, Daily, and Weekly.
4. Select the access group time.
5. Check the door phone's relay and/or third-party locks to be opened. Please note that if the third-party lock is linked to a door phone, it will follow the access group of the door phone and not display on the list here.
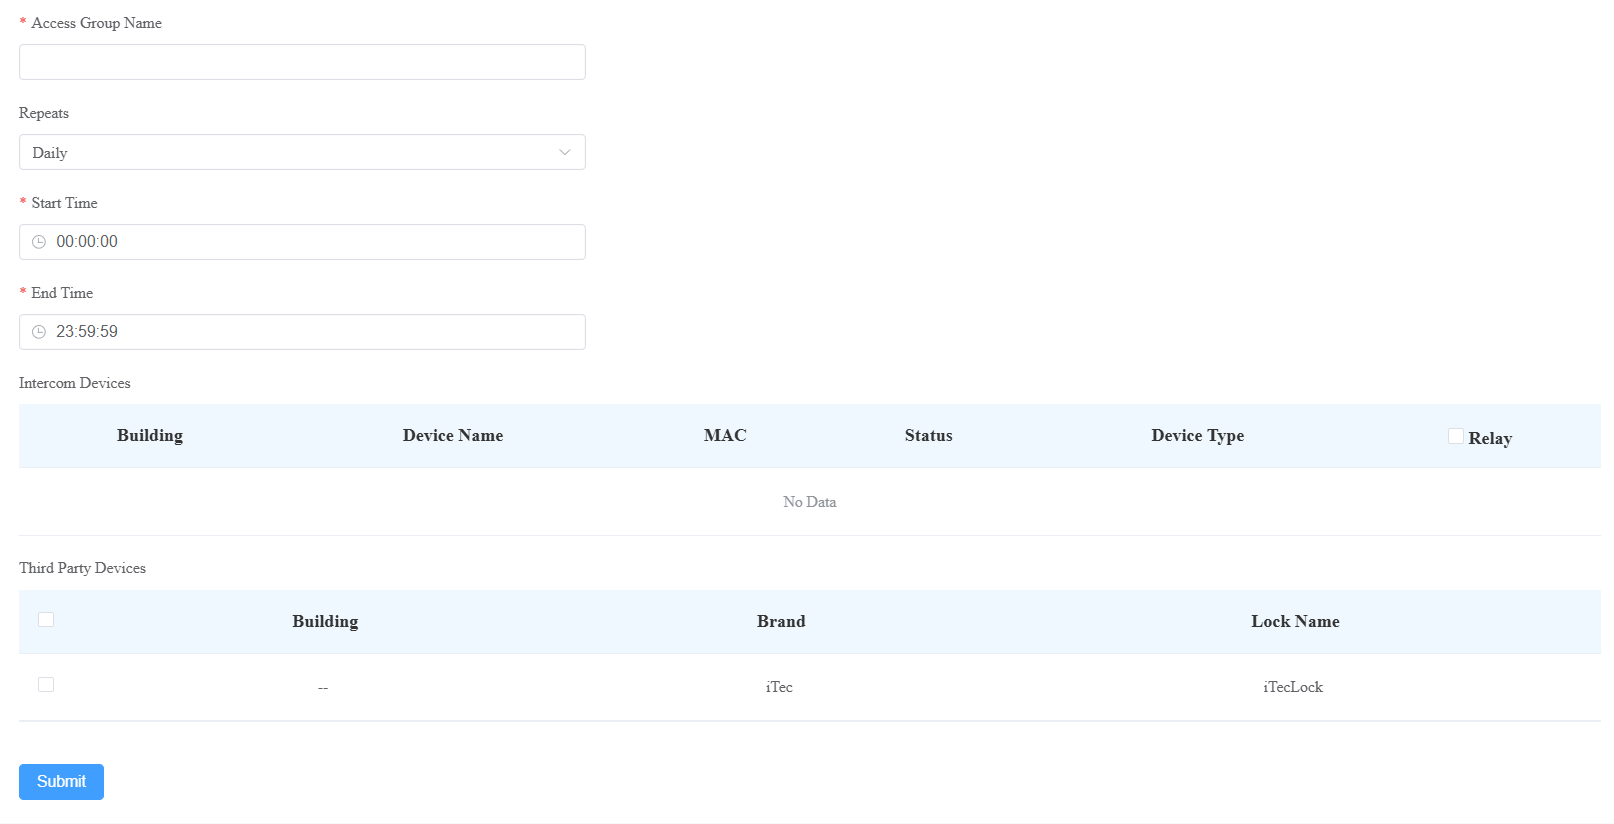
6. Click Submit to save the settings.
You can also set up the access control schedule on residents' private devices when adding or editing a resident's access settings.
Note
- The Self Devices Authorization option will only appear after devices are added to the resident's room.
- If your installer selects Only Public Area in Permission Of Access Control Management when creating or editing a new community, then
A) you are not able to set up access control permissions for the residents.
B) residents can only use access methods to open relays of public devices.
1. Click  .
.
2. Set up an access control schedule for the resident’s private device.
3. Select the device's relay(s).
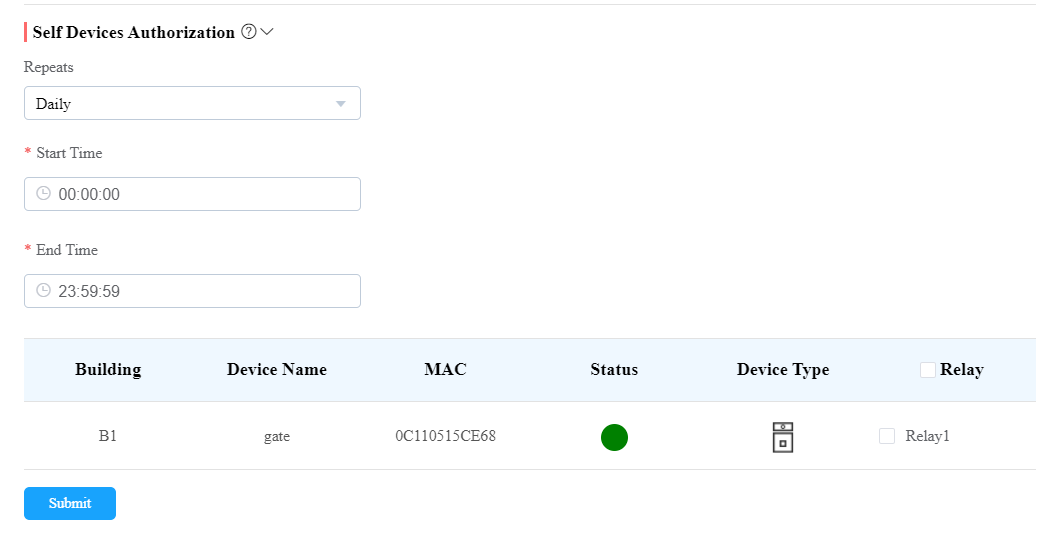
4. Click Submit to save the settings.
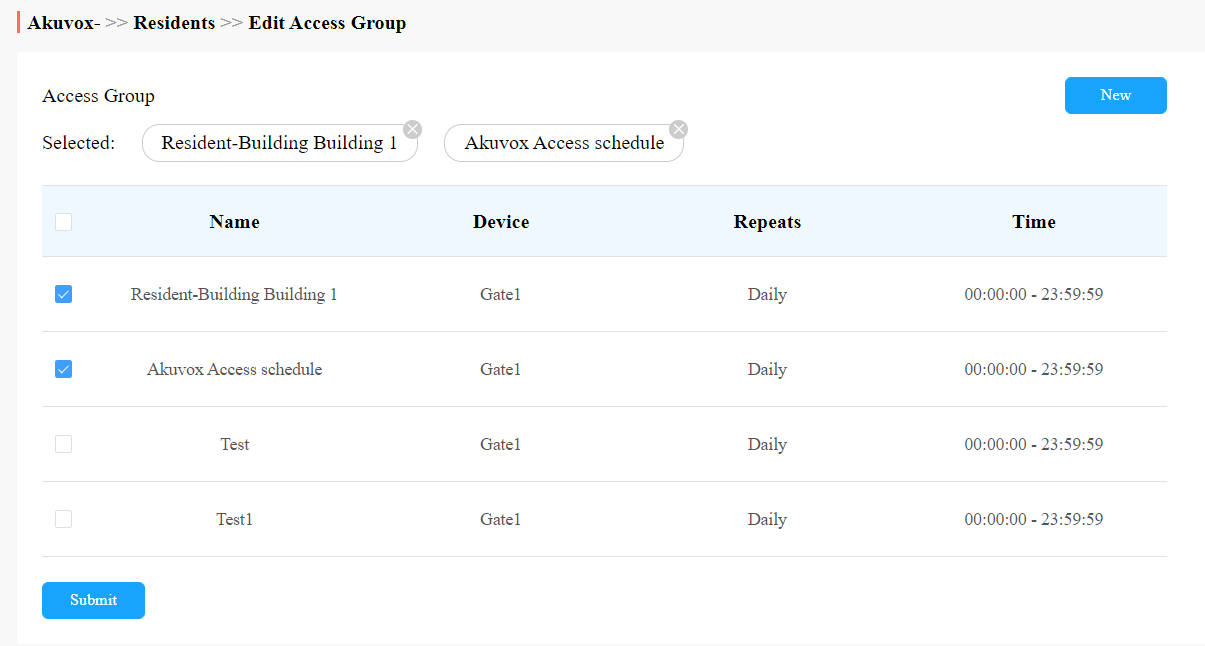
Search/Check/Edit Access Group
You can search, check, and edit the access group.
1. Search the access group by type and keywords. You cannot delete the default access group that is created automatically with the adding of each building in the community. It contains all the devices installed in the public area of the building.
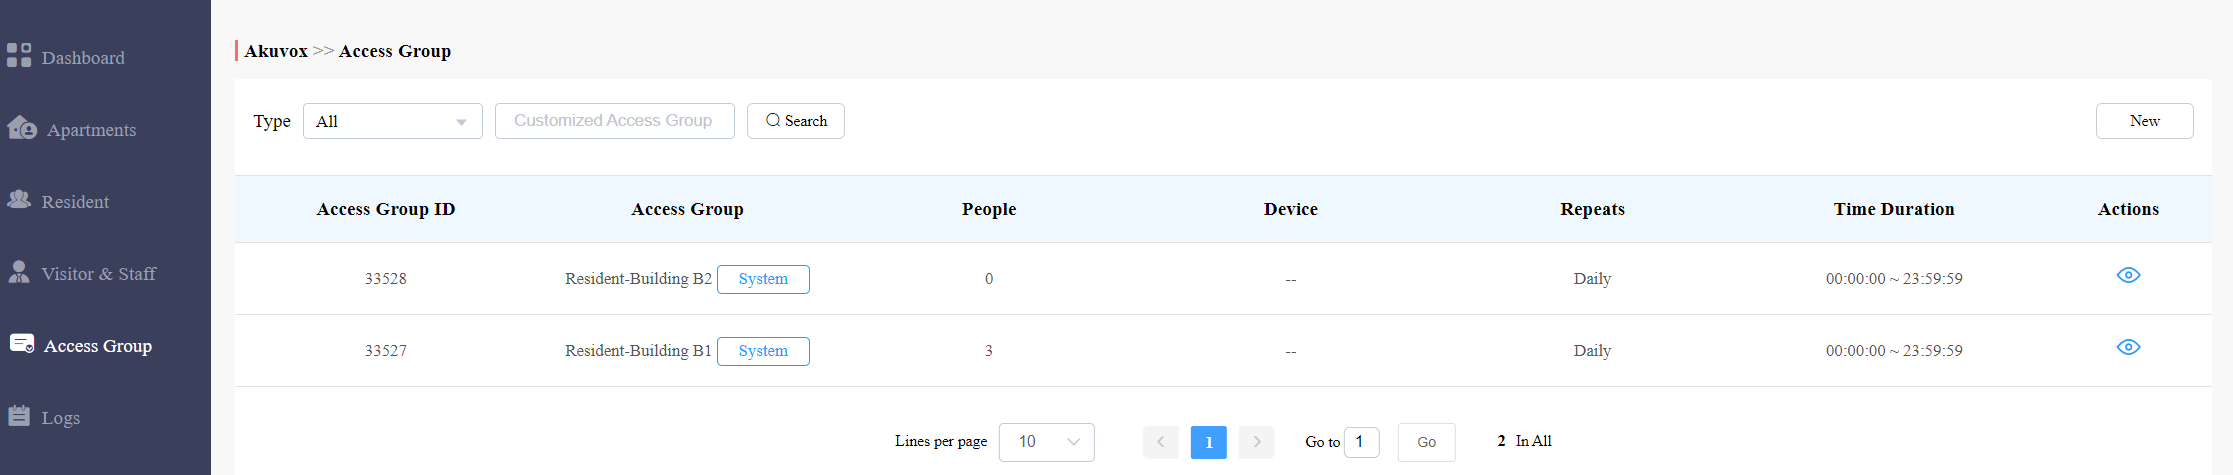
2. Click of the specific access group to check access group details.
3. Click Add People or Remove People to add or delete residents.
4. Click Edit in the upper right corner to edit the access group.

Resident Management
The Residents module in the navigation column is used to add residents for whom you can create a SmartPlus end-user account (family master account) and a family member account. You can set up access types and access control schedules for the end users and their family members. Moreover, you can search, modify, check, and delete residents.
Add Residents
Adding residents deals with creating residents’ accounts (master/family member accounts) and setting up the door access types and access control schedules. You can add residents one by one or using a template.
Add Resident Account
Before adding residents, you are required to double-check the residents’ information and then add them to the corresponding apartments and building set up by the community manager (Installer).
To create a user account:
1. Click Resident > New.
(1).png)
2. Set up resident information. You can add remarks for users in the Remark box to indicate their identity, such as "tenant" or "resident."
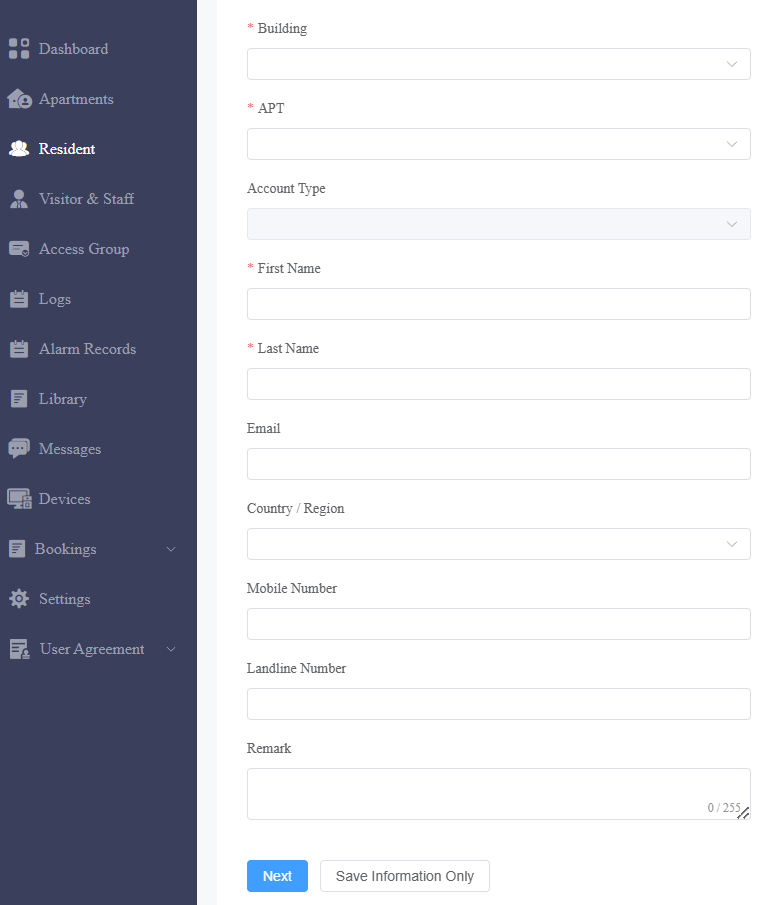
3. Click on to complete creating an account.
Note:
- Click on Next when you want to set up access methods and the access group or click on
.png) when you only want to save the resident’s basic information.
when you only want to save the resident’s basic information.
.png) when you only want to save the resident’s basic information.
when you only want to save the resident’s basic information.- The area code will display in the Mobile Number box after selecting Country/Region.
- A resident’s master account should be created first before the family member's account can be created. The ways to create the master account and family member account are identical.
- Family member accounts must be created under the same apartment, building, and community as those of the master account.
- You can create three family member accounts for free. Creating more requires an activation fee.
- The SmartPlus app login method for family members varies depending on the information you entered when applying for a family member account. See below:
Description:
No. | If | Then |
1 | If you fill in a family member's email and mobile phone, | then login information will be sent to the family member's email or mobile phone for login. |
2 | If you do not fill in the family member's email and mobile phone number, but fill in the master account’s email, | then login information (SmartPlus SIP number + Password) will be sent to the master account email for login. |
3 | If you do not fill in the family member's email and mobile phone number but fill in the master account’s mobile phone number, | then login information (SmartPlus SIP number + Password) will be sent to the master account’s mobile phone for login. |
4 | If you do not fill in the family member's email and mobile phone number, the master account’s email and mobile phone number, | then login information will be sent to the master account’s email or mobile phone number as soon as you fill in the master account’s email or mobile phone number. |
Set up Access Control for Resident(s)
You can set up access types such as PIN code, RF card, facial recognition, and ID card, as well as access control schedules for the residents.
1. Click Resident > New.

2. Fill in the account information and click on Next to the next page, where you can set up access types and schedules.
3. Select the accessible floors and configure the access methods.
- PIN: The PIN code should be 2-8 digits without starting with "9".
- RF Card: Enter the RF card code.
- ID Access: The ID Access feature is designed for users with South American ID cards. You can enroll the RUN and Serial numbers on their ID cards into the Akuvox SmartPlus Cloud system. Then, users can open doors conveniently by using the QR code on their ID cards.
Note
- This feature is limited to certain projects. If you want to use this feature, please contact your installer or distributor.
- Click here to view the detailed steps of setting up ID access.

4. Select the access group and click Submit.
Search/Delete/Edit User Accounts
After the user account is created, you can search and edit the user account as well as reset the user account password. With Delete Account Permission enabled by your installer, you can delete user accounts.
Search/Delete User Accounts
- Click Resident.
- Search the specific user account by building, apartment, account type, account status, app status, or user account name. You can also click the Name, APT, or the icon
 next to them to reorder the residents and find your desired user quickly.
 - Tick the checkbox of the account(s) you want to delete or tick the checkbox by the Name field and click on
 to delete all the accounts.
 next to them to reorder the residents and find your desired user quickly.
.png)
Please note that when Delete Account Permission is not enabled by your installer,  will not appear and you cannot delete user accounts.

Edit User Account
You can reset the users’ SmartPlus app account password, and edit users’ account information and their access control settings.
1. Click on  of the desired user account.

2. Click on  if you want to reset the password (SmartPlus).
3. Click on Edit to change the account information.

Note
You cannot edit the mobile phone number, email number, and area code of user accounts that have linked sites.
4. Scroll down to edit the access type or create new access types by clicking New.

5. Click on Edit to edit the access control setting, and edit the setting by re-selecting the access control schedule (Access Group) or by creating a new access group(s).

Add Community Residents to a Building Using Template
The template can maximize your efficiency in creating a community especially when it has many residents.
- Click Resident > Import.
- Click Download Import Template.
- Fill in the information in the template.
- Click Batch Add Resident to import the template to the community.
.png)


Template Description:
No. | Settings | Description |
1 | Building | Fill in the building number or name. Note: should not be more than 128 characters in length. |
| 2 | Accessible Floors | Set the accessible floors for the residents. The options range from -10 to 128 and include G0, G1, G2, and All Floors. |
3 | Apt | Fill in the apartment number. Note: must be 1-6 digit integral number(s). |
| 4 | Apt Name | Enter the apartment name. |
5 | Account Type | Enter 0 for the family master account and 1 for the family member account. |
6 | First Name | Fill in the resident’s first name. Note: should not be more than 64 characters in length. |
7 | Last Name | Fill in the resident’s last name. Note: should not be more than 64 characters in length. |
8 | Email (Optional) | Fill in the resident’s Email. |
9 | Mobile Number(Optional) | Fill in the resident’s mobile phone number. |
10 | Telephone Calling Code (Optional) | Fill in the resident’s country code. |
11 | Phone1/2/3 (Optional) | Fill in the resident’s mobile phone number. |
12 | RF Card (Optional) | Fill in the RF card for the resident. |
13 | PIN (Optional) | Fill in the PIN code for the building access for the resident. |
14 | Access Group ID (Optional) | Fill in the access group for residents for the access control. |
| 15 | Remark | You can add remarks for users to indicate their identity, such as "tenant" or "resident." |
Edit Community Residents in Batch
You can export the resident information in .xlsx format, modify it, and re-import it to the community, which improves efficiency when you need to modify much account information.
- Click Resident > Import.
- Click Export Resident.
- Modify the information in the file.
- Click Batch Edit Resident to import the file to the community.


Note
- Keep the field blank if you do not want to change the original information.
- After the user's email address is modified, the SmartPlus App login email containing a new password will be sent to the new email address.
- The email addresses, mobile phone numbers, and area codes of the user accounts that have linked sites cannot be modified.
Import Face Data/RF Cards/PIN Codes
You can import the face data, RF card code, and PIN code in batch using the template for the users.
Import Face Data
- Go to the Residents module and click on Import.
- Choose the face data .zip file and click on Import Face to import the file.
.png)

Face data should be imported in .zip file format and the photos need to be named by building name, room number, and user name. e.g "Building1+1001+Paul Edward.jpg".
Import RF Cards/PIN Codes
You can import RF card codes and PIN codes in batches for users.
- Go to the Resident module and click on Import.
- Click on Download Import Template to download the RF card/PIN code template.
- Fill in the RF card codes and PIN codes in the template and click Import RF Card/PIN to import the template.
.png)
RF card template:
.png)
Note
- You can assign multiple cards to the family master who can assign the card to family member accounts via the SmartPlus App.
- Enter the RF card codes for one user separated by ";".
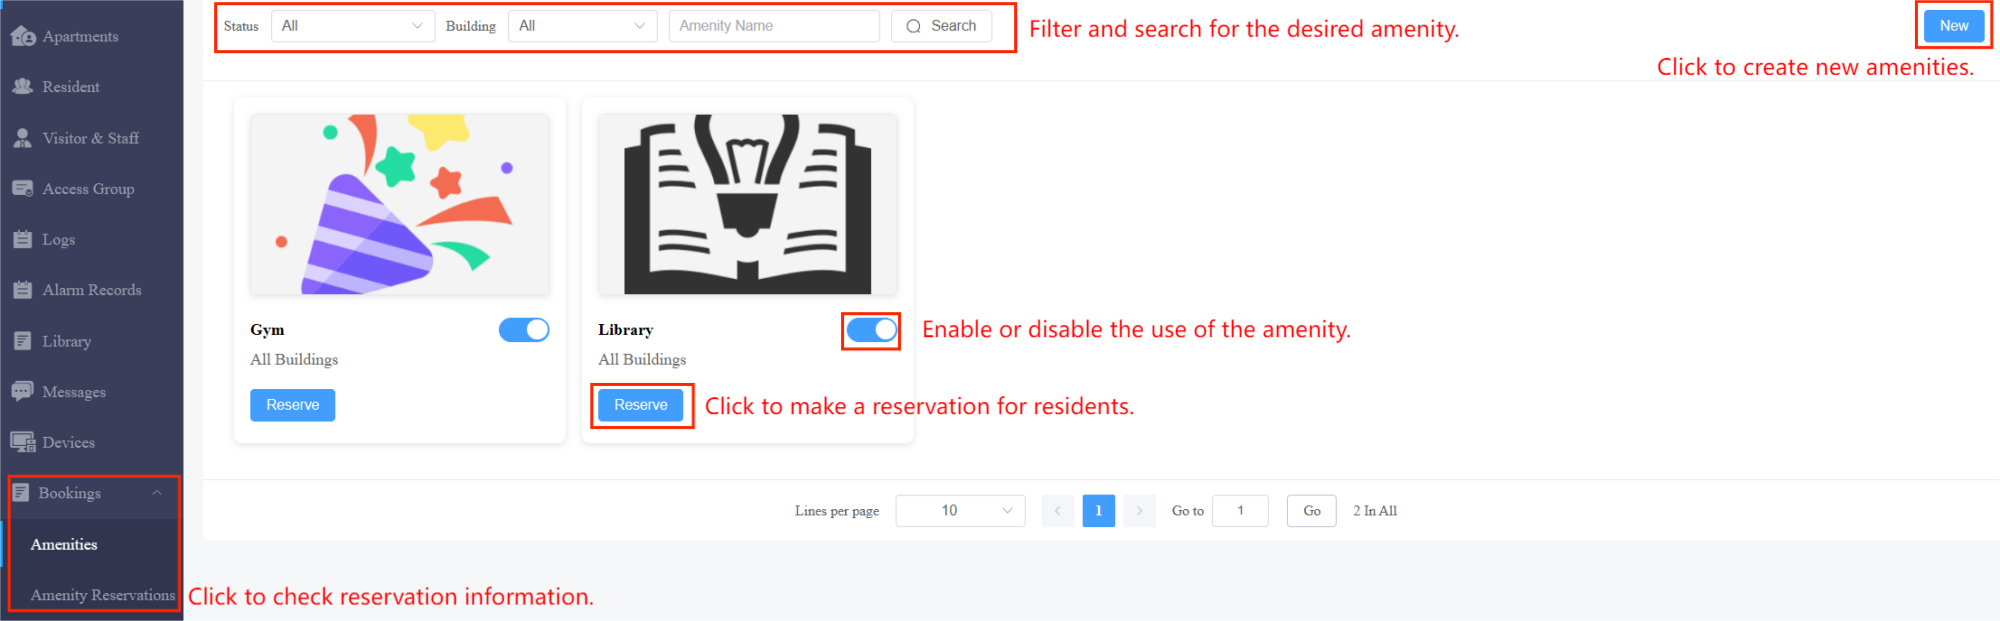
Bookings for Residents
The Bookings module facilitates the management of amenities and reservations. You can conveniently add and modify amenities, and make a reservation for residents.
Note
- ONLY the communities with the Premium Feature Plan support this feature.
- Click here to view the detailed steps of adding new amenities, making reservations for residents, and checking reservation information.
Visitor & Staff Management
Visitor & Staff module allows you to create access credentials for the property management staff, delivery personnel, and visitors.
Manage Access Credentials for Visitors
You can set up temporary keys and ID access for visitors, and select the access schedule that applies to the access methods.
Create a Temporary PIN Code
You can set up a temporary PIN/QR code along with the access schedule, which will then be sent to the visitor’s email for door access.
1. Click on Temp Keys, then click on New.

2. Create a temporary key along with the access schedule.
3. Select the specific relay(s) to be triggered by the temporary key.
4. Click on Submit to generate a temporary key.


Parameter Set-up:
No. | Column Name | Description |
1 | Building | Select the building in which the resident to be visited lives. |
2 | APT | Select the resident’s apartment. |
3 | Name | Enter the visitor’s name. |
4 | ID Number | Enter the visitor ID number. |
5 | Repeats | Select “Never” “Daily”, and “Weekly” for the temporary key access schedule.
|
6 | Expiration Time | Set the expiration time for the one-time “Never” schedule only. The PIN code validity will expire on the expiration time. |
7 | Validity Times Per Device | You can put a number in the field based on the format: “each door count” * “the number of door phones selected” = “total number of PIN code validity”. For example, If you type in “1” and select 3 door phones, then the PIN code will be valid three times in total (1 x 3 door phones=3 times). You can use the PIN code on any one of the door phones selected. When the PIN code is used on any one of the door phones, it will no longer be valid on the rest of the door phones. Note: This is applicable when you select “Never” in the Repeat field. |
8 | Start Time End Time | Set the Start Time and End Time for the PIN code validity period during a day on a daily or weekly. |
9 | Delivery Method | The PIN code will be sent to the visitor’s email address you entered. |
Edit/Delete Temporary PIN Code
1. Enter the visitor's name to search and find the specific temporary PIN code.
2. Click to change the temp key's valid time when it does not expire.
3. Click on to view the details of the temporary PIN code.
4. Click on  to delete the specific temporary PIN code or you can tick the checkbox of the temporary PIN code you want to delete, and you can delete all the temporary PIN by ticking the checkbox of
  .
.

Note:
After you click  to check the temporary key details, you can click View Door Logs to check the temporary key door logs shown as follows.
 to check the temporary key details, you can click View Door Logs to check the temporary key door logs shown as follows.
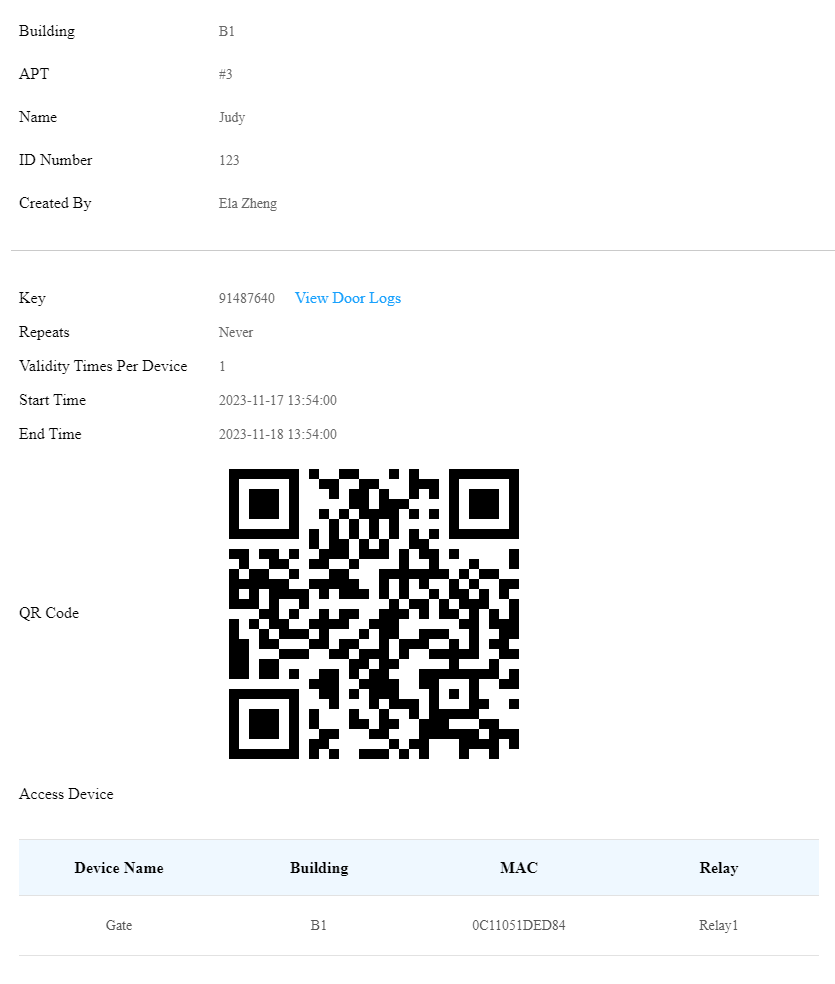
Set up ID Access
The ID Access feature is designed for users with South American ID cards. You can enroll the RUN and Serial numbers on their ID cards into the Akuvox SmartPlus Cloud system. Then, users can open doors conveniently by using the QR code on their ID cards.
Note
- This feature is limited to certain projects, if you want to use this feature, please contact your installer or distributor.
- Click here to view the detailed configuration.

Manage Access Credentials for Delivery Personnel
You can create both delivery PIN code and RF card for the delivery staff, who can use the PIN to access the designated place, for example, a parcel room to deliver the package to the residents.
Create Delivery PIN Codes/RF Cards
You can create a delivery PIN code and RF card along with an access control schedule (Access Group).
1. Click Visitor & Staff > Delivery Auth > New.

2. Enter the delivery person's name.
3. Enter the PIN code or RF card number. Please note that the PIN code should be 2-8 digits without starting with "9".
4. [Optional]Select the accessible floors. Click Add to add accessible floors of other buildings. You can select 10 floor numbers at maximum.
5. Select the default or self-created access group.

Modify and Delete Delivery PIN Codes
1. Click Visitor & Staff > Delivery Auth.
2. Search the PIN code by name or PIN code in the fuzzy search field and click Search.
3. Click  to modify the PIN code.
4. Click to delete the PIN code.

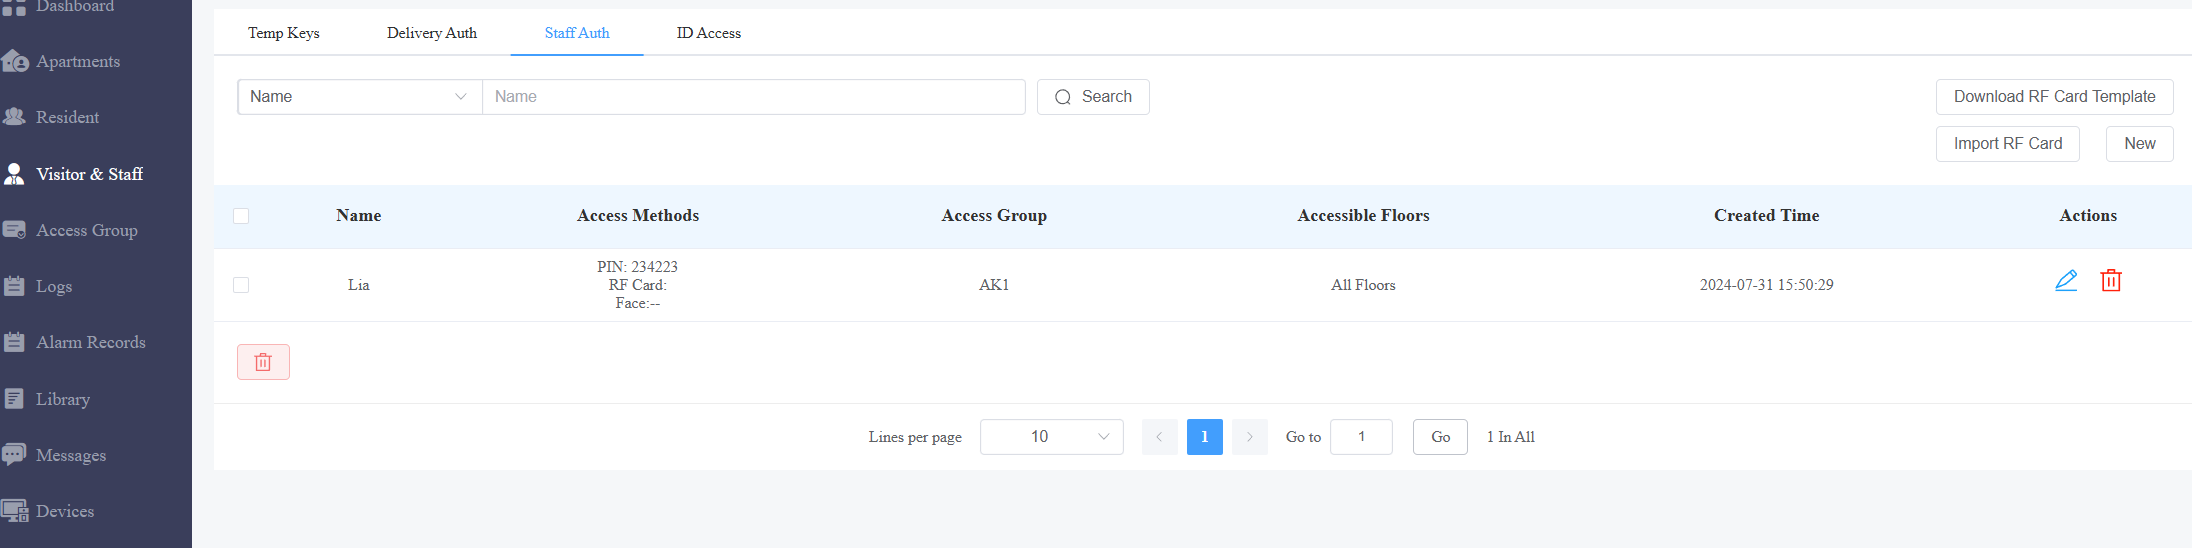
Manage Access Credentials for Property Management Staff
You can create, modify, and delete RF cards, PIN codes, and face data for the property management staff. You can either create RF card(s) separately or in batch using a template.
1. Click Visitor & Staff > Staff Auth > New.

2. Set up the access methods and select the accessible floors.
- PIN: The PIN code should be within 2-8 digits without starting with "9".
- RF Card: Enter the RF card code.
- ID Access: The ID Access feature is designed for users with South American ID cards. You can enroll the RUN and Serial numbers on their ID cards into the Akuvox SmartPlus Cloud system. Then, users can open doors conveniently by using the QR code on their ID cards.
- Face ID: Upload the face picture. Once the staff’s Face ID is added, a
 will display in the Access Methods column.
 will display in the Access Methods column.
Note
- This feature is limited to certain projects, if you want to use this feature, please contact your installer or distributor.
- Click here to view the detailed steps of setting up ID access.

3. Scroll down to select the default access group or self-created one.

Add RF Cards Using Template for Property Manager
- Click Visitor & Staff > Staff Auth.
- Click on
 .
. - Populate the RF card template.
- Click on
 to upload the template file.
 .
. to upload the template file.
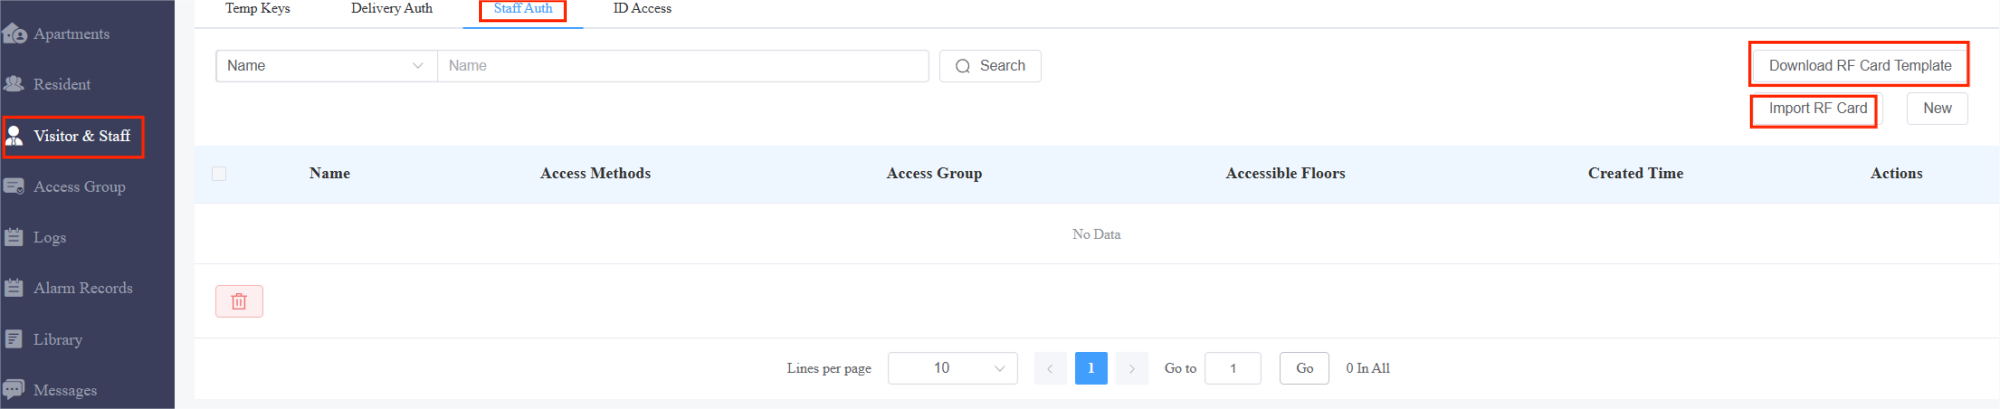
Template Sample

Template Description:
No. | Field Name | Description |
1 | Staff Name | Enter the staff name. |
2 | RF Card | Enter the RF card. |
3 | Access Group ID | Enter the Access Group ID(s) you have already created in the SmartPlus. Multiple Access Group IDs should be separated by “;”. |
Modify/Delete Property Manager RF Cards/PIN Codes
- Click Visitor & Staff > Staff Auth.
- Search the staff info by name, PIN code, or RF card number code in the fuzzy search field and click Search if needed.
- Click
 to modify and
 to delete the target user. Please note that in the staff info editing interface, the Face ID will be displayed using a default image instead of the enrolled one though the staff has a Face ID enrolled already.
 to modify and
Apartment Management
The Apartment module allows you to search and check the apartment-based information related to residents, devices, call type, and call settings. You can also modify call type, and call setting, as well as authorize the resident to create QR codes for the door access.
Search/Check Apartment
1. Search the apartment(s) by narrowing down the search range from building to the apartment, or you can enter the apartment name or the keyword for the search.

2. Click on to check the details of the apartment.

Edit and Reset Apartment
You can edit or reset the apartment configurations for the resident, including call type, call setting, apartment name, and more.
- Edit apartments
1. To go to the editing screen, do any of the following:
- Click on
 of the desired apartment.
 - Click on
 of the desired apartment, and then
  on the top right.
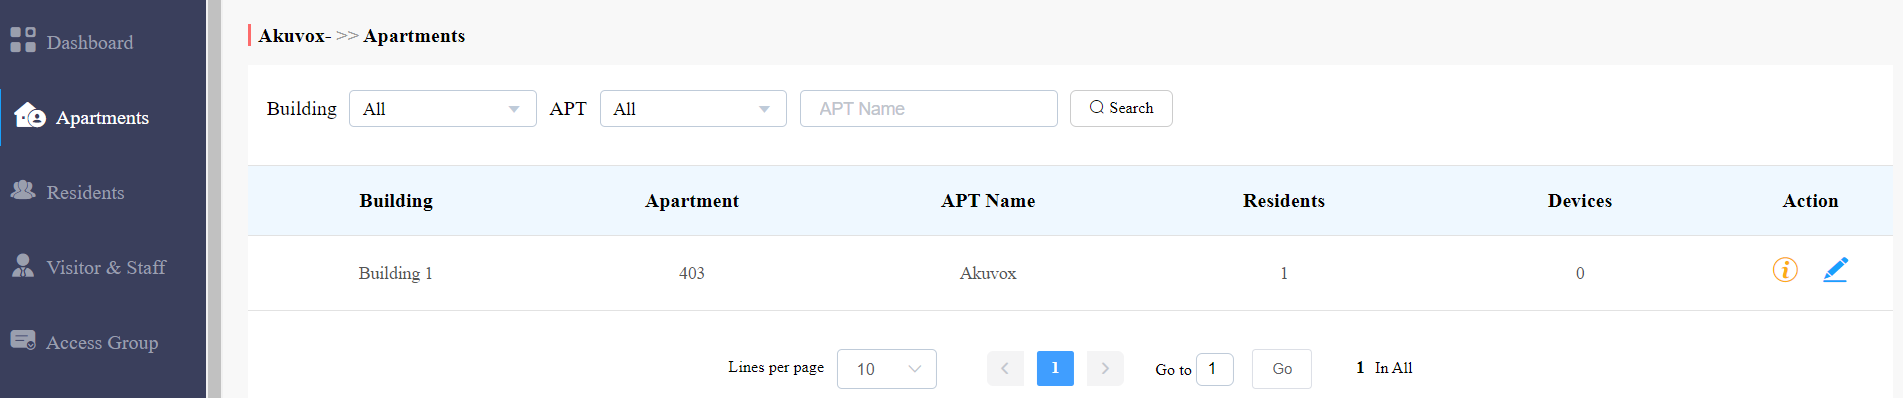
 of the desired apartment, and then
  on the top right.
2. Edit apartment name, call type, and call setting.
3. Edit permission control:
- Allow User to Create QR Code: When enabled, residents can create a QR code on their SmartPlus Apps for door access.
- Allow User to Register Face ID: When enabled, residents can enroll their face ID on their SmartPlus Apps for door access.
- Family Member Amount Limit: When enabled, you can set the number of family member accounts(0-63) that users can create.
- Allow User to Create ID Access: When enabled, users can set up ID access on their SmartPlus Apps for door access.
- Allow User to Create RF Card: When enabled, users can add RF cards on their SmartPlus Apps for door access. Only projects with premium feature plan support this option.
Note:
If you disable the Register Face ID, then the user face IDs registered from the App will become invalid for access. These Face IDs will be back to be valid after the Premium Feature expires.

Parameter Set-up:
No. | Column Name | Description |
1 | Apartment Name | Fill in the apartment name. |
2 | Call Type | Six call types. For example, if you select “SmartPlus and Indoor monitors” you will be able the answer the call using SmartPlus and Indoor monitor. |
3 | SIP Call Or IP Call | Select “All my devices were installed in the same place (villa or house)” for IP call if all of the user’s intercom devices are in the same LAN ( Local Area Network). If not, select “Some of my devices were installed in a different place (villa or house)” for SIP call. |
Reset apartments
To reset the apartment, do the following:
1. Go to the editing screen by any of the methods.
- Click on
 of the desired apartment; Or
 - Click on
 of the desired apartment, and then
  on the top right.
 of the desired apartment; Or
 of the desired apartment, and then
  on the top right.
2. On the pop-up screen, Click  at the bottom left.
3. Click OK when you are asked.
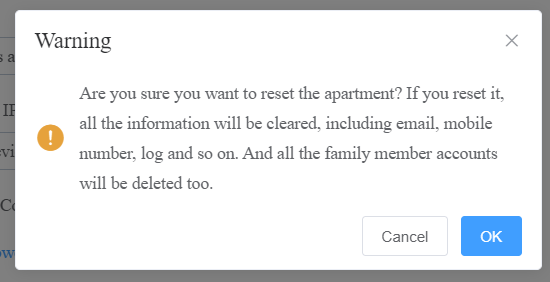
Once you agree to reset, some information or data in this apartment will be removed while some not:
Data to be removed including
- Family member accounts.
- Emails, mobile numbers, country/region, and landlines.
- Logs(audit logs excluded) and histories.
- Messages and alarms; and
- Accessing settings, including PIN, face data, NFC, Bluetooth, and QR Codes.
Data to be kept including
- Family master account status, such as inactivated, expired, and so on.
- The number of free sub-accounts.
- Audit logs.
- Settings include Call Or IP Cal, time zone, language, home Automation, premium plan, and the With Indoor Monitor feature.
Other changes including
- The user’s app changes to be unregistered and needs to be re-initialized.
- The user’s login credentials are reset, and the user is not going to receive the reset email.
Note:
It is free to create a new account in the family after resetting, while it charges after deleting. The resetting feature is suitable for rental scenarios, you can empty the accounts after the tenants move out and create accounts for the new ones.
Export Apartment Settings
You can export apartment settings in an XLSX file by clicking Export on the Apartments module.

Export File Example:

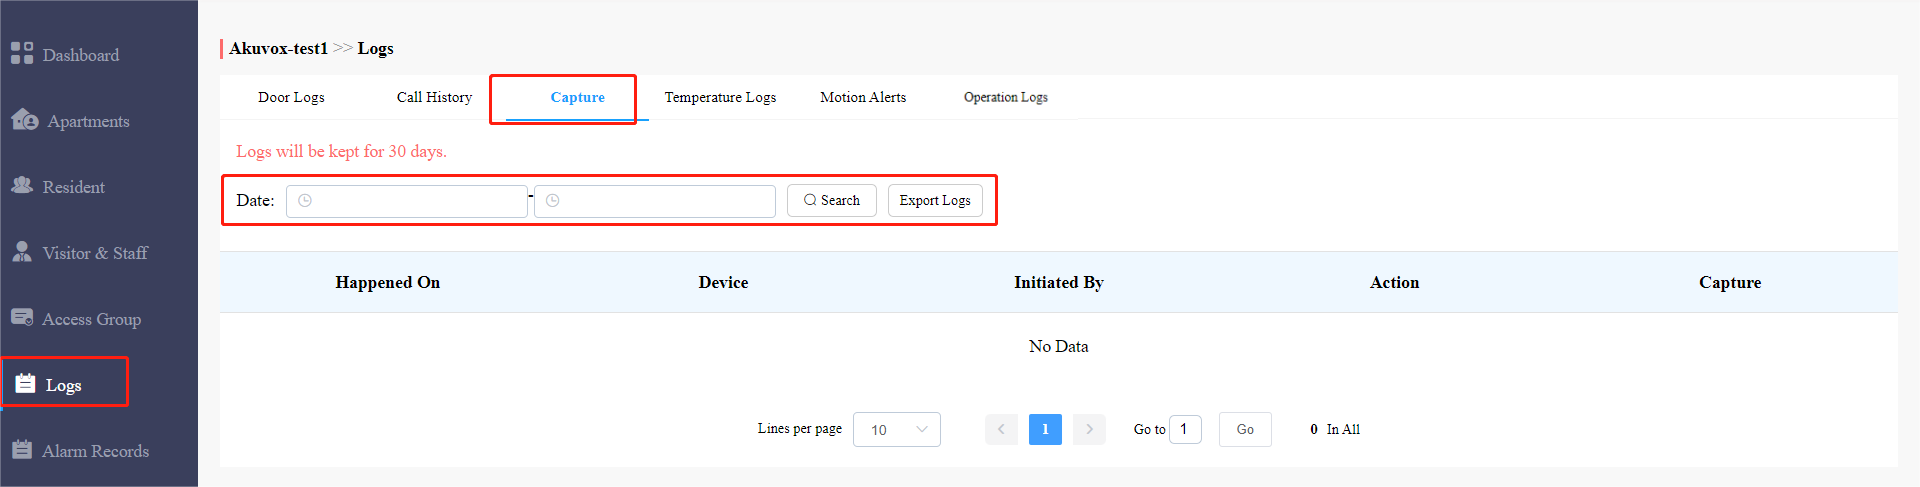
Logs
Log module contains six sub-modules used for checking the door logs, call history, temperature logs, image captured, temperature logs, motion alerts, and operation logs that can be stored for 30 days. With Log Access Control enabled by your installer, you can check door logs, call history, and captured images.

When Log Access Control is not enabled by your installer, you cannot check door logs, call history, and captured images. The three modules will be hidden.
.png)
Check/Export Door Logs
Door logs have 4 types: All, Call, Door Release, and Door Close. The Call type log shows the SIP/IP-based calls initiated on the door phone, indicating when, where, and to whom the calls are made, while the Door Release/Close logs tell you when, where and by whom the door unlocks are made (be it failure or success). You can narrow down your log check by the specific time range with parameters: Device Name, Initiated by, Apartment, and Action for the targeted search.
- Click on Door Logs.
- Select Call type in the Log Type field.
- Set up the time range for the door logs to be checked.
- Select the building and further narrow down the search by Device Name, Initiated by, Apartment, and Action for the targeted search if needed.
- Click on Export Logs to export logs.
Parameter Set-up:
No. | Column Name | Description |
1 | Happened On | Show when the call is made on the door phone. |
2 | Building | Show in which building the call was made. |
3 | Device Name | Display the device name to distinguish it from others. |
4 | Initiated By | Show who has made the call on the door phone. |
5 | APT | Show to which apartment the call is made. |
6 | Log Type | Indicates your current log type. |
7 | Action | This indicator is for the door release type log. |
8 | Key | This indicator is for “Door release type” log. |
9 | Response | This indicator will be shown as “Success” regardless of what number is dialed on the door phone. |
10 | Capture | Show you the captured image of the call initiators. You can click on the image for an enlarged picture. |
Check/Export Call History
This sub-module allows you to check call history in terms of when and by whom the SIP-based intercom calls are made and received. Call history records all the calls made and received on the intercom devices as well as on the SmartPlus apps for end users and property managers in the community. You can set the time range or enter the caller or receiver to check the targeted call information.
- Click on Call History.
- Set the time range of the call history if needed.
- Enter the caller name or receiver name if needed.
- Click on Search.
- Click on Export Logs to export logs.

Parameter Set-up:
No. | Column Name | Description |
1 | Happened On | Shows when the calls are made. |
2 | Caller | Shows who have made the calls. Note: When a caller or a receiver is a property manager, then the property manger’s name will be displayed. |
3 | Receiver | Shows who have answered the call. |
4 | Call Duration | Shows how long the call lasted. |
Check/Export Captured Images
Images capturing are either initiated manually by residents or the property management staff. You can check when, where, how, and by whom the images are captured.
- Click on Capture.
- Set the time range if needed.
- Click on Search.
- Click Capture to see the enlarged image.
- Click on Export Logs to export logs.
Parameter Set-up:
No. | Column Name | Description |
1 | Happened On | Shows when the images are captured. |
2 | Device | Show you the door phone from which the images are captured. |
3 | Initiated By | Shows who have initiated the image capturing. |
4 | Action | Shows how the image capturing is initiated, the capturing can be initiated from SmartPlus, the indoor monitor, etc. |
5 | Capture | You click on the image to see a larger picture. |
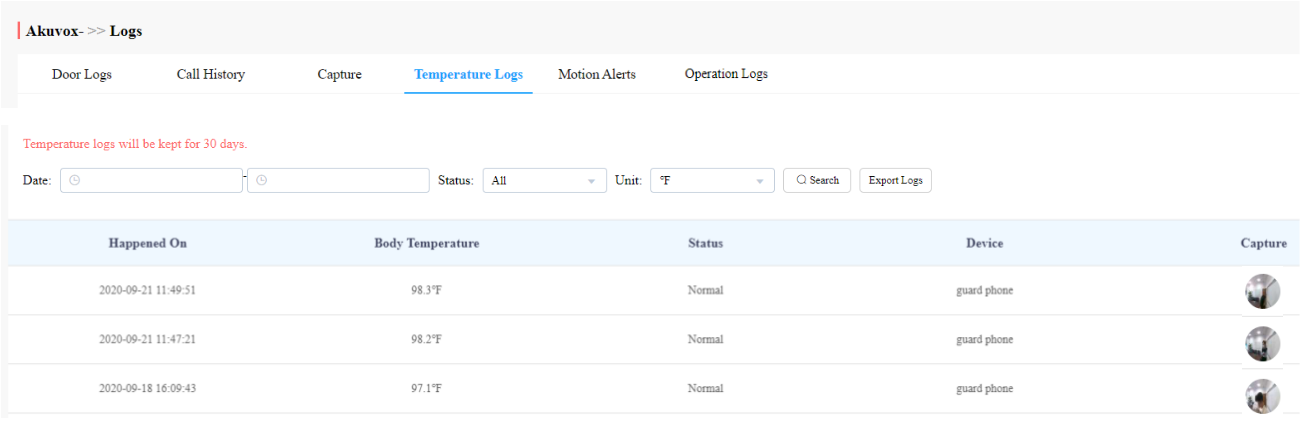
Check Temperature Logs
You can check the temperature log of any people who have been checked on their body temperature before being granted the door access etc, for security purposes.
- Click on Temperature Logs.
- Set the temperature log time range if needed.
- Select the temperature measurement unit.
- Click on Search.
- Click Capture to see the enlarged image.
- Click Export Logs to export temperature logs.
Check Motion Alerts
Motion alerts sub-module allows you to check the captured images of people whose movements have triggered the motion detection in the door phones (door phones with motion detection function).
- Set the time range.
- Click on Search.
- Click on the specific captured image for an enlarged one.
- Select and delete the motion alert if needed.

Parameter Set-up:
No. | Column Name | Description |
1 | Happened On | Shows when the image is captured due to motion detection. |
2 | Building | Shows in which building the image is captured. |
3 | Device | Shows which door phone the image is captured from. |
4 | Capture | Displays the images captured due to motion detection. |
5 | Action | Clicks on the image for an enlarged one. |
Check Operation Logs
Operation Logs sub-module allows you to check the operation record in the SmartPlus platform. The records mainly involve the changes made to the apartment, end user, and various access types such as PIN, RF card, Face, temporary PIN code, time zone, and password.
- Select the Operation Logs type.
- Select the time range and click on Search.
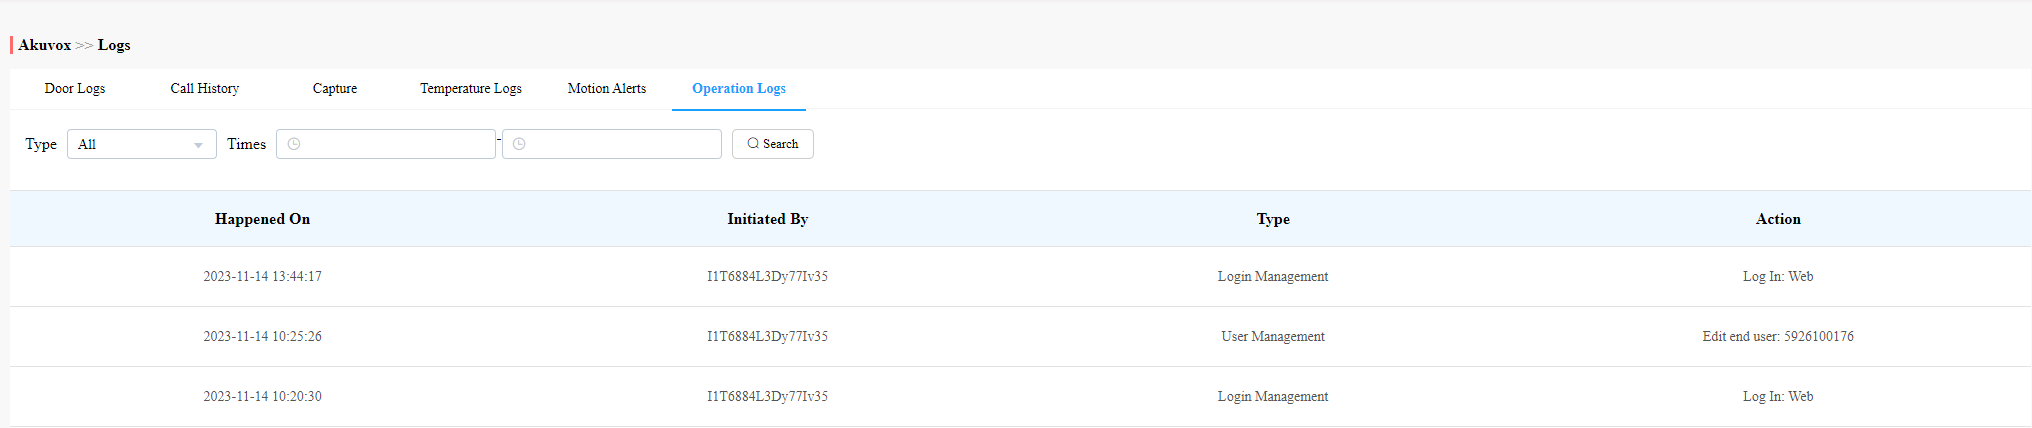
Parameter Set-up:
No. | Column Name | Description |
1 | Happened On | Shows when the operational changes are made. |
2 | Initiated By | Shows who have initiated the operations by indicating the property manager account. |
3 | Type | Shows the specific type of operation. |
4 | Action | Shows the specific operations made. |
Library
Library serves as a module where you can check, modify, and delete all types of created PIN codes and RF Cards conveniently at one stop.
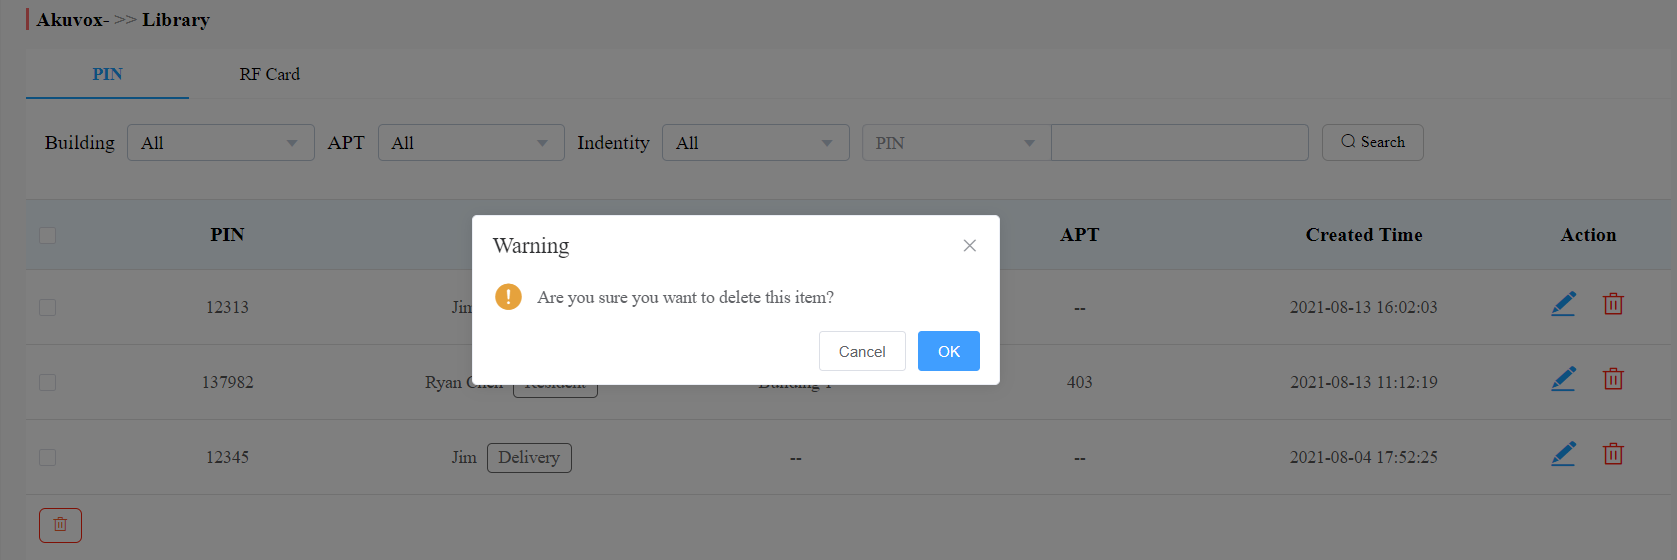
Check/Modify/Delete PIN Code(s)
1. Click on PIN.
2. Search the PIN by building, apartment, identity, PIN code, and Name.
3. Click on to edit the PIN code.
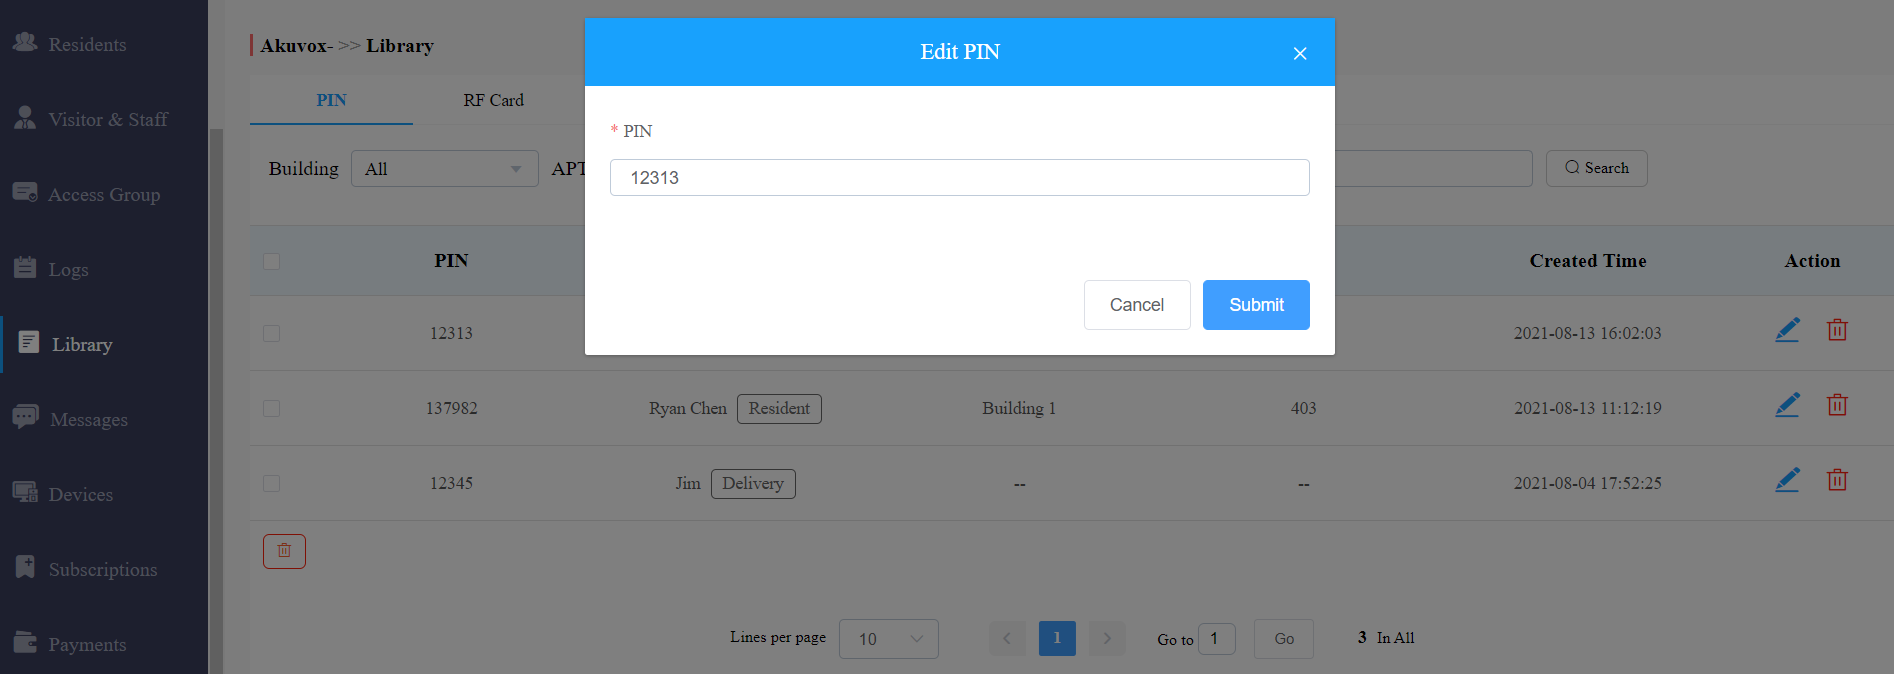
4. Click on to delete the PIN code selected.
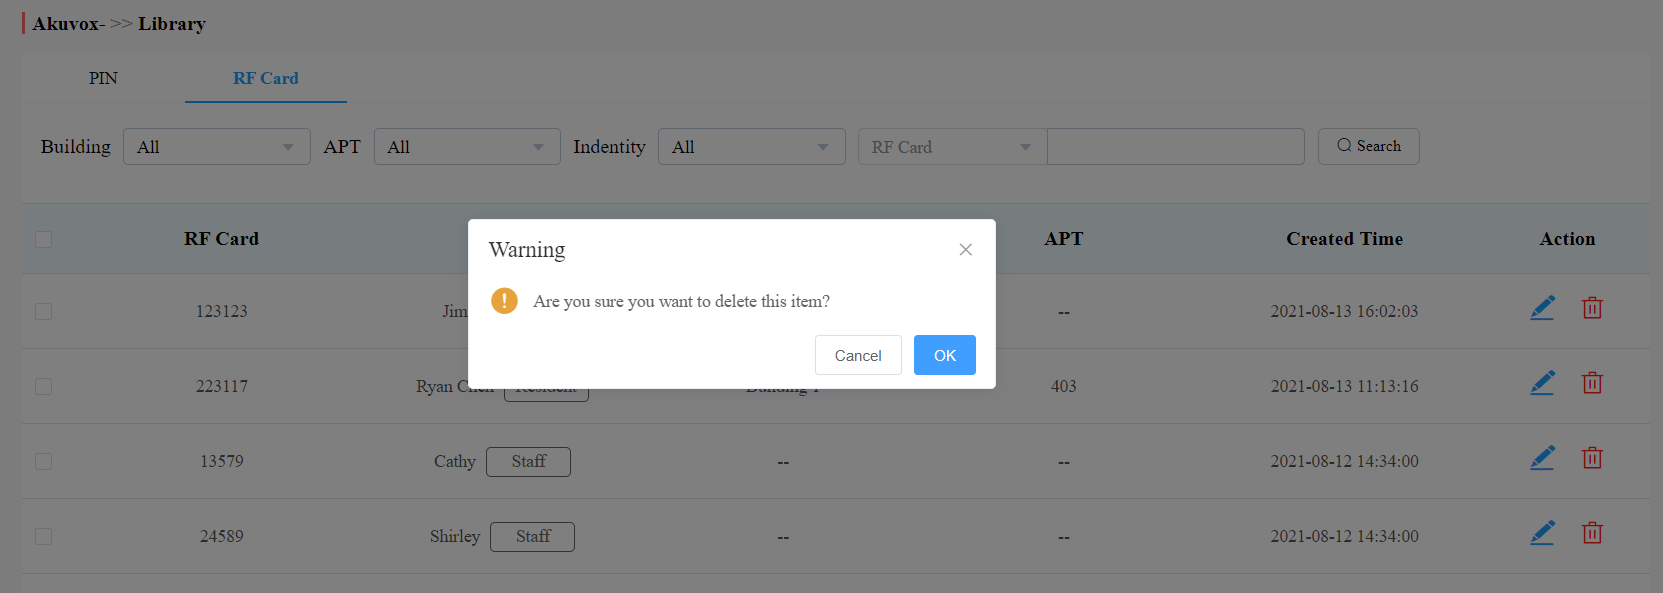
Check/Modify/Delete RF Card(s)
1. Click on RF Card.
2. Search the RF card by building, apartment, identity, PIN code, and name.
3. Click on to edit the PIN code.
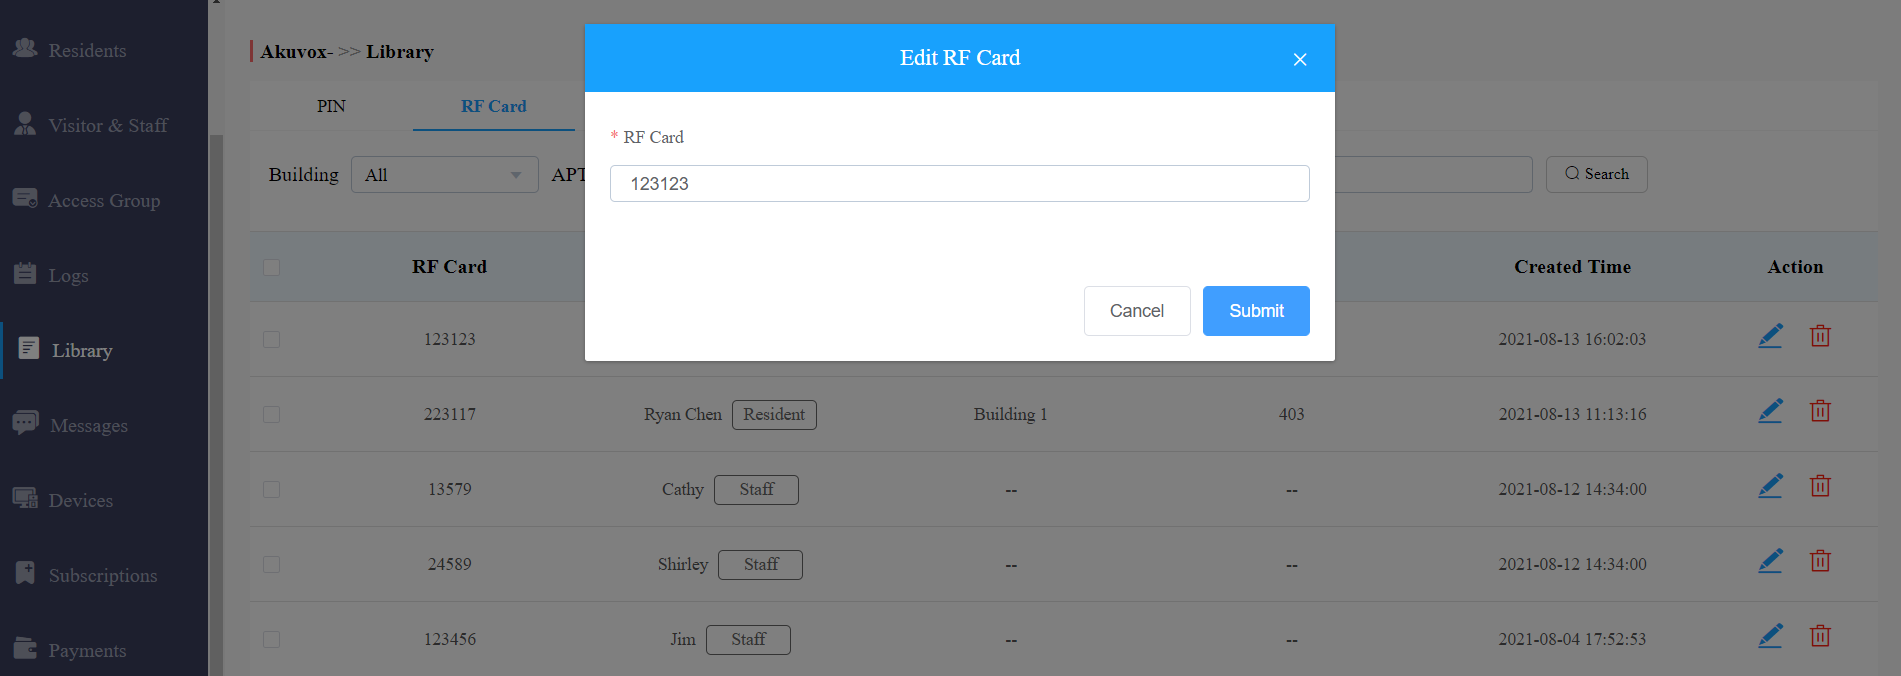
4. Click on to delete the RF card selected.
Messages
Messages module allows you to create and send the message to the residents living in the community. Moreover, you can check the messages that have been sent if needed.
Create/Edit Messages
You can create one-time messages or message templates for your convenience.
1. Click on New.
2. Create the message title and content if you want to create a one-time message(s). Select the receiver type.
Note
- Only the indoor monitor C319 with firmware version 119.30.10.204 and above can receive messages exceeding 256 bytes within 1024 bytes.
- Other indoor monitors can receive messages of fewer than 256 bytes.
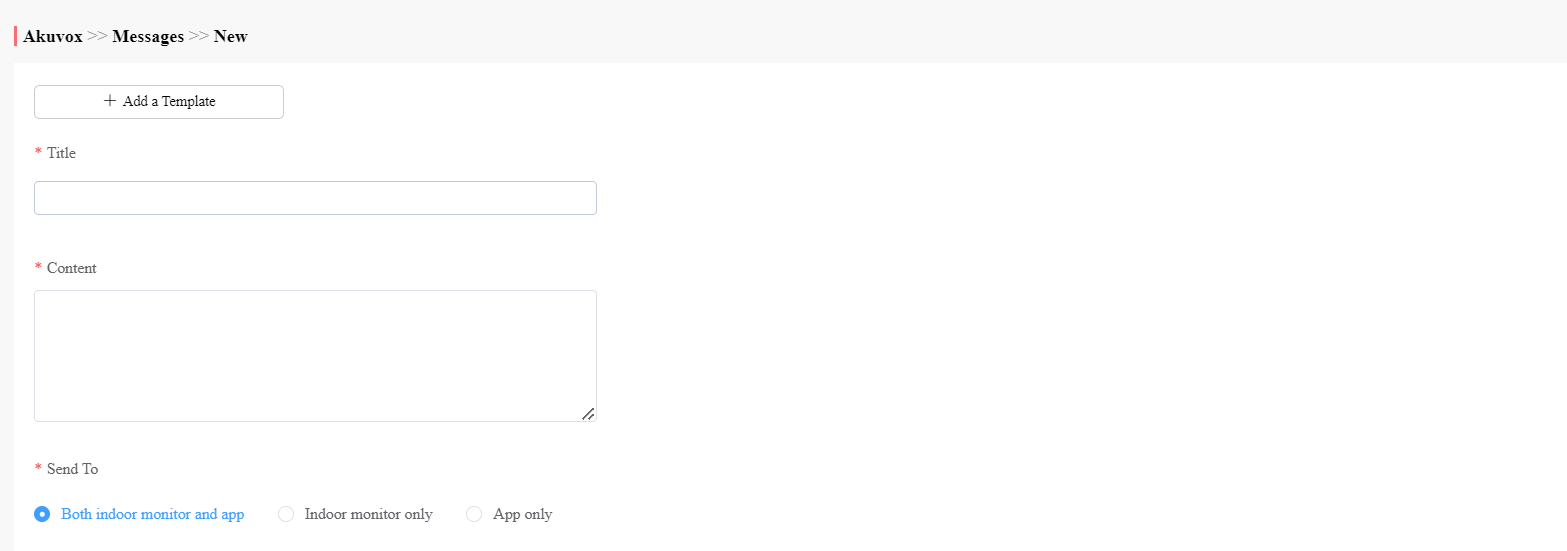
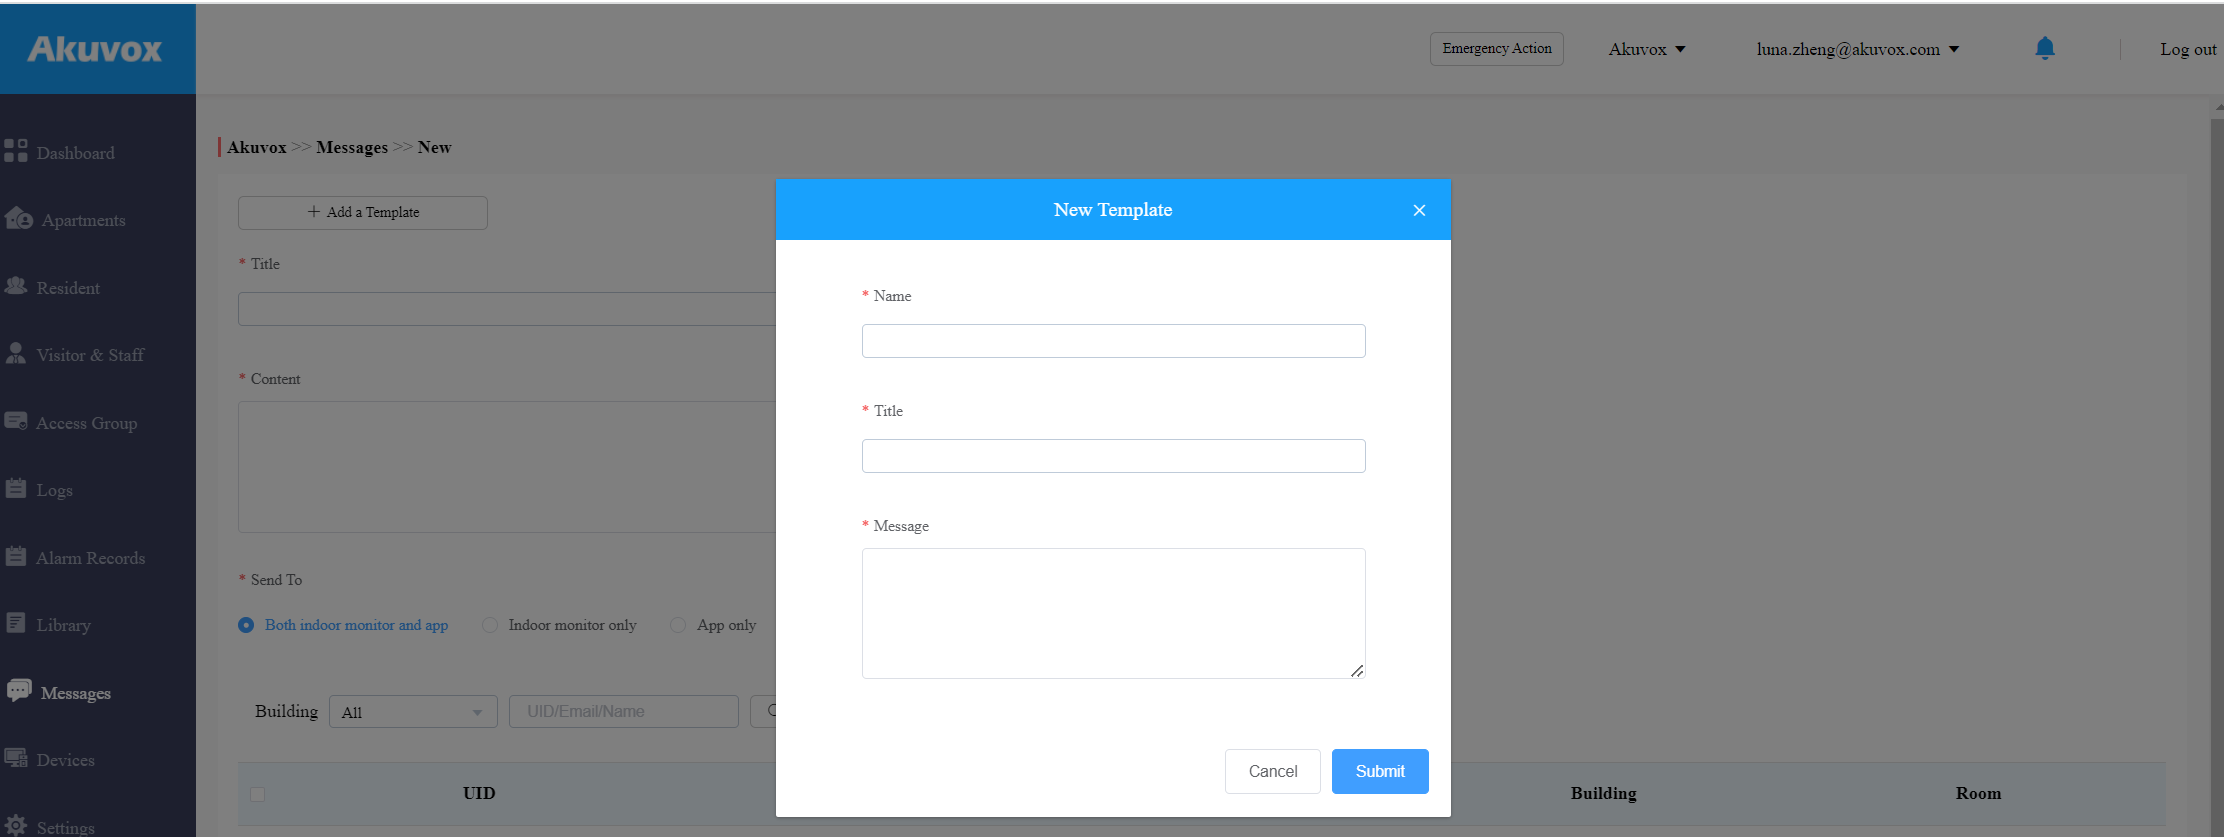
3. Click + Add A Template if you want to create reusable message templates. You can create up to 30 templates.
4. Enter the template name, the message title, and the contents.
You can edit and delete the message template if needed.
- Move the arrow to the created message template.
- Click on
 if you want to delete the template directly.
 - Click on
 to edit the message template you created.
 if you want to delete the template directly.
 to edit the message template you created.
Send Messages
After the message is created, you can send the message to the targeted resident(s) as needed.
- Select the building(s) in the community.
- Select and tick the checkbox of the targeted resident(s) by their UID (user identification), name, and Email, or select All to include all the residents, then click Search.
- Click on Send to send the message to the targeted resident(s).

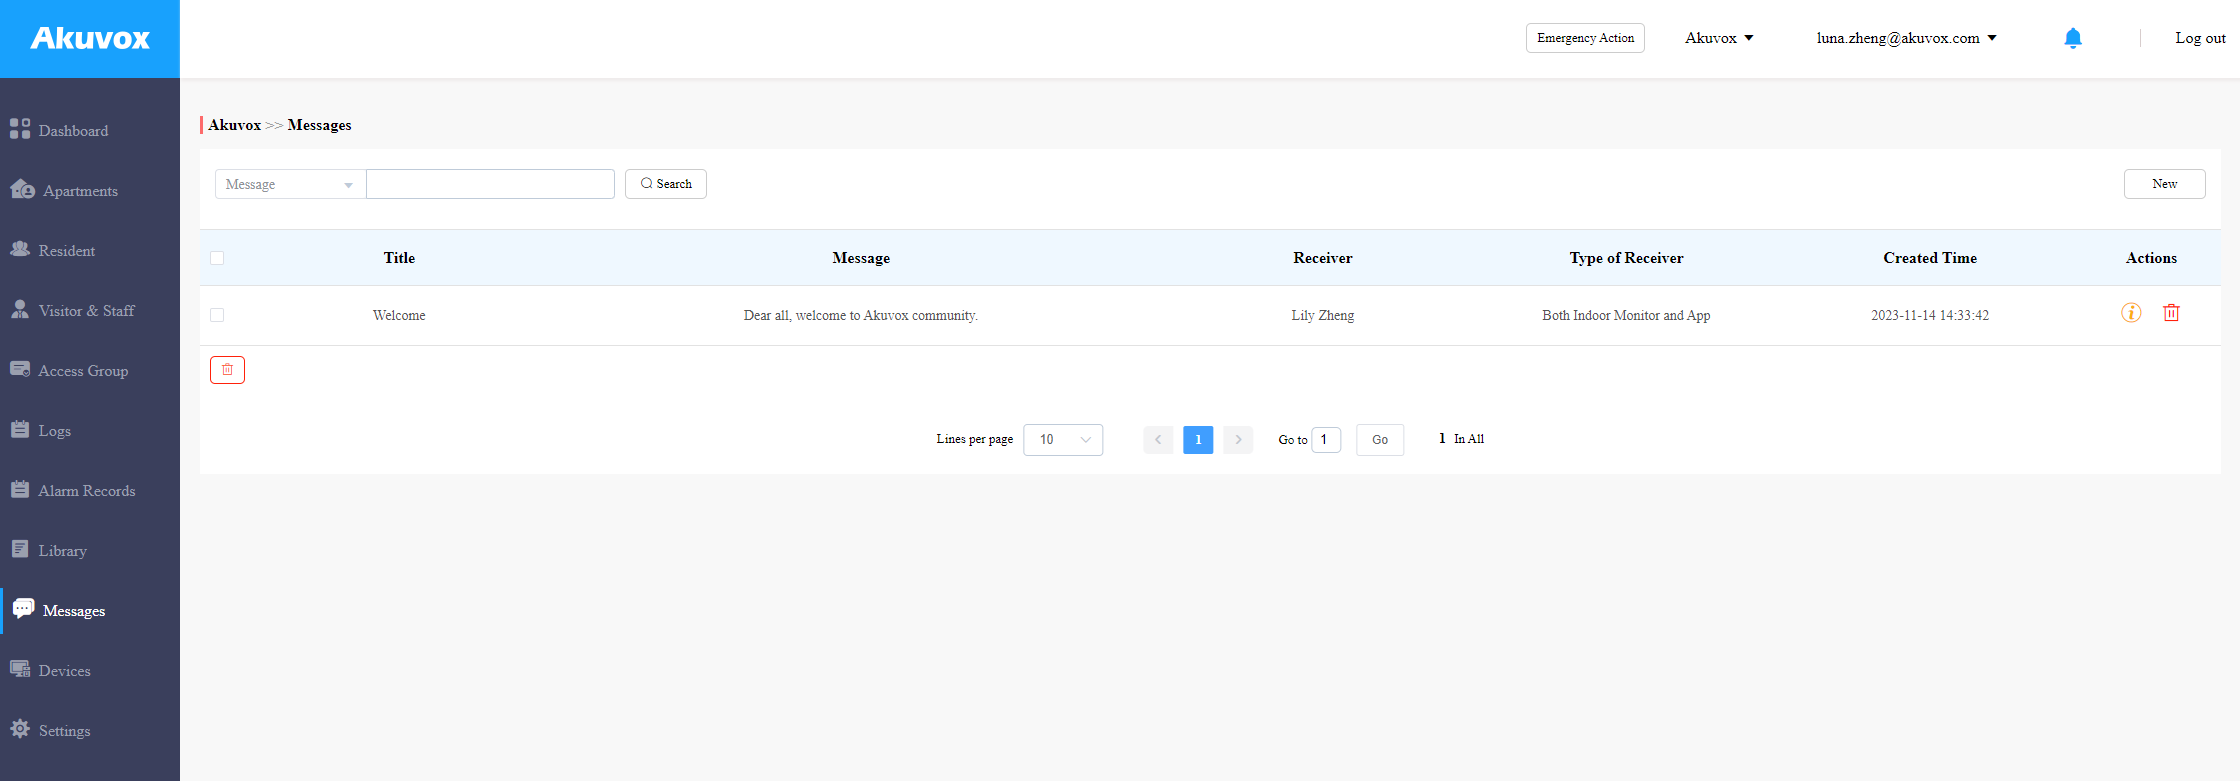
Search/Check/Delete Messages
You can search, check, and delete messages if needed.
- Enter the part of the message ( or the complete message) for a fuzzy search.
- Click on Search to find the message you need.
- Click on
 if you want to see the details of the message(s).
 - Click on
 to delete.
 if you want to see the details of the message(s).
 to delete.
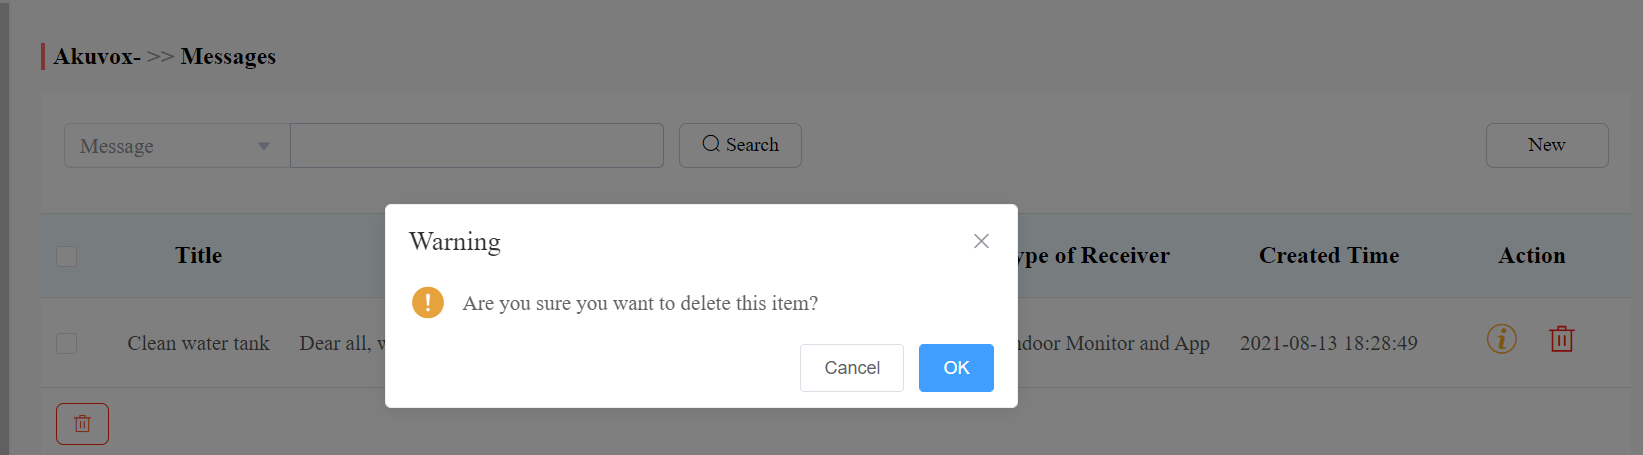
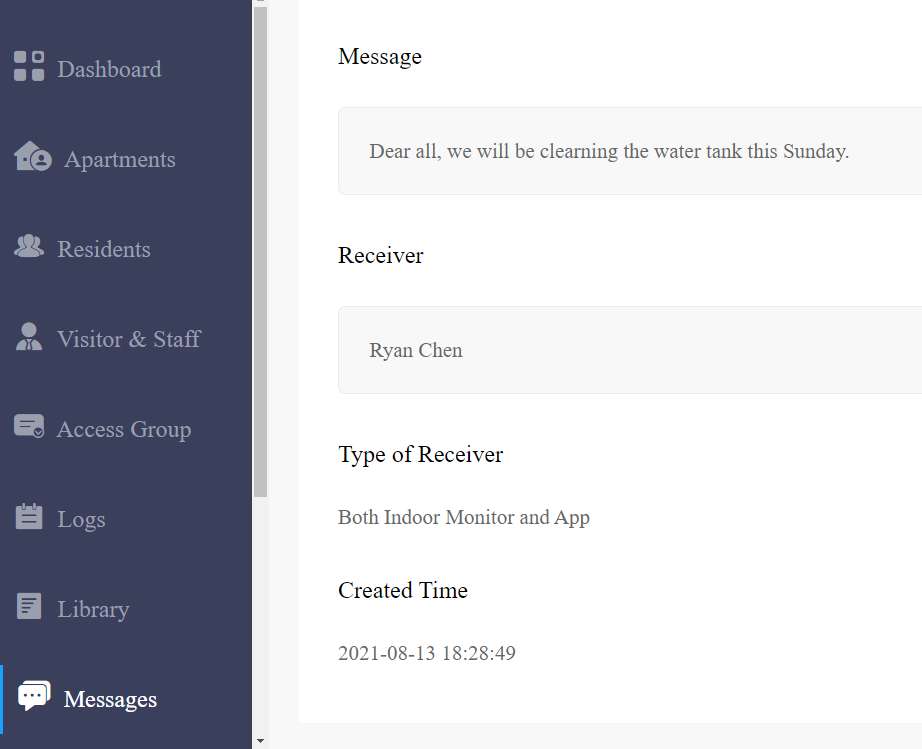
Parameter Set-up:
No. | Column Name | Description |
1 | Title | Shows the message title. |
2 | Message | Shows the message contents. |
3 | Receiver | shows who has received the messages. |
4 | Type of Receiver | Shows the receiver types: Both indoor monitor and app, Indoor monitor only, App only. |
5 | Created Time | shows when the messages are created. |
6 | Actions | Click |
 to see the message details and to delete the messages respectively.
Message Details Sample
Device Management
Devices module allows you to manage all the devices added under your property management in terms of modifying device names, contact screen display, relays, and door unlock.
You can also conduct device settings via provisioning, reboot, reset, and remote control. And you can change the device name for the third-party camera.
Modify Intercom Devices
You can modify the contact screen display, device name, relay name, DTMF code, and unlock type as previously set up by your community manager.
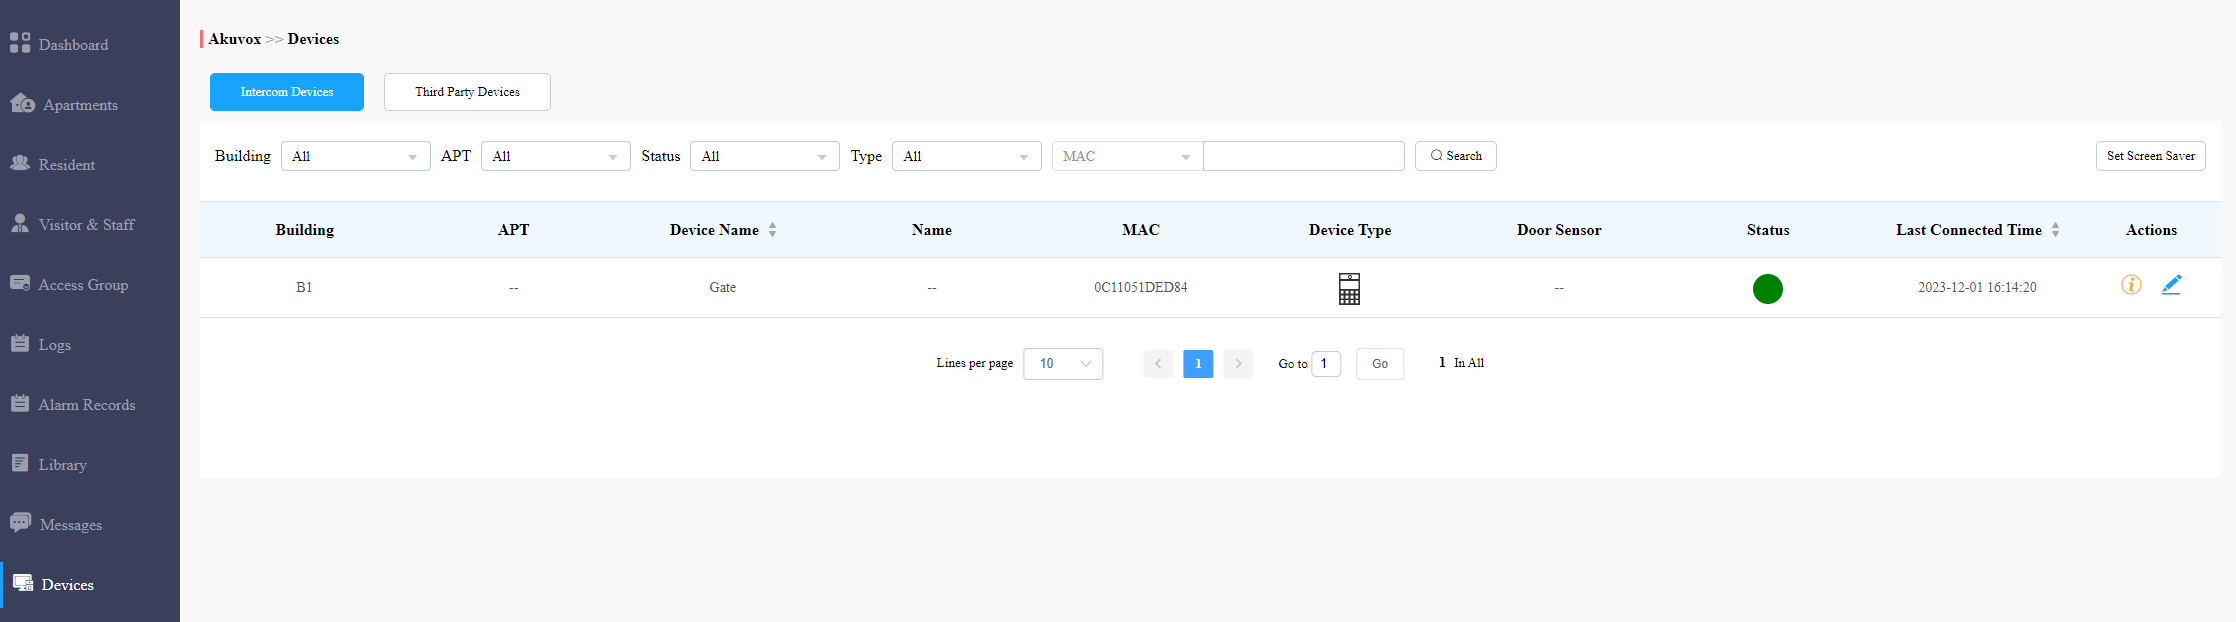
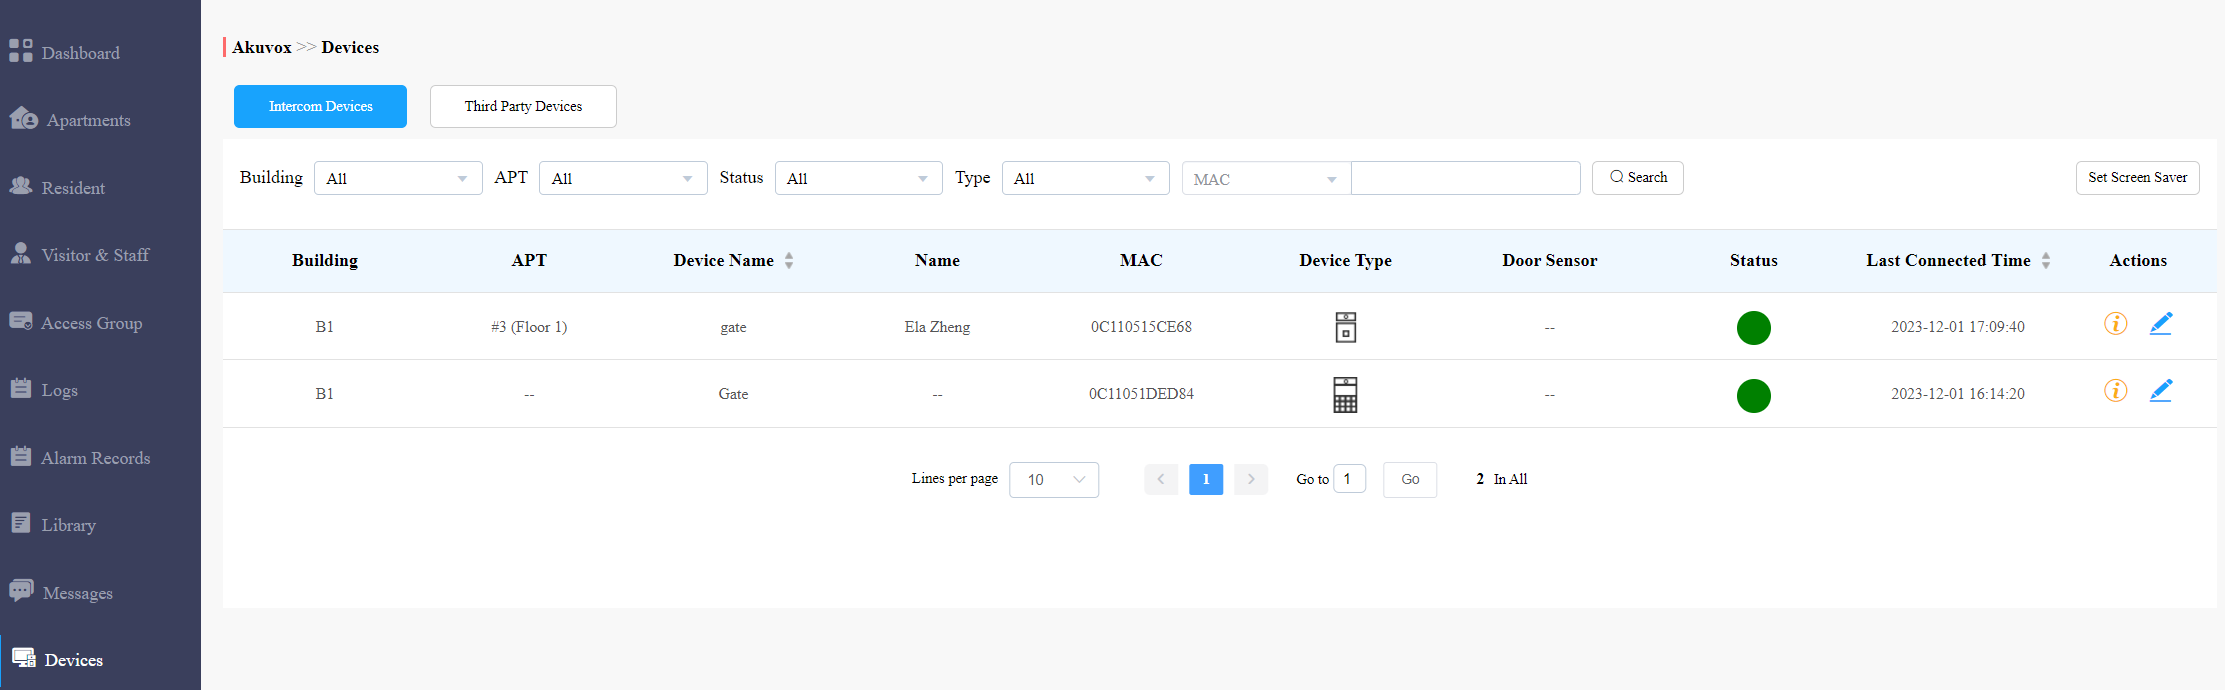
1. Click Devices > Intercom Devices.
2. Click Search to find the targeted device(s) for the modification.
Note
- Door Sensor indicates whether the door is open or not.
.png) : Close
: Close .png) : Open
: Open - To learn about supported door phones and the steps for displaying door status, please refer to Display and Check Door Status.
.png) : Close
: Close .png) : Open
: Open3. Click on  .
.

4. Modify the settings.

| Regardless of the device type, you can check where the device is installed and modify the device name. | ||
No. | Field Name | Description |
1 | Building | Indicates in which building the device is located. |
2 | APT | Indicates in which apartment the device is located. |
3 | Device Name | Distinguish the device from others. |
| If it is a door phone or an access control, you can configure the following options. | ||
| 1 | Allow users to monitor this device |
|
2 | Contact Display Settings | If the device is a multi-tenant door phone or a single-tenant door phone, the option Note: The following models with specific firmware versions or higher support the Directory selection feature:
|
3 | Relay Name | Name the relay to distinguish it from others. |
4 | DTMF code | Enter the DTMF code for the door access. |
5 | Access Method | Select specific unlock methods to trigger the desired relay. For example, if you select PIN in Unlock type for Relay1 and select RF Card for Relay2 when users enter PIN codes on the door phone, only Relay1 will be triggered and vice versa. Note: If the SmartPlus Homepage or SmartPlus Talkingpage is not checked, the corresponding icons will not appear on the app home page. |
| 6 | Relay Schedule | Apply the access group to the desired relay. Click here to view the models supporting this feature and configuration steps. |
.png) will be available for selecting specific residents and indoor monitors that can be displayed as contacts on the door phone's Contacts screen.
will be available for selecting specific residents and indoor monitors that can be displayed as contacts on the door phone's Contacts screen.| If it is an indoor monitor, you can configure the following options. | ||
| 1 | Relay | Turn on or off the device's built-in relay and name the relay. |
| 2 | External Relay | When the device is connected to an external relay, enable this option. You can click here to view the supported models and the detailed configuration. |
| 3 | External Relay Type | Select the relay type between Akuvox-MK485-G2R-8J8C V3.0 and HF-8000. The former supports up to 8 relays and the latter up to 4. |
| 4 | External Relay Mode |
|
| 5 | IP Address | When Ethernet is selected as the external relay mode, enter the IP address. |
| 6 | Port | When Ethernet is selected as the external relay mode, enter the port. |
| 7 | Relay Name | Name the external relay to distinguish it from others. |
| 8 | Relay Function | Define the relay function according to the device connected to the relay. |
Modify Third-Party Device
You can check and edit the third-party device's information after installers add the devices to your projects.
Third-party Cameras
- Click Devices > Third Party Devices > Camera.
- Click Search to find the targeted device(s) for the modification.
- Click on
 . You can:
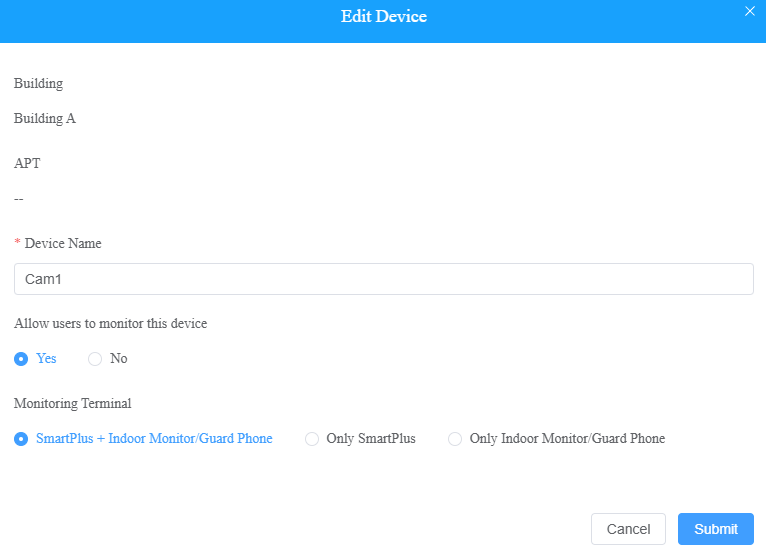
- change the device name;
- set whether users can view the monitoring stream through their indoor monitors and SmartPlus Apps.
- If Yes is selected, specify through which devices users can monitor.

Third-party Locks
1. Click Devices > Third Party Devices. Select the lock brand.
2. Click to modify the device's name.
3. Click to view the device's information.

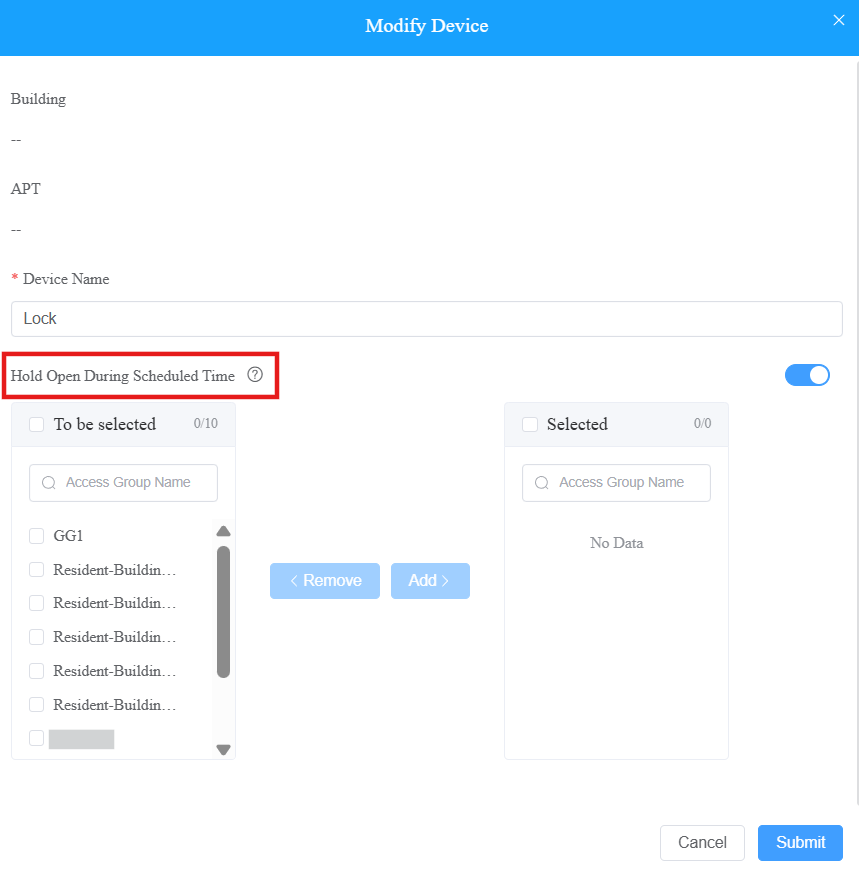
For iTec locks, you can set the lock to be open during scheduled times by clicking .
.
Then, select an access group and move it from the left to the right box.
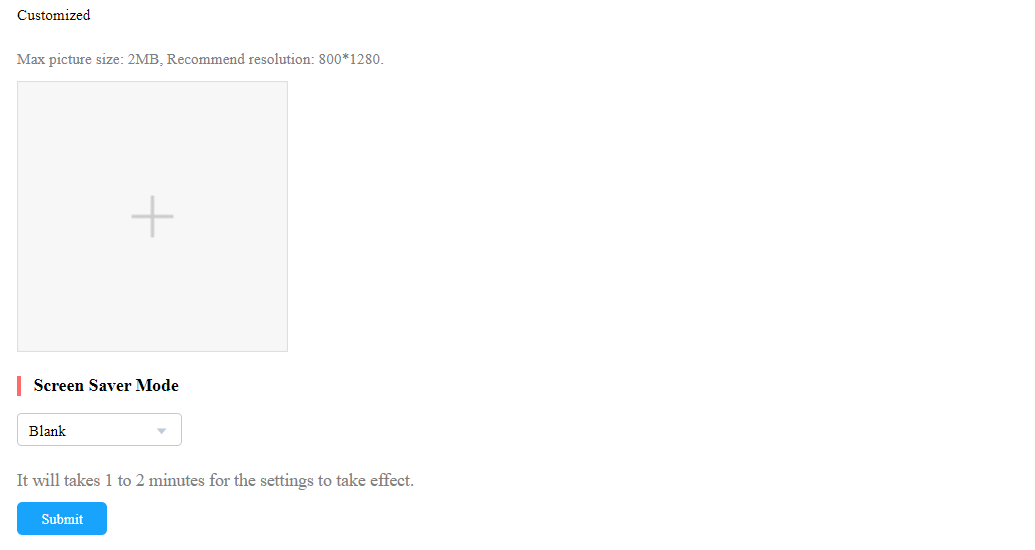
Add Screensaver to Device
You can upload screensavers and synchronize them to the intercom devices. For example, you can select and synchronize welcome screensaver pictures to door phones for a special day, festival, holiday, or for some other commercial purposes.
1. Click Devices > Set Screen Saver.
2. Click New.

3. Select the door phones you want to set up the screen saver for.
Note:
The following models with specific firmware versions or higher support this feature:
- R29: 29.30.3.104
- X915 V1.0: 915.30.1.408
- X915 V2.0: 2915.30.10.8
4. Select from the default screensavers, or upload custom screensavers you like. (2 pictures minimum and 5 pictures maximum).
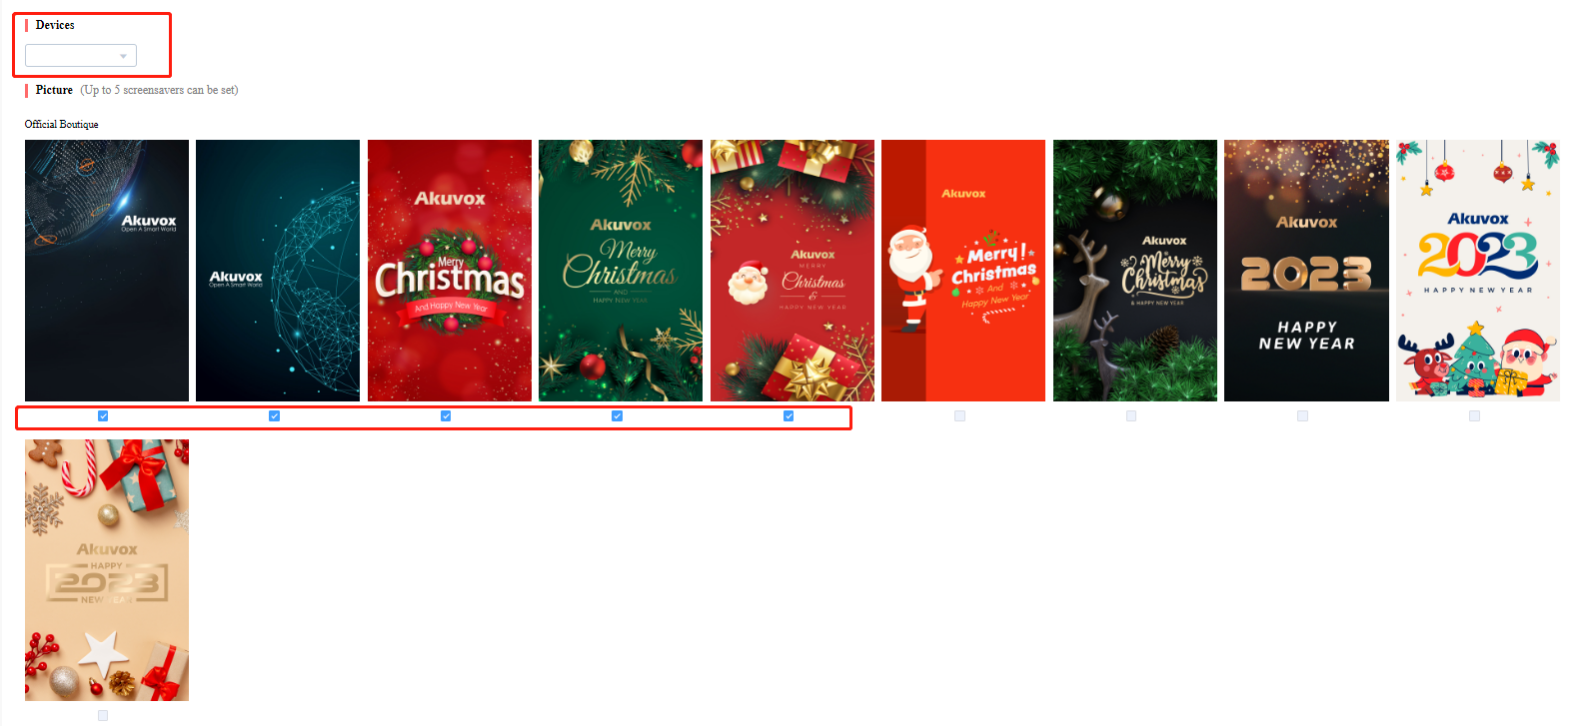
5. Select the screen saver display mode.
- If you select the Image ( the fault mode), the door phone will display the screen-saver pictures you’ve added.
- If you select None, the screen saver will be disabled.
- If you select Black, the screen saver will be black.
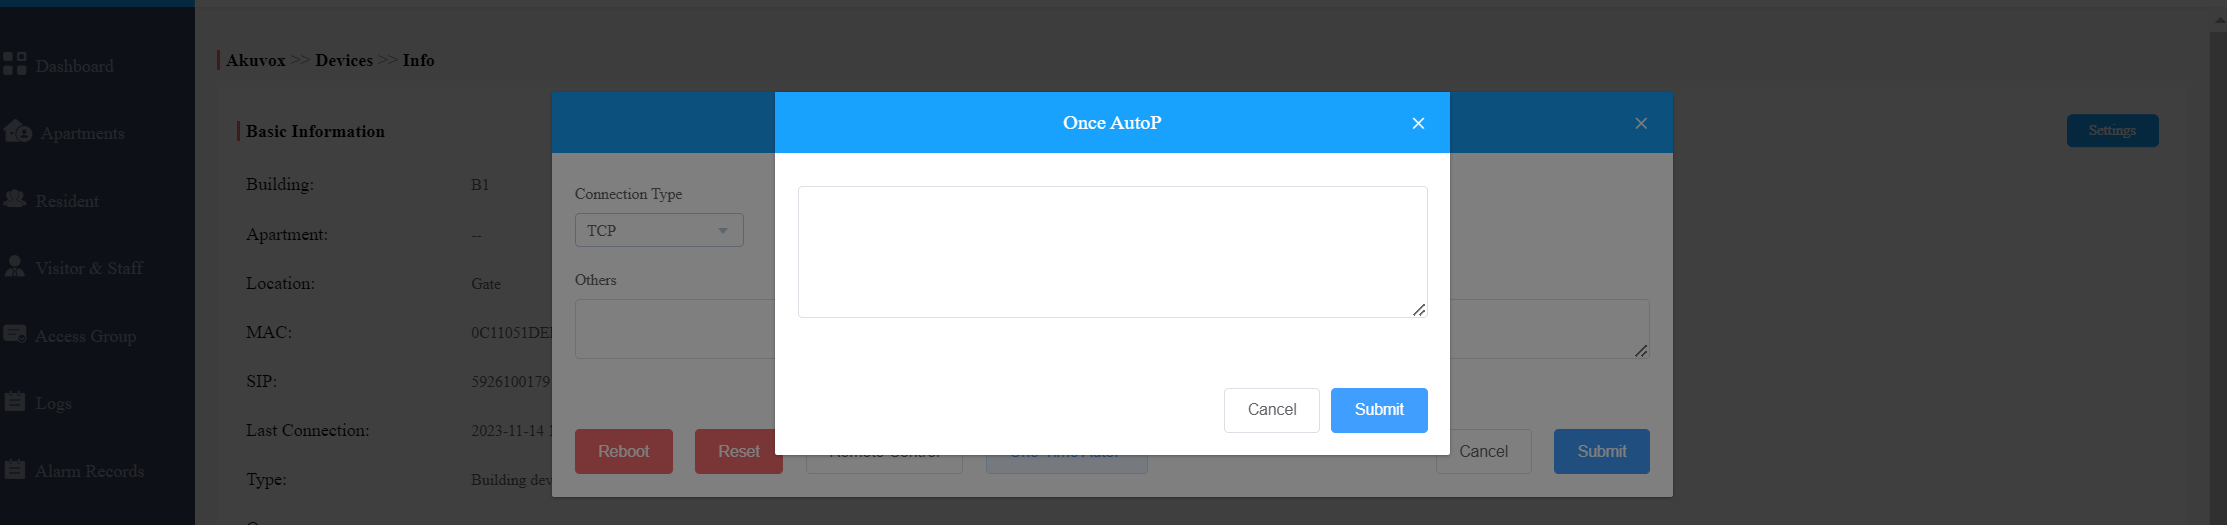
Device Setting
The device module allows you to configure the device data transmission types, reboot and reset the device, remote control the device’s web interface, and conduct provisioning for the devices.
1. Click on of the specific device.
2. Click on Settings.
Note
If the device model is R20K or R20B and connected to an expansion module(MD06/MD12), a Push Button Setting option will be available for you to set up the expansion module.
Click here to view the details of setting up the expansion unit.

3. Configure the device data transmission type in the Connect Type field.
4. Reboot, reset, or log into the device web interface remotely via remote control.
5. Enter the commands for the Auto-provisioning, then click on Submit.
.png)
6. Click on One Time Autop if only you want the Autop command(s) to be implemented one time.
Note:
- Duplicate commands will not be retained.
- One Time Autop allows you to carry out the Autop command(s) only one time with no repetition.
Subscriptions
Subscriptions is the module where you can activate and renew services, including the SmartPlus App service of your account, residents' master accounts and family member accounts, third-party locks(Dormakaba and iTec), and the video storage function.
Note
- Only when you installers set the Charge Mode to By Property Manager can you pay the fee.
- Only after your installers assign the locks can you pay the fee.
Activate Services
1. Click on  .
.

2. Select the service type and check the desired item(s). You can click the icon  next to the APT or APT Name to reorder the list to find the desired accounts quickly. Then scroll down to click on Next.

3. Click on  to enter your Billing information and click Submit.

4. Select your payment method (click on Other payment method for more payment options).
5. Tick the check box to agree to the terms and conditions and click on Pay.

Billing Information Description:
No. | Column Name | Description |
1 | Company/Family | Enter the name of the property management company. |
2 | ATTN | Enter the name of the property manager. |
3 | Address | Enter the address of the property management company. |
4 | TEL | Enter the telephone number of the property management company. |
5 | Fax | Enter the fax number of the Property management company. |
Note
Akuvox SmartPlus can only be paid by Stripe and Papal.You can also pay for the service using coupons if you have any.
1. Ticket the checkbox of the coupon , then click on Pay.

2. Click Download Invoice File to download the invoice if needed.

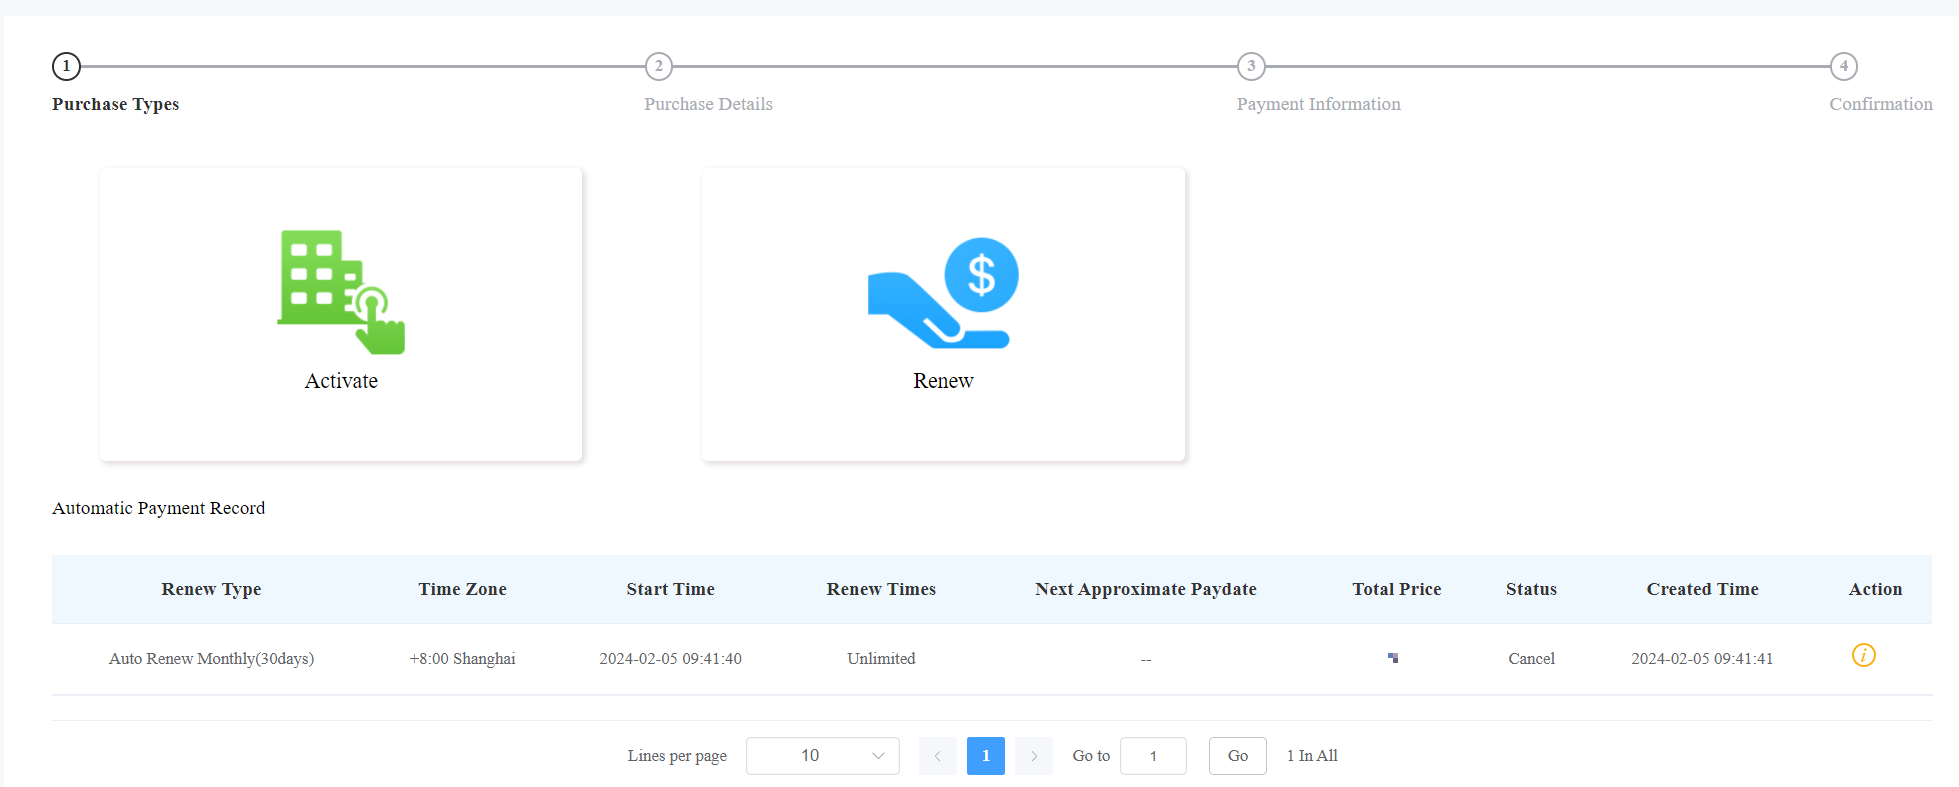
Renew Services
1. Go to the Subscription module.
2. Click on  , and select the service type.
3. Check the desired item(s).

4. Choose to renew manually or automatically.
- Renew Manually:
Select Manual and the renewal period with a maximum of 5 years.
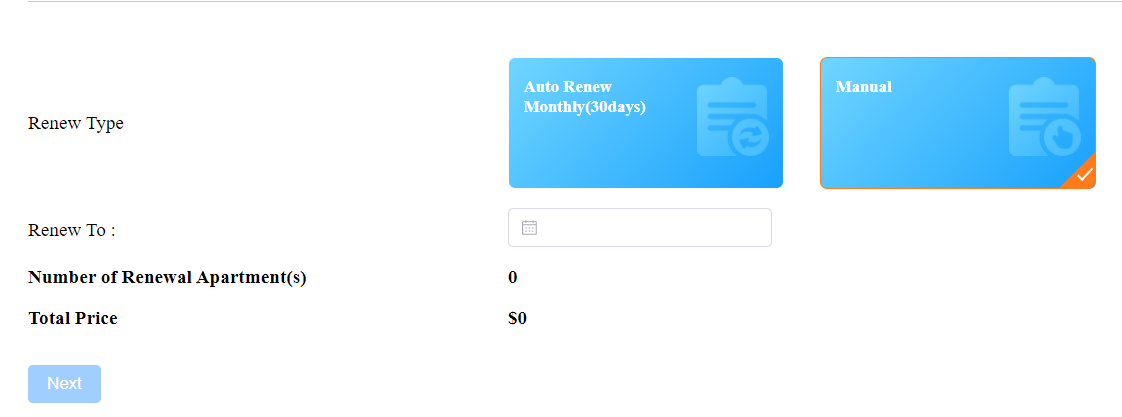
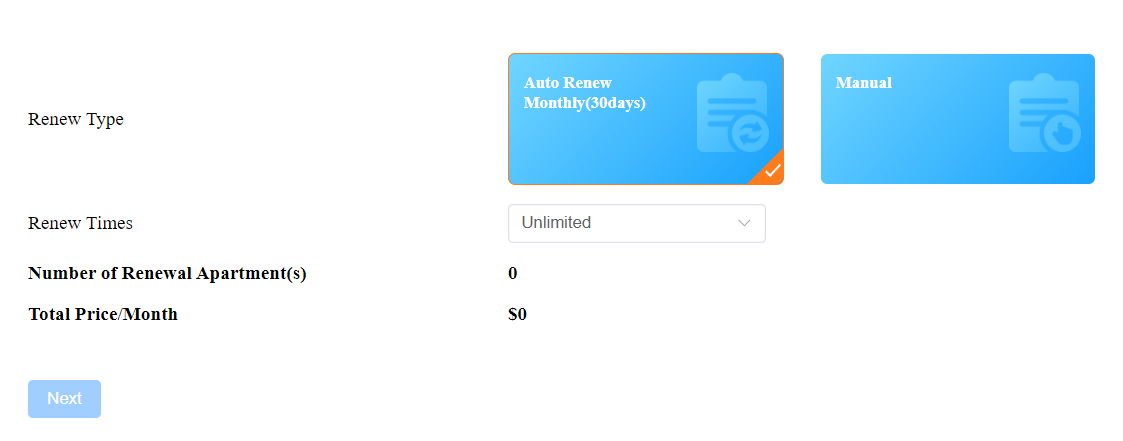
- Renew Automatically: Renewal occurs every 30 days and extends the account's upcoming expiration date by 30 days.
Note
Auto Renew is ONLY available for some installer accounts of Ucloud. If you want to use this feature, please contact the Akuvox tech team.
Select Auto Renew Monthly(30 days) and the Renew Times that decide how many months the renewal lasts.
5. Click  to modify the billing information.
6. Tick the check box to agree to the terms and conditions and click Submit.
.png)
7. Select the Payment method and continue the steps until the service is paid.

Note
- Akuvox SmartPlus can be paid by Stripe and Paypal.
- Coupons are not supported for auto-renew.
- After two consecutive failed charges, the automatic renewal will be deactivated, and you will be notified by email.
- The expiration email will not be sent to you and the end users when the auto-renew service is activated for their apartments.
You can also pay for the service using coupons if you have any.
1. Tick the checkbox of the coupon  , then click on Pay.

2. Click Download Invoice File to download the invoice if needed.

Automatic Payment Records
On the Subscription module, you can check the automatic payment records including Auto Renew settings, total prices, etc.
Transaction History
Payments module allows you to search, check, and delete the transaction history following the user account activation and renewal. You can also download the invoice if needed.
Check Transaction History
After the payment is made, you can check the details of the transaction if needed. Community transaction history will display the orders for the activation and renewal of the master account, extra family member account, and property manager SmarPlus. Office transactions will display all the orders for the activation and renewal of the user account, as well as the orders for the premium functions.
1. Check the transactions by Type, Status, and transaction Order Number.

2. Click on of the transaction you want to check.
3. Click on Download Invoice File if you want to download the invoice if needed.

Note
Only orders that are renewed daily will display the Next Expiration Date.Parameter Set-up:
No. | Column Name | Description |
1 | Order Number | Shows the order of each transaction. |
2 | Type | Shows the transaction types: Activation, Subscription, Additional app. |
3 | The number of Apartments | Shows the number of apartments involved in one order. |
4 | Total Price | Shows the total cost of each transaction. |
5 | Status | Seven types of status: All, Succeed, Processing, Failed, Time out, Cancel, System Processing.
|
6 | Created Time | Shows the time when the order is created |
7 | Action | Click |
 to check for details. Click
  to pay for the order that is ready for payment. Click
 to go to the billing system. Click
  to delete orders.
Delete Transaction History
1. Tick the check box(s) of the order you want to delete.
2. Click on to delete each order.
3. Click on to delete all the orders that are selected.

Settings
The Setting module allows you to configure and modify basic settings, time settings, motion detection, and visitor access settings.
Basic Setting
You can configure and modify the community information, device access type, and email notification.
- Click on Basic Setting.
- Enter the community name.
- Enter the community address (Street, City, Postcode, State/Province).
- Select on/off to authorize the resident to create a PIN code on their SmartPlus App.
- Select PIN Access Mode ( PIN for direct PIN code access, APT+PIN for apartment No.+ PIN code).
- Select on/off to enable or disable email notifications when the device is disconnected.
- Click on Submit for validation.

Time Setting
You configure and modify your time setting based on your geographical location and time zone.
- Click on Time Setting.
- Select your time zone.
- Select your time format (24-hour or 12-hour format).
- Select your data format(Y/M/D; M/D/Y; D/M/Y).
- Click Submit for validation.

Motion Detection
You can not only enable and disable motion detection on the door phone but also set up the device motion detection type and alert trigger delay if needed.
- Click on Advanced Setting.
- Click Enable or Disable the motion detection according to your need.
- Select motion detection type: IR detection (IR sensor) and video detection according to your need.
- Set alert trigger delay time when the sensor is triggered.

Emergency Action
You can make all doors open or close automatically or manually during emergencies. For example, during a fire emergency, the doors can be opened automatically once an emergency alarm is triggered on any one of the door phones so that people can be quickly evacuated to a safer place. Also, you can unlock all the doors manually on the SmartPlus Cloud in an emergency.
1. Go to Settings > Basic Setting.
2. Select automatic door unlock or manual unlock.
- Select On, if you want the doors to be unlocked automatically when an emergency occurs.
- Select Off, if you want to unlock the doors manually on the SmartPlus web portal. You can click
 near the top of any page to open or close the doors manually.
 near the top of any page to open or close the doors manually.
3. Select whether to send notifications to users' SmartPlus Apps and indoor monitors. When enabled, both devices will sound an alert when the emergency unlock happens.
Note
Click here to view the models that support this feature and detailed configuration.


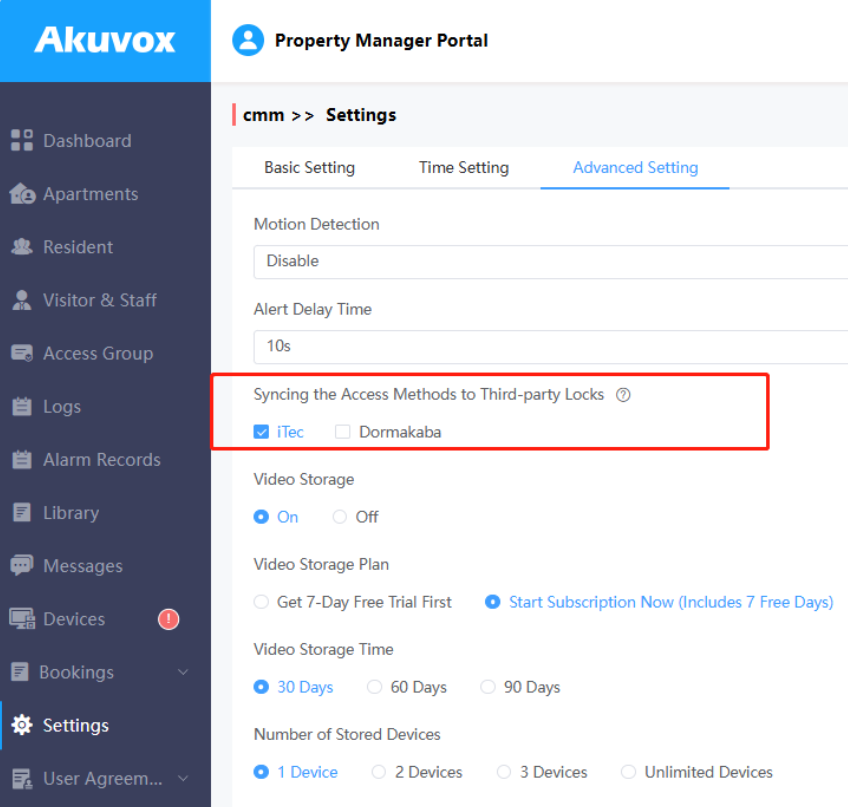
Video Storage
The video storage feature allows Akuvox devices to automatically record 10 seconds of video when opening doors, calling, and detecting motions. End users can also record videos with their SmartPlus Apps.
Note
- Your installers can set this feature for you. If it is disabled by your installer, you cannot set it up.
- Only when your installer sets the Charge Mode to Pay by PM, can you pay for this feature.
1. Click on Advanced Settings.
2. Set up the video storage feature if it is enabled:
- Video Storage Plan:
- Get a 7-day Free Trial First: You can try this feature for 7 days for free.
- Start Subscription Now(Includes 7 Free Days): You can subscribe to this feature directly. It includes a 7-day trial. Click Subscribe on the right to pay for the fee.
- Video Storage Time: 30 Days, 60 Days, and 90 Days are available. It is 30 days by default for the 7-day Free Trial Plan.
- Number of Stored Devices: Choose the number of devices that record videos.
- Device(s) for Video Storage: Select the specific device(s).
- Video Recording with Audio During Calls: Decide whether to record videos with audio during calls.

Note
Click here to view the detailed configuration of this feature.
Synchronize User Access Methods to Open Third-party Locks
You can control whether to synchronize the user PIN and RF card to open third-party locks(Dormakaba and iTec). Once enabled, users can directly open locks with their PINs and RF cards created by you on the SmartPlus Cloud.
1. Click Advanced Settings.
2. Check the desired option(s).
3. Click Submit to start the synchronization. It may take a few seconds. After the progress reaches 100%, the failed synchronization will be displayed.
Note
Dormakaba lock:
- PIN: Must be 6 digits.
- RF Card: Must be 20 characters.
- PIN: Must be 4-8 digits.
- RF Card: Must be 1-16 characters long and contain only 0-9 and A-F.
Alarm Records
You can check and export alarm records if needed.
Emergency Alarm
It displays the fire alarms uploaded by the device.

Arming Alarm
It displays the alarm records uploaded by the indoor monitor in the community.

- Click Alarm Records. Select the desired alarm mode.
- Select alarm records time interval, then search for the alarm record you need.
- Click Export logs if you want to export the alarm records if needed. You can select the alarm time interval before exporting alarm records.

Note:
A red dot means there are unsolved alarm records.Contact Us
For more information about the product, please visit us at www.akuvox.com or feel free to contact us by
Sales email: sales@akuvox.com
Technical support email: support@akuvox.com
Telephone: +86-592-2133061 ext.7694/8162
We highly appreciate your feedback about our products.
Was this article helpful?
-20190329_%E5%89%AF%E6%9C%AC.png)