Open Doors
- 20 Sep 2023
- Print
- DarkLight
- PDF
Open Doors
- Updated on 20 Sep 2023
- Print
- DarkLight
- PDF
Article Summary
Share feedback
Thanks for sharing your feedback!
Add Users on Door Phone Web Interface
You can add a single user or multiple users in batch on the door phone web interface. In this procedure, you can set up user's ID and name and door access methods.
In this part, take R29 for example.
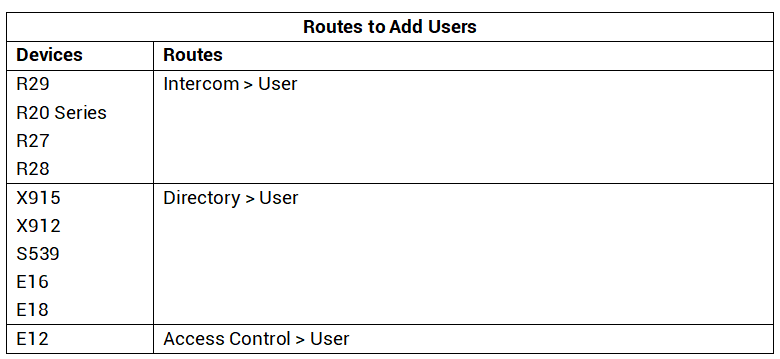
Note
- The steps to add users on other door phones are the same, but the routes may be different. Please refer to this chart.
Add a Single User
1. Log into the device web interface. The default username and password are admin.
2. Navigate to Intercom > User interface. Click on Add to enter the configuration page.
(1).png)
3. On the configuration page, you can set up user information and door access methods.

· User Information
Enter the desired username and user ID that is 11 digits maximum in length.

· Private PIN
Enter the desired private PIN code.

Note
- R20 series and E12 do not support for unlocking door via private PIN.
· RF Card
a. Place the card on the device card reader area and click on Obtain.
b. After reading, the card code will appear in the Code box.
c. Click on Add to add the card.

Note
- E12 and E16 only support IC card.
- Check supported card format in this chart.

· Face
a. Select the full-face photo from your local driver.
.png)
b. After adding the user successfully, the status will change from Unregistered to Registered. Click Reset if you want to re-upload the photo.
(1).png)
Note
- The facial recognition feature is only applicable to devices with touch screens.
3. After configuring the above parameters, scroll down to click Submit. A user is added successfully.
.png)
Add Users in Batch
When users become so many that you cannot add them one by one, you can add them in batch.
1. Log into the device web interface. The default username and password are admin.
2. Navigate to Intercom > User. Click Export to export the user data.
(1).png)
Note
- Add a user first to serve as the template, or the prompt "File not found" will pop up.
- Configure AES (Advanced Encryption Standard) only when the config file is encrypted with AES.
3. Open the .xml file in the .tgz file. You may copy the existing example and paste it between the template and </UserData>. Then, fill the information in corresponding places.
a. Enter Data ID in a sequential order.
b. Fill in User ID and User Name.
c. If needed, enter Pin Code and Card Code.
.png)
c. Save the file.
Note
- This method does not support for importing face data in batch.
- You may use the tool 7-Zip to edit the file if your computer system is Windows.
4. Upload the .tgz file from your local driver by clicking on Import. It will appear "File uploaded success" after importing successfully.
.png)
 See the added users on the Intercom > User interface.
.png)
Add Users on Door Phone Screen
Exception
- To add cards on X912, R27, and R28, please refer to the article Add Cards on X912, R27 and R28 for detailed steps.
Open the Door During a Call Using DTMF
Push Exit Button Connection
Was this article helpful?
-20190329_%E5%89%AF%E6%9C%AC.png)