The local contact information is used to initiate SIP or IP calls to users. You can group the contact information to facilitate group calls to target users. Moreover, the contact list functions as a whitelist, allowing only listed numbers to open doors via DTMF during calls.
When the device is deployed on the SmartPlus Cloud, cloud contacts will display on the device web but not editable.
Manage Contact Groups
You can create and edit a contact group for the contacts. The contact group will be used when you are adding a user.
To set it up, navigate to the web Directory > User > Group interface. Click +Add to create a group. You can also add groups on the Setting > Directory screen. You can add 500 groups at a maximum.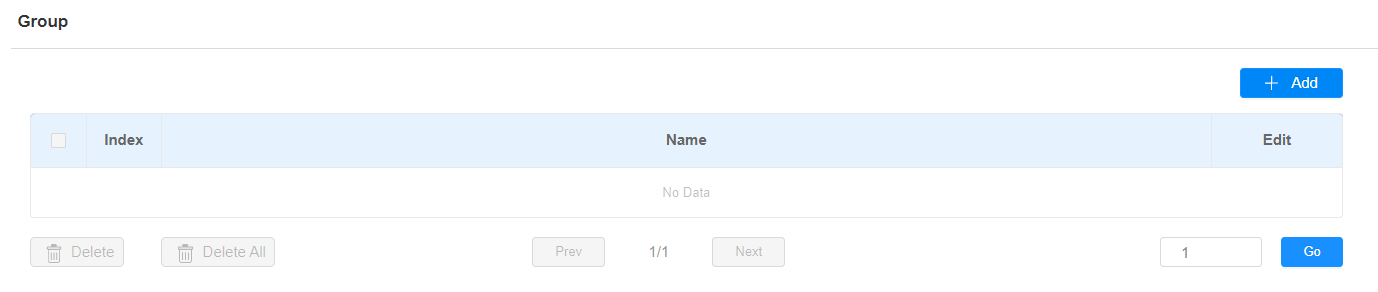

Set up Contact Details
You can add users’ contact information when adding or editing a user on the Directory > User interface. The users added will be displayed on the device’s Directory screen.
Click +Add to add a user or click![]() to modify a user. Scroll to the Contact Details section.
to modify a user. Scroll to the Contact Details section.
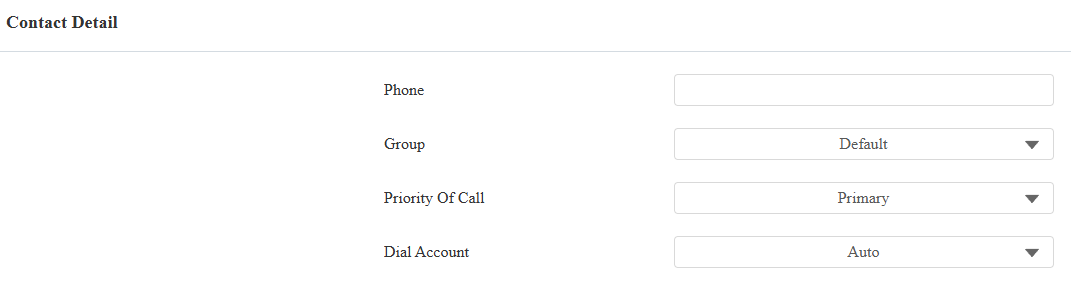
Phone: The IP or SIP number.
Group: Assign the contact to the Default, Hidden Contact, or a self-created group.
Priority of Call: When assigning the contact to a self-created group, set the priority of the call among three options: Primary, Secondary, and Tertiary. For example, if you set the priority of call for one of the contacts in a specific contact group as Primary, then the contact will be the first to be called among all the contacts in the same contact group when someone presses on the contact group to make a group call.
Dial Account: Select the account to make a call to the contact.
Contacts List Display
You can customize the contact list display to cater to users' operational and visual preferences.
Set it up on the web Directory > Directory Setting interface.
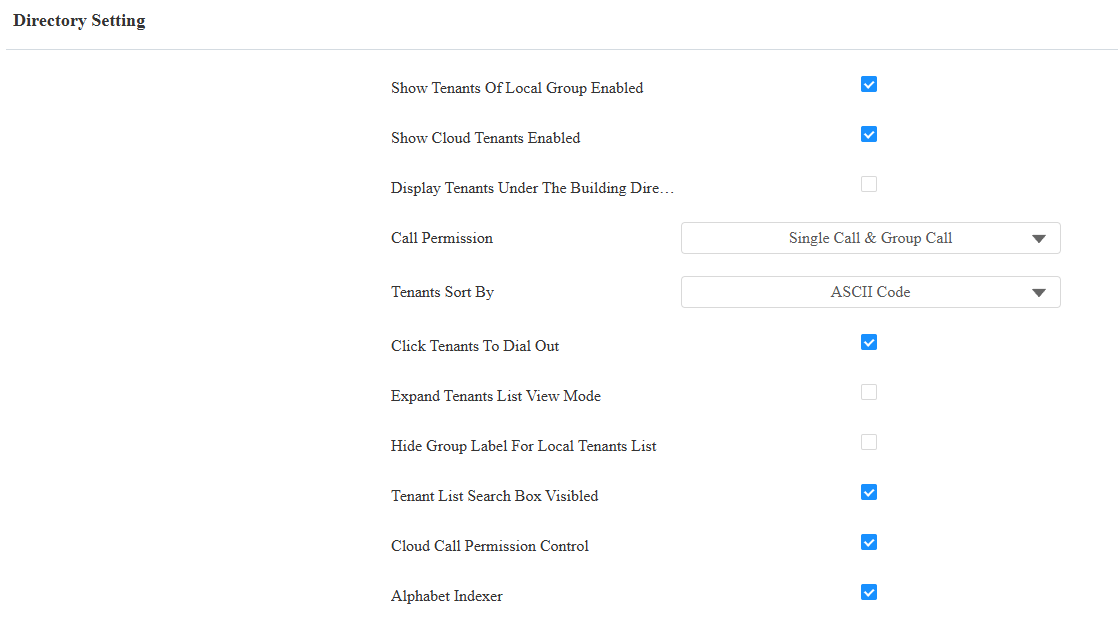
Show Tenants of Local Group Enabled: Decide whether to display tenants in groups. If unchecked, only the group name will be displayed.
Show Cloud Tenants Enabled: The contacts synchronized from the SmartPlus Cloud can be displayed.
Display Tenants Under The Building Directly: Available when Show Cloud Tenants Enabled is checked. When enabled, users can tap the Building name to view the resident list on the Directory screen.
Call Permission:
Single Call & Group Call: Users can call contacts one by one or simultaneously in a group.
Only Single Call Allowed: Users can only call contacts one by one.
Only Group Call Allowed: Users can only call contacts in a group simultaneously.
Tenants Sort By:
ASCII Code lists the tenants by their names in the sequence of the ASCII code.
Room No. lists the tenants according to their room numbers.
Group Member Sort By: Decide the tenant display order in groups. You can choose ASCII Code or Room No.
Import lists the tenants according to their order in the imported file.
Click Tenants to Dial Out: When enabled, users can press anywhere on the contact tab to dial out. When disabled, users need to press the Call icon to dial out.
Expand Tenants List View Mode: Control the width of the contact tab. When enabled, the contact tab will be wider.
Hide Group Label for Local Tenants List: Decide whether to display the local group name. When enabled, the tenants will be displayed directly instead of in the group.
Tenant List Search Box Visible: Set whether to display the search box at the top of the screen.
Cloud Call Permission Control: This option will display when the device is connected to the SmartPlus Cloud. It decides whether to link the SmartPlus user’s permissions to open doors and make calls.
For example, when users are not authorized to open doors during a specific time and the Cloud Call Permission Control feature is enabled, their SmartPlus App and/or indoor monitors will not receive calls from the door phone.
If this feature is disabled, even if users cannot open doors, they can receive calls.
Alphabet Indexer: When enabled, users can find the desired contact with the alphabet indexer on the Directory screen.