Vous pouvez configurer et mettre à jour l’appareil via l’interface web en utilisant un provisionnement automatique unique ou programmé avec des fichiers de configuration. Cela élimine la nécessité de configurer les configurations manuellement, vous faisant gagner du temps et des efforts.
Provisioning Principle
L’auto-provisionnement est une fonctionnalité utilisée pour configurer ou mettre à jour les appareils en batch via des serveurs tiers. DHCP, PNP, TFTP, FTP et HTTPS sont les protocoles utilisés par les appareils Akuvox pour accéder à l’URL de l’adresse du serveur tiers qui stocke les fichiers de configuration et le firmware, lesquels seront ensuite utilisés pour mettre à jour le firmware et les paramètres correspondants sur l’appareil.
Veuillez consulter le schéma de flux ci-dessous :
.png)
Configuration Files for Auto-provisioning
Les fichiers de configuration pour l’auto-provisionnement existent en deux formats : les fichiers de configuration généraux et les fichiers de configuration basés sur MAC.
Différences :
Provisionnement général de la configuration :
Un fichier de configuration général est stocké sur un serveur, permettant à tous les appareils associés de télécharger le même fichier pour mettre à jour les paramètres.
Provisionnement de configuration basé sur MAC :
Les fichiers de configuration basés sur MAC sont spécifiques à chaque périphérique, identifiés par leurs adresses MAC uniques. Les fichiers nommés avec l’adresse MAC de l’appareil seront automatiquement associés avant de le télécharger pour provisionnement.
Note
Les fichiers de configuration doivent être au format CFG.
Le nom du fichier de configuration général pour la provisionnement par lots varie selon le modèle.
Le fichier de configuration basé sur MAC porte le nom de son adresse MAC.
Les appareils accèdent d’abord aux fichiers de configuration généraux avant ceux basés sur le MAC si les deux types sont disponibles.
Vous pouvez cliquer here pour voir le format détaillé et les étapes.
AutoP Schedule
Akuvox vous propose différentes méthodes AutoP qui permettent à l’appareil d’effectuer la provision selon le planning.
Set it up on the Upgrade > Advanced > Automatic Autop interface.
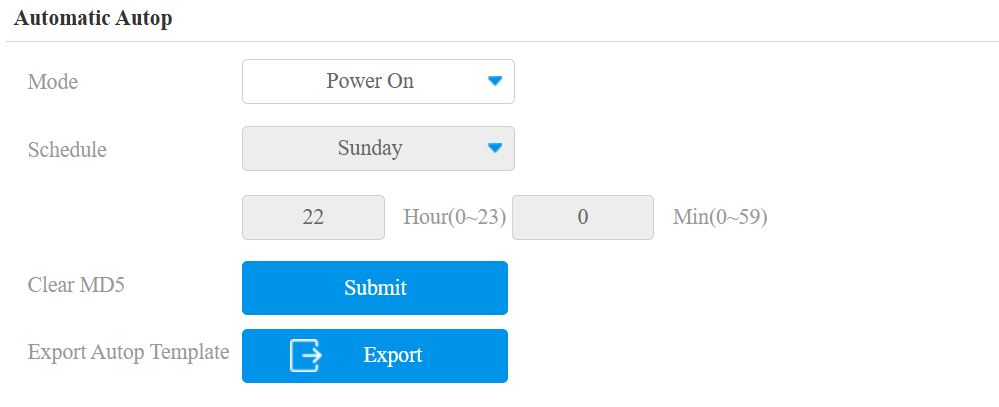
Mode:
Power On: Allow the device to perform Autop every time it boots up.
Repeatedly: Allow the device to perform Autop according to the schedule.
Power On + Repeatedly: Combine Power On and Repeatedly modes, allowing the device to perform Autop every time it boots up or according to the schedule.
Hourly Repeat: Allow the device to perform Autop every hour.
Schedule: When Power On + Repeatedly mode is selected, you can select the specific day and time for the Autop.
Clear MD5: Used to compare the existing autop file with the autop file in the server, if the files are the same, then the provisioning will be stopped, thus avoiding unnecessary auto-provisioning.
Static Provisioning
Vous pouvez configurer manuellement une URL serveur spécifique pour télécharger le firmware ou le fichier de configuration. Si un planning de provisionnement automatique est mis en place, l’appareil effectuera le provisionnement automatique à un moment précis selon le planning de provisionnement automatique que vous avez configuré. De plus, TFTP, FTP, HTTP et HTTPS sont les protocoles pouvant être utilisés pour mettre à jour le firmware et la configuration de l’appareil.
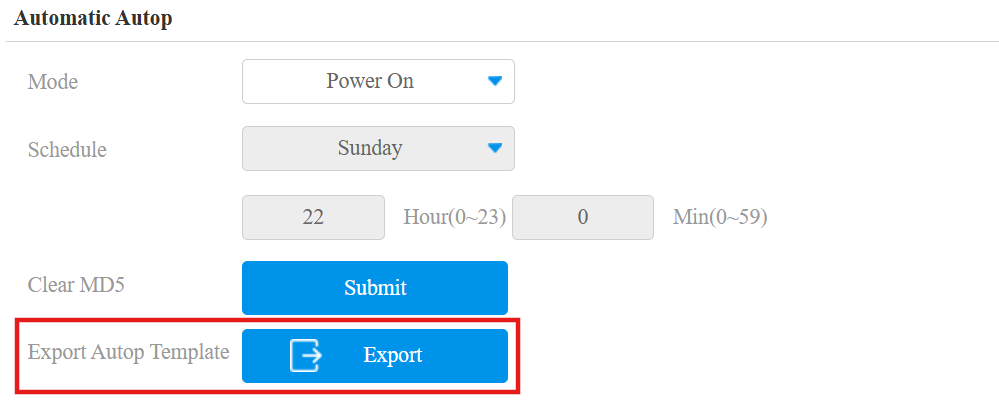
Download the Autop template on the Upgrade > Advanced > Automatic Autop interface.
Set the Autop server on Upgrade > Advanced > Manual Autop interface.
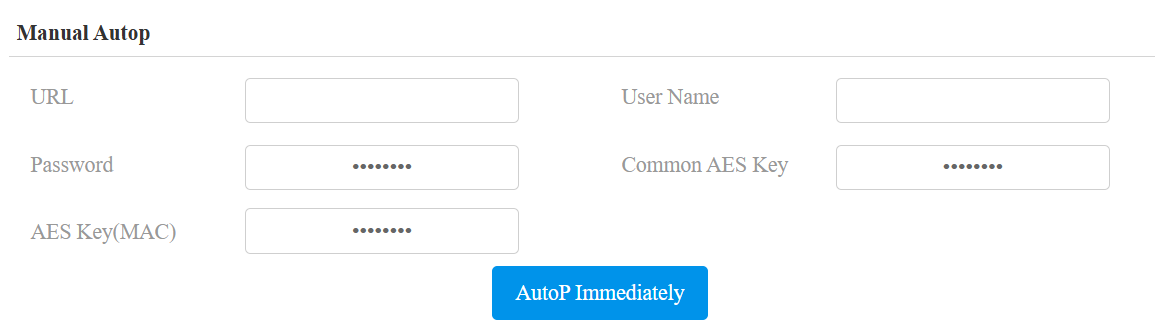
URL: The TFTP, HTTP, HTTPS, or FTP server address for the provisioning.
User Name: Set up a username if the server needs a username to be accessed.
Password: Set up a password if the server needs a password to be accessed.
Common AES Key: Set up AES code for the intercom to decipher the general Auto Provisioning configuration file.
AES Key(MAC): Set up the AES code for the intercom to decipher the MAC-based auto-provisioning configuration file.S
Note
AES as one type of encryption should be configured only when the config file is encrypted with AES.
Server Address Format:
TFTP: tftp://192.168.0.19/
FTP: ftp://192.168.0.19/(allows anonymous login)
ftp://username:password@192.168.0.19/(requires a user name and password)
HTTP: http://192.168.0.19/(use the default port 80)
http://192.168.0.19:8080/(use other ports, such as 8080)
HTTPS: https://192.168.0.19/(use the default port 443)
Tip
Akuvox does not provide a user-specified server. Please prepare the TFTP/FTP/HTTP/HTTPS server by yourself.
DHCP Provisioning
L’URL de provisionnement automatique peut également être obtenue via l’option DHCP qui permet à l’appareil d’envoyer une requête à un serveur DHCP pour un code d’option DHCP spécifique. Si vous souhaitez utiliser l’option personnaliséetelle quedéfinie par les utilisateurs avec des codes d’option allant de 128 à 255), vous devez configurer l’option personnalisée DHCP sur l’interface web.
.png)
Note
Le type d’option personnalisée doit être une chaîne. La valeur est l’URL du serveur TFTP.
Set up DHCP Autop with Power On mode and export Autop Template to edit the configuration.
Download the Autop template on the Upgrade > Advanced > Automatic Autop interface.
Set it up on Upgrade > Advanced > DHCP Option interface.
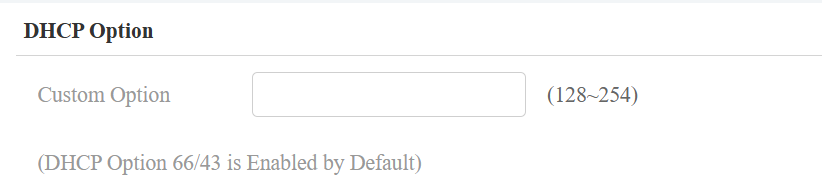
Custom Option: Enter the DHCP code that matches the corresponding URL so that the device will find the configuration file server for the configuration or upgrading.
DHCP Option 66: If none of the above is set, the device will automatically use DHCP Option 66 to get the upgrade server URL. This is done within the software and the user does not need to specify this. To make it work, you need to configure the DHCP server for option 66 with the updated server URL in it.
DHCP Option 43: If the device does not get a URL from DHCP Option 66, it will automatically use DHCP Option 43. This is done within the software and the user does not need to specify this. To make it work, you need to configure the DHCP server for option 43 with the updated server URL in it.