IP Call Configuration
Un appel IP est un appel direct entre deux interphones utilisant leurs adresses IP, sans serveur ni PBX. Les appels IP fonctionnent lorsque les appareils sont sur le même réseau.
Make IP Calls
Make IP calls by pressing the Dial key on the home screen, entering the IP number such as “192✳168✳35✳123”, and pressing the Call button.
IP Call Setup
Enable IP call on the Intercom > Call Feature > Direct IP interface.

Port: Set the port for direct IP calls. The default is 5060, with a range from 1-65535. If you enter a value within this range other than 5060, ensure consistency with the corresponding device for data transmission.
SIP Call Configuration
Le protocole d’initiation de session (SIP) est un protocole de transmission de signalisation utilisé pour initier, maintenir et terminer des appels.
Un appel SIP utilise SIP pour envoyer et recevoir des données entre appareils SIP, et peut utiliser Internet ou un réseau local pour offrir une communication de haute qualité et sécurisée. L’initiation d’un appel SIP nécessite un compte SIP, une adresse SIP pour chaque appareil, ainsi que la configuration des paramètres SIP sur les appareils.
SIP Account Registration
Chaque appareil a besoin d’un compte SIP pour effectuer et recevoir des appels SIP.
Les dispositifs d’interphone Akuvox prennent en charge la configuration de deux comptes SIP, qui peuvent être enregistrés sur deux serveurs indépendants.
Cliquez ici pour voir l’exemple d’enregistrement du compte SIP.
Register the SIP account on the Account > Basic interface.

Status: Indicate whether the SIP account is registered or not.
Account 1/Account 2: The door phone supports 2 SIP accounts.
- Account 1 is the default account for call processing. Also, it will be utilized when the Akuvox SmartPlus cloud service is activated.
- The system switches to Account 2 if Account 1 is not registered.
- To designate the account to be used for outgoing calls, select the account number for contacts or dial plan prefixes in their settings.
Tip
For configuring contact call and dial plan, see here.
When the device is connected to the SmartPlus Cloud, the display label, register name, and username will show its SIP number.
Display Label: The label of the device.
Display Name: The designation for Account 1 or 2 is to be shown on the device itself on the calling screen.
Register Name: Same as the username from the PBX server.
User Name: Same as the username from the PBX server for authentication.
Password: Same as the password from the PBX server for authentication.
SIP Server Configuration
Les serveurs SIP permettent aux appareils d’établir et de gérer des sessions d’appel avec d’autres interphones en utilisant le protocole SIP. Ils peuvent être des serveurs tiers ou un PBX intégré dans un moniteur intérieur Akuvos.
To set it up, go to the web Account > Basic interface.

Server IP: Enter the server’s IP address or its domain name.
Port: Specify the SIP server port for data transmission.
Registration Period: Define the time limit for SIP account registration. Automatic re-registration will initiate if the account registration fails within this specified period.
You can also register SIP accounts on the Setting > Account screen.

SIP Call DND&Return Code Configuration
La fonction Do Not Disturb (DND) empêche les appels SIP entrants non désirés, assurant ainsi une mise au point ininterrompue. Cela permet aussi de définir un code à envoyer au serveur SIP lors du refus d’un appel.
Set it up on the web Intercom > Call Feature > DND interface.

Return Code When DND: Specify the code sent to the caller via the SIP server when rejecting an incoming call in DND mode.
Outbound Proxy Server
Un serveur proxy sortant reçoit et transmet toutes les requêtes au serveur désigné. C’est une configuration optionnelle, mais si elle est configurée, toutes les futures requêtes SIP y sont envoyées en premier lieu.
Set it up on the Account > Basic > Outbound Proxy Server interface.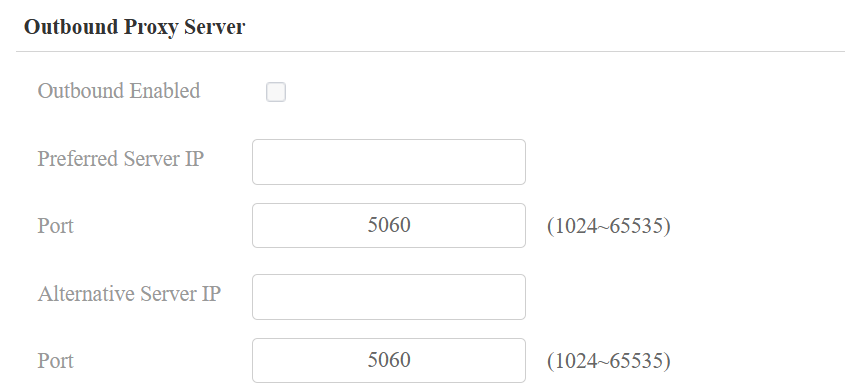
Preferred Server IP: Enter the SIP proxy IP address.
Port: Set the port for establishing a call session via the outbound proxy server.
Alternative Server IP: Enter the SIP proxy IP address to be used when the main proxy malfunctions.
Port: Set the proxy port for establishing a call session via the backup outbound proxy server.
Data Transmission Type
Les dispositifs d’interphone Akuvox prennent en charge quatre protocoles de transmission de données : le Protocole de Datagramme Utilisateur (UDP), le Protocole de Contrôle de la Transmission (TCP), la Sécurité de la Couche de Transport (TLS) et le DNS-SRV.
Set it up on the Account > Basic > Transport Type interface.

UDP: An unreliable but very efficient transport layer protocol. It is the default transport protocol.
TCP: A less efficient but reliable transport layer protocol.
TLS: An encrypted and secured transport layer protocol. Select this option if you wish to encrypt the SIP messages for enhanced security or if the other party’s server uses TLS. To use it, you need to upload certificates for authentication.
DNS-SRV: A DNS service record defines the location of servers. This record includes the hostname and port number of the server, as well as the priority and weight values that determine the order and frequency of using the server.
SIP Hacking Protection
L’écoute clandestine par téléphone Internet est une attaque réseau qui permet aux parties non autorisées d’intercepter et d’accéder au contenu des sessions de communication entre les utilisateurs de l’interphone. Cela peut exposer des informations sensibles et confidentielles aux attaquants. La protection contre le piratage SIP est une technique qui protège les appels SIP contre toute compromission sur Internet.
Set it up on the Account > Advanced > Call interface.

Prevent SIP Hacking: Activate this feature to only receive calls from contacts in the whitelist. This protects users’ private and secret information from potential hackers during SIP calls.
Two-way Video Call
R29 allows you to have two-way video calls with the callee so that you can see the callee’s video image. Set it up on the Intercom > Basic interface.
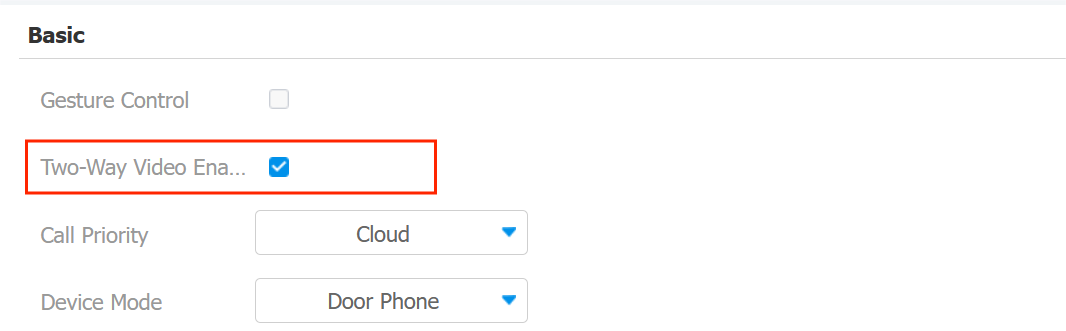
Two-way Video Enabled: Enabled by default. Activate this feature to allow callers to see the called party's video stream during a video call.
In the following situations, two-way video calls can be established:
The device initiates a video call and the other party with a camera answers it.
The other party with a camera initiates a video call and the device answers it.
In all other cases, only audio communication is displayed.
Video Transport Type
You can set the video transport type for SIP calls on the Account > Advanced > Call interface. The setting does not apply to IP calls.

Video Transport Type: It is Send and Receive by default.
Inactive: Disable the function.
Send Only: The device sends the video stream to the other party.
Receive Only: The device only receives the video stream from the other party.
Send and Receive: The device can send and receive video streams to and from the other party.