Device Network Connection
Pour assurer un fonctionnement normal, assurez-vous que l’adresse IP de l’appareil est correctement configurée ou obtenue automatiquement depuis le serveur DHCP.
Check the network on the web Status > Basic > Network information Interface.

Set up the network connection on the Network > Basic interface.

IP Channel: Select the IP channel from IPv4, IPv6, and IPv4&IPv6.
IPv4/IPv6:
DHCP: DHCP mode is the default network connection. If the DHCP mode is selected, the device will be assigned by the DHCP server with IP address, subnet mask, default gateway, and DNS server address automatically.
Static IP: When static IP mode is selected, the IP address, subnet mask, default gateway, and DNS server address should be configured according to the network environment.
IP Address: Set up the IP address when the static IP mode is selected. To access the device’s web settings with the IP address, your computer should be on the same local network as the device.
Subnet Mask: A subnet mask tells your device which IP addresses are part of your local network and which ones are not. For example, if the subnet mask is 255.255.255.0, it means that devices with similar starting IPs (like 192.168.1.x) are in the same network.
Default Gateway: The gateway is like a bridge between your device and other networks, such as the internet. Usually, it’s the IP address of your router.
Preferred/Alternate DNS Server: Domain Name System(DNS) is the overall system or network that handles the translation of domain names (like www.example.com) into IP addresses (like 192.0.2.1), which computers use to identify each other on a network. The door phone connects to the alternate DNS server when the primary one is unavailable.
Subnet Prefix Length: Indicate how many bits of an IP address are used to identify the network portion.
You can also set up the network on the Setting > Network screen.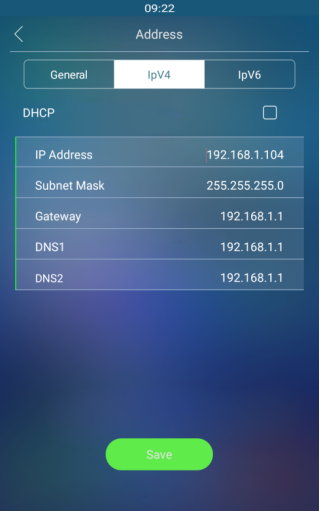
Device Local RTP Configuration
Le protocole de transport en temps réel (RTP) permet aux appareils de diffuser en temps réel des données audio et vidéo sur un réseau.
Pour utiliser le RTP, les appareils ont besoin d’une gamme de ports. Un port est comme un canal de données sur un réseau. En configurant des ports RTP sur votre appareil et routeur, vous pouvez éviter les interférences réseau et améliorer la qualité audio et vidéo.
Set it up on the web Network > Advanced > Local RTP interface.

Starting RTP Port: Set the port value to establish the start point for the exclusive data transmission range.
Max RTP Port: Set the port value to establish the endpoint for the exclusive data transmission range.
Device Deployment in Network
Pour faciliter le contrôle et la gestion des appareils, configurez les dispositifs d’interphone Akuvox avec des détails tels que la localisation, le mode de fonctionnement, l’adresse et les numéros d’extension.
Set it up on the Network > Advanced > Connect Setting interface.
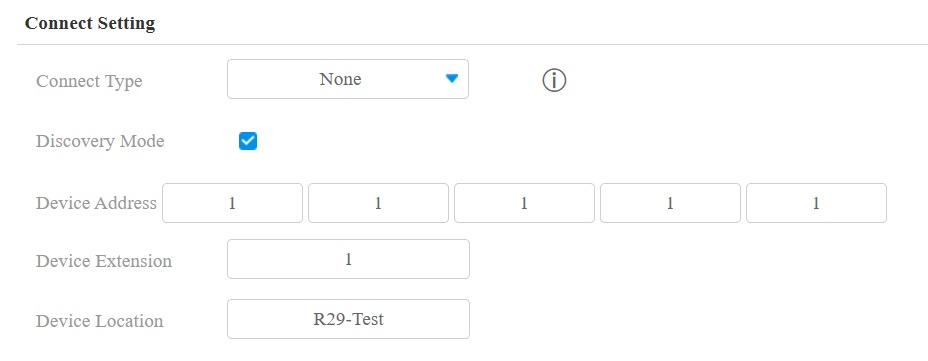
Connect Type: It is automatically set up according to the actual device connection with a specific server in the network, such as SDMC, Cloud, or None. You can also select it manually.
Aucun : Aucun est le réglage d’usine par défaut, indiquant que l’appareil n’est dans aucun type de serveur. Les appareils se connectent directement entre eux ou au sein d’un réseau local (LAN) sans dépendre de serveurs externes.
Cloud : L’appareil est connecté au SmartPlus Cloud, un système basé sur le cloud qui simplifie la gestion de l’accès aux biens. Le mode Cloud permet aux appareils d’interagir intelligemment entre eux et avec l’application mobile SmartPlus, en sauvegardant les données quotidiennement et sur différents hôtes. Il convient aux projets nécessitant un déploiement et une gestion intelligents, flexibles et sécurisés.
SDMC : L’appareil est connecté au SDMC, une plateforme de gestion conçue pour les projets sur site. Le mode SDMC gère et sauvegarde les données à distance sur un réseau local. Il dispose également de nombreuses fonctionnalités adaptées aux projets nécessitant une grande confidentialité, un coût réduit et une gestion centralisée.
Discovery Mode: Enabled by default. Available for None server mode. The device can be discovered by other devices in the network. When disabled, the device will be concealed and not be discovered by other devices.
Device Address: Available for None server mode. Uneditable in Cloud and SDMC mode. It can be used to call the device. Specify the device address by entering device location information from the left to the right: Community, Building, Unit, Floor, and Room in sequence.
Device Extension: Available for None server mode. Uneditable in Cloud and SDMC mode. The device extension number ranges from 0 to 10.
Device Location: The location in which the device is installed and used. Available for None server mode. Uneditable in Cloud and SDMC mode.
Device Web HTTP Setting
Cette fonction gère l’accès aux sites web de l’appareil. L’appareil prend en charge deux méthodes d’accès à distance : HTTP et HTTPS (chiffrement).
Set it up on the Network > Advanced > Web Server interface.

Protocol: HTTP is enabled by default.
NAT Setting
La traduction d’adresses réseau (NAT) permet aux appareils d’un réseau privé d’utiliser une seule adresse IP publique pour accéder à Internet ou à d’autres réseaux publics. Le NAT sauve les adresses IP publiques limitées et masque les adresses IP internes ainsi que les ports du monde extérieur.
Pour enregistrer des comptes SIP sur des serveurs tiers dans un réseau étendu (WAN), vous devez activer la fonction RPort sur les interphones afin d’établir une connexion stable.
To set it up, go to the Account > Advanced > NAT interface.

UDP Keep Alive Messages: If enabled, the device will send the message to the SIP server, which will recognize whether the device is online.
UDP Alive Messages Interval: Set the message-sending interval from 5-60 seconds. The default is 30 seconds.
RPort: Enable the RPort when the SIP server is in a WAN.
LTE Wireless Connection (Optional)
Le module LTE permet la connectivité réseau cellulaire pour l’appareil dans les zones où les réseaux filaires ne sont pas disponibles, ce qui est particulièrement bénéfique pour les installations dans des bâtiments anciens.
Only R29C-L has an LTE module and the LTE setting can only appear after the SIM card is inserted. Set up the LTE on the device's Cellular Network screen.
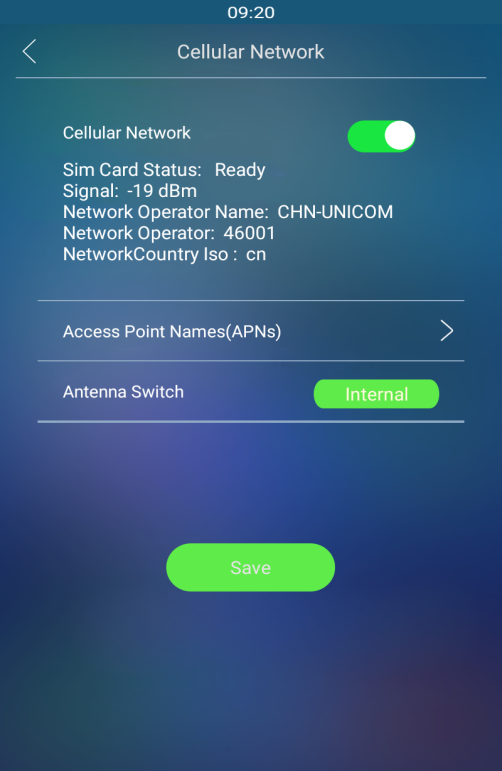
Cellular Network: Move the toggle switch on and off to enable or disable the LTE function.
Access Point Name (APNs): Check the Cellular Network provider for the Access Point.
Antenna Switch: Select internal and external antenna for signal transmission. The internal antenna is a built-in antenna in the device while the external antenna is optional and is used to reinforce the signal in a compromised network environment.
LTE Data Usage Control
LTE data usage can be checked on the device web Network > Data Usage interface.
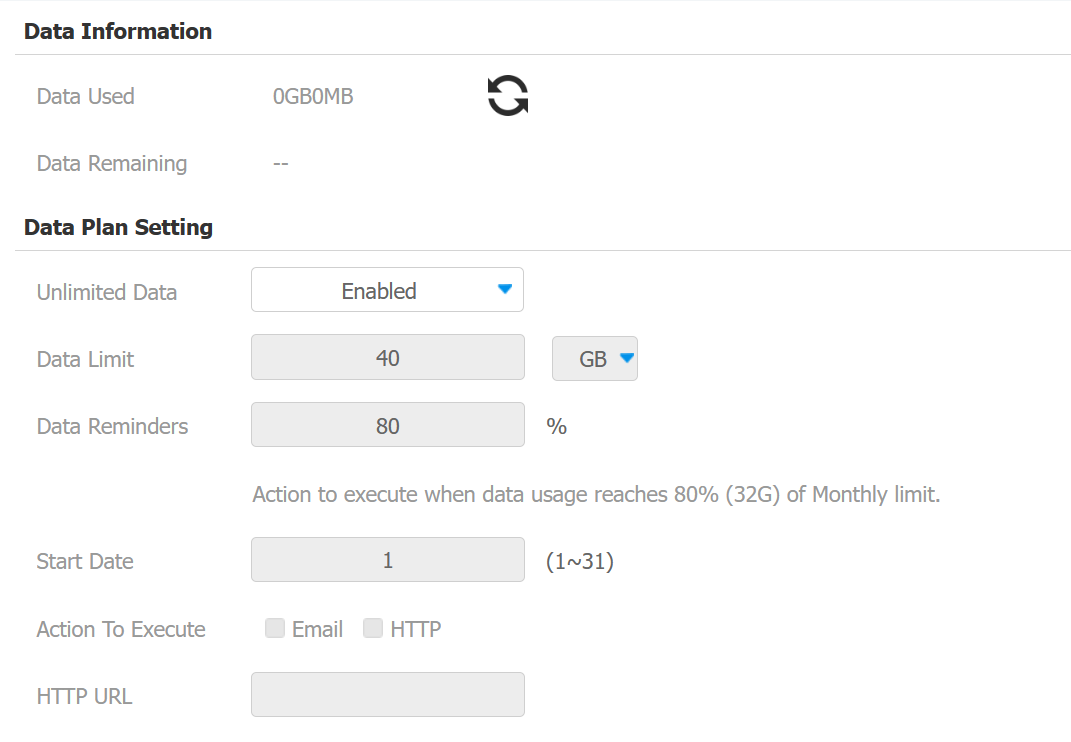
Unlimited Data: Enable this option if you have an unlimited data plan; otherwise, leave it disabled (default).
Data Limit: Set the data limit based on the plan, either 40 GB or MB.
Data Reminders: Choose a percentage to trigger notifications. For example, at the default of 80%, notifications will be sent when this threshold is reached.
Start Date: Specify the start date for monitoring data usage (1-31). The default is 1. If set to 1, monitoring ends on the last day of the month. If set to 2, it ends at 23:59 on the first day of the next month. For months with fewer than 31 days, monitoring ends on the last day of that month.
Action To Execute: Select Email or HTTP URL to receive notifications when data usage reaches the limit.
HTTP URL: Enter the HTTP URL for notifications.