MJPEG et RTSP sont les principaux types de flux de surveillance abordés dans ce chapitre.
MJPEG, ou Motion JPEG, est un format de compression vidéo qui utilise des images JPEG pour chaque image vidéo. Les appareils Akuvox affichent les flux en direct sur l’interface web et capturent des captures d’écran de surveillance au format MJPEG. Les paramètres liés à MJPEG déterminent la qualité vidéo et le statut on/off de la fonction de diffusion en direct.
RTSP signifie Real Time Streaming Protocol (Protocole de Streaming en Temps Réel). Il peut être utilisé pour diffuser la vidéo et l’audio des caméras tierces vers l’appareil. Vous pouvez ajouter le flux d’une caméra en ajoutant son URL. Le format URL des appareils Akuvox est rtsp:// D evice’s IP/live/ch00_0
ONVIF est un forum d’interface vidéo en réseau ouvert. Il permet à l’appareil de scanner et de découvrir des caméras ou des interphones avec des fonctions ONVIF activées. Les flux en direct obtenus via ONVIF sont essentiellement au format RTSP.
MJPEG Image Capturing
You can take a monitoring image or check the monitoring video in MJPEG format with the device. To view the video stream, you need to turn on the MJPEG video function and choose the image quality.
To set it up, go to the Surveillance > RTSP interface.

Video Resolution: Specify the image resolution, varying from the lowest CIF(352×288 pixels) to the highest 1080P(1920x1080 pixels).
Video Framerate: Frames per second refers to how many frames are displayed in one second of video. The default frame rate is 30fps.
Video Quality: The video bitrate ranges from 50 to 90.
You can set up the MJPEG authorization in the RTSP Basic section. It is enabled by default.
MJPEG Authorization Enabled: Once enabled, accessing the door phone’s real-time image or video by entering the URL into the browser requires verification of the Authentication Mode, Username, and Password.
Tip
To view a dynamic stream, use the URL http://device_IP:8080/video.cgi.
For capturing a screenshot, use the following URLs, with the image formats varying accordingly:
http://device_IP:8080/picture.cgi
http://device_IP:8080/picture.jpg
http://device_IP:8080/jpeg.cgi
For example, if you want to capture the jpg format image of the door phone with the IP address 192.168.1.104, you can enter http://192.168.1.104:8080/picture.jpg in the web browser.
RTSP Stream Monitoring
La fonction RTSP permet aux moniteurs intérieurs Akuvox, ou aux appareils tiers, d’obtenir le flux en direct depuis le téléphone portier.
Vous pouvez configurer les identifiants d’authentification RTSP et les paramètres vidéo.
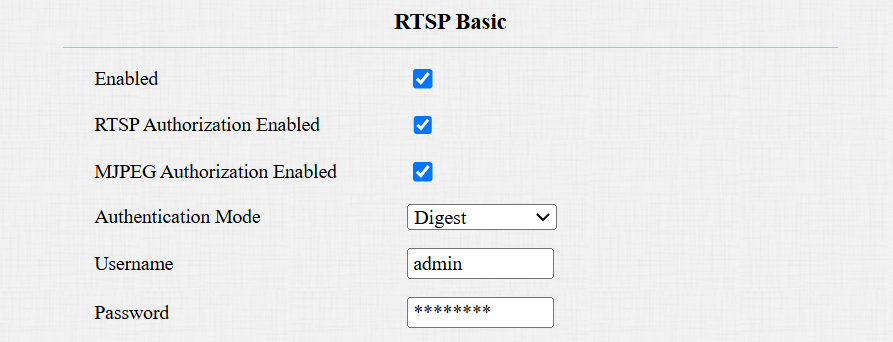
RTSP Basic Setting
You are required to set up the RTSP function on the Surveillance > RTSP interface in terms of RTSP Authorization, authentication, password, etc, before you can use the function.
RTSP Authorization Enabled: Once enabled, configure RTSP Authentication Mode, RTSP Username, and RTSP Password. These credentials are required for accessing the door phone's RTSP stream from other intercom devices like indoor monitors.
Authentication Mode: It is Digest by default, which uses hashing instead of the easily reversible Base64 encoding. A token is used for verification.
Username: Set the username for authorization.
Password: Set the password for authorization.
RTSP Stream Setting
Le flux RTSP peut utiliser soit H.264, soit Mjpeg comme codec vidéo. Si vous choisissez H.264, vous pouvez aussi ajuster la résolution vidéo, le débit binaire et d’autres réglages.
Set it up on the Surveillance > RTSP > RTSP Stream interface.
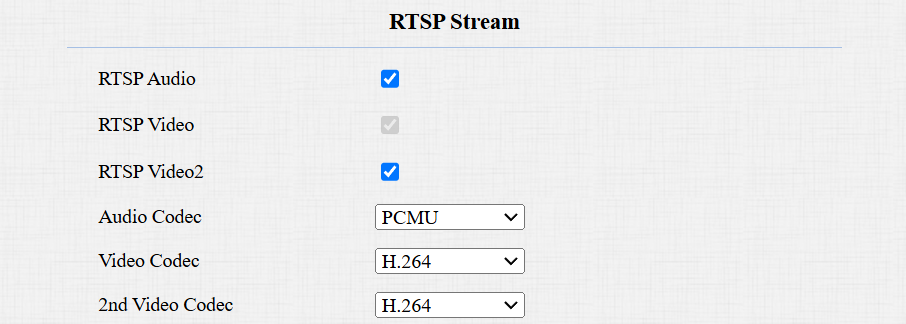
RTSP Audio: Decide whether the RTSP stream has sound.
RTSP Video: Decide whether the RTSP stream has video. After enabling the RTSP feature, the video RTSP is enabled by default and cannot be modified.
RTSP Video2: The device supports two RTSP streams.
Audio Codec: Choose a suitable audio codec for RTSP audio.
Video Codec: Specify the video compression formats.
H.264: Offer highly efficient compression but at a cost of higher latency and computational load.
H.265: Offer superior compression efficiency and support for higher resolutions, but it comes with higher computational requirements and potential compatibility issues.
MJEPG: Offer improved quality but inefficient compression.
You can set up the video parameters for H.264 and H.265 in the H.264 And H.265 Video Parameters section.

Video Resolution: Specify the image resolution, varying from the lowest CIF(352×288 pixels) to the highest 1080P(1920x1080 pixels).
Video Framerate: Frames per second refers to how many frames are displayed in one second of video. The default frame rate is 30fps.
Video Bitrate: The amount of video data transferred in a specific duration of time. A higher video bitrate means a higher possible quality, but also higher file sizes and more bandwidth. The default is 2048 kbps.
2nd Video Resolution: Specify the image resolution for the second video stream channel.
2nd Video Framerate: Set the frame rate for the second video stream channel.
2nd Video Bitrate: Set the bit rate for the second video stream channel. The default is 512 kbps.
RTSP OSD Setting
This feature is used to add a watermark to the RTSP video or picture.
Set it up on the web Surveillance > RTSP > RTSP OSD Setting interface.
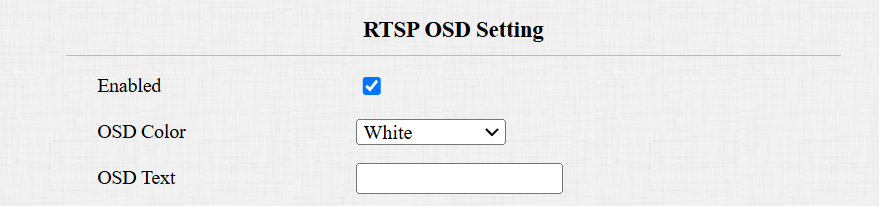
OSD Color: There are five color options, White, Black, Red, Green, and Blue, for RTSP watermark text.
OSD Text: Customize the watermark text.
NACK
L’accusé de réception négatif (NACK) indique une défaillance ou une erreur dans la transmission ou le traitement des données. Il est utilisé pour demander la retransmission ou signaler la défaillance à l’émetteur afin d’assurer l’intégrité des données.
To enable NACK, navigate to the Intercom > Call Feature > Others interface.

NACK Enabled: It can be used to prevent losing data packets in a weak network environment when discontinued and mosaic video images occur.
ONVIF
Vous pouvez accéder à la vidéo en temps réel depuis la caméra de l’appareil en utilisant le moniteur intérieur Akuvox ou d’autres appareils tiers comme le Network Video Recorder (NVR). Activer et configurer la fonction ONVIF sur l’appareil permettra à sa vidéo d’être visible sur d’autres appareils.
Cliquez ici pour voir un exemple d’utilisation de la fonctionnalité ONVIF : l’intégration avec le système NVR Uniview.
To set it up, go to the Surveillance > ONVIF interface.

Discoverable: When enabled, the video from the door phone camera can be searched by other devices.
Username: Set the username required for accessing the door phone's video stream on other devices. It is admin by default.
Password: Set the password required for accessing the door phone's video stream on other devices. It is admin by default.
Tip
Once the settings are configured, to access the video stream on the third-party device, simply enter the ONVIF URL: http://Device’s IP:80/onvif/device_service.
Certains NVR peuvent envoyer des requêtes d’ouverture de porte à l’appareil et contrôler l’ouverture. Vous pouvez activer ou désactiver cette fonction en allumant ou désactivant un interrupteur sur la même interface que la fonction ONVIF.

Live Stream
Il existe deux façons de vérifier la vidéo en temps réel depuis l’appareil. L’un d’eux est d’aller sur l’interface web de l’appareil et de visualiser la vidéo là-bas. L’autre est d’entrer la bonne URL dans le navigateur web et d’accéder directement à la vidéo.
See the live stream on the device Surveillance > Live Stream interface. You are required to enter the username and password set on the RTSP Basic section before viewing the live stream.

Camera Mode
La Plage Dynamique Élevée (HDR) est une technologie utilisée en photographie, vidéographie et dispositifs d’affichage pour améliorer la qualité de l’image en capturant une plus grande plage de luminosité et de couleur.
Linéaire désigne une représentation directe de la luminosité dans les images. Les images linéaires sont couramment utilisées dans les environnements à éclairage contrôlé, comme les scènes intérieures, où une luminosité constante est présente.
To set it up, go to the Device > Camera interface.
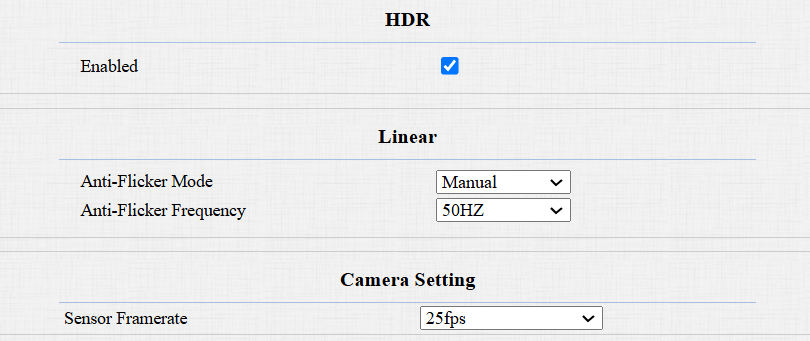
Anti-Flicker Mode: The anti-flicker feature reduces or eliminates flickering in images or videos caused by varying light sources.
Auto: The device will switch automatically between 50Hz and 60Hz anti-flicker frequency.
Manual: Select the anti-flicker frequency manually.
Off: Disable the anti-flicker function.
Anti-Flicker Frequency: Select the anti-flicker frequency between 50Hz and 60Hz.
Sensor Framerate: Adjust the camera frame rate.
30fps: Better for applications needing higher smoothness.
25fps: Suitable for standard video recording and playback, especially under a 50Hz power frequency to minimize flicker.
Face Automatic Exposure
The FaceAE feature is used to adjust the exposure settings based on the lighting conditions, aiming to capture clear and well-exposed images of people.
To enable it, go to the Device > Camera interface.

Exposure Brightness Threshold: Define which areas of an image are considered "overexposed" based on brightness levels. When the threshold is close to 255, only very bright areas are considered overexposed.
Data Transmission Type for Third-party Camera
You can select the data transmission type between the device and a third-party camera when it is connected to the SmartPlus Cloud.
To set it up, go to the Surveillance > RTSP > Third Party Camera interface.

UDP: An unreliable but very efficient transport layer protocol.
TCP: A less efficient but reliable transport layer protocol. It is the default transport protocol.