Device Network Configuration
Pour assurer un fonctionnement normal, assurez-vous que l’adresse IP de l’appareil est correctement configurée ou obtenue automatiquement depuis le serveur DHCP.
On the Device
Check and configure the network connection on the device More > Settings > Advance > Network screen.
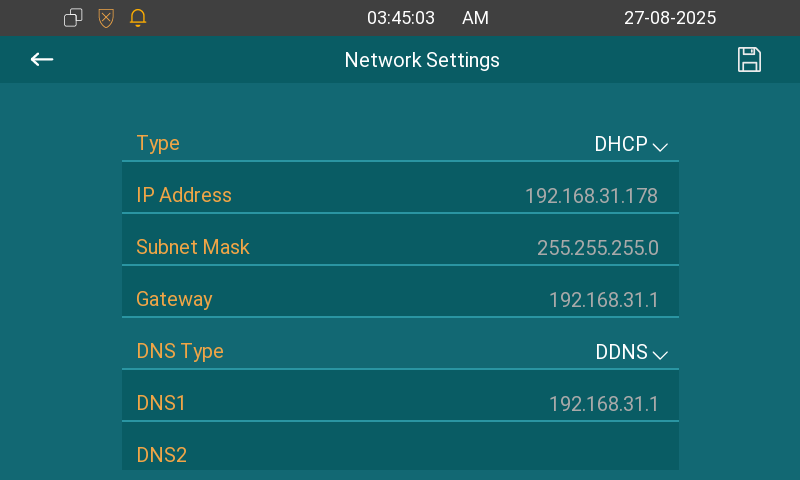
Type:
DHCP mode is the default network connection. If the DHCP mode is selected, the device will be assigned by the DHCP server with an IP address, subnet mask, default gateway, and DNS server address automatically.
When static IP mode is selected, the IP address, subnet mask, default gateway, and DNS server address(es) have to be manually configured according to the actual network environment.
IP Address: Set up the IP address when the static IP mode is selected. To access the device’s web settings, your computer should be on the same local network as the device.
Subnet Mask: A subnet mask tells your device which IP addresses are part of your local network and which ones are not. For example, if the subnet mask is 255.255.255.0, it means that devices with similar starting IPs (like 192.168.1.x) are in the same network.
Gateway: The gateway is like a bridge between your device and other networks, such as the internet. Usually, it’s the IP address of your router.
DNS Type: Domain Name System(DNS) is the overall system or network that handles the translation of domain names (like www.example.com) into IP addresses (like 192.0.2.1), which computers use to identify each other on a network. The device connects to the alternate DNS server when the primary one is unavailable.
DDNS: Dynamic DNS. It is obtained automatically through the DHCP server.
Static DNS: When selected, you need to enter the DNS manually.
DNS1/2: The preferred and alternate Domain Name Server(DNS). The DNS1 is the primary DNS address, while the DNS2 is the secondary one. The device will connect to the alternate server when the primary server is unavailable.
Note
You can also press More > Status > Network to check device network status.
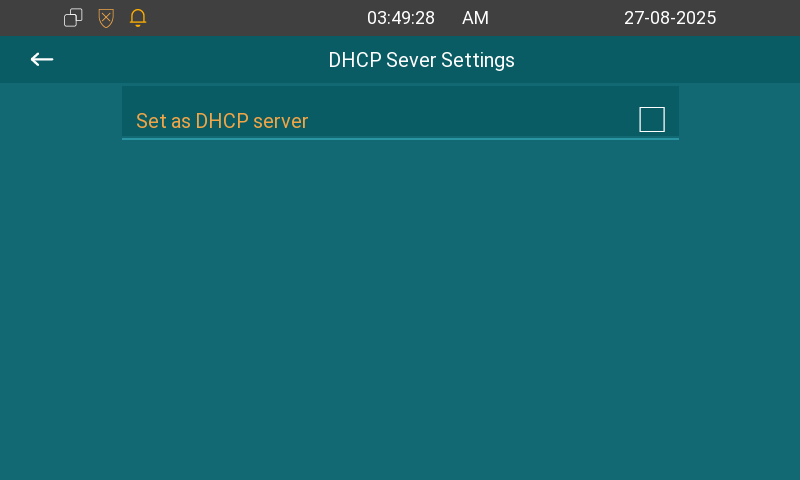
Besides, you can set the device as a DHCP server on the More > Settings > Advance > DHCP Server screen.
On the Web Interface
Check the network on the web Status > Basic interface.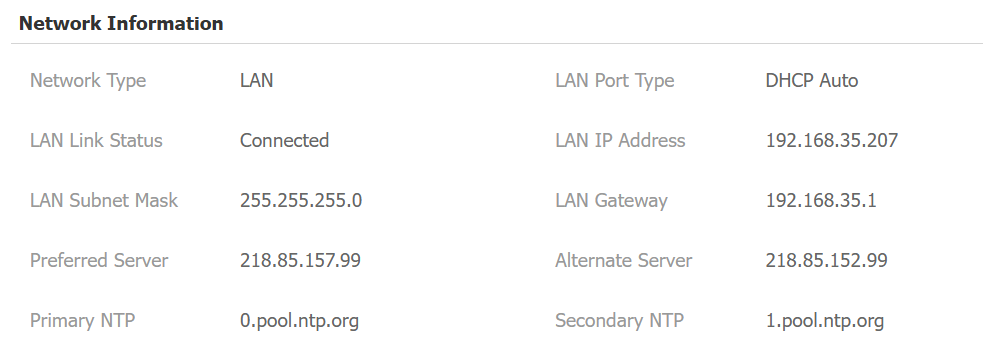
Check and configure the network connection on the web Network > Basic interface.
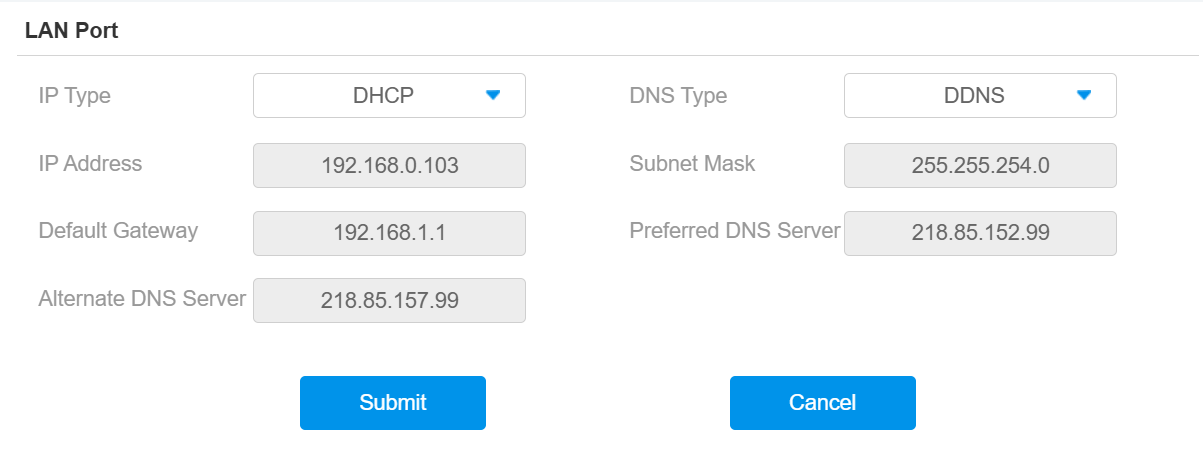
DHCP: DHCP mode is the default network connection. If the DHCP mode is selected, the device will be assigned by the DHCP server with an IP address, subnet mask, default gateway, and DNS server address automatically.
Static IP: When static IP mode is selected, the IP address, subnet mask, default gateway, and DNS server address(es) have to be manually configured according to the actual network environment.
IP Address: Set up the IP address when the static IP mode is selected. To access the device’s web settings, your computer should be on the same local network as the device.
Subnet Mask: A subnet mask tells your device which IP addresses are part of your local network and which ones are not. For example, if the subnet mask is 255.255.255.0, it means that devices with similar starting IPs (like 192.168.1.x) are in the same network.
Default Gateway: The gateway is like a bridge between your device and other networks, such as the internet. Usually, it’s the IP address of your router.
DNS Type: Domain Name System(DNS) is the overall system or network that handles the translation of domain names (like www.example.com) into IP addresses (like 192.0.2.1), which computers use to identify each other on a network. The device connects to the alternate DNS server when the primary one is unavailable.
DDNS: Dynamic DNS. It is obtained automatically through the DHCP server.
Static DNS: When selected, you need to enter the DNS manually.
DNS1/2: The preferred and alternate Domain Name Server(DNS). The DNS1 is the primary DNS address, while the DNS2 is the secondary one. The device will connect to the alternate server when the primary server is unavailable.
Device Deployment in Network
Pour faciliter le contrôle et la gestion des appareils, configurez les dispositifs d’interphone Akuvox avec des détails tels que la localisation, le mode de fonctionnement, l’adresse et les numéros d’extension.
Deploy the device in the network on the web Network > Advanced > Connect Setting interface.
Connect Mode: It is automatically set up according to the actual device connection with a specific server in the network, such as SDMC, Cloud, or None.
None: None is the default factory setting indicating the device is not in any server type. Devices connect directly to each other or within a local area network (LAN) without relying on external servers.
Cloud: The device is connected to the SmartPlus Cloud, a cloud-based system simplifying property access management. The Cloud mode allows devices to interact intelligently with one another and the mobile SmartPlus App, backing up data daily and on different hosts. It suits projects requiring smart, flexible, and secure deployment and management.
SDMC: The device is connected to the SDMC, a management platform designed for on-premise projects. The SDMC mode manages and backs up data remotely on a local network. It also boasts many features suitable for projects requiring high privacy, lower cost, and centralized management.
Discovery Mode: With discovery mode enabled, the device can be discovered by other devices in the network. Uncheck the box if you want to conceal the device.
Discovery Network Type: Specify the device network connection type.
Device Node: Specify the device address by entering device location info from left to right: Community, Building, Unit, Floor, and Room in sequence.
Device Extension: The device extension number for the device you installed.
Device Location: The location in which the device is installed and used.
Control4 Mode: Enable this option for integration with the Control4 smart home.
Device NAT Setting
La traduction d’adresses réseau (NAT) permet aux appareils d’un réseau privé d’utiliser une seule adresse IP publique pour accéder à Internet ou à d’autres réseaux publics. Le NAT sauve les adresses IP publiques limitées et masque les adresses IP internes ainsi que les ports du monde extérieur.
Pour enregistrer des comptes SIP sur des serveurs tiers dans un réseau étendu (WAN), vous devez activer la fonction RPort sur les interphones afin d’établir une connexion stable.
To set up NAT, go to Account> Basic > NAT interface.
Stun Server Address: Set the SIP server address in the Wide Area Network(WAN).
Port: Set the SIP server port.
Then go to Account > Advanced > NAT interface.

RPort: Enable the RPort when the SIP server is in WAN for the SIP account registration.
Device Web HTTP Setting
Cette fonction gère l’accès aux sites web de l’appareil. L’appareil prend en charge deux méthodes d’accès à distance : HTTP et HTTPS (chiffrement).
Set it up on the Network > Advanced > Web Server interface.

HTTPS Port: Set the HTTP/HTTPS port within the valid range.
Device Wi-Fi Setting
You can set the Wi-Fi on the More > Settings > WLAN screen.
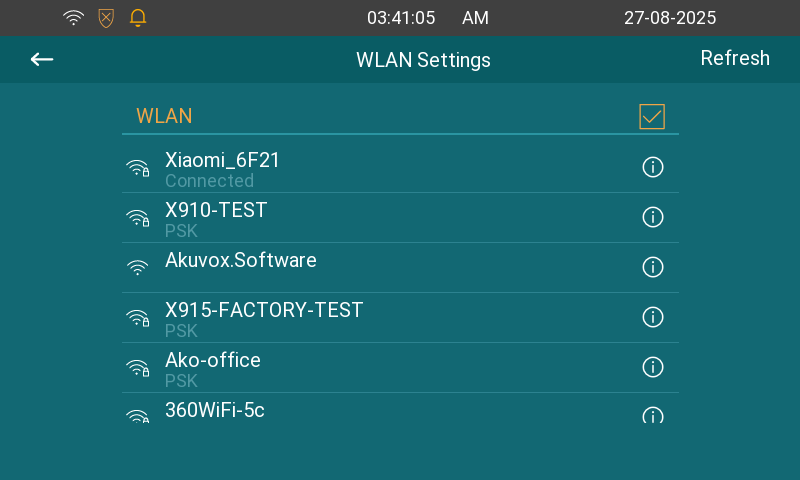
Note
Only C313W supports Wi-Fi connection.
VLAN Setting
Un réseau local virtuel (VLAN) est un groupe logique de nœuds provenant du même domaine IP, quel que soit leur segment de réseau physique. Il sépare le domaine de diffusion de couche 2 via des commutateurs ou des routeurs, n’envoyant les paquets balisés qu’aux ports avec des identifiants VLAN correspondants. L’utilisation de VLANs améliore la sécurité en limitant les attaques ARP à des hôtes spécifiques et améliore les performances réseau en minimisant les trames de diffusion inutiles, économisant ainsi la bande passante pour une efficacité accrue.
Set it up on the Network > Advanced > VLAN Setting interface. You can also set it up on the More > Settings > Advance > Network screen.
Priority: VLAN Priority lets you assign a priority to outbound packets containing the specified VLAN-ID (VID). Packets containing the specified VID are marked with the priority level configured for the VID classifier.
VLAN ID: The same VLAN ID as the switch or router.
SNMP Setting
Le protocole simple de gestion réseau (SNMP) est un protocole pour gérer les dispositifs réseau IP. Il permet aux administrateurs réseau de surveiller les appareils et de recevoir des alertes pour des conditions qui méritent une attention particulière. SNMP fournit des variables décrivant la configuration du système, organisées en hiérarchies et décrites par des bases d’information de gestion (MIB).
Set it up on the Network > Advanced > SNMP interface.
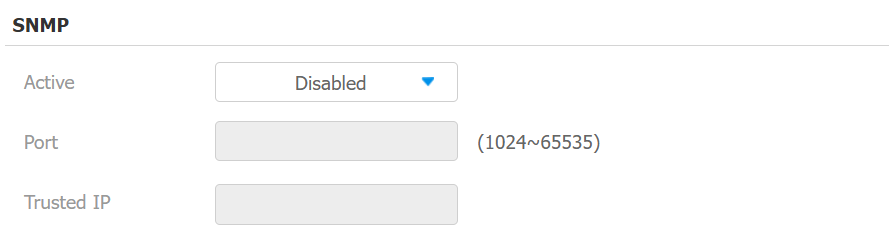
Port: Set a specific port for the data transmission from 1024-65535.
Trusted IP: Enter the third-party IP address.
Allowed Scanning Whitelist
You can limit devices from scanning the indoor monitor on the same LAN to enhance security.
Set it up on the Network > Advanced > Allowed Scanning Whitelist interface.
