Screen Display Setting on the Device
Vous pouvez configurer diverses fonctionnalités de l’affichage de l’écran en termes de luminosité, d’économiseur d’écran et de taille de police, etc.
You can do this configuration on the device More > Setting > Display screen.
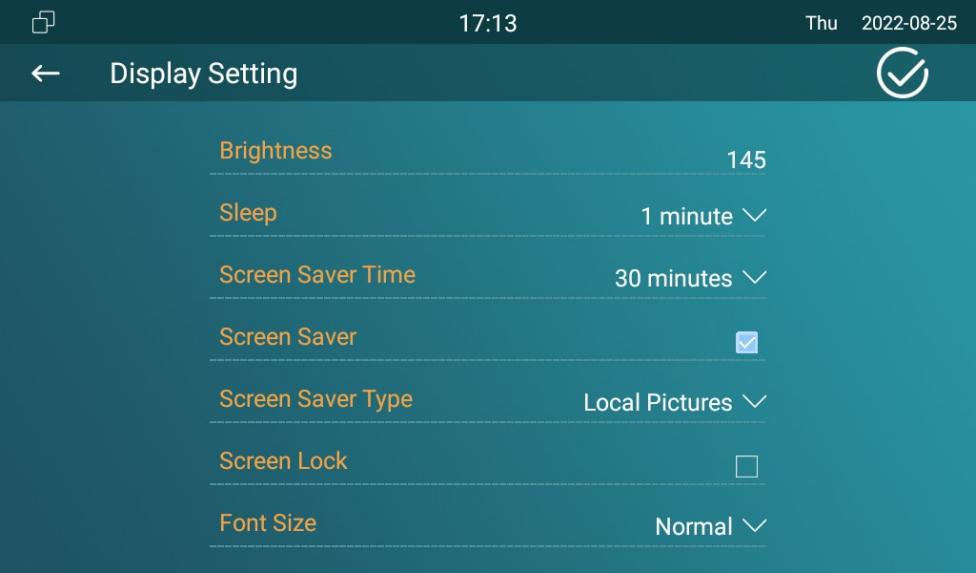
Parameter Set-up:
- Brightness: press on the brightness setting and move the yellow dots to adjust the screen brightness. The default brightness is 145.
- Sleep: set the sleep timing based on the screen saver (15 sec to 30 min).
- If the screen saver is enabled, then the sleep time here is the screen saver start time. For example, if you set it as 1 min, then the screen saver will start automatically when the device has no operation for 1 min.
- If the screen saver is disabled, then the sleep time here is the screen turn-off time. for example, if you set it as 1 min, then the screen will be turned off automatically when the device has no operation for 1 min.
- Screen Saver: tick the square box to enable the screen saver function.
- Screen Lock: tick the screen lock if you want to lock the screen after the screen is turned off (turn dark). You are required to enter the system code to unlock the screen or you can unlock the screen by facial recognition.
- Font Size: select font size (Small, Normal, Large, Huge).
- Screen Saver Type: select screen saver type among three options: Local Pictures, Local Videos, Clock.
Details for the screen saver types are shown below:
| NO. | Screen Saver Type | Type Description |
|---|---|---|
| 1 | Local Pictures | Display picture uploaded to the indoor monitor as the screen saver. |
| 2 | Local Videos | Display videos from the indoor monitor as the screen saver |
| 3 | Clock | Display the clock as the screen saver. |
Screen Display Setting on the Web Interface
Le moniteur intérieur de la série Akuvox vous permet de personnaliser les écrans pour enrichir l’expérience visuelle et opérationnelle des utilisateurs.
Upload Screen Saver
You can upload screen-saver pictures separately or in batches to the device and to the device web interface for publicity purposes or for a greater visual experience.
To upload screen saver on the device web interface Phone > Display Setting > Screen Saver Setting.
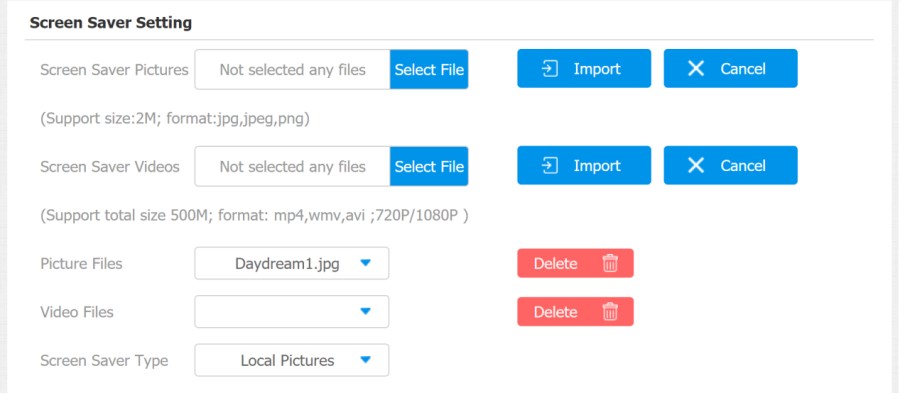
Parameter Set-up:
- Screen Saver Pictures: select the existing screen saver pictures.
- Screen Saver video: select the existing screen saver video.
- Picture File: choose a picture file you want to use for the screen saver.
- Video Files: choose a video file you want to use for the screen saver.
- Screen Saver Type: select screen saver type among three options: Local Pictures, Local Videos, Clock.
Details for the screen saver types are shown below:
| NO. | Screen Saver Type | Type Description |
|---|---|---|
| 1 | Local Pictures | Display picture uploaded to the indoor monitor as the screen saver. |
| 2 | Local Videos | Display videos from the indoor monitor as the screen saver |
| 3 | Clock | Display the clock as the screen saver. |
- The previous pictures with a specific ID order will be overwritten when the repetitive designation of pictures to the same ID order occurred.
- The pictures uploaded should be in JPG format with 2M maximum.
Upload Wall Paper
Vous pouvez personnaliser votre image d’arrière-plan sur le web de l’appareil pour obtenir un effet visuel et une expérience pour les utilisateurs.
Go to Phone > Display Setting > Wallpaper interface.
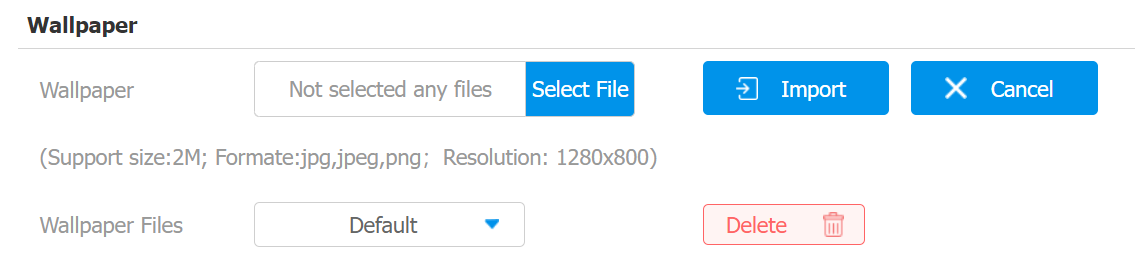
Parameter Set-up:
- Wallpaper Files: Select the default wallpaper or the uploaded wallpaper.
Status Bar
Le réglage de la barre d’état vous permet de personnaliser la couleur de la barre d’état de l’appareil selon vos scénarios. Vous pouvez faire cette configuration sur le web. Choisissez le mode personnalisé puis ajustez la valeur RVB pour la barre d’état.
You can do this configuration on web Phone > Display Setting > Status Bar interface.
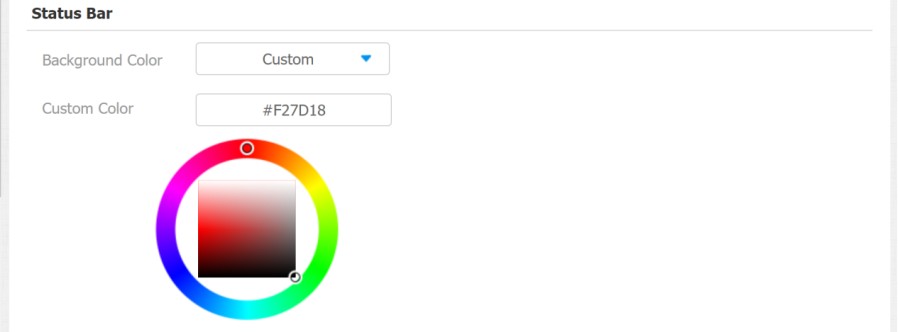
Parameter Set-up:
- Background Color: Select Custom to adjust the color.
- Custom Color: Move your mouse pointer to the color area to select a specific color or enter the color value.
Upload Device Booting Image
Vous pouvez télécharger l’image de démarrage pour qu’elle soit affichée pendant le processus de démarrage de l’appareil.
Navigate to Phone > Logo interface.
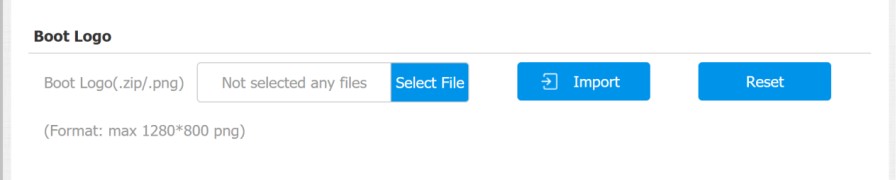
- The pictures uploaded should be in .png or .zip format.
Upload Device Web Logo
Vous pouvez personnaliser le logo web dans le coin supérieur gauche de l’interface web si nécessaire.
To upload the web logo, go to Phone > Logo > Web Logo.
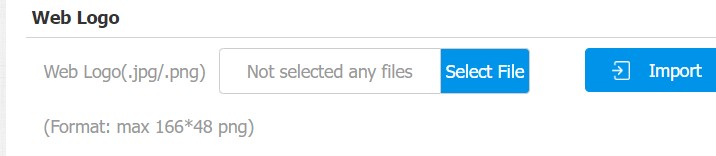
- The pictures uploaded should be in .png format with 50K maximum.
Icon Screen Display Configuration
Le moniteur intérieur Akuvox vous permet de personnaliser l’affichage des icônes sur l’écran d’accueil et l’écran Plus pour faciliter l’utilisation des utilisateurs.
Navigate to Phone > Key/Display interface.
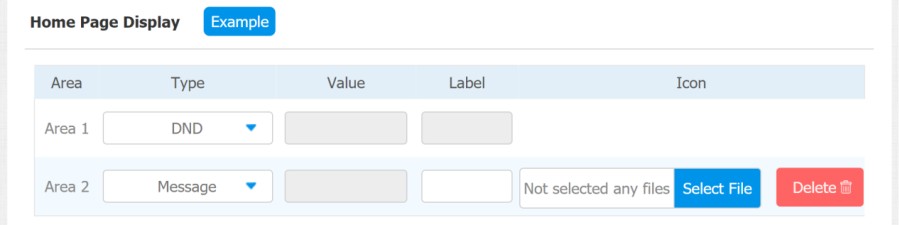
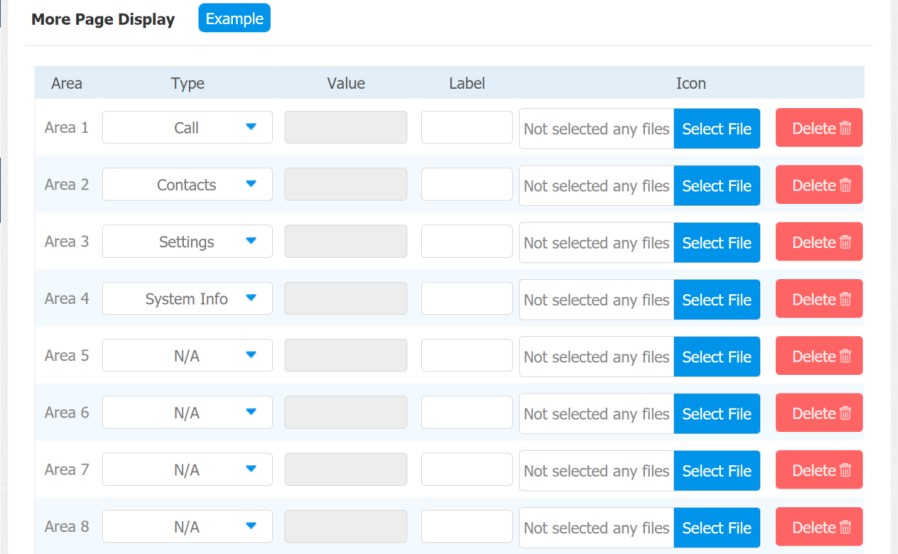
Parameter Set-up:
- Type: click to select among DND, Message, Contact, Call, Display, System Info, Setting, Sound, Arming, SOS, Browser, Motion Detection, Custom APK, Relays, Lift, Unlock, N/A is selected, and the icon display in the corresponding area will disappear.
- Value: enter the value if you select the icon type Custom APK and Browser. For example, when you select Custom APK, you are required to enter its package name and class name in the corresponding Value field before the APK icon can be displayed on the home screen. If Browser is selected, you are required to enter the URL of the browser before the browser icon can be displayed, while the value does not apply to other icon types.
- Label: click to rename the icon if needed, while the DND icon cannot be renamed.
- Icons: click to select the picture to be uploaded as the icon to be displayed.
- You can configure 2 icons in areas 1 and 2 on the home screen.
- You can configure 8 icons on the More screen.