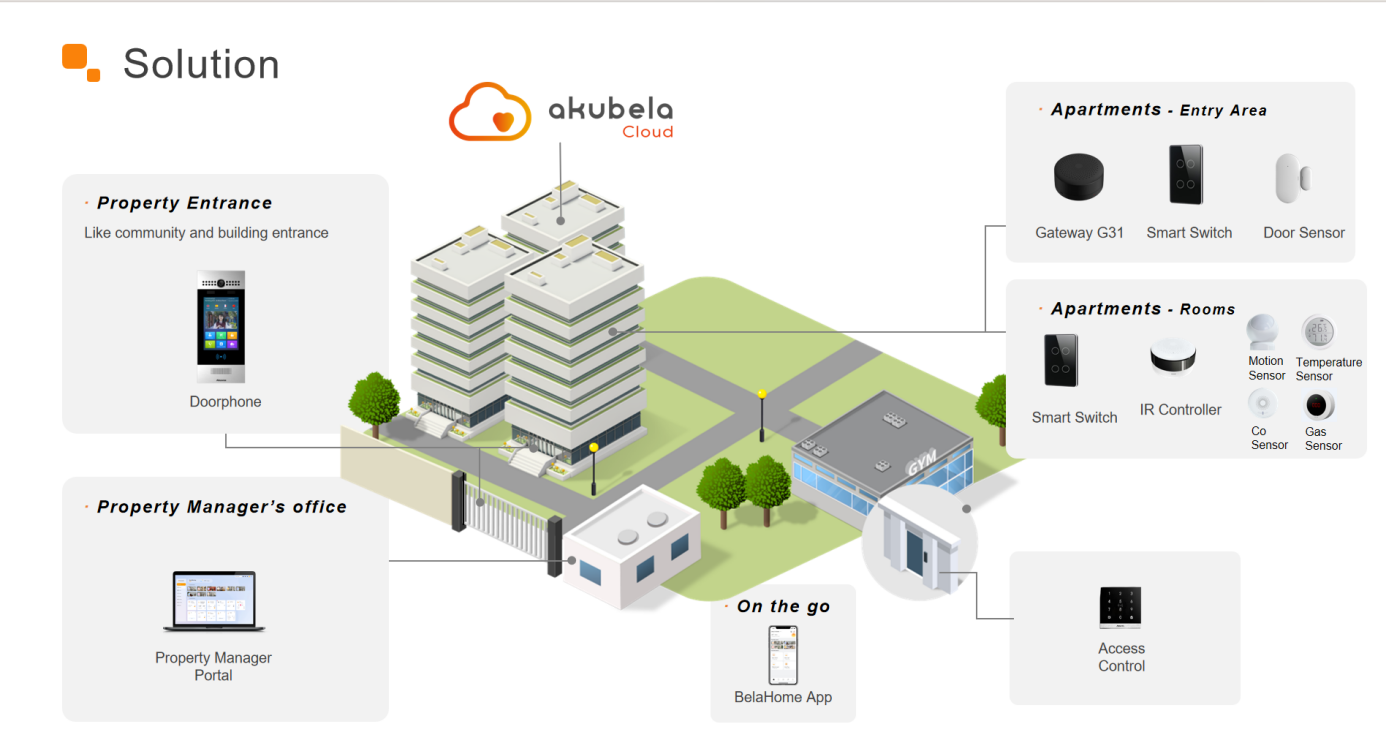
Solution Overview
This solution uses G31 as home center. It is designed for residential properties with the following requirements:
A cost-effective smart home system to enhance the property’s value.
Control basic appliances, lighting, and simple security functions using only a mobile phone.
No intercom needed, or an existing video intercom is already installed.
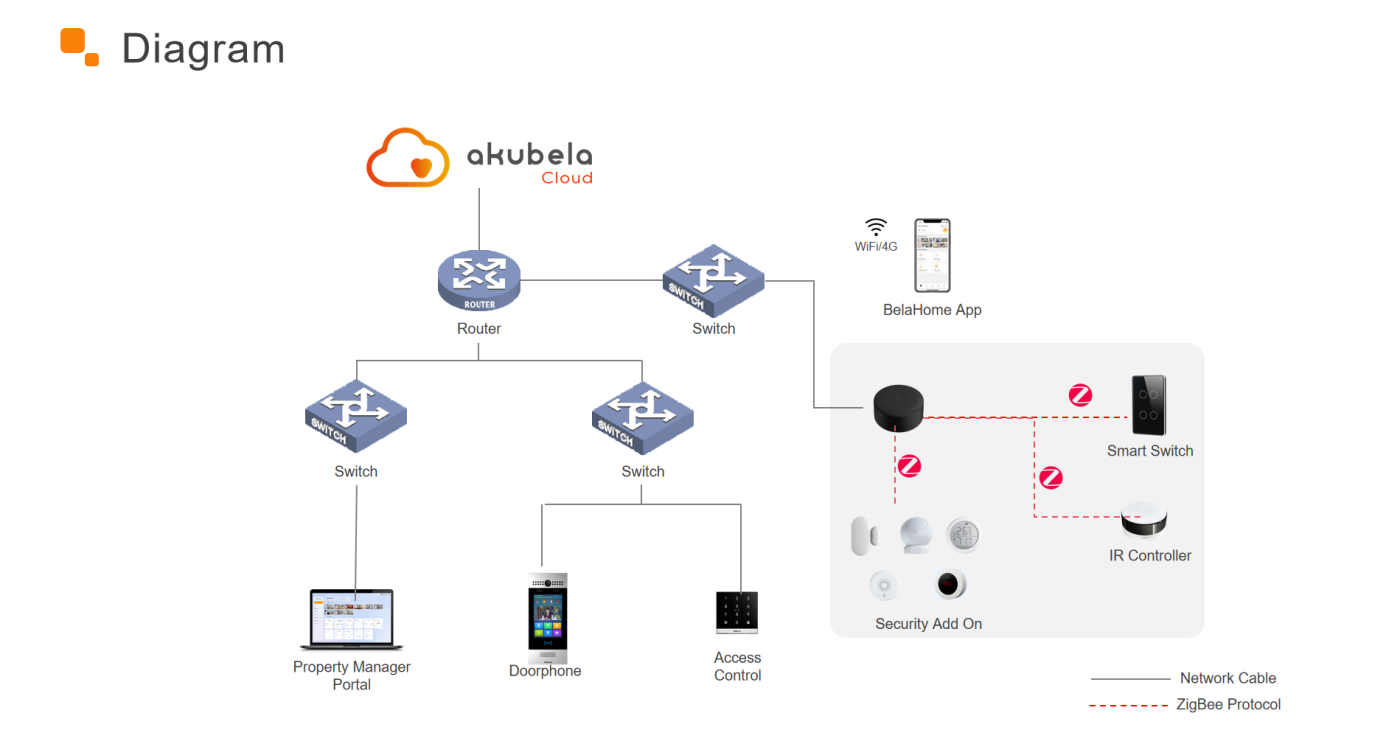
Topology
Installation
G31 installation: Refer to G31 Quick Guide
Security sensors installation: Refer to akubela Add-on
IR controller installation: Refer to IR Controller IR21 Quick Guide or IR Controller IR22 Quick Guide
Before Getting Started
1. Setup Requirements
(1) G31 firmware required: Version 31.1.37.19 or later.
(2) G31 Network setup:
G31 supports either a wired connection or 2.4 GHz Wi-Fi (both cannot be used simultaneously).
Network connection is optional during installation, but Internet access is required for normal operation. End users can control the system only after the G31 connects to the cloud.
To use the G31 as a home center, it must be connected to the Internet.
(3) Accounts:
Prepare an Akubela cloud installer account in advance. Contact your distributor if unavailable.
Download the BelaHome app and obtain a user account in advance.
(4) Project Preparation
A project feature list is required; configuration is based on this list.
Create an Excel sheet to map the G31, other devices, and their corresponding room numbers. Bring this sheet onsite.
Example Template:
Location | G31(MAC) | Intercom (MAC) | Sub-Device 1 | Sub-Device 2 | ... |
|
|
|
|
|
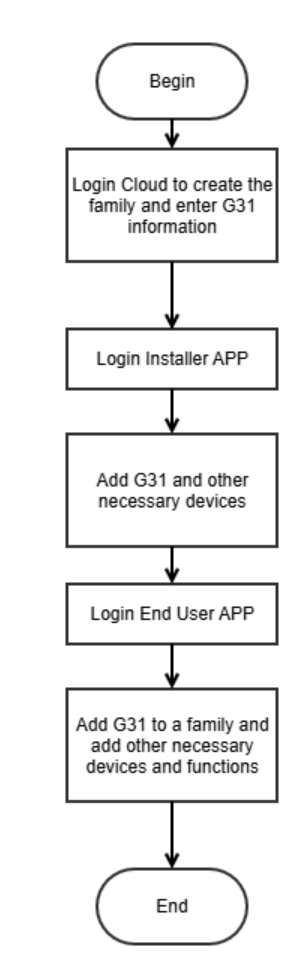
2. Workflow
3. Supported Functions
The BelaHome app functions available depend on whether you log in with an installer or end-user account.
Installer
Function | Supported |
Add Zigbee Devices | ✔ |
Add 3rd-party Devices (limited brands) | ✔ |
Add Infrared Devices (IR21/IR22 only) | ✔ |
Add & Control Scenes | × |
Add & Control Alarm | × |
Energy | × |
Intercom (with app and Akuvox Door Phones) | × |
End user
Function | Supported |
Add & Control Zigbee devices | ✔ |
Add & Control Infrared devices | ✔ |
Add & Control 3rd-party devices (limited brands) | ✔ |
Add & Control Scenes | ✔ |
Add & Control Alarm | × |
Energy | × |
Intercom (with Belahome app and Akuvox doorphone) | ✔ |
NOTE:
Currently, only infrared air conditioners can be used in scenes.
Supported 3rd-party devices are limited to IKEA Curtain and Yale Lock.
When the G31 serves as the home center, it supports up to 32 sub-devices and cannot add other devices as sub-gateways.
Configuration
1. Set Up G31 as Home Center (Installer)
1.1. Add G31 on akubela Cloud
(1) Log in to the akubela Cloud with your installer account, and create a community project and buildings.
(2) Set up a general house layout.
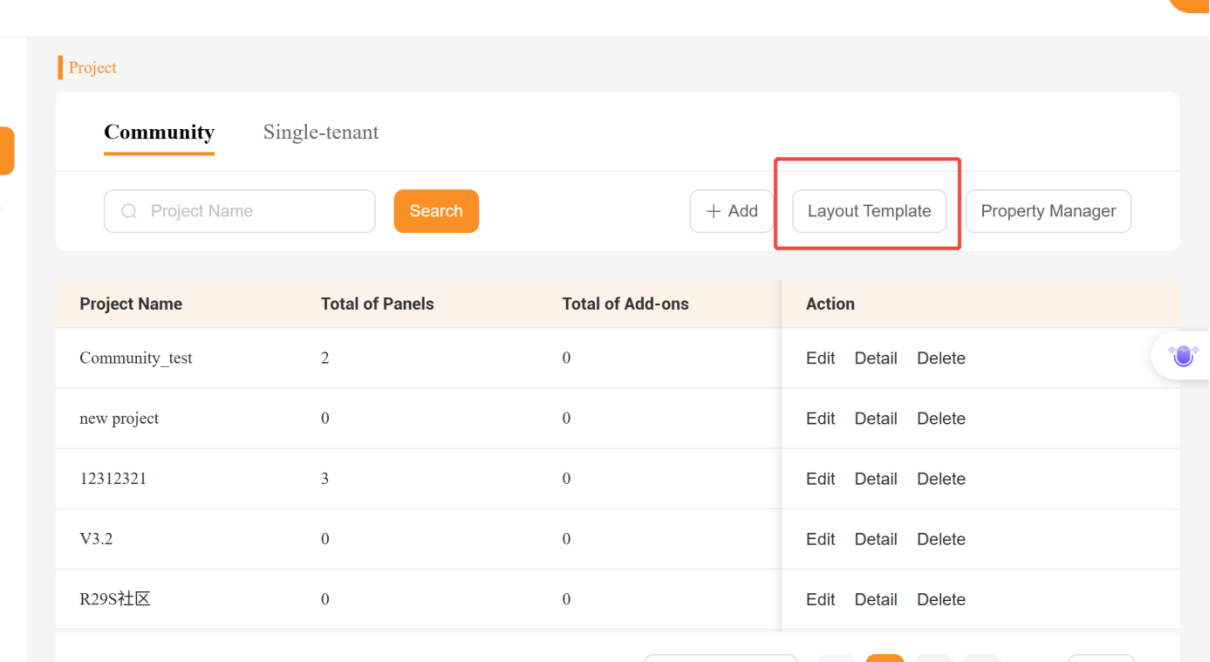
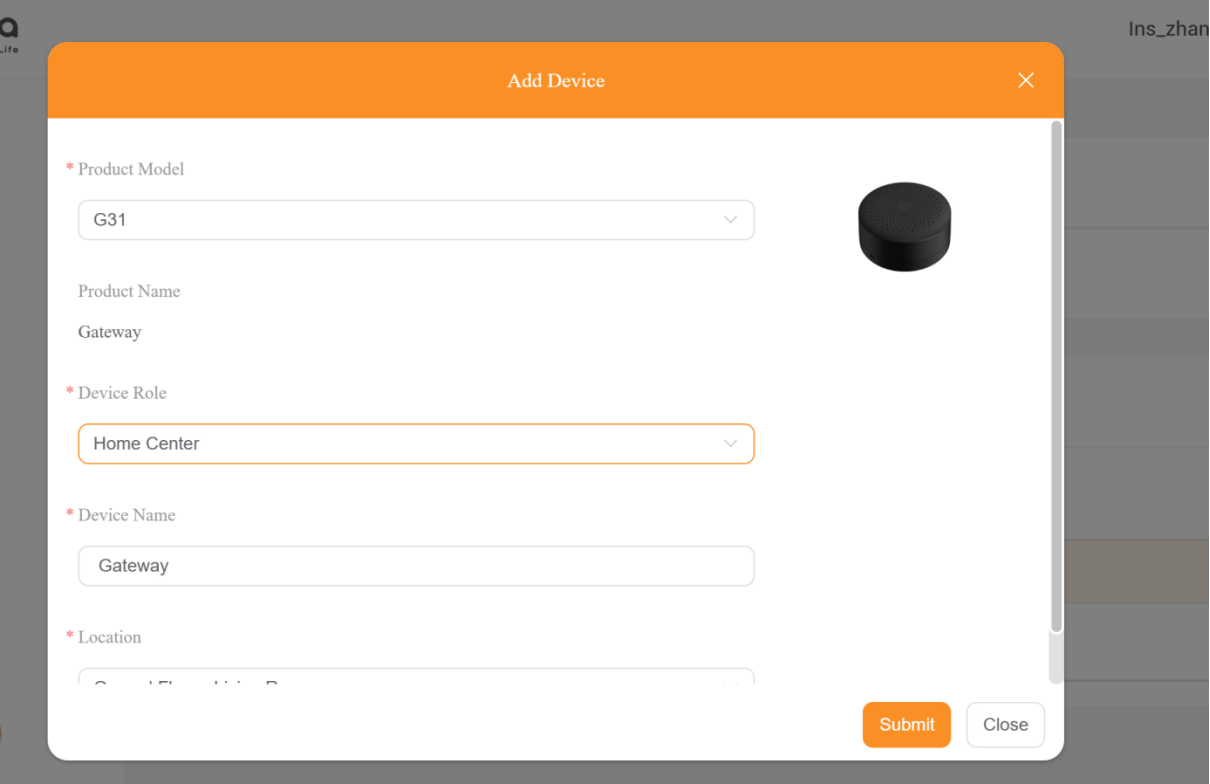
(3) Create a home, enter the G31 MAC address and other required information, and select the layout you created earlier.
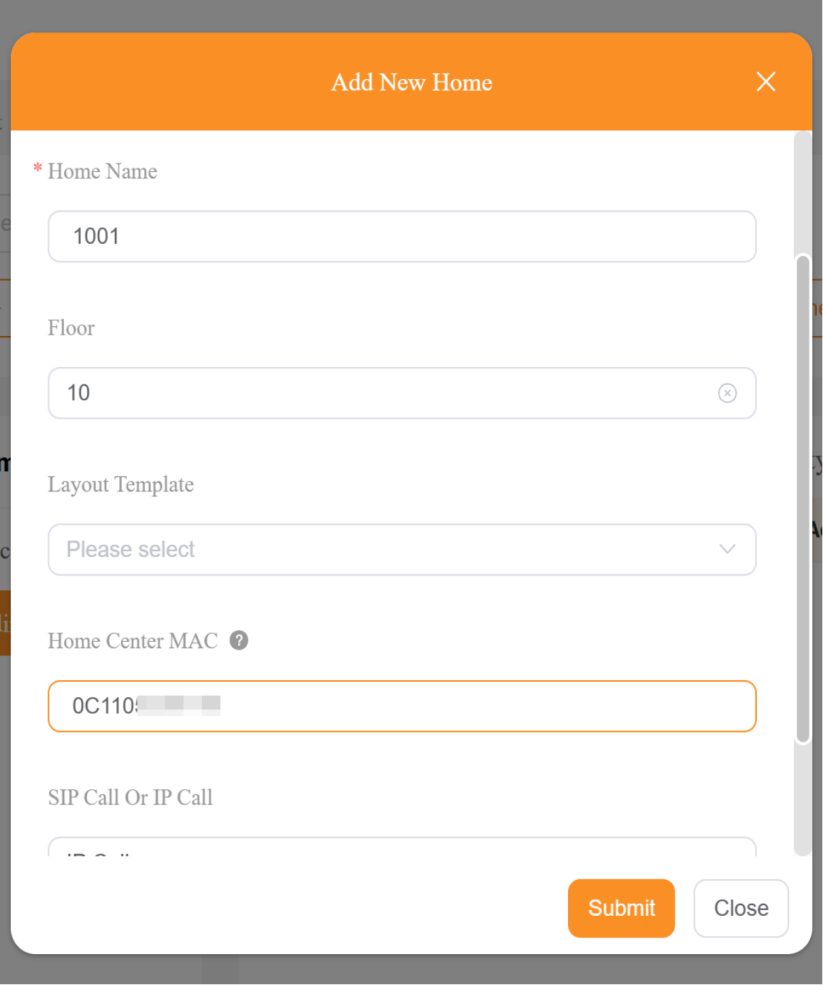
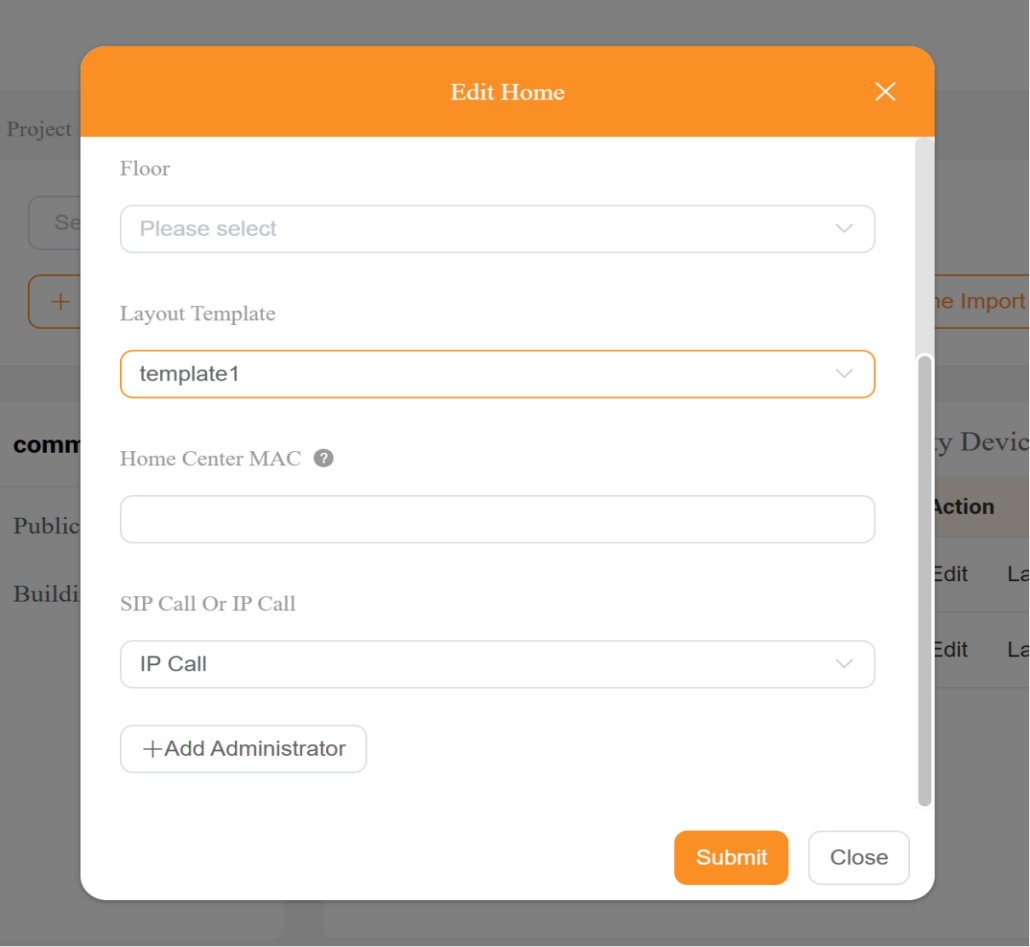
TIP:
For efficiency, use a template to create rooms and add devices in batches. See this guide for details.
1.2. Add Intercom Devices on the Cloud (Optional)
Add the door phone’s MAC, device name, and relay name to the corresponding home or public area.
NOTE:
Ensure the the door phone’s MAC has already been added in the distributor’s MAC library on the Akuvox SmartPlus platform.
It is recommended to complete this step before installation.
.png)
1.3. Log in to the App with Installer Account
Open the BelaHome app, tap  to switch the login role to Installer, and enter the installer account credentials to login.
.png)
.png)
1.4. Set Up G31 as Home Center
(1) In the app, select G31 Configuration.
.png)
(2) The G31 automatically enters pairing mode for the first 10 minutes (green light flashing). If it does not, follow the onscreen instructions to manually put G31 into paring mode, then tap Next.
.png)
(3) Connect your mobile phone to the G31 hotspot “G31-XXXXX” (no password required).
NOTE:
If the connection fails, disable cellular data and try again.
For iOS devices, wait until the Wi-Fi icon appears in the status bar before proceeding.
Do not enable VPN during setup.
.png)
.png)
(4) Return to the app and tap Next. After a few seconds, you will hear a beep and the green light will turn off. The G31 will now appear on the homepage.
.png)
.png)
(5) Tap the G31 device to edit its name and location.
.png)
1.5. Add Zigbee Sensors
(1) Tap + and select the devices you want to add.
NOTE:
A gray icon means the device is not supported by G31.
.png)
.png)
(2) Follow the onscreen instructions to put the Zigbee device into pairing mode. Or refer to this guide for details.
.png)
(3) After pairing, you can edit the device information such as name and location.
.png)
.png)
1.6. Add Infrared Devices
(1) Tap + , then select IR controller.
NOTE:
A gray icon means the device is not supported by G31.
.png)
.png)
(2) Follow the onscreen instructions to put the IR21/22 into pairing mode. Or refer to this guide for details.
.png)
.png)
(3) After pairing, edit the IR controller information such as name and location.
.png)
.png)
(4) To add IR TVs or Air Conditioners, see here.
1.7. Add Third-Party Devices
(1) Tap + and select the corresponding device.
(2) For detailed instructions, refer to
for more settings.
1.8. Create Scenes
Scenes cannot be added using the installer account.
To configure scenes, log in with the family administrator account and refer to this guide.
2. Bind G31 with a Family as Home Center (End User)
2.1. Log in to BelaHome App
(1) Download the BelaHome app.
(2) Log in using the user account credentials (scan QR code or enter username and password). For detailed steps, see this video.
.png)
(3) Select Click to Add > G31.
.png)
.png)
2.2. Bind G31 with Family
Using Wired Connection
If the installer has already created an administrator account on the cloud
Once the G31 is connected to the network, its configuration and any previously added Zigbee devices will automatically appear on the app’s Home screen. No additional setup is required.
If the user creates account themselves
(1) Ensure your mobile phone is connected to the same Wi-Fi network that the G31 is using.
(2) Choose G31 (Ethernet) in the app. The app will automatically search for the G31 on the same network. Tap the detected G31 to add it to the family.
.png)
.png)
.png)
.png)
Using WiFi Connection
(1) Choose G31 (Wi-Fi), then select an available Wi-Fi network and enter the password. Tap Next.
.png)
.png)
(2) Following the onscreen instructions to put G31 into paring mode. Tap Next.
.png)
(3) Connect to the G31 hotspot “G31-XXXXX”.
NOTE:
If the hotspot connection fails, disable cellular data and try again.
For iOS devices, wait until the Wi-Fi icon appears on the status bar before proceeding.
Do not enable any VPN settings on your phone.
.png)
.png)
(4) Return to the app and tap Next. After a few seconds, you will hear a beep and the green light will turn off. The G31 will now appear on the homepage.
.png)
.png)
.png)
2.3. Add Infrared Devices
(1) To add infrared devices like TV or AC, tap Add Remote Control in the IR controller’s details screen.
(2) Refer to this guide, section akubela IR Controllers for details on adding and learning IR remotes.
2.4. Change the Network Connection
Switch Between Wired and Wireless
If you need to switch from wired to wireless connection (or vice versa), you must reset the G31 and perform the installer configuration again. For details, see this section.
Change Wi-Fi Network
If your G31 was previously connected via Wi-Fi and you want it to connect to a new Wi-Fi network:
(1) In the app, tap G31 > Change WiFi.
.png)
(2) Select the new Wi-Fi and enter the password.
.png)
(3) Following the onscreen instructions to put G31 into paring mode and tap Next.
.png)
(4) Connect to the G31 hotspot “G31-XXXXX)” (no password required).
NOTE:
If the hotspot connection fails, disable cellular data and try again.
For iOS devices, wait until the Wi-Fi icon appears on the status bar before proceeding.
Do not enable any VPN settings on your phone.
(5) Return to the app and tap Next. Wait a few seconds.
.png)
.png)
(6) When you see “Change successfully” in the app and hear a beep, the Wi-Fi change is complete.
.png)
.png)
3. More Settings
3.1. Reset G31
If you need to reset the G31 due to incorrect configurations:
(1) Quick press the reset button 5 times within 2 seconds. The yellow LED will start flashing.
(2) Press and hold the button until the LED turns red.
(3) When you hear a beep and the green LED flashes, the reset is complete.
3.2. Replace Devices
If the G31 is faulty and needs replacement, follow this guide from the beginning to configure the new device.
3.3. Other Settings
For additional operations in BelaHome, see this guide.