IP Call & IP Call Configuration
An IP call is a direct call between two intercom devices using their IP addresses, without a server or a PBX. IP calls work when the devices are on the same network.
Navigate to Intercom > Basic.

Parameters Set-up:
- Port: set up the IP direct call port, 5060 is the default port.
SIP Call & SIP Call Configuration
Session Initiation Protocol(SIP) is a signaling transmission protocol used for initiating, maintaining, and terminating calls.
A SIP call uses SIP to send and receive data between SIP devices, and can use the internet or a local network to offer high-quality and secure communication. Initiating a SIP call requires a SIP account, a SIP address for each device, and configuring SIP settings on the devices.
SIP Account Registration
Each device needs a SIP account to make and receive SIP calls.
Akuvox intercom devices support the configuration of two SIP accounts, which can be registered under two independent servers.
Click here to view the SIP account registration example.
To perform the SIP account setting on the web Account > Basic > SIP Account Interface. The Register Name, User Name, and Password are obtained from the SIP account administrator.
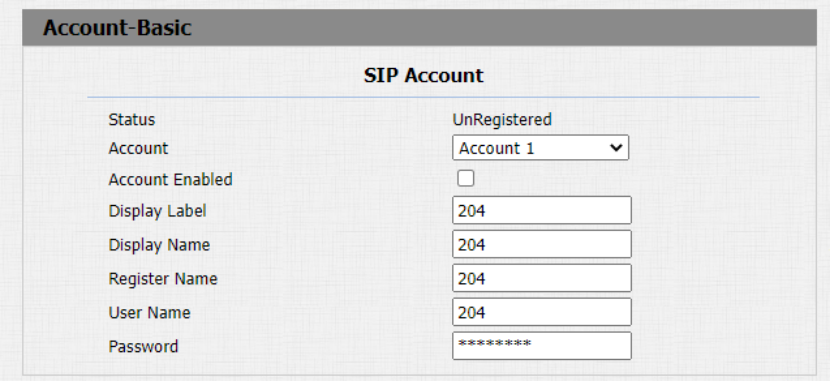
Parameter Set-up:
-
Status: check to see if the SIP account is registered or not.
-
Account: select the exact account (Account 1&2) to be configured.
-
Account Enabled: click Enable to activate the registered SIP account.
-
Display Label: configure the device label to be shown on the device screen.
-
Display Name: configure the name, for example, the device’s name to be shown on the device being called to.
SIP Server Configuration
SIP servers enable devices to establish and manage call sessions with other intercom devices using the SIP protocol. They can be third-party servers or built-in PBX in Akuvox indoor monitor.
To do this configuration also on web Account > Basic > SIP Server interface.
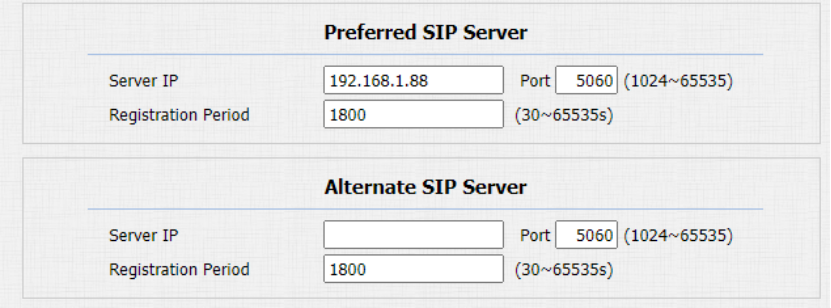
Parameter Set-up:
-
Preferred SIP Server: enter the primary server IP address number or its URL.
-
Alternate SIP Server: enter the backup SIP server IP address or its URL.
-
Port: set up SIP server port for data transmission.
-
Registration Period: set up SIP account registration time span. SIP re-registration will start automatically if the account registration fails during the registration time span. The default registration period is “1800”, ranging from 30-65535s.
Configure Outbound Proxy Server
An outbound proxy server is used to receive all initiating request messages and route them to the designated SIP server in order to establish a call session via port-based data transmission.
To set it up on the device web Account > Basic > Outbound Proxy Server Interface.
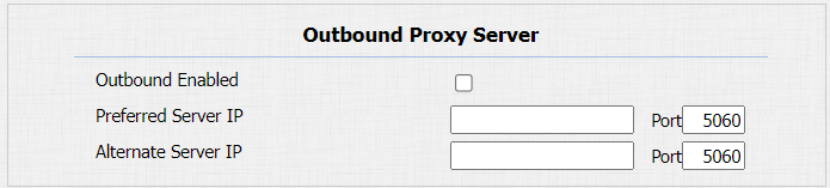
Parameters Set-up:
-
Preferred Server IP: enter the SIP address of the primary outbound proxy server.
-
Backup Server IP: set up Backup Server IP for the backup outbound proxy server.
Configure Data Transmission Type
Akuvox intercom devices support four data transmission protocols: User Datagram Protocol(UDP), Transmission Control Protocol(TCP), Transport Layer Security(TLS), and DNS-SRV.
To do this configuration on web Account > Basic > Transport Type interface.

Parameters Set-up:
-
UDP: select “UDP” for unreliable but very efficient transport layer protocol. UDP is the default transport protocol.
-
TCP: select “TCP” for reliable but less-efficient transport layer protocol.
-
TLS: select “TLS” for secured and reliable transport layer protocol.
-
DNS-SRV: select “DNS-SRV” to obtain DNS record for specifying the location of servers. And SRV not only records the server address but also the server port. Moreover, SRV can also be used to configure the priority and the weight of the server address.
Configure NAT Setting
Turn on NAT to enable the communication between devices in different intercoms.

Parameters Set-up:
- Stun Server Address: the default port is 3478.
Configure Calling Feature
DND
The Do Not Disturb(DND) feature prevents unwanted incoming SIP calls, ensuring uninterrupted focus. It also allows you to set a code to be sent to the SIP server when rejecting a call.
Navigate to Intercom > Call Feature interface.
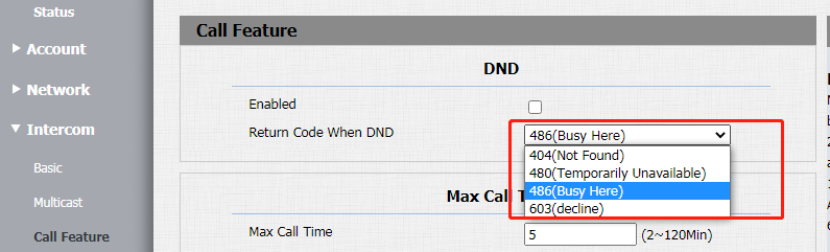
Parameter Set-up:
- Return Code When Refuse: select code to be sent to the caller side via SIP server when you reject the incoming call.
Manager Dial Call
Manager Dial Call includes two types of calls: Sequence call and group call. It allows quick initiation of pre-configured numbers by pressing the Management key on the door phone.
You can create up 10 numbers. To do the configuration on the web Intercom > Basic > Manager Dial interface.
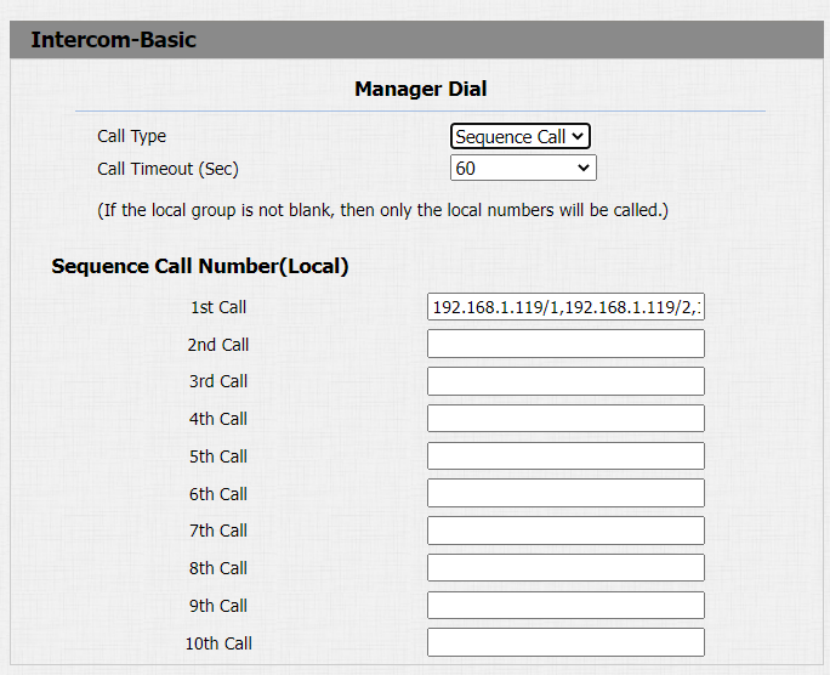
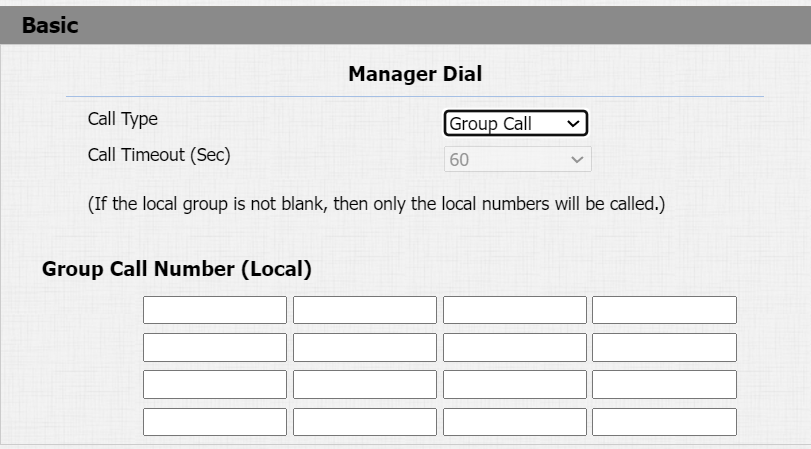
Parameters Set-up:
-
Call Type: select the group call or sequence call for the manager dial call.
-
Sequence Call: sequence call is used to initiate multiple numbers when your press the manager dial button. If the previous callee does not answer within the sequence call timeout, the call will be transferred to the next one. If the call is answered by one of the callee, the call will not be transferred anymore.
-
Group Call: group call is used to initiate calls to multiple numbers at the same when you press the manager dial button.
Call Hang-up
You can hang up the call on the door bell by pressing the push button if needed. To enable the push-button call hang-up, navigate to Intercom > Basic.

- Sequence Call Number(Local): enter the sequence call number. You can enter five sequence call number maximum in each line.
Web Call
The web call feature allows for making calls via the device’s web interface, commonly used for remote call testing purposes.
You can navigate to Upgrade > Diagnose > Web Call.

Parameters Set-up:
- Web Call (Ready): enter the IP/SIP number to dial out.
Auto Answer
Auto-answer feature allows the device to automatically pick up incoming calls without any manual intervention. You can also customize this feature by setting the time duration for auto-answering and choosing the communication mode between audio and video.
To enable this feature on web Account > Advanced > Call interface, you can set up the related parameters on web Intercom > Call Feature > Auto Answer.

Parameters Set-up:
-
Auto Answer Delay: set up the delay time (from 0-5 sec.) before the call can be answered automatically. For example, if you set the delay time as 1 second, then the call will be answered in 1 second automatically.
-
Mode: set up the video or audio mode you preferred for answering the call automatically.
Multicast
The Multicast function allows one-to-many broadcasting for different purposes. For example, it enables the indoor monitor to announce messages from the kitchen to other rooms or to broadcast notifications from the management office to multiple locations. In these scenarios, indoor monitors can listen to or send audio broadcasts.
Click here to watch the demonstration video.
Navigate to Intercom > Multicast.
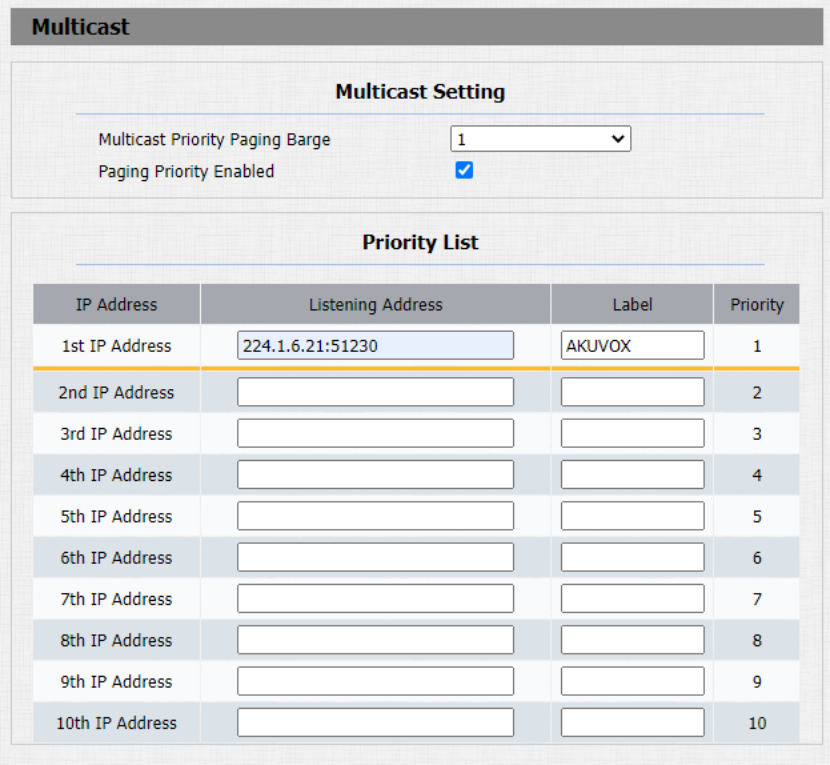
Parameters Set-up:
-
Multicast Priority Paging Barge: multicast or how many multicast calls are higher priority than SIP call, if you disable Paging Priority Active, SIP call will have higher priority.
-
Paging Priority enabled: multicast calls are called in order of priority or not.
-
Listening Address: enter the multicast IP address you want to listen. The multicast IP address needs to be the same as the listened part and the multicast port can not be the same for each IP address. Multicast IP address is from 224.0.0.0 to 239.255.255.255.
Configure Maximum Call Duration
The door phone allows you to set up the call time duration in receiving the call from the calling device as the caller side might forget to hang up the intercom device. When the call time duration is reached, the door phone will terminate the call automatically.
You can navigate Intercom > Call Feature > Max Call Time.

-
Parameters Set-up:
-
Max Call Time: enter the call time duration according to your need (Ranging from 2-120 min). The default call time duration is 5 min.
- Max call time of the device is also related with max call time of SIP server. If using SIP account to make a call, please pay attention to the max call time of SIP server. If the max call time of SIP server is shorter than the max call time of device, the shorter one is available.
Configure Maximum Dial Duration
Maximum Dial Duration is the time limit for incoming- and/or outgoing calls on the door phone. If configured, the door phone will automatically terminate the call if no one answers the call within the preset time, whether it is incoming or outgoing.
You can navigate to Intercom > Call Feature > Max Dial Time.

Parameters Set-up:
-
Dial in Time: enter the dial in time duration for your door bell (ranging from 30-120 sec.) for example, if the dial in time duration is 60 seconds in your door bell, then the door bell will hang up the incoming call automatically if the call is not answered by the door bell in 60 seconds. 60 seconds is the dial in time duration by default.
-
Dial out Time: enter the dial in time duration for your door bell (ranging from 5-120 sec.) for example, if the dial out time duration is 60 seconds in your door bell, then the door bell will hang up the call it dialed out automatically if the call is not answered by the device being called.
- Max dial time of device is also related with max dial time of SIP server. If using SIP account to make a call, please pay attention to the max dial time of SIP server. If the max dial time of SIP server is shorter than the max dial time of device, the shorter one is available.
Hang Up After Open Door
This feature automatically ends the call once the door is released, allowing for the seamless reception of subsequent calls.
Navigate to Setting > Door > Hang Up After Open Door.

Parameters Set-up:
-
Type: select the open door type. Door can be unlocked via “DTMF”, “HTTP” command, “DTMF Or HTTP”, and “DTMF, HTTP or Input”.
-
Timeout: the time out value can be set up from 1 second to 15 seconds. 5 seconds is default. The call will be automatically hung up within this value after the door is opened.