Monitor and Image
Monitor Setting
You can add video streams using RTSP. If the Display in Call function is enabled, the video of the added monitor device will show up when it calls the indoor monitor.
To set it up, go to the Device > Monitor interface.
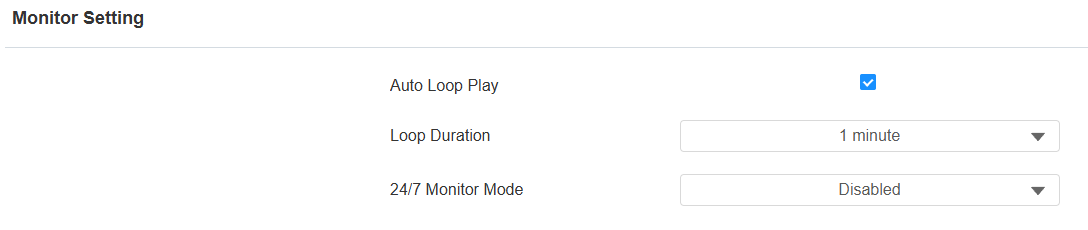
Auto Loop Play: Set whether to play all monitoring streams in rotation.
Loop Duration: The duration of playing each monitoring stream. The default is 1 minute.
24/7 Monitor Mode: When enabled, the indoor monitor displays the monitoring screen for 6 hours, then plays a 10-second screensaver before resuming the monitoring stream.
On the Device > Monitor > Door Phone section, click +Add to add a monitor.

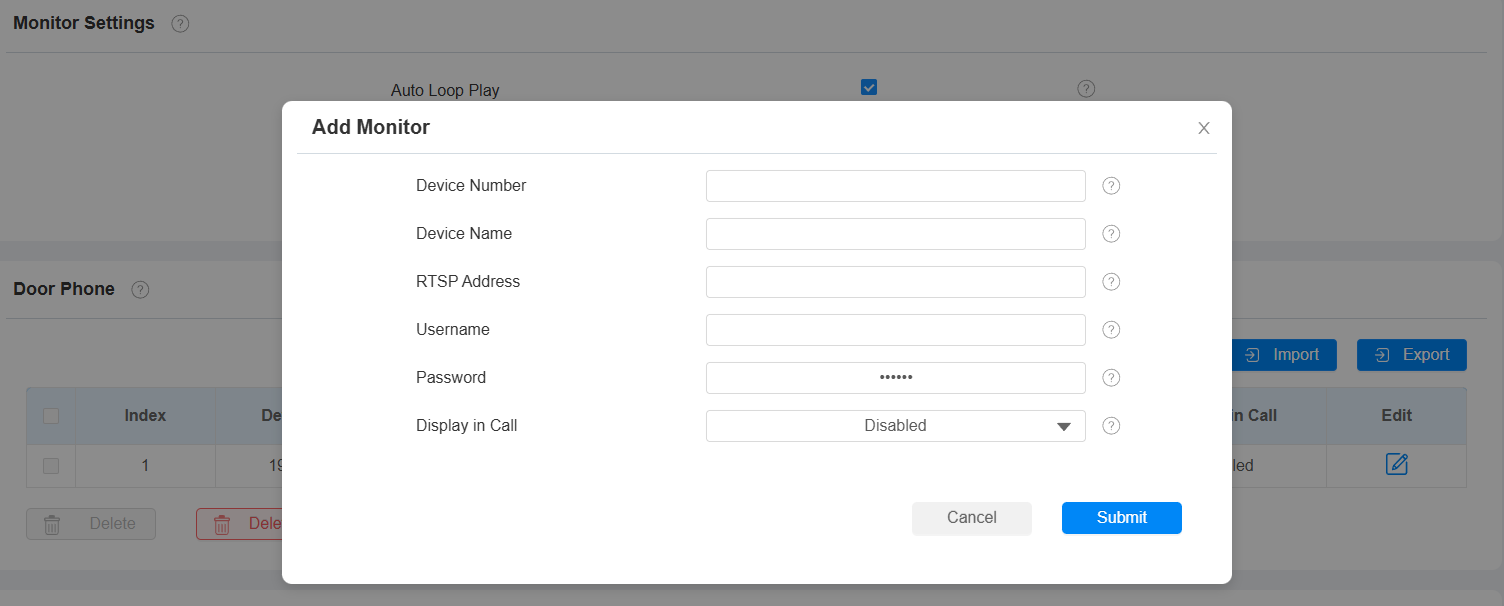
Device Number: The device's SIP/IP number for identification.
Device Name: The device name for identification.
RTSP Address: The RTSP address of the monitoring device. RTSP format: rtsp://Device IP address/live/ch00_0.
Username: The username of the monitoring device for authentication.
Password: The password of the monitoring device for authentication.
Display In Call: Enable it to display the monitoring video during a call.
Note
You can import and export the monitoring device settings via a template in .xml format.
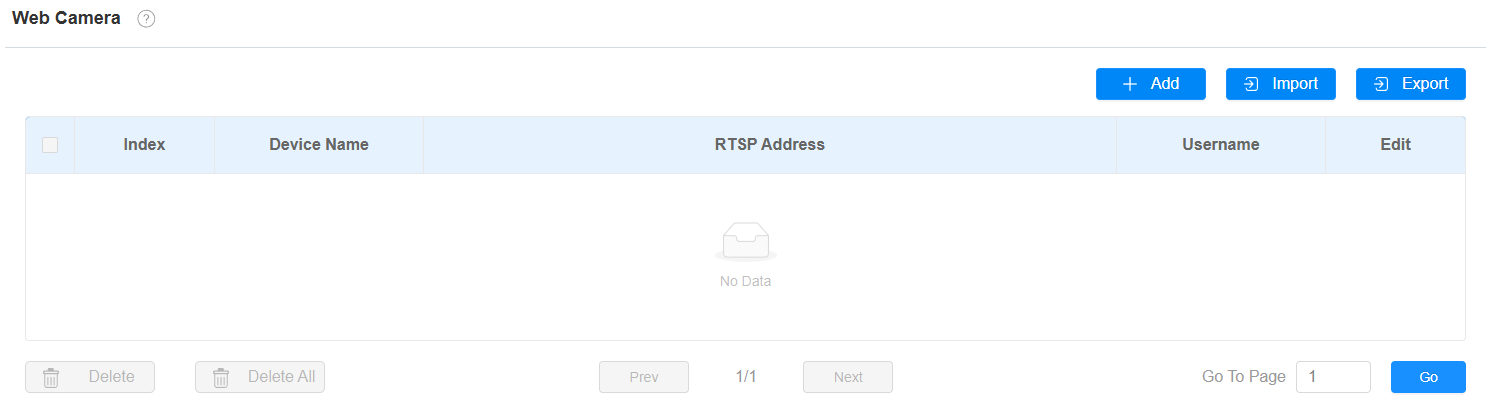
Web Camera Setting
You can configure the monitor feature for third-party cameras on the web Device > Monitor > Web Camera interface.
Click Add to add a camera.
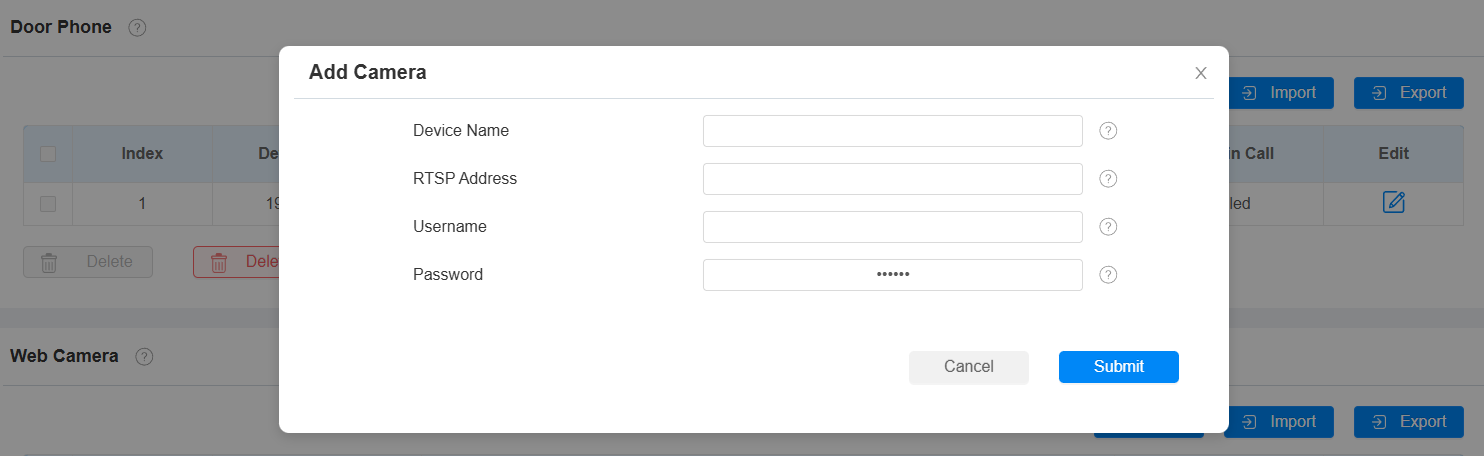
Device Name: The name of the third-party camera.
RTSP Address: The RTSP URL for the third-party camera. Confirm it with the third-party service provider.
Username: The username of the monitoring device for authentication.
Password: The password of the monitoring device for authentication.
You can also import or export the monitor list in batch on the same interface. The import file only supports the .xml format.

View Monitoring Streams
After adding the monitored device’s RTSP URL, select Monitor on the home screen.
Tap + and — to switch between channels.
RTSP Authentication
With RTSP authentication, users can monitor the indoor monitor via RTSP audio stream. This feature can be applied to, for example, listen to the baby in the baby’s room for safety.
To set it up, go to Settings > Basic interface.

Enable RTSP Audio: Enable it if you want to monitor the device via RTSP audio stream.
Authorization Type: It is Digest by default.
Username: Set the username for the authentication.
Password: Set the password for the authentication.
Voice Encryption
The encryption function provides three encryption methods to protect voice signals from eavesdropping during a call.
To set it up, go to the Account > Advanced > Encryption interface.

Voice Encryption:
Disabled: The call will not be encrypted.
SRTP(Compulsory): All audio signals(technically speaking, it is RTP streams) will be encrypted to improve security.
SRTP(Optional): Encrypt the voice from the caller. If the caller also enables SRTP, the voice signals will also be encrypted.
ZRTP(Optional): The protocol that the two parties use to negotiate the SRTP session key.
Web Interface Automatic Log-out
You can set up the web interface's automatic log-out timing, requiring re-login by entering the user name and the passwords for security purposes or for the convenience of operation.
To set it up, go to the web Security > Basic > Session Timeout interface.

High Security Mode
High security mode is designed to enhance the security. It employs encryption across various facets, including the communication process, door opening commands, password storage methods, and more.
To set it up, go to the web Security > Basic > High Security Mode interface.

Important Notes
1. The High Security mode is off by default when you upgrade the device from a version without the mode to one with it. But if you reset the device to its factory settings, the mode is on by default.
2. This mode makes the old version tools incompatible. You need to upgrade them to the following versions or higher to use them.
PC Manager: 1.2.0.0
IP Scanner: 2.2.0.0
Upgrade Tool: 4.1.0.0
SDMC: 6.0.0.34
3. The supported HTTP format for relay triggering varies depending on whether high secure mode is enabled or disabled.
If the mode is on, the device only accepts the new HTTP formats below for door opening.
http://username:password@deviceIP/fcgi/OpenDoor?action=OpenDoor&DoorNum=1
http://deviceIP/fcgi/OpenDoor?action=OpenDoor&DoorNum=1
If the mode is off, the device can use both the new formats above and the old format below:
http://deviceIP/fcgi/do?action=OpenDoor&UserName=username&Password=password&DoorNum=1
4. It is not allowed to import/export configuration files in tgz. format between a device with the high security mode and another one without it. For assistance with file transfer, please contact Akuvox technical support.