Akuvox ACR-CID01 supports configuring access keys for Mifare cards so they can be securely read by Akuvox door phones and access control terminals.
Note
Click here to view the guidance on using ACR-CID01.
Click here to download the ACR-CID01 configuration software ACRM.
The following devices with specific firmware or higher support reading Mifare Plus and DESFire cards:
S539: 539.30.10.238;
S535: 535.30.10.233;
S538: 538.30.10.705;
S532: 532.30.10.117;
X916: 916.30.10.311;
X915V2: 2915.30.10.228;
X912: 912.30.11.13;
X910: 2910.30.10.240;
R29: 29.30.10.327;
R28V2: 228.30.10.127;
R20V5: 320.30.10.226;
E12V2: 312.30.10.208(Not Support Reading Mifare Plus);
E16V2: 216.30.10.106(Not Support Reading Mifare Plus);
E18: 18.30.10.205(Not Support Reading Mifare Plus);
A01/02: 101.30.10.103;
A03: 103.30.10.105;
A05V2: 205.30.10.111;
A08: 108.30.10.149.
This article takes X915 as an example.
Mifare Classic, Mifare Plus, and DESFire cards are security cards that use key-based access control. Access keys must be configured before the cards can be read by Akuvox devices.
You can purchase the cards from Akuvox or other channels. Akuvox offers Mifare-F08-1K-Keyfod, Mifare-S50-1K-Card, and DESFire-EV3-Card. Contact Akuvox sales team at sales@akuvox.com for details.
Mifare Classic
Configure Card Keys
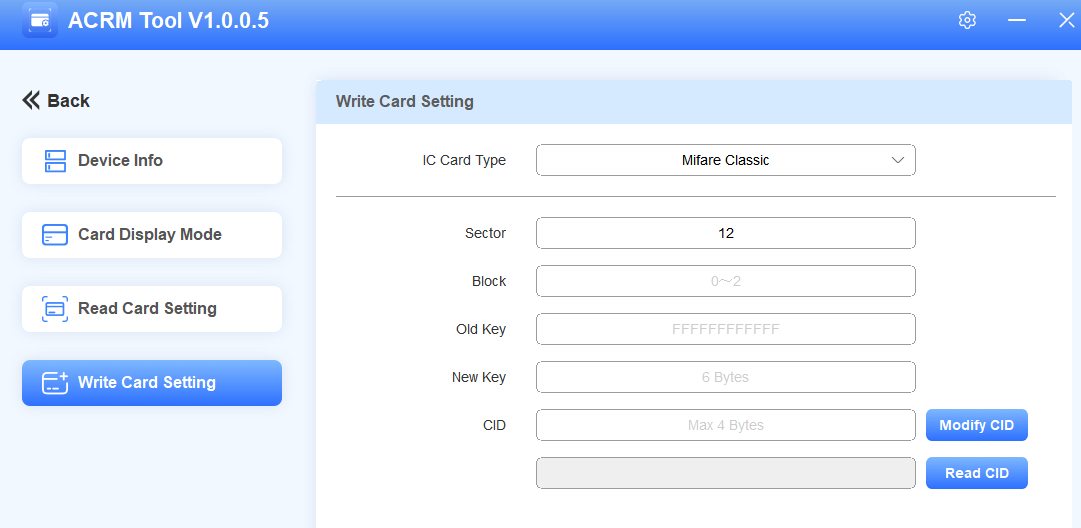
Click Write Card Setting on the ACRM tool.
Select Card Type as Mifare Classic.
Enter the sector number(0 to 15) that stores the card data.
Enter the block number(0 to 2).
Enter the old block key. The key is “FFFFFFFFFFFF”(case insensitive) by default for new cards.
Enter the 6-byte new key.
Set the output card code(CID) with a maximum of 4 bytes.
Click Modify CID. “Successfully write card” will pop up.
Then, you need to set up the Mifare card feature and assign the card to a user on the door phone.
Set up the Door Phone
Use the device IP to log into its web interface. The initial username and password are admin.
Click Access Control > Card Setting.
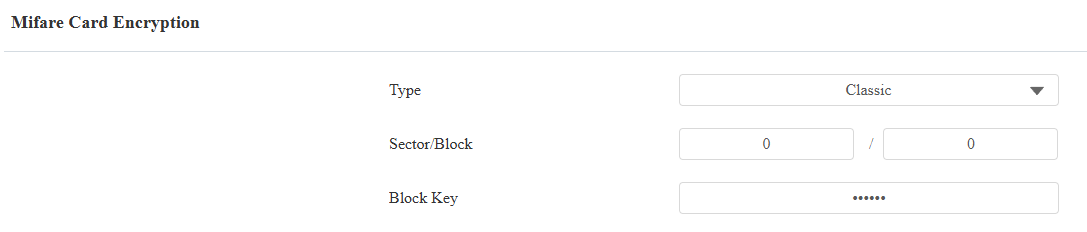
Select Classic for Mifare Card Encryption.
Enter the sector number, block number, and block key that you set.
Click Submit.
Assign Card to User
Click Directory > User.
Click +Add to add a new user, or click
 to modify an existing user’s information.
Find the RF Card part. Click Obtain while placing the card on the door phone’s card reader.
The card code will display automatically.

Click Submit after finishing other settings.
The user can open the door by swiping the card on the door phone.
Mifare Plus
Configure Card Keys
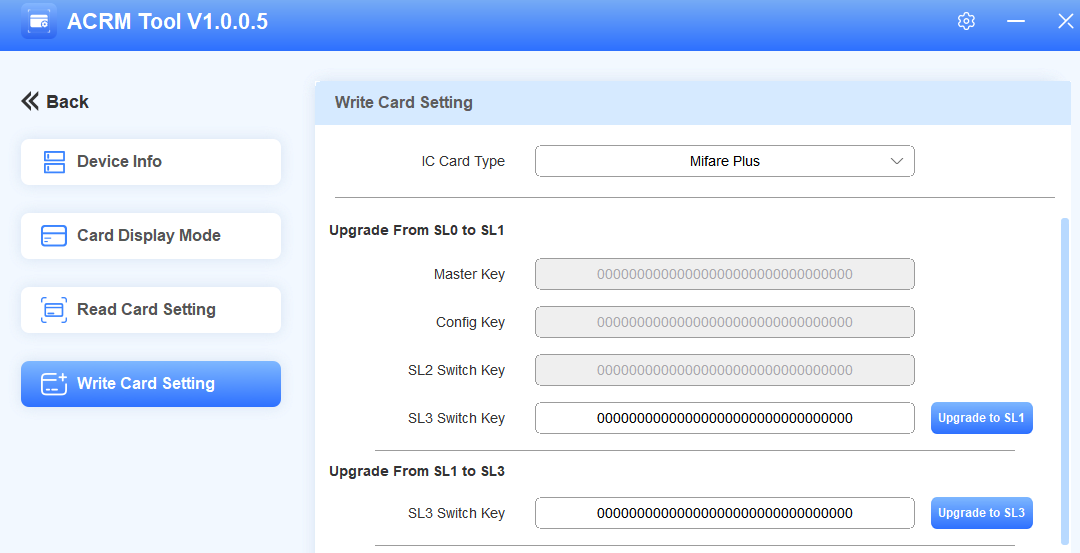
Click Write Card Setting on the ACRM tool.
Select Card Type as Mifare Plus.
Upgrade the card. It must at least be upgraded to SL1 for usage.
To upgrade the card from SL0 to SL1, customize the SL3 Switch Key with a maximum of 16 bytes. Then, click Upgrade to SL1.
To upgrade the card from SL1 to SL3, enter the SL3 Switch Key you set. Then, click Upgrade to SL3.
Note
The card cannot be upgraded from SL0 to SL3.
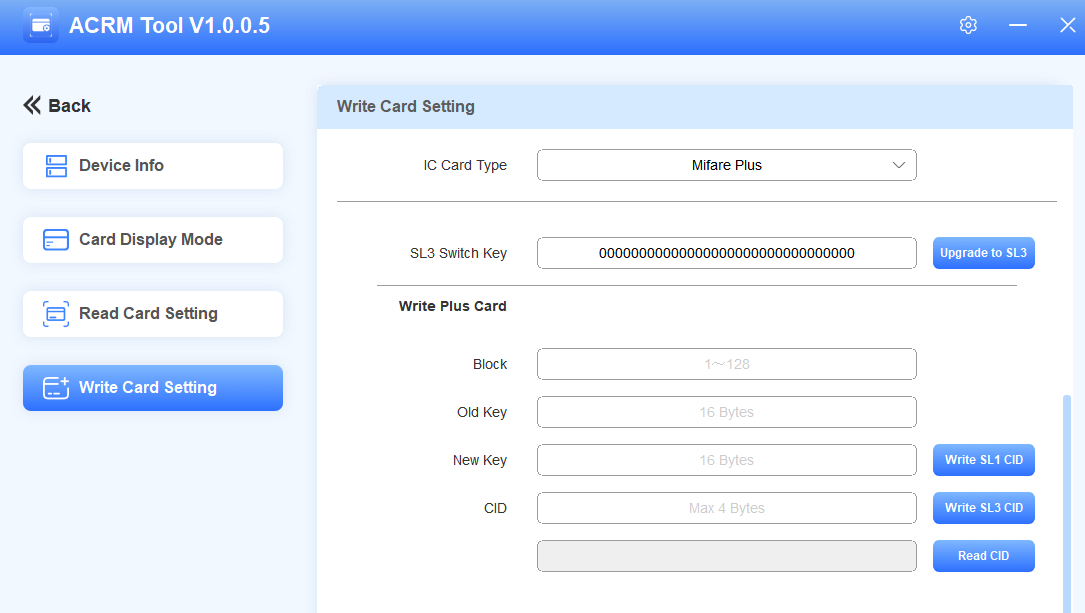
Enter the block number(1 to 128). Do not enter these numbers: “3, 7, 11, 15, 19, 23, 27, 31, 35, 39, 43, 47, 51, 55, 59, 63, 67, 71, 75, 79, 83, 87, 91, 95, 99, 103, 107, 111, 115, 119, 123, 127”.
Enter the old key. It is 32-bit F(case-insensitive) by default for new cards.
Customize the new 16-byte key and 4-byte CID.
Click Write Card.
Write SL1 CID: Write the key into the SL1 card.
Write SL3 CID: Write the key into the SL3 card.
Set up the Door Phone
Use the device IP to log into its web interface. The initial username and password are admin.
Click Access Control > Card Setting.
Select Plus for Mifare Card Encryption.
Enter the block number and key in any of the choices that you set.
Note
The three choices mean that you can use three types of Mifare Plus cards. When swiping a card, as long as one of the choices matches its SL key, the card code in the block you specified will be output.
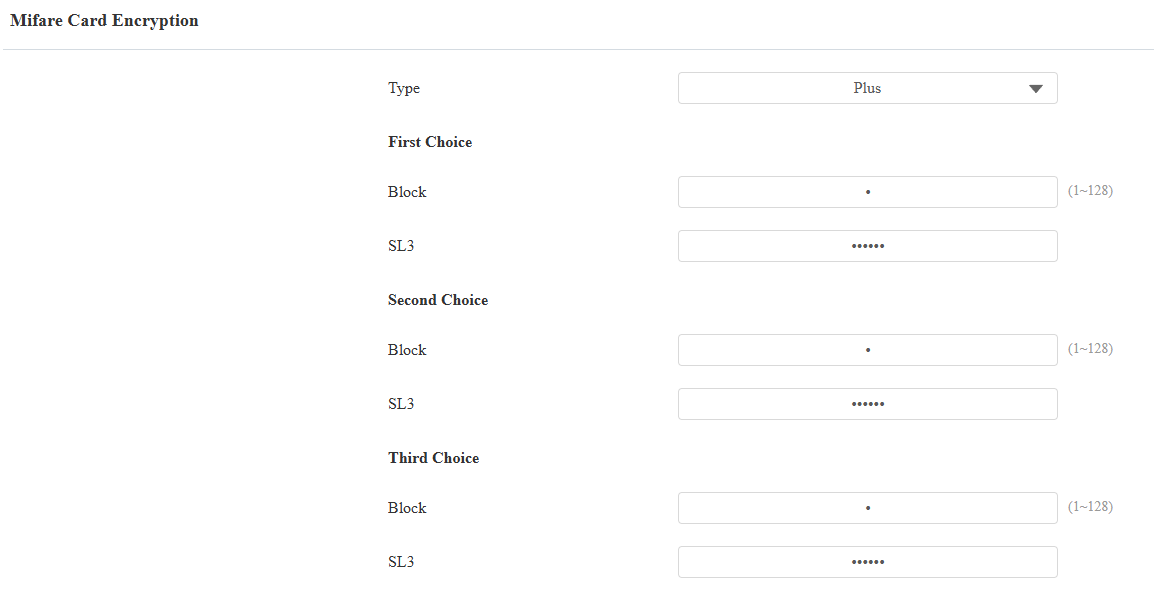
Click Submit.
Assign Card to User
You need to assign the card code to a user for door opening.
Desfire
Configure Card Keys
Create App
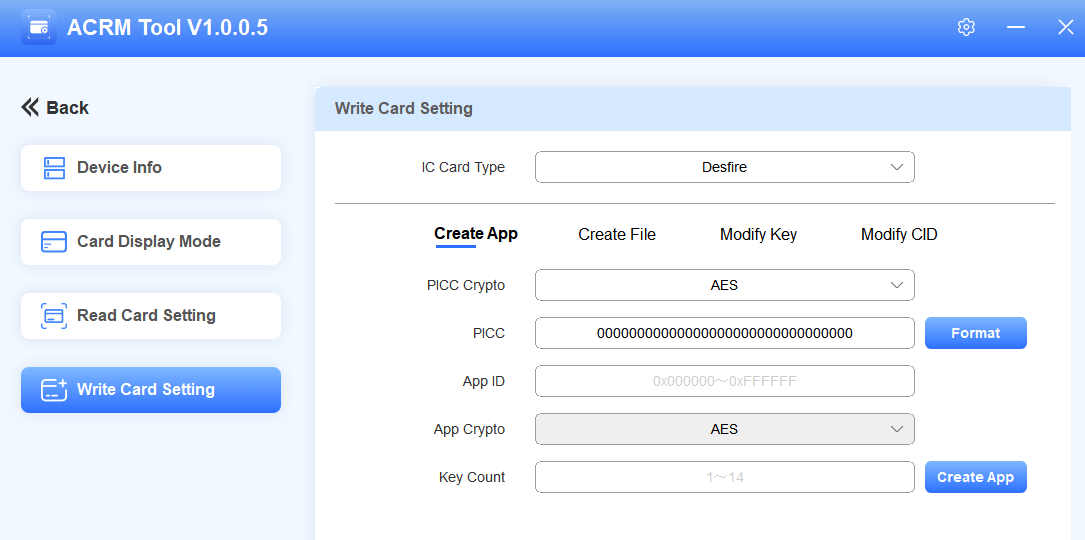
Click Write Card Setting on the ACRM tool.
Set the IC Card Type to Desfire. If you need to format the card, enter the PICC and click Format. The default is 32-bit 0 for Akuvox Desfire cards.
Enter 6-digit hexadecimal as the App ID.
Set the key count with 14 at most. The key count decides the key ID. For example, if you enter 4, then you can set 4 keys with key ID 0, 1, 2, and 3.
Click Create App. “Successfully Create App” will pop up.
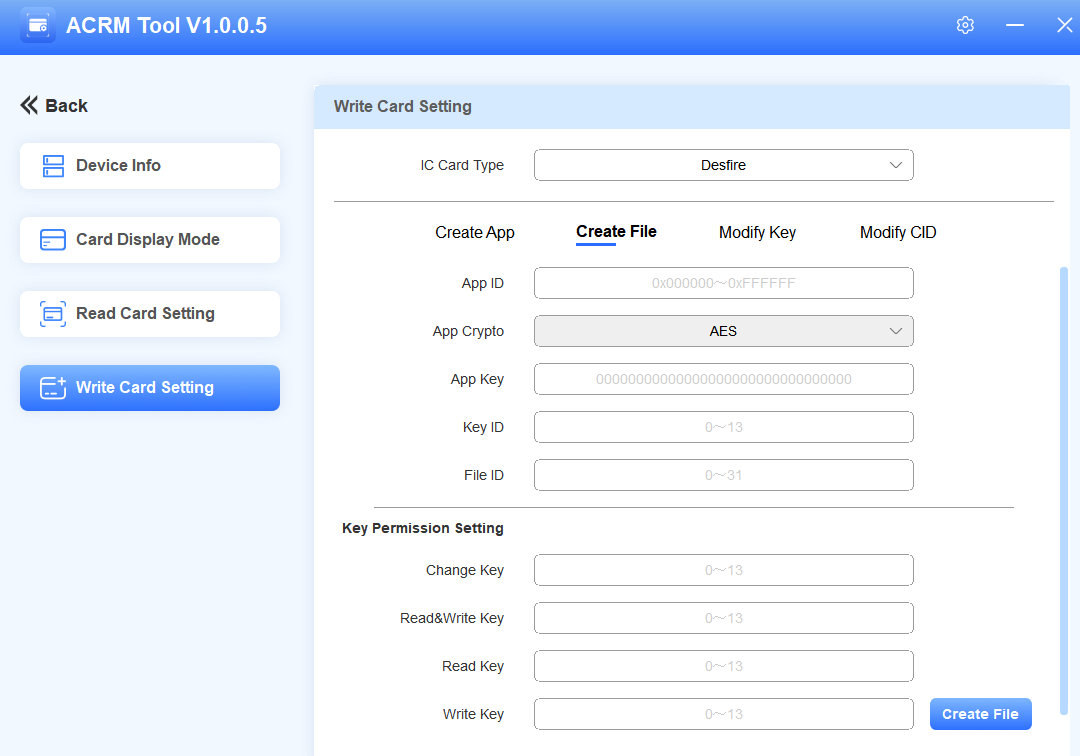
Create File
Enter the App ID you set on the Create App interface.
Enter the App Key.
If it is an Akuvox Desfire card, it is 32-bit 0 by default.
If it is a third-party card, please confirm it with the service provider.
Enter the Key ID based on the key count you selected on the Create App interface. For example, if the key count is 1, then the Key ID is 0. If it is 2, the Key ID for the first key is 0, the second key is 1.
Customize the File ID from 0 to 31.
Set key permissions. You can grant permissions to specific keys.
Enter the corresponding key ID when you need to read and/or write the CID. Please note that the Change Key function is currently unavailable.
If the key count is 1, you can set all the values to 0.
Click Create File. “Successfully Created File” will pop up.
After creating the App and File, the encryption of the card is done. If you want to change the App Key and card code, further navigate to the Modify Key and Modify CID chapters of the ACRM Tool manual.
Set up the Door Phone
Use the device IP to log into its web interface. The initial username and password are admin.
Click Access Control > Card Setting.
Select DESFire for Mifare Card Encryption.
Enter the App ID and File ID that you set.
Enter the App Key.
Enter the Key ID that is granted permission to read the CID.
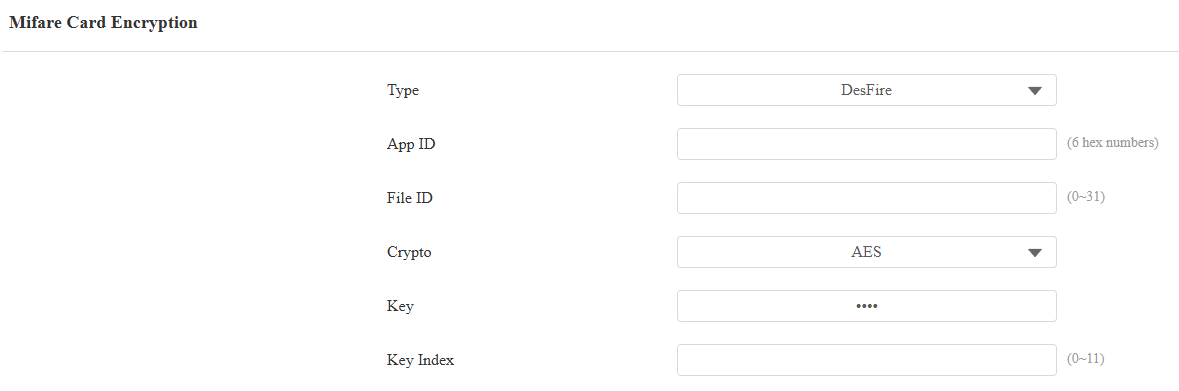
Click Submit.
Assign Card to User
You need to assign the card code to a user for door opening.