Elevator Control is a cloud-managed access feature that connects user permissions, trigger devices, and EC33 relay logic into one unified workflow.
It allows installers and project managers to define:
Which floors each elevator controller can access
Which devices (door phone, access control terminal, indoor monitor, guard phone) can trigger elevator unlock
How long each trigger keeps the relay active (Hold Time)
Which floors/elevators each resident is allowed to use
It also supports floor mapping modes for different wiring structures, plus schedule-based hold-open behavior for selected floors.
Compatible model and version(or higher)
Model
Firmware Version
Model
Firmware Version
EC33
33.30.1.107
R29
29.30.10.712
R20
320.30.12.16
A08
108.30.11.210
X915V2
2915.30.10.707
A095
95.30.11.6
A094
92.30.11.106
R28V2
228.30.11.17
X916
916.30.10.508
S539
539.30.10.605
A01/A02
101.30.11.109
S535
535.30.11.8
X912
912.30.12.207
S538
538.30.10.705
R25
25.30.10.206
Important Note:
For projects created before cloud version 7.4.0(April 15, 2026), the Elevator Control option is hidden by default.
To enable this feature, please contact the Akuvox support team. Once enabled, reconfigure Accessible Floors in the project to ensure proper operation.
Key Concepts
Floor Mapping Mode
This defines how the system calculates the relationship between:
Floor number ↔ EC33 relay
Because the EC33 controls floors through relay wiring, the cloud must understand which relay represents which floor.
Two modes exist:
Custom Floor Name (recommended)
Map floor names manually to relays.
Set Ground Floor
The system calculates floors automatically based on wiring order.
Most projects should use Custom Floor Name because wiring in real projects is often non-sequential.
Trigger Device
Trigger devices are devices that allow the activation of elevator control.
Examples:
Door phones
Access control devices
Indoor monitors
Guard phones
Important logic:
If a device is NOT configured as a trigger device, it cannot trigger elevator control.
Controlled Floors
This defines which floors a specific EC33 controls.
This is used when:
One building has multiple elevators
Elevators serve different zones
Example:
Elevator | Floors |
|---|---|
Elevator A | 1-10 |
Elevator B | 11-20 |
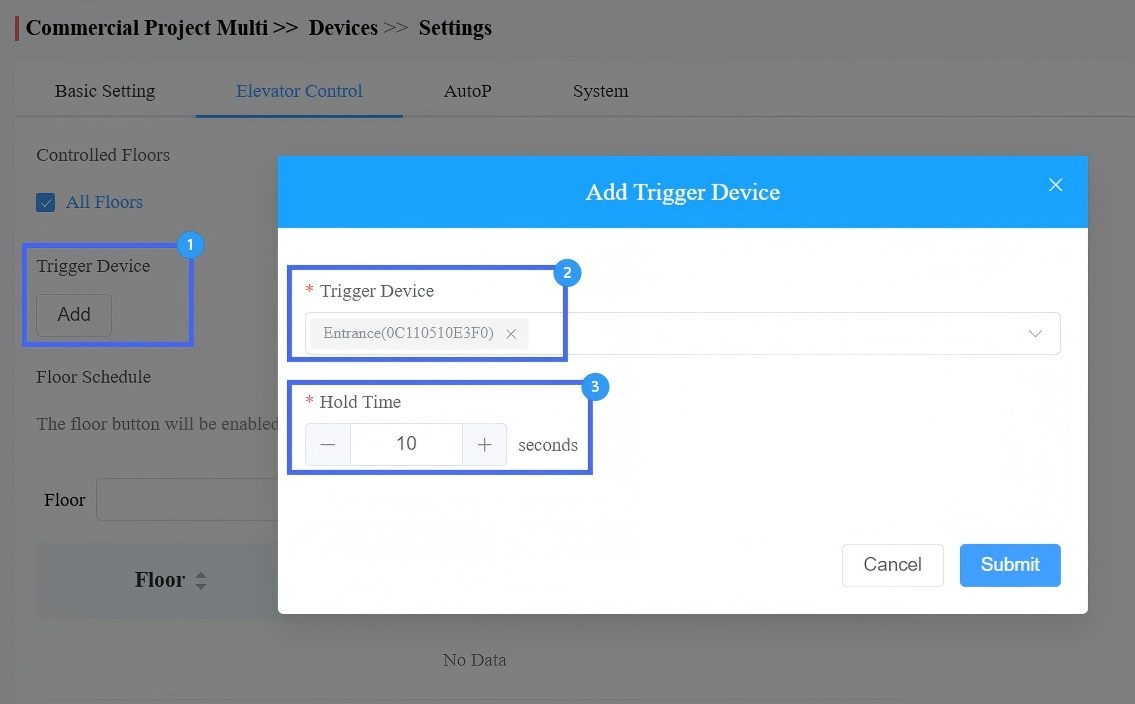
Hold Time
Defines how long the relay remains active after being triggered.
Example:
Lobby door phone → 5 seconds
Parking entrance → 15 seconds
This allows different unlock times depending on the entry location.
Before You Start
Please confirm the following first:
Elevator Control is enabled in the project features.
EC33 hardware is online and added to the cloud.
If floors exceed 32, the expansion board is installed, and the EC33 master board is added to the cloud.
Step 1: Enable Elevator Control in the Project
Log in to the cloud with your installer account.
Click Commercial(s) on the dashboard.
Click New to create a new project, or click
 to modify a current one.
 Find the Elevator Control feature and enable it.
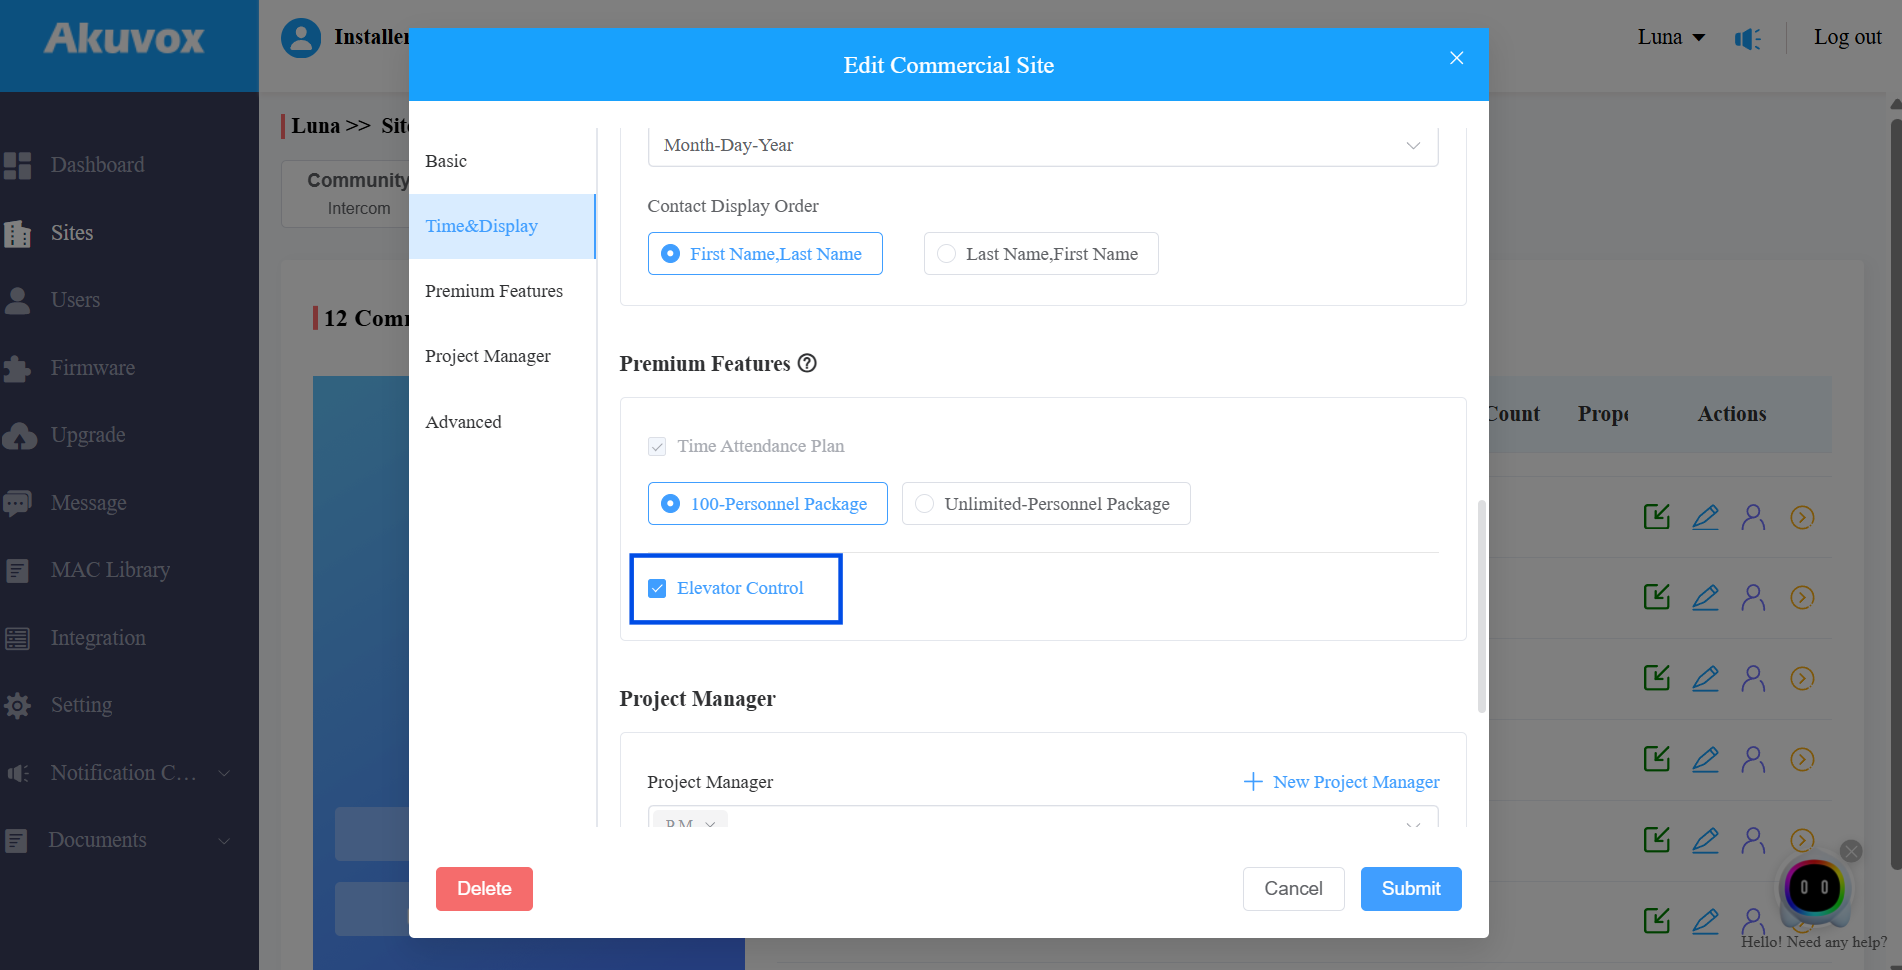
Submit the setting.
Note
Elevator Control is a premium feature that requires payment.
Step 2: Configure Building Floor Mapping
Click
 of the target project.
Click Devices > + Add Building to create new buildings, or click
 > Edit to modify a current one.
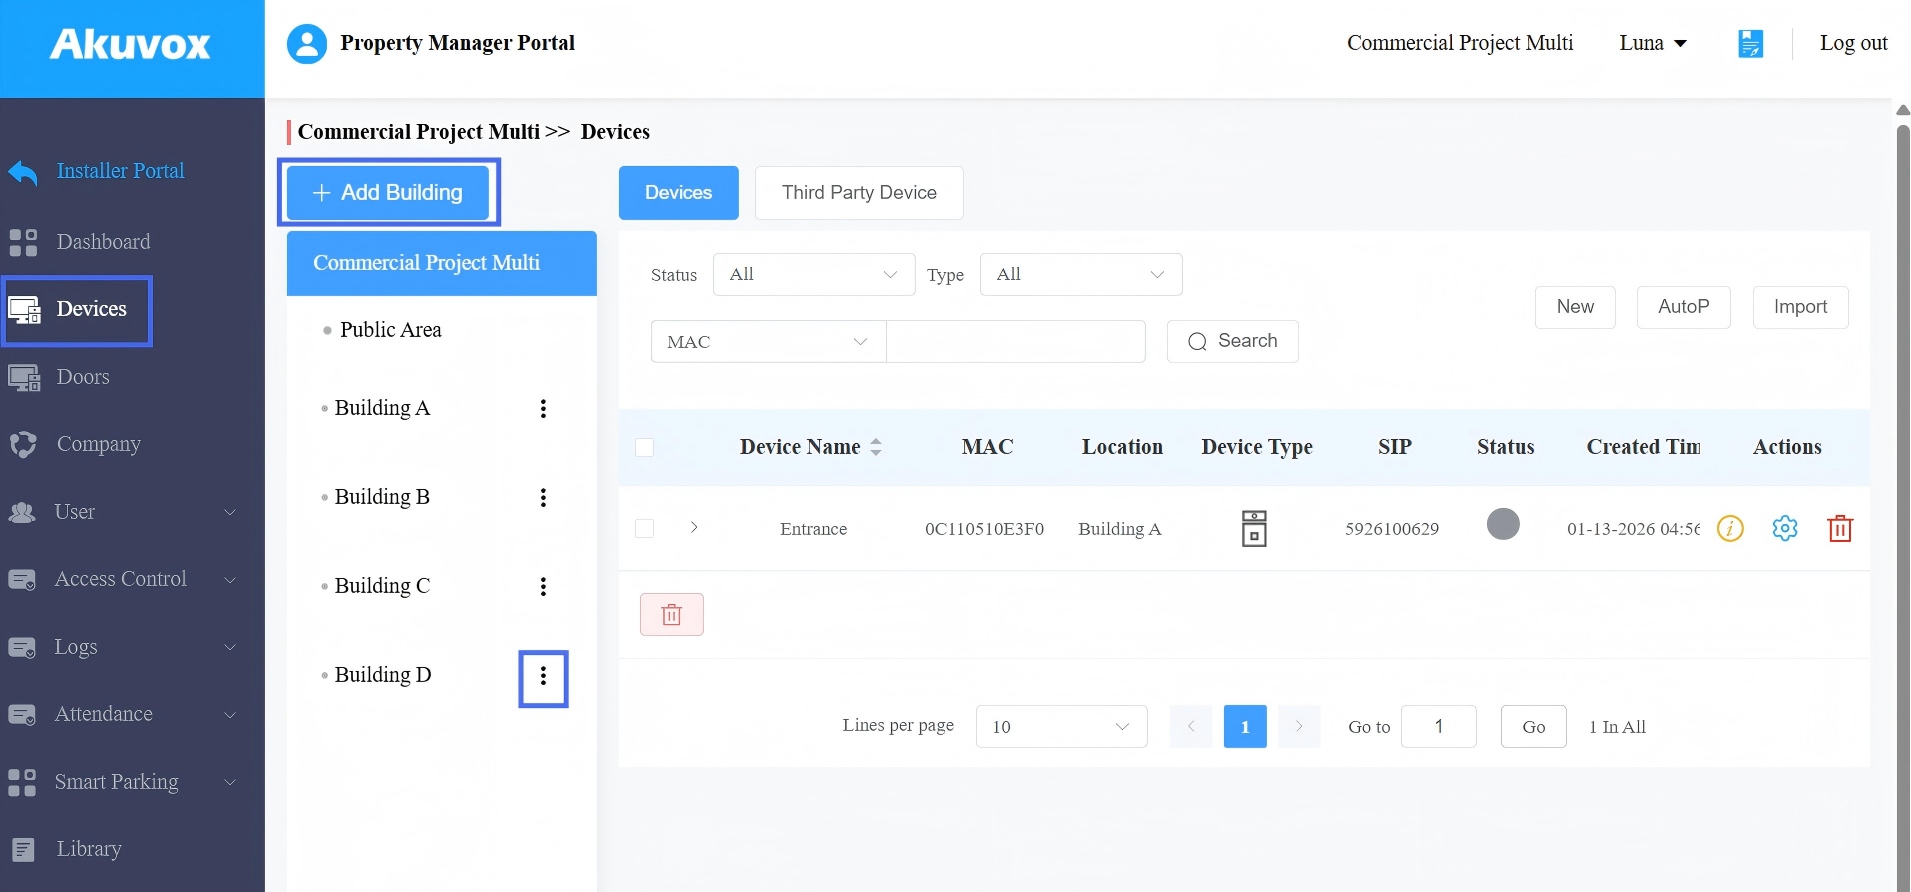
Name the building.
Select the Floor Mapping Mode between Custom Floor Name and Set Ground Floor.
Option A: Custom Floor Name
Use this when you want flexible relay usage and custom labels (for example, Gym, Supermarket, B1, B2).
Set the Starting Relay. This defines the first relay used for elevator control. For example, ff relays 1-2 are used for other purposes, start from relay 3.
Set the Ending Relay. This defines the last relay used.

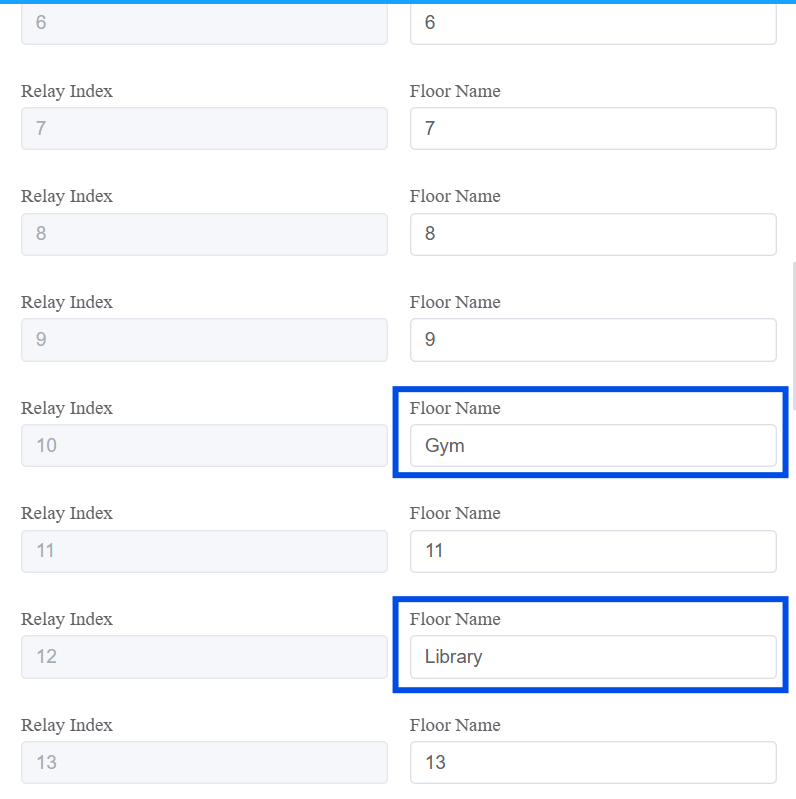
Configure Custom Floor Name (optional per floor). Rename special floors if required.
If not renamed, floor name = relay index.
Submit the setting.
Floor Mapping Example | |
|---|---|
Relay | Floor |
Relay 1 | Floor 1 |
Relay 2 | Floor 2 |
Relay 3 | Floor 3 |
Relay 10 | Gym |
Relay 12 | Library |
Option B: Set Ground Floor
Use this when relays are wired in strict floor order from the lowest floor.
Set the Starting Floor (the lowest floor).
Set the Ending Floor (the highest floor).
Set the Ground Floor (which floor is treated as ground).
Select Configure on the Device based on your deployment plan.
Choose it if floor mapping/ground-floor behavior should be finalized directly on the device side.
Do NOT choose it if you want cloud-side configuration to remain the primary control source.
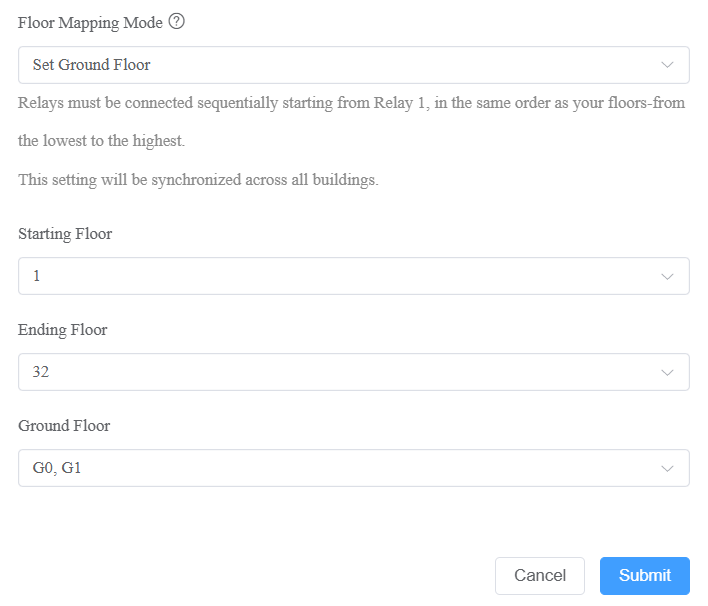
Submit the setting.
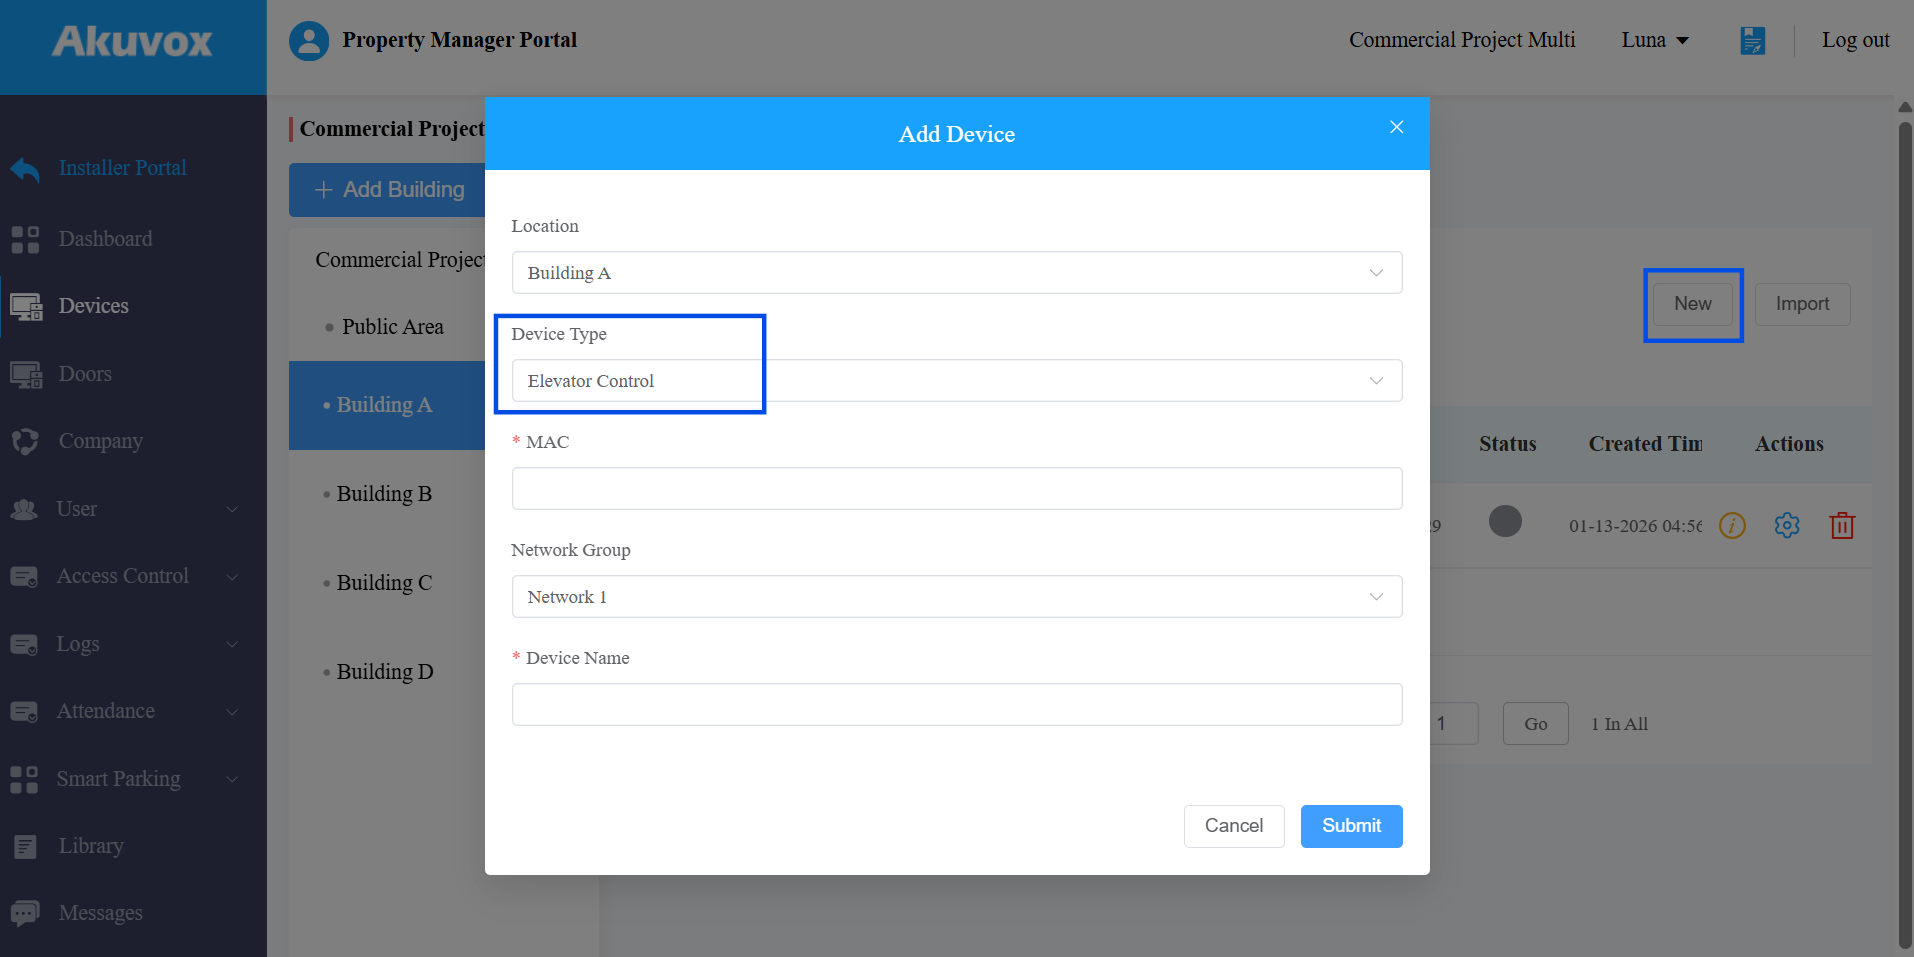
Step 3: Add EC33 Under Building
Add the elevator control device EC33 to the correct building. It CANNOT be added to the Public Area.
Select the target building.
Click New on the right.
Set Device Type to Elevator Control.
Enter the device MAC and name the device.
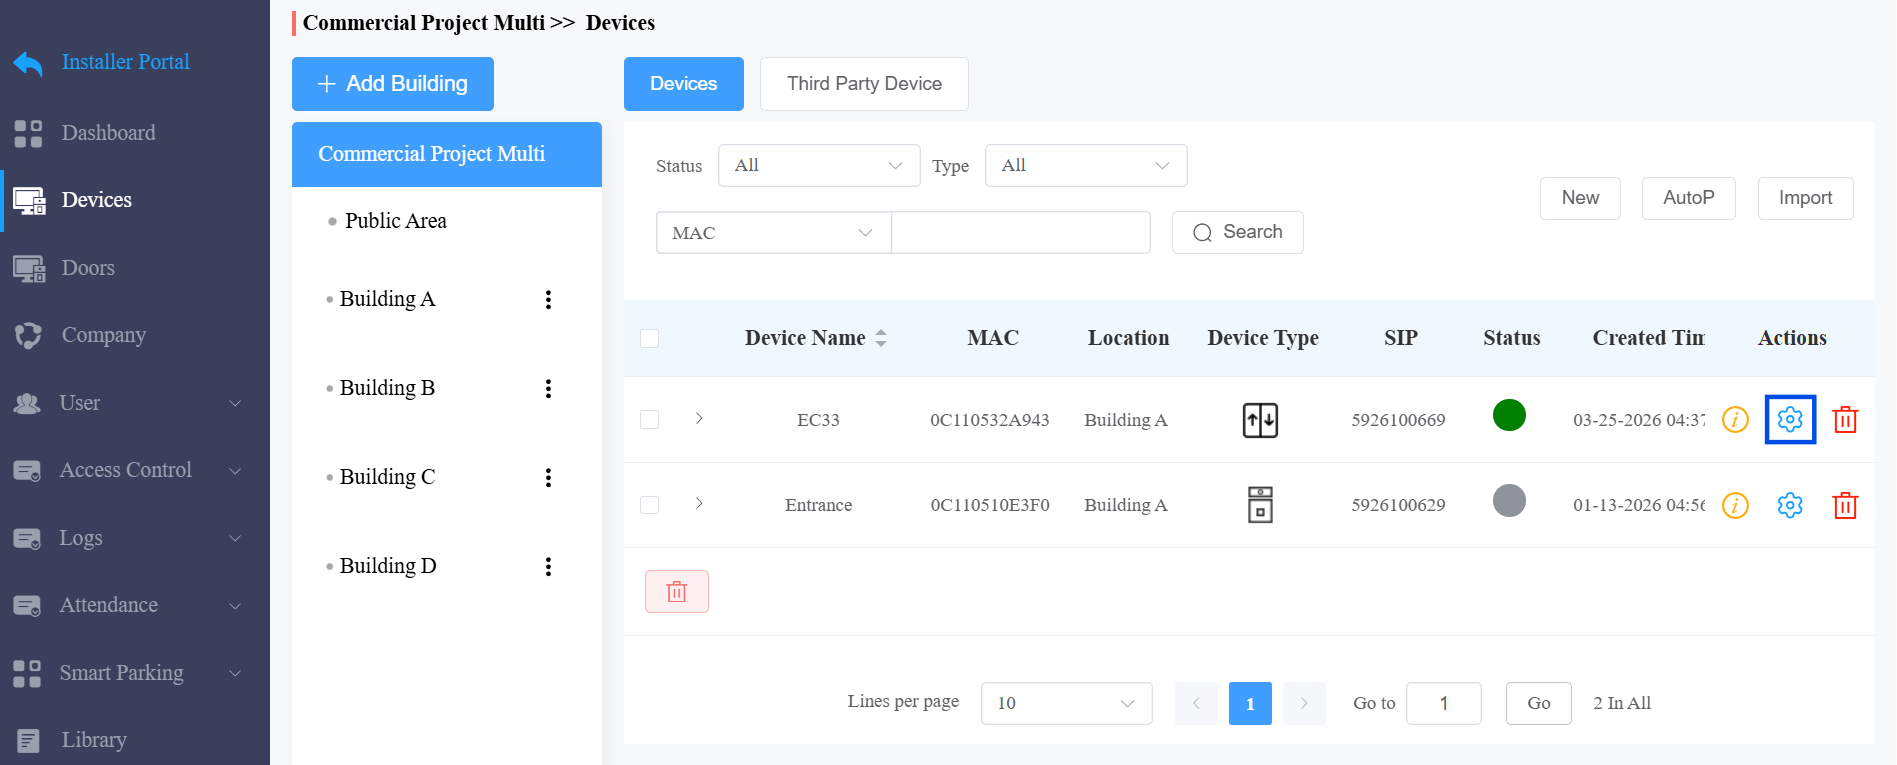
Step 4: Configure EC33 Core Behavior
Open EC33 Settings  > Elevator Control.
Controlled Floor
Set which floors this EC33 can serve.
Default is All Floors.
You can split by elevator zone (high/low, odd/even).
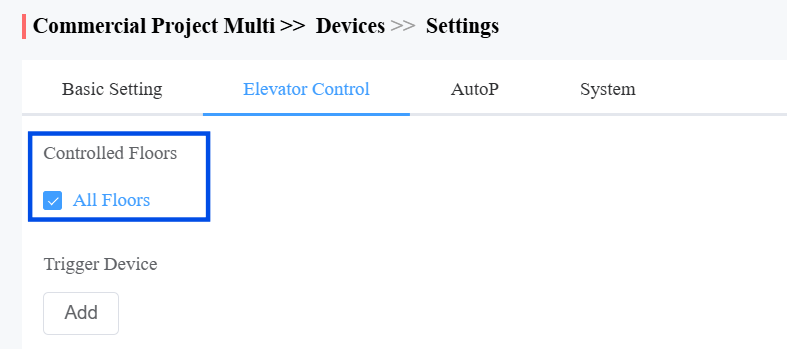
Trigger Device and Hold Time
Select allowed trigger devices for this EC33, then define hold time per trigger source.
Why this matters:
Different entrances or terminals may require different relay hold durations.
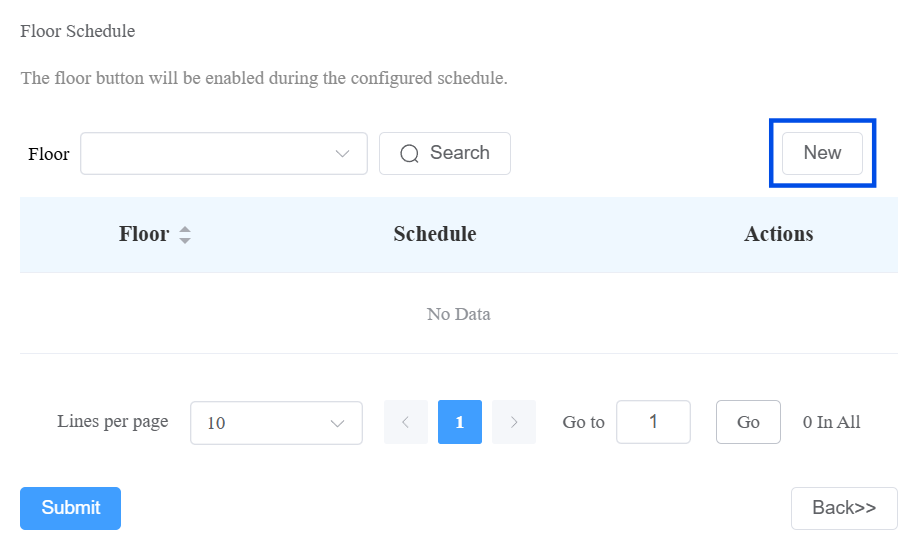
Floor Schedule
Set time windows when selected relays remain hold-open.
Click New to add a schedule.
Select the floor(s) that use the schedule.
Select the Repeats mode: Daily, Weekly, or Never.
Specify the time range by holding and dragging the time block.
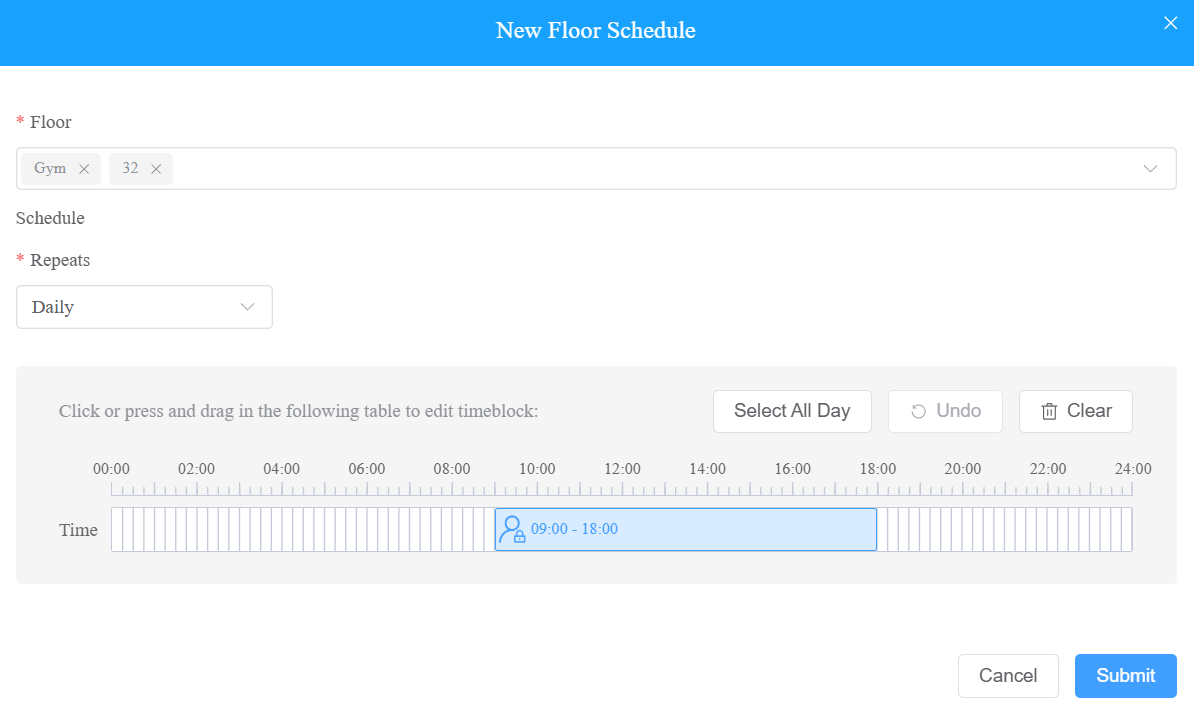
Submit the setting.
Step 5: Configure User Elevator Permissions
For Multi-Company Projects
You need to configure the elevator and floor settings for a company. Then, configure accessible floors for groups.
Click Company >
 of the target company.
 Scroll to the Floors section.
Select the accessible buildings and floors.
Select the elevator control device.
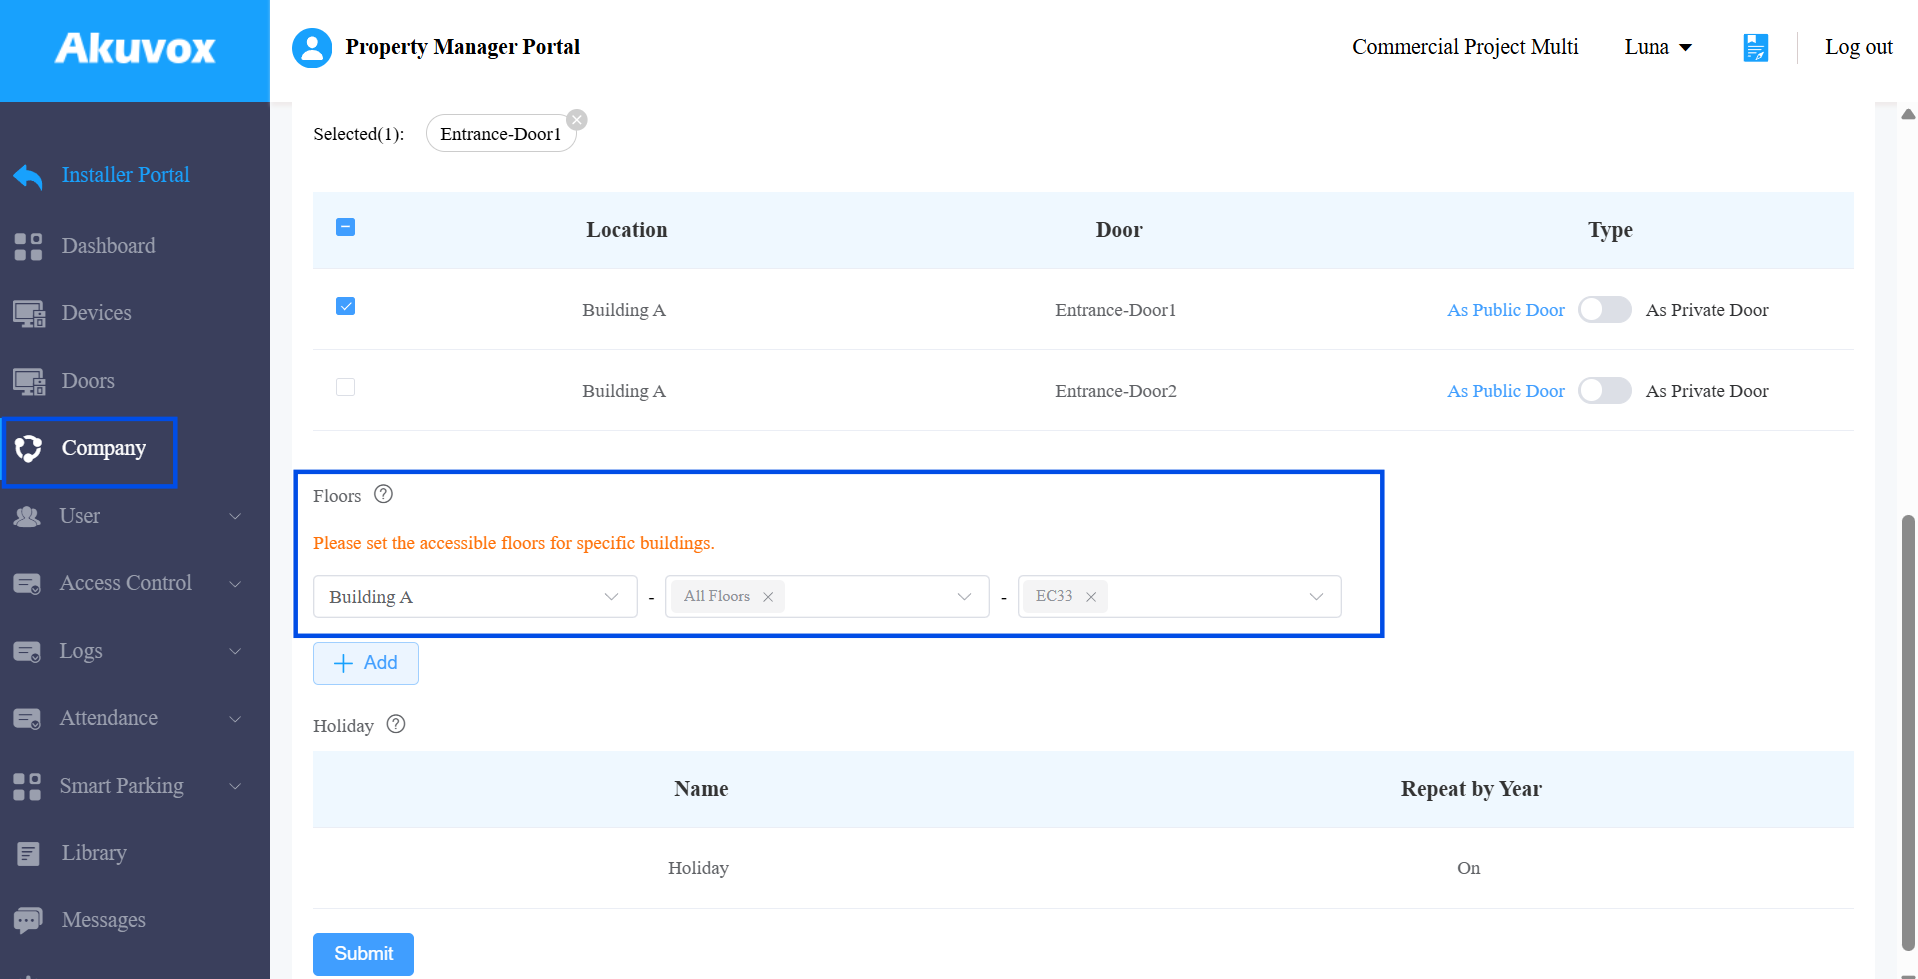
Submit the setting.
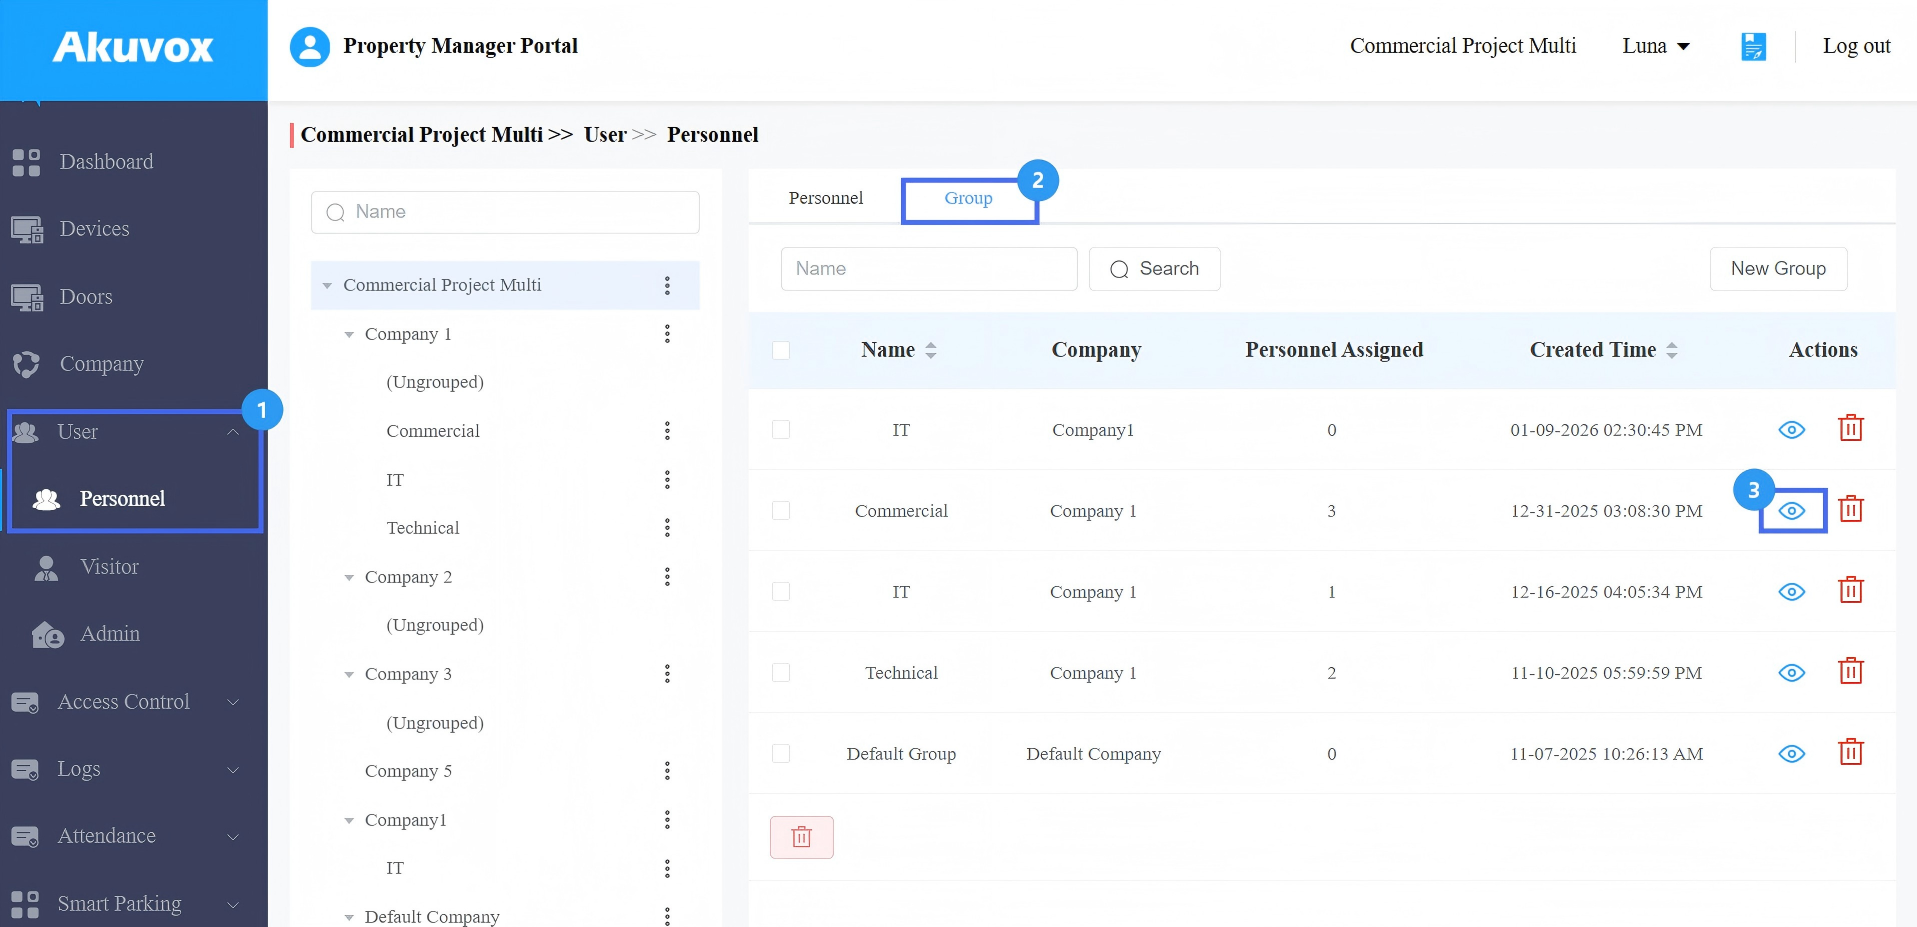
Go to User > Personnel > Group.
Click
 of the target group.
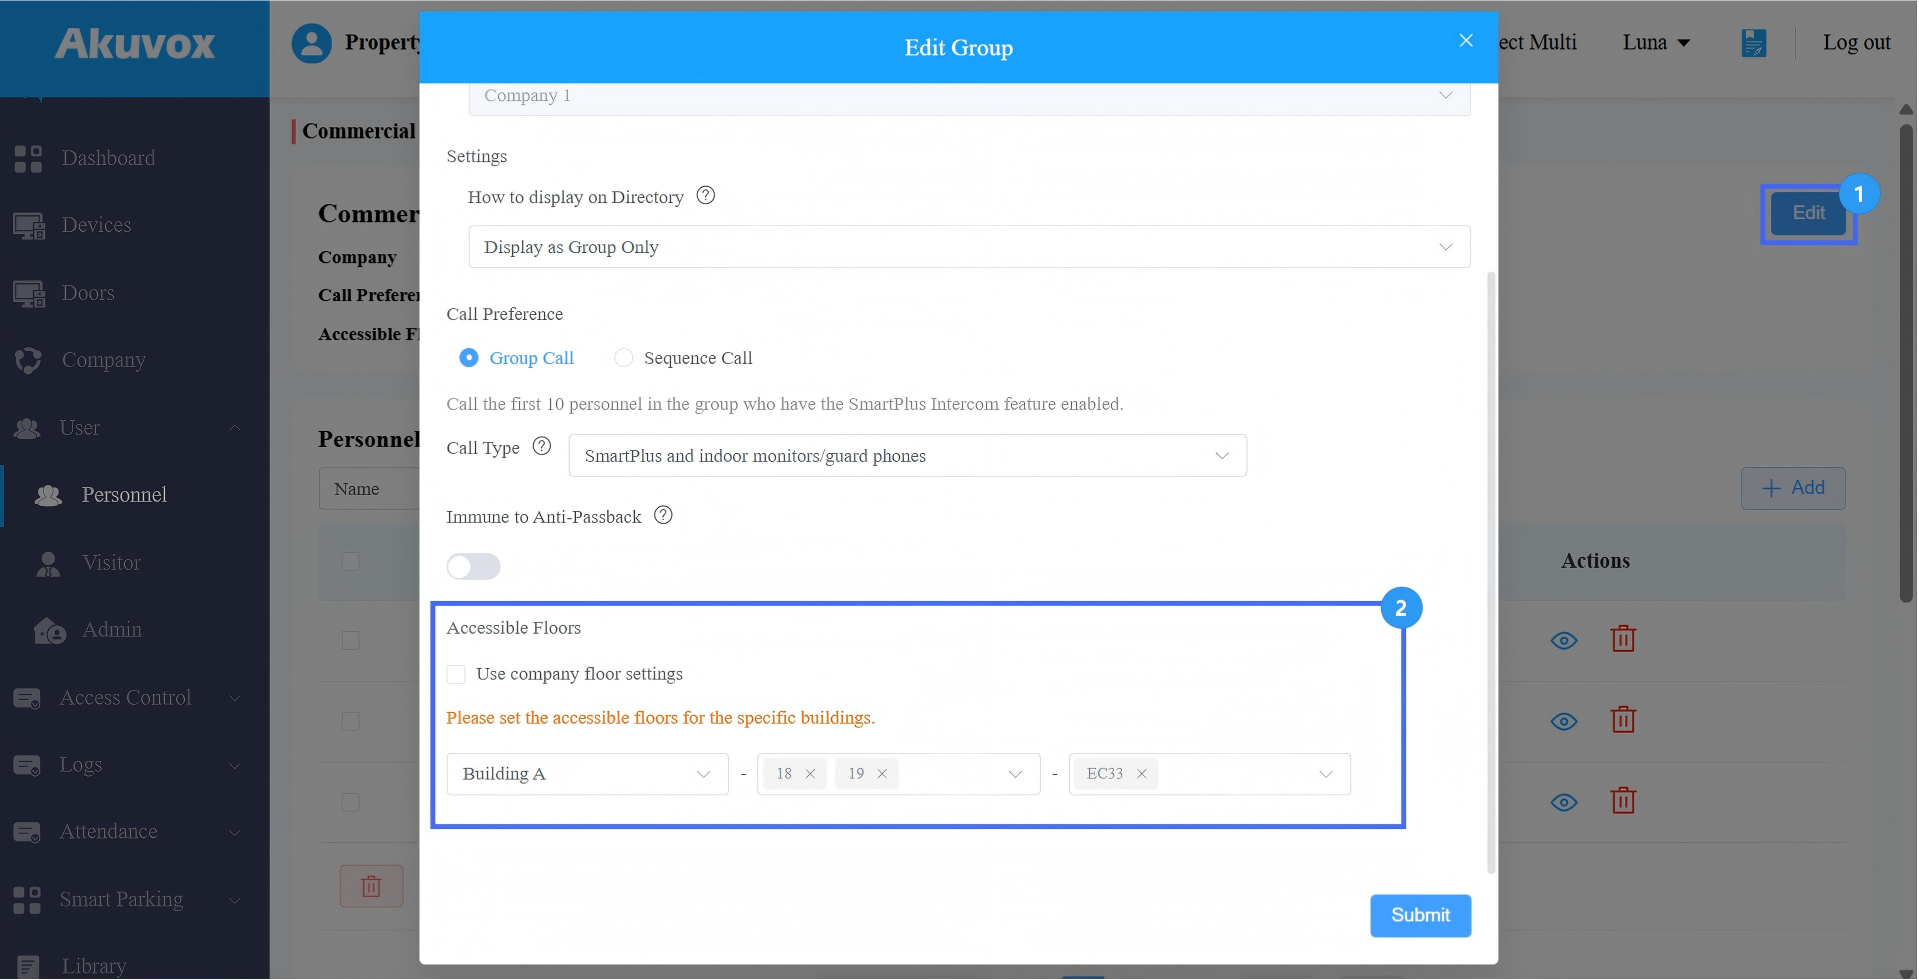
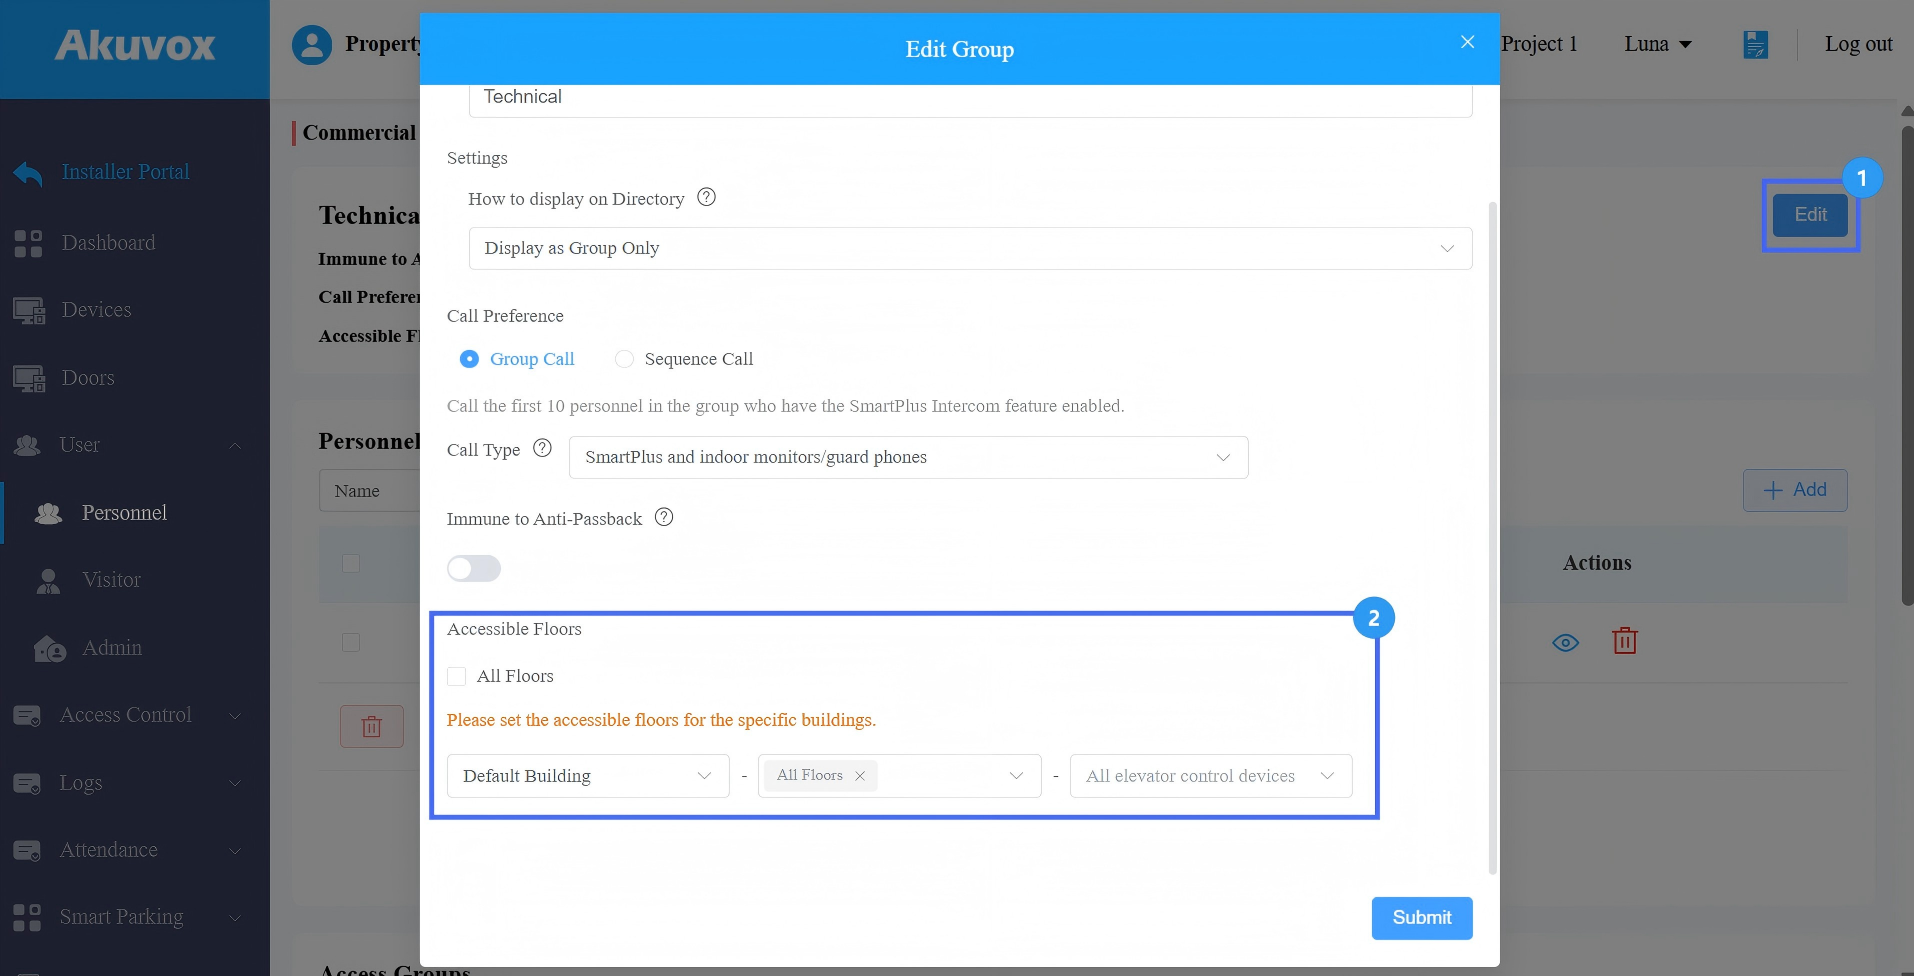
Click Edit in the upper-right corner.
Set whether to use the company floor settings.
If not, specify the accessible buildings and floors, and choose the elevator control device.
Note
A user may belong to multiple groups, and each group can have up to 20 accessible floors selected.
This may result in more than 20 accessible floors being assigned to a user from the cloud, but ONLY the first 20 accessible floors will take effect.
Submit the setting.
For Single-Company Project
Go to User > Personnel > Group.
Click
of the target group.
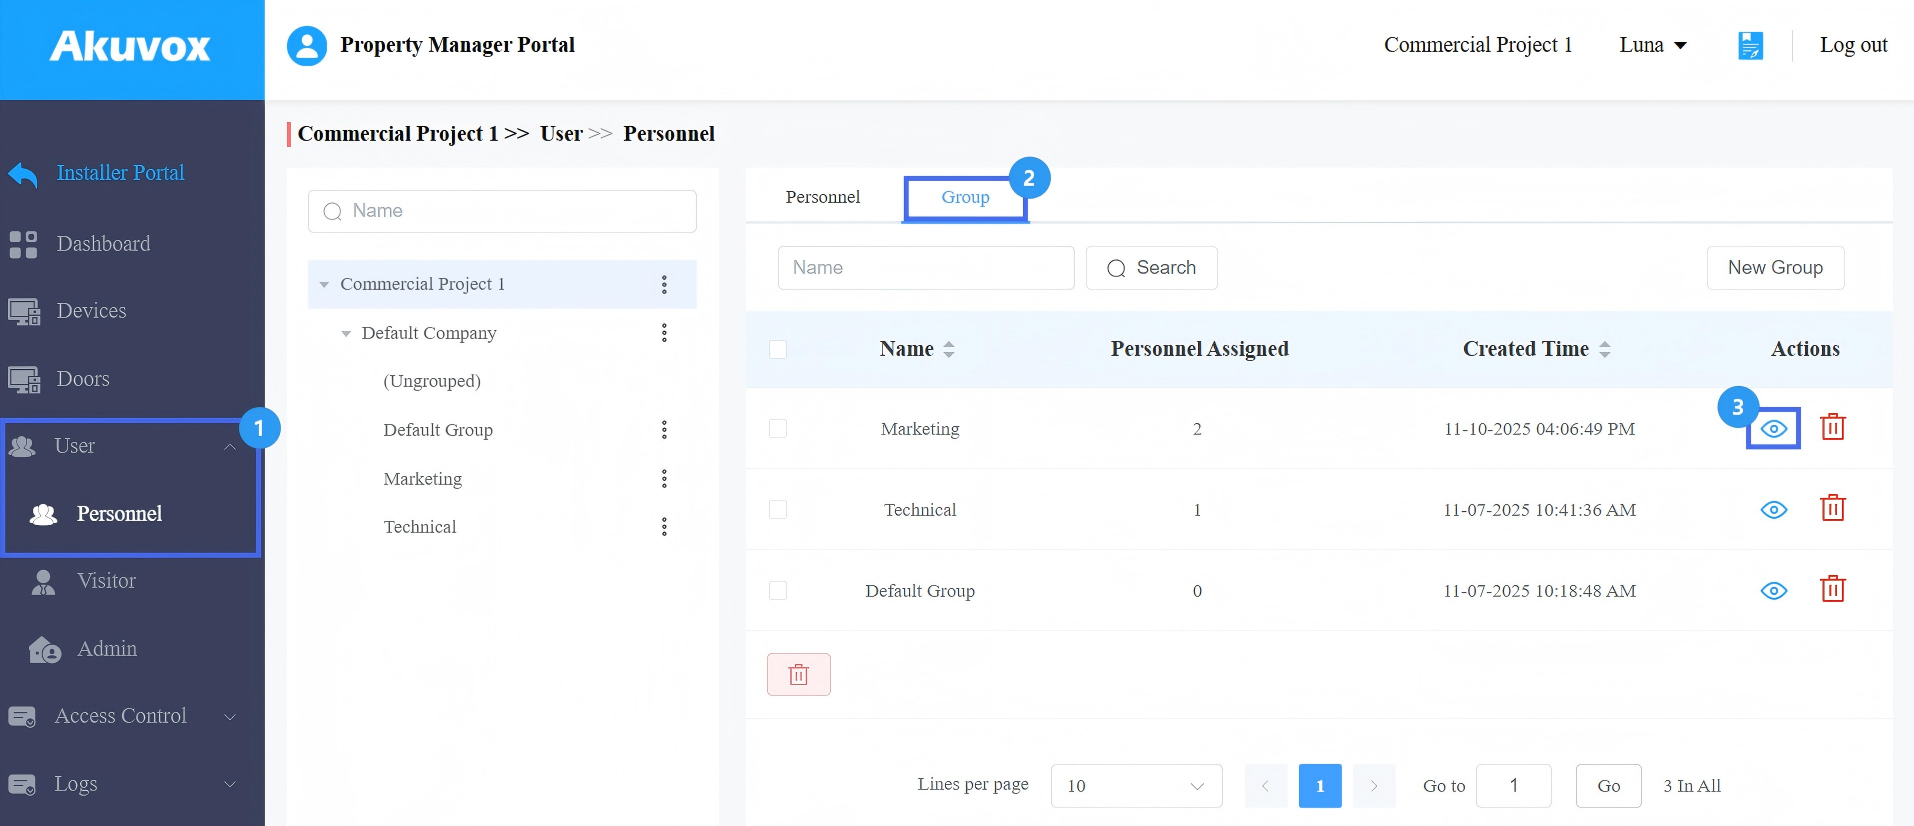
Click Edit in the upper-right corner.
The All Floors option is enabled by default. If disabled, specify the accessible buildings and floors, and choose the elevator control device.
Note
A user may belong to multiple groups, and each group can have up to 20 accessible floors selected.
This may result in more than 20 accessible floors being assigned to a user from the cloud, but ONLY the first 20 accessible floors will take effect.
Step 6: Trigger Elevator Control
After completing the elevator control configuration:
Users can use their assigned credentials to trigger elevator access from multiple devices.
Supported trigger methods include:
Using their credentials (card, PIN, Bluetooth, QR, etc.) on a door phone or access control device
Triggering elevator control from the indoor monitor
Triggering elevator control from the guard phone
Triggering elevator control from the SmartPlus App
The system will only allow access to floors and elevators based on the user’s configured permissions.
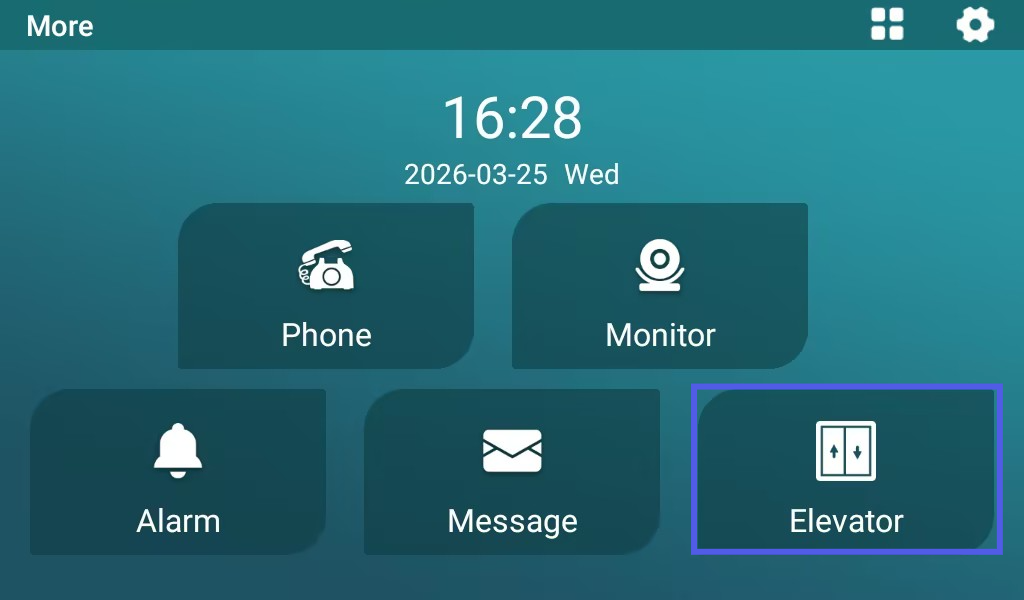
Trigger from the Indoor Monitor
To trigger from the indoor monitor, display the Unlock Elevator button on the device screen.
Compatible model and versions(or higher)
X937: 937.30.14.703
S562: 562.30.15.811
S563: 563.30.14.902
S567(Android 14): 567.30.114.716
Use the device’s IP to log in to its web interface. The initial username and password are admin.
Go to Device > Display Setting.
Select the Unlock Elevator button to display on the desired area.
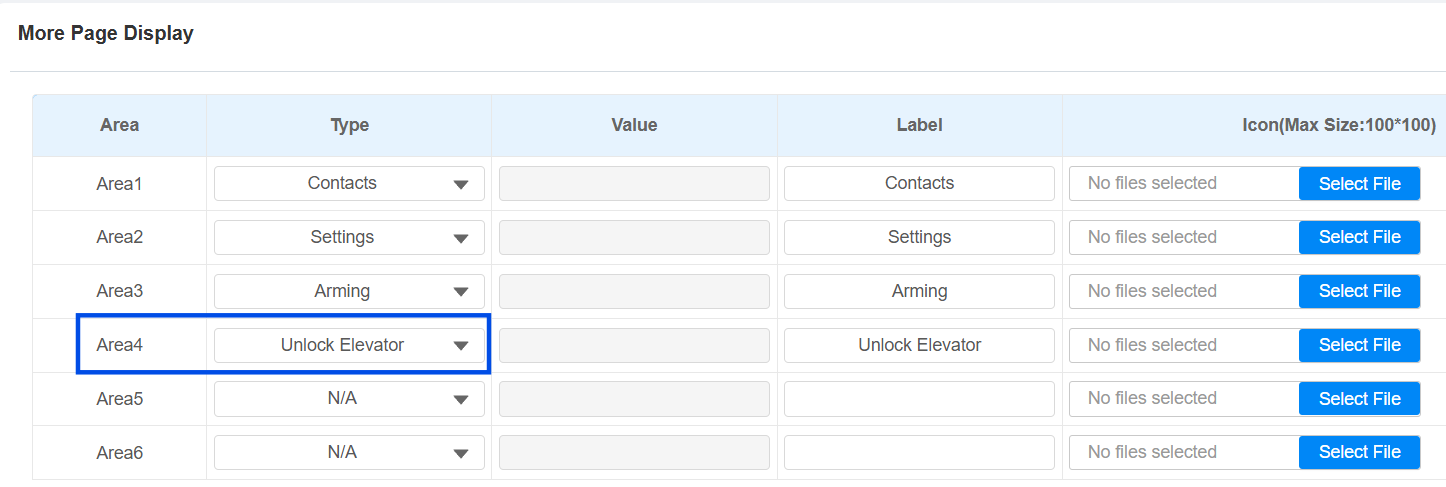
Submit the setting.
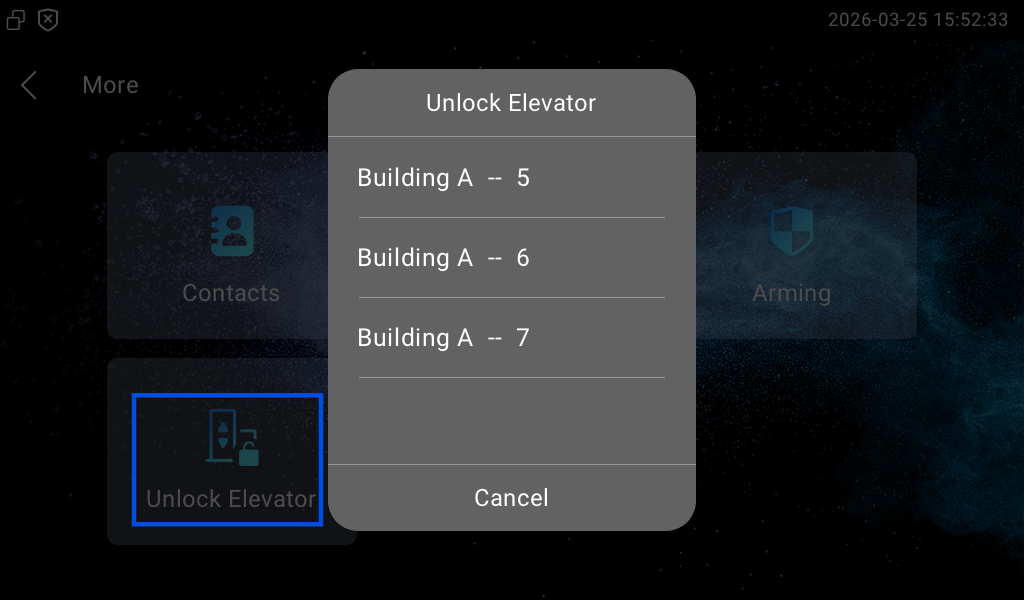
Residents can tap the icon to select their destination floor.
Trigger from the Guard Phone
To trigger from the guard phone, display the Elevator button on the device screen.
Compatible model and version(or higher)
R49G: 49.30.10.84.
Use the device’s IP to log in to its web interface. The initial username and password are admin.
Go to Phone > Preference.
Select the Elevator button to display on the desired area.
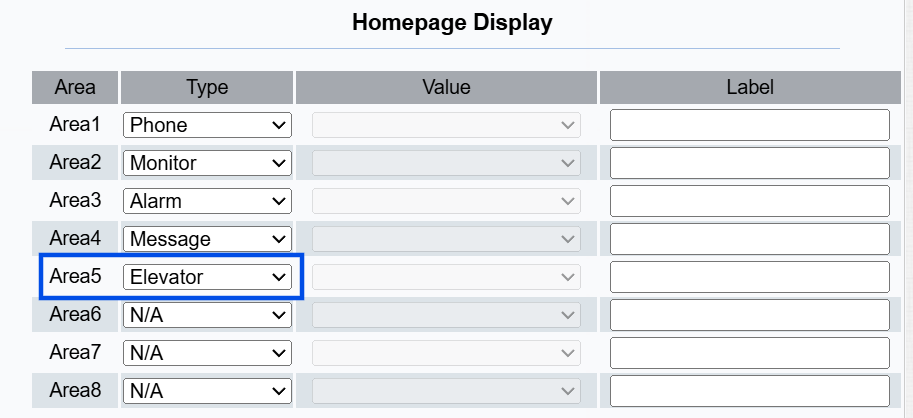
Submit the setting.
Users can tap Elevator and select the destination floor(s).
They can also keep the relay activated by clicking Hold Open, and close it manually by clicking Restore.

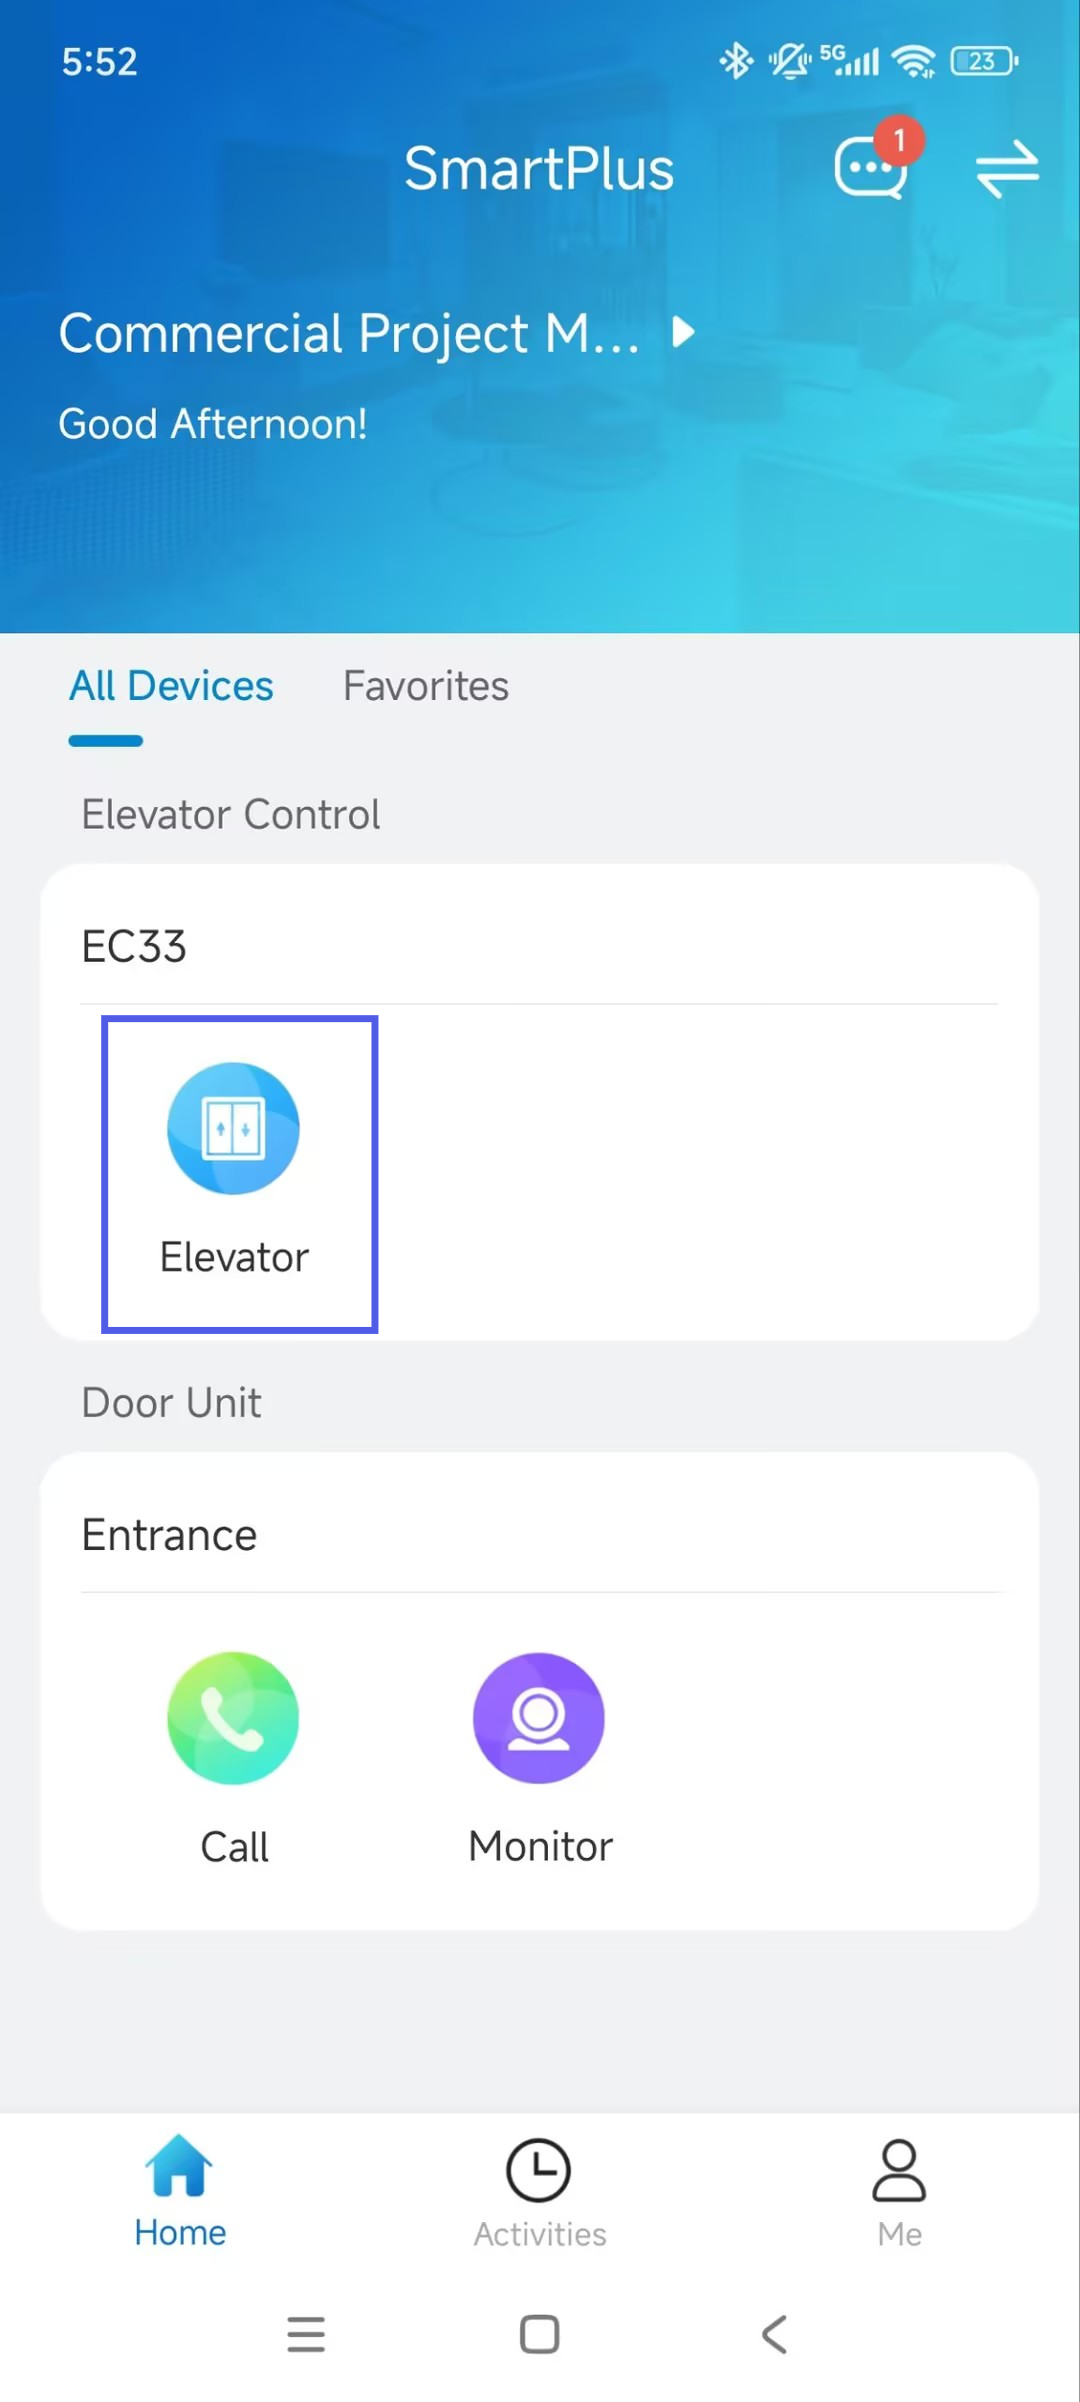
Trigger from the SmartPlus App
Supported SmartPlus App Version:
Coming soon.
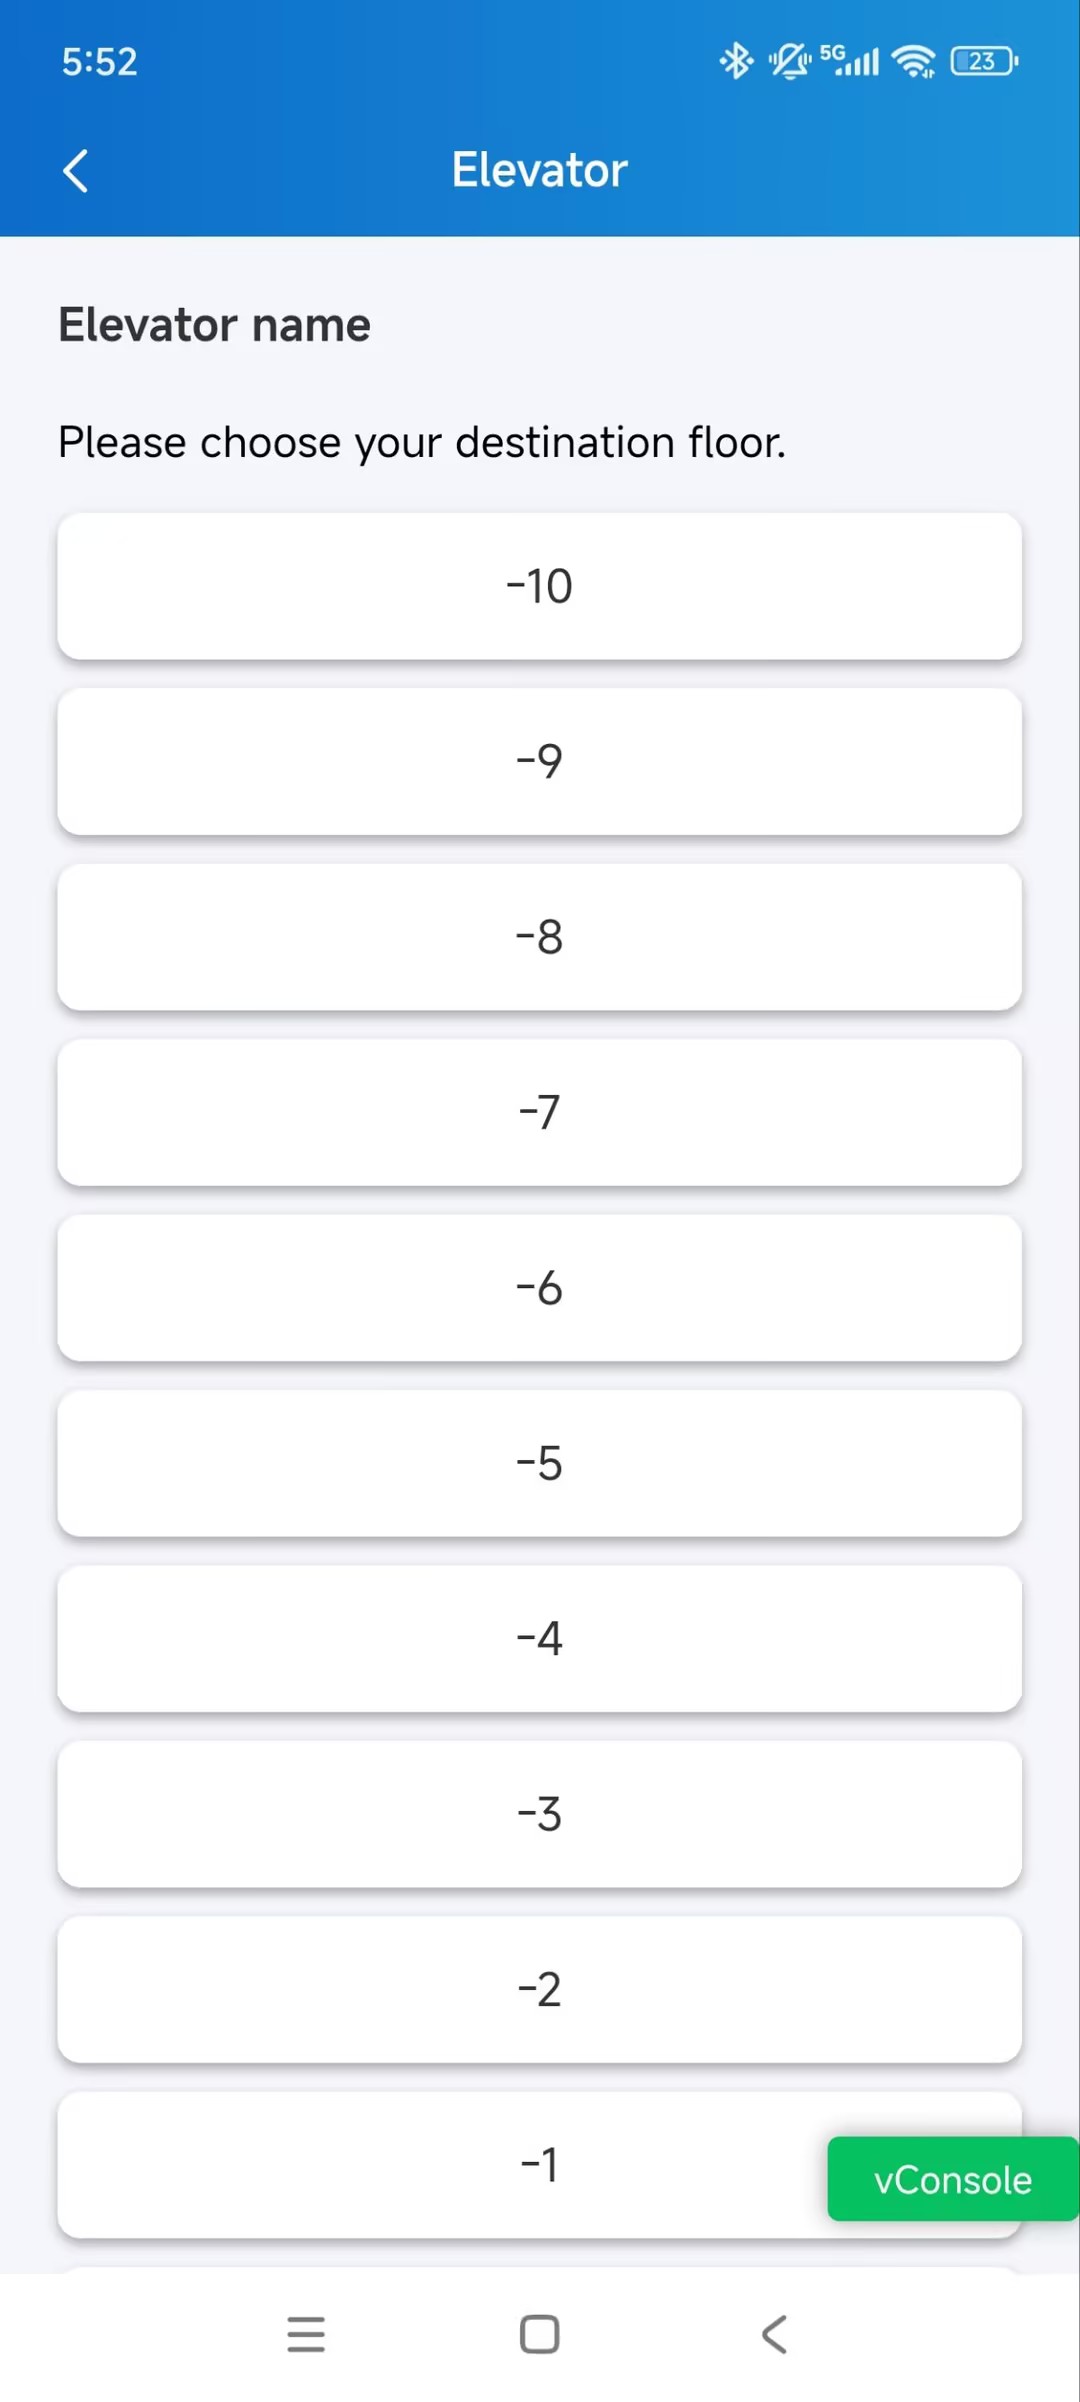
Tap Elevator on the homepage.
Select the accessible floor.