MR03 supports fall detection and bed-exit detection for elderly care, healthcare, and other indoor monitoring scenarios.
When an alarm event occurs, the device can report it to other system components, such as:
Indoor Monitors
Guard Phones
SDMC
SmartPlus Cloud
Third-Party Systems
This allows caregivers or administrators to receive alerts and respond quickly.
Example scenario: An elderly resident falls in the bedroom →MR03 detects the fall → Alarm notification appears on the indoor monitor.
Prerequisites
Before configuration, ensure the following:
MR03 is installed and powered on.
The device is connected to a network.
The installation position (ceiling or wall) has been determined.
The room area to be monitored has been determined.
Select the Working Mode
Select a Working Mode that supports the fall detection capability required for the scenario.
For a fall detection scenario, the Fall Detection mode provides fall-related detection capabilities. Full Function mode can be used when fall detection needs to be combined with other supported detection functions.
The Working Mode should be selected according to the functions required in the deployment.
Long-press the physical button on MR03’s top until it announces its IP address.
Use the device IP to log in to its web interface. The initial username and password are admin.
Go to Fall Settings > General Settings.
Select Fall Detection or Full Function.
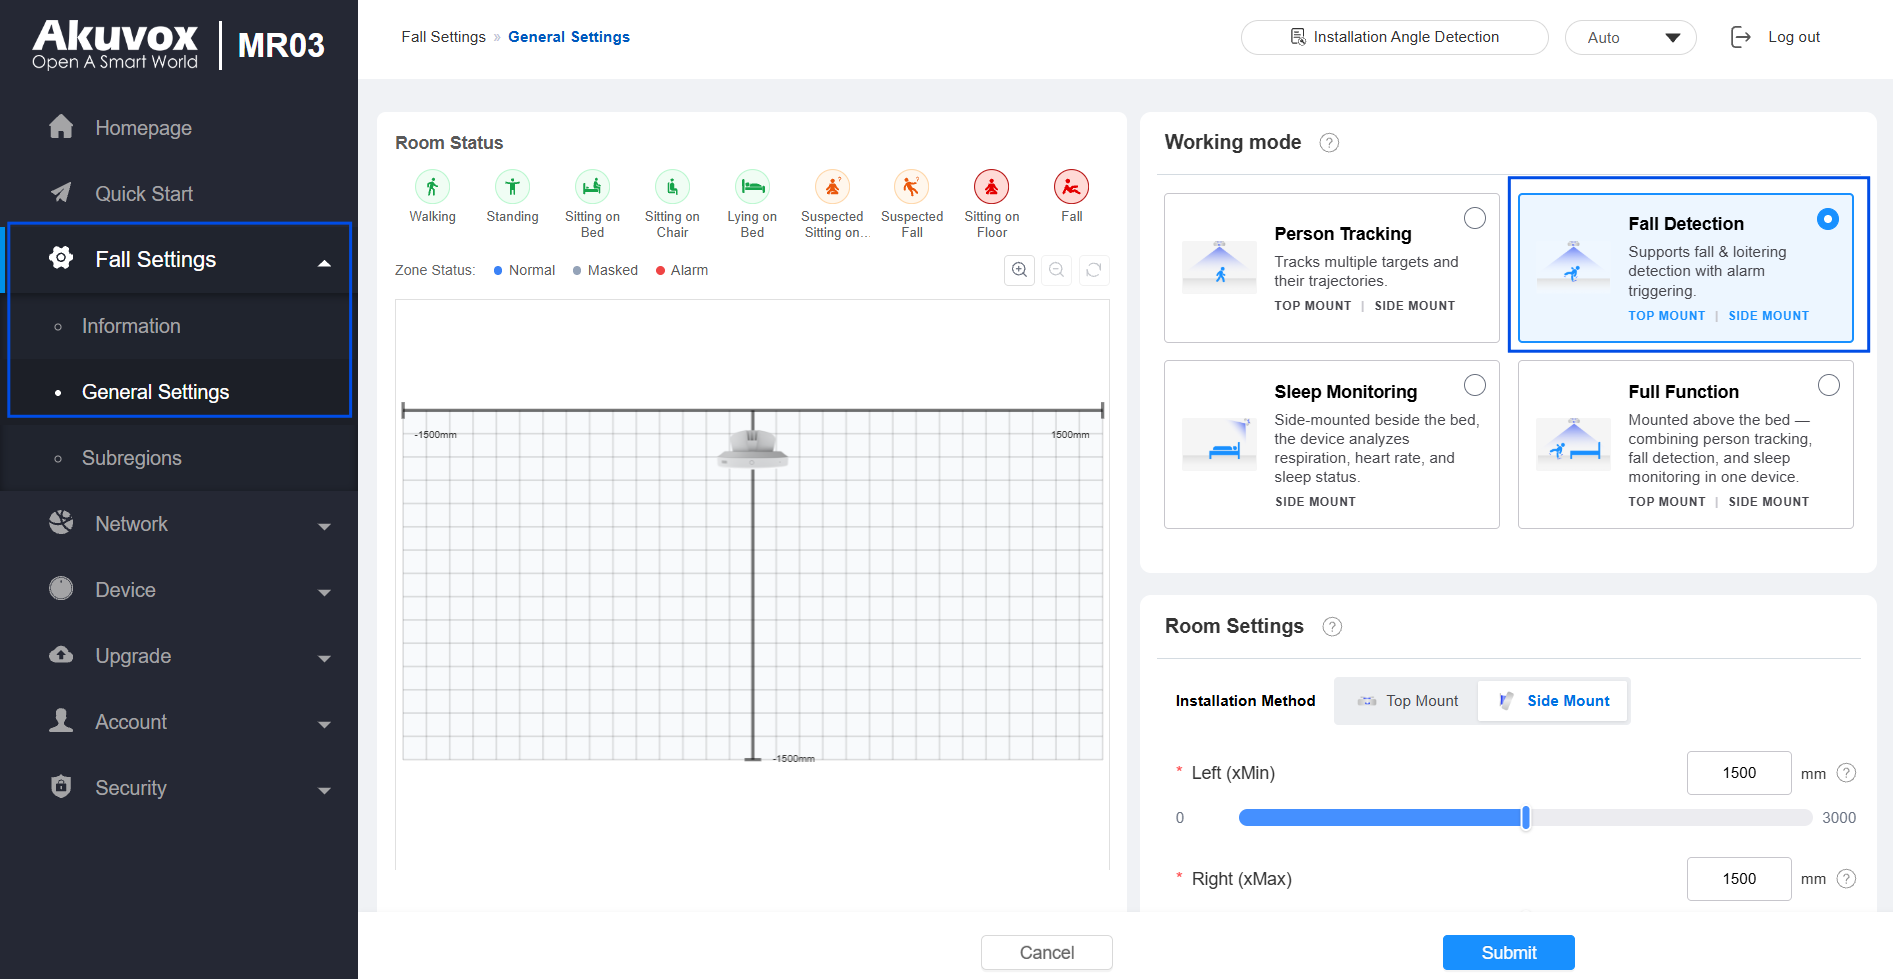
Click Submit.
Configure Fall Detection
Fall detection is suitable for scenarios where caregivers need to identify when a person falls or remains sitting on the floor within the monitored area.
The configuration consists of three levels:
Working Mode determines which detection capabilities are available on MR03.
Room Settings define the overall physical space that MR03 monitors.
Sub-regions allow you to apply specific detection behaviors to different areas within the room when required.
Step 1: Configure the Detection Space
Room Settings define the overall detection environment for MR03.
Go to Fall Settings > General Settings.
Select Top Mount or Side Mount based on the installation type.
Define the detection area based on the room size by setting the xMin, xMax, yMin, and yMax.
Define the Maximum Detection Height.
Set the Installation Height based on the actual scenario.
Enter the device Installation Location name.
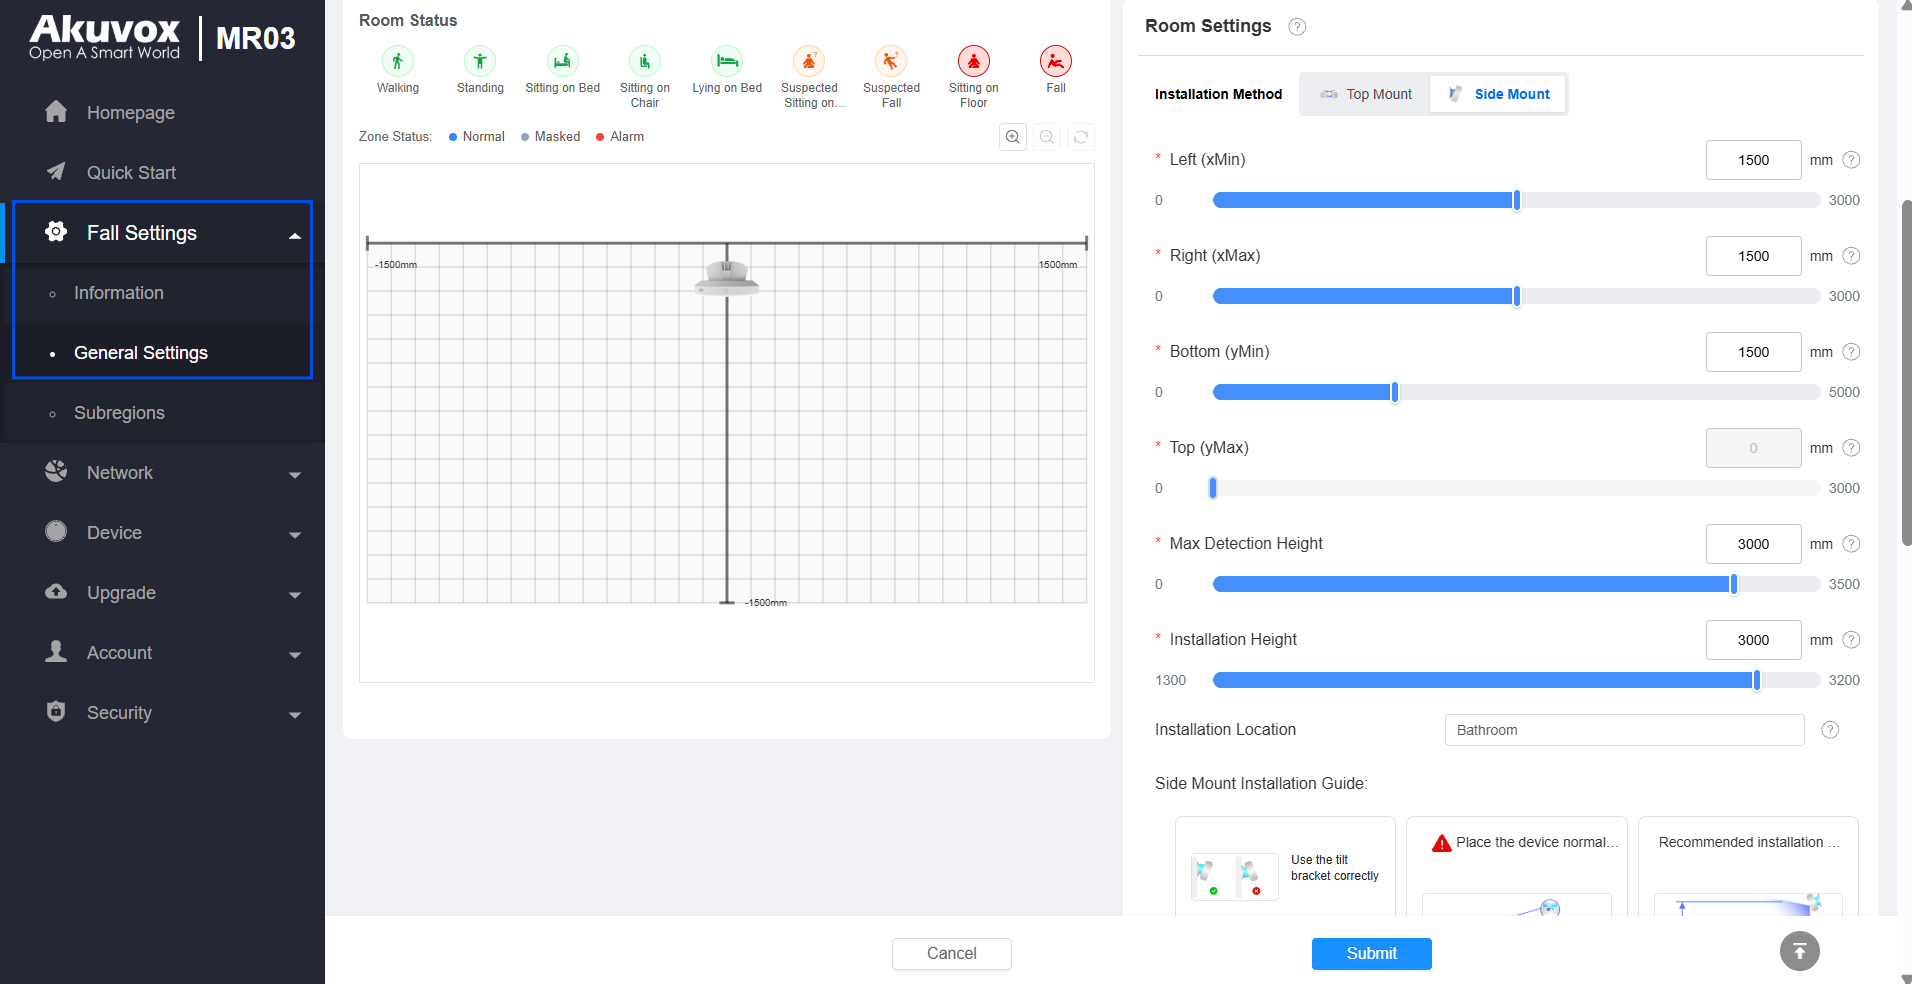
Submit the settings.
Recommendation:
Ensure the configured detection area covers the actual activity area while avoiding unnecessary empty space.
Step 2: Configure Subregions
Sub-regions are used when different areas within the room need different detection behaviors.
For example, a bedroom can be divided into:
Custom: The main activity area where fall or occupancy detection may be required.
Door: The entrance area where fall or occupancy detection may be required.
Shield: An area that should be excluded from fall detection.
Go to Fall Settings > Sub-regions.
Click +Add Subregion to create a sub-region.
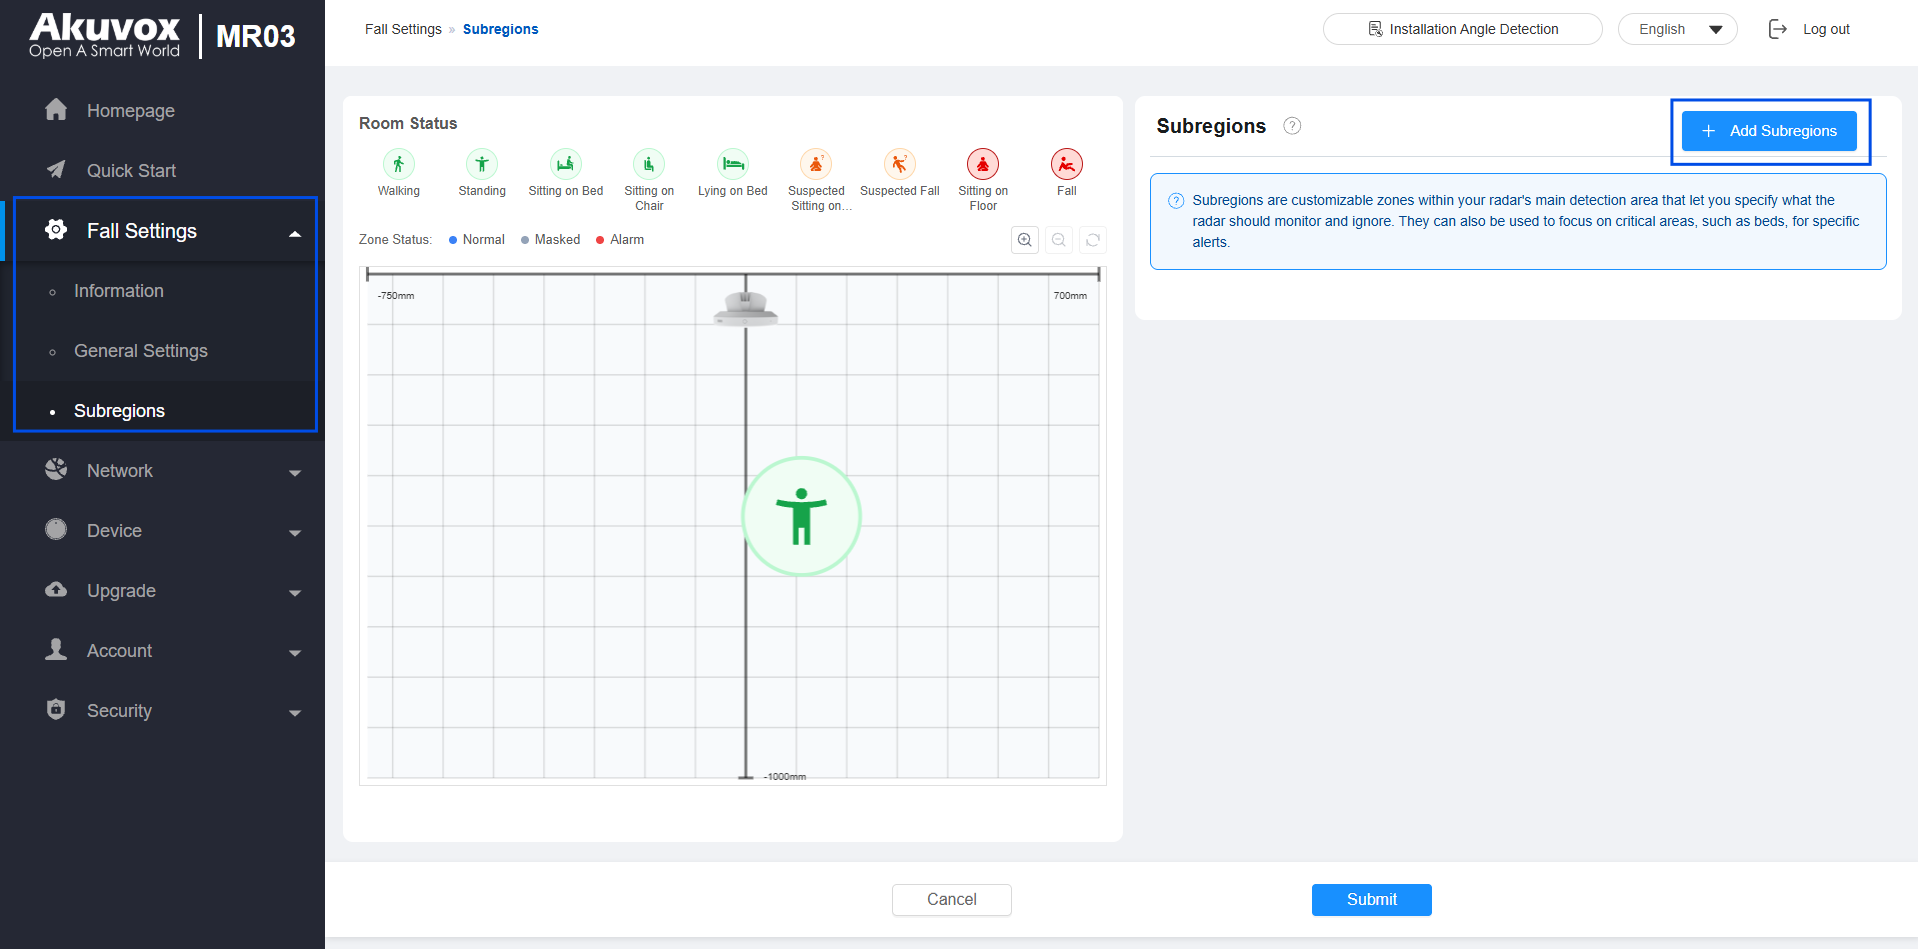
Customize the Region Name.
Select the Region Type. Here, we create 2 sub-regions. One type is Custom, and another is Door.
Custom: General detection area.
Door: Entrance area.
Define the sub-region size and position by setting xMin, xMax, yMin, and yMax.
Enable Fall Detection.
Enable Occupancy Detection if needed. It detects whether individuals are occupying the area.
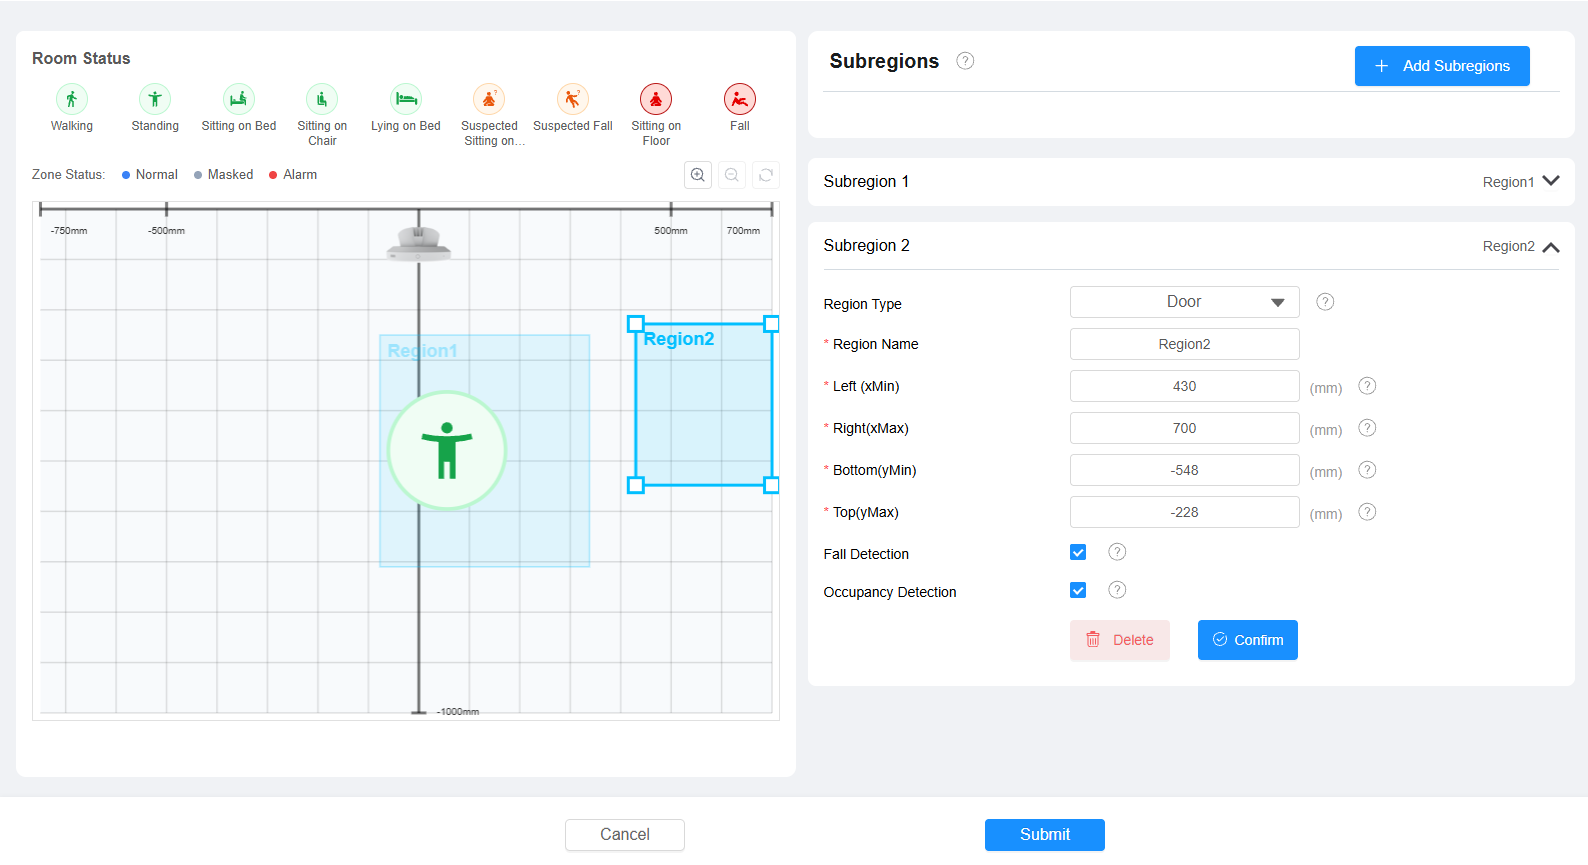
Confirm the setting and submit.
After the configuration, the Room Status section displays real-time detection results, including personnel status and region status.
[Optional]Step 3: Configure Fall Detection Settings
Go to Fall Settings > General Settings > Fall Detection Settings.
Set the Fall Confirmation Time. When the duration of the fall event reaches this value, it will be considered a fall event, triggering an alarm.
Set the Fall Delay Reporting Time. When the duration of the fall event reaches this value, it will be reported to the configured SDMC, indoor monitor, guard phone, or third-party system.
Enable Sitting on Floor Alarm as needed.
Set the Sitting on Floor Detection Time when Sitting on Floor Alarm is enabled. When the duration reaches this value, the alarm will be triggered.
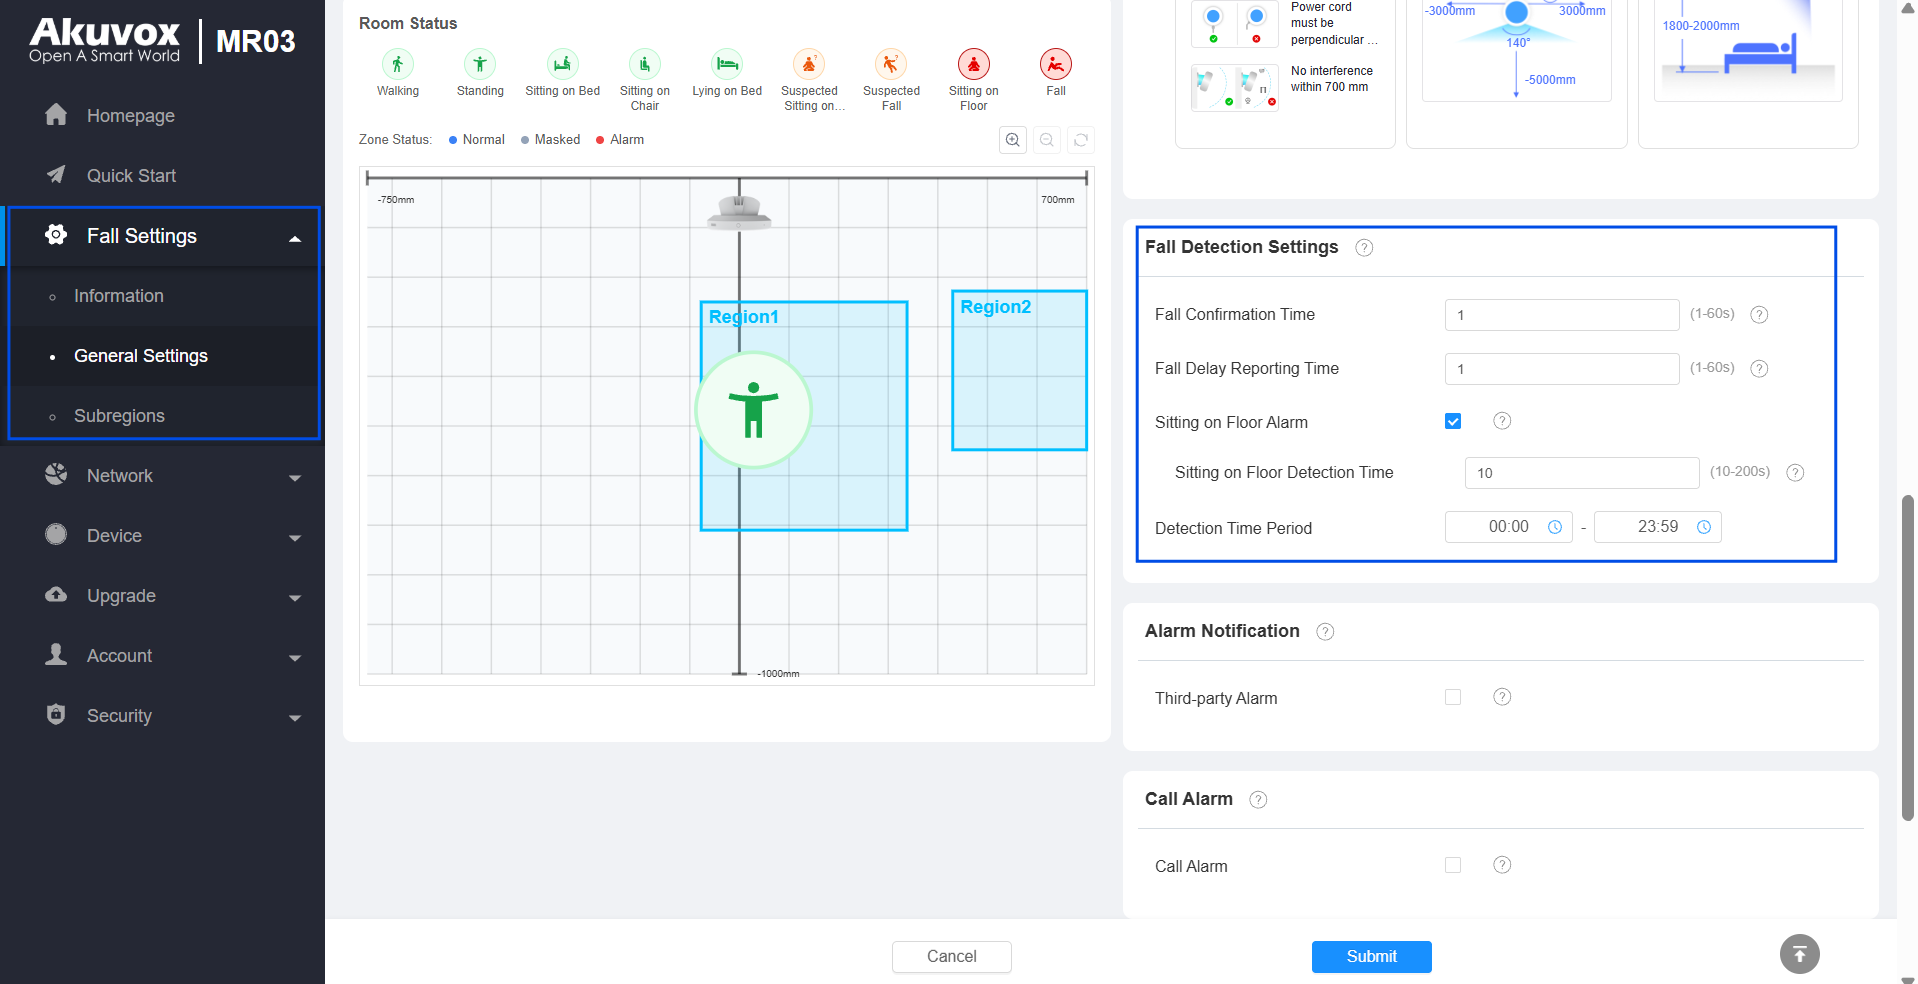
Submit the setting.
Configure Bed-exit Detection
Bed-exit detection is intended for scenarios where caregivers need to know when a person leaves a defined bed area and remains outside the area for longer than the configured time.
Bed-exit detection requires MR03 to know which area represents the bed. Therefore, a Bed sub-region is used to define the bed area and apply bed-exit-related detection to it.
Step 1: Configure the Detection Space
The detection space defines the area where the detection is active.
Go to Fall Settings > General Settings.
Select Top Mount or Side Mount based on the installation type.
Define the detection area based on the room size by setting the xMin, xMax, yMin, and yMax.
Define the Maximum Detection Height.
Set the Installation Height based on the actual scenario.
Enter the device Installation Location name.
Submit the setting.
Recommendation:
Ensure the configured detection area covers the actual activity area while avoiding unnecessary empty space.
Step 2: Define the Bed Area
Subregions allow precise control of detection behavior within specific areas.
Go to Fall Settings > Sub-regions.
Click +Add Subregion to create a sub-region.
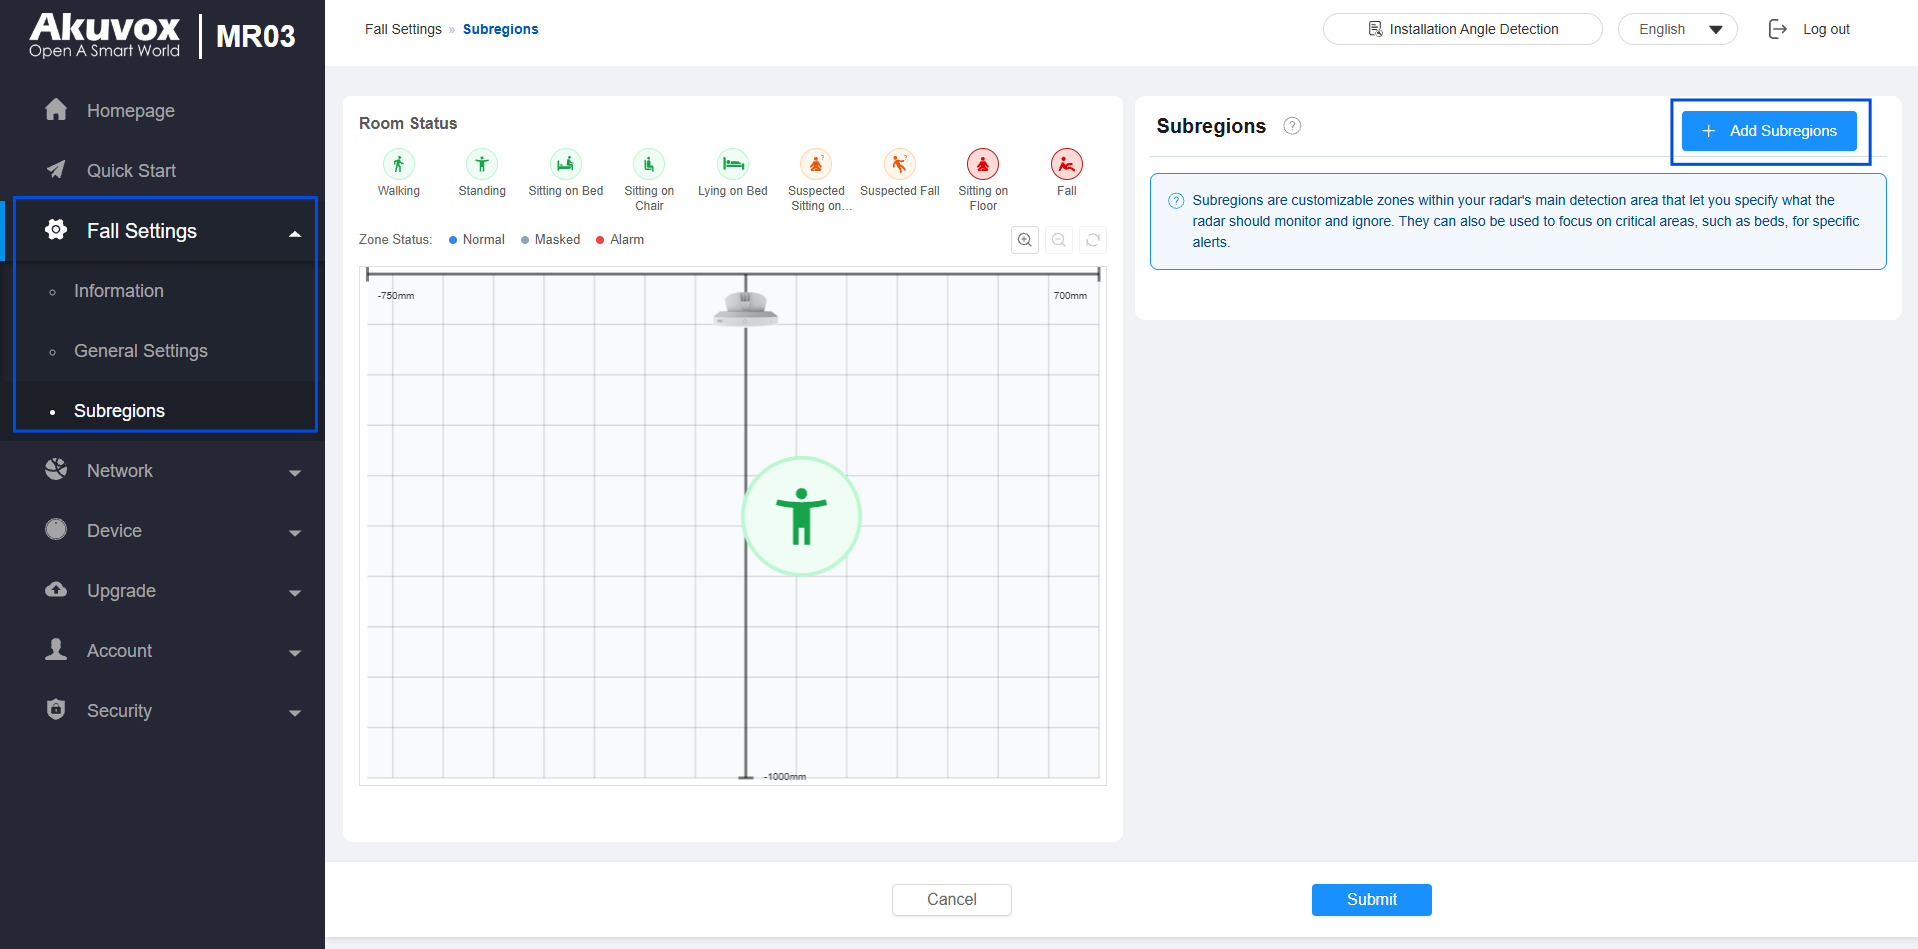
Select the Bed region type.
Customize the Region Name.
Define the sub-region size and position by setting xMin, xMax, yMin, and yMax.
Enable Bed-exit Detection.
Set the Bed-exit Time Threshold. If the target leaves the bed for longer than the set time, an alarm will be triggered and reported.
Set the In-Bed Detection Start Time and In-Bed End Time if Schedule is enabled.
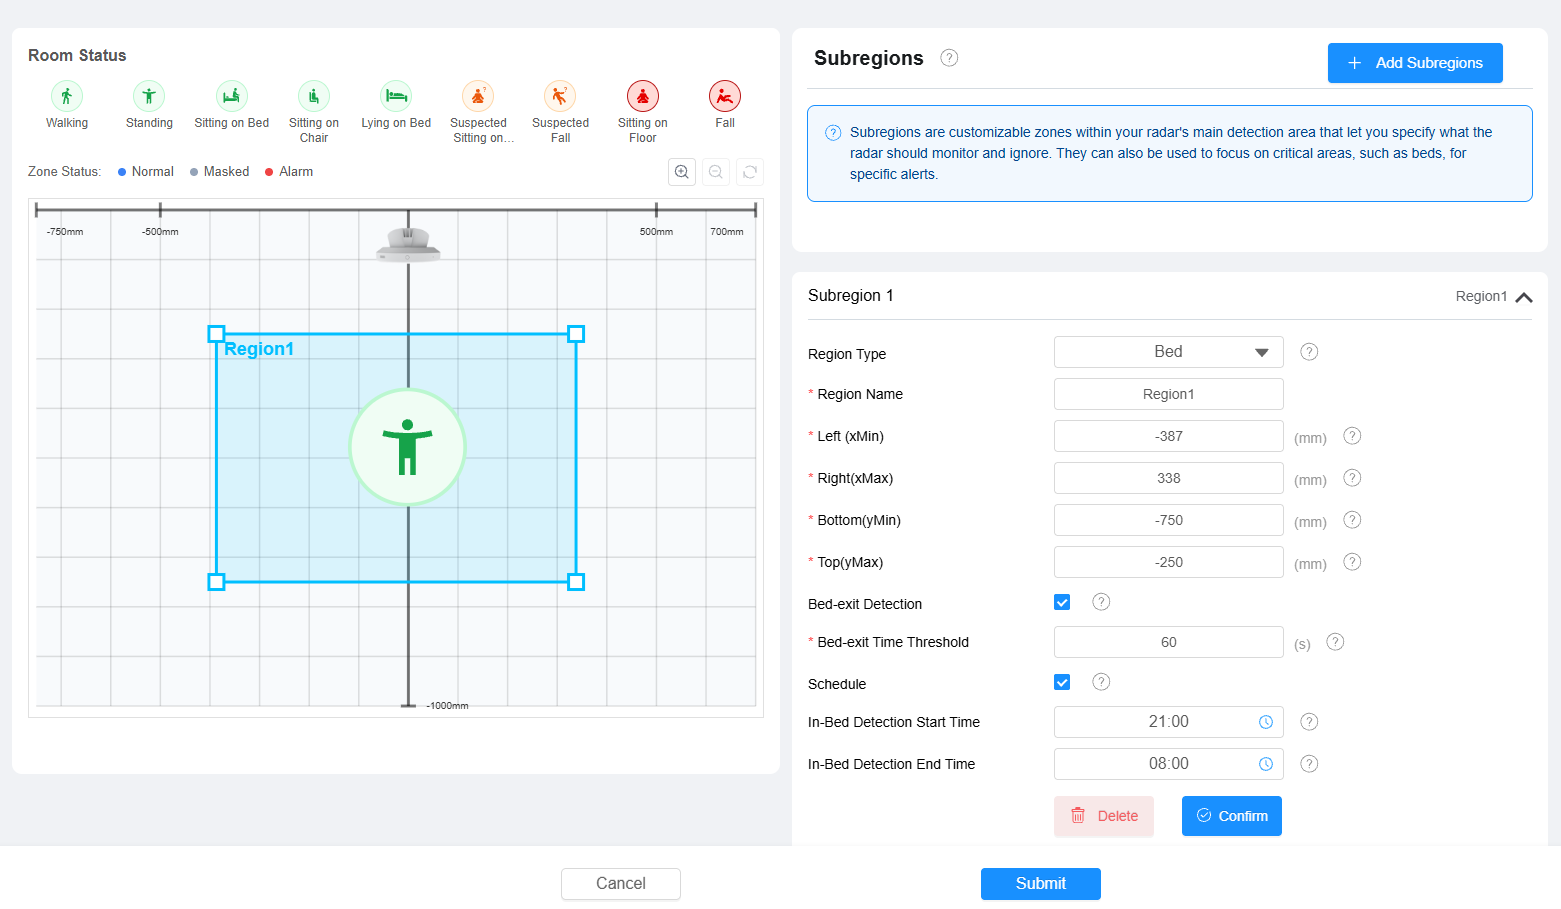
Confirm the setting and submit.
After configuration, when fall events or bed-exit events occur, MR03 will sound an alarm and flash a red indicator light quickly.
Alarm Reporting
To receive alarm reporting,
Devices should share the same Device Address in the on-premise projects.
Devices should be added to the same room when they are connected to the SmartPlus Cloud.
Devices should be added under the same node when they are connected to the Akuvox SDMC software.
Receive Alarm on the SmartPlus Cloud
Before receiving alarms, ensure that the installer has added the MR03 to the SmartPlus Cloud. For configuration steps, refer to the guide Add MR03 Sensor to the SmartPlus Cloud.
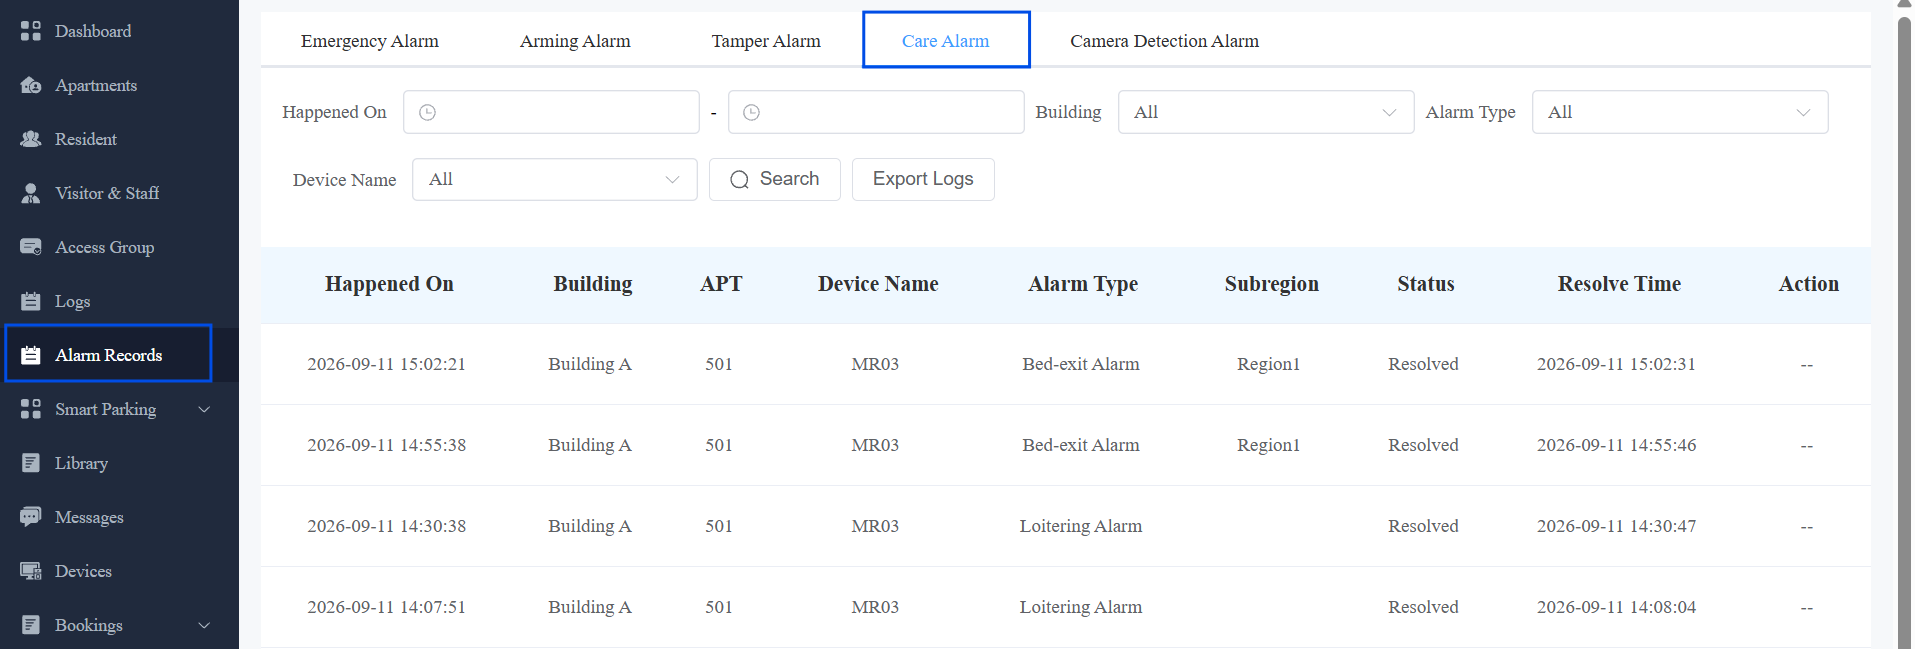
Once set up, property managers can monitor and manage alarms from the Alarm Records > Care Alarm interface.
To resolve an alarm, click the resolve icon  to mark it as handled.
Receive Alarm on the Guard Phone
Compatible model and version(or higher)
R49G: Coming soon.
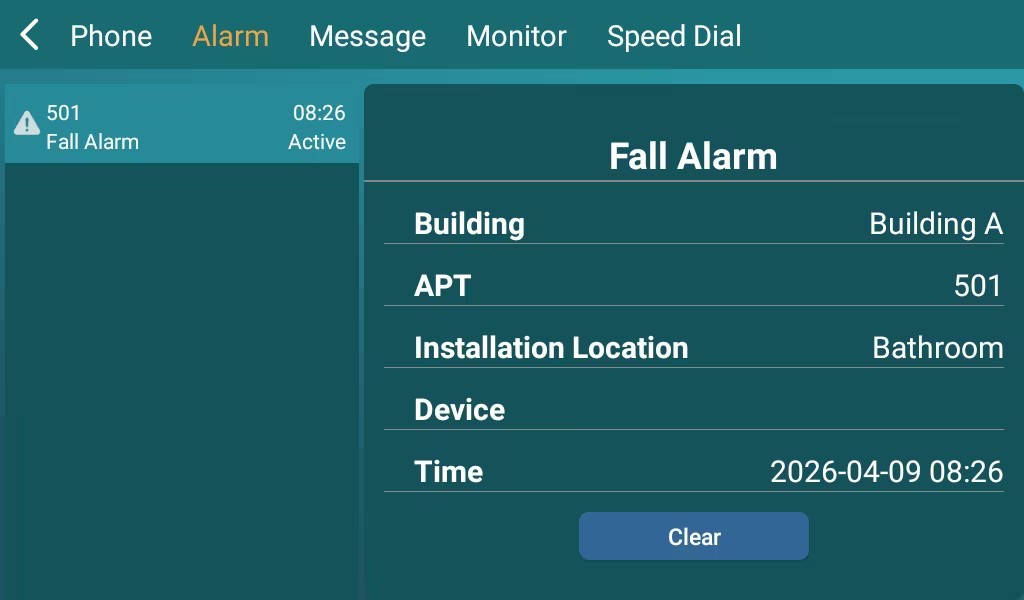
Check the alarm record on the R49G’s Message > Alarm screen.
Receive Alarm on the Indoor Monitor
Compatible model and version(or higher)
S562: 562.30.16.178
S567: 567.30.115.224
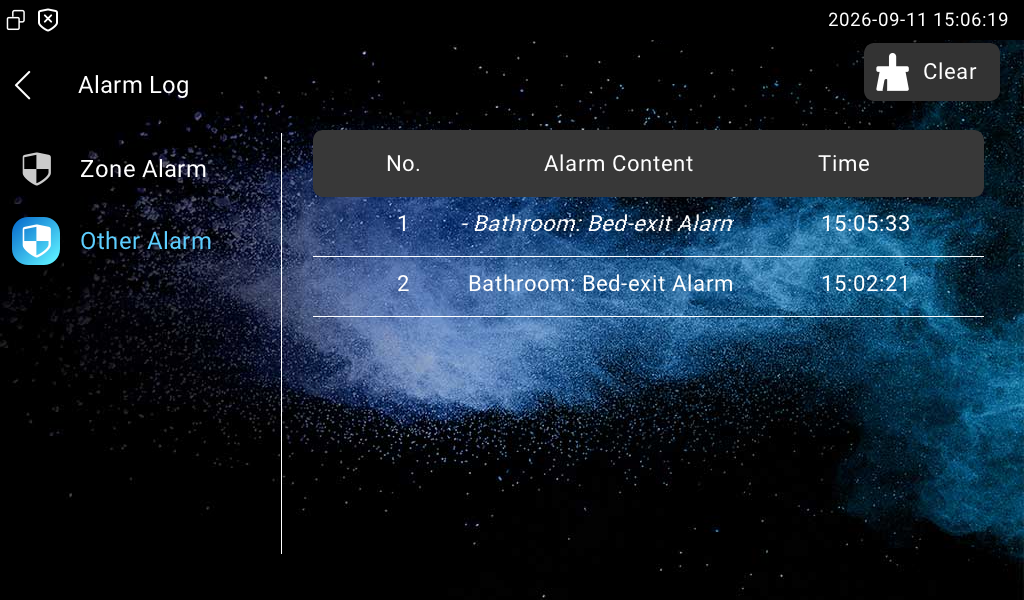
The indoor monitor will sound an alarm and display the notification.
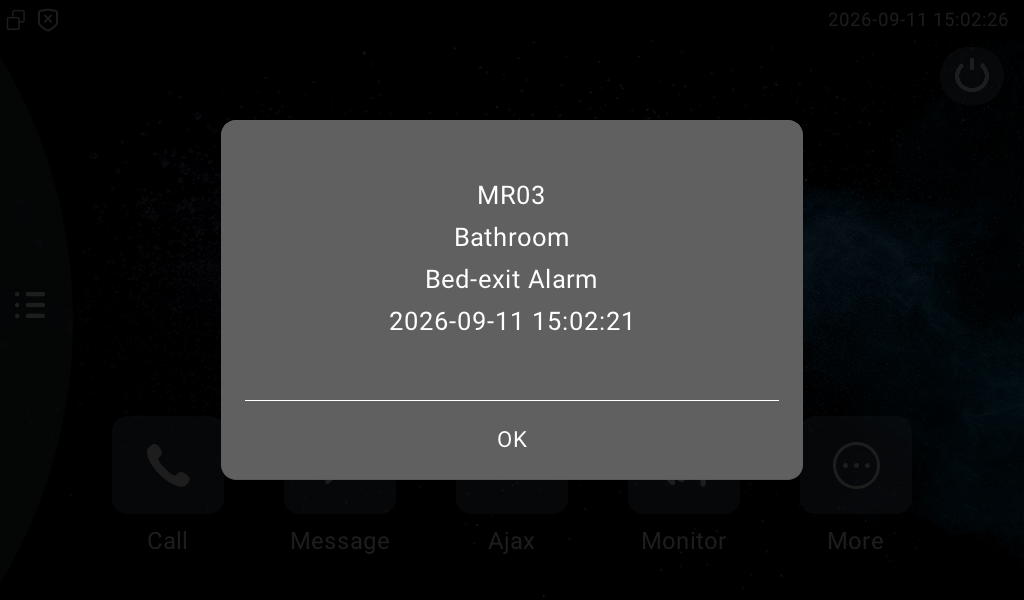
The alarm is recorded on the Arming > Alarm Log > Other Alarm screen.