Integration via Wiegand
La fonctionnalité Wiegand permet à l’appareil Akuvox d’agir comme un contrôleur ou un lecteur de carte.
To set it up, go to Device > Wiegand interface.
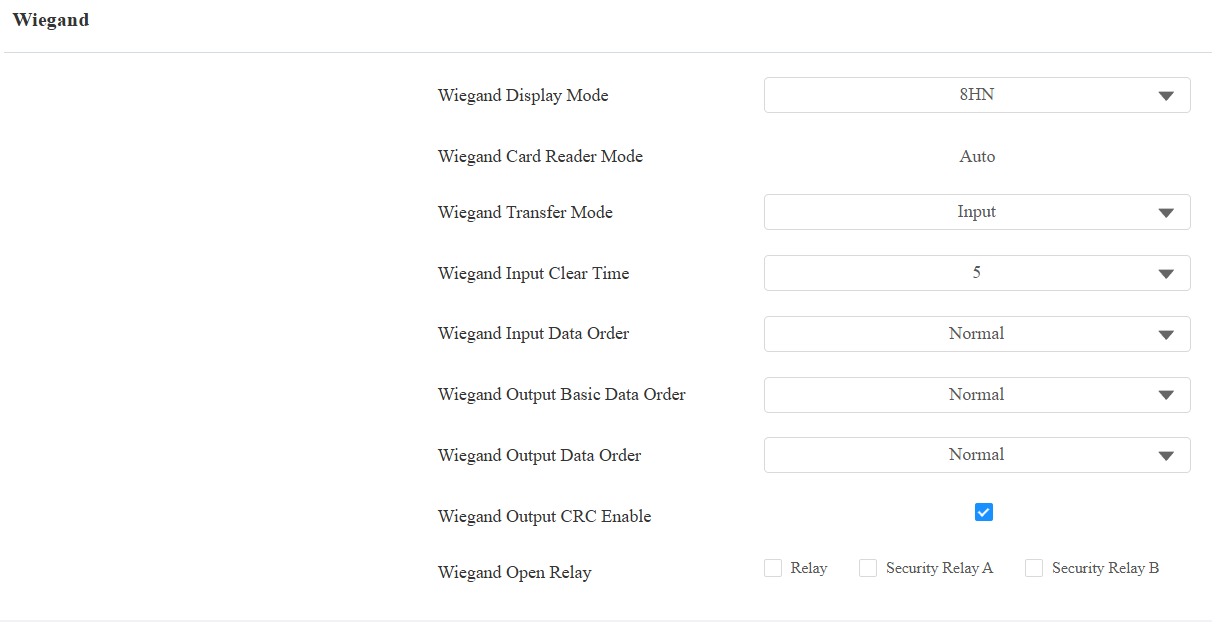
Wiegand Display Mode: Select the Wiegand card code format from the provided options.
Wiegand Card Reader Mode: The transmission format should be identical between the access control terminal and the third-party device. It is automatically configured when the Wiegand Transfer Mode is Input.
Wiegand Transfer Mode:
Input: A08 serves as a receiver.
Output: A08 serves as a sender.
Wiegand Input Clear Time: When the interval of entering passwords exceeds the time. All entered passwords will be cleared.
Wiegand Input Data Order: Set the Wiegand input data sequence between Normal and Reversed. If you select Reversed, then the input card number will be reversed.
Wiegand Output Basic Data Order: Set the sequence of the Wiegand output data.
Normal: The data is displayed as received.
Reversed: The order of the data bits is reversed.
Wiegand Output Data Order: Determine the sequence of the card number.
Normal: The card number is displayed as received.
Reversed: The order of the card number is reversed.
Wiegand Output CRC Enable: It is enabled by default for Wiegand data inspection. Disabling it may lead to integration failure with third-party devices.
Wiegand PIN Code Output: Available when Output is selected as Wiegand Transfer Mode. This option determines the output PIN format.
Disabled: Turn off the feature.
8 bits per digit: When users press "1" on the keypad, the binary data will be transmitted in 8 bits, "11100001".
4 bits per digit: When users press "1" on the keypad, the binary data will be transmitted in 4 bits, "0001".
All at once: After users enter the whole PIN code, the data will be transmitted according to the Wiegand card reader mode. For example, “123456” will be converted to “01e240” in Wiegand 26.
RF Card Verification: Available when Output is selected as Wiegand Transfer Mode. When enabled, the device will verify whether the card code is assigned to a user. If it is not, the device will announce "Opening Door Failed". When disabled, the device will not perform local verification.
PIN/QR Code Verification: Available when Output is selected as Wiegand Transfer Mode. When enabled, the device will verify whether the credential is assigned to a user. If it is not, the device will announce "Opening Door Failed". When disabled, the device will not perform local verification.
Wiegand Open Relay: Select the relay triggered by Wiegand.
Note
Click here to view more information on Wiegand settings including:
Akuvox devices work as Wiegand input/output;
Wiegand Card Reader Connection.
Facility Code Setting
A facility code is a unique number on access control cards. It identifies the device that issued the card.
When the Wiegand Transfer Mode is Output, you can set up the facility code on the Device > Wiegand interface.

Facility Code: The value ranges from 0 to 255. If filled in, the first two digits of the card number will be replaced by the code. If the code is less than 2 digits, a zero will be automatically added to the card number.
Tip
Since the Facility Code replaces the first two digits of the original card number, to keep the original card number intact, you can manually configure the Wiegand Card Reader Mode.
For example, if the card number is 3 bytes (Wiegand-26), you can select Wiegand-34 (4 bytes) to ensure the Facility Code replaces the first two digits with 0 instead of the original number.
Integration via HTTP API
L’API HTTP est conçue pour assurer une intégration réseau entre l’appareil tiers et l’appareil Akuvox.
To set it up, go to Setting > HTTP API interface.

Enabled: Enable or disable the HTTP API function for third-party integration. If the function is disabled, any request to initiate the integration will be denied and return HTTP 403 forbidden status.
Authorization Mode: Select among the following options: None, Normal, Allowlist, Basic, Digest, and Token for authorization type, which will be explained in detail in the following chart.
Username: Enter the user name when Basic or Digest authorization mode is selected. The default username is admin.
Password: Enter the password when Basic or Digest authorization mode is selected. The default password is admin.
1st IP-5th IP: Enter the IP address of the third-party devices when the Allowlist authorization is selected for the integration.
Please refer to the following description for the Authentication mode:
NO. | Authorization Mode | Description |
|---|---|---|
1 | None | No authentication is required for HTTP API as it is only used for demo testing. |
2 | Normal | This mode is used by Akuvox developers only. |
3 | Allowlist | If this mode is selected, you are only required to fill in the IP address of the third-party device for the authentication. The allowlist is suitable for operation in the LAN. |
4 | Basic | If this mode is selected, you are required to fill in the username and password for the authentication. In the Authorization field of the HTTP request header, use the Base64 encode method to encode of the username and password. |
5 | Digest | The password encryption method only supports MD5. MD5( Message-Digest Algorithm) In the Authorization field of HTTP request header: WWW-Authenticate: Digest realm="HTTPAPI",qop="auth,auth-int",nonce="xx", opaque="xx". |
6 | Token | This mode is used by Akuvox developers only. |
Power Output Control
L’appareil peut servir d’alimentation pour les relais externes. Cliquez ici pour consulter les besoins en puissance de sortie.
To set it up, go to Access Control > Relay interface.

Power Output:
Always: The device can provide continuous power to the third-party device.
Triggered By Open Relay: The device can provide power to the third-party device via the 12 output and GND interface during the timeout when the status of relays is shifted from low to high.
Security Relay A: The device can work with the security relay.
Integration via RS485
Vous pouvez connecter l’appareil à un appareil externe tel que SR01 ou à un lecteur de cartes basé sur OSDP via RS485. Pour que la connexion soit efficace, il faut sélectionner le bon mode RS485.
Cliquez here pour voir la configuration détaillée de la fonctionnalité OSDP.
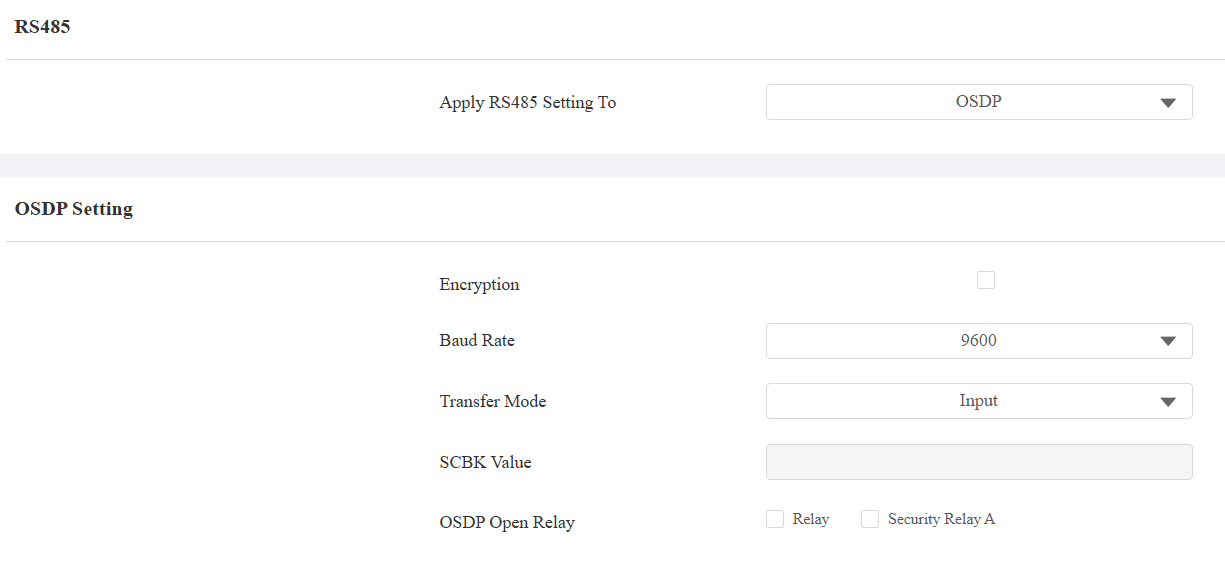
To set it up, go to the Device > RS485 interface.
Disabled: The RS485 function is disabled.
OSDP: The device is connected to an OSDP-based external device, such as a card reader.
Encryption: Check this option when the protocol is encrypted.
Baud Rate: Set the baud rate for data transmission during communication. The default is 9600, supported by Akuvox devices.
Transfer Mode: Select the RS485 working mode, Output, or Input.
Local Relay Verification: When Output is selected, set whether to carry out the access credentials verification. When unchecked, door-opening failure prompts will not be given. Enabled by default.
SCBK Value: Secure Communication Key Value.
When it is filled, OSDP will use this value for encryption, employing a customized protocol for communication.
When it is left empty, OSDP will use the default encrypted protocol for communication.
OSDP Open Relay: Check the relay to be triggered via OSDP.
Security Relay: Select this option when the device works with the SR01.
Integration with Third-party Access Control Server
The device can transmit QR code and card data to a third-party server without doing any verification. The generation and verification of the data are conducted on the third-party server.
To set it up, go to Access Control > Relay > Third Party Integration interface.

List:
None: Disable the function.
General: Transmit the QR code-linked HTTP URL in Akuvox’s method.
HTTP URL: Enter the HTTP command format provided by the third-party service provider. After scanning the QR code, the HTTP command will carry the dynamic QR code information automatically before it is sent to the QR code server for verification. See the example: http://{Server IP}:8090/api/visitor/scan?codeKey={QRCode}&deviceId={DeviceID}.
Device ID: The device ID is provided by the third-party server. It will be added to the HTTP command automatically when using a QR code for door access.
Success Parameter: Receiving this value indicates that opening the door succeeds.
Failed Parameter: Receiving this value indicates that opening the door fails.
Customize: Transmit QR code, RF card, and PIN data in a customized method.
Remote Verification: Check the access method to be verified by the third-party server.
HTTP URL: Enter the HTTP command format provided by the third-party service provider. After scanning the QR code, swiping the card, or entering the PIN, the HTTP command will carry the dynamic information automatically before it is sent to the server for verification. See the example format: http://{Server IP}:8090/api/visitor/scan?codeKey={QRCode}/{Card}/{Pin}&deviceId={DeviceID}. For example, if a user swipes a card, the URL will be http://192.168.35.123:8090/api/visitor/scan?codeKey={QRCode}/123456/{Pin}&deviceId=1.
Device ID: The device ID is provided by the third-party server. It will be added to the HTTP command automatically when using a QR code, RF card, or PIN for door access.
Success Parameter: Receiving this value indicates that opening the door succeeds.
Failed Parameter: Receiving this value indicates that opening the door fails.
Data Transmission Type for Third-party Camera
You can select the data transmission type between the device and a third-party camera when it is connected to the SmartPlus Cloud.
To set it up, go to the Surveillance > Camera interface.

UDP: An unreliable but very efficient transport layer protocol.
TCP: A less efficient but reliable transport layer protocol. It is the default transport protocol.