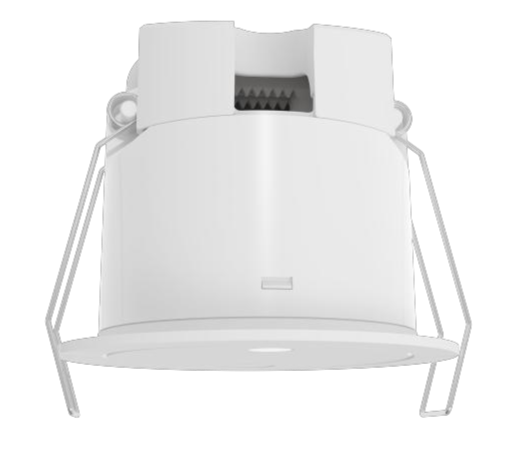
MSA201-Z
This guide covers the new version of the human presence detector. For the old version, see here.
What You Should Know
Detector Versions
There are two versions of the human presence detector: old and new. Both share the same appearance and part numbers.
Identification:
The system identifies the version when added: New version offers enhanced capabilities such as environmental learning, configurable detection radius, and delay times adjustable to the second.
All detectors received since Q1 2025 are the new version.
Detector Features
Feature | Description |
Occupancy Status | Occupied: Triggered by any of the following:
Unoccupied: No large movements, minor movements, or presence signals detected within the sensing area.
|
Delay Time | The time it takes for the detector to switch from Occupied to Unoccupied after the person leaves the detection zone. |
Detection Distance | Floor area radius from detector’s vertical projection point. |
Sensitivity Level | High/Medium/Low; lower sensitivity weakens detection of micro-movements. |
Environmental Learning | Allow the detector to self-adjust its parameters to reduce false positives after the detection radius and delay time are set. |
Indicator Light | Enables/disables the detector’s LED. When disabled, the LED will not flash upon detecting presence. |
Presence Detection Enable | Enables/disables micro-movement detection. If disabled, the detector reports only large movements. |
Occupancy Detection | Enables/disables the detector entirely. When disabled, neither large nor minor movement data is reported. |
Illuminance | Show current light levels in the space. |
Supported Devices and Firmware
Device | Required Firmware |
HyPanel Lite (KS41) | 41.1.36.130 and later |
HyPanel (PS51) | 51.1.39.23 and later |
HyPanel (PS51(V2)) | 251.1.39.7 and later |
HyPanel Plus (PS52) | 52.1.39.11 and later |
HyPanel KeyPlus (KS53) | 53.1.39.10 and later |
HyPanel Pro (PG71) | 71.1.39.44 and later |
HyPanel Ultra (PH81) | 281.1.39.29 and later |
HyPanel Supreme (PHX1) | 1001.1.39.27 and later |
HyPanel Elite 7 (PG42) | 42.1.37.47 and later |
HyPanel Elite 10 (PH59) | 159.1.39.137 and later |
SmartPanel (X933H) | 933.1.39.10 and later |
SmartPanel Elite 10 (PH58) | 119.1.39.10 and later |
G31 Gateway | 31.1.37.37 and later |
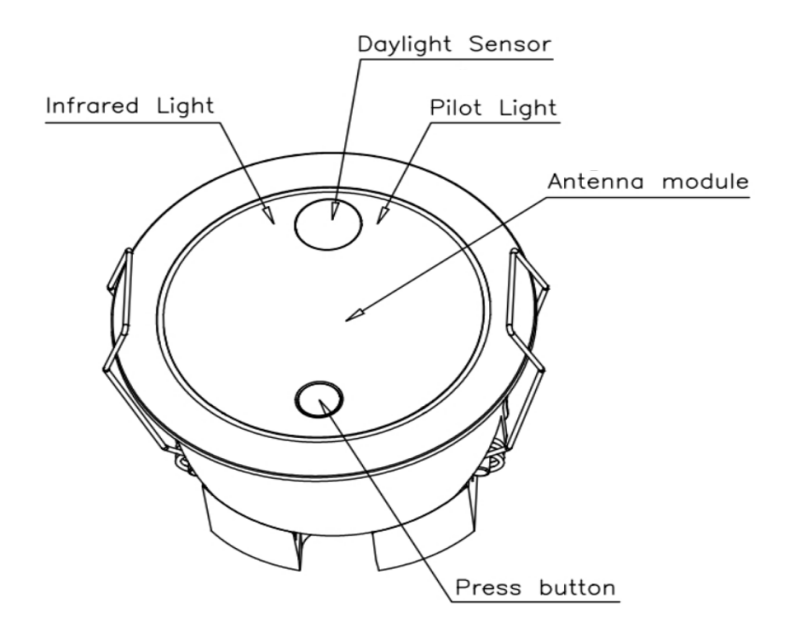
Product Overview
Product Overview
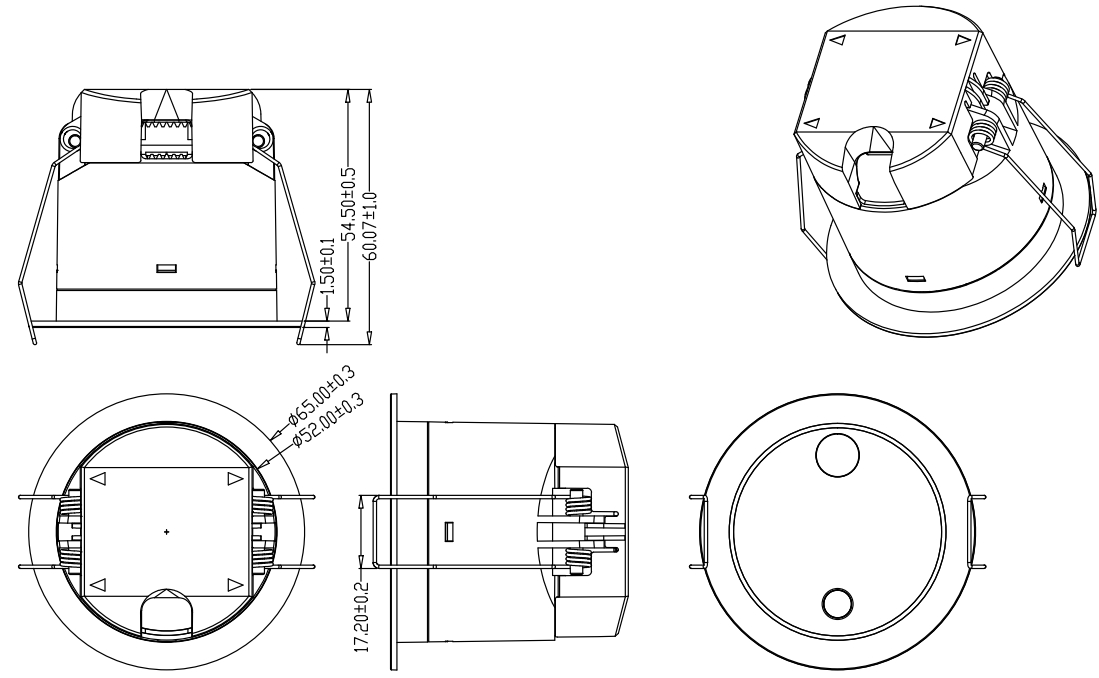
Dimensions
Unit: mm
Detector Placement Design
Preparation
Required: Floor plan with room size, layout, AC outlet locations, installation height.
Recommended: On-site photos or video.
Environment Assessment
Recommended
Rooms with large, well-defined detection areas and suitable heights, where the detector can reliably detect presence from any direction.
Not Recommended
Small, confined spaces (e.g.,office cubicles, bathroom stalls): Strong boundary definition and detection accuracy are difficult to achieve, resulting in unstable presence-detection signals.
Open-edge areas near glass walls or curtains: Microwaves may penetrate and cause false detection.
Rooms with ceilings >4 m or <2.5 m
Placement Points Confirmation
Avoid Problematic Areas
Obstacle & Interference Checklist
Object | Risk / Notes |
Large metal objects | Strong microwave reflections may cause false detection |
Glass partitions / windows/doors | Microwaves may penetrate, causing false detection; maintain >1.5 m distance |
High-power wireless devices (5G routers/densely deployed Wi-Fi devices) | Possible signal interference; maintain >1.5 m distance |
AC vents/airflow | Airflow may move objects (e.g., plants), triggering false detection; maintain >1.5 m distance |
Ceiling obstacles (e.g., smoke barriers) | May block detection and create blind spots |
Select Optimal Locations
Core activity areas must fall within detector detection zone (shadow area in figure).
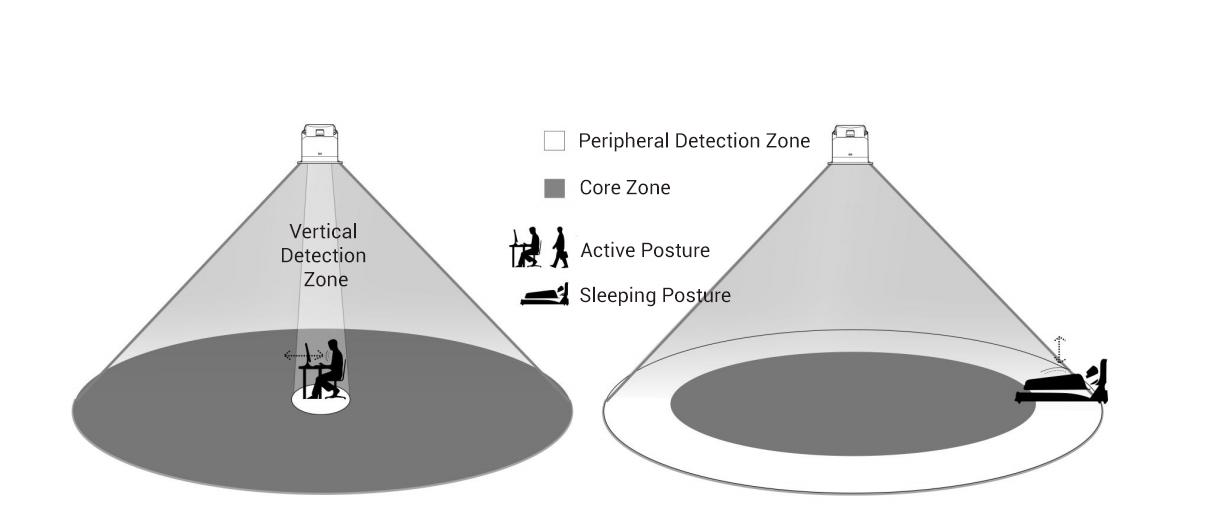
Sleeping posture: Core detection area must cover the bed for reliable micro-movement detection. Signals may be missed if the person is near the edge of the detection range.
Active posture (standing/sitting): Avoid placing the detector directly above areas with frequent activity (e.g., seating or play areas). Being in the detector’s vertical detection zone increases the chance of false triggers.
Determine Final Placement
Determine detector placements based on the size of the room. The detection radius is 0.5-3.5m; use this to calculate the number of detectors needed and their positions in each area.
Placement Examples
Example 1
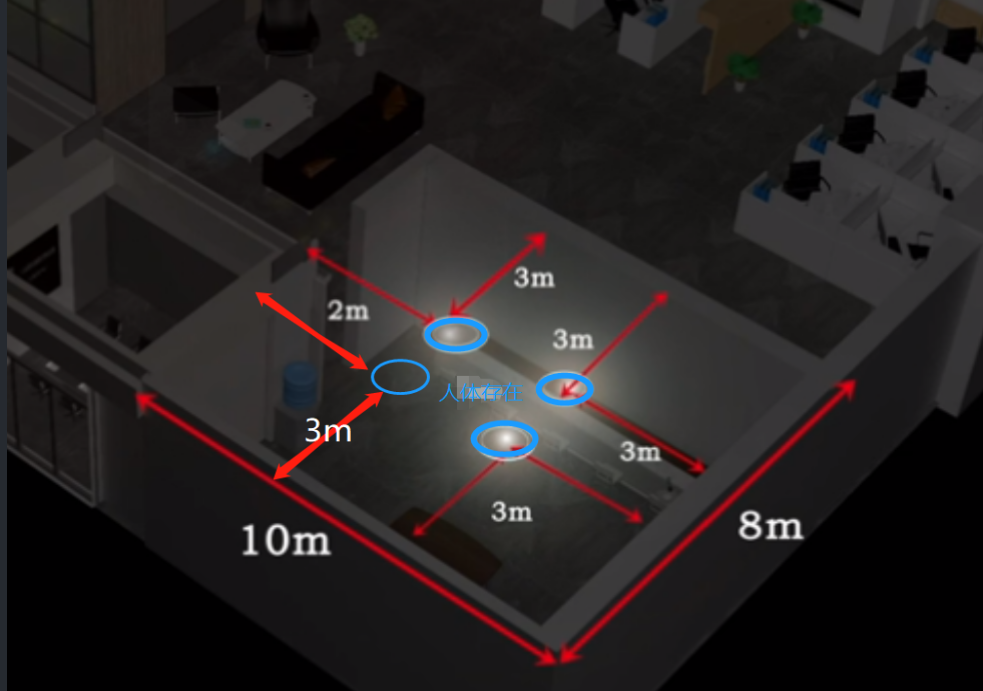
Example 2
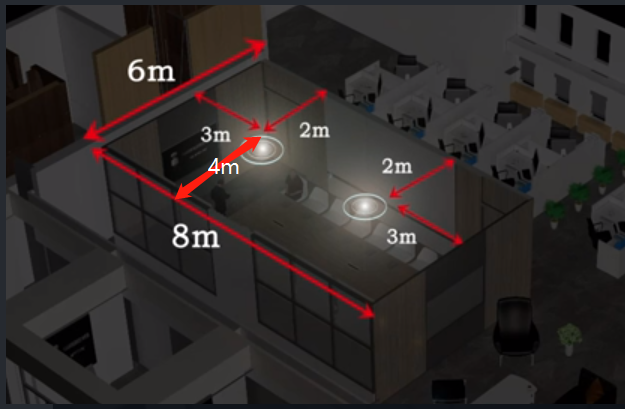
Placement Reasoning
Detectors are placed 2 m from the right side and 4 m from the left to avoid potential interference from glass walls.
Center placement (3 m) risks false triggers from microwaves penetrating glass. Shifting right extends the left-side radius to 4 m, effectively detecting movement while minimizing false positives.
Center placement is possible with adjusted sensitivity and delay settings.
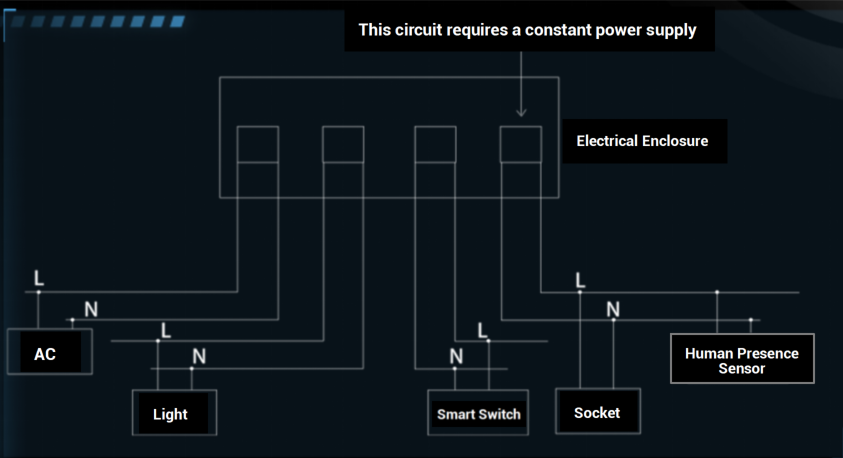
Power Supply
Connect detectors to a constant power circuit.
Wiring and Installation
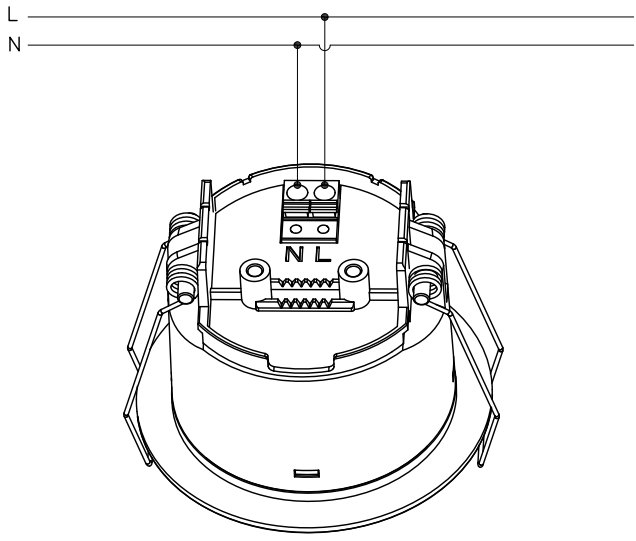
Wiring Diagram
Installation (Ceiling-Mount Only)
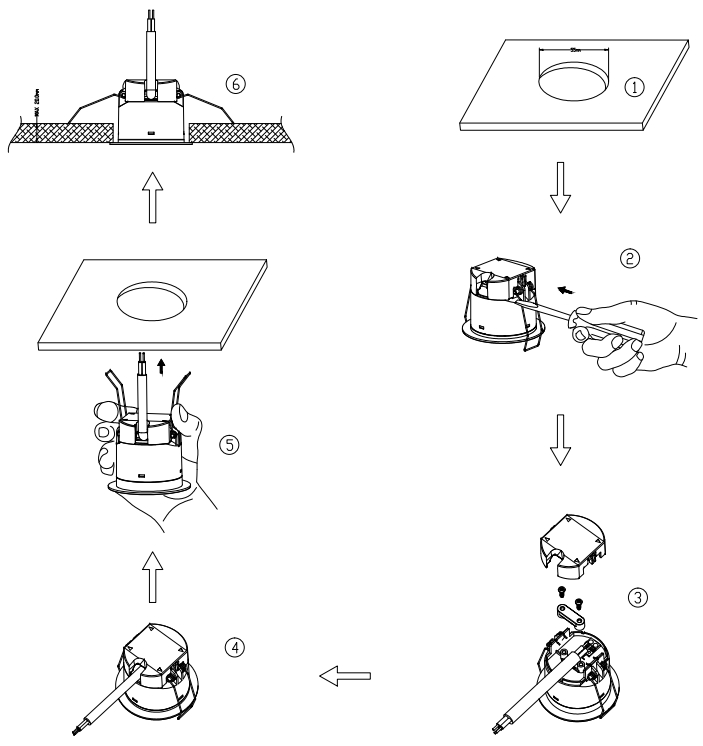
① Cut a 55 mm diameter hole in the ceiling.
② Use a flat-head screwdriver to gently pry off the wiring cap.
③ Connect the wires as per the wiring diagram.
④ Secure the wires with the wire clip, press them into place, fasten with screws, and reattach the wiring cap.
⑤ Bend the spring clips backward and insert the detector into the ceiling hole.
⑥ Verify that the detector is securely installed and stable.
Configuration
Network Pairing
Press and hold the detector button for 5 seconds, the LED will flashes rapidly, indicating the detector is in pairing mode.
Log in to the BelaHome app, tap Home > the add icon to add the detector to your akubela system.
Parameter Settings
Set Detection Radius
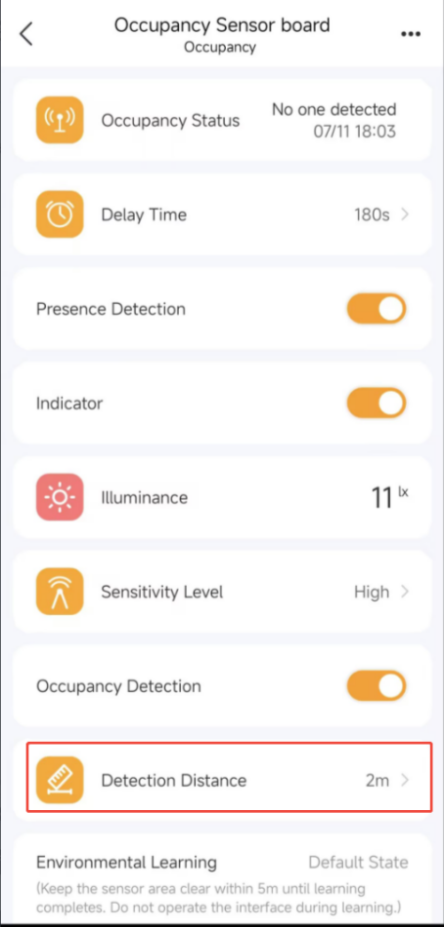
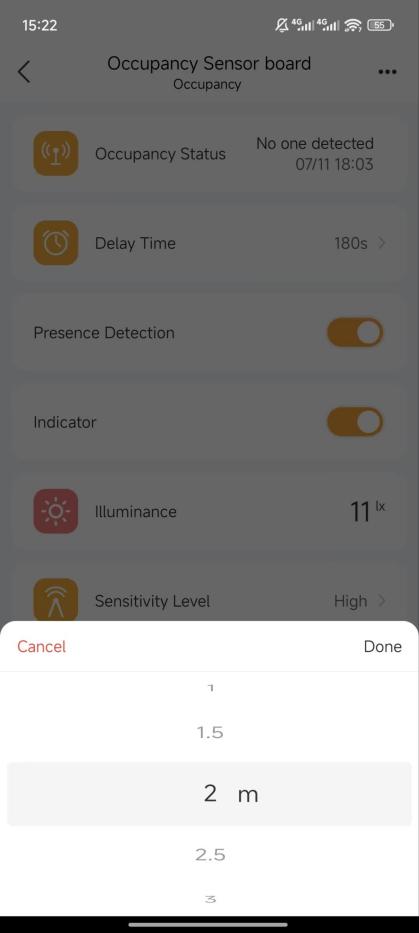
In the BelaHome app, tap [the detector card] > Detection Distance and adjust radius from 0-4 m in 0.5m increments.
NOTE:
Initial values are reference only; verify and fine-tune on site.
Set Sensitivity and Delay
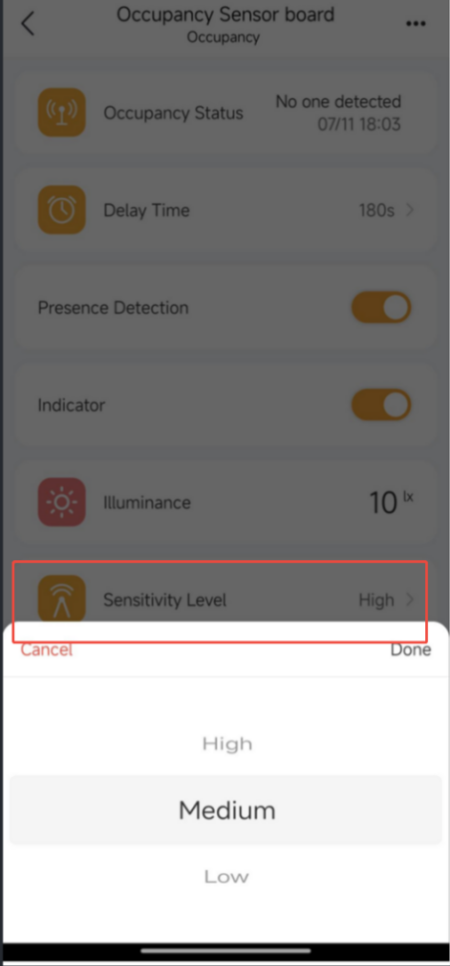
In the BelaHome app, tap the detector card to set the sensitivity level and delay time.
Sensitivity:
High: Suitable for detecting micro movements such as sleeping posture.
Medium: General presence detection.
Low: For environments with potential interference (curtains, plants).
NOTE:
Too high sensitivity can increase false positive.
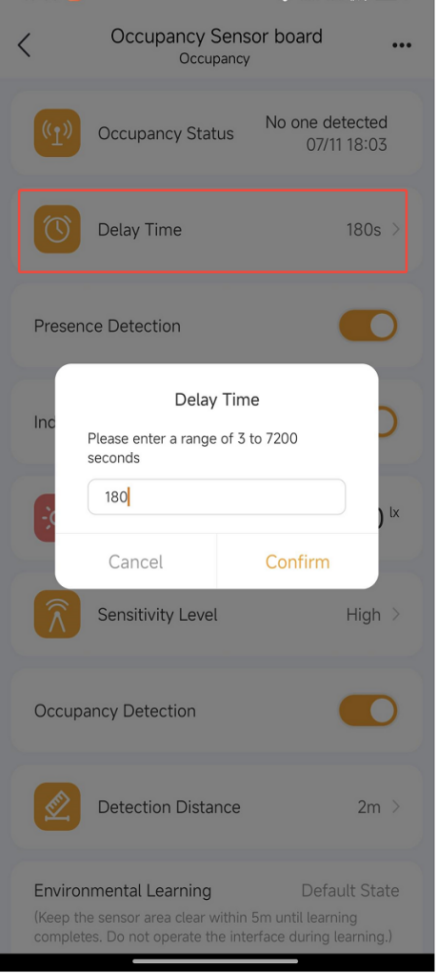
Delay (3-7200 s)
Short (3-30 s): For scenarios that require rapid unoccupied detection.
Standard (30-180 s): Suitable for most scenarios.
Long ( >180s): Exclusive for extended inactivity, e,g., sleeping(about 900s).
NOTE:
Delay too short easily cause “no-presence” false reports. Especially in low-sensitivity mode, delay times shorter than 30s could fail to capture micro-movements. Overly long delays may affect user experience. Adjust according to the actual scenario.
Testing and Fine-tuning
Proper placement and parameter tuning are critical. Reference testing steps:
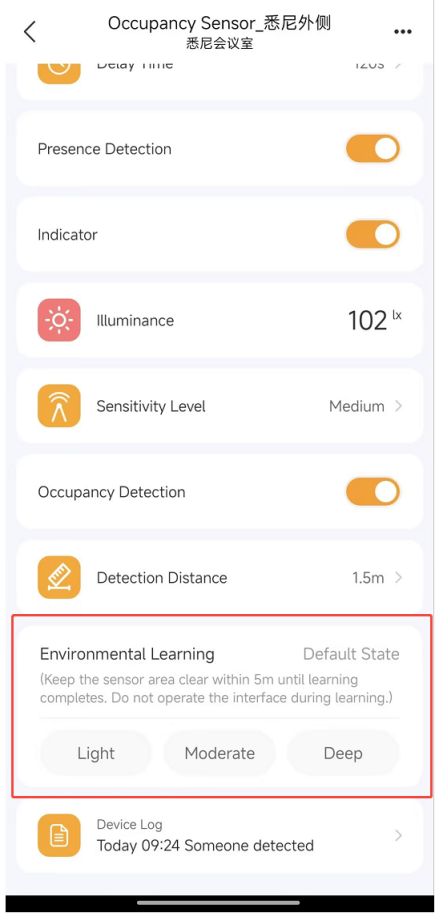
Use Environmental Learning
If the detector frequently reports false “Occupied” or fails to switch from “Unoccupied” to “Occupied,” enable Environmental Learning (Light/Moderate/Deep) in the BelaHome app to auto-tune the detector based on the environment.
Modes
Light Learning: Balances static human detection with filtering mild disturbances (e.g., slight plant movement).
Moderate Learning: Stronger interference filtering but weaker detection of static humans. Recommend extending delay time to ≥180 s.
Deep Learning: Maximize suppression of interference; however, static human signals may be missed. Recommend extending delay time to ≥600 s.
Suggested Approach
Start with Light Learning. If interference persists, increase step by step.
Setting Instructions
In the BelaHome app, tap the detector card and enable the the desired learning mode.
Ensure no human activity within 5 m for at least 5 minutes; otherwise, learning fails.
Do not adjust any parameters or change learning modes during the process.
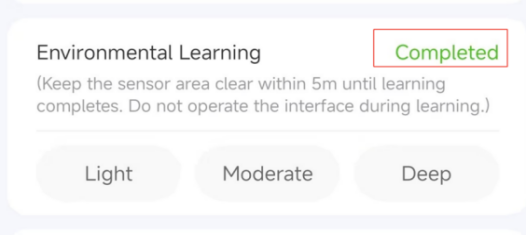
Check the app to confirm learning completion.
NOTE:
To reset or switch learning modes, toggle the sensitivity level once (e.g., Medium → High → Medium). This clears existing learning data.
Confirm Presence-Detection Distance
Set the delay time to 30 s.
Wait for the detector to report “Unoccupied”.
Enter the detection zone from the expected entry path to test the occupied trigger distance.
If the trigger distance is not suitable, adjust the detection radius.
Verify Accurate Presence Reporting
Set the delay time to 30 s.
Choose three points within the core activity area in the detection zone.
At each point, test multiple postures (sitting, standing, lying if applicable, sitting with back toward the detector, etc.) for at least 2 minutes.
Check whether any incorrect “Unoccupied” reports occur.
NOTE:
Multiple posture testing is required because the detector detects micro-movements from chest breathing. Different postures and facing directions change the angle and distance to the detector, affecting signal reflection and detection sensitivity.
Verify Delay Time Settings
After setting the delay based on project needs, test whether the detector reports “Unoccupied” within the expected time after the person leaves - not too long (affects user experience) and not too short (causes false “Unoccupied”).
Practical Example - Apartment Layout
NOTE:
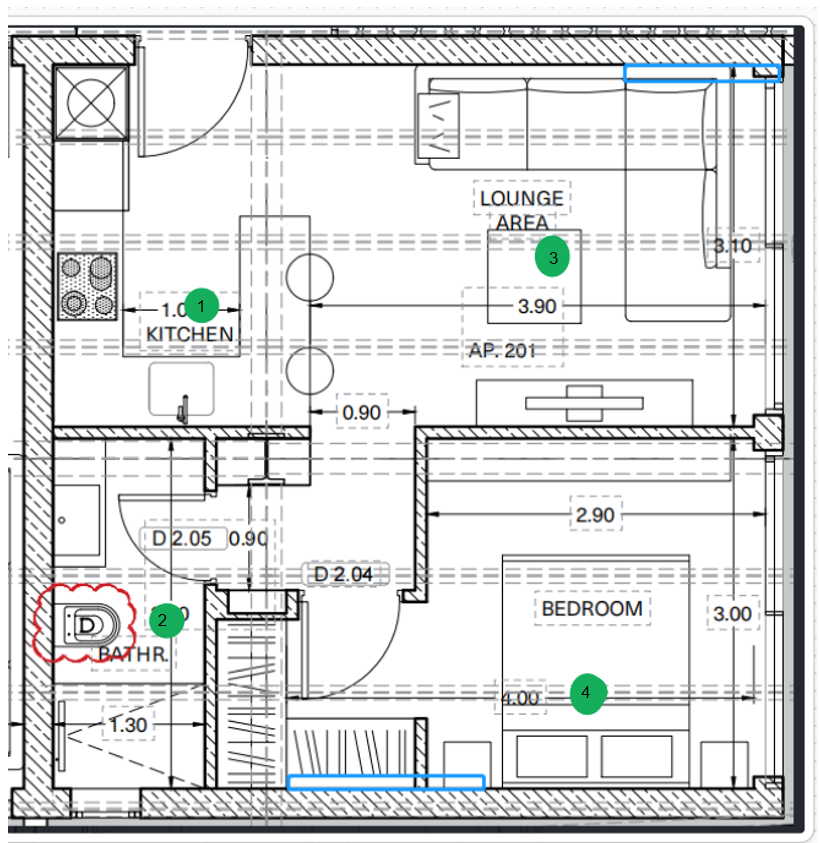
Blue areas in the floor plan indicate air-conditioning outlets.
Detector Placement
Detector | Installation Location | Placement Rationale |
1 (Kitchen/Dining Table) | 1.5 m from entry door | Avoid interference from outside activity; Core activity area falls within detector detection zone; Single detector sufficient for the space. |
2 (Bathroom) | Avoid door, face toilet | Core activity area falls within detector detection zone; Single detector sufficient for entire bathroom. |
3 (Living Room) | >1.5 m from AC vent, face L-shaped sofa | Core seating area falls within detection zone; Single detector sufficient for the space. |
4 (Bedroom) | Cover main activity area | Core activity area falls within detection zone; Single detector sufficient for the space. |
Detector Parameter Settings
Detector | Detection Radius | Sensitivity | Delay Time | Remarks | |
1 (Kitchen/Dining Table) | 1.5 m | Medium | 120 s |
| |
2 (Bathroom) | 1.5 m | Medium | 120 s |
| |
3 (Living Room) | 2.5 m | Medium | 120 s |
| |
4 (Bedroom) | 2 m | High | 900 s |
| |
Troubleshooting
Issue | Possible Cause | Solution |
Detector output abnormal | Incorrect wiring | Reconnect according to the wiring diagram. |
Unstable power supply | Adjust the power circuit to ensure stable power. | |
Detector fails to detect presence | Person outside breathing-signal coverage | Increase detection sensitivity. |
Detector installed directly above a person’s back; Bed at the edge of the detection zone | Reposition the detector. | |
Detector blocked by obstacles | Reposition to avoid obstructions. | |
False reports | Detector too close to glass, wood, or other non-metallic materials | Lower sensitivity or reposition the detector. |
Detector too close to wireless devices | Keep >1.5 m distance from wireless devices. | |
Vibrations or other movements in detection zone | 1. Ensure no other activity signals (vibration devices, fans, moving curtains/plants). 2. Lower sensitivity. |