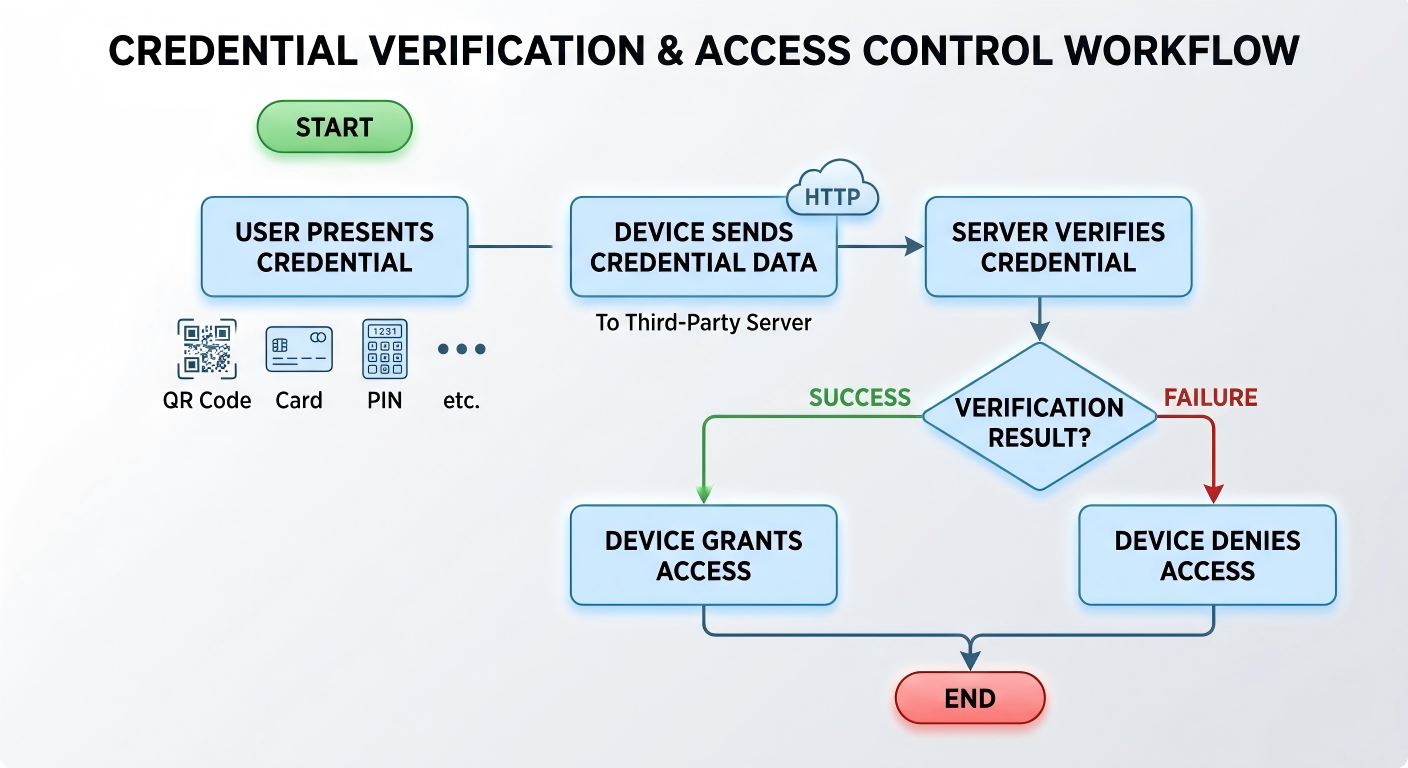
This feature allows Akuvox devices to forward access credentials (such as QR codes, cards, or PIN codes) to a third-party server for verification instead of performing local authentication.
Typical Use Cases:
Centralized access control managed by a third-party platform.
Custom security logic implemented on external servers.
How It Works:
Supported Models
This feature is supported on the following models:
Model | Firmware Version(or higher) | Model | Firmware Version(or higher) |
|---|---|---|---|
A01/A02 | 101.30.10.128 | A05V2 | 205.30.10.157 |
A08 | 108.30.11.122 | E18 | 18.30.11.27 |
E16V2 | 216.30.11.25 | X915V2 | 2915.30.10.625 |
X916 | 916.30.10.353 | R29 | 29.30.10.309 |
S535 | 535.30.11.13 | S539 | 539.30.10.428 |
X912 | 912.30.12.209 |
Before You Start
Make sure you have:
The HTTP API provided by the third-party server.
Device ID assigned by the third-party system.
Authentication method planned (QR code, card, PIN, or multi-factor).
Configuration Overview
Two integration modes are supported:
General Integration
Used for QR code authentication only.
The device sends a predefined HTTP request containing QR code data.
Customized Integration
Used for multiple authentication methods.
Supports QR code, card, PIN, and multi-factor authentication.
Allows flexible data formatting for server-side processing.
Configuration Steps
Take A08 as an example.
Use the device IP to log in to its web interface. The initial username and password are admin.
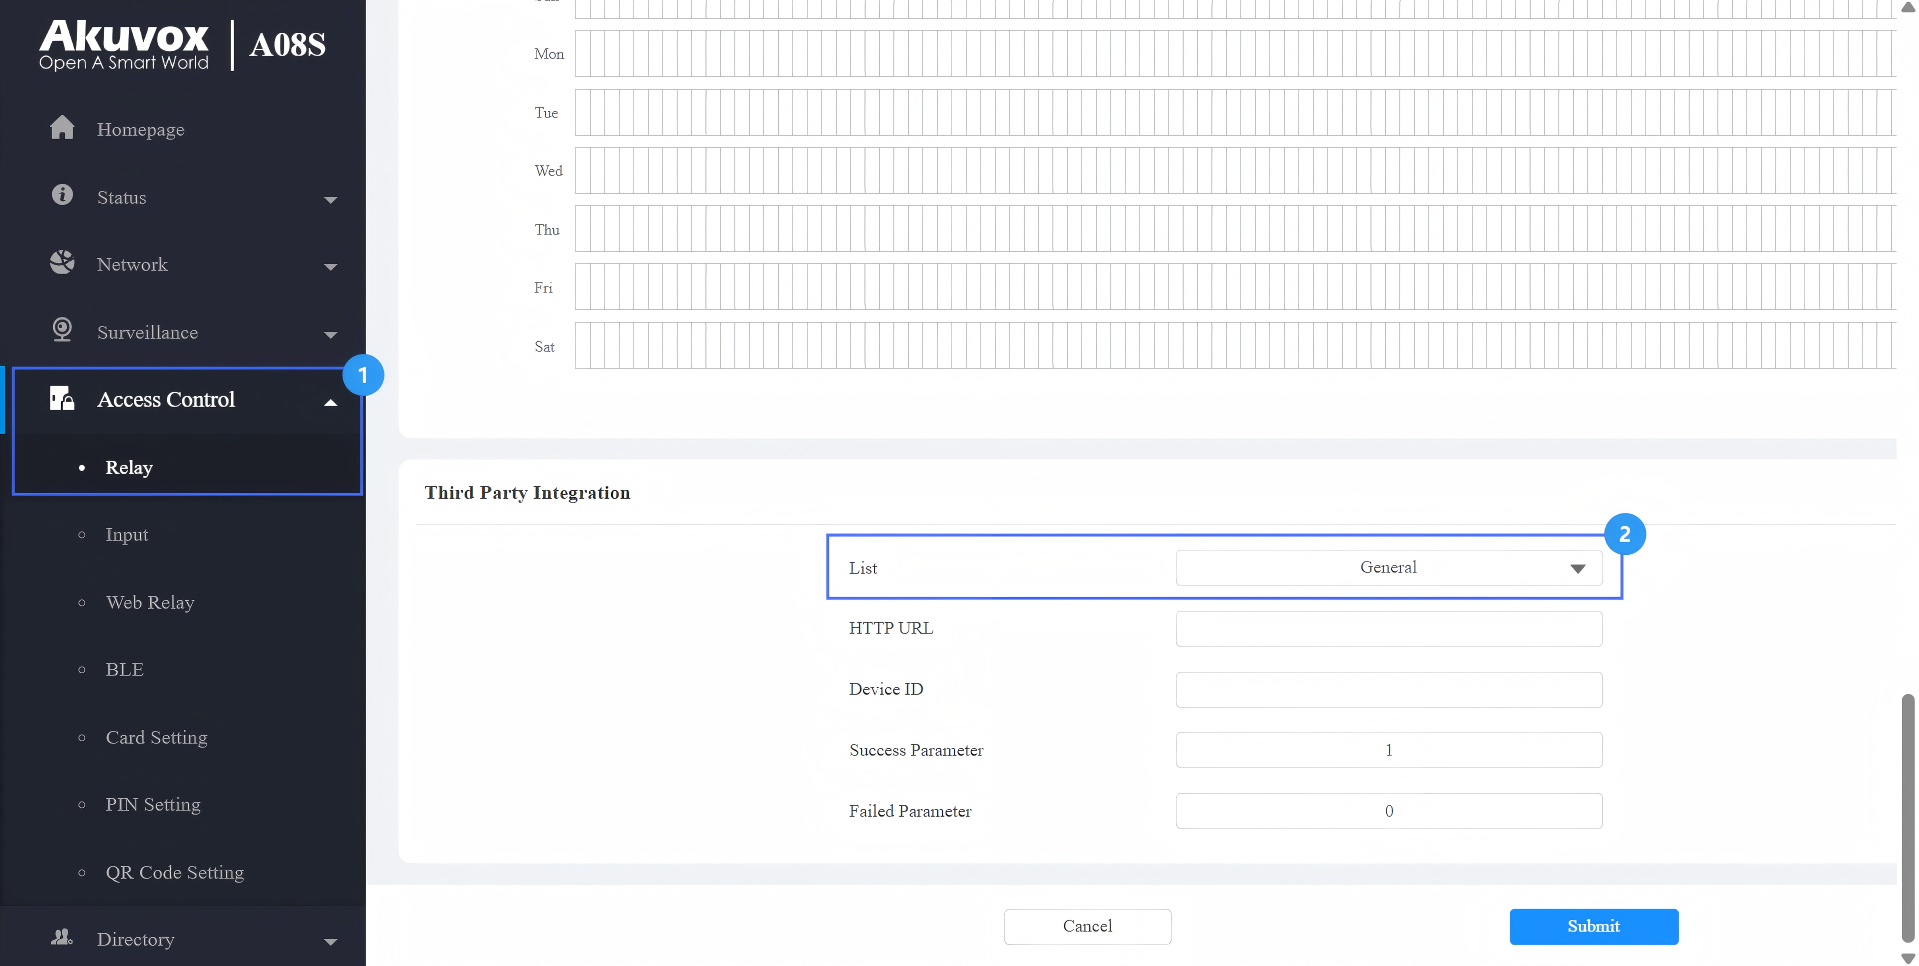
Go to Access Control > Relay > Third Party Integration.
Select the integration type.
General: Transmit the QR code-linked HTTP URL in Akuvox’s method.
Customize: Transmit access credential data in a customized method.
Option A: General Integration(QR Code Only)
When to Use:
Only QR code authentication is required.
The server verifies QR codes via HTTP requests.
Enter the HTTP command provided by the third-party service provider.
Example Format:
http://192.168.31.123:8090/api/visitor/scan?codeKey={QRCode}&deviceId={DeviceID}
Enter the device ID provided by the third-party server.
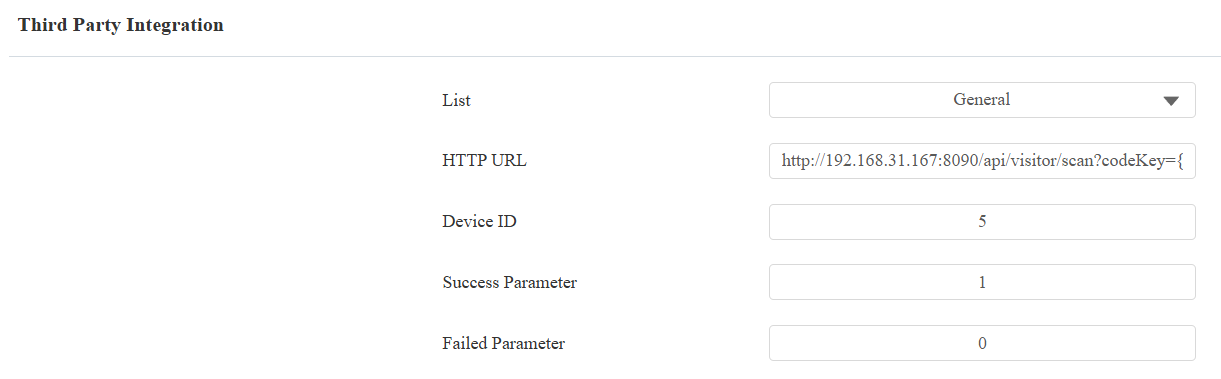
Submit the setting.
Server Response Format
After receiving the request, the third-party server must return a valid JSON response indicating whether access is granted.
The device determines the result based on specific fields in the response.
Supported Success Parameter:
"isvalid": true
"isvalid": 1
"validation_result": "1"
Supported Failed Parameter:
"isvalid": false
"isvalid": 0
"validation_result": "0"
Response Timeout
The device waits for a response from the third-party server within a limited time.
Timeout: 3 seconds
If no valid response is received within this time:
The request will be considered failed.
Access will be denied automatically.
Result
When a QR code is scanned:
{QRCode}is replaced with the actual QR content.{DeviceID}identifies the device.
The server verifies the request.
The device opens the door if verification is successful.

Received URL Example
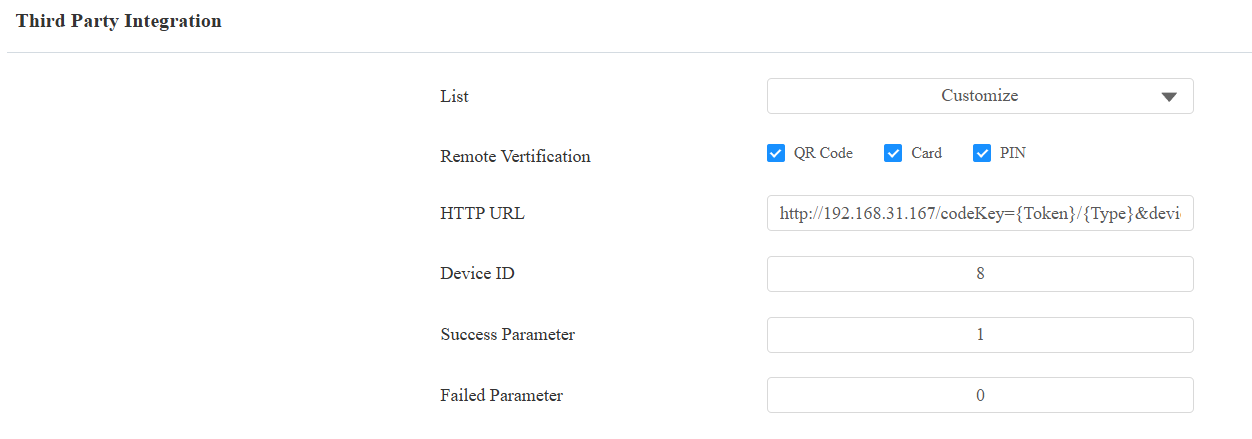
Option B: Customized Integration
When to Use:
Multiple authentication methods are required.
Custom verification logic is implemented on the server.
Supported Credentials:
QR code
RF card
PIN
Multi-factor authentication
Before configuring the integration, specify which Authentication Mode is used by the device.
Select the authentication mode on the Access Control > Relay > Access Authentication Mode interface.

Scenario 1: Any Method Mode
In this mode, any selected credential can trigger verification.
Select the access method(s) to be verified by the third-party server.
Enter the HTTP command provided by the third-party service provider.
Example format:
http://192.168.31.123:8090/api/visitor/scan?codeKey={QRCode}/{Card}/{Pin}&deviceId={DeviceID}.
Enter the device ID provided by the third-party server.
Submit the setting.
Tip
Specific models(X916, S535, R29, A05V2, E18, and E16V2) support the Prompt on LCD feature.
Select Default to adopt the Akuvox door phone’s door-opening prompt.
Select Return Value to use the return value from the third-party server as the prompt.
Server Response Format
After receiving the request, the third-party server must return a valid response indicating whether access is granted.
The device determines the result based on specific fields in the response.
Supported Success Parameter:
"isvalid": true
"isvalid": 1
"validation_result": "1"
Supported Failed Parameter:
"isvalid": false
"isvalid": 0
"validation_result": "0"
Response Timeout
The device waits for a response from the third-party server within a limited time.
Timeout: 3 seconds
If no valid response is received within this time:
The request will be considered failed.
Access will be denied automatically.
Result
The device sends the credential used (QR, card, or PIN).
The corresponding variable is replaced in the URL.
The server verifies the credential and returns the result.

Received URL Example
Scenario 2: Two-Factor Authentication Mode
This mode requires two credentials in sequence. The supported combinations are RF Card + PIN and PIN + RF Card.
Workflow:
The user completes the first authentication step ➡ The device sends the first credential data to the server ➡ The user completes the second authentication step ➡ The device sends the second credential data to the server.
Select Multi-Factor remote verification mode.
If the access method is not matched, the user is prompted to use the correct method.
If matched, the collected credentials are sent to the server for verification.
Enter the HTTP command provided by the third-party service provider.
Example Format:
http://192.168.31.123:8090/api/visitor/scan?codeKey={Token}/{Type}&deviceId={DeviceID}
Enter the device ID provided by the third-party server.
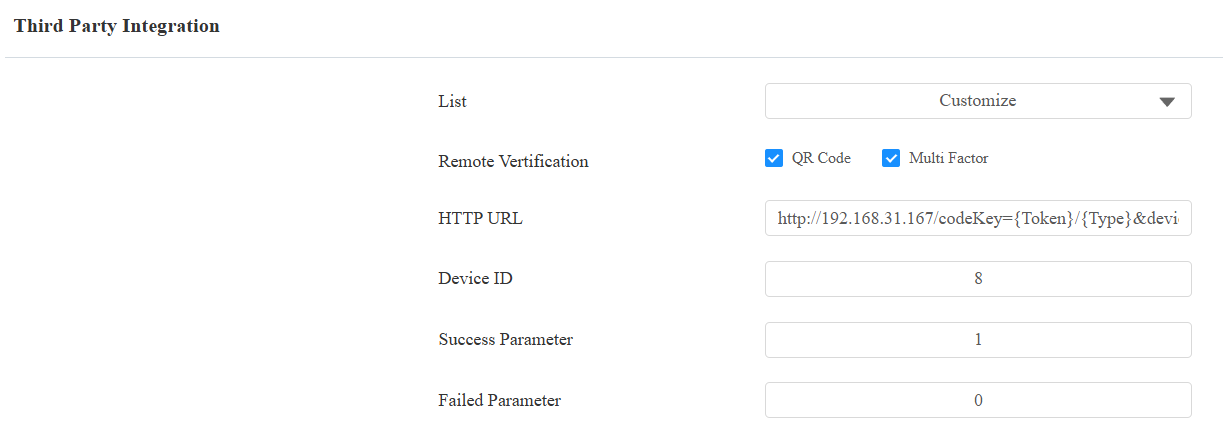
Submit the setting.
Tip
Specific models(X916, S535, R29, A05V2, E18, X912, and E16V2) support the Prompt on LCD feature.
Select Default to adopt the Akuvox door phone’s door-opening prompt.
Select Return Value to use the return value from the third-party server as the prompt.
Server Response Format
After receiving the request, the third-party server must return a valid JSON response indicating whether access is granted.
The device determines the result based on specific fields in the response.
Supported Success Parameter:
"isvalid": true
"isvalid": 1
"validation_result": "1"
Supported Failed Parameter:
"isvalid": false
"isvalid": 0
"validation_result": "0"
Response Timeout
The device waits for a response from the third-party server within a limited time.
Timeout: 3 seconds
If no valid response is received within this time:
The request will be considered failed
Access will be denied automatically
Result
{Token}represents the credential collected in each step.{Type}indicates the authentication sequence:1= RF Card + PIN2= PIN + RF Card3= Face + RF Card4= Face + PIN
The server verifies both credentials before granting access.

Received URL Example
Variable Description
Variable | Description |
|---|---|
{QRCode} | QR code content |
{Card} / {CardCode} | Card number |
{Pin} / {PINCode} | PIN code |
{UserID} | The user ID associated with the user face. |
{DeviceID} | Device identifier |
{Token} | Credential collected in the current step |
{Type} | Two-factor authentication type |
{Time} | The device’s current time |
Model Capability Differences
Authentication Capabilities
Different models support different authentication methods for integration with third-party servers.
Model | Supported Methods |
|---|---|
S539 / X915 | QR Code |
R29 / E16 | QR Code, Card |
S535 | QR Code, Card, Face, PIN |
E18 | QR Code, Card, PIN |
X916 | QR Code, Card, Face |
X912 | QR Code, Card, Face, PIN, Two-Factor |
A08 | QR Code, PIN, RF Card, Two-Factor |
A05 | QR Code, Card, Face |
A02 / A01 | Card, PIN |
Supported Variables by Model
Different models support different variables when sending data to the server.
Model | Variable Format |
|---|---|
S539 / X915V2 | {QRCode}, {DeviceID}, {Time} |
E16V2 | {QRCode}, {Card}, {DeviceID}, {Time} |
S535 | {QRCode}, {Card}, {Pin}, {UserID}, {DeviceID}, {Time} |
E18 | {QRCode}, {Card}, {Pin}, {DeviceID}, {Time} |
X916 / R29 | {QRCode}, {Card}, {UserID}, {DeviceID}, {Time} |
X912 | {QRCode}, {Card}, {Pin}, {UserID}, {DeviceID}, {Token}, {Type}, {Time} |
A08 | {QRCode}, {Card}, {Pin}, {DeviceID}, {Token}, {Type}, {Time} |
A05V2 | {QRCode}, {Card}, {UserID}, {DeviceID}, {Time} |
A02 / A01 | {Card}, {PINCode}, {DeviceID}, {Time} |
Note
The variable formats are NOT interchangeable between models.
Only variables supported by the device model can be used in the HTTP command.
Using unsupported variables may result in failed requests.