Integration via Wiegand
The Wiegand feature enables the Akuvox device to act as a controller or a card reader.
Set it up on the web Access Control > Wiegand interface.
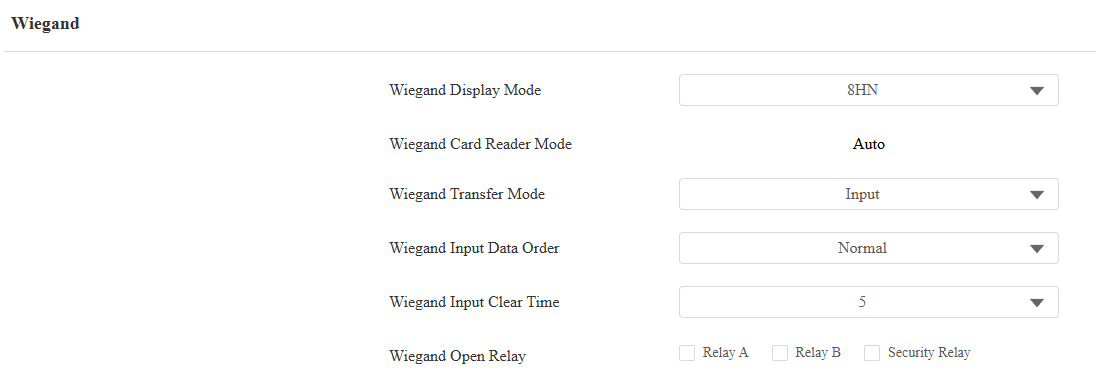
Wiegand Display Mode: Select the Wiegand card code format from the following options: 8H10D, 6H3D5D(W26), 6H8D, 8HN, 8HR, 6H3D5D-R(W26), 8HR10D, and RAW.
Wiegand Card Reader Mode: The transmission format should be identical between the A15 and the third-party device.
Wiegand Transfer Mode:
Input: The device serves as a receiver.
Output: The device serves as a sender and can directly output the data, such as the card code.
Convert To Card No. Output: The device serves as a sender and cannot directly output the data, such as the face data.
Wiegand Input Data Order: Set the Wiegand input data sequence between Normal and Reversed. If you select Reversed, then the input card number will be reversed.
Wiegand Output Basic Data Order: Set the sequence of the card data before going through Wiegand conversion and outputting the card code.
For example, if the card data is 0x11 0x22 0x33 0x44 and the Reversed option is selected, the data will be 0x44 0x33 0x22 0x11.
Wiegand Output Data Order: Determine the sequence of the card data after the Wiegand conversion.
For example, if the card data is 0x11 0x22 0x33 0x44 0x55, it will be 0x33 0x44 0x55 after the Wiegand conversion(e.g., Wiegand 26). If Reversed is selected, the card data is 0x55 0x44 0x33.
Wiegand Output CRC Enabled: It is enabled by default for Wiegand data inspection. Disabling it may lead to integration failure with third-party devices.
Wiegand Input Clear Time: When the interval between entering passwords exceeds this time. All entered passwords will be cleared.
RF Card Verification: Available when Output or Convert to Card No. Output is selected. When enabled, the device will verify whether the card code is assigned to a user. If it is not, a prompt "Opening Door Failed" will pop up on the device screen. When disabled, the device will not perform local verification.
PIN/QR Code Verification: Available when Output is selected as Wiegand Transfer Mode. When enabled, the device will verify whether the credential is assigned to a user. If it is not, a prompt "Opening Door Failed" will pop up on the device screen. When disabled, the device will not perform local verification.
Wiegand Open Relay: Check the relay to be triggered through Wiegand.
Note
Click here to view more information on Wiegand settings, including:
Akuvox devices work as Wiegand input/output.
Wiegand Card Reader Connection.
When the device is in Wiegand Output mode, you can set the Wiegand PIN code output format that determines how data is transmitted. The format should be consistent with that of the third-party device.

8 bits per digit: When users press "1" on the keypad, the binary data will be transmitted in 8 bits, "11100001".
4 bits per digit: When users press "1" on the keypad, the binary data will be transmitted in 4 bits, "0001".
All at once: After users enter the whole PIN code, the data will be transmitted according to the Wiegand card reader mode. For example, “123456” will be converted to “01e240” in Wiegand 26.
Integration via HTTP API
HTTP API is designed to achieve a network-based integration between the third-party device and the Akuvox device.
To set it up, go to the web Device Setting > HTTP API interface.
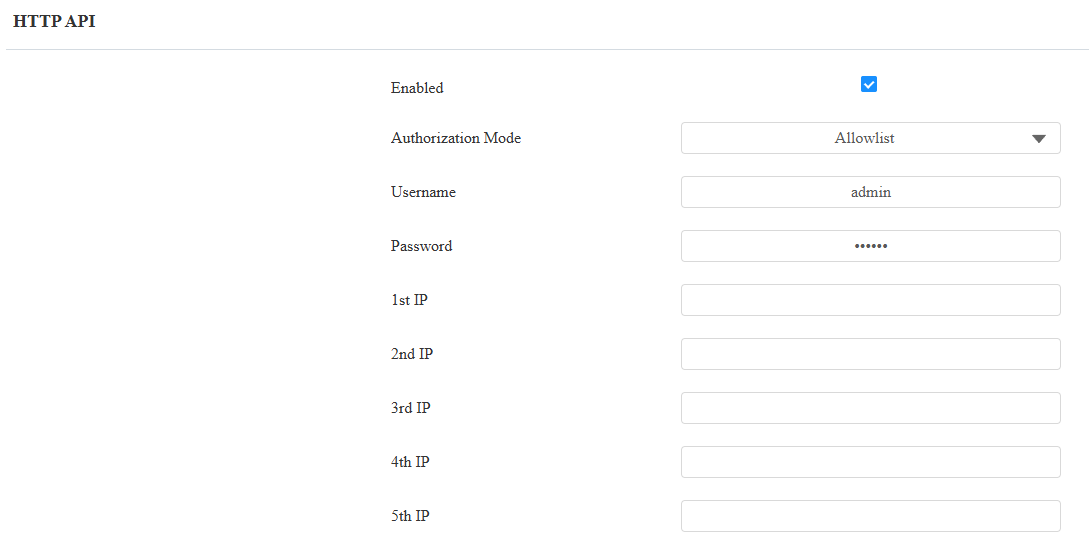
Enabled: Enable or disable the HTTP API function for third-party integration. If the function is disabled, any request to initiate the integration will be denied and return an HTTP 403 forbidden status.
Authorization Mode: Select one of the following options: None, Allowlist, Basic, Digest, and Token for authorization type, which will be explained in detail in the following chart.
Username: Enter the username when Basic or Digest authorization mode is selected. The default username is admin.
Password: Enter the password when Basic or Digest authorization mode is selected. The default password is admin.
1st IP-5th IP: Enter the IP address of the third-party devices when Allowlist authorization is selected for the integration.
Please refer to the following description for the authentication mode:
Authorization Mode | Description |
|---|---|
None | No authentication is required. This mode is intended for testing only and is not recommended in production environments. |
Allowlist | Authenticates requests based on the source IP address. Add the IP address of the third-party device to the allowlist before sending requests. Recommended for trusted LAN environments. |
Basic | Authenticates requests using a username and password. The credentials must be Base64-encoded and included in the Authorization header. |
Digest | Authenticates requests using HTTP Digest authentication. Only the MD5 algorithm is supported. |
Token | Reserved for Akuvox internal development and testing. |
Power Output Control
The device can serve as a power supply for the external relays. Click here to view the power output requirements and the wiring example.
To set it up, go to the web Access Control > Relay > 12V Relay Output interface.

12V Power Output:
Always: Provide continuous power to the third-party device.
Triggered by Open Relay: Provide power to the third-party device via 12 output and GND interface during the timeout when the status of the relays is shifted from low to high.
Integration via RS485
You can connect the device to an external device such as SR01 or an OSDP-based card reader via RS485. To make the connection effective, you need to select the right RS485 mode.
Click here to view the detailed configuration of the OSDP feature.
To make the connection effective, you need to set up the RS485 on the Access Control > RS485 interface.
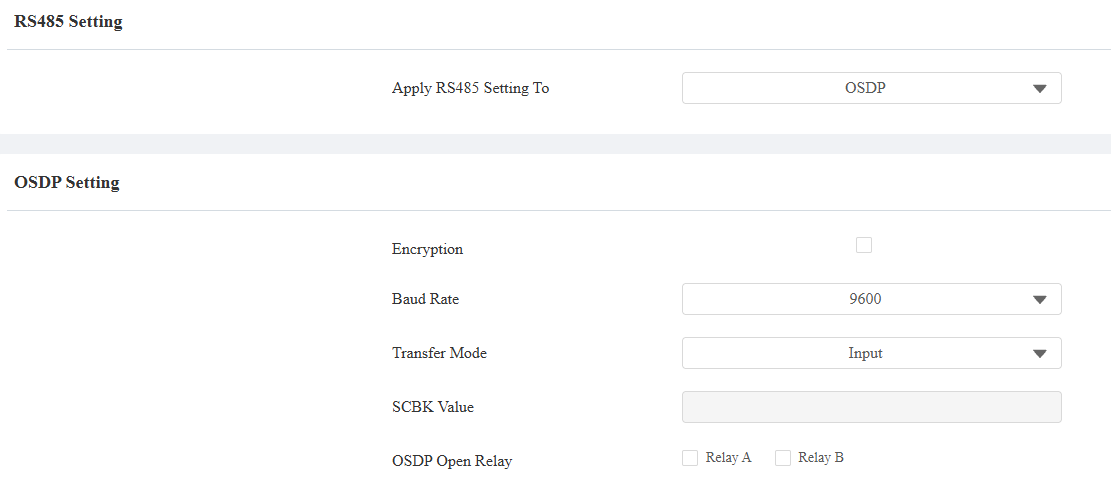
Disabled: The RS485 function is disabled.
OSDP: The device is connected to an OSDP-based external device such as a card reader.
Encryption: Check this option when the protocol is encrypted.
Baud Rate: Set the baud rate for data transmission during communication. The default is 9600, supported by Akuvox devices.
Transfer Mode: Select the RS485 working mode: Output, or Input.
Local Relay Verification: When Output is selected, set whether to carry out the access credentials verification. When unchecked, door-opening failure prompts will not be given.
SCBK Value: Secure Communication Key Value.
When it is filled, OSDP will use this value for encryption, employing a customized protocol for communication.
When it is left empty, OSDP will use the default encrypted protocol for communication.
Address: The RS485 address to distinguish this device from others.
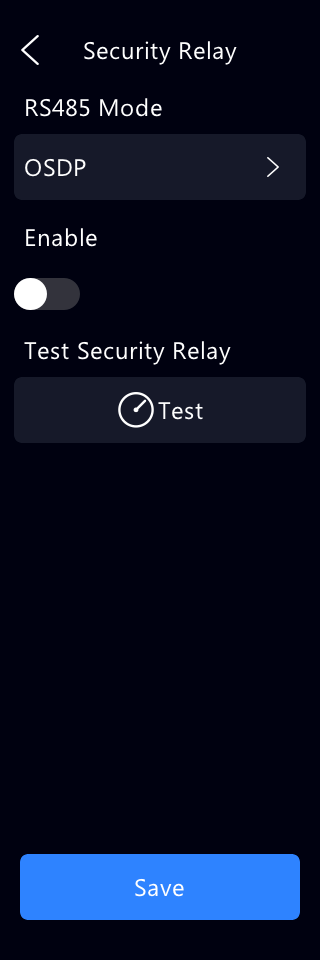
Security Relay: Select this option when the device works with the SR01.
You can also select the RS485 Mode on the Setting > Security > Security Relay screen.
Integration with Third-party Access Control Server
The device can transmit credential data to a third-party server without doing any verification. The generation and verification of the data are conducted on the third-party server.
To set it up, go to Access Control > Relay > Third Party Integration interface.
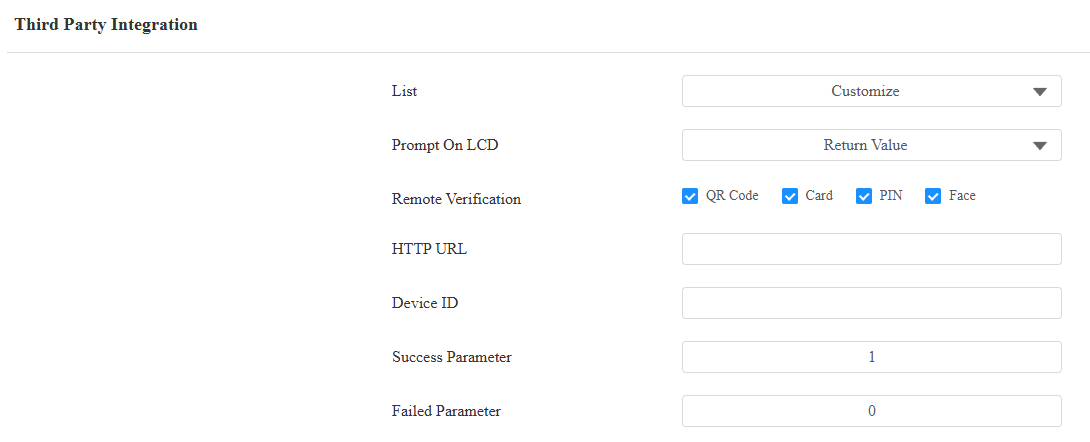
None: Disable the function.
General: Transmit the QR code-linked HTTP URL in Akuvox’s method.
HTTP URL: Enter the HTTP command format provided by the third-party service provider. After scanning the QR code, the HTTP command will carry the dynamic QR code information automatically before it is sent to the QR code server for verification. See the example: http://{Server IP}:8090/api/visitor/scan?codeKey={QRCode}&deviceId={DeviceID}.
Device ID: The device ID is provided by the third-party server. It will be added to the HTTP command automatically when using a QR code for door access.
Success Parameter: Receiving this value indicates that opening the door succeeds.
Failed Parameter: Receiving this value indicates that opening the door fails.
Customize: Transmit access credential data in a customized method. When Face is selected, the device performs local face recognition first. If no matching face is detected, authentication fails. If a match is found, the associated User ID or PIN is submitted to the third-party server for further verification.
Remote Verification: Specify which access credentials will be verified by the third-party server. In all cases, the specified credential is forwarded to the server as-is, with no local verification performed on the device.
Available options depend on the configured device theme:
Theme
Available Options
Default
QR Code, Card, PIN, Face
Multi-factor Authentication
QR Code, Multi-Factor
When the Multi-factor Authentication theme is selected, the Remote Verification options behave as follows:
Option
Description
QR Code
The device scans the QR code and sends it directly to the third-party server.
Multi-Factor
The device first checks whether the authentication method matches the configured method.
If not matched → User is prompted to use the correct method.
If matched → The collected credentials are sent to the server for verification.
HTTP URL: Enter the HTTP command format provided by the third-party service provider. After a QR code scan, card swipe, PIN entry, or face recognition, the device automatically replaces variables in the URL and sends the request to the server.
Example format:
http://{Server IP}:8090/api/visitor/scan?codeKey={QRCode}/{Card}/{UserID}/{Pin}&deviceId={DeviceID}.
If a user swipes a card, the URL will be http://192.168.35.123:8090/api/visitor/scan?codeKey={QRCode}/123456/{UserID}/{Pin}&deviceId=1.
In the Multi-factor Authentication theme, the available placeholders depend on the Authentication Mode selected.
Variable
Description
{Token}
Credential collected in the current authentication step.
{Type}
Two-factor authentication type:
1 = RF Card + PIN
3 = Face + RF Card
4 = Face + PIN
Device ID: The device ID is provided by the third-party server. It will be added to the HTTP command automatically.
Success Parameter: Receiving this value indicates that opening the door succeeds.
Failed Parameter: Receiving this value indicates that opening the door fails.