IP Call & IP Call Configuration
An IP call is a direct call between two intercom devices using their IP addresses, without a server or a PBX. IP calls work when the devices are on the same network.
To configure the IP call feature and port on the device web Phone > Call Feature > Others interface.

Parameter Set-up:
- Direct IP Call: enable the direct IP call. For example, if you do not allow direct IP calls to be made on the device, you can untick the check box to terminate the function.
- Direct IP Call Port: the direct IP Call Port is 5060 by default with the port range from 1-65535. If you enter any values within the range other than 5060, you are required to check if the value entered is consistent with the corresponding value on the device you wish to establish a data transmission.
SIP Call & SIP Call Configuration
Session Initiation Protocol(SIP) is a signaling transmission protocol used for initiating, maintaining, and terminating calls.
A SIP call uses SIP to send and receive data between SIP devices, and can use the internet or a local network to offer high-quality and secure communication. Initiating a SIP call requires a SIP account, a SIP address for each device, and configuring SIP settings on the devices.
SIP Account Registration
Each device needs a SIP account to make and receive SIP calls.
Akuvox intercom devices support the configuration of two SIP accounts, which can be registered under two independent servers.
Click here to view the SIP account registration example.
To configure the SIP account on the device More >Setting > More > Account screen.
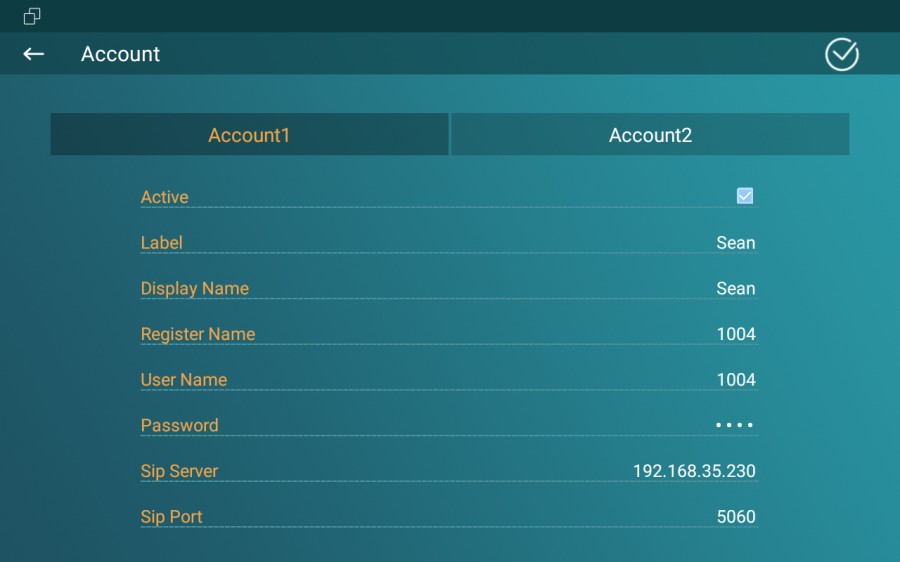
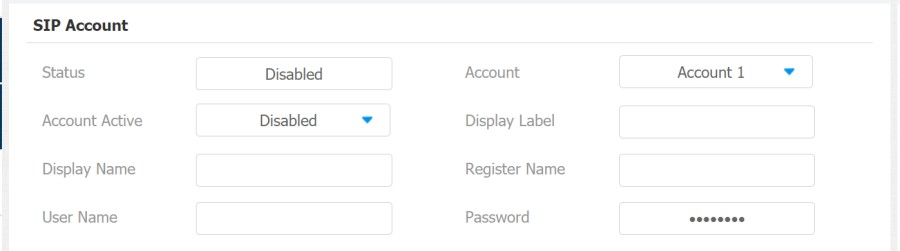
The parameter settings for SIP account registration can be configured on the Account Setting screen and they can also be configured on the device web interface. To perform the SIP account setting on the Web Account > Basic > SIP Account Interface. Register Name, User Name, and Password are obtained from the SIP account administrator.
Parameter Set-up:
- Status: check to see if the SIP account is registered or not.
- Account: select Account1 or Account2.
- Account Enabled: check to activate the registered SIP account.
- Display Label: configure the device label to be shown on the device screen.
- Display Name: configure the name, for example, the device's name to be shown on the device being called to.
SIP Server Configuration
SIP servers enable devices to establish and manage call sessions with other intercom devices using the SIP protocol. They can be third-party servers or built-in PBX in Akuvox indoor monitor.
To perform the SIP account setting on the Web Account > Basic > SIP Account Interface.

Parameter Set-up:
- Server IP: enter the Server's IP address number or its URL.
- Port: set up SIP server port for data transmission.
- Registration Period: set up SIP account registration time span. SIP re-registration will start automatically if the account registration fails during the registration time span. The default registration period is 1800, ranging from 30-65535s.
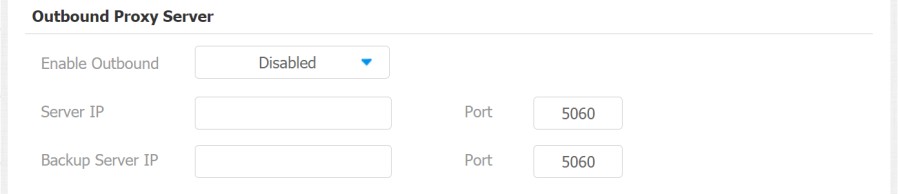
Outbound Proxy Server configuration
An outbound proxy server receives and forwards all requests the designated server. It is an optional configuration, but if set it up, all future SIP requests get sent there in the first instance.
To configure the outbound proxy server on Account > Basic > Outbound Proxy Server interface.
Parameter Set-up:
- Enable Outbound: enable or disable to turn on or turn off the outbound proxy server.
- Server IP: enter the SIP address of the outbound proxy server.
- Port: enter the port number for establishing call sessions via the outbound proxy server.
- Backup Server IP: set up backup server IP for the backup outbound proxy server.
- Port: enter the port number for establishing call sessions via the backup outbound proxy server.
SIP Call DND & Return Code Configuration
The Do Not Disturb(DND) feature prevents unwanted incoming SIP calls, ensuring uninterrupted focus. It also allows you to set a code to be sent to the SIP server when rejecting a call.
Go to Phone > Call Feature interface.

Parameter Set-up:
- DND: check Whole Day or Schedule to enable the DND function. DND function is disabled by default.
- Return Code When DND: select what code should be sent to the calling device via the SIP server. 404 for Not found; 480 for Temporary Unavailable; 486 for Busy Here; 603 for Decline.
- Schedule: enable DND schedule for your indoor monitor. To configure a specific time to enable the DND feature. If you choose Schedule for DND, the Whole Day tab is available.
- DND Start Time: the start time for DND schedule.
- DND End Time: the end time for DND schedule.
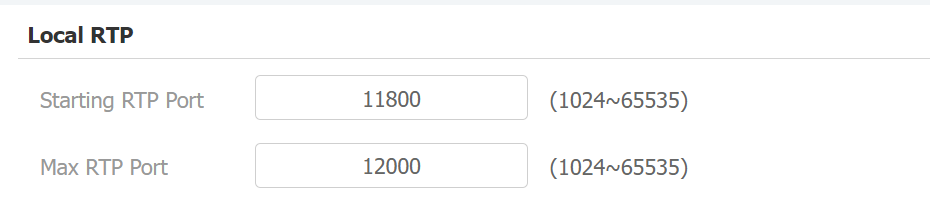
Device Local RTP Configuration
Real-time Transport Protocol(RTP) lets devices stream audio and video data over a network in real time.
To use RTP, devices need a range of ports. A port is like a channel for data on a network. By setting up RTP ports on your device and router, you can avoid network interference and improve audio and video quality.
To set up device local RTP on web Network > Advanced > Local RTP interface.
Parameter Set-up:
- Starting RTP Port: enter the port value in order to establish the start point for the exclusive data transmission range.
- Max RTP port: enter the port value in order to establish the endpoint for the exclusive data transmission range.
Data Transmission Type Configuration
Akuvox intercom devices support four data transmission protocols: User Datagram Protocol(UDP), Transmission Control Protocol(TCP), Transport Layer Security(TLS), and DNS-SRV.
To do this configuration on web Account > Basic > Transport Type interface.

Parameter Set-up:
- UDP: select UDP for unreliable but very efficient transport layer protocol. UDP is the default transport protocol.
- TCP: select TCP for reliable but less-efficient transport layer protocol.
- TLS: select TLS for a secured and reliable transport layer protocol.
- DNS-SRV: select DNS-SRV to obtain a DNS record for specifying the location of services. And SRV not only records the server address but also the server port. Moreover, SRV can also be used to configure the priority and the weight of the server address.