When encountering local door-opening failure of Akuvox intercom devices, please first check:
whether the feature is configured correctly, e.g. the DTMF codes are consistent between devices;
whether the device firmware is the latest version, if not, upgrade it to the latest version and see if the problem still occurs. Click here to learn how to check the device’s firmware version.
Unlock Failure by DTMF
When users tap the DTMF-linked unlock button on the indoor monitor, or type in the DTMF value on the keypad, the door is not opened. Neither the device gives any response.
You can analyze the problem from the following aspects:
The connection between the door lock and the device is incorrect or poor;
The DTMF configuration is incorrect.
Check the Connection
Test whether other access methods such as swiping an RF card can open doors successfully. If it does, the problem may not be led by the connection.
Check DTMF Configuration
The DTMF configuration involves settings of:
the DTMF value;
the DTMF-linked unlock button;
the DTMF whitelist.
DTMF Value
The DTMF unlock method requires the DTMF values to be consistent between door phones and indoor monitors.
Use the door phone R29S and the indoor monitor S567 as examples.
Log into R29’s web interface with its IP address. The initial username and password for login are admin.
Go to Intercom > Relay interface.
Specify which relay is connected to the door lock. If it is Relay A, here its DTMF code is “#”.

Log into S567’s web interface with its IP address. The initial username and password for login are admin.
Go to Device > Relay interface and find the Remote Relay part. Check if any of the three codes is the same as the code set in the door phone.
Here the DTMF1 Code is also “#”, which is correct.

DTMF-Linked Button
Users can open doors by either typing in the DTMF value on the indoor monitor’s keypad or simply tapping the DTMF-linked unlock button. If the button does not work, you need to check whether the configuration is correct.
Use the indoor monitor S567 as an example.
Log into S567’s web interface with its IP address. The initial username and password for login are admin.
Go to Device > Relay interface. Check whether you have set an unlock key to Remote Relay DTMF type.
The indoor monitor has three remote DTMF codes. Make sure you choose the one with the right serial number.
Note
When the device is connected to the SmartPlus Cloud, the setting may be changed to Config on Cloud due to Cloud configuration synchronization.

DTMF Whitelist
DTMF whitelist limits DTMF door opening to specific contacts.
Use the door phone R29S as an example.
Log into R29’s web interface with its IP address. The initial username and password for login are admin.
Go to Intercom > Relay and find the DTMF part. If it is set to Only Contacts List. Only when the indoor monitor is in the contacts of the door phone, can users open doors with DTMF codes on the indoor monitor. All Numbers option does not constrain the numbers to unlock with DTMF.

Go to Contacts > Contacts List where you can add contacts.

Unlock Failure by HTTP Commands
The failure may appear as the door phones give no response.
You can analyze the problem from the following aspects:
The HTTP feature is not enabled;
The HTTP command used is incorrect.
The HTTP authentication failed. In PCAP files, filter for HTTP and you will see the 401 Unauthorized error. Please refer to the article for exporting PCAP files: How to capture network traces on Akuvox intercoms.

Log in to the device’s web interface. The initial username and password for login are admin.
Enable the HTTP Door-opening Feature
Go to Access Control > Relay and find the Open Relay Via HTTP part.
Enable the Open Relay via HTTP feature and customize the user name and password as parts of the HTTP command.
Note
If the door opening fails when you type in the HTTP command in a browser, uncheck Session Check box.
When it is enabled, you need to log in to the device’s web while opening the door.

Specify HTTP Command Formats
The HTTP command formats vary by whether the device supports high-security mode and whether the mode is enabled or not.
Therefore, you need to use the right command format.
Click here to view how to identify whether the device supports high-security mode.
Click here to view how to choose the HTTP format.
Verify Authentication Credentials
Go to the Access control > Relay > Open Relay via HTTP interface to confirm the username and password.
Re-enter the credentials and save.

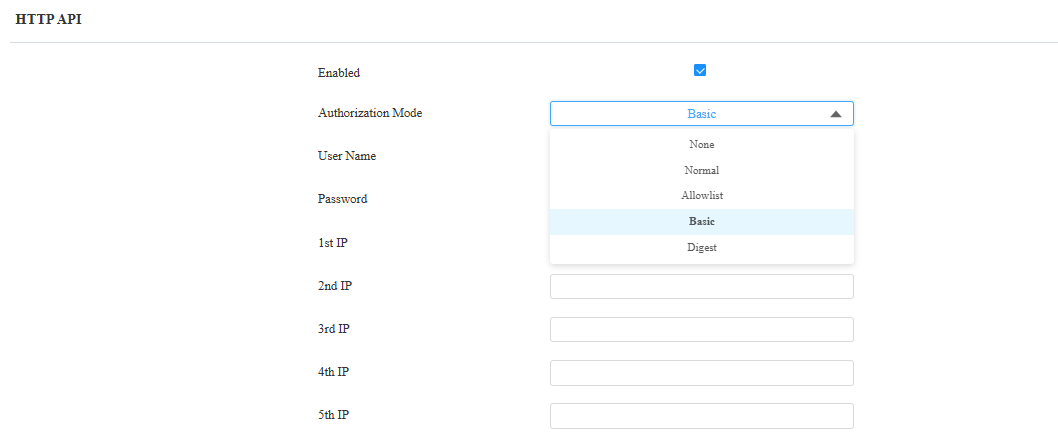
Configure the Authorization Mode.
Go to the Settings > HTTP API interface. Select the appropriate authorization mode:
Allowlist Mode: Add the IP address of the HTTP command sender (e.g., if using indoor monitor S567 to control X915, add S567's IP to the allowlist).
Basic/Digest Mode: Ensure the sender uses the same authorization method as configured.
Unlock Failure by User-specific Access Methods
Such access methods as PIN codes, RF cards, and facial recognition should be assigned to specific users for door opening.
The failure with these methods may appear as a “Door-opening Failure” on the touch-screen door phones. The push-button door phones may make a “Dengdeng” sound or give no response.
You can analyze the problem from the following aspects:
The card/PIN code entered is wrong;
The face data enrollment fails;
The user is not authorized to open doors within the schedule;
The Mifare card encryption feature is enabled but not set up;
Incorrect posture for facial recognition or environmental influence. If conditions permit, adjust the recognition posture and lighting to see if the problem still occurs.
If the door phones announce “Welcome, please come in” but the door is not opened. Please check whether the connection between the devices and door locks is appropriate.
Use the door phone R29S as an example. Log into its web interface with its IP address. The initial username and password for login are admin.
Check the Door Log
The door log helps you track the door-opening records.
Go to Phone > Door Log interface. When the user is identified as a visitor, it means the codes he/she uses do not match the codes assigned to him/her. And the facial data is not in the device’s database.

Re-upload the Face Photo
Facial recognition may fail when the uploaded face photo is over-beautified or the face is in a backlight or not in a front view.
Go to Intercom > User interface and click
 of the target user.
Click Reset to remove the uploaded photo and click Select File to choose a new one from your local driver.
Please upload a clear photo of the user’s front face uncovered.

A pop-up window will notify you whether the registration is successful or not.

Check the Schedule Assigned to the User
The access schedule defines when the user can open doors with credentials.
Go to Intercom > User where you can view the Schedule ID.

Go to Intercom > Schedule to check the schedule details.

Set up Mifare Card Encryption
Mifare cards are encrypted cards. To open doors with these cards, enter the right sector/block and block key on the device’s web.
Please click here to view the configuration steps.
Tip
When unable to troubleshoot, please report the problem through the Ticket system and provide relevant information.
Please view the article Feedback a Problem to Akuvox Technical Team for instructions on collecting information.