The action URL can be sent as an HTTP command to a third-party server when specific events are triggered on Akuvox door phones or access control terminals, such as opening the door or making a call. The third-party device can record the status change of Akuvox devices or perform actions.
Configuration
This part takes R20A with firmware version 320.30.11.47 as an example.
Use the device IP(scanned by IP scanner) to log in to its web interface. The initial username and password are admin.
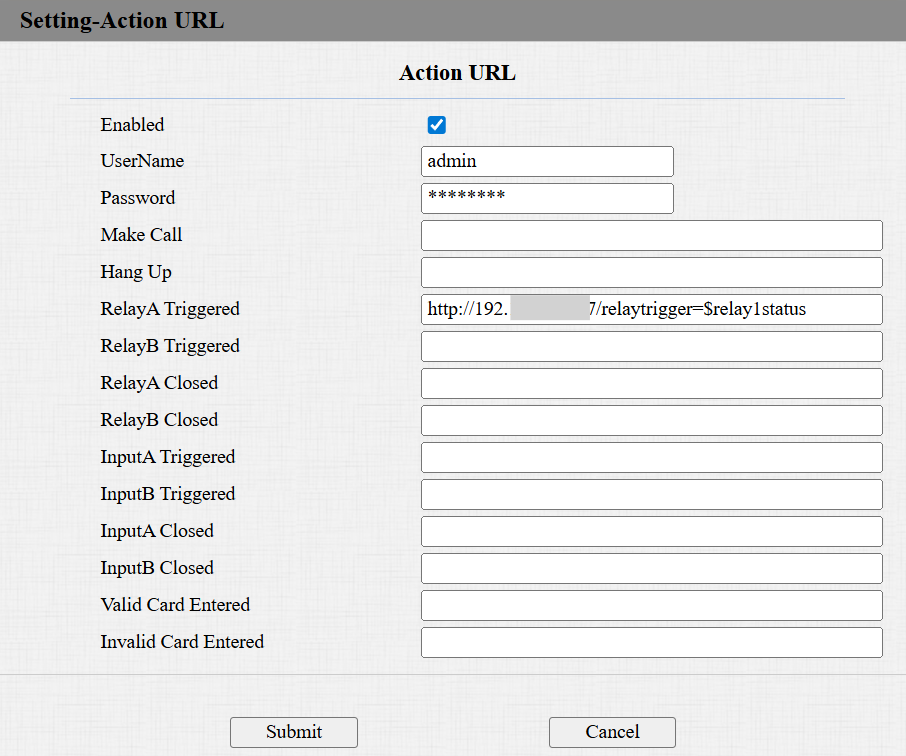
Go to Device Management > Setting > Action URL interface.
Enable the action URL feature.
Enter the username and password when the third-party server requires digest authentication.
If the URL below contains a username and password, the authentication in the URL takes precedence.
Enter the URL in the desired action field, which complies to the format specified by the third-party server. Take sending relayA status as an example.
The example format is http://{server ip}/relaytrigger=$relay1status.
Optionally, to carry the device information, you can add the following variables($mac, $ip, $model, and $firmware) to the URL. The example format is http://{server IP}/mac=$mac:ip=$ip:model=$model:firmware=$firmware:active_url=$active_url:active_user=$active_user:relay1status=$relay1status
server IP: The IP address of the third-party server.
relaytrigger: The event triggered. You can customize the event name.
$relay1status/$mac/$ip/$model/$firmware: Variables that the device will automatically replace with actual values before sending.
Click Submit.
The third-party server receives an HTTP URL when relayA is triggered(for example, a user swipes his/her card to open the door).
The actual value replaces $relay1status.
0: RelayA is closed.
1: RelayA is open.

The URL carries the device information:

Attachment
The supported action URLs vary by model. The list below lists the action URLs supported by X915V2 based on firmware 2915.30.10.510. You may take it as reference.
To check other models, please see the Google Drive Excel form.
Event List | Variable List |
Event | Description | Example Format | Variable | Description |
Make Call | The device makes an outgoing call. | Http://server ip/Callnumber=$remote | $remote | The called IP/SIP number. |
Hang Up | The device hangs up a call. | Http://server ip/Callnumber=$remote | $remote | The IP/SIP number in the call hung up by the device. |
Relay A Triggered | The device's relayA is triggered. | Http://server ip/relaytrigger=$relay1status | $relay1status | The status of the relay. 1:Open; 0:Closed. |
Relay B Triggered | The device's relayB is triggered. | Http://server ip/relaytrigger=$relay2status | $relay2status |
Relay C Triggered | The device's relayC is triggered. | Http://server ip/relaytrigger=$relay3status | $relay3status |
Relay A Closed | The device's relayA is closed. | Http://server ip/relayclose=$relay1status | $relay1status |
Relay B Closed | The device's relayB is closed. | Http://server ip/relayclose=$relay2status | $relay2status |
Relay C Closed | The device's relayC is closed. | Http://server ip/relayclose=$relay3status | $relay3status |
Input A Triggered | The device's input A is triggered. | Http://server ip/inputtrigger=$input1status | $input1status | The status of the input. 1:Open; 0:Closed. |
Input B Triggered | The device's input B is triggered. | Http://server ip/inputtrigger=$input2status | $input2status |
Input C Triggered | The device's input C is triggered. | Http://server ip/inputtrigger=$input3status | $input3status |
Input A Closed | The device's input A is closed. | Http://server ip/inputclose=$input1status | $input1status |
Input B Closed | The device's input B is closed. | Http://server ip/inputclose=$input2status | $input2status |
Input C Closed | The device's input C is closed. | Http://server ip/inputclose=$input3status | $input3status |
Valid Code Entered | Enter a registered PIN code to open the door. | Http://server ip/validcode=$code | $code | |
Invalid Code Entered | Enter an unregistered PIN code to open the door. | Http://server ip/invalidcode=$code | $code |
Valid Card Entered | Swipe a registered card to open the door. | Http://server ip/validcard=$card_sn | $card_sn | |
Invalid Card Entered | Swipe an unregistered card to open the door. | Http://server ip/invalidcard=$card_sn | $card_sn |
Valid Face Recognition | Scan a registered face to open the door. | Http://server ip/unlocktype=$unlocktype | $unlocktype | Face |
Invalid Face Recognition | Scan an unregistered face to open the door. | Http://server ip/unlocktype=$unlocktype | $unlocktype | Null. |
Valid QR Code Entered | Scan a registered QR code to open the door. | Http://server ip/unlocktype=$unlocktype | $unlocktype | QR Code. |
Invalid QR Code Entered | Scan an unregistered QR code to open the door. | Http://server ip/unlocktype=$unlocktype | $unlocktype | Null. |
Break-in Alarm A | Break-in alarm is triggered via inputA. | Http://server ip/inputtrigger=$input1status | $input1status | 1: The input is triggered; 0: The input is not triggered. |
Break-in Alarm B | Break-in alarm is triggered via inputB. | Http://server ip/inputtrigger=$input2status | $input2status |
Break-in Alarm C | Break-in alarm is triggered via inputC. | Http://server ip/inputtrigger=$input3status | $input3status |
Setup Completed | The device boots up. This URL is not controlled by the Action URL Enable switch. If you do not want to use this action URL, leave the field blank. | Http://server ip/model/$model | $model | The device model. |
To retrieve device information, you can add the following fields to the URL. The example format is http://server ip/mac=$mac:ip=$ip:model=$model:firmware=$firmware:active_url=$active_url:active_user=$active_user
For example, to get device information triggered by the inputA event, the example URL is http://server ip/mac=$mac:ip=$ip:model=$model:firmware=$firmware:active_url=$active_url:active_user=$active_user:inputtrigger=$input1status