akubela offers highly flexible scene configuration options.
This guide uses a hotel room as an example to show how to set up lighting scenes for complex requirements.
Hotel Room Layout and Device Placement
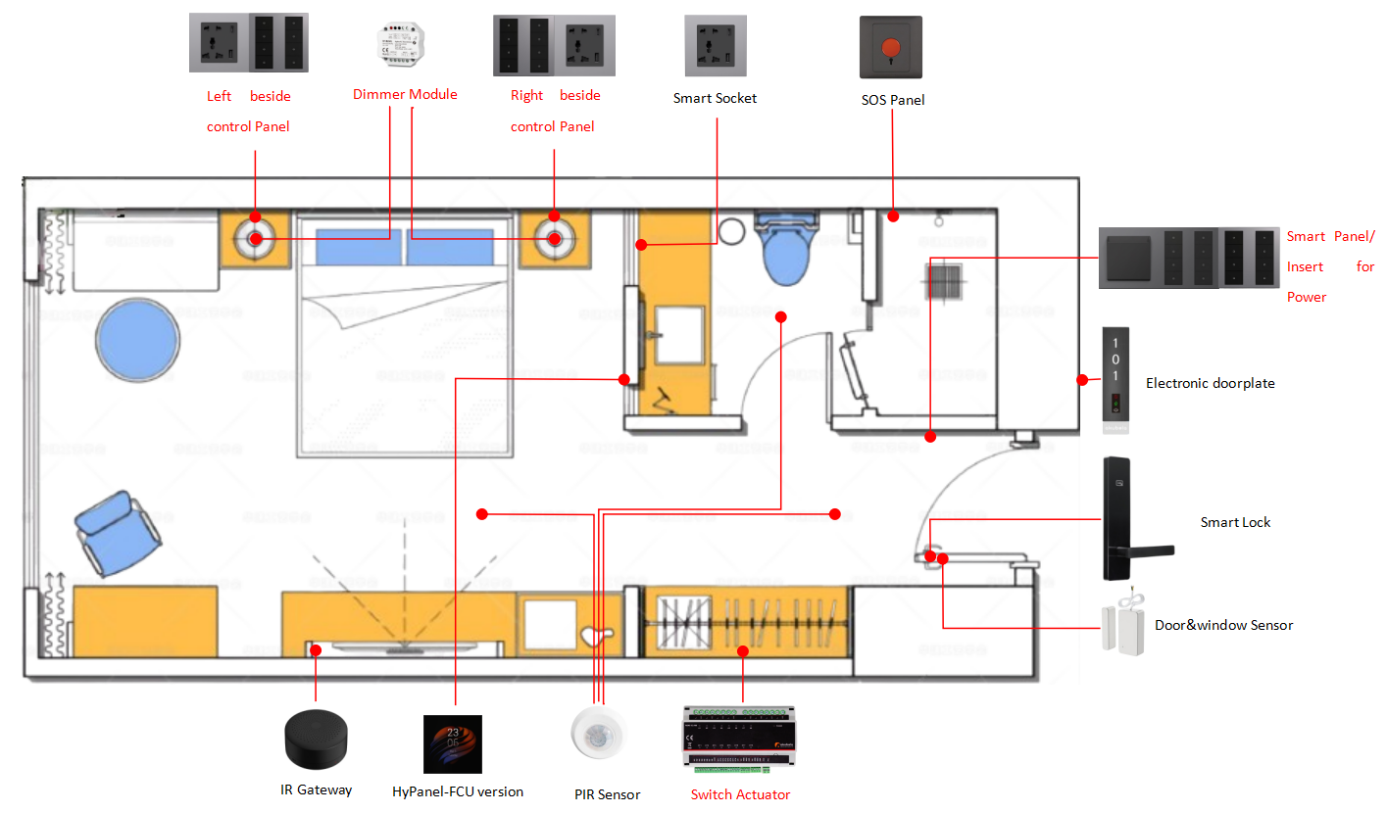
| Entryway & Hallway | Bathroom | Bedroom |
Lights | | Bathroom spotlight: On/off, directly connected to R8 Mirror light: On/off, directly connected to R8
| Bedroom spotlight: On/off, directly, connected to R8 Bedside lamp: On/off & dimmable, connected via dimmer module
|
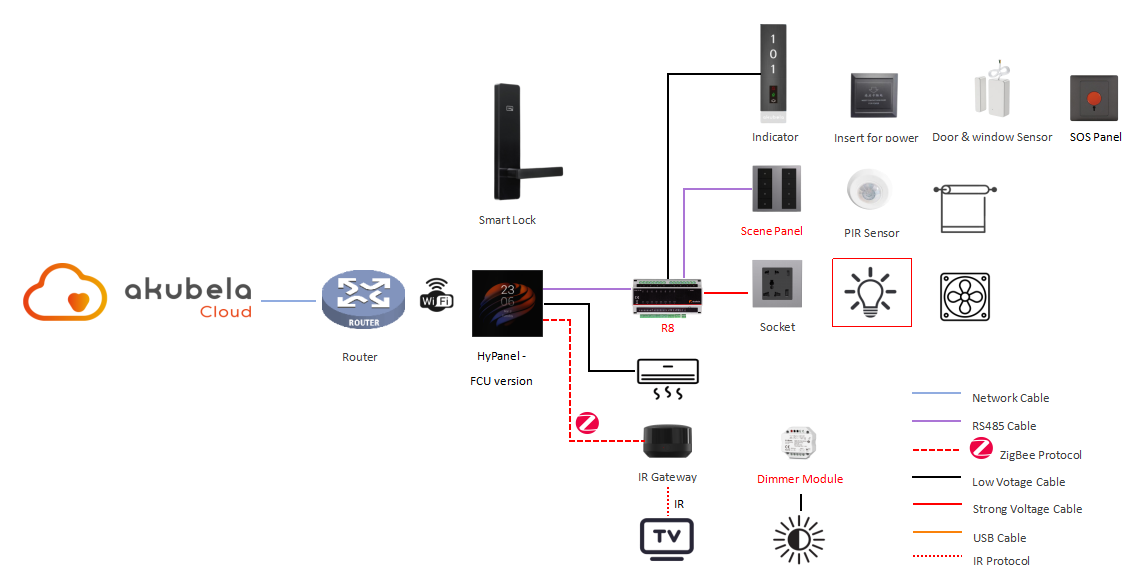
Topology
Scene Configuration
Requirements
Area | Scene | Device Control | Remark |
Entryway & Hallway | | Hallway switches: Button 1: turn on hallway spotlights (for direct-connected lights: press once = on, press again = off) Button 2: trigger Bright (for scenes: press once to activate; press again only turns off button LED, scene not re-triggered) Button 3: trigger Relax Button 4: trigger Leave
| Switch Interlock: This feature links multiple switches controlling the same lights or scenes. When one switch is turned on or off, the LEDs on all linked switches update to match its state. Hallway switch Button 1 - Bedroom left bedside switch Button 2 Hallway switch Button 2 - Bedroom left bedside switch Button 3 - Bedroom right bedside switch Button 3 Hallway switch Button 3 - Bedroom right bedside switch Button 2 Bedroom left bedside switch Button 4 - Bedroom right bedside switch Button 4
Scene Mutual Exclusion: Some scenes are mutually exclusive (activating one turns off the others), so their button LEDs cannot stay on simultaneously. Bright, Relax, Leave, Reading1, Reading2, Sleep, and hallway spotlights : Bright activated: all off except hallway spotlights Relax activated: all off except hallway spotlights Leave activated: all off Reading1 activated: all off except hallway spotlights & Reading2 Reading2 activated: all off except hallway spotlights & Reading1 Sleep activated: all off Hallway spotlights on: Leave and Sleep off Bathroom Scenes: All On activated: all off Spotlights on: all off Mirror lights on: all off All Off activated: all off
Auto LED Off: For Leave, All Off, and Sleep scenes, button LEDs automatically turn off after a set time. PIR Sensor Logic: The Leave scene is triggered when all PIR sensors detect no presence. To prevent false triggers, set an observation period—only if no presence is detected for the entire period will the scene activate.
|
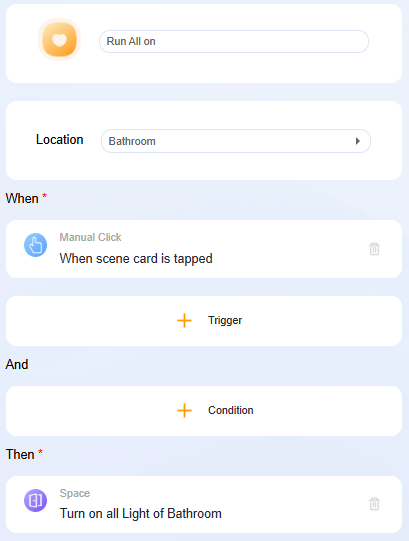
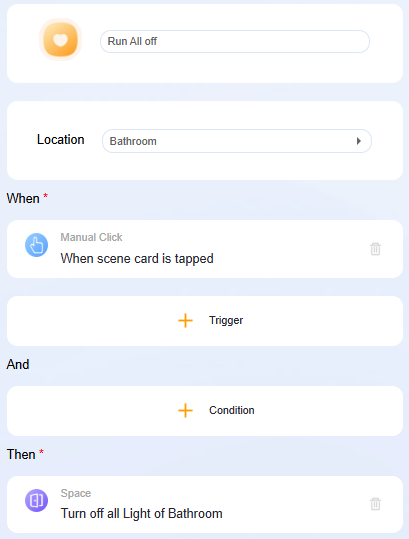
Bathroom | | Bathroom switches: Button 1: trigger All on Button 2: turn on bathroom spotlights Button 3: turn on mirror lights Button 4: trigger All off
|
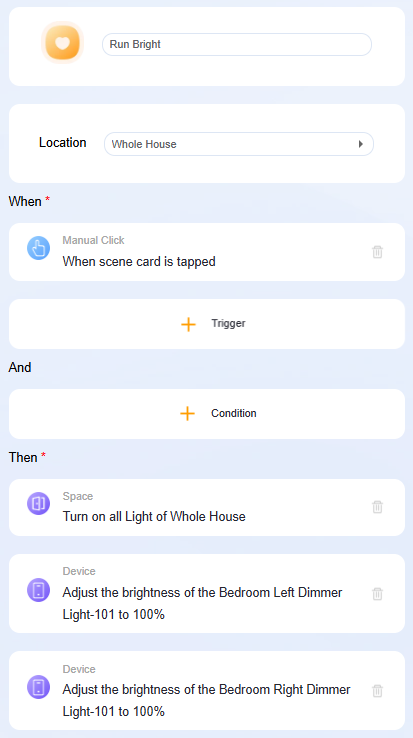
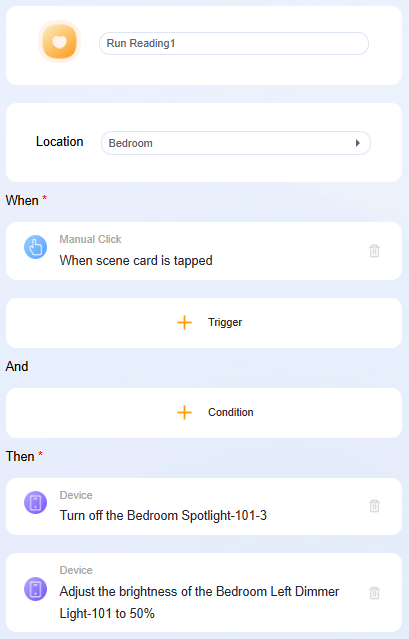
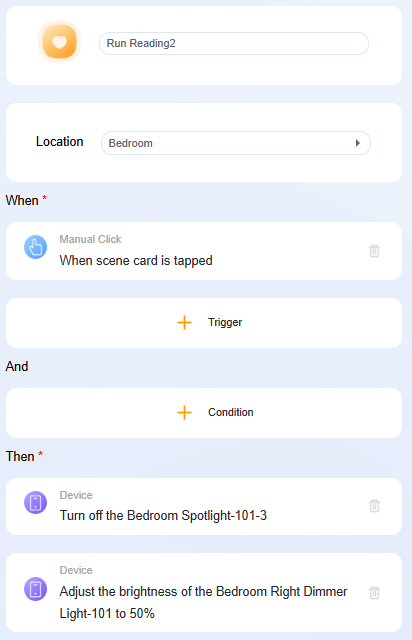
Bedroom | Bright: all lights on; bedside lights at 100% brightness Relax: all lights on, bedside lights at 30% brightness Reading1: bedroom spotlight off, left bedside light at 50% brightness Reading2: bedroom spotlight off, right bedside light at 50% brightness Sleep: all lights off, button LEDs off
| Bedroom left bedside switches: Bedroom right bedside switches: |
Setup Steps
Log in to Device Web Portal
(1) Open a browser and enter the HyPanel Home Center’s IP address.
(2) Log in using the credentials (default: admin/admin).
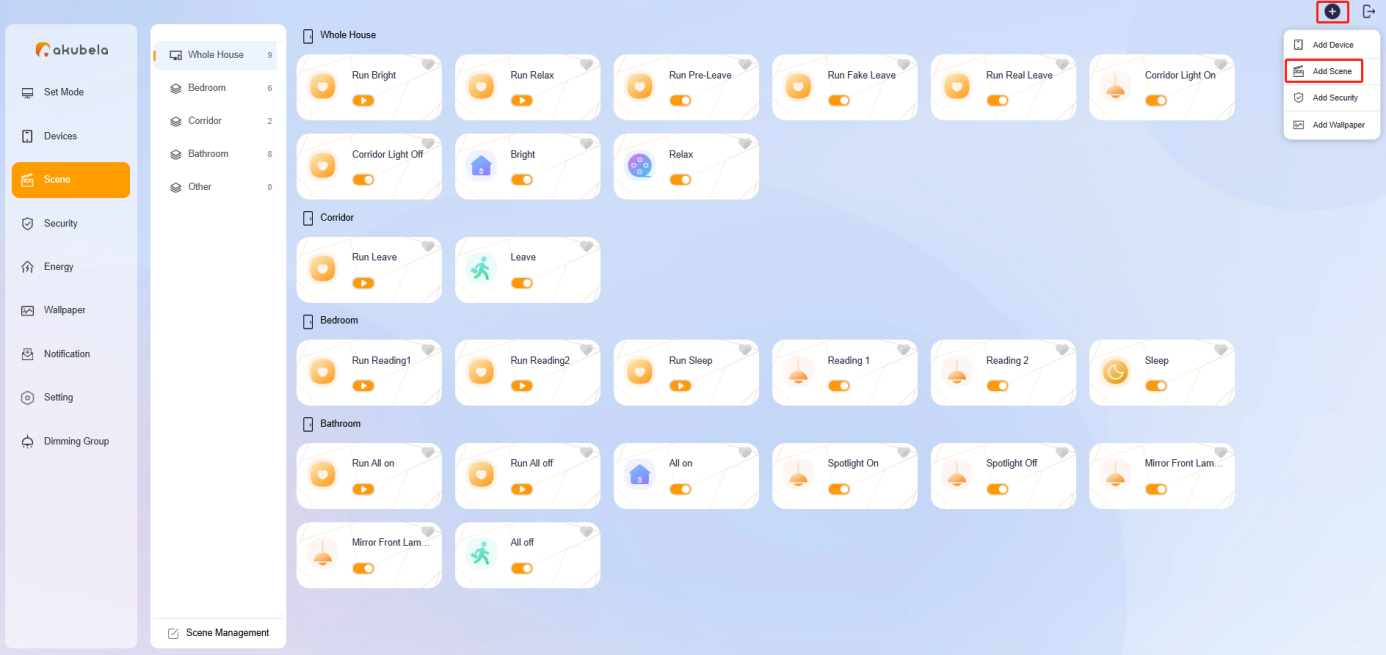
Create Light-Control-Only Scenes
Go to Scene, click + in the top right corner, and select Add Scene.
Whole Home | Entryway & Hallway | Bedroom | Bathroom |
 .png)
| 
|   
|  
|
Bind Scenes to Switch Buttons
Create new scenes and bind them to the corresponding switch buttons.
TIP:
For mutually exclusive scenes whose button LEDs cannot be on simultaneously, configure switch buttons to first turn off other buttons before activating the target scene.
| Button1 | Button2 | Button3 | Button4 |
Entryway & Hallway | 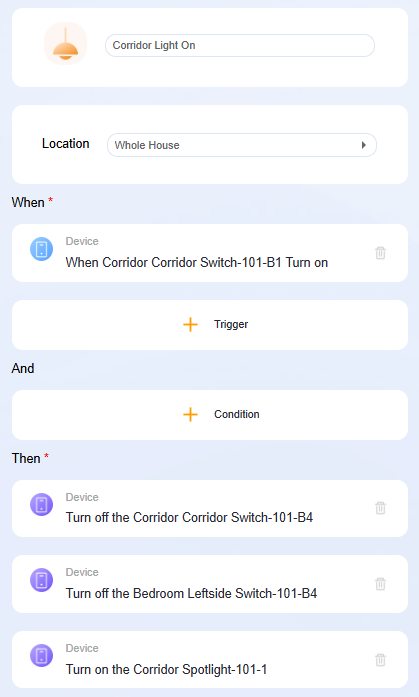 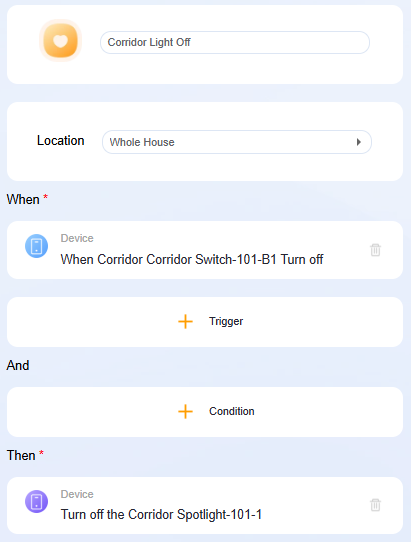
| .png)
| .png)
| .png)
|
Bedroom (Left side) | .png)
| / | / | .png)
|
Bedroom (Right side) | .png)
| / | / | / |
Bathroom | .png)
| .png) .png)
| .png) .png)
| .png)
|
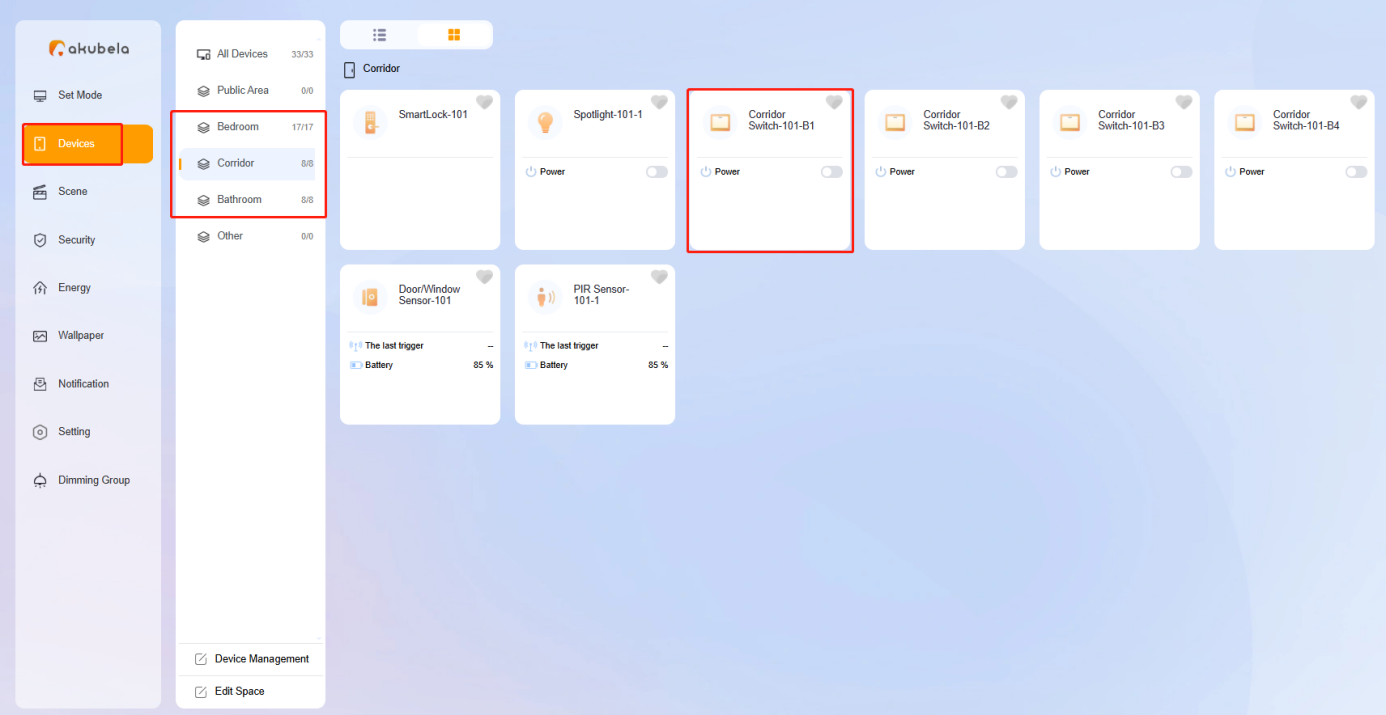
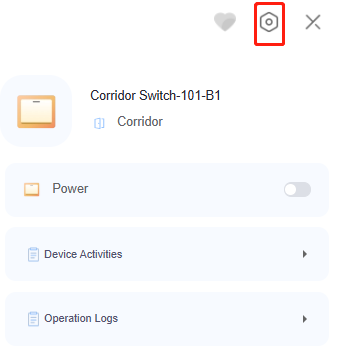
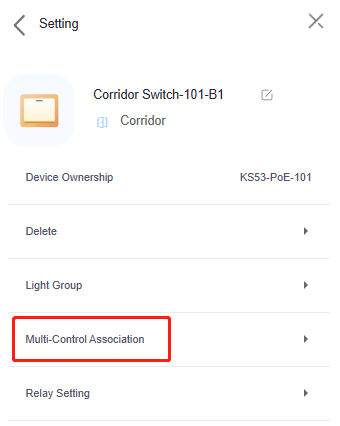
Configure Multi-Control Association
Click the desired switch card, then select  > Multi-Control Association.
| Button1 | Button2 | Button3 | Button4 |
Entryway & Hallway | .png)
| .png)
| .png)
| / |
Bedroom (Left side) | / | / | / | .png)
|
Bedroom (Right side) | / | / | / | / |
Bathroom | / | / | / | / |
Trigger Leave Scene with PIR Sensors
When all PIR sensors detect no presence, the Leave scene is triggered:
(1) If presence is detected, set a flag to 1 (using HyPanel’s Relay1 as the flag).
(2) Set a 60-second delay before running the real Leave scene.
.png)
.png)
.png)
Further Reading
For detailed explanations of conditions and options in scene creation, see Create Automation Scenes.