.png)
This guide is applied to the following version:
Android:
Google:3.40.0004
Huawei:3.40.1004
Xiaomi:3.40.1104
OPPO:3.40.1204
vivo:3.40.1304
iOS:3.40.4
In this guide, you’ll learn about
User accounts creation and management,
Managing and controlling devices in your home,
Making calls, and sending voice and text messages to devices or family members,
Customizing the photo wall to display your favorite photos;
Creating automation scenes to control your devices;
Arming your home in different security modes, and more.
The attached Appendix gives you information about how to add third-party devices, e,g., Somfy shade, SONOS, Phillips Hue lights, etc.
Getting Started
Before You Start
To make login and setup as smooth as possible, have the following items available:
Internet connection: Make sure your mobile device has internet access via Wi-Fi or cellular data.
NOTE:
If your account is created in the Local mode, ensure your mobile phone is connected to the same local network as the akubela home center device.
BelaHome App: Download the latest version from Google Play Store or App Store.
Your BelaHome account.
If your devices are connected to the cloud, do any of the following:
 Tap Account Registration on any HyPanel device’s screen to self-register an administrator account. Tap Sign Up on the BelaHome app login screen to self-register an account. Contact your service provider with your email address and other required information. You’ll receive your account credentials via a “Welcome to akubela” email.
If your devices are not connected to the cloud, use the default credentials:
Username: Admin888 Password: Admin888
Home center device: Ensure your home center device is powered on and connected to a network.
NOTE:
To access all features in this guide, we recommend updating your home center device to the latest firmware version.
Sign In
To log in to the app, do one of the following:
Sign in with email
Enter your email address and password, and tap Log In.
Sign in with QR code
Find the QR code.
If your devices are connected to the cloud, the QR code is included in the Welcome email.
If your devices are not connected to the cloud:
(1) Ensure your phone and home center device are on the same local network.
(2) Swipe down from a HyPanel screen, and go to
 > System Settings > About > Family > Family Account.
Tap
 in the upper left corner of the app.
Scan the QR code with your phone, or tap the album icon to select a saved QR code image from your photo gallery.

Your Account
Know Your Account Types
akubela has three types of user accounts, each with different permission levels:
Administrator: Only one per family.
Can log in to the user web portal
Has full access to all features and functions
Manages family data
Manages family member accounts
Manager
Accesses all available features and functions
Manages general member accounts
General member
Can use available features like controlling devices and scenes
Cannot add new devices or scenes, or change existing settings.
No matter which account type you have, you can always edit your profile, change your password, leave the family, or delete your account.
Edit Your Profile
To update your name, profile photo, or phone number, simply tap ![]() > [your avatar].
> [your avatar].
NOTE:
You cannot change your photo or name if:
You’ve joined a family that’s running in local mode and your phone is connected to a different network than the home center device.
The home center device is offline.

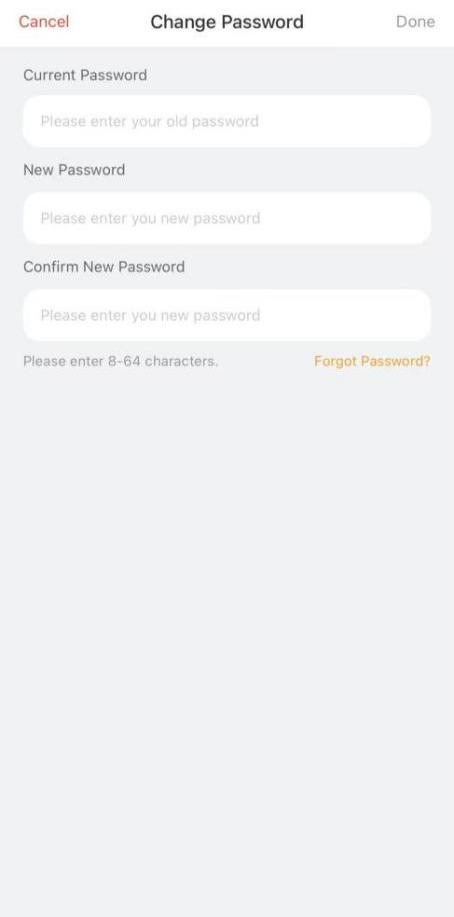
Manage Your Password
Reset Password
To reset your password, you can either:
Tap Forgot Password below the login button on the sign-in screen.
After logging in, go to
 > [your photo] > Account Setting > Change Password, and tap Forgot password at the bottom right.
You’ll receive an email with instructions to reset your password.
NOTE:
If any family you belong to is running without a cloud connection, the password reset feature will not work until all families are connected to the cloud.
Change a Weak or Compromised Password
If your password is easy to guess or hasn’t been changed for a long time, it’s a good idea to update it for better security.
Tap
> [your avatar].Go to Account Setting > Change Password.
Set a new and stronger password.
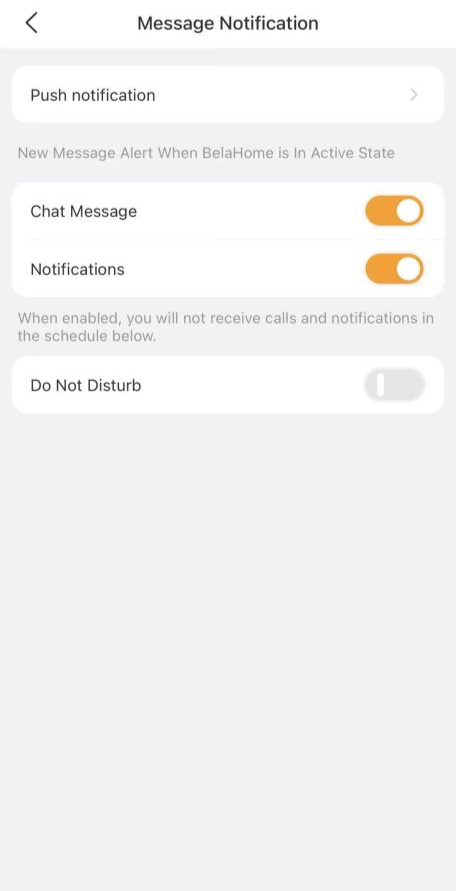
Manage Message Pushing
When the app is active in the foreground, you can choose which types of messages to receive and set a Do Not Disturb (DND) period.
To configure these setting, go to ![]() > Setting > Message Notification.
> Setting > Message Notification.
Chat Messages: Messages received in the Contacts screen, including voice and text messages from other users or triggered by scene automation.
Notifications: All messages listed under
 >
>  > Notifications.
Do Not Disturb: Set a time period during which notifications are silenced while the app is in the foreground. Disabled by default.
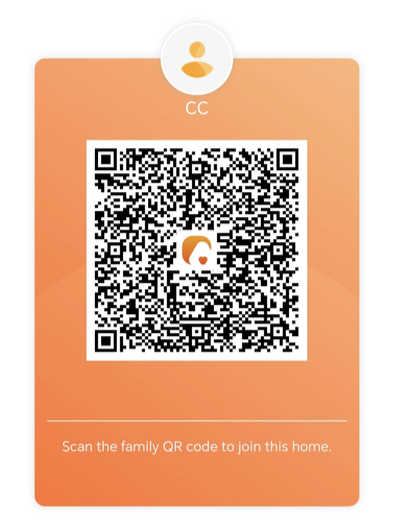
Join Other Families
You can join multiple families by scanning the family QR code and have whatever permissions each grants you.
To join a new family, do any of the following:
If you’re signed in, tap
>  to scan the family’s QR code, and then follow the onscreen instructions.
If you’re not signed in, tap
 on the login screen, scan the family’s QR code, and follow the onscreen instructions.
After joining, you can switch between families by tapping the current family name on the Home screen or searching for it directly.
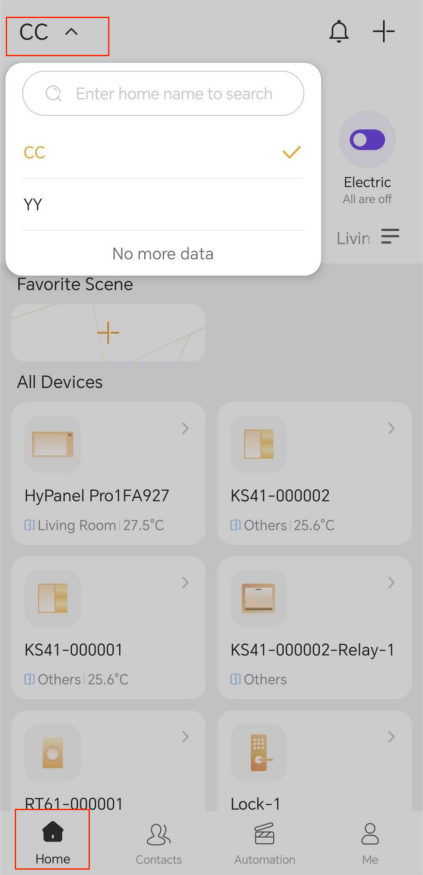
Unbind Your Account from a Family
You can unbind your account from any family you’ve joined.
If you are the family administrator and other member accounts remain, you must transfer the administrator role to someone else before unbinding.
NOTE:
If any family you belong to runs without cloud connection, unbinding will not work until all families are connected to the cloud.
To unbind your account, do as the following:
Tap
> Family Management.Select your account from the family member list, and tap Unbind Family. Follow the onscreen instructions
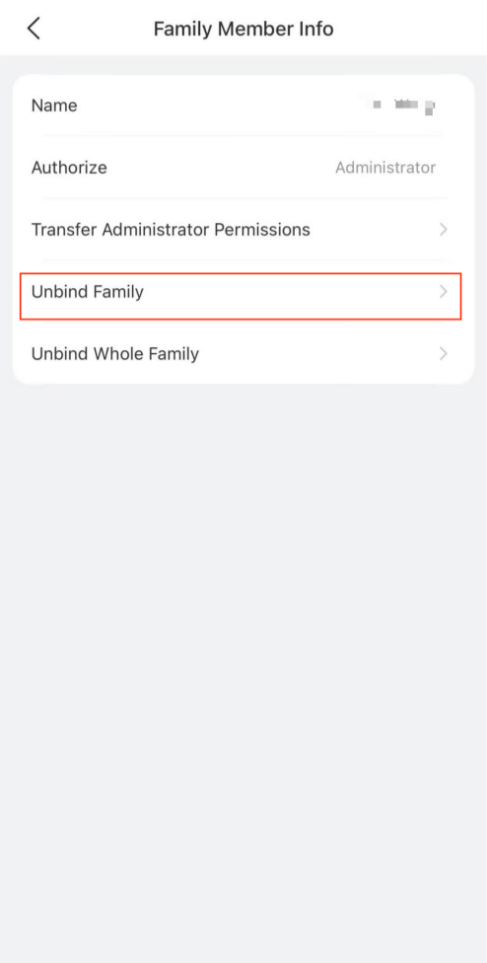
After you unbind from a family:
You can still log in to the BelaHome app.
You lose access to the unbound family.
Any permissions and chat data associated with that family will be removed
Delete Your Account
You can cancel your account at any time.
If you are the family administrator and other member accounts remain, you must transfer the administrator role to someone else before deleting.
To delete your account, go to ![]() > [your avatar] > Account Setting > Delete Account.
> [your avatar] > Account Setting > Delete Account.
.png)
Once deleted, you won’t be able to sign in or access any families you joined.
Family Member Management
What You Should Know
The administrator and managers can manage accounts.
The administrator can manage both manager and general member accounts.
Managers can manage general member accounts only.
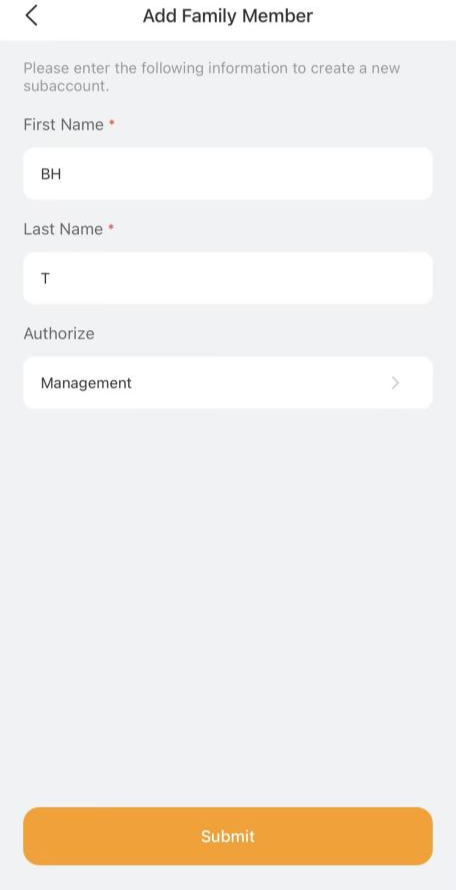
Add Family Members
The administrator and managers can add new family members and assign their permissions.
The steps differ by system’s cloud connection modes.
When the system is connected to the cloud
Go to
> Family Management. Tap
 to open the Add Family Member screen.
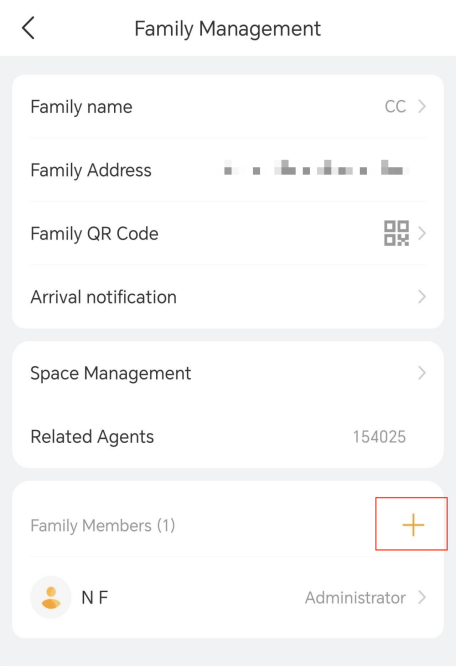
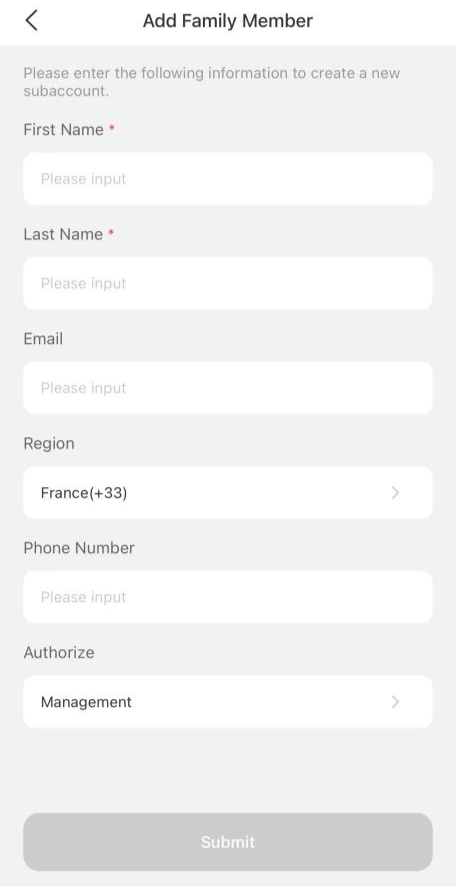
Enter the member’s name, valid email address, and assign permissions. Once added, the member will receive an email with their login credentials.
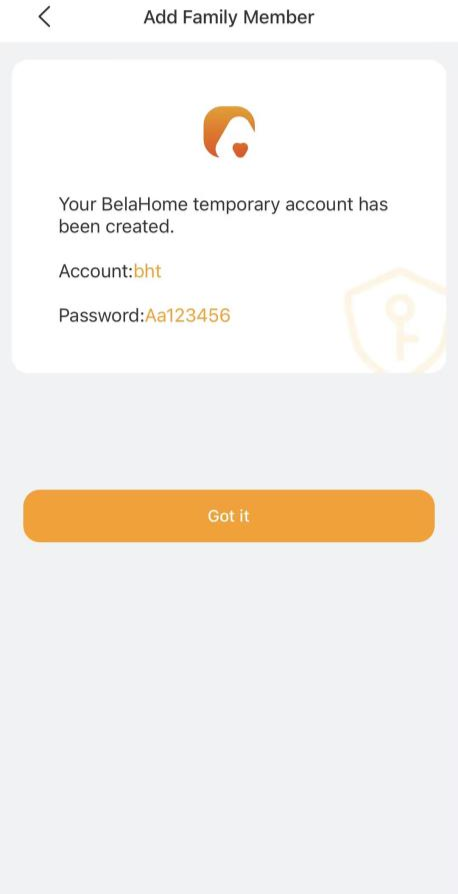
When the system is not connected to the cloud:
NOTE:
Accounts created in local mode must be used on the same local network as the home center device.
Go to
> Family Management. Tap
 .
.Enter the member’s name and assign their permissions.
Invite a Member Using a QR Code
Go to
> Family Management. Tap Family QR code to display the invitation code.
NOTE:
The QR code is valid for 5 minutes.
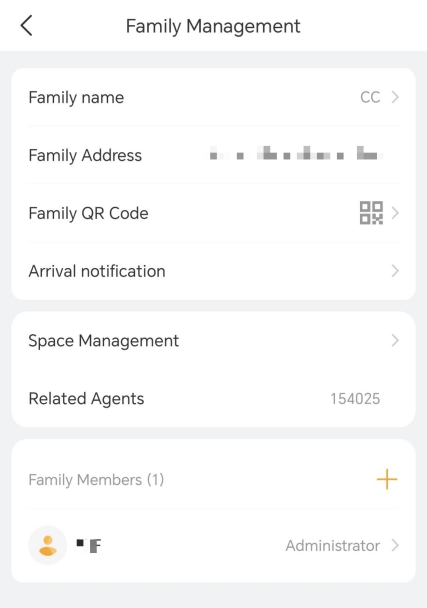
Change a Member’s Account Type
To change a member’s role:
Go to
> Family Management.Select the member.
Tap Authority to change the role.
.png)
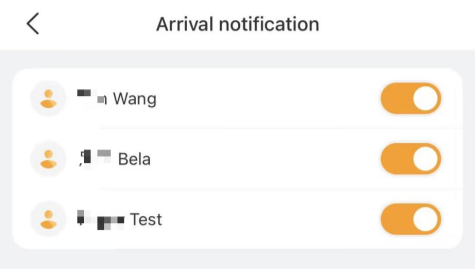
Manage Arrival Notification Permissions
When a member unlocks the door using Face ID, PIN, etc., an arrival notification is sent to other family members by default.
The administrator can manage all members and control whether their arrival notifications are sent, while other users can only manage their own settings and choose whether to share their arrival status.
Go to
> Family Management > Arrival notification.
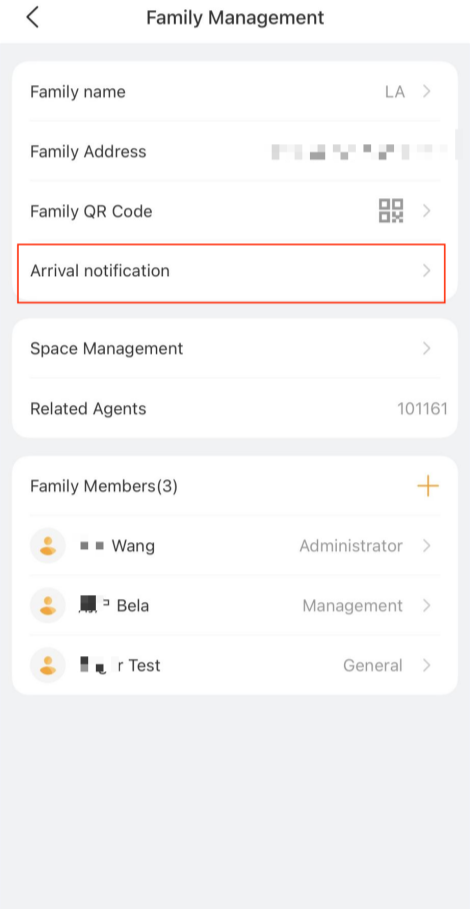
Disable/enable the specific member’s permission.
Unbind Member Accounts from the Family
Administrators and Managers can unbind their own or other member accounts.
NOTE:
Unbinding is not available when the family is running without the cloud connection.
Once unbound, the user:
Can still log into the BelaHome app
Cannot access the family unbind from
Will lose all permissions and chat data associated with this family
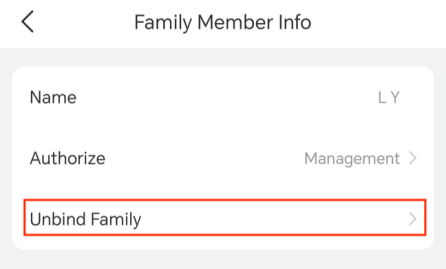
Unbind a Specific Member
Go to
> Family Management.Select the desired member account.
Tap Unbind Family, and follow the onscreen instructions.
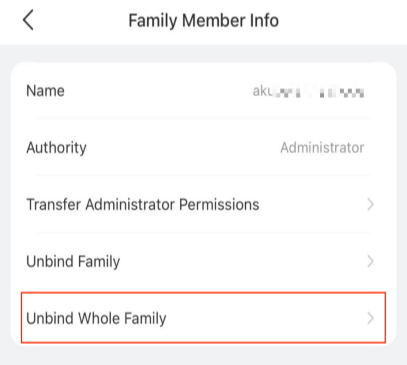
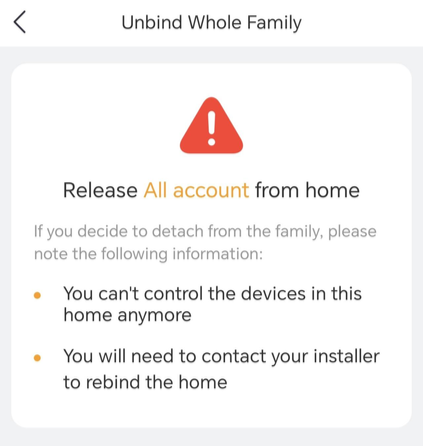
Unbind All Accounts
Only the administrator can unbind all accounts in a family, including their own and all other members.
Go to
> Family Management.Select the administrator account.
Tap Unbind Whole Family.
NOTE:
Once this option is selected, all accounts in the family will be unbound. To restore access, you’ll need to contact your service provider to rebind the accounts.
Transfer Administrator Role
The administrator can transfer their role to another family member.
Go to
> Family Management, then tap your family.Select the administrator.
Tap Transfer Administrator Permissions, choose the member to assign the role to, and follow the onscreen instructions.
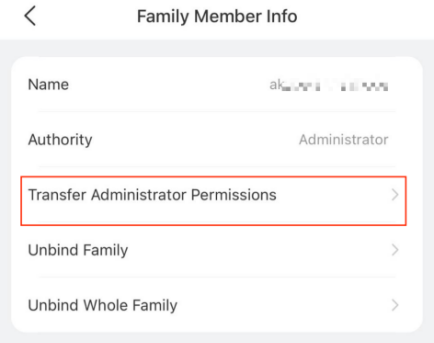
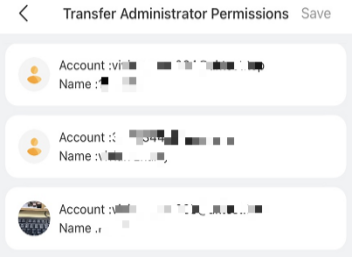
After the transfer is complete, the previous administrator will automatically become a general member.
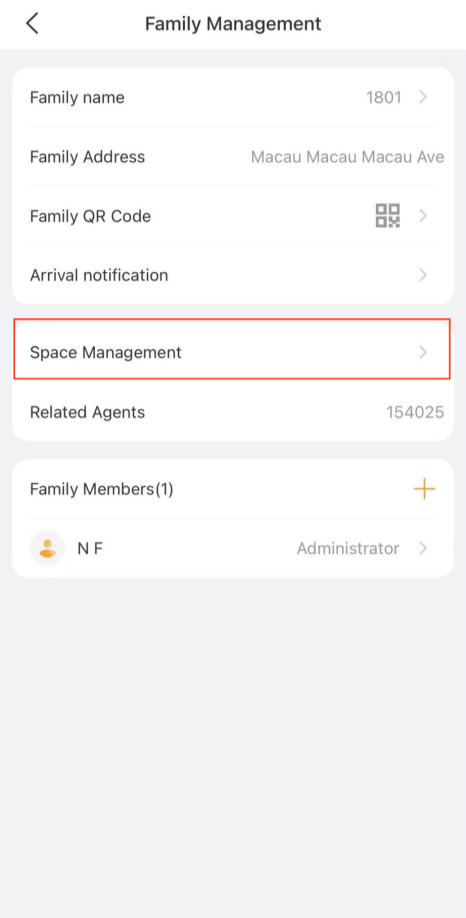
Space Management
The administrator and Managers can add, delete, and reorder rooms within the family.
Access the Space Management Screen
In the Space Management view, you’ll see all rooms in the family, along with the number of devices in each room.
To go to the Space Management screen, do any of the following:
Tap
 >
>  , scroll down the list, and select Space Management.
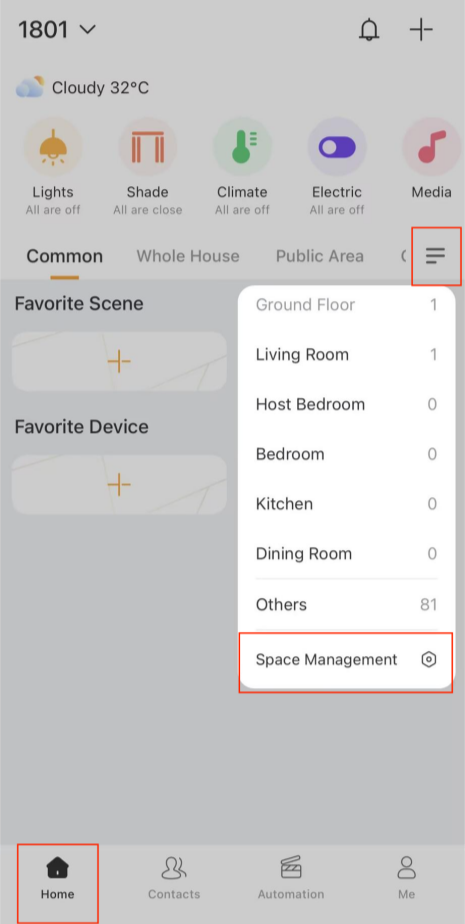
Tap
> Family Management > Space Management.
Add a Room
To add a room:
Open the Space Management screen.
Tap
 at the bottom.
.png)
Enter the room name and select the space it belongs to.
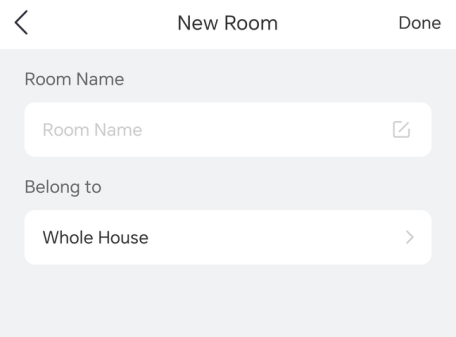
Tap Done.
TIP:
To move devices to the new room, see Change Device Location.
Delete a Room
Open the Space Management screen.
Tap Edit in the upper right corner.
Tap the icon
 of the desired room you want to remove.
Tap Delete > Done.
.png)
.png)
Rearrange Rooms
You can change the order in which spaces and rooms appear on the Home screen for quicker access.
Open the Space Management screen.
Tap Edit in the upper right corner.
Tap and hold the icon
 of the room you want to move, then drag it to the desired position.
.png)
Tap Done.
The new order will automatically update on the Home screen.
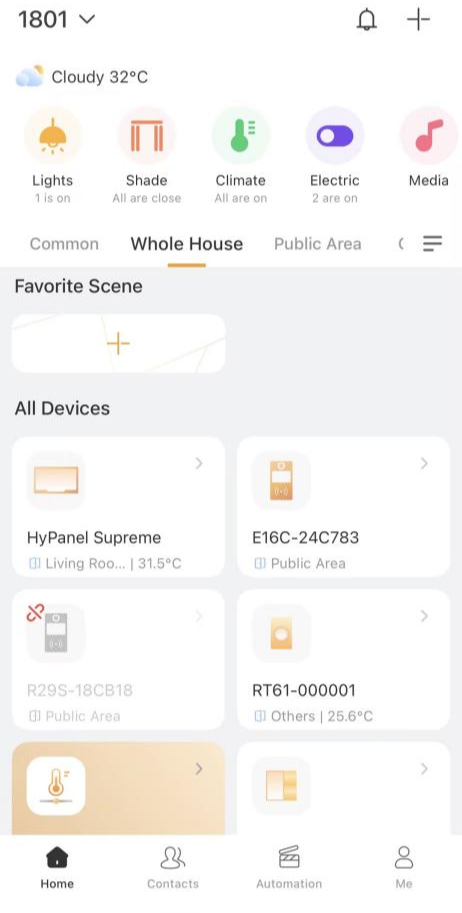
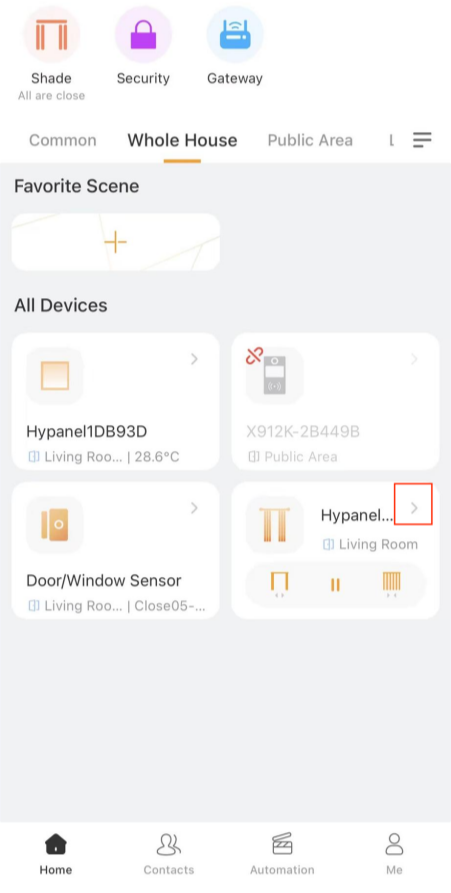
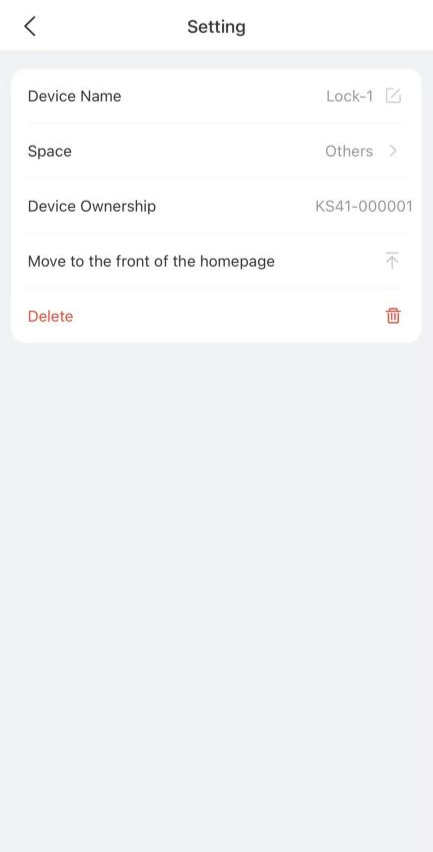
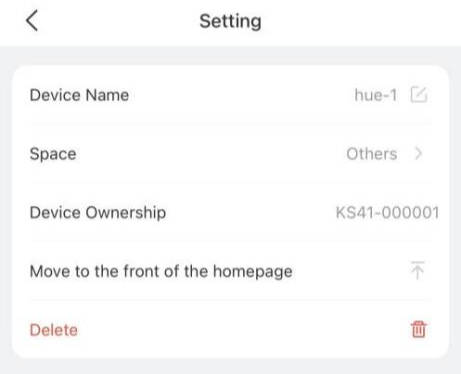
Device Management
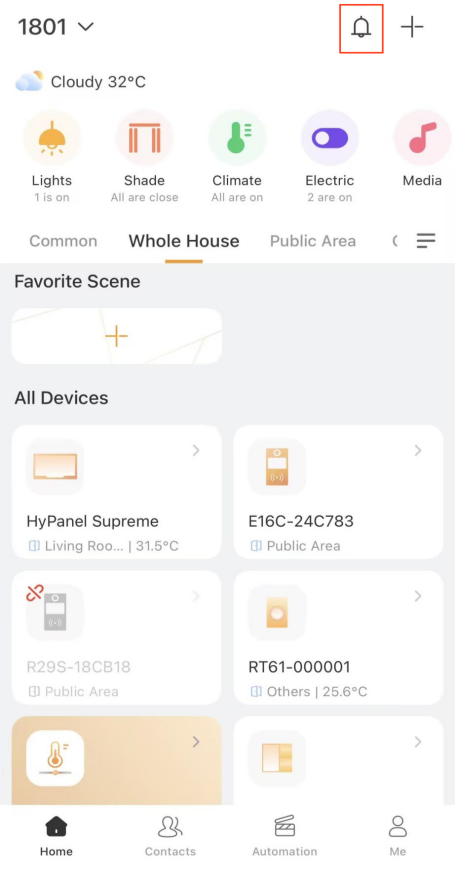
View Device Information
You can view key information for each devices, including:
Connection status:
Offline. The device appears gray with the icon
 in the upper left corner. It cannot be controlled via BelaHome.
 Online. The device appears orange. It is connected and controllable via BelaHome.
Settings: Tap the
 icon on the desired device card, then tap
 in the upper right corner to see and modify its settings.
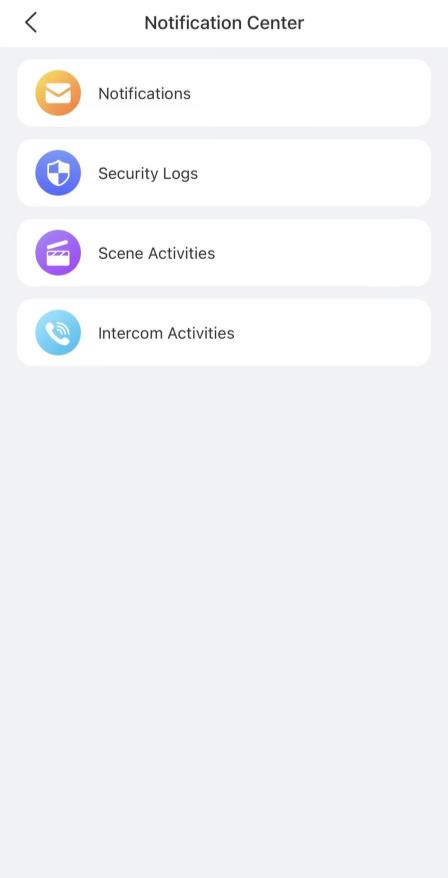
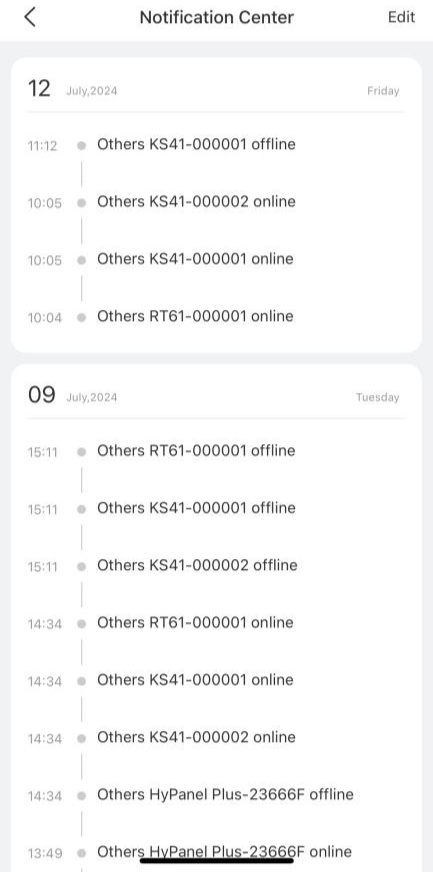
Check Notifications and Logs
Online/Offline Notifications
When a device connection status changes, you will receive an online/offline notification.
To view or delete notifications, go to ![]() >
> ![]() > Notifications.
> Notifications.
Device Logs
For Zigbee devices (locks, sensors, switches, etc.), tap the device![]() > Device Log to view activity history.
> Device Log to view activity history.
.png)
.png)
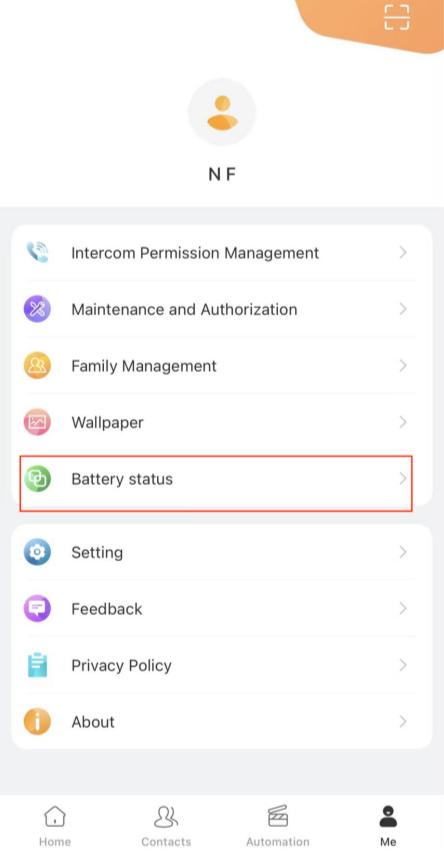
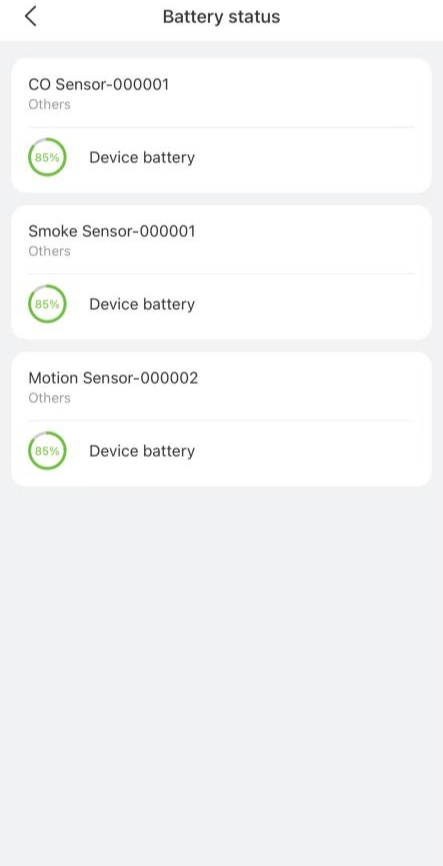
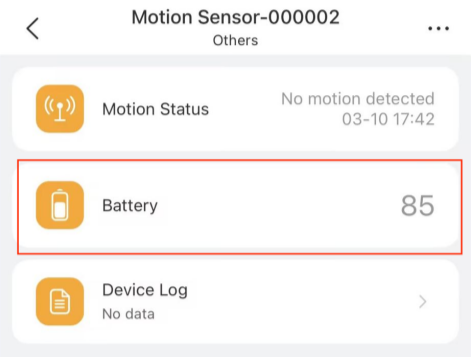
Check Zigbee Device Battery
For Zigbee devices that report battery data via HyPanel devices, do any of the following:
Go to
 > Battery status.
Go to the device
 > Battery.
Add Devices
The administrator and managers can add Zigbee devices and compatible third-party devices via the BelaHome app.
Add Zigbee Devices via Scanning
Tap
 , then tap
  in the upper right corner.
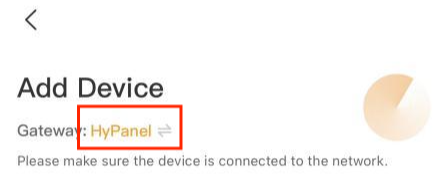
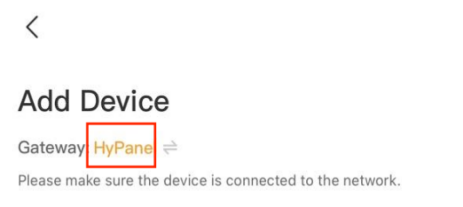
 To switch gateways, tap the gateway name.
Put the Zigbee device(s) in pairing mode. You can add multiple devices at once.
NOTE:
For best results, place the Zigbee device and the gateway as close as possible -- ideally in the same room. If there is a wall between them, keep the distance within 10 meters.
Wait for the search results, then select one or more devices you want to add.
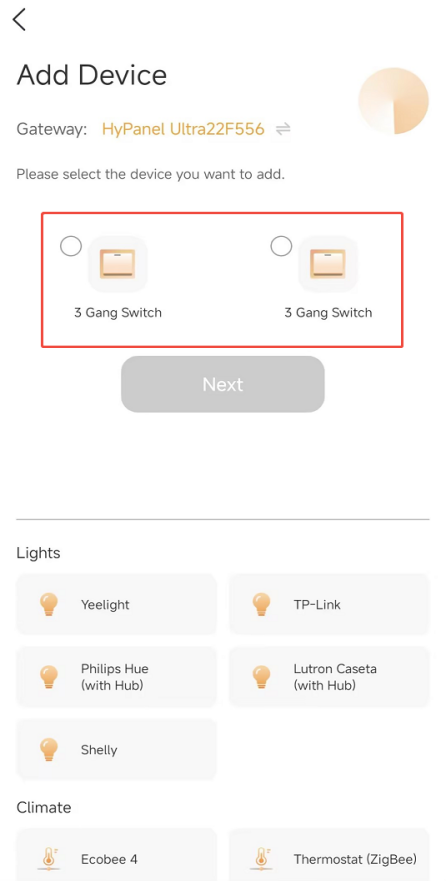
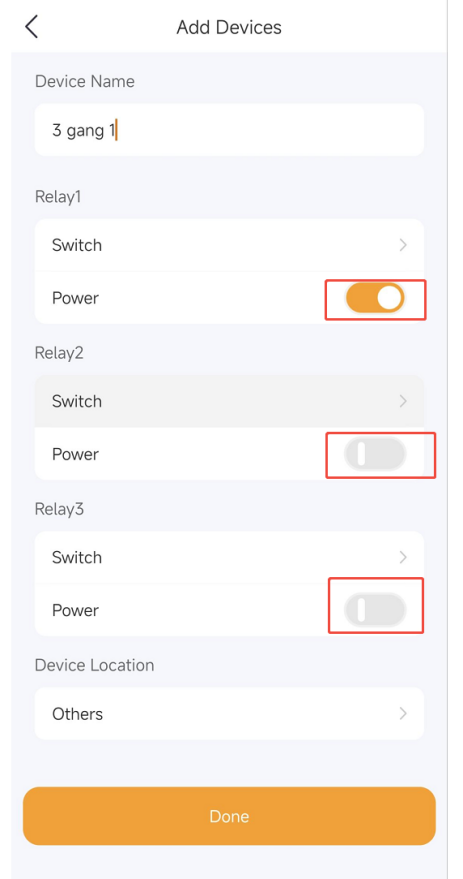
Set the device name and location for each device, then tap Finish.
TIP:
On/off control is provided for switchable devices to help confirm correct mapping during setup.
Add Third-Party Devices Manually
NOTE:
HyPanel Lite does not support adding third-party devices, do not select it as the gateway.
Tap
 , then tap
  in the upper right corner.
 Switch to the desired gateway (if needed).
Select the device type from the list below.
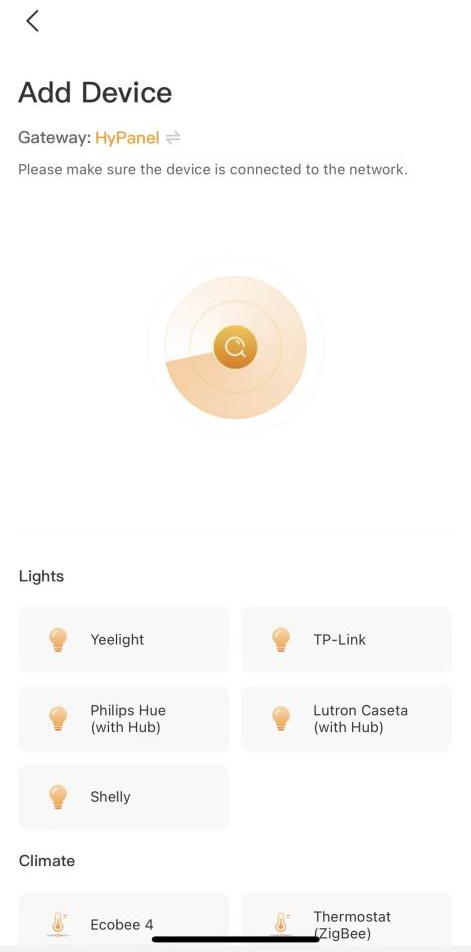
Follow the onscreen instructions and the device manual.
Set the device location and name, then tap Finish.
You can refer to Appendix - Add third-party devices via BelaHome to get more detailed instructions.
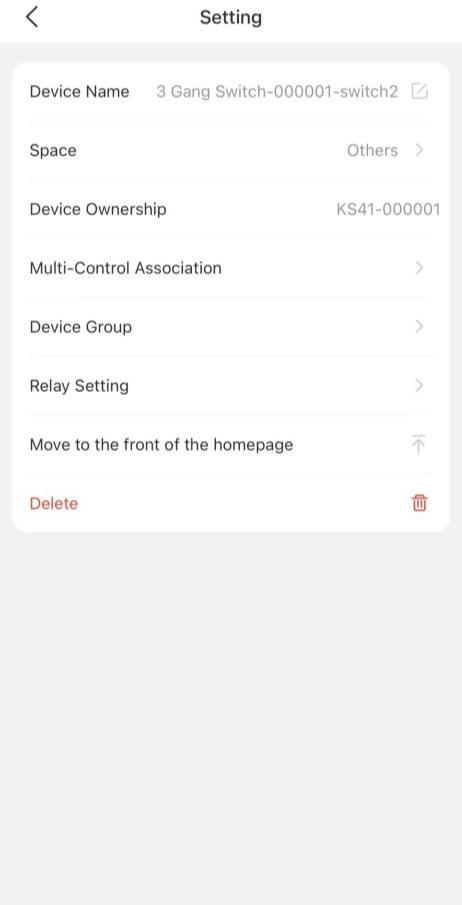
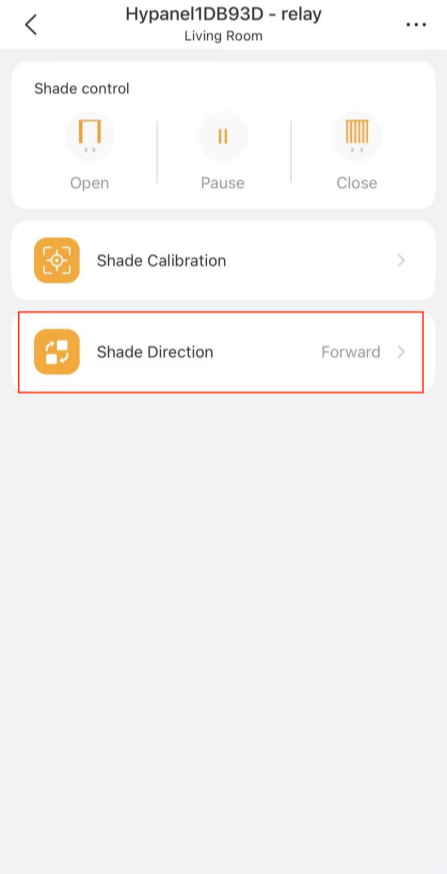
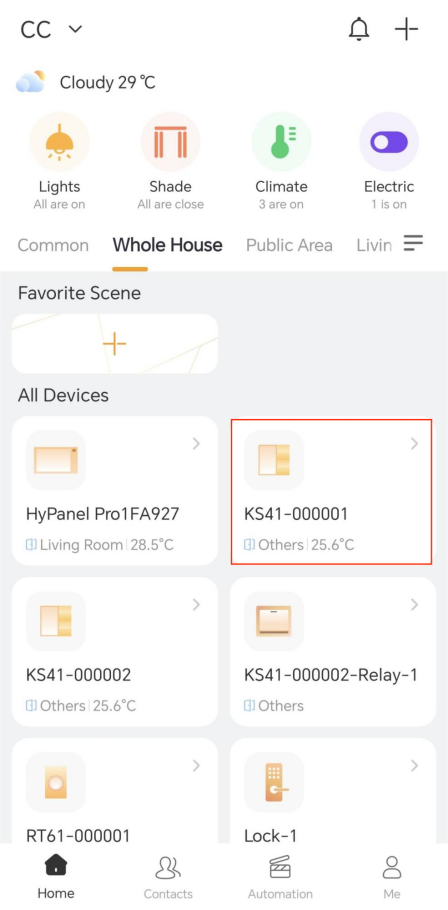
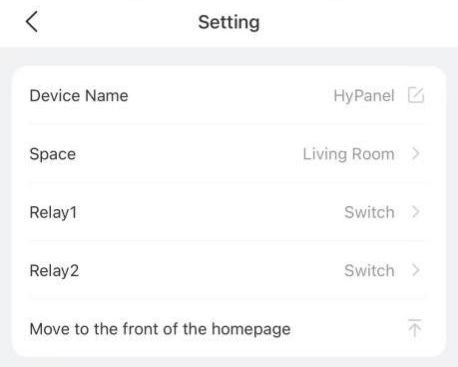
Change Relay Type for HyPanel Devices
You can change the relay type for each relay on a relay version HyPanel device.
On the Home screen, tap the panel card.
Tap
 in the upper right corner.
Tap Relay 1/2 to choose a new type.
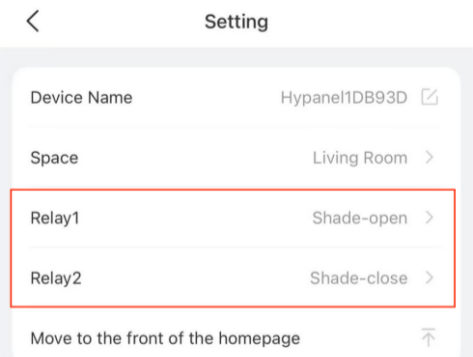
NOTE:
If one relay is set to heating and another to cooling, they will appear as a thermostat in the device list.
If the relays are set to shades, relay 1 = Open, relay 2 = Close (reverse the Shade Direction if wiring is reversed).
Limit Device Editing Permissions
You can restrict device setting edits to prevent unauthorized or accidental changes in the app.
To enable restrictions:
1. Go to ![]() > Setting > Authorization Management.
> Setting > Authorization Management.
2. Toggle on Device Management Password, and set a 6-digit PIN.
3. Tap Save.
.png)
Once enabled, certain setting changes, such as modifying a panel’s relay type, will require the PIN.
.png)
Bypass Sensors
Some sensors can be temporarily bypassed to stop detection, helping prevent false triggers in scenarios such as maintenance.
To bypass a device:
Tap
 and tap the desired device card.
Tap
 in the upper right corner.
Tap Bypass, choose a time duration, and tap
 to confirm.
.png)
.png)
Change Device Location
You can now move a device to another room (except for wired sensors).
Tap
 .
.Tap the desired device card.
Tap
 in the upper right corner.
Tap Space, and select a new room.
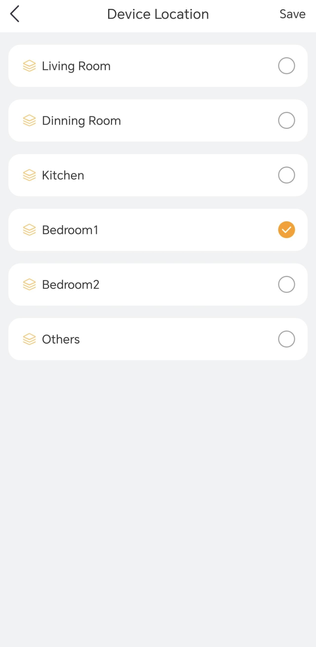
Tap Save.
Remove a Device
You can remove malfunctioned, damaged, or offline Zigbee and third-party devices from the system. Please note that this will permanently erase all data and configurations for the device.
Tap
 .
.Tap the desired device card.
Tap
 in the upper right corner, and tap Delete.
Control Devices
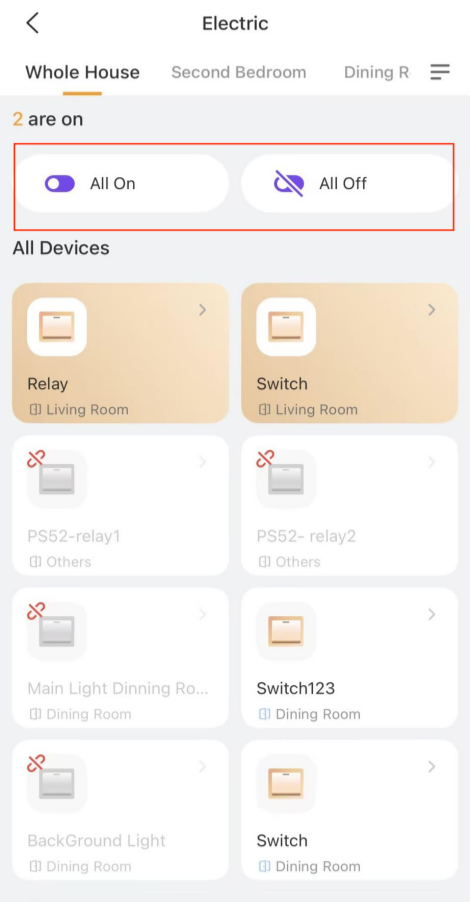
One-Touch Control
Easily turn all devices of the same type on or off with a single tap.
On the
 screen, select the device type.
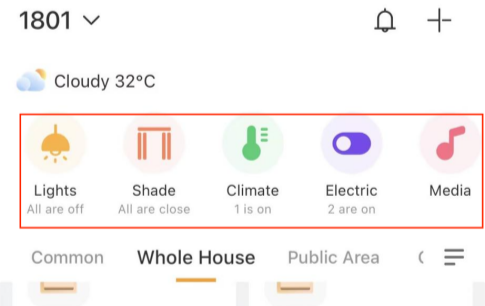
Tap All On or All Off.
Group Control
You can group lighting devices and switches to control them together.
NOTE:
If grouped devices have different features, only the shared functions will be available. For example, grouping a switch light and a dimmable light will only show the switch function.
To customize a group and manage it:
Tap the desired device card, then tap
 > Device Group.
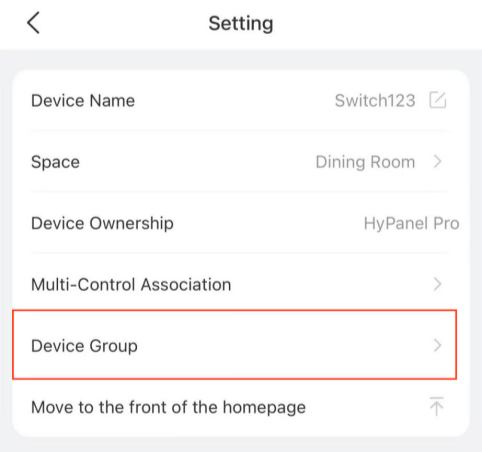
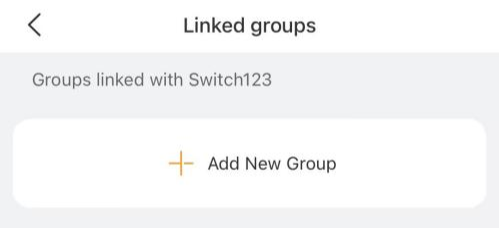
Tap Add New Group to create a new group.
Tap Add device to include devices in the group. You can filter devices by space or name.
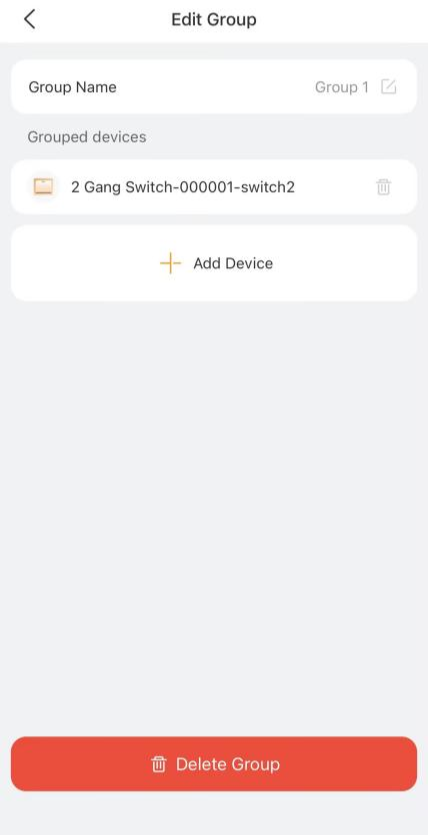
.png)
Name this group.
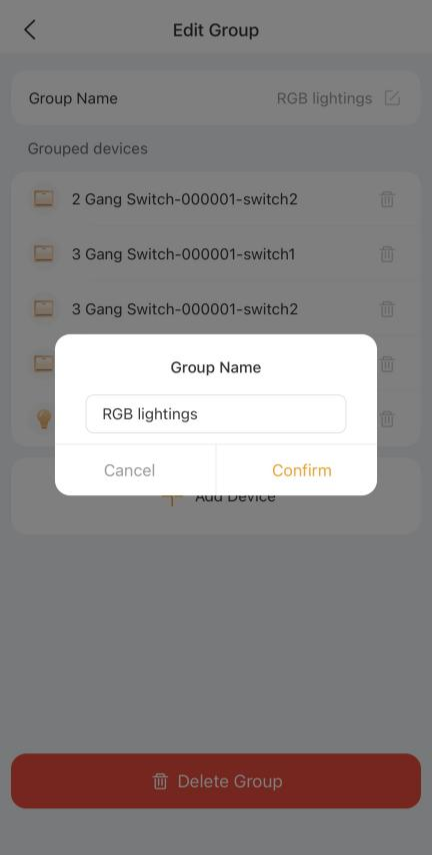
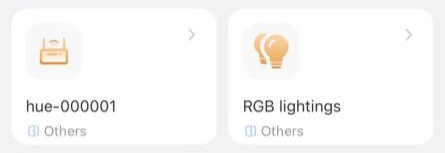
Once completed, the group will appear on the Home screen.
Multi-Control Association
Link switches and lights to keep their on/off states synchronized. When one device's state changes, the associated devices will follow. For example, if multiple switches control the same light in a room, you can associate them so that their on/off states remain the same.
On the Home screen, find one desired device, and tap
 .
.Tap
 > Multi-Control Association.
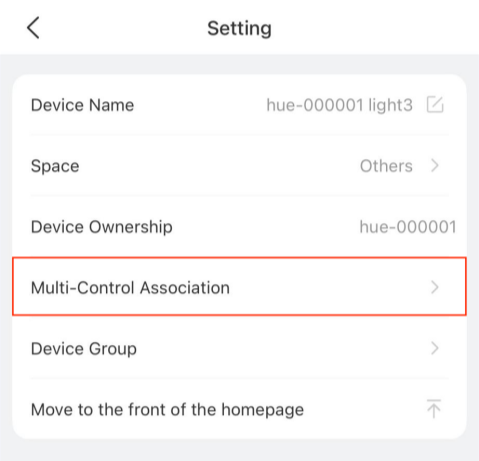
Tap Link with devices to select devices. You can filter devices by space or name.

.png)
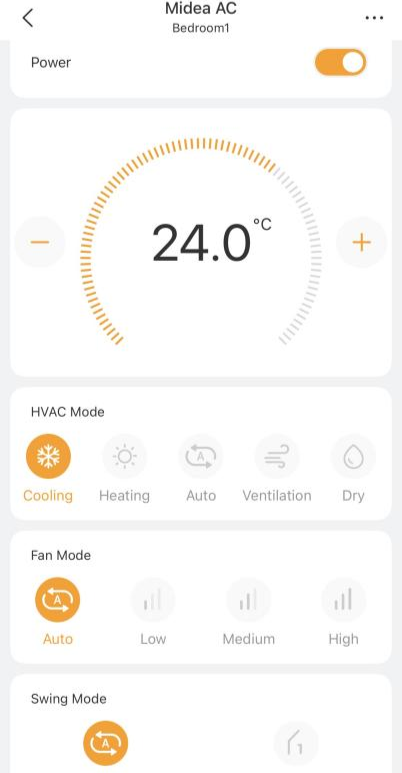
Control a Single Device
Switches and Smart Plugs
Tap the device card to toggle on/off. The card’s background turns to be orange, indicating that the device is on.
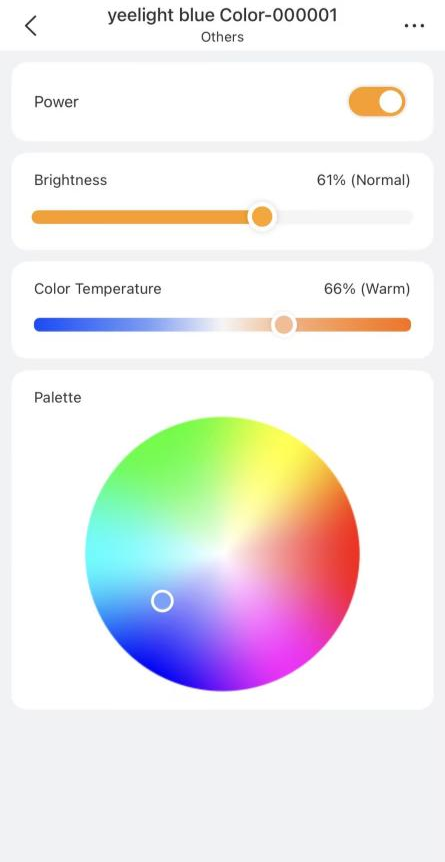
Lighting Devices
Some lights can only be turned on or off with a single tap, while others like RGB lights, offer more features such as color adjustment, brightness control, and so on.
To control an RGB light, do the following:
On the
 screen, tap
 to go to the device’s details setting screen.
 To turn the light on or off, tap
 .
.To adjust its brightness, drag the corresponding slider.
To change the color temperature, drag the corresponding slider.
To set the light color, pick the desired color from the palette.
Smart Locks
Tap the lock device card to enter its details screen:
Long press
 to unlock the door remotely.
Tap
 to lock the door after unlocking.
Tap Device Log to view doorbell ringing logs, lock's online/offline status, and unlock records (temporary code, fingerprint, card, etc.).
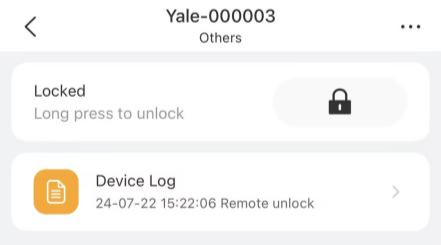
TIP:
Deadlock status and control will appear for supported locks.
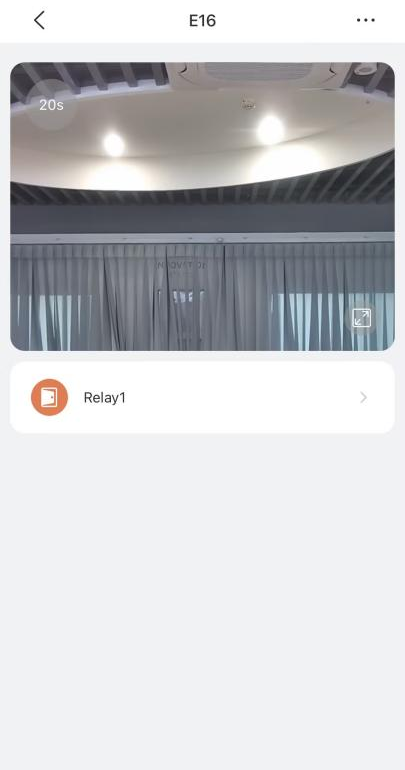
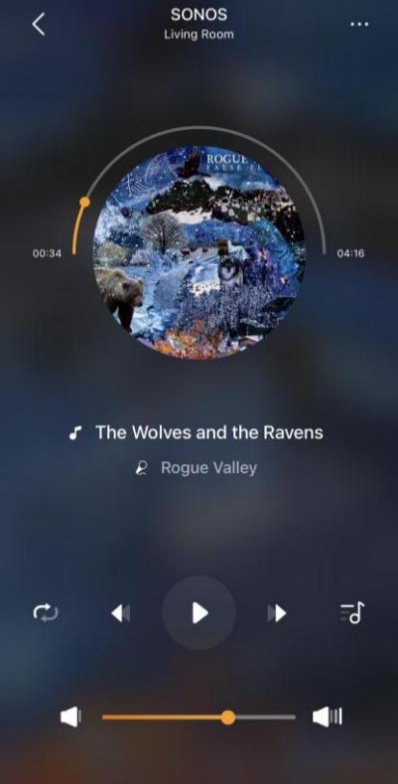
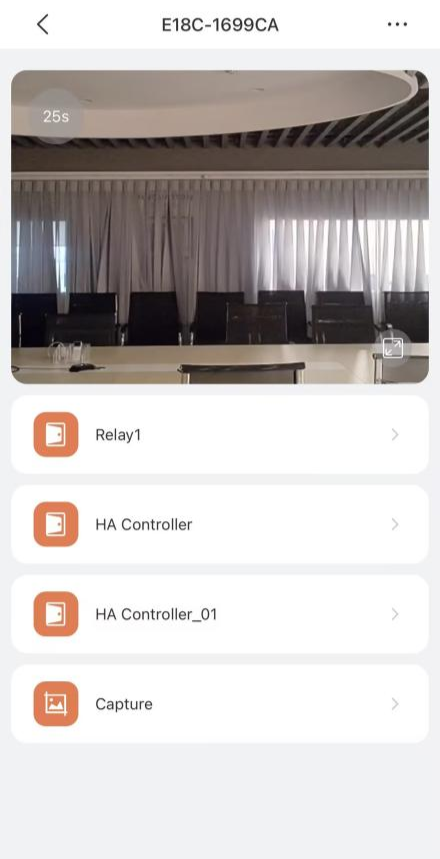
akubela Panels, Door Phones, Cameras, and Third-Party Devices
To control the device, tap its device card to access its detailed screen. You can then turn the panel’s relays on or off, see monitor stream from the camera or door phone, open the door, play music using SONOS speakers, and more.
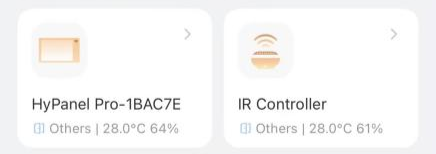
akubela IR Controllers
Add TV and AC directly
You can add up to 30 TVs and ACs with IR controllers, allowing you to control them through the app and panels.
Tap the IR controller to enter its detail screen.
Tap
 .
.Choose an Air Conditioner or TV.
Choose the device brand.
Ensure the status of the device you wish to control matches what indicated in the prompt, then tap Yes to confirm or No to proceed to the next potential device.
NOTE:
If the device you want to control did not respond, tap
to try again.
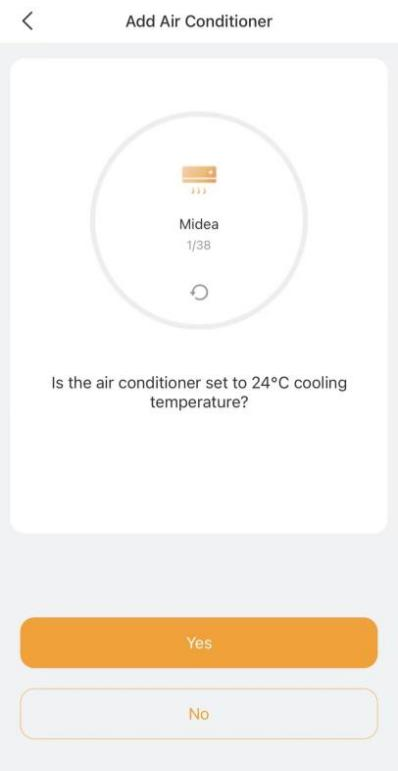
Name the device and choose its location.
You can see the device listed on both the IR controller’s screen and the Home screen.
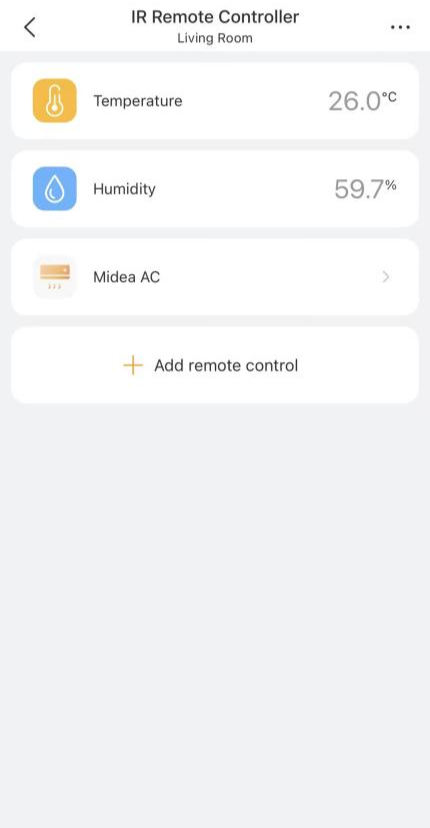
To access the control screen of the added IR device, for example, an AC, tap the device on the Device screen. This allows you to turn it on or off, change its mode, fan speed, and more.
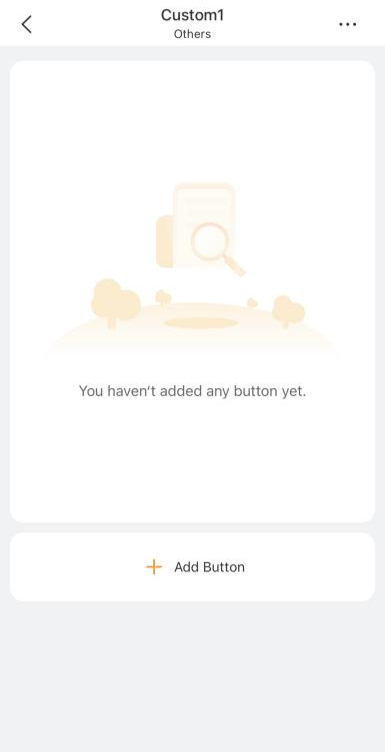
Learn Remote Functions
If adding AC or TV fails, try to use the IR Controller to add and learn their remote functions. Note that each remote supports up to 100 keys.
On the IR controller’s detail screen, tap
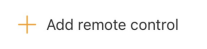 .
.Select Custom Remote Control from the list.
Name the remote and set its location to distinguish it from others.
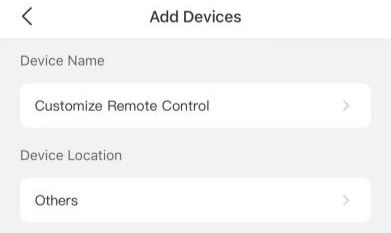
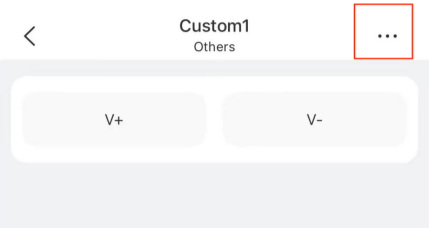
Tap Done. The added remote will be listed on the details screen.

Select the desired remote, and tap
 .
.
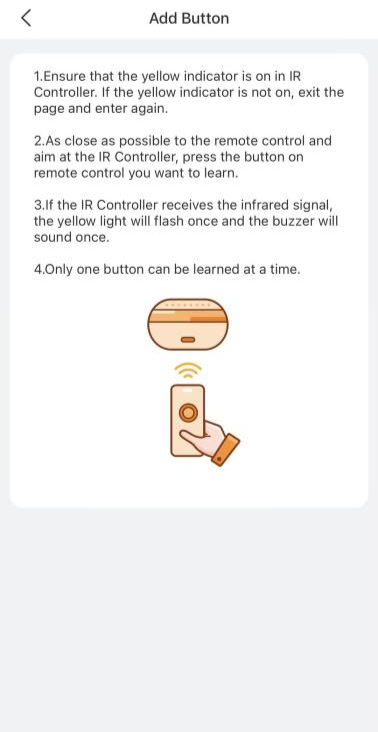
Ensure the indicator light of the IR Controller is yellow.
Point original remote at IR controller as close as possible.
Press the key you want to learn from the original remote; the IR controller’s indicator light will flash once.
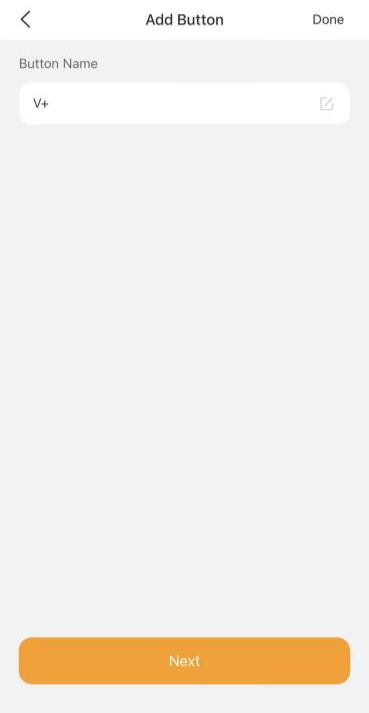
Name the key.
To continue to add keys, tap Next > Add Button.
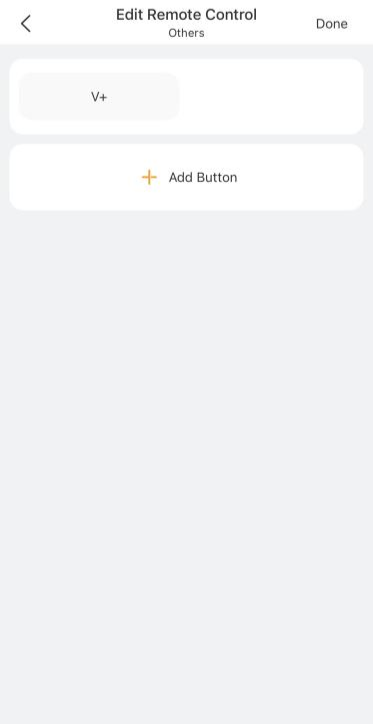
Repeat steps 8 & 9 for more keys.
Tap Done when finished.
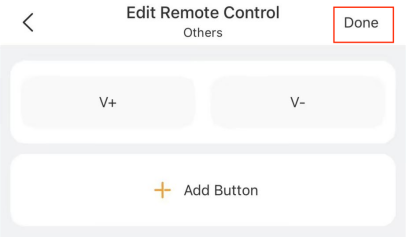
To add additional keys or delete the remote, tap in the upper right corner, and select the desired option.
Reorder Devices
To reorder devices on the Home screen
Tap and hold any device until it jiggles, then drag it to your desired location. Once completed, tap Done.
To move a device to the top
On the Home screen, tap and hold any device until the devices start jiggling. Tap
 of the desired device.
Select the desired device, tap
 in the upper right corner, and tap Move to the front of the homepage.
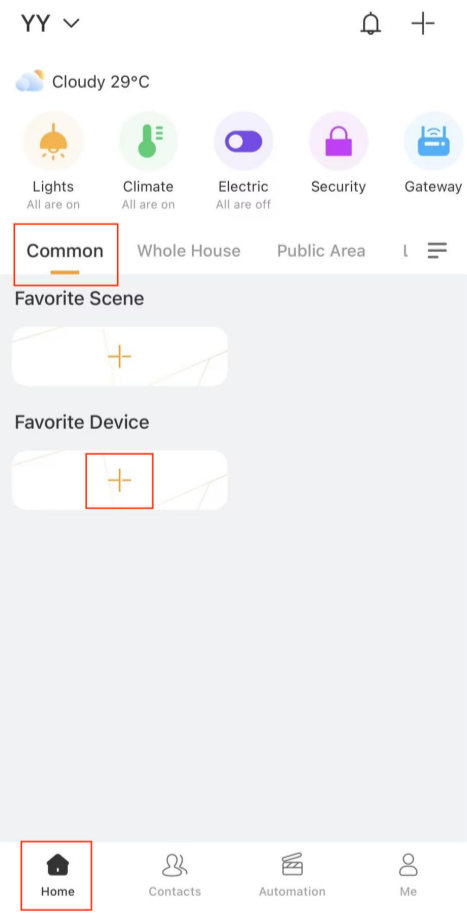
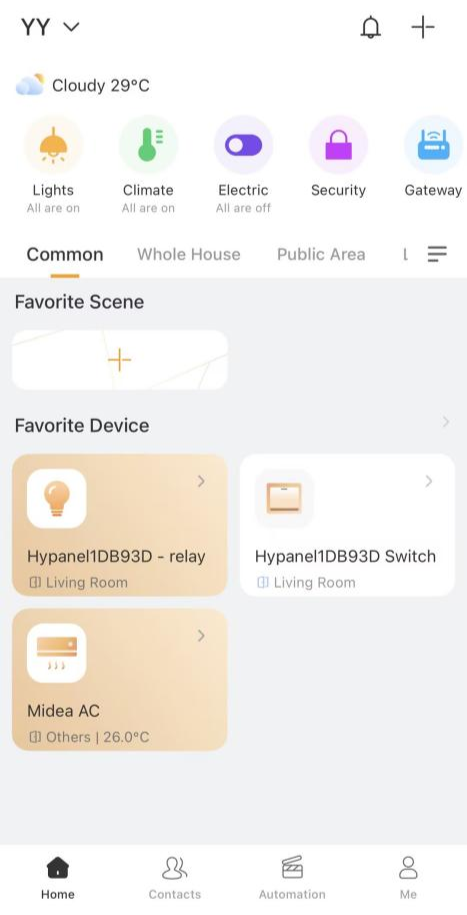
Add Devices to Favorites
You can add frequently used devices to Favorites for quicker access and control.
Tap
 > Common, then tap
  in the Favorite Device.
Select the devices from the list or search by name. Then tap
 in the upper left corner to save.
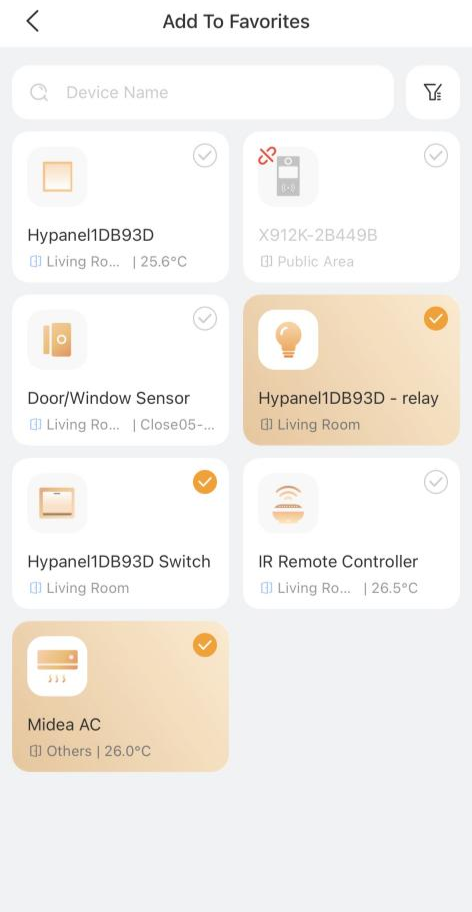
The selected devices will now appear on the Home screen.
To remove a favorite:
Tap Favorite Device on the Home screen and deselect the device.
Scenes
Scenes allow you to control smart devices based on specific actions, events, schedules, or manual triggers.
Scene Types
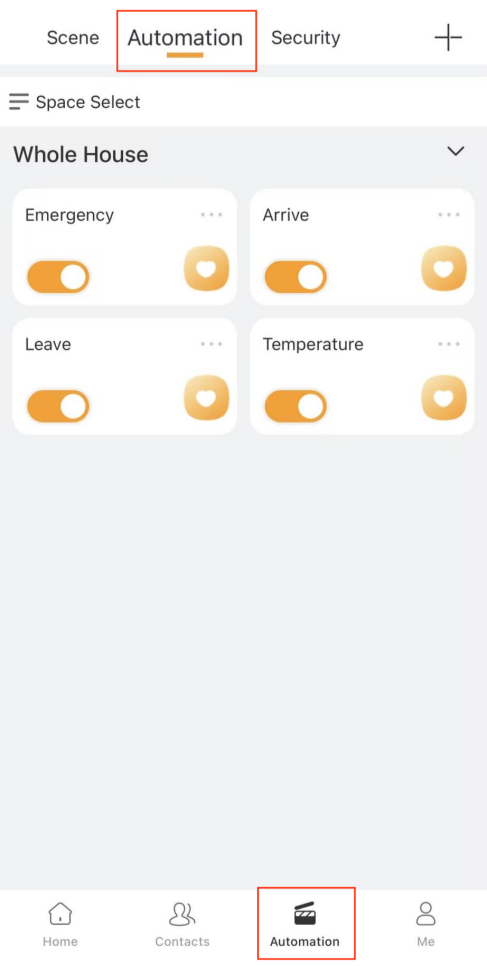
There are three types of scenes, each with its own icon and behavior:
Auto scenes
 : Triggered automatically based on schedules or events. They are displayed on the
  > Automation screen.
With orange toggle
: Scene is active and will run when conditions are met.With white toggle
 : Scene is inactive. Tap it to enable auto-run.
NOTE:
Auto scenes are not shown on HyPanel devices.
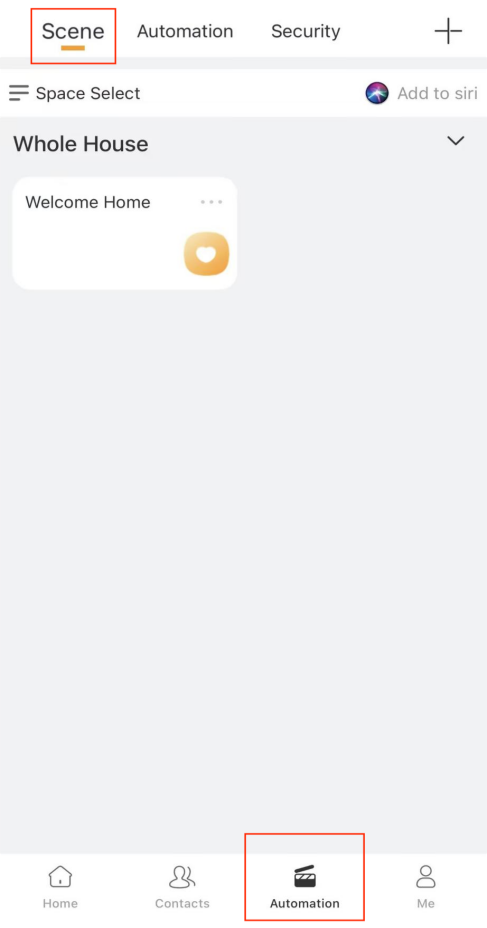
Manual scenes: Triggered by tapping the scene card. They are displayed on the
 > Scene screen.
Auto and manual scenes: Can be triggered automatically or manually. Any of the set conditions will activate the scene. They will also appear on the
 > Scene screen.
Create a Scene
A scene consists of condition(s) and task(s). When the conditions are met, the preset tasks or actions could be triggered.
To create a scene, go to ![]() >
>  > Add scene, and do the following.
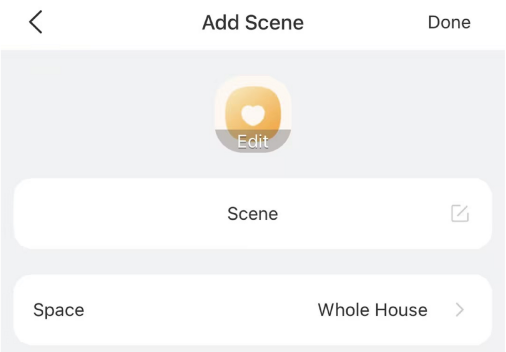
Enter a scene name and optionally choose an image for it.
Set the scene space so you can find it easily among all scenes.
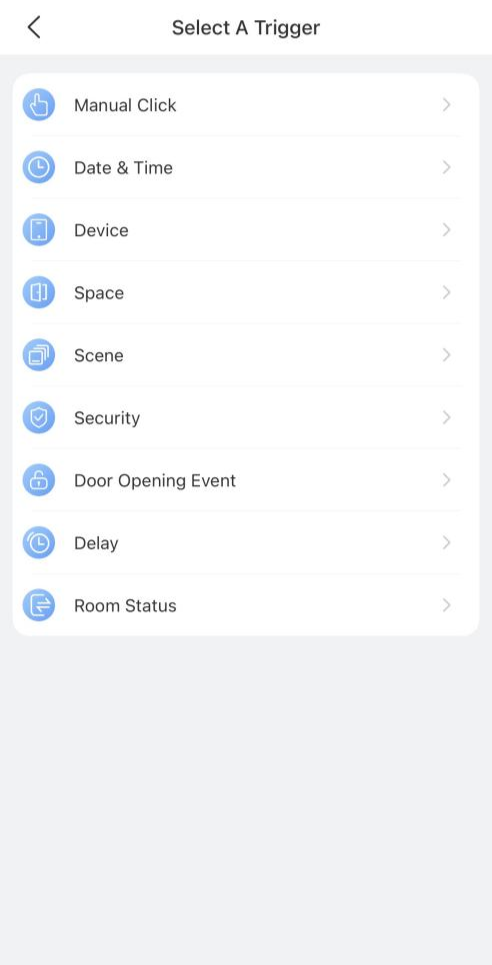
In the When field, tap
 to add one or more trigger conditions. The scene will activate when any of the selected conditions are met.
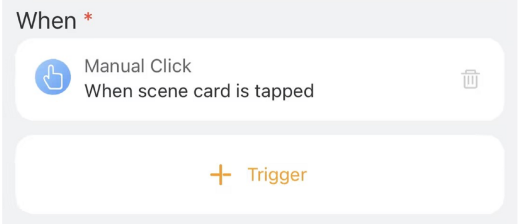
Manual Click: Trigger by tapping the scene card on panels, in the app, or the user web portal.
Date&Time: Trigger at a specific time and days.
Device: Trigger based on device actions (e.g., motion detected, door unlocked).
Space: Trigger when a condition is met across all same-type devices in a room.
Scene: Trigger when another scene runs or its auto-run is enabled/disabled.
Security: Trigger when the system is armed/disarmed or an alert is triggered.
Door Opening Event: Trigger when designated users unlock specific intercom devices using selected methods, or when any user unlocks them from inside.
Delay: Trigger after a specified delay.
Room Status: (Hotel project only) Trigger when the room status changes to Checked In or Checked Out.
(Optional) In the And field, add preconditions that must already be met before the trigger condition(s) can activate the scene.
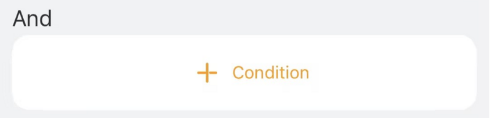
NOTE:
If you add conditions in both When and And fields, the scene will run only if:
a) preconditions in the And field have already been met; and
b) any of the trigger condition in When field are satisfied.
In the Then field, define the actions to execute once the scene is triggered.


Activate Scenes
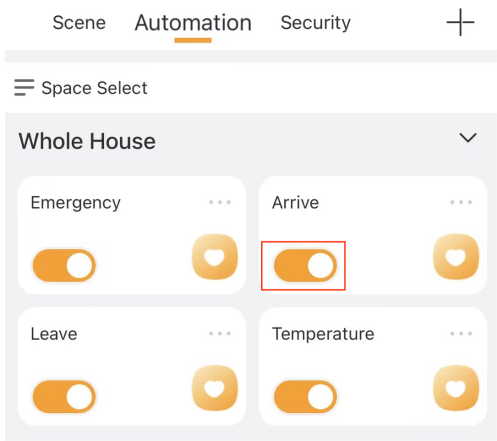
Auto Scenes
When auto scenes are enabled (switch is on as the below figure shown), they will run automatically once the preset conditions are met. No further action is needed.
When the switch is off ![]() , the scene will not activate automatically.
, the scene will not activate automatically.
Manual Scenes
To run a manual scene, you can:
Tap the Scene Card
Go to ![]() > Scene, and tap the desired scene.
> Scene, and tap the desired scene.
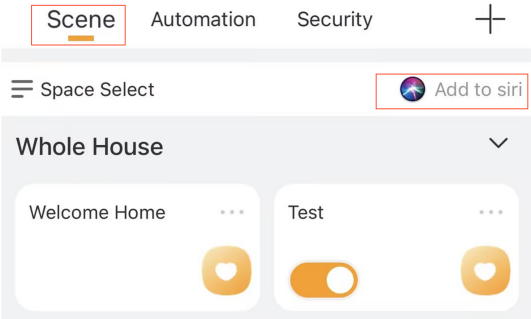
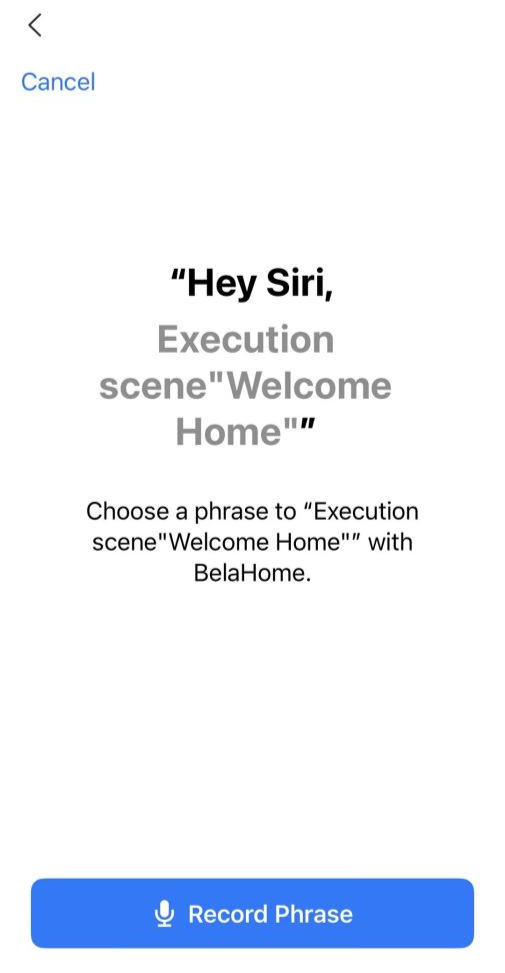
Use Siri (iPhone Only)
Tap
 > Scene >
  .
.
Find the desired scene and tap the
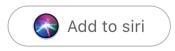 button.
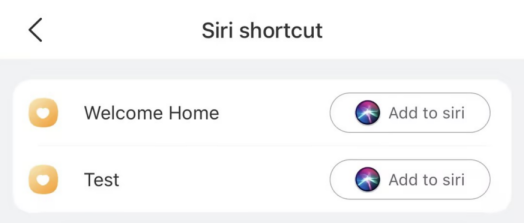
Tap Record Phrase to record your Siri command.
Check Scene Logs
To view or manage scene activity logs, go to ![]() >
> ![]() > Scene Activities.
> Scene Activities.

.png)
Add Scenes to Favorites
You can add frequently used scenes to your Home screen for quick control.
NOTE:
Only scenes with manual conditions can be added to the Favorites.
Tap
 , select Common or Whole House. Then tap
  in the Favorite Scene field.
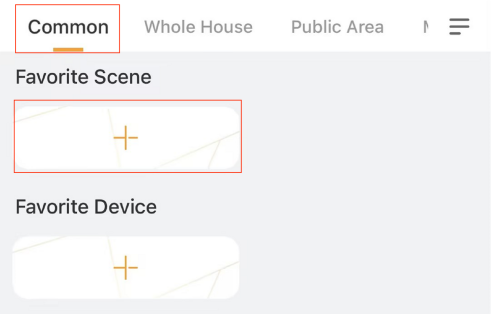
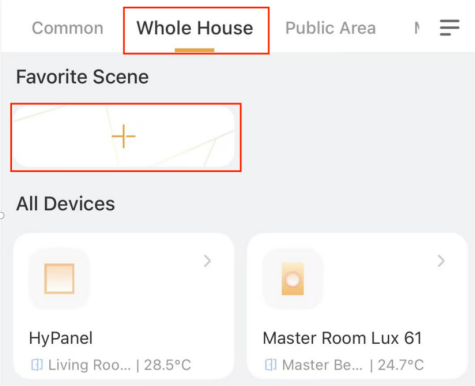
Select the desired scenes.
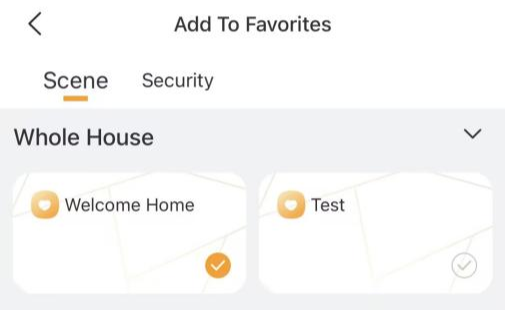
Tap  at the upper left corner. Favorite scenes will appear only on the selected screen (Common or Whole House).
To remove a scene, tap Favorite Scene on the Home screen, and deselect the scene.
Communication in Family
BelaHome lets you easily stay in touch with your family—make calls, send messages, and even share moments through a personalized photo wall.
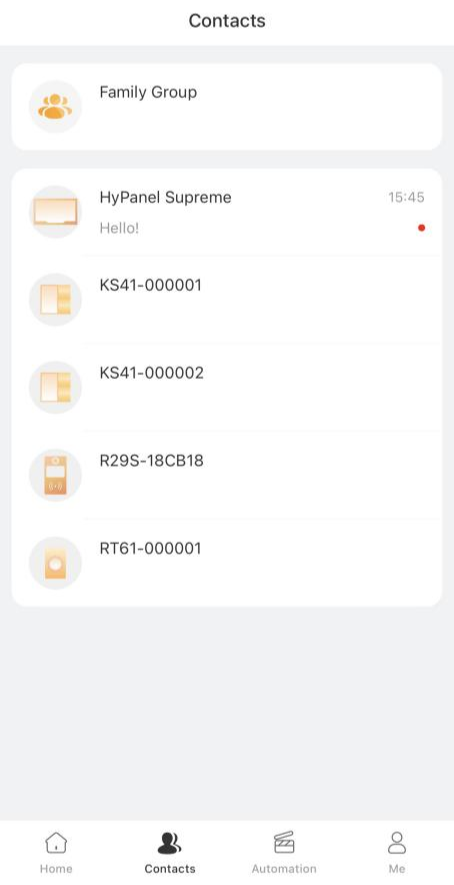
View Messages
All received messages are listed on the ![]() screen. Tap a contact to view the message history.
screen. Tap a contact to view the message history.
Send Messages
You send text or audio messages to online devices.
Send Text Messages
Tap
 on the bottom tab bar.
Select a member or device, or choose Family Group to message all members and devices.
Tap the text field at the bottom, type the message, and tap Send.
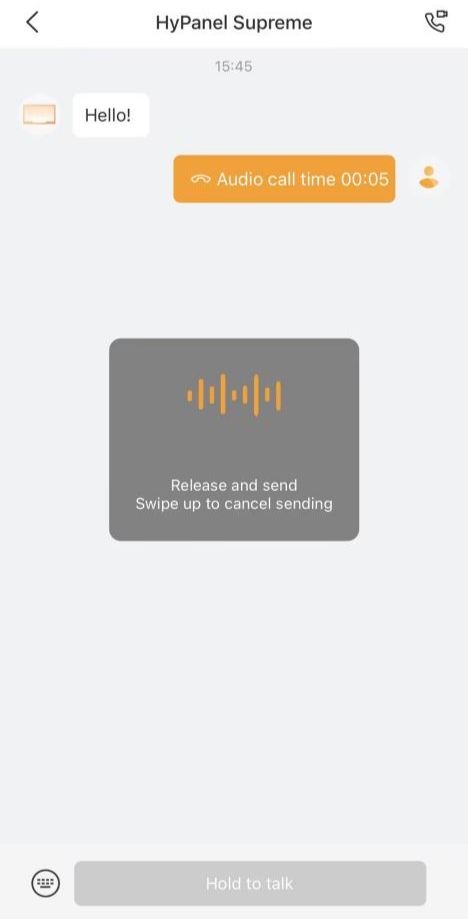
Send Audio Messages
Tap
on the bottom tab bar.Select the member or device you want to send audio messages to.
Tap
 and hold
 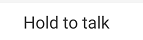 to record. Each message can be up to 30 seconds.
 Lift your finger to send. To cancel while recording, slide your finger up.
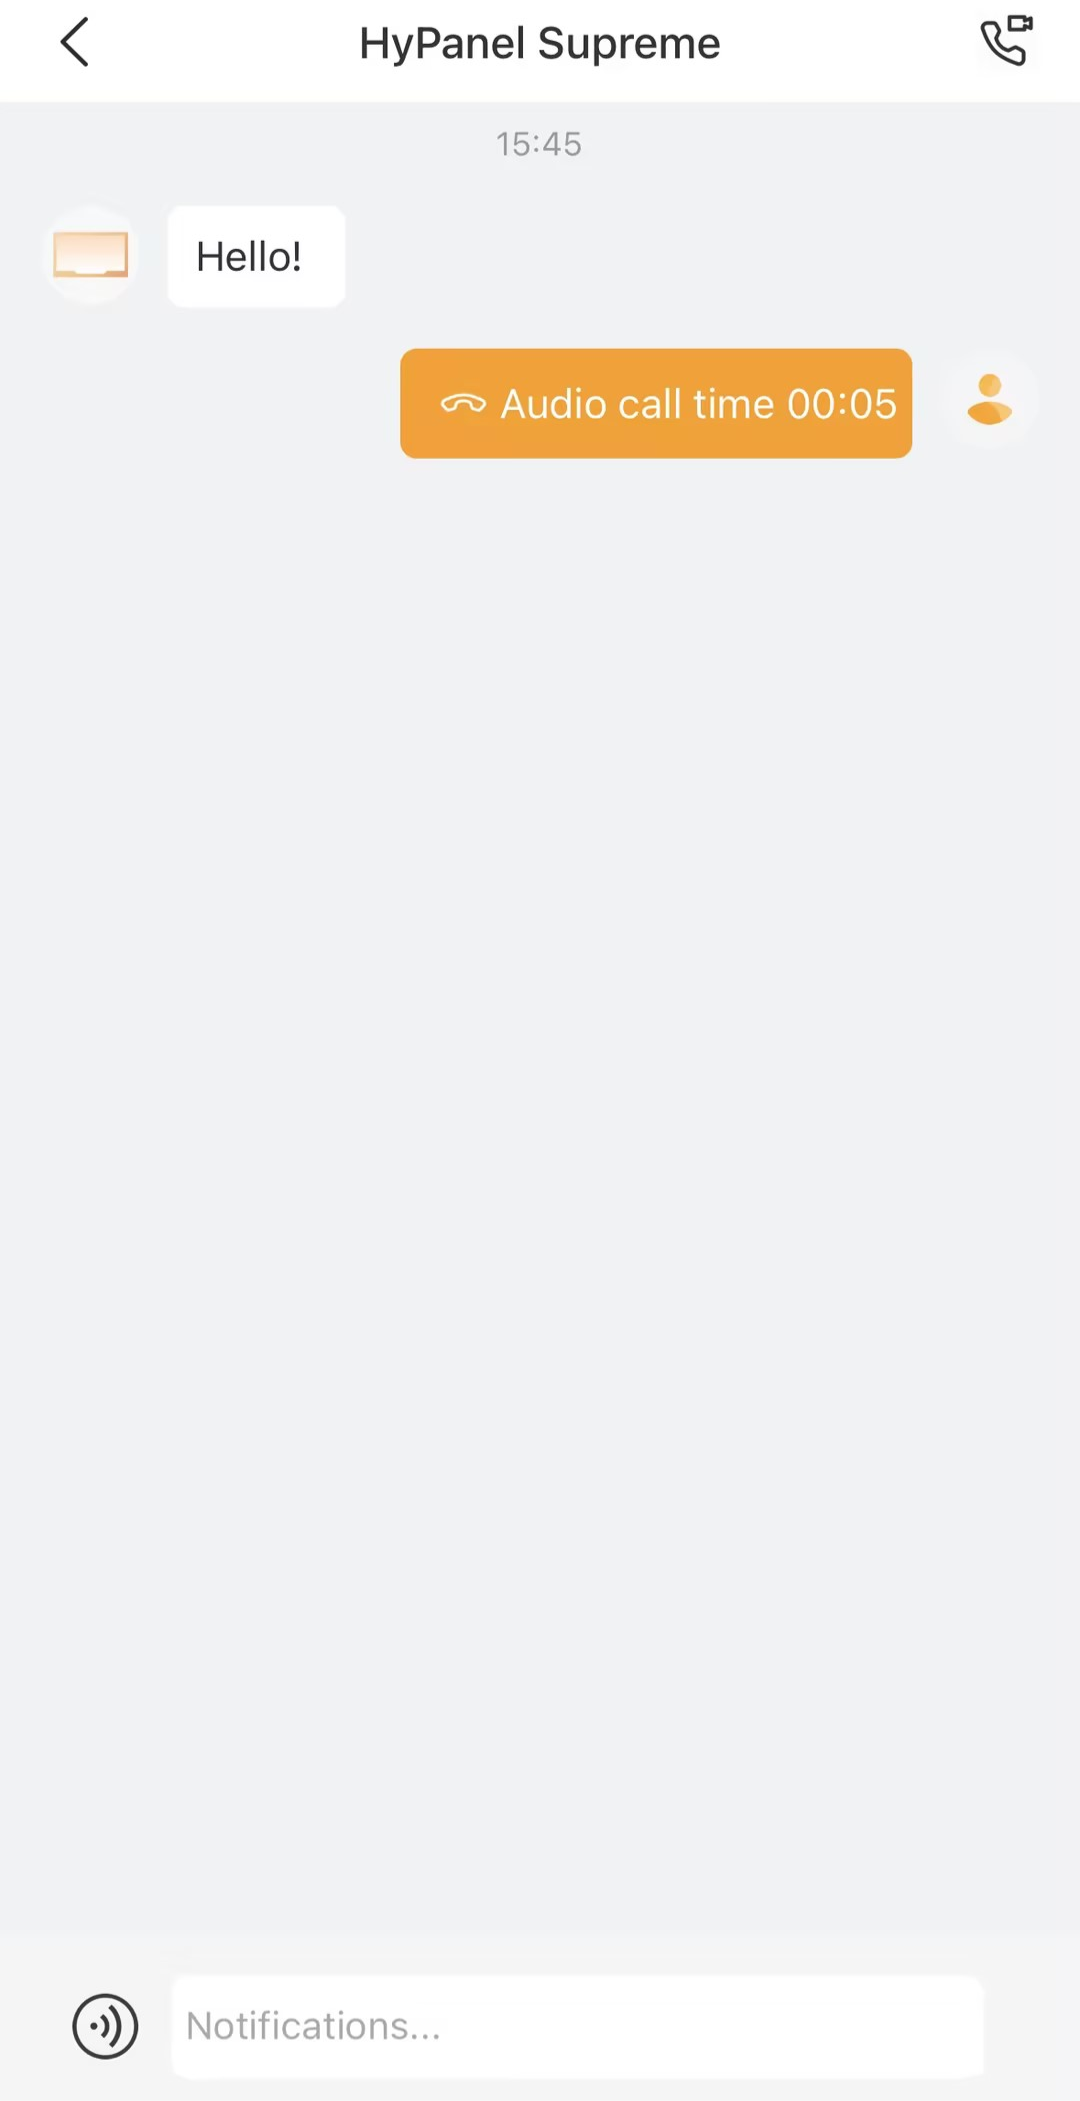
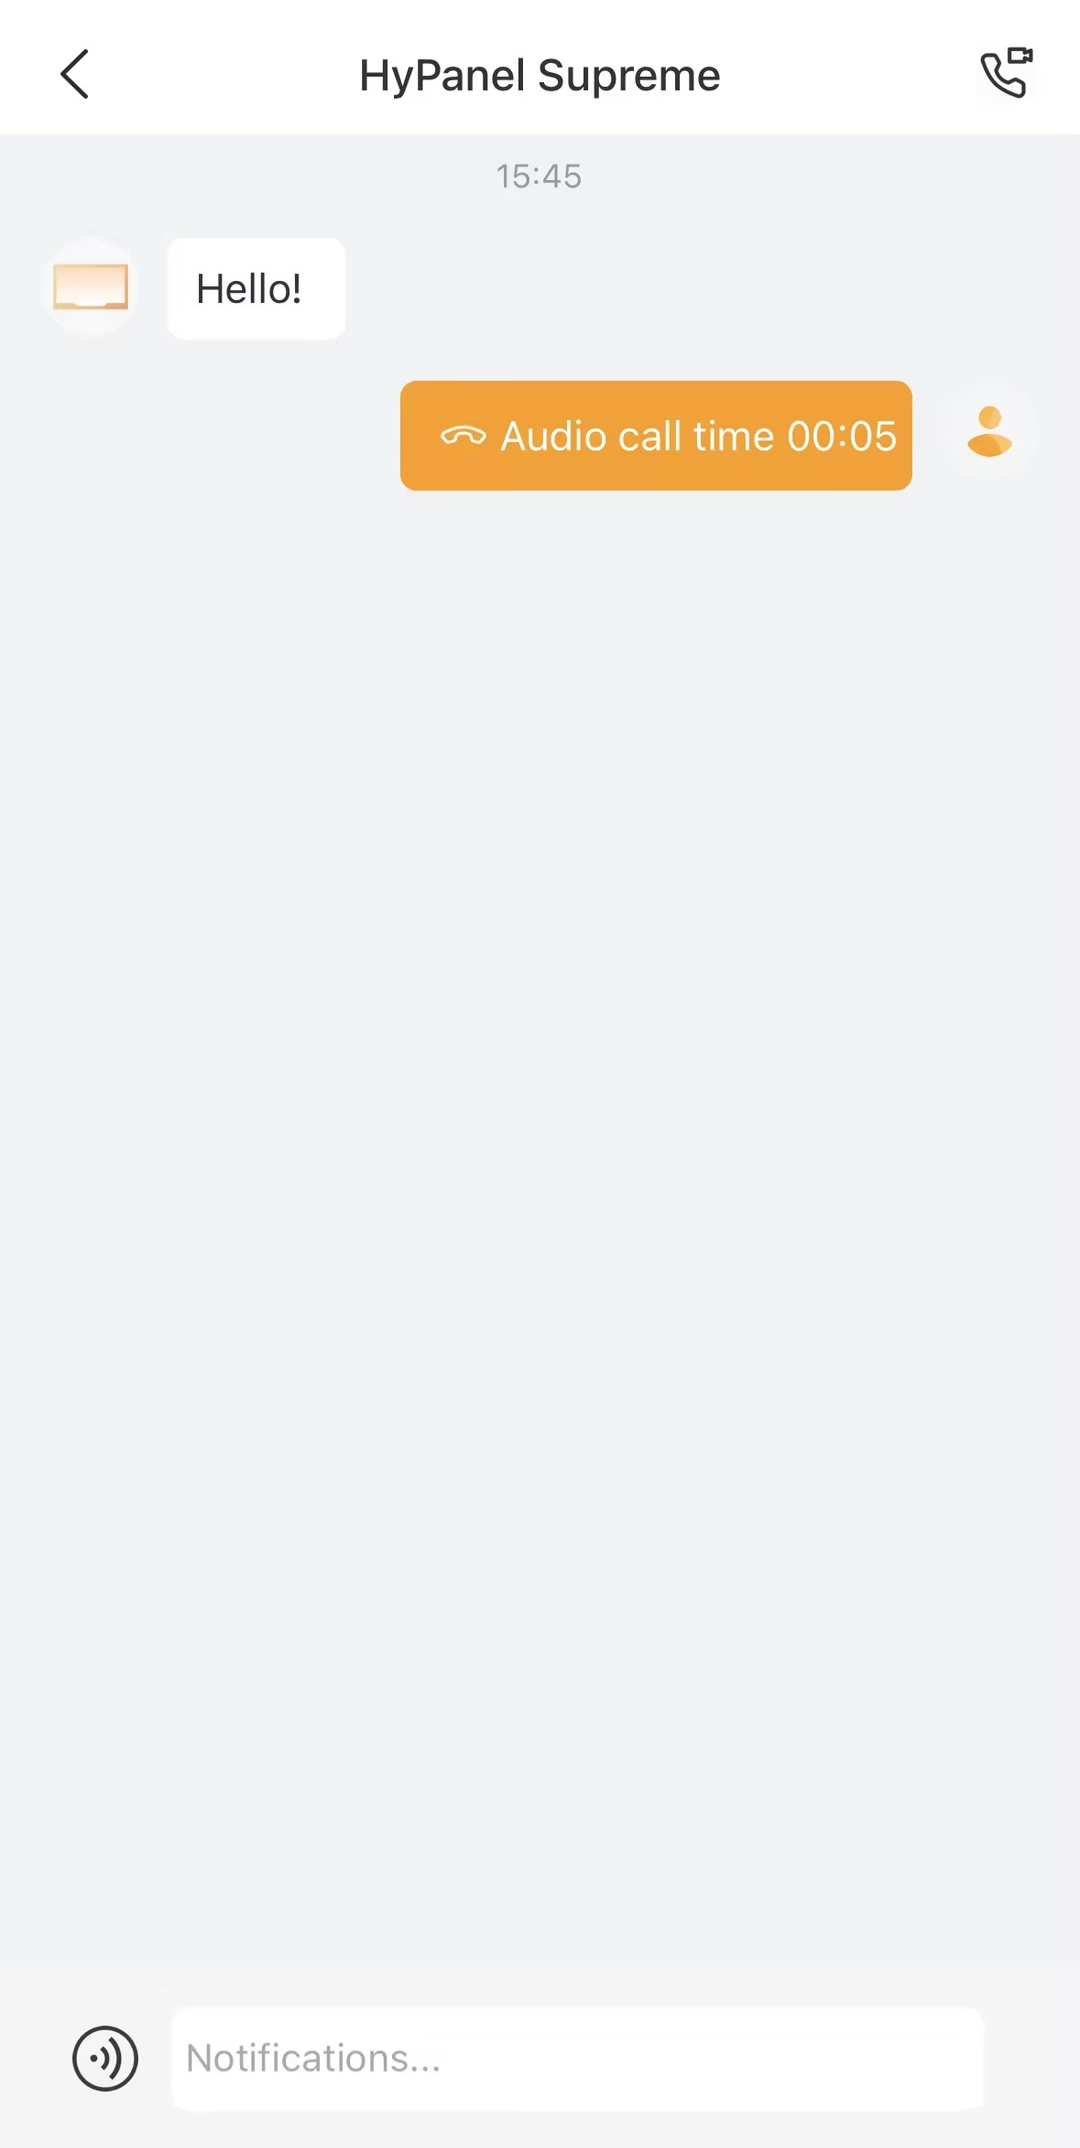
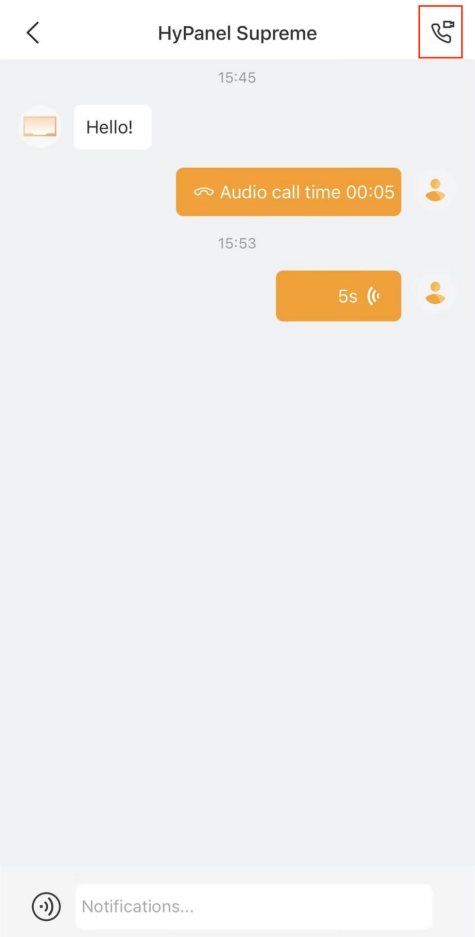
Make One-to-One Calls
Voice Calls
Use BelaHome to make voice calls with family members or HyPanel series devices.
Tap
on the bottom tab bar.Select the member or device.
In the chat, tap
 at the top right to call.
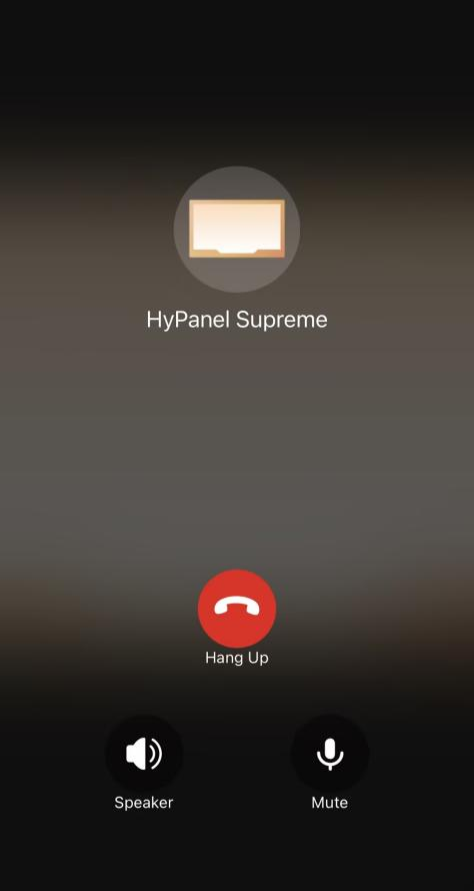
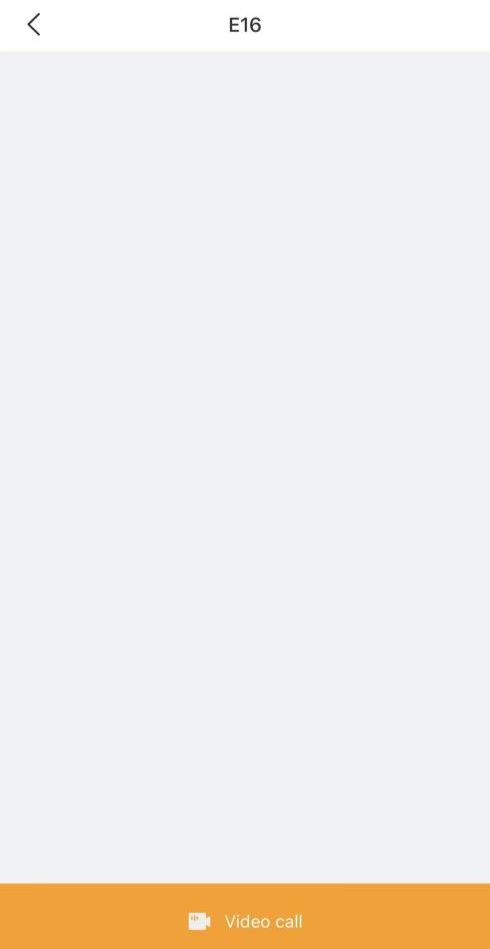
Video Calls
You can make video calls with door phones to see and speak to visitors.
Tap
at the bottom tab bar.Select the door phone from contacts.
Tap Video Call.
During a video call, you can :
Tap Open Door
 to unlock the door
Tap
 to enlarge the monitor video.
Tap Hang Up
 to end the call.
Tap Mute
 to silence your microphone.
Create Your Own Photo Wall
You can personalize your SmartPanel or HyPanel devices by turning its screen saver into a photo wall. The devices can display up to 9 of your favorite photos, replacing the default screen savers.
NOTE:
If your family only has HyPanel Lite devices, this photo wall function is not available, and the entrance
will not appear.
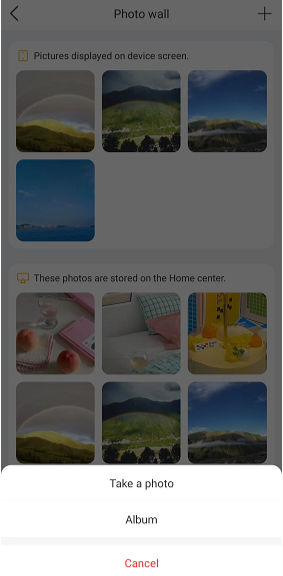
Add New Photos
You can easily upload and display your favorite images using the BelaHome app.
Tap
 > Wallpaper.
Select the panel to display your photos on.
Tap
 at the upper right.
Choose Take a photo or select existing images from your Album.
TIP:
To make sure your uploaded photos show on the panel, follow the panel’s user guide to turn on the screen saver and set its style to Photo Wall.
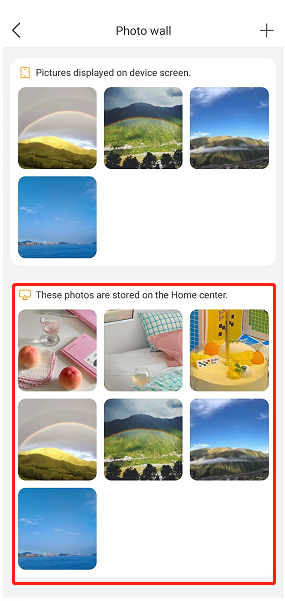
Share Uploaded Photos with Other Panels
Photos uploaded to the Home Center can be sent to additional panels for display.
NOTE:
This feature is only available when the family is connected to the cloud.
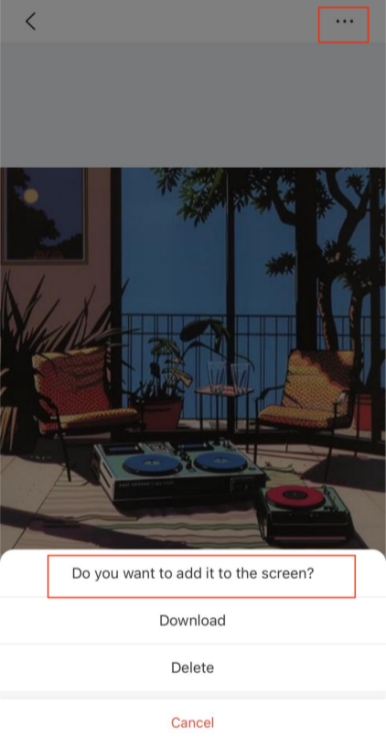
To share photos with other panels:
Tap
> Wallpaper. Select the desired panel.
Choose from the available photos stored on the Home Center.
On the followed screen, tap
 > Do you want to add it to the screen.
NOTE:
Only images with suitable dimensions for the selected panel will be shown on the These photos are stored on the Home Center field.
Ensure the screen saver feature is enabled on the panel and that the display style is set to Photo Wall.
If your HyPanel Pro is installed vertically, the cropping frame will automatically switch to vertical.
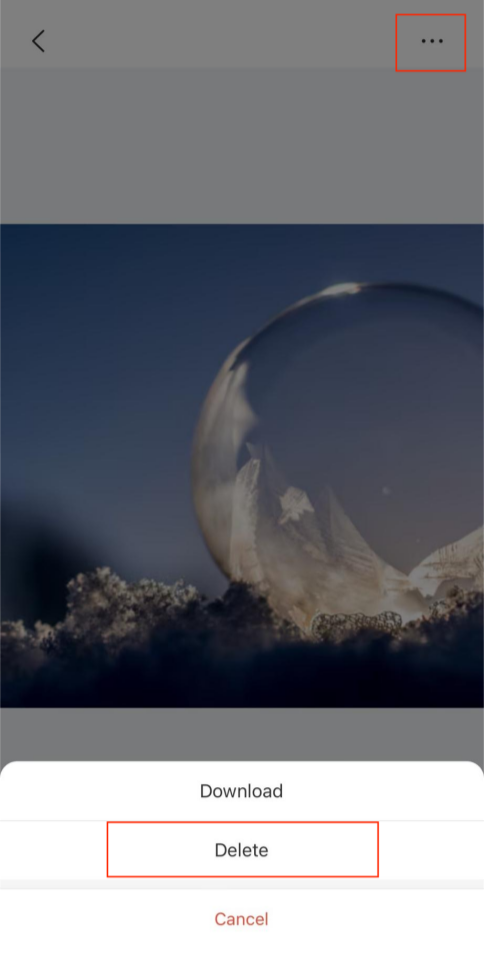
Delete Photos
Photos can be deleted from either the panel or the Home Center. Deleting an image in one panel does not affect its availability in the other.
Tap
 > Wallpaper.
Select the panel that displays the image.
Choose the photo to remove from the panel or home center storage.
On the followed screen, tap
 > Delete.
Security
With akubela, you can easily arm and disarm your home’s security system anytime, giving you peace of mind whether you're at home or away.
NOTE:
The security feature is not supported on HyPanel Lite devices. If your home only includes HyPanel Lite panels, the Security tab will not appear.
Configure a Security Mode
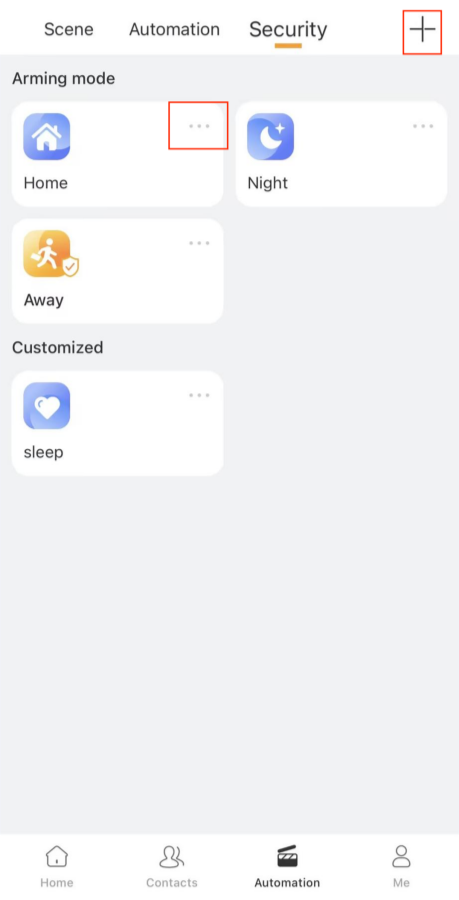
akubela provides three default modes: Home, Away, and Night. You can also create custom modes to suit your needs.
To set up or customize a security mode:
Tap
 > Security.
Do any of the following:
To configure a default mode, tap its
 icon in the upper right.
To create a new mode, tap
 > Add security.
On the configuration screen, complete the following:
Add a defence delay before the system arms.
Delay the alarm after the trigger to avoid false alerts.
Tap
 to select one or more devices to act as trigger — for example, when a device is turned on/off or detects motion.
 Choose the actions that should happen when the condition is met:
Alarm Siren: Enable to trigger a siren sound.
Make SOS Call: Automatically call a designated emergency number (configured via the user portal or cloud).
Send Message: Notify all family members and panels.
Send HTTP command: Perform custom actions through HTTP requests.
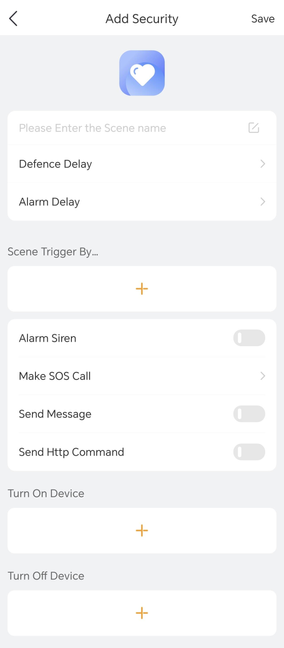
If needed, configure connected relay devices to turn on or off when the mode is activated.
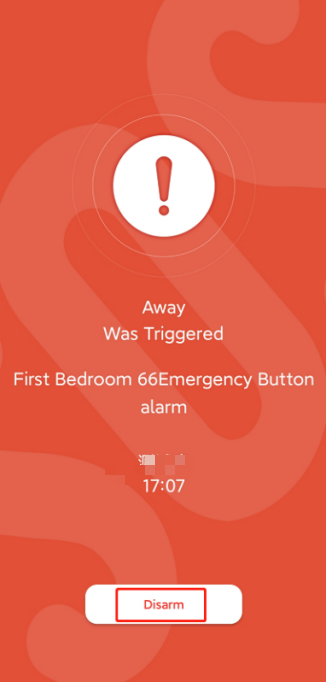
Arm or Disarm Your System
To arm your system, tap ![]() > Security, and tap the desired arming mode. The mode card turns orange to show it’s active.
> Security, and tap the desired arming mode. The mode card turns orange to show it’s active.
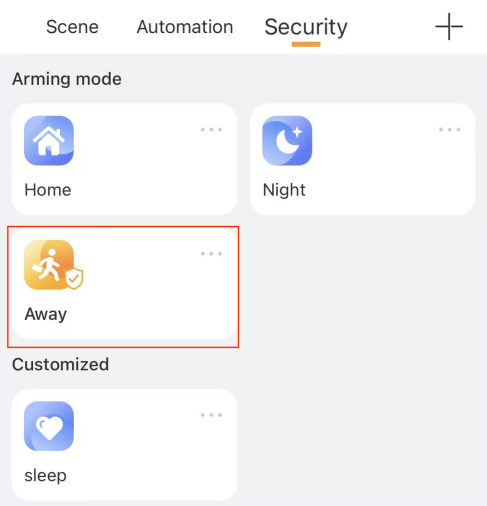
To disarm, simply tap the highlighted mode card again. This image will turn blue.
Alarm Pop-ups
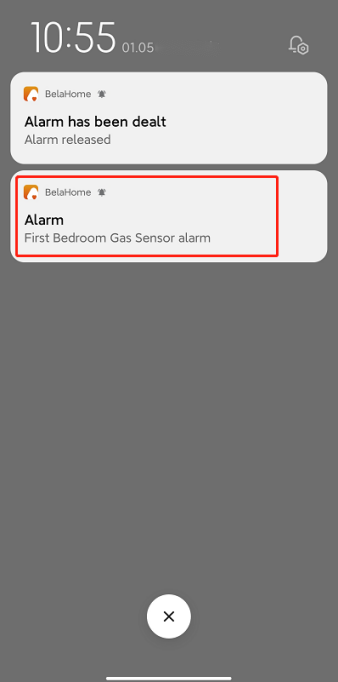
When a sensor in any security mode is triggered, you’ll receive an instant pop-up alert on your phone. Tap the notification to view detailed information in full screen.
To stop the alarm, tap Disarm.
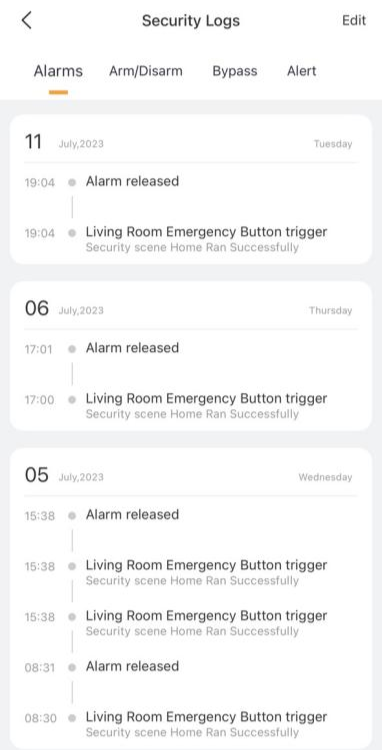
View Security Logs
To view or delete security logs, go to ![]() >
> ![]() > Security Logs.
> Security Logs.
You can check the following records:
Alarms: History of sensor alarms and cleared alarms in any security mode (Away, Home, Night, or custom modes).
Arm/Disarm: History of system arming and disarming events.
Bypass: History of sensors being ignored or restored.
Alert: History of all sensor triggers, regardless of the current security mode.

Use Intercom Devices
When intercom permissions, your account can control connected door phones to unlock doors, view monitoring streams, and access doors using temporary keys, PIN codes, QR codes, facial recognition, and more.
NOTE:
If intercom features aren’t enabled for your account, you won’t be able to use any intercom-related functions. Please contact your service provider to activate them.
Unlock Doors with App
Remotely Open the Door
You can open the door directly for your visitors just by tapping the specified button.
Tap
 , then tap the desired door phone to access its details screen.
Tap
 to open desired door.
 If need, tap
 to make a screenshot.
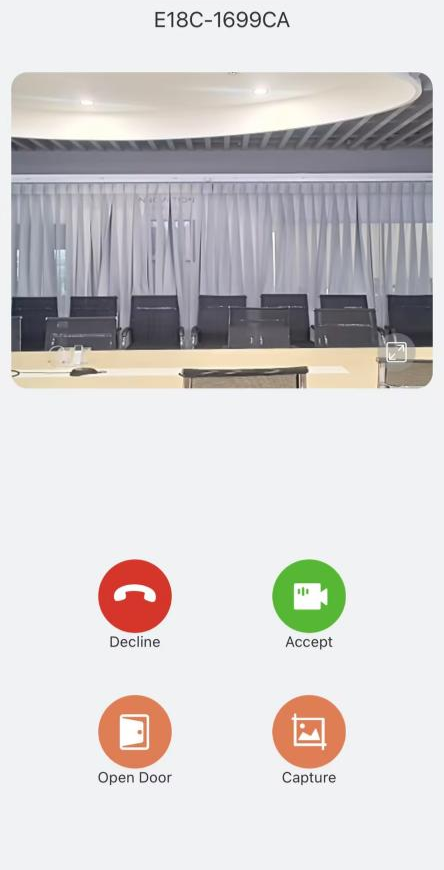
Unlock the Door Before Answering a Call
You can unlock the door right from the preview screen.
Tap Open Door
 on the talking page.
Tap Capture
 to take a screenshot if needed.
 Tap Decline
 to end the call.
Tap Accept
 to receive a video call.
Unlock the Door During a Call
You can also unlock the door while on a call—whether someone calls you or you call them.
If you’re answering a call, tap Open Door ![]() .
.
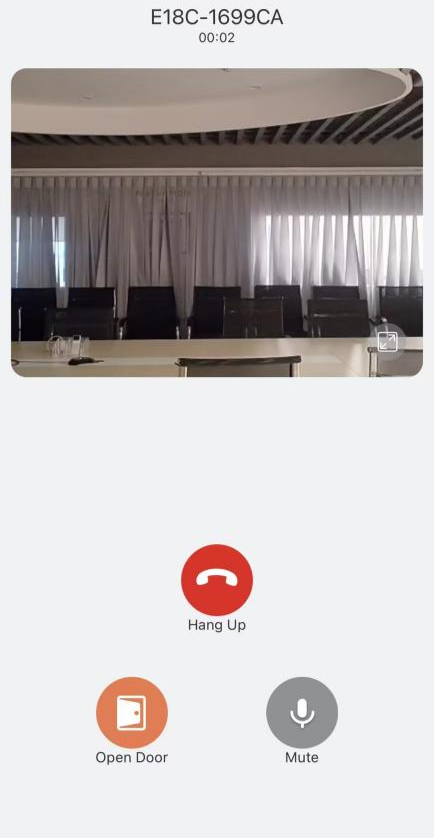
TIP:
To make a call with the door phone to hear and see who the visitor is, tap
at the bottom tab bar, select the desired door phone, and tap Video Call. You can refer to Video Call section in this guide for more instructions.
Unlock Doors with Temp Keys
A Temp Key is a quick, secure way to let someone in—perfect for visitors, housekeepers, or delivery personnel.
NOTE:
This feature only works with door phones that have a screen.
Create Temp Keys
Go to
 > Intercom Permission Management > Temp Keys.
Tap
 .
.Enter the visitor’s name and configure settings such as repeat mode, doors to unlock, valid time and more.
Tap Submit. The Temp Key will now appear in the key list and is ready to use.
.png)
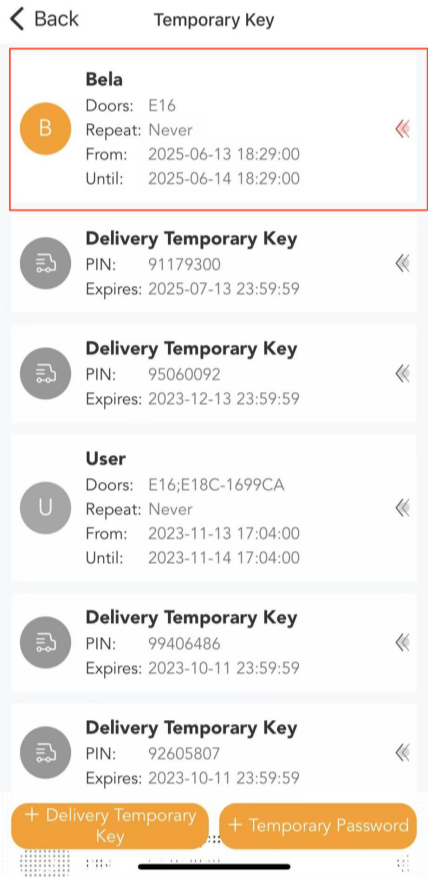
Create Temp Key for Delivery Person
Go to
> Intercom Permission Management > Temp Keys.Tap
 .
.The system will automatically generate a one-month-valid key.
.png)
.png)
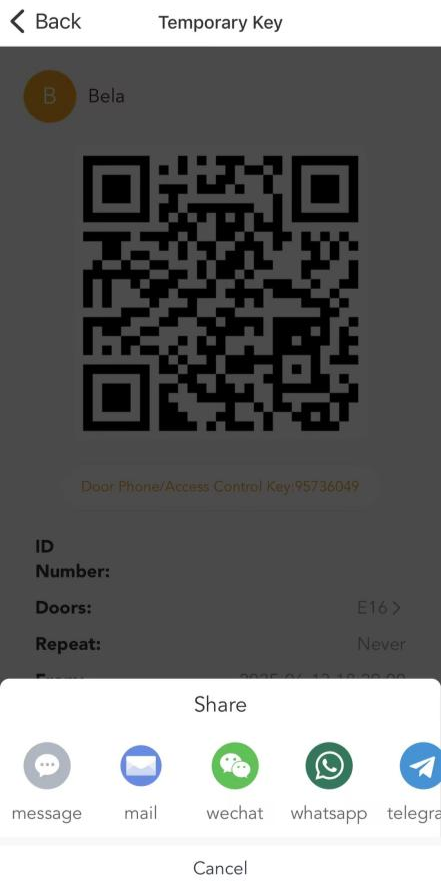
Share Temp Keys with Visitors
You can easily share a Temp Key with the person you created it for.
Go to
> Intercom Permission Management > Temp Keys.Tap the temp key you want to share..
Tap Share Key, then then choose how you’d like to share it.
.png)
Delete Temp Keys
Temp Keys stop working as soon as they’re deleted. To remove expired or unused keys:
Go to
> Intercom Permission Management > Temp Keys.Find the key you want to delete.
Swipe left on it and tap Delete.
.png)
Unlock Doors with a PIN Code
You can unlock supported doors by entering a secure PIN.
NOTE:
Each account can create only one door release PIN.
Your door phone must support PIN access.
To create a PIN:
Go to
> Intercom Permission Management > Door Release PIN. Enter a numeric password(4-8 digits).
Tap Submit.

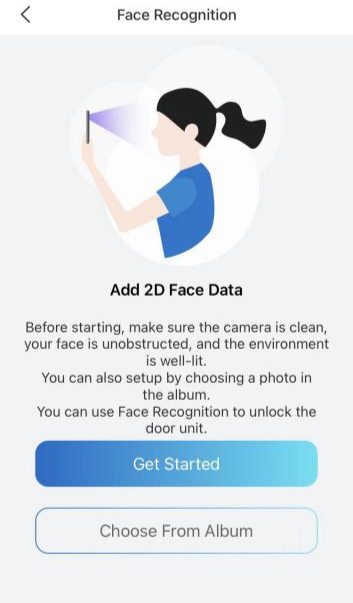
Unlock Doors with Face ID
Facial recognition lets you unlock the door quickly and hands-free.
NOTE:
Each account can enroll only one face.
Your door phone must support facial recognition access.
To set up Face ID:
Go to
> Intercom Permission Management > Face Recognition.Tap Get Started or Choose from Album, then follow onscreen instructions to enroll your face data.
To delete your face data, go to ![]() > Intercom Permission Management > Face Recognition > Delete Face Data. After deletion, Face ID will no longer work for unlocking.
> Intercom Permission Management > Face Recognition > Delete Face Data. After deletion, Face ID will no longer work for unlocking.
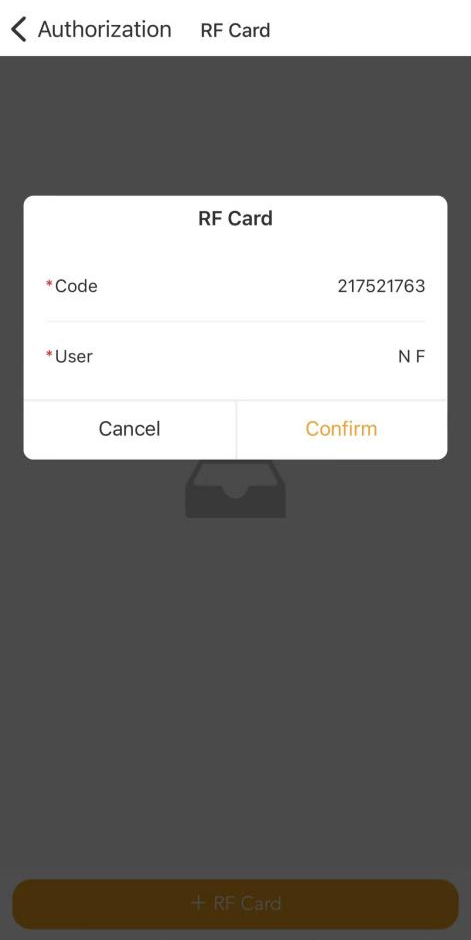
Unlock Doors with RF Cards
Family administrators can assign RF cards to members for easy door access.
NOTE:
Only the family administrator can manage RF cards.
To add a card:
Go to
> Intercom Permission Management > RF Card.Tap
 , enter the card number, and select the user to assign it to.
Tap Confirm.
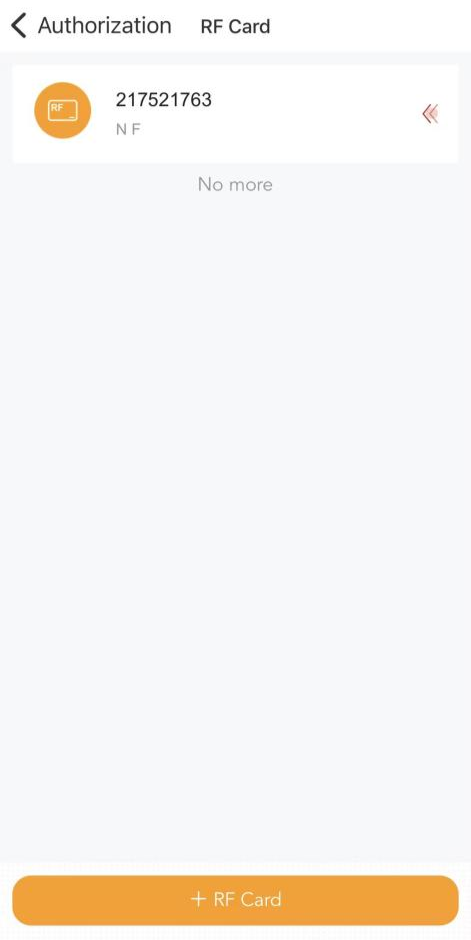
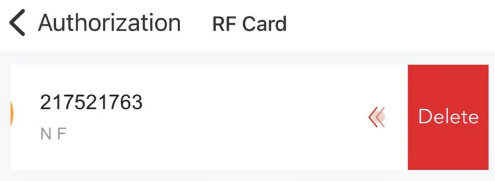
To delete a card, just swipe the card to the left, then tap Delete.
Unlock Doors with NFC
You can use your phone’s NFC to unlock the door by simply tapping it near the door phone’s reading area.
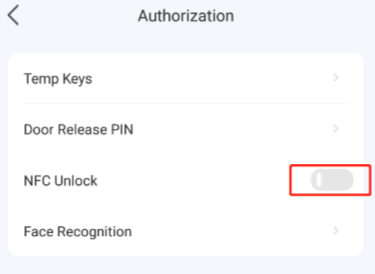
NOTE:
NFC unlock is only available on Android phones with NFC.
If both the SmartPlus and BelaHome apps are installed on your phone, NFC unlock may not work.
To enable NFC feature, go to ![]() > Intercom Permission Management > NFC Unlock.
> Intercom Permission Management > NFC Unlock.
Unlock Doors Using Siri
You can use Siri on your iPhone to unlock the door when it’s inconvenient to operate it manually.
NOTE:
This function is only available on iPhones.
To enable this feature:
Tap
 and select the desired door phone.
Tap
 to open the Setting screen.
Tap Add to siri, choose the door to open, and follow the onscreen instructions to set your voice command.
.png)
View Intercom-Related Records
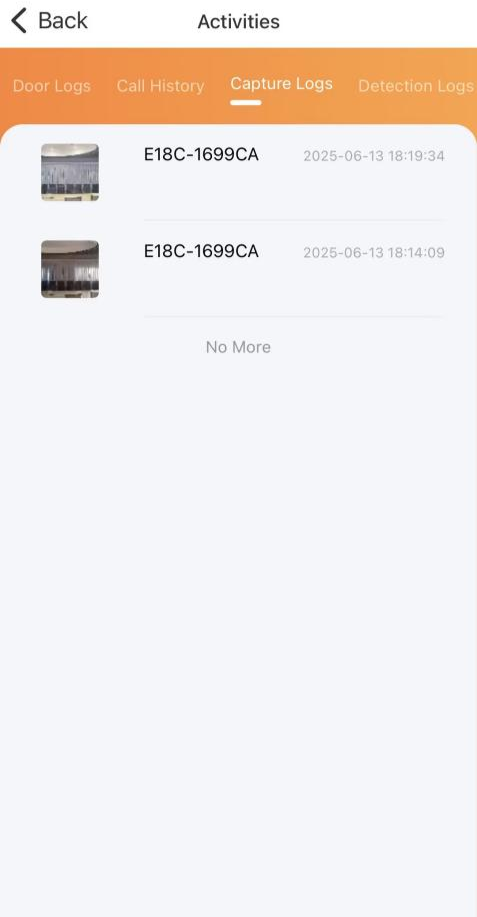
To view all door and intercom activity logs, go to ![]() >
> ![]() > Intercom Activities screen.
> Intercom Activities screen.
Door Logs: Includes all call and door unlock records. Any relays triggered by the door phone are also recorded.
Call History: Lists all outgoing, incoming, and missed calls.
Capture Logs: Displays all snapshots taken from live video feeds.
Detection Logs:
Motion Detection: Displays suspicious movement detected by door phones.
Package Detection: Records a package is placed or removed within the door phone’s camera detection area.
Maintenance and Booking Amenities
NOTE:
The amenity booking and maintenance requests features are only available for users in community projects.
Your smart home devices must be connected to the cloud for these features to work.
Book Amenities
You can easily book shared amenities such as gyms and swimming pools in your community.
Go to
> Property > Booking >  .
.Select the amenity you’d like to book.
.png)
Tap the date label to choose your preferred date and time, and then tap OK.
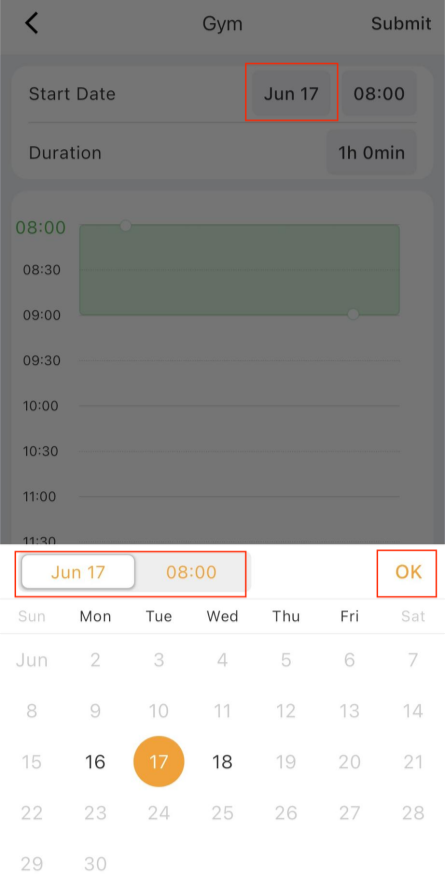
Adjust the booking time:
1) Drag the time block to set the start time.
2) Expand or shrink the block to set the duration.
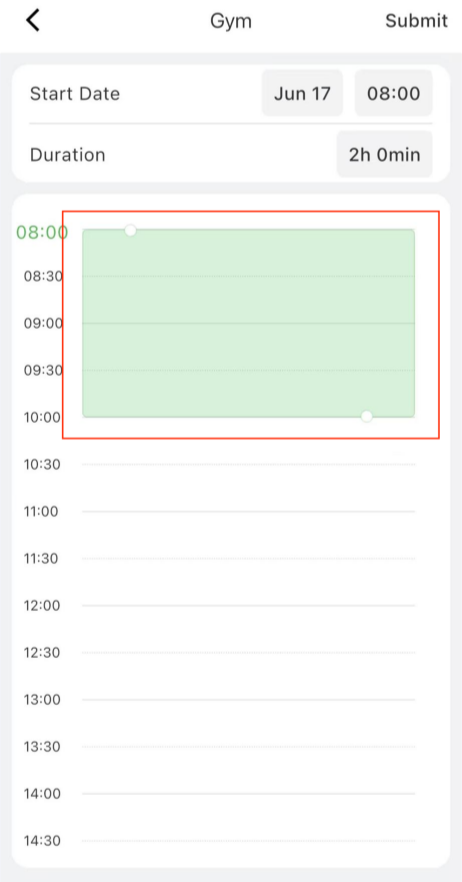
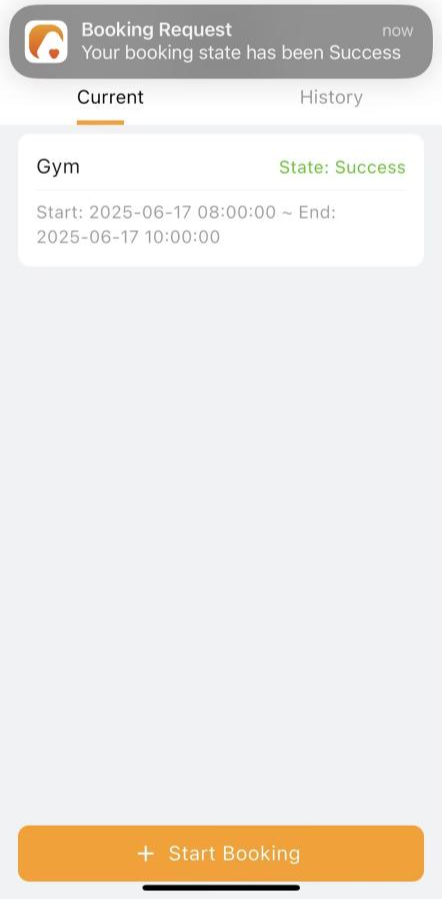
Tap Submit in the upper right corner. Your request will be reviewed.
After your booking is approved:
You’ll receive a notification in the app.
The booking status will change to Success.
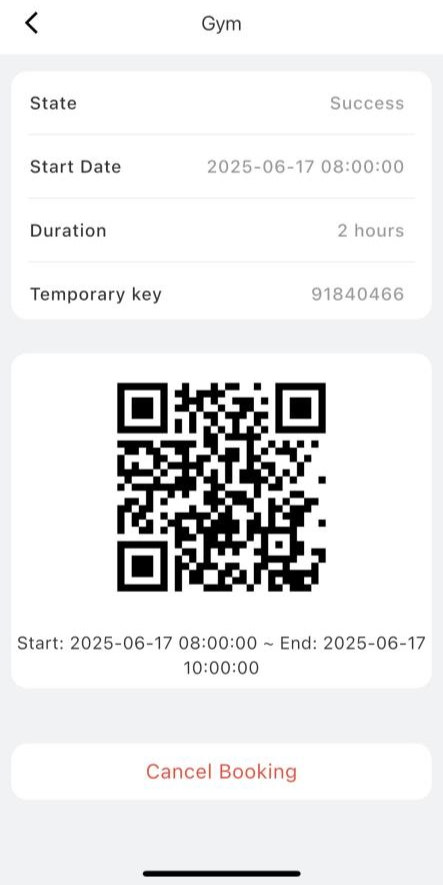
Tap your booking record to view a temporary access key and QR code for entry.
Submit a Maintenance Request
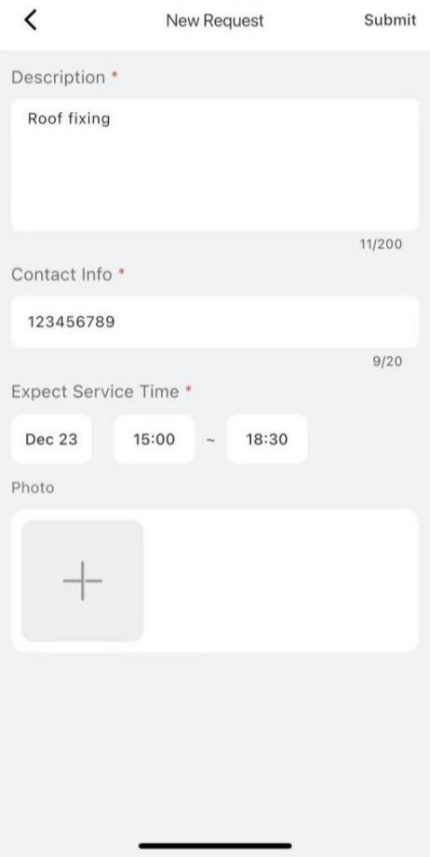
If something needs fixing in your home, you can easily request maintenance through the app.
Go to
> Property > Maintenance Request >  .
.Fill in the required details and tap Submit.
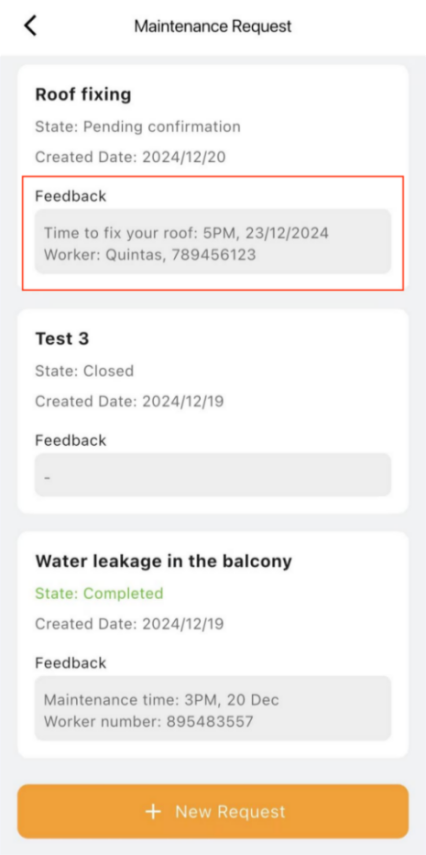
After submission:
Your property manager will review the request and contact you to confirm the service.
Once assigned, the worker’s name, contact info, and scheduled time will appear in the Feedback section.
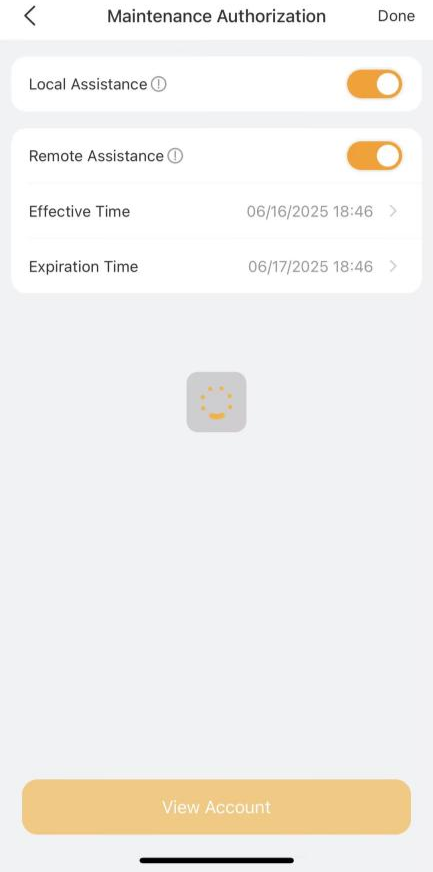
Grant Remote Maintenance Permissions
If you need help from your service provider to update settings or perform maintenance remotely, you can create a temporary maintenance account that gives them remote access to your device’s web portals and the BelaHome app.
NOTE:
Only the family administrator can create the temporary maintenance account.
Only one temporary account can be valid at a time. If you create a new one, the old one will be invalidated.
To create a temporary maintenance account:
Go to
> Feedback > Grant Access.Enable the permission(s) you need:
Local Assistance: For accessing the device web portal when the service provider is on the same local network.
Remote Assistance: For remote access via the app and web portals.
Set the account valid time.
Tap Done to generate an account.
Tap View Account again to view and share the login credentials.
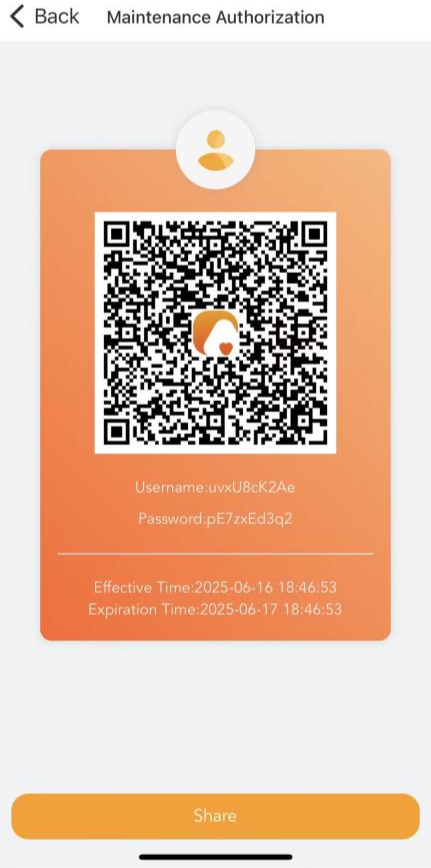
Your service provider can:
Use the BelaHome app with admin-level permissions (except: Family Management, family switching, intercom permissions management, temporary PIN codes for smart lock, and messaging family members).
Log in remotely to the device web portal at my.akubela.com.
Support
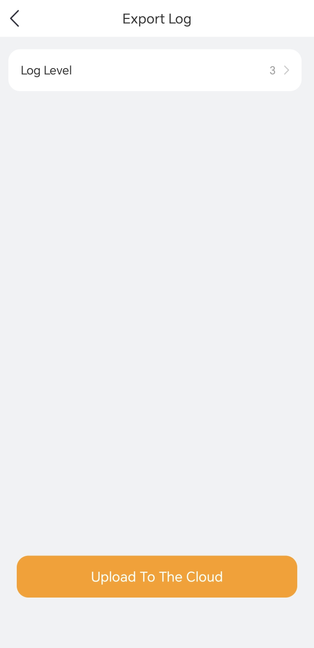
Upload Logs for Debugging
If your devices are malfunctioning or behaving unexpectedly, you can upload logs to the akubela Cloud. Our technical engineers will review them to help identify and resolve the issue.
Logs are categorized by levels 1-7, where a higher level means more detailed log information. The default level is 3.
To change the log level:
Go to
> Setting > Export Log.Tap
 , select a level, and then tap Done.
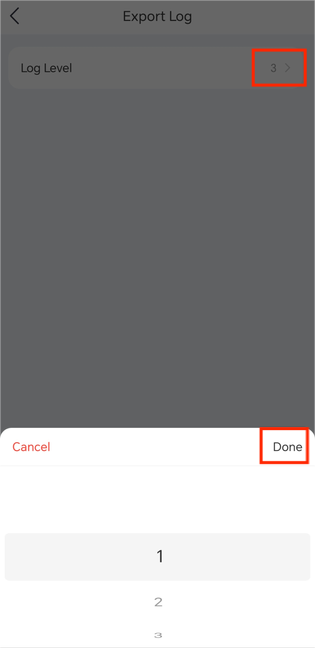
To upload logs for analysis, simply tap Upload to The Cloud.
Updates
Check BelaHome App Version
To view the version of the BelaHome app you’re using, go to ![]() > About .
> About .
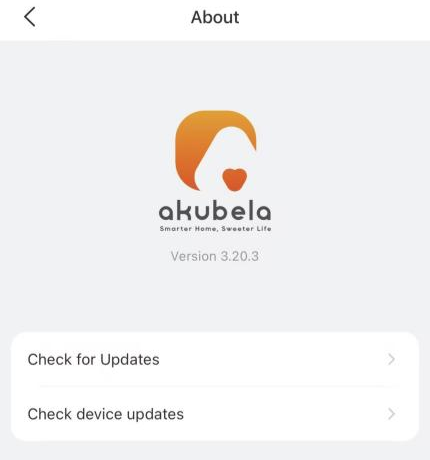
To update the app to the latest version, tap Check for Updates, and follow onscreen instructions. Your settings and data will remain unchanged when you update the app to the latest version.
Check Device Firmware Version
To view firmware versions for all HyPanel devices in your home, go to ![]() > About > Check device updates.
> About > Check device updates.
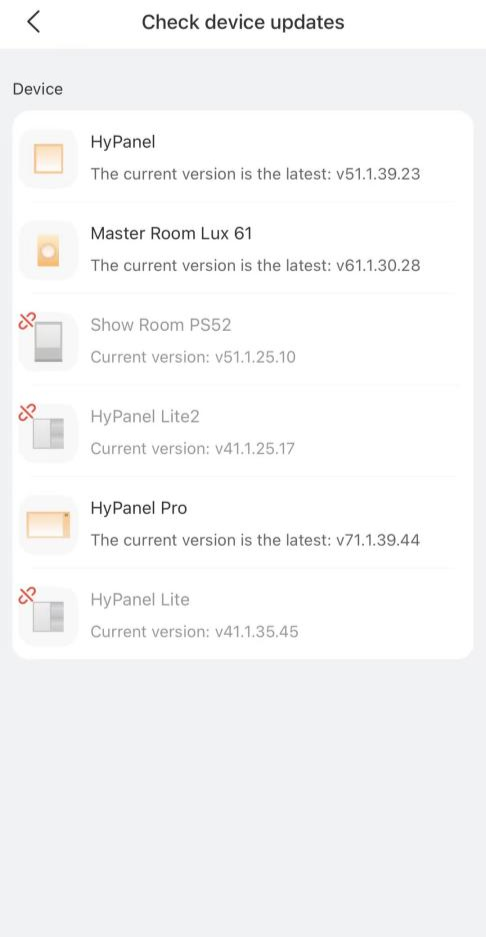
TIP:
You'll receive a notification whenever your service provider upgrades your devices via the cloud.
Change System Units
To adjust the system’s units, unit and color temperature units, go to ![]() > Setting, and select Temperature Unit or Color temperature based on your needs.
> Setting, and select Temperature Unit or Color temperature based on your needs..png)
Privacy Policy
As you use our services, you trust us with your information. We keep working hard to protect your data. The Privacy Policy is meant to help you be clear about what information we collect, why we collect it, and how you can protect your privacy.
For detailed Privacy Policy, go to ![]() > Privacy Policy.
> Privacy Policy.
Get Help
If you need help, go to ![]() > Feedback > User Guide, and do any of the followings:
> Feedback > User Guide, and do any of the followings:
Browse FAQs to find answers to common questions..
Tap Feedback to describe your issue and submit it to our support team.
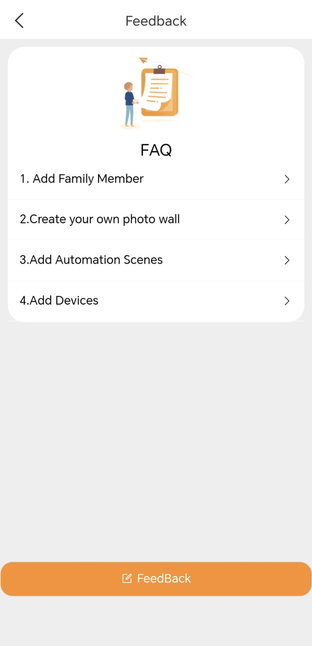
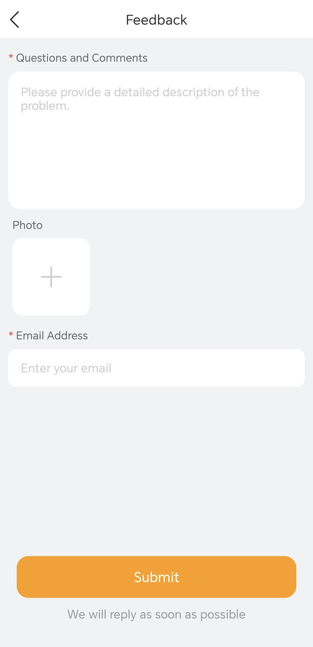
You can also:
Email us at support@akubela.com for assistance.
Visit our Knowledge Base for detailed guides and manuals: https://knowledge.akuvox.com.