SmartPlus Cloud supports deploying Akuvox IP cameras(VC50B and VC50T) to extend the monitoring coverage of residential projects. By adding cameras to public areas, building entrances, or apartments, installers can provide additional monitoring views beyond traditional intercom devices, such as entrances, lobbies, parking areas, corridors, or other important locations.
This guide explains how to add and configure IPCs on SmartPlus Cloud, including enabling video storage, configuring end-user access permissions, linking IPC devices with intercom devices, and setting up detection events.
Before You Start
Permissions by Location Type
Live video access and detection event configuration vary depending on where the camera is installed:
Location | Live Video | Basic Event | Smart Event |
|---|---|---|---|
Public Area / Building | ✔ | ✔ | ✔ |
Apartment | X | ✔ | X |
Single-Family Site | X | ✔ | X |
Model Compatibility
Camera
VC50B/VC50T: 650.30.0.31 or later.
AK-Partner App
1.0.10(iOS) or later.
Door Phone/Access Control Terminal
The following models with specific versions or higher support linking to the camera.
Model | Minimum Version | Model | Minimum Version |
|---|---|---|---|
X915V2 | 2915.30.10.811 | A095 | 95.30.11.104 |
R20V5 | 320.30.12.103 | A01/A02 | 101.30.11.204 |
A03 | 103.30.11.204 | A08 | 108.30.12.6 |
S535 | 535.30.11.32 | A05V2 | 205.30.11.127 |
E16V3 | 416.30.12.104 | X916 | 916.30.10.604 |
R28V2 | 228.30.11.108 | E18 | 18.30.11.202 |
X912 | 912.30.13.3 | R29 | 29.30.10.743 |
S532 | 532.30.10.404 | E16V2 | 216.30.12.103 |
X910 | 2910.30.11.111 | R25 | 25.30.11.3 |
S539 | 539.30.10.710 | S538 | 538.30.10.720 |
A094 | 92.30.11.140 | E12V2 | 312.30.11.112 |
Indoor Monitor
The following models with specific versions or higher support viewing the live video from the camera.
Model | Minimum Version | Model | Minimum Version |
|---|---|---|---|
S567 | 567.30.115.222 | X937 | 937.30.15.213 |
S563 | 563.30.15.217 | R49 | 49.30.10.97 |
S562 | 562.30.16.158 | S565 | 565.30.15.532 |
C313V3 | 313.30.16.216 |
System Requirements for Live Video and Playback
It is recommended to use the latest stable version of your OS or browser. Playback quality may also be affected by device performance, system decoding capability, and network conditions.
Feature | Minimum Version | Recommended Version |
|---|---|---|
Live Video | Android 10+, iOS 13+, Chrome/Edge 94+, Firefox 130+, Safari 16.4+ | Android 13+, iOS 17+, Chrome/Edge 130+, Firefox 137+, Safari 17+ |
Playback | Android 10+, iOS 16.4+, Chrome/Edge 94+, Firefox 130+, Safari 16.4+ | Android 13+, iOS 17+, Chrome/Edge 130+, Firefox 137+, Safari 17+ |
Part 1: Add the Camera via the Cloud Portal
Log in to the cloud portal with your installer account.
Navigate to the desired project type: Community or Single-Family Site.
For Community
Click
 of the target project.
 Select where the camera is installed.
The public area of the whole community — Select Public Area under the community structure, then Cameras.
A specific building entrance — Select a building, then Cameras.
An apartment gate — Click
 of the target apartment. Scroll down to the Camera(s) section.
Click New. Take adding to the Public Area as an example.
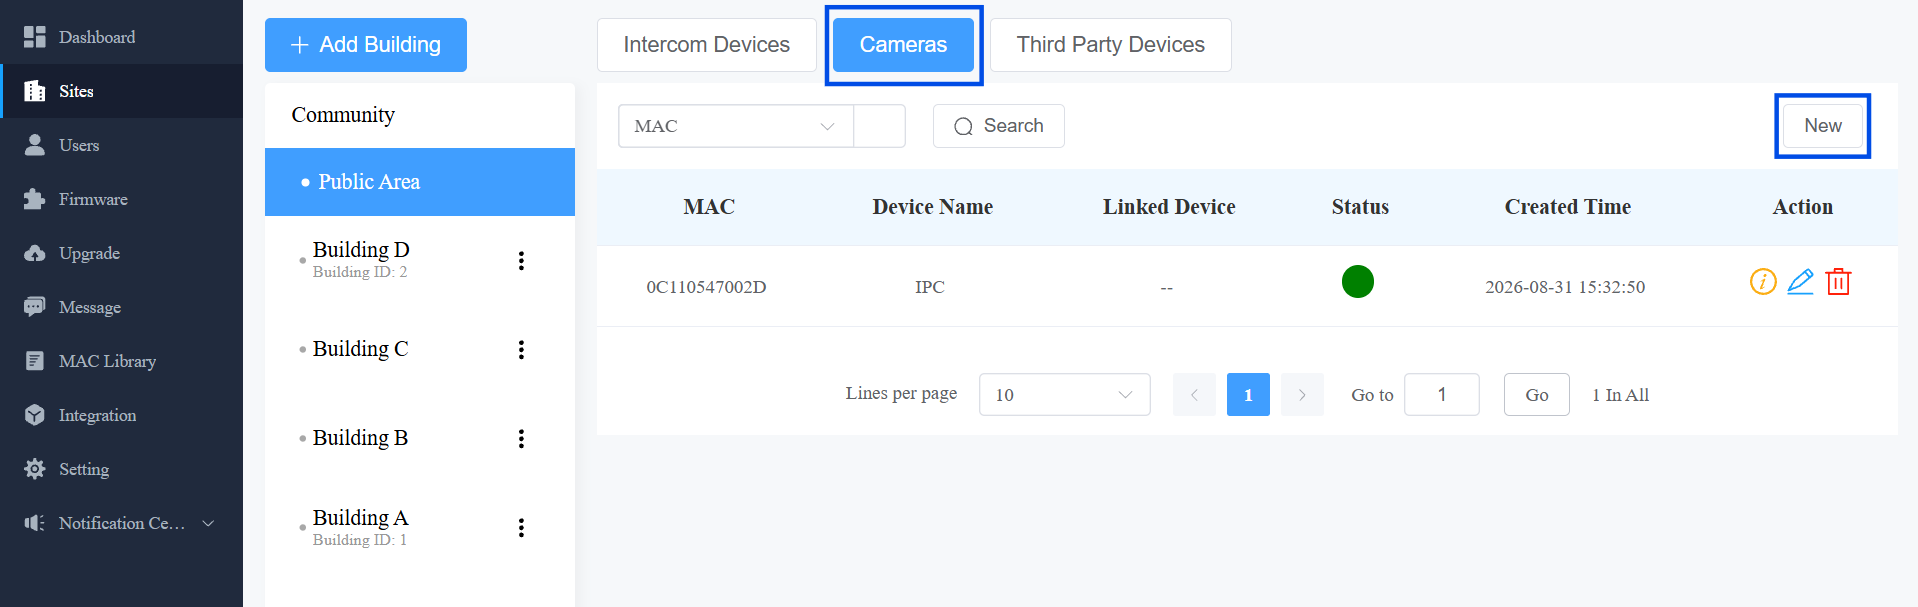
For Single-Family Site
Click
 of the target site.
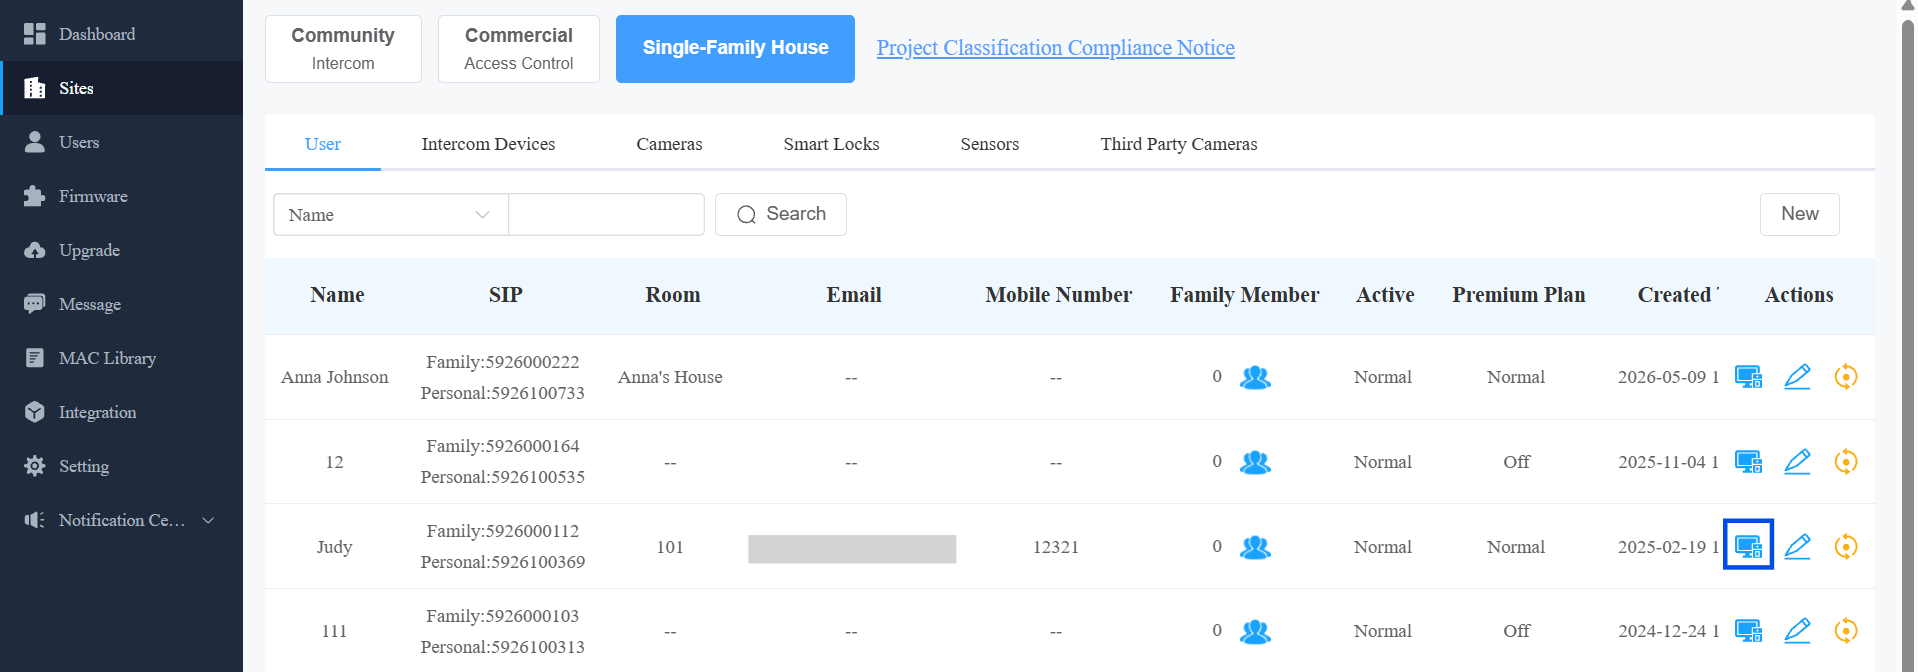
Click Camera(s) > New.
Configure the Camera Settings
Enter the camera’s MAC and name.
Select the Network Group. For most single-network deployments, use the default network group.
Enable the Video Storage feature to store recorded videos. Without it being enabled, videos will not be recorded.
Click
 to open the feature setting.
See the Video Recording and Storage guide for storage plans and playback details.
Set Allow end user to call this device. Enabled by default.
This option is only available when the camera is added to the Public Area or a building.
Not shown for apartment or single-family cameras. They can be called by residents by default.
Set Allow end user to monitor this device. Enabled by default.
This option is only available when the camera is added to the Public Area or a building.
Not shown for apartment or single-family cameras. They can be monitored by residents by default.
When enabled, set the End User Monitoring Terminal: SmartPlus App and/or Indoor Monitor.
Enable Link Device if needed. Then specify which device is linked to the camera. This determines how the camera's video is viewed in the app — for both end users and PMs using the SmartPlus App.
If not linked, the camera icon will display on the SmartPlus App’s homepage for monitoring.
If linked, the icon will be hidden. Tap Monitor of the linked device and switch to the camera’s video stream.
Note
Specific models and versions support linking to the camera. See Model Compatibility.
One device can only be linked to one camera.
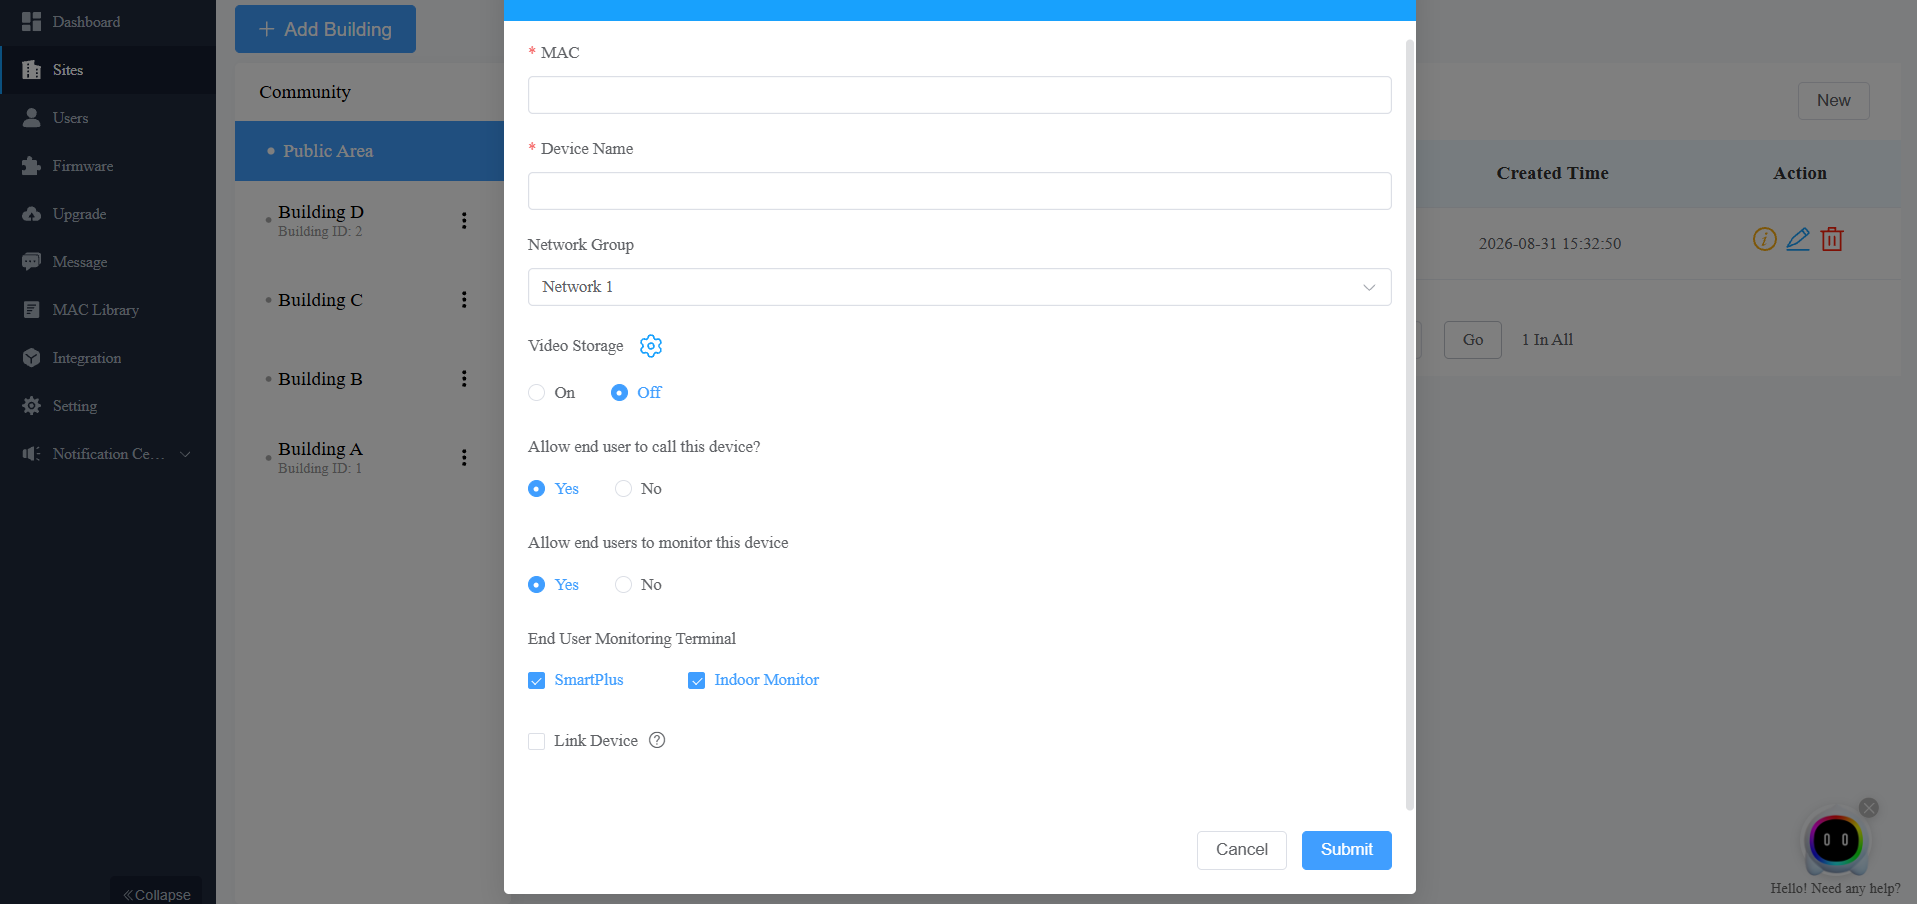
Click Submit.
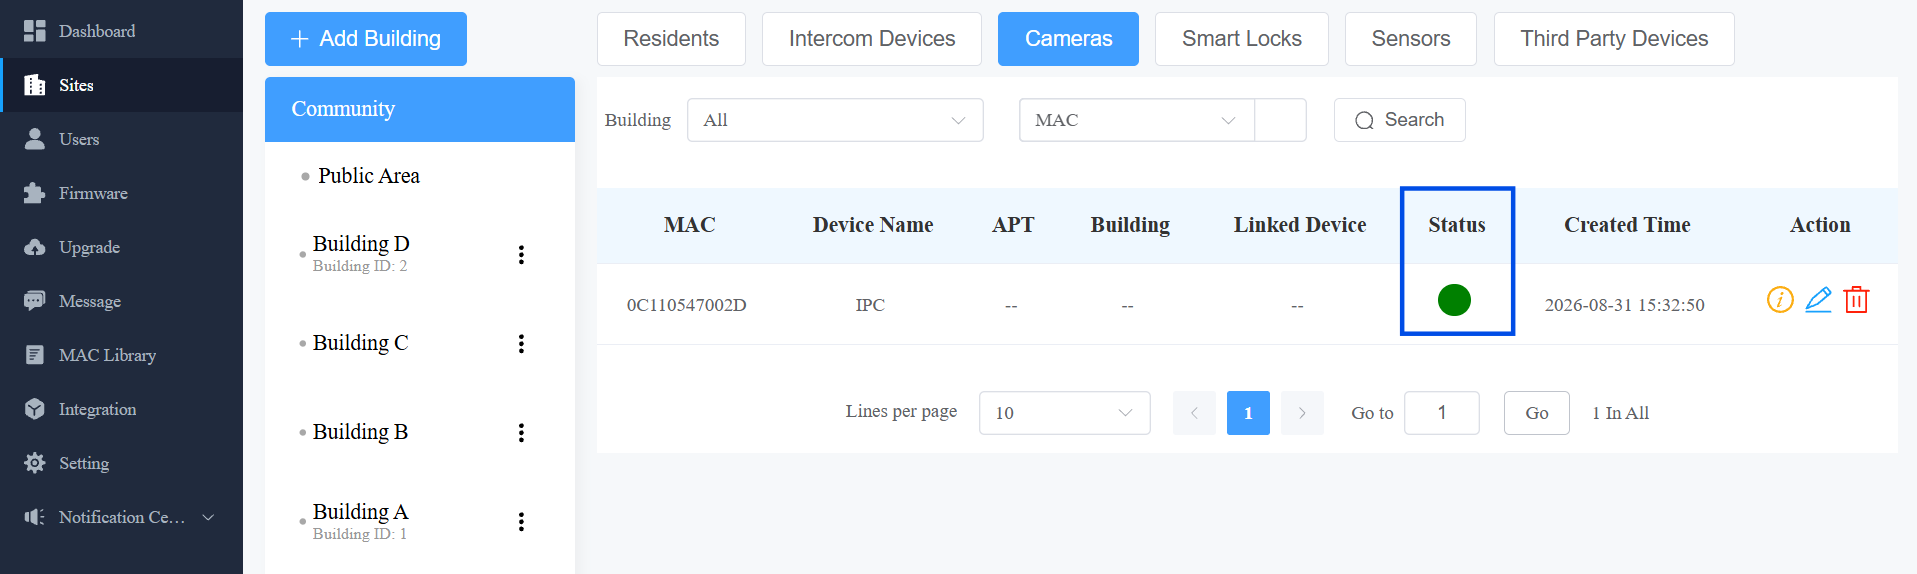
Once the connection is established, the Status indicator will turn green.
Part 2: Add the Camera via the AK-Partner App
Select the desired project type: Community or Single-Family Site.
For Community
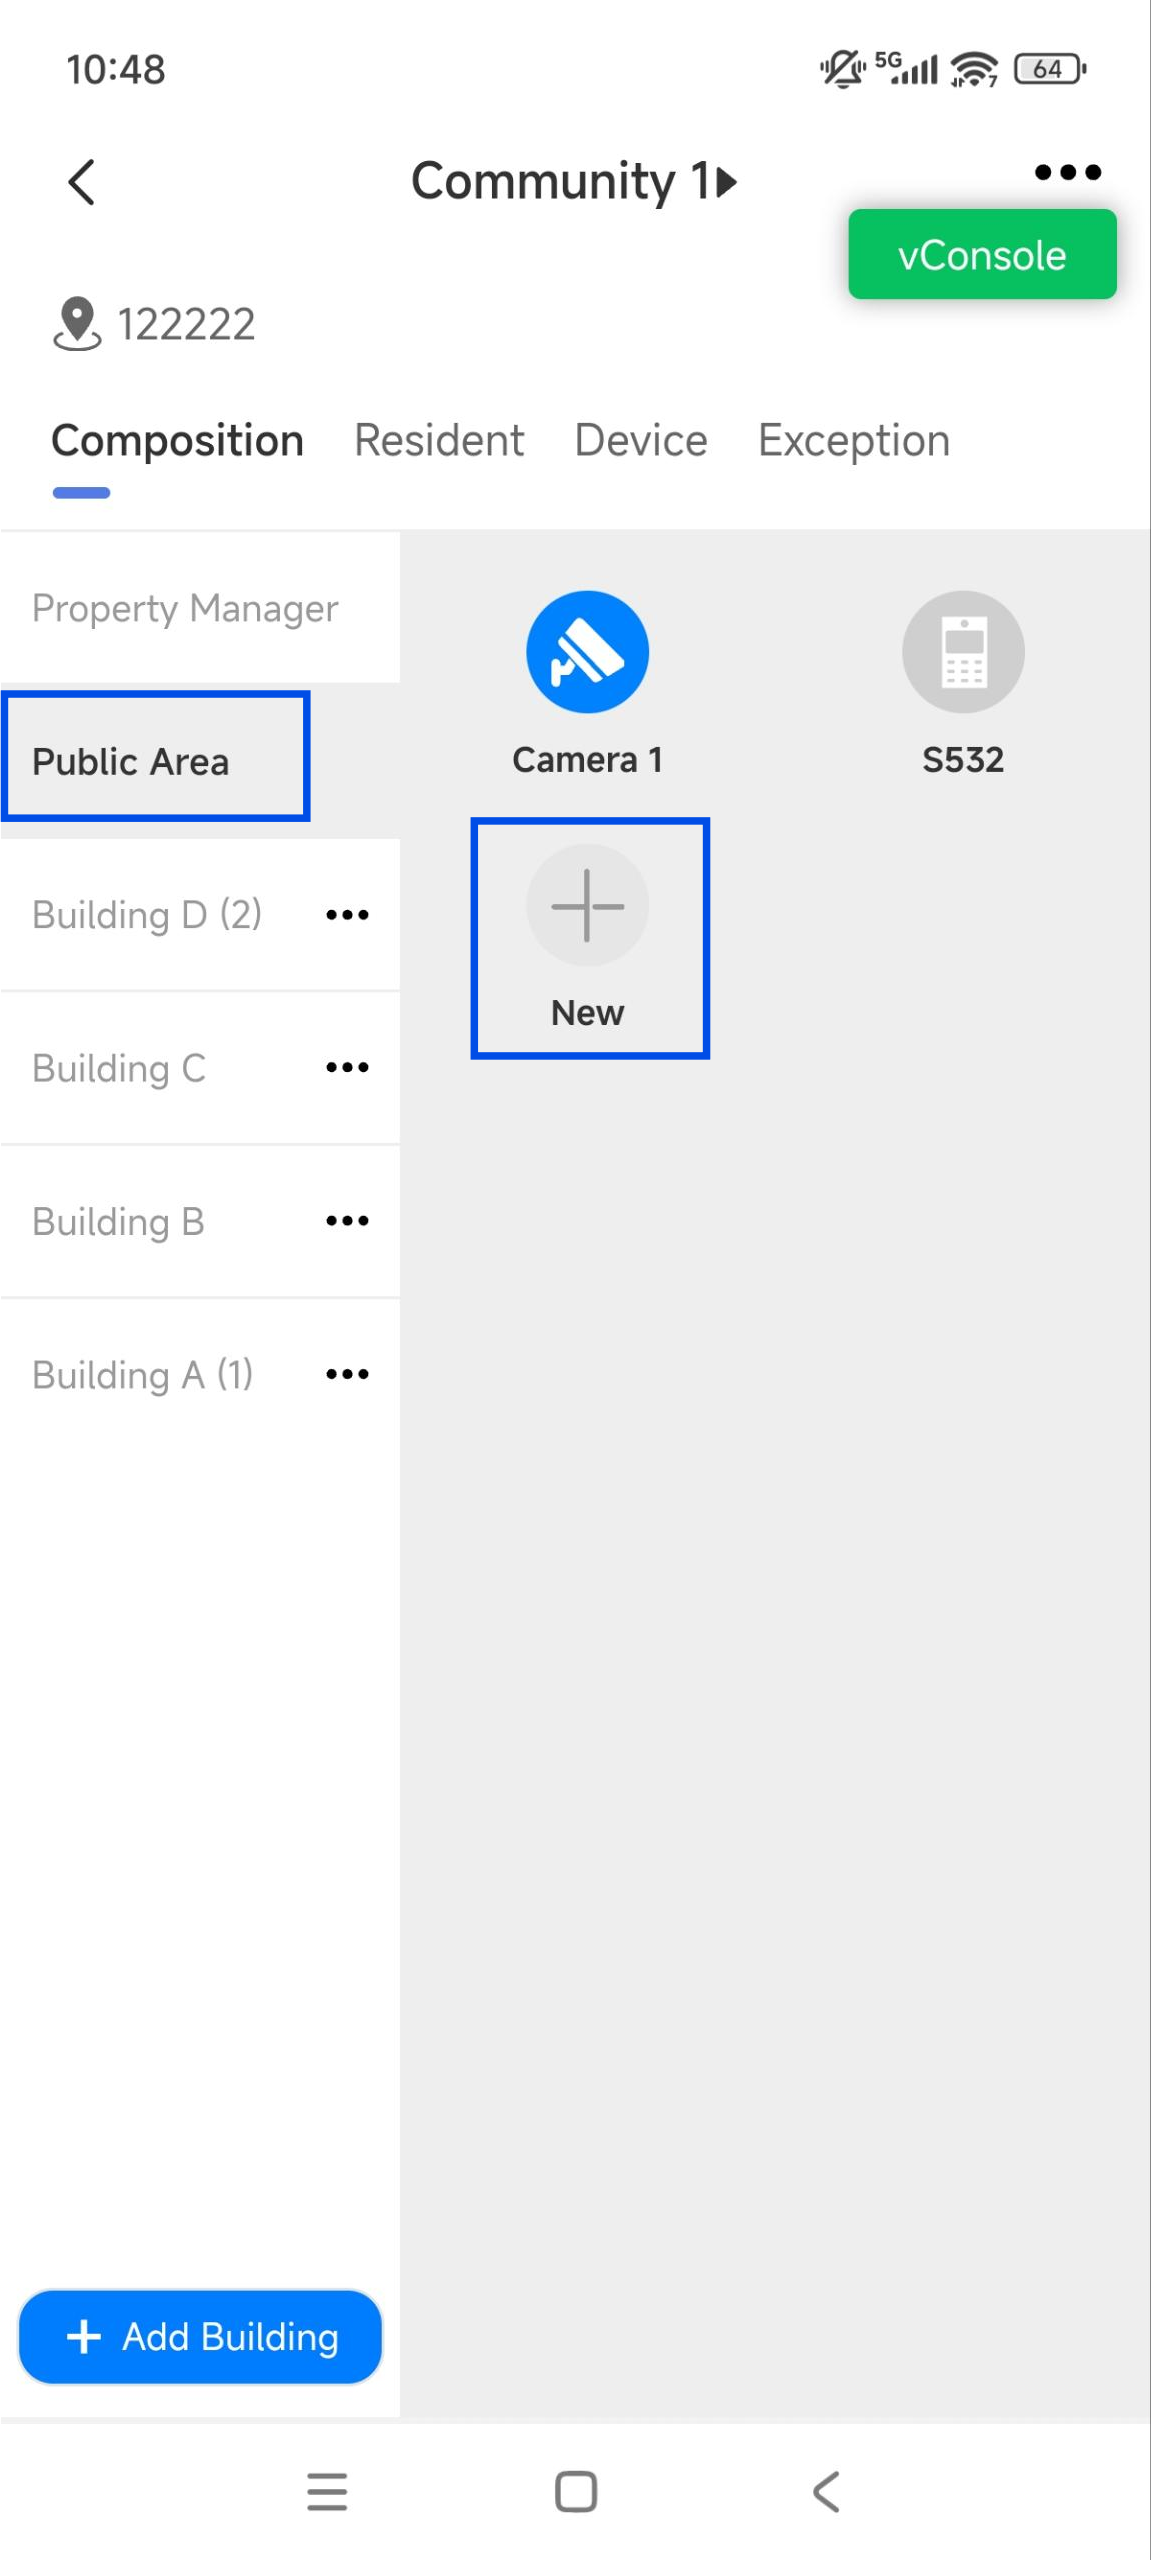
Select the desired project on the homepage.
Select the location where the camera is installed.
The public area of the whole community — Select the Public Area.
A specific building entrance — Select a building.
An apartment gate — Tap the apartment name. Then select Devices.
Tap New. Take adding to the Public Area as an example.
For Single-Family Site
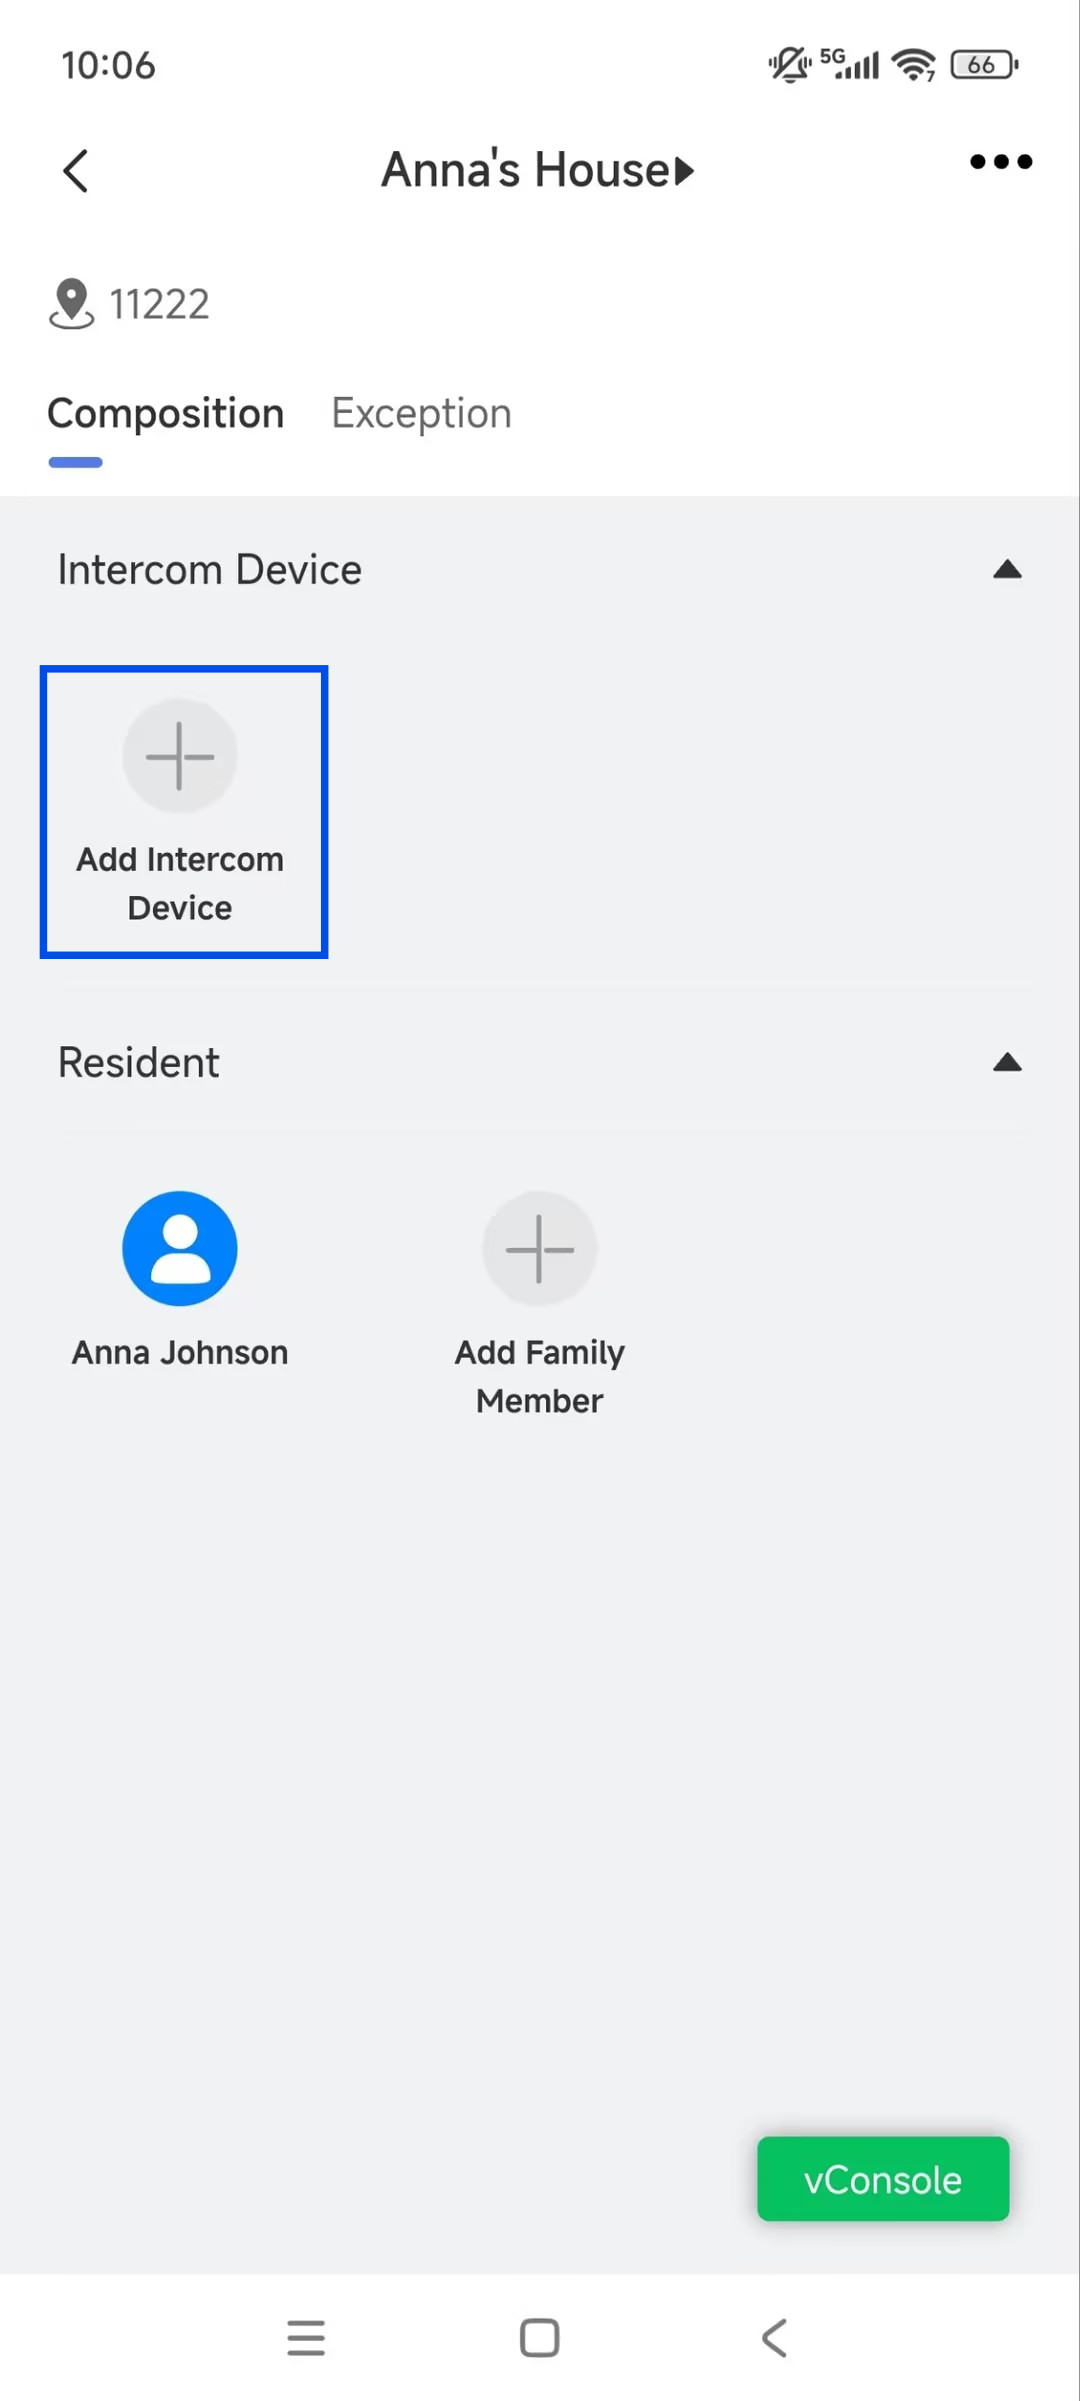
Select the desired project on the homepage.
Tap Add Intercom Device.
Configure the Camera Settings
Set the Device Type to Camera.
Enter the camera’s MAC and name.
Select the Network Group. For most single-network deployments, use the default network group.
Enable Link Device if needed. Then specify which device is linked to the camera. This determines how the camera's video is viewed in the app — for both end users and PMs using the SmartPlus App.
If not linked, the camera icon will display on the SmartPlus App’s homepage for monitoring.
If linked, the icon will be hidden. Tap Monitor of the linked device and switch to the camera’s video stream.
Note
Specific models and versions support linking to the camera. See Model Compatibility.
One device can only be linked to one camera.
.jpg)
Click Submit.
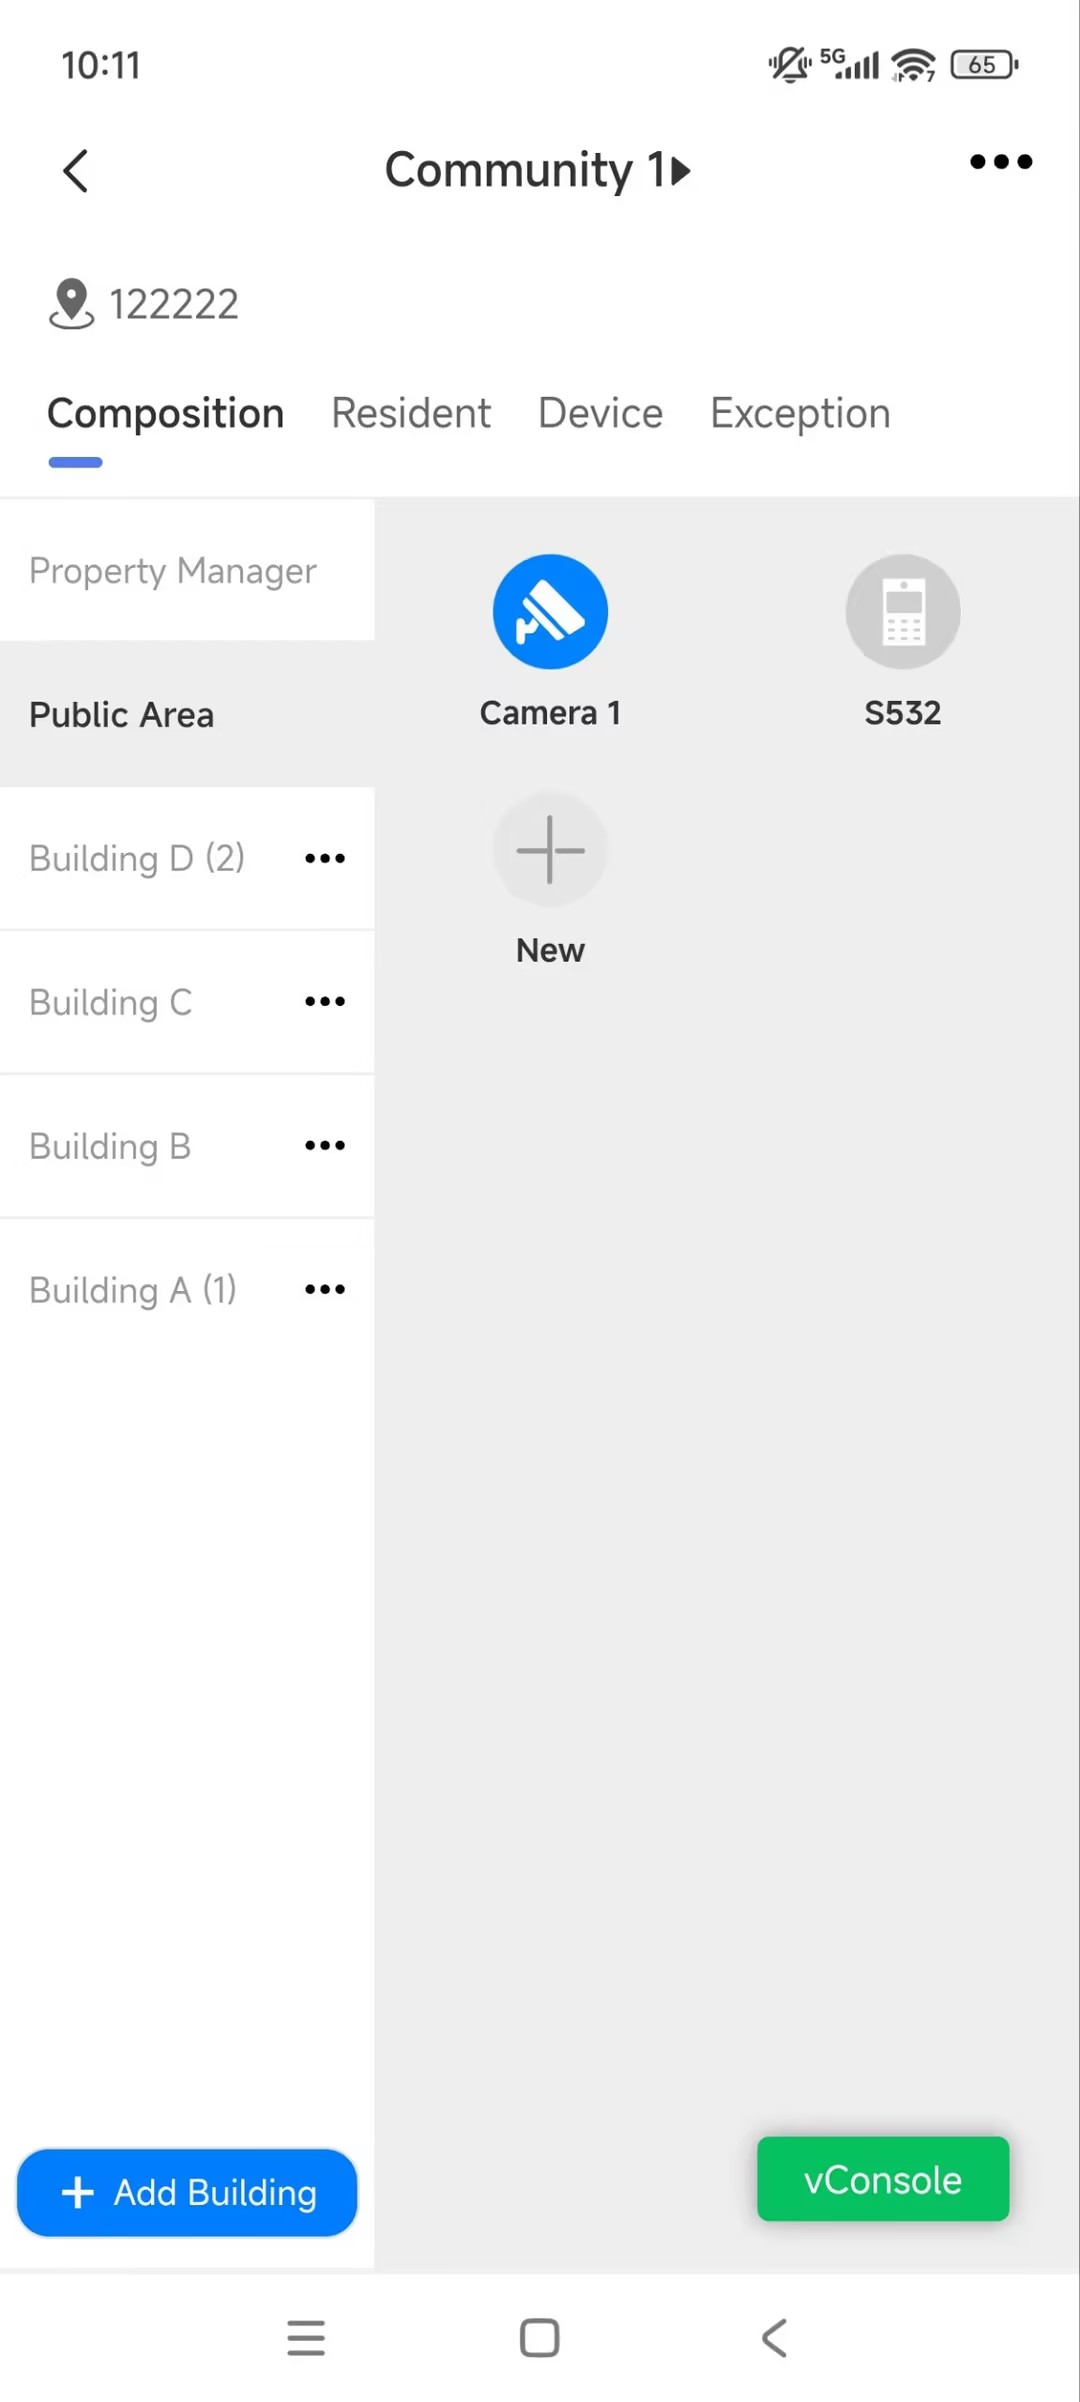
Once the connection is established, the camera will appear online.
Part 3: View the Camera’s Live Video
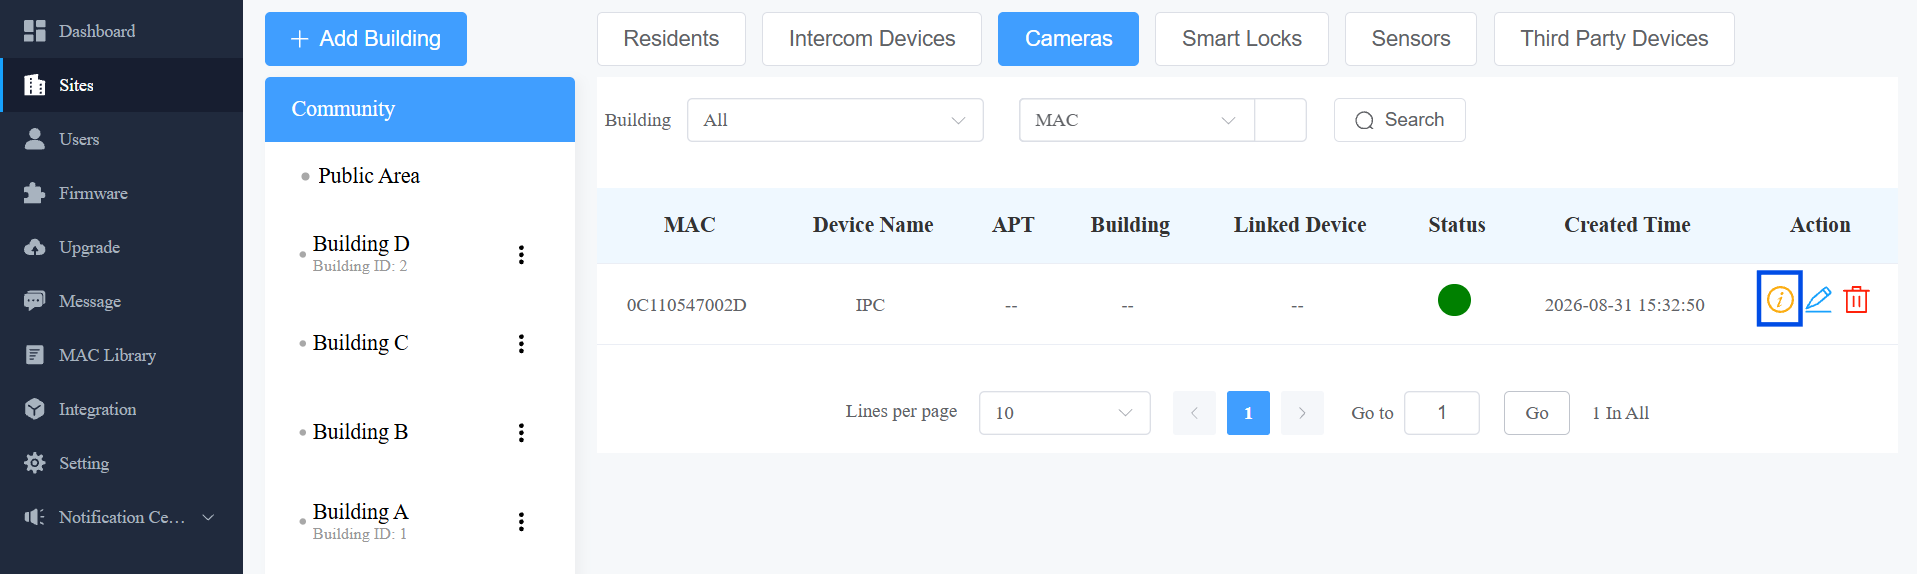
You can ONLY view live video of cameras added to the public areas of a community project. Live video viewing is not available for apartment cameras or cameras added to a Single-Family Site.
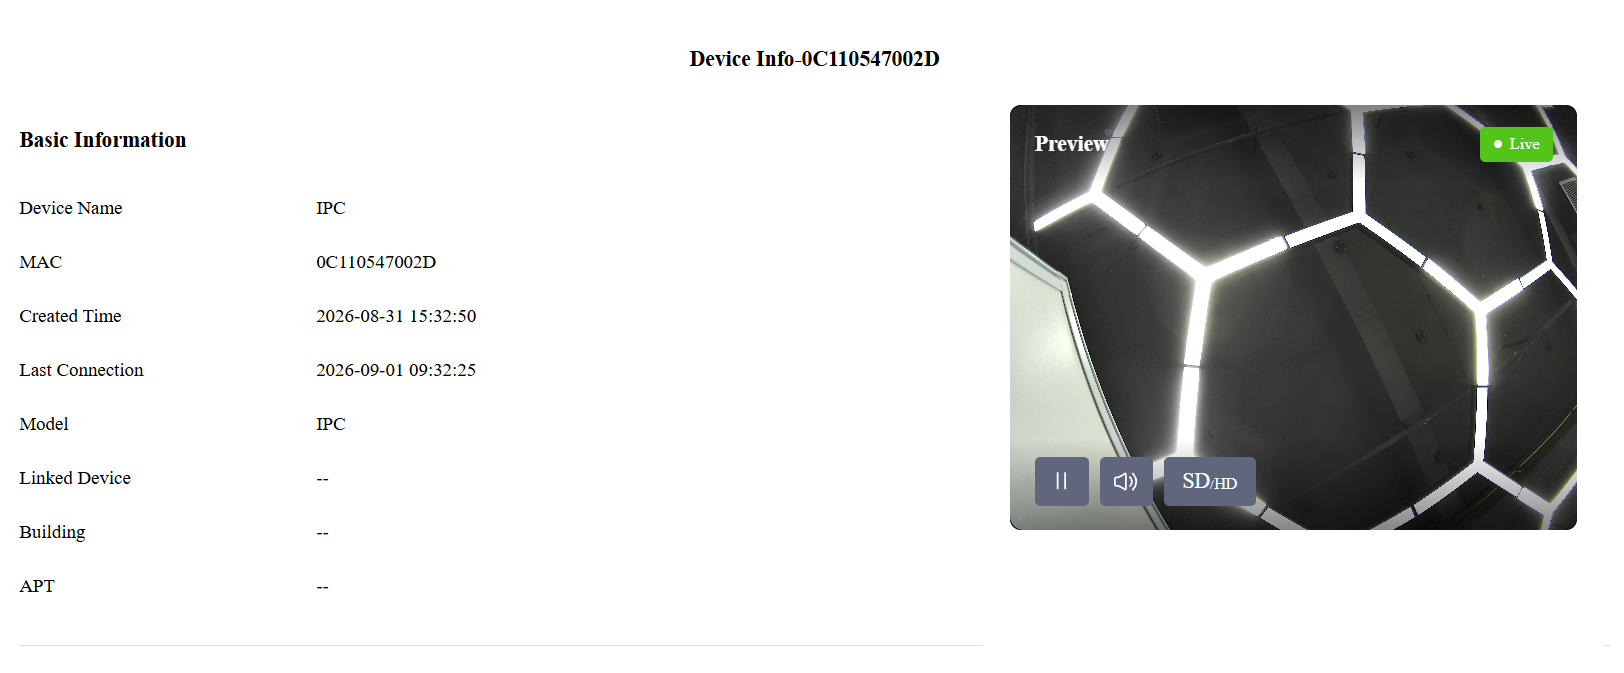
On the Cloud Portal
View the camera’s live video by clicking  .
.
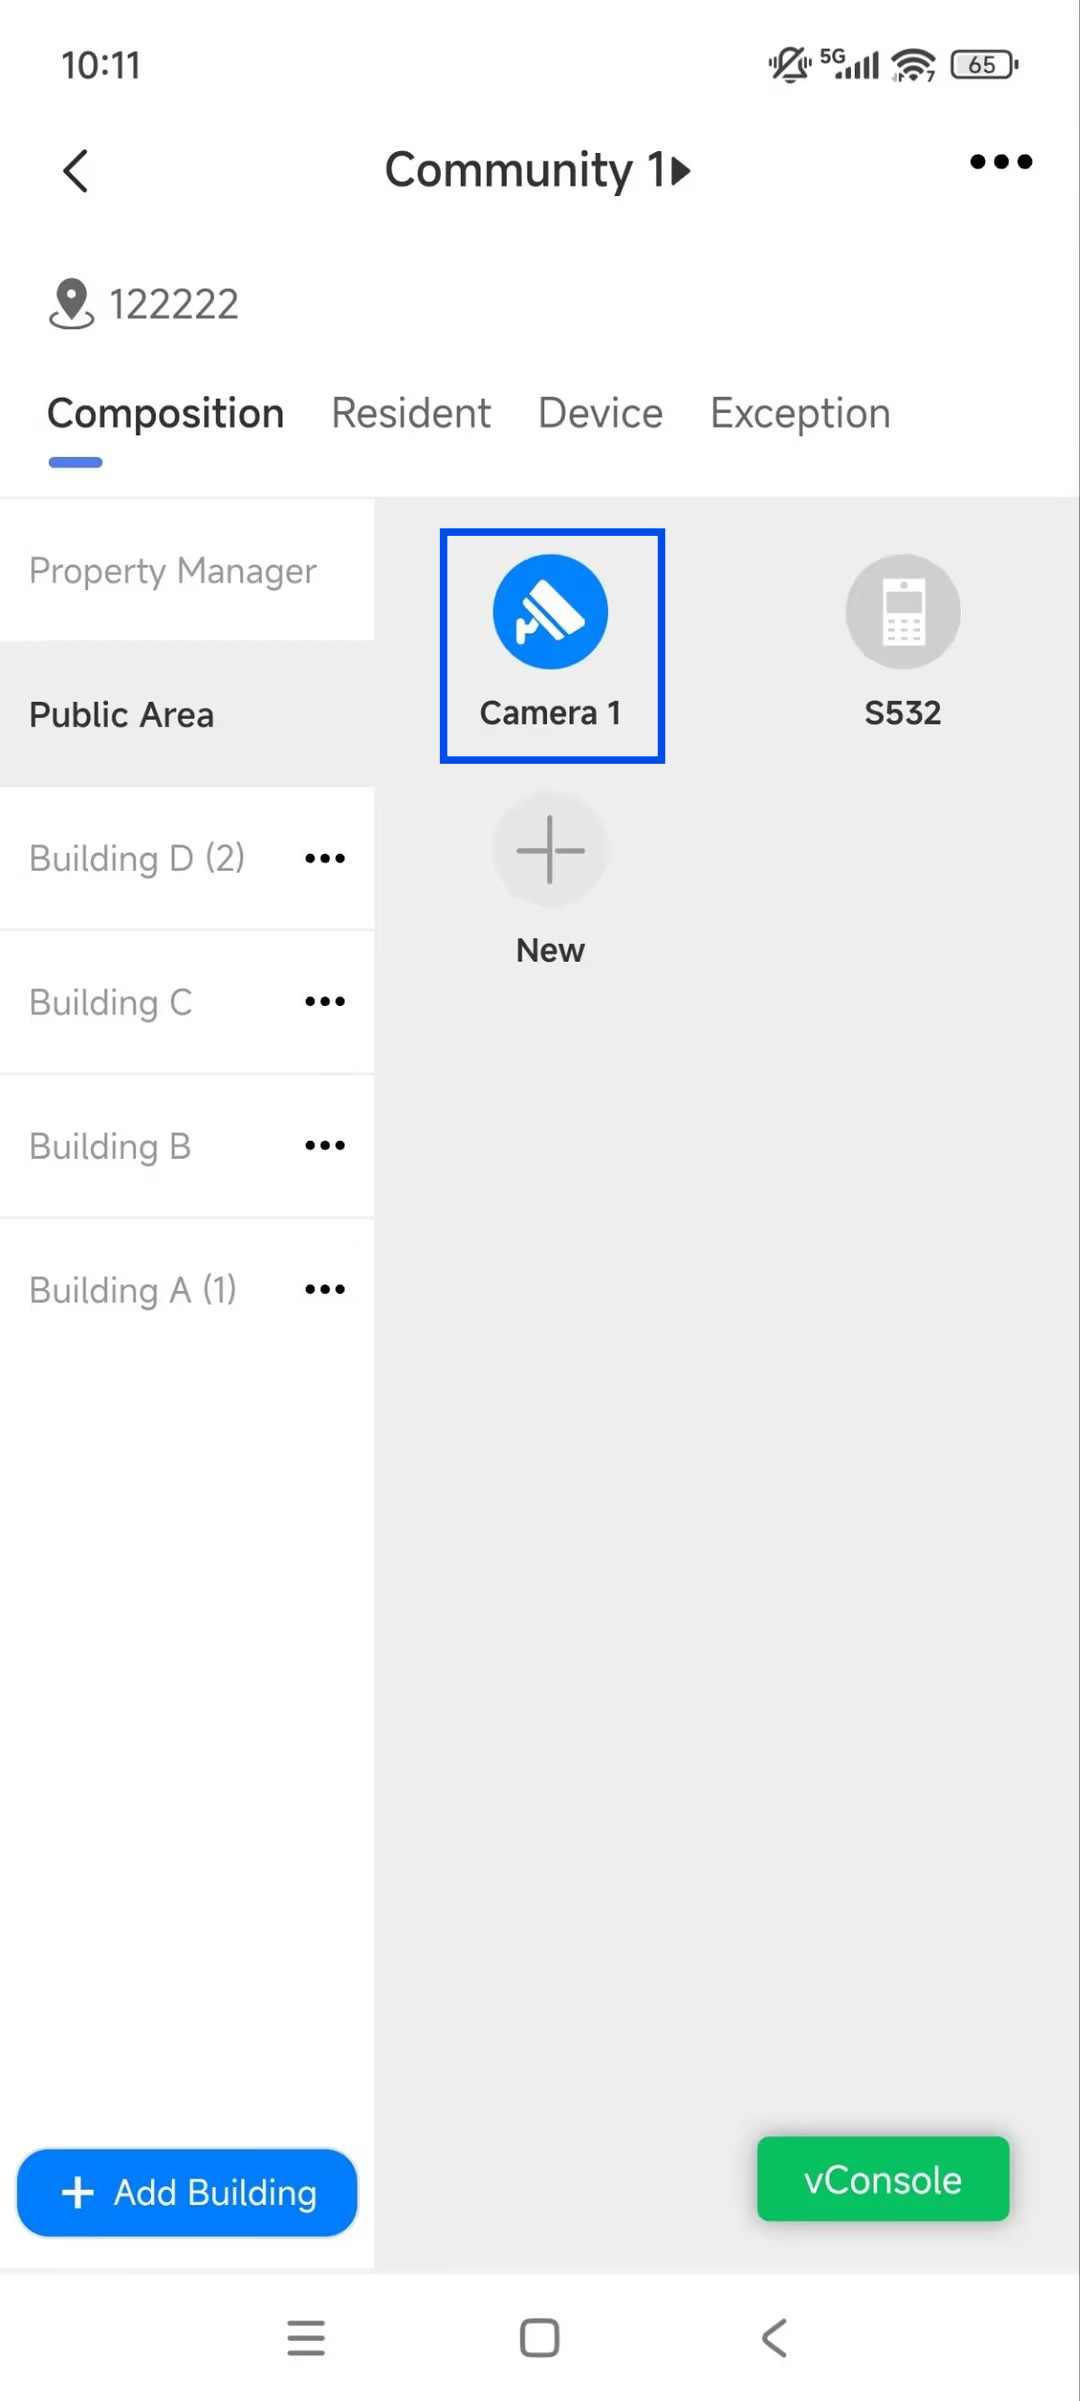
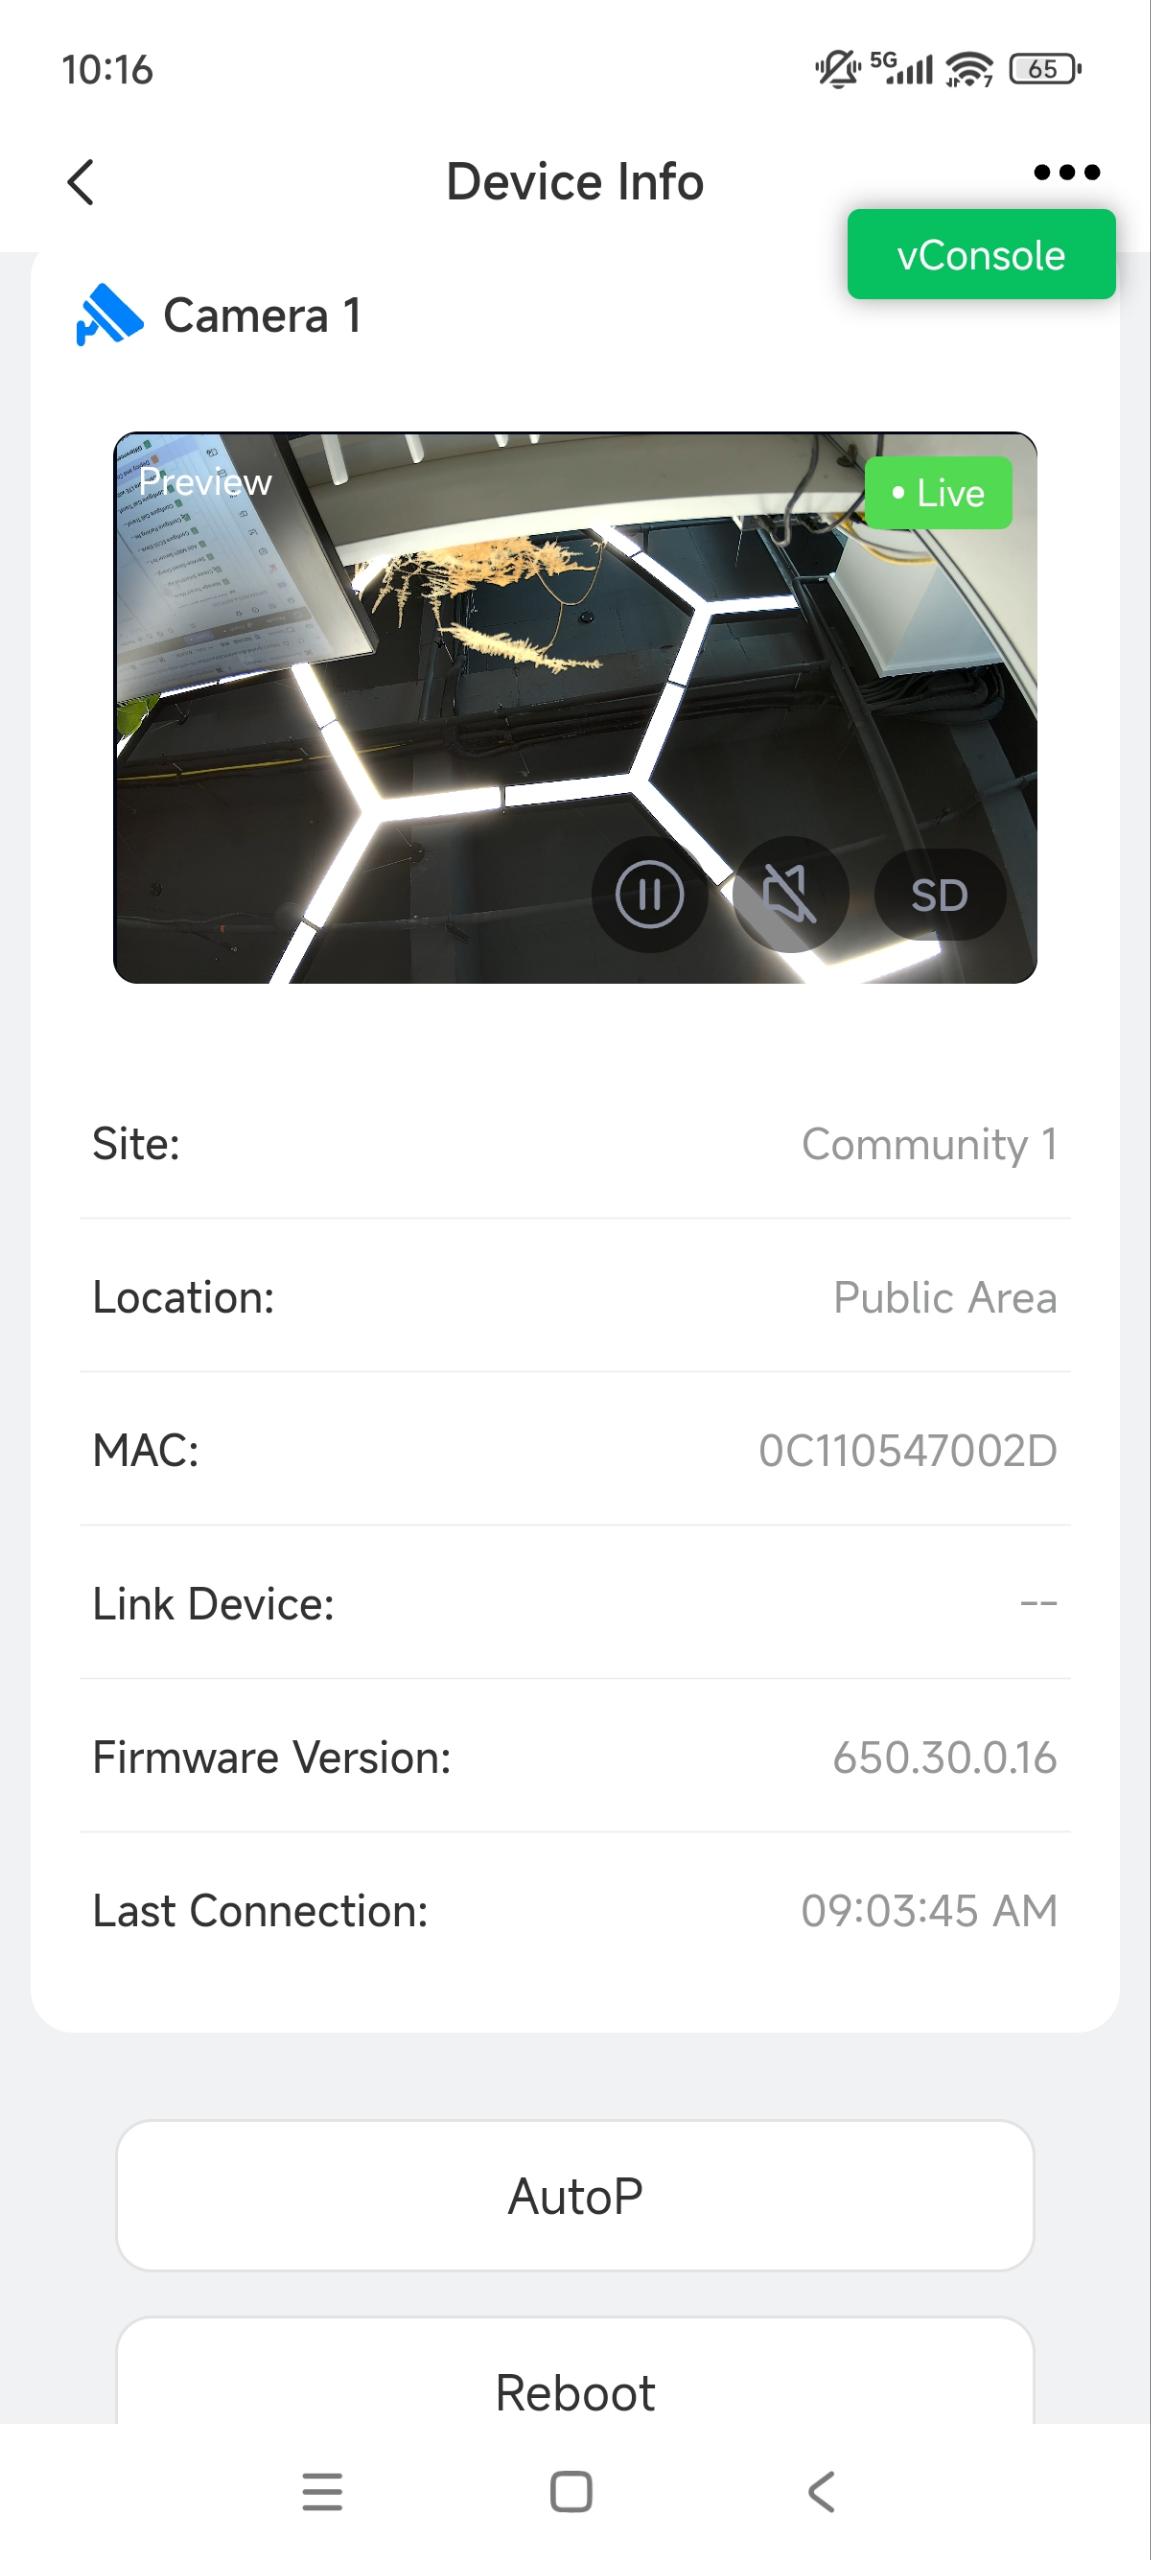
On the AK-Partner App
Note
AK-Partner App’s version should be 1.0.10(iOS) or higher.
View the camera’s live video by tapping the camera icon.
Part 4: Configure Camera Detection Events
The camera supports basic and smart detection events. When an enabled event is triggered, SmartPlus Cloud sends an alarm notification to the property manager(PM) cloud platform and to the PM SmartPlus App.
Note
Smart Event configuration is not available for apartment cameras or cameras added to a Single-Family Site.
On SmartPlus Cloud, detection events only generate an alarm notification. Currently, the cloud does not support configuring additional linked actions for these events.
Part 4-1: Configure Basic Events
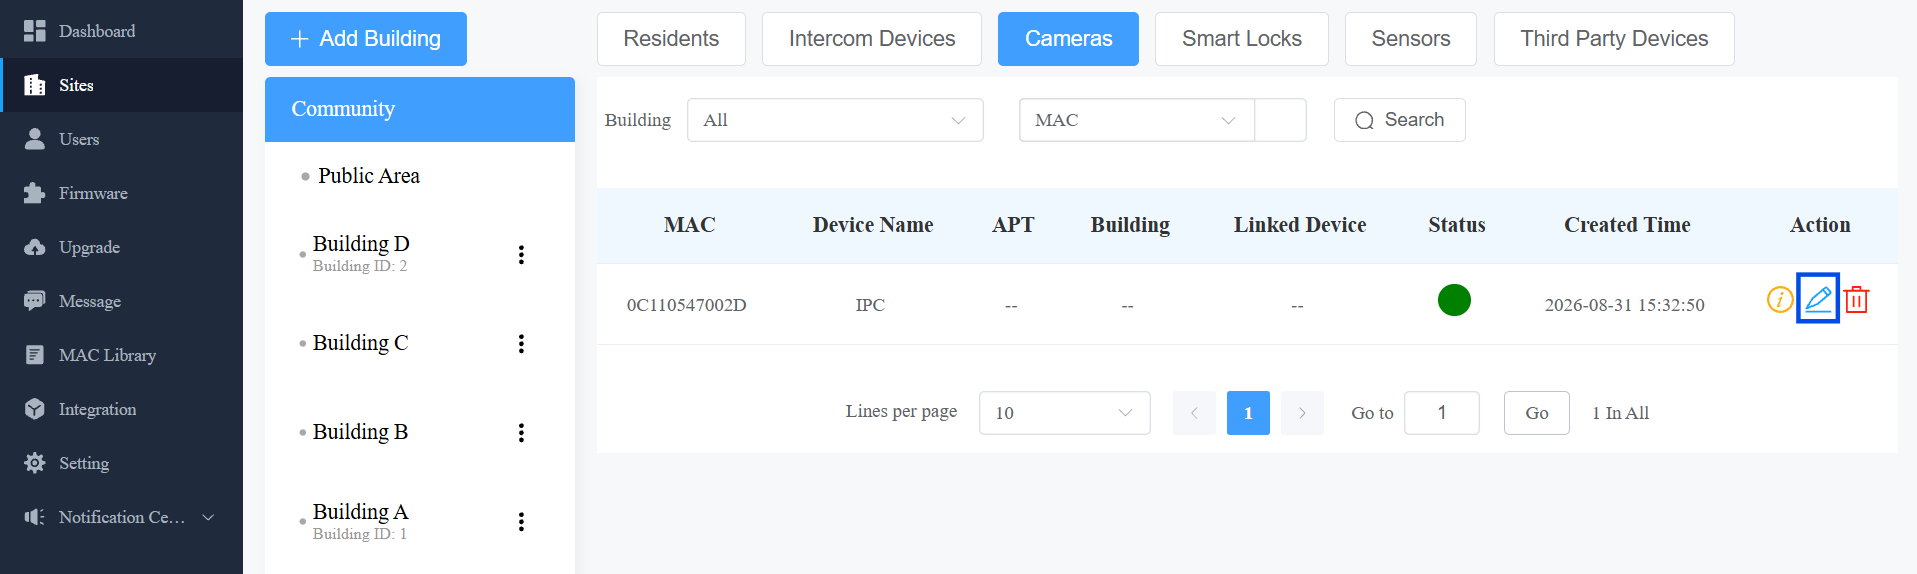
Click
 of the camera.
Select Basic Event.
Enable and configure the desired event. See the chart below.
Configure the detection schedule when the detection is activated, whichever detection event is enabled.
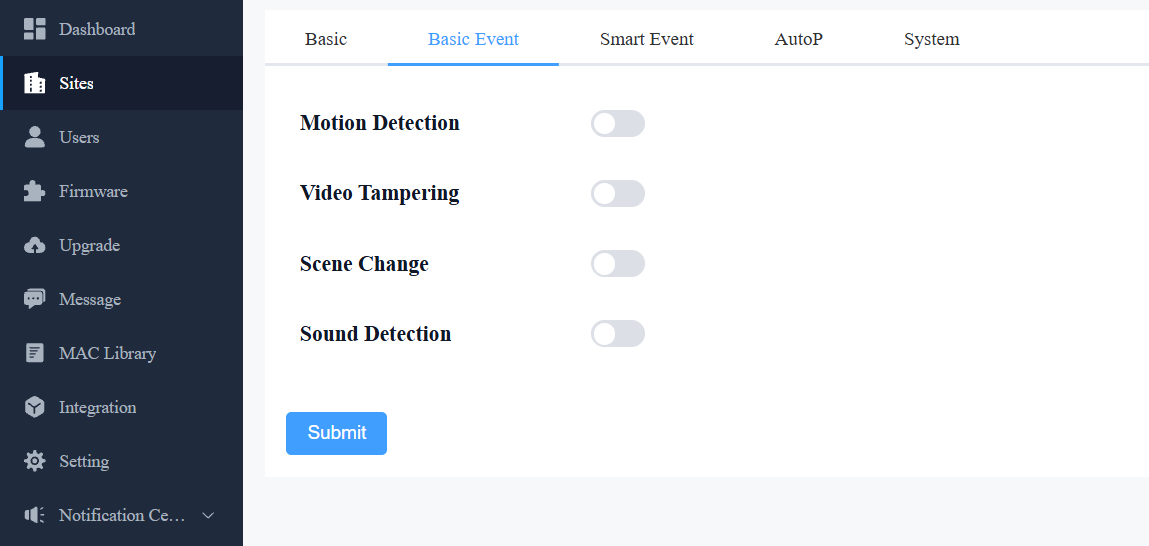
Basic Event
Event | What It Detects | Configuration |
Motion Detection | General movement in the camera's view. | Click Draw to draw up to 4 detection areas in the video frame. Sensitivity: 0–100 (default 50). Higher values detect smaller or subtler movement. |
Video Tampering | The camera view being blocked, covered, or redirected. | Sensitivity: 1 (Low) – 5 (High), default 3 (Medium). |
Scene Change | A sudden change in the camera's background or field of view (e.g., the camera was moved or knocked out of position). | Sensitivity: 1 (Low) – 5 (High), default 3 (Medium). |
Sound Detection | Abnormal sound levels picked up by the camera. | Detection Type:
For these three types, set Difference: the volume change (in dB) required to trigger an alarm. Range 1–90, default 20.
|
Part 4-2: Configure Smart Events
Smart Events are only supported for cameras added to the public areas of the community project.
Click
of the camera.
Select Smart Event.
Enable and configure the desired event. See the chart below.
Configure the detection schedule when the detection is activated, whichever detection event is enabled.
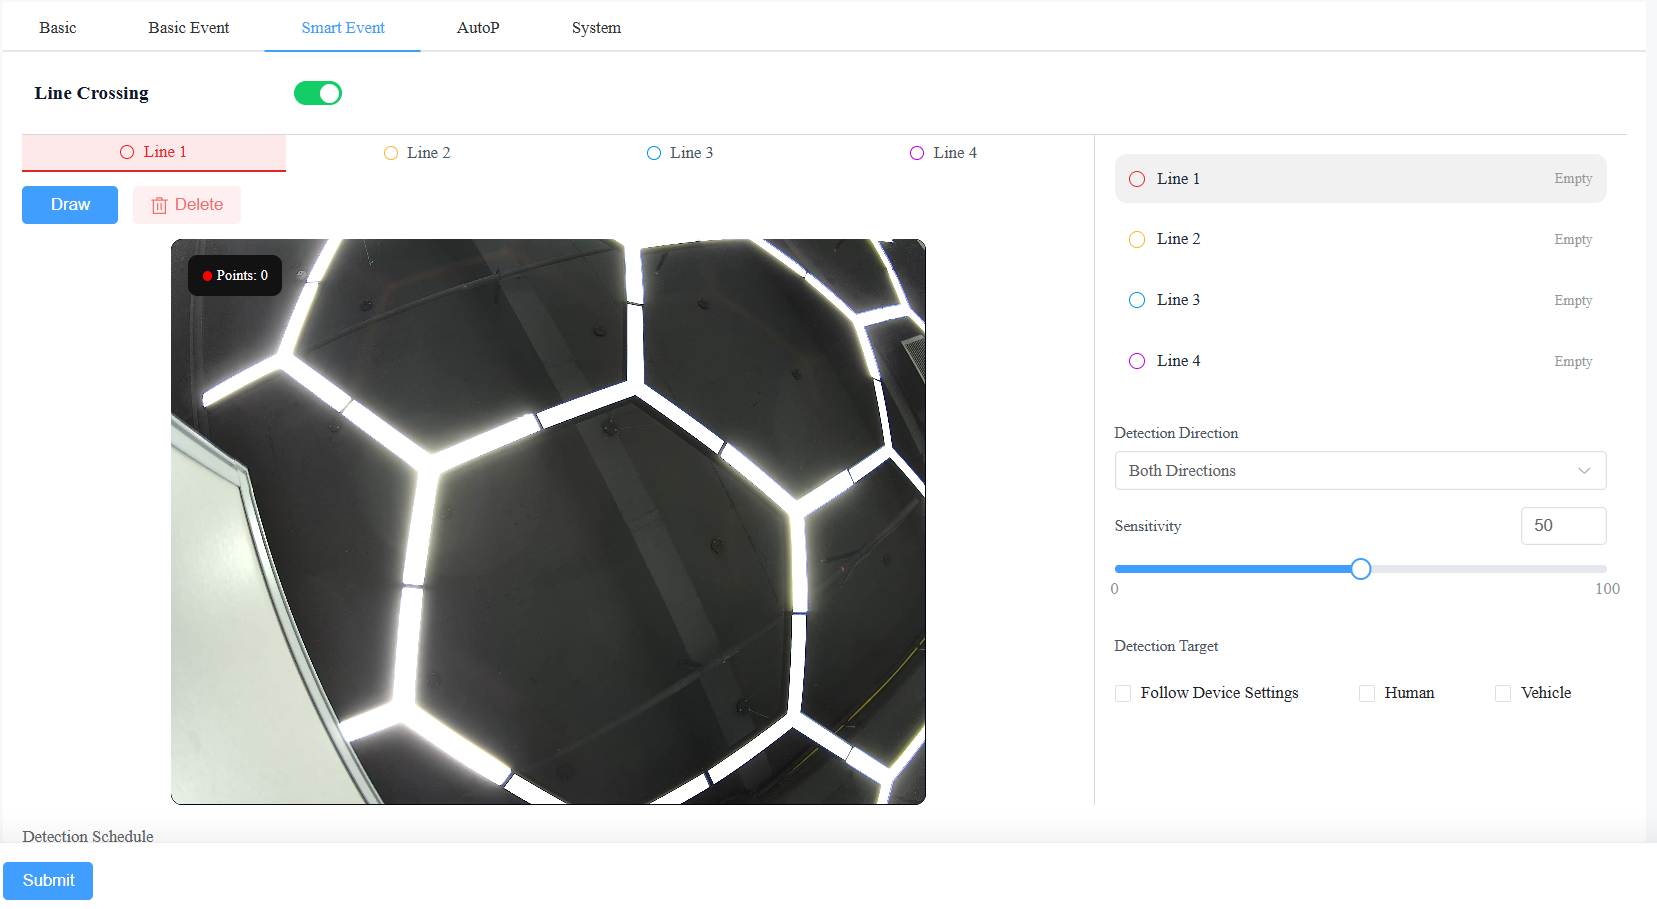
Smart Event
Event | What It Detects | Configuration |
Line Crossing | A person or object crossing a defined virtual line. | Click Draw to draw a line in the video preview.
Detection Direction: The direction of crossing that triggers an alarm. Default: Both.
Sensitivity: 0–100, default 50. Detection Target:
|
Intrusion | A person or object entering a defined restricted zone. | Click Draw to draw a zone in the video preview. Up to four zones can be defined. Sensitivity: 0–100, default 50. Duration Threshold: The minimum duration a target must remain within the detection area before an alarm is triggered. Range: 1–30 s. Default: 5. Detection Target:
|
Troubleshooting
Issue | Possible Cause | Solution |
Camera cannot be linked to a device. | The device model/firmware version doesn't support linking (see Model Compatibility list). | Check the device against the Model Compatibility list before attempting to link; upgrade firmware if applicable. |
Video Storage toggle is enabled but no footage is being recorded/played back. | No storage plan has been purchased or configured for the project. | Confirm a storage plan is active — see the Video Recording and Storage guide. |
"Allow user to call/monitor this device" options don't appear when configuring a camera. | These toggles are only available for cameras added to a Public Area or building — not for apartment or single-family cameras (which are callable/monitorable by residents by default). | No action needed — this is expected behavior for apartment/single-family cameras. |
Sound Detection triggers too frequently or not at all. | Detection Type/Difference (or Threshold) value doesn't match the ambient noise environment. | Adjust the Difference/Threshold value (1–90 dB) based on on-site testing rather than leaving the default 20 dB. |
User expects a linked action (e.g., unlock door, trigger relay) when a detection event fires, but nothing happens beyond the notification. | SmartPlus Cloud only supports alarm notifications for detection events — linked actions are only available on on-premise deployments. | Clarify this limitation with the customer up front; no cloud-side workaround exists currently. |