Akuvox devices support the integration with the KONE lift control panel. Users can use their credentials to unlock the lift button and access the desired floor.
This article guides you to configure the integration step by step between Akuvox door phones and KONE DCS from the Akuvox side.
Topology
If users want to use the SmartPlus Cloud service and the KONE devices at the same time, use a dual-network router to connect the communication systems of Akuvox and KONE devices.
.png)
What You Should Know
Concepts Learning
These concepts will be mentioned in the following configurations.
Conventional Collective Control System: Passengers select their destination floors on the control panel inside the lift car.
Car Operating Panel(COP): The panel located inside the lift car that passengers use during their ride.
Traditional DCS: “The destination operating panels are on all floors, and there are no buttons on the car operating panel.”
Destination Operating Panel(DOP): The panel located outside the lift car that allows passengers to select their desired destination floor.
Hybrid DCS: “The destination operating panels are located only on the main floors, while other floors have conventional landing signalization. Cars have a conventional operating panel.”
Click here to learn more about KONE DCS.
Model and Firmware
In the integration, an S538, X915V2, X916, or R29 must be used as the central machine, and it can work as the access control device as well. This article takes X915V2 as an example.
Other device models(basically all door phones and access control terminals), such as E16, can also be used as the access control device.
Note
X915V2’s firmware version should be 2915.30.10.427 or higher.
X916’s firmware version should be 916.30.10.330 or higher.
R29’s firmware version should be 29.30.10.425 or higher.
S538’s firmware version should be 538.30.10.705 or higher.
One access control device can only unlock one control panel.
The lift control panel supports integration, as long as it supports the GCAC protocol used for efficient communication and control within lift systems.
Click here to learn more about KONE lift control system.
Before You Start
Please confirm which lift control panel type is used in your project: DOP, COP, or a mixed type.
Ensure the KONE company provides you with the following information:
For the DOP used project: DOP ID and DOP Floor ID.
For the COP used project: COP Elevator ID and COP Group ID.
Traditional DCS Integration
This part illustrates device configurations in two scenarios.
Scenario 1: One X915V2 works as the central machine, and another as the access control device.
Scenario 2: The X915V2 works as the central machine, and other models work as the access control device.
Scenario 1: Set Central Machine
Set Lift Control
Use the device IP to log in to its web interface. The initial username and password are admin.
Go to the Device > Lift Control interface.
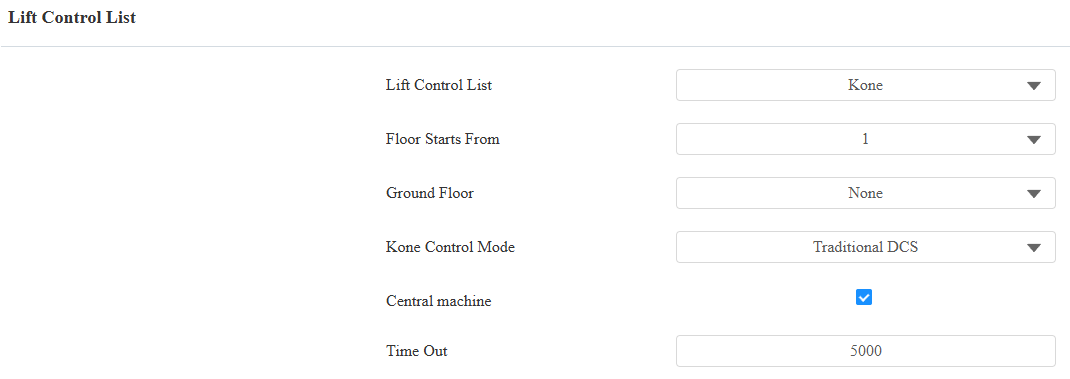
Select Kone as the lift control brand and select Traditional DCS as the control mode.
Set the start floor and ground floor.
Check the Central machine box.
Set the timeout(5000~15000ms). It is 5000ms by default, defining the time for users to press the lift button.
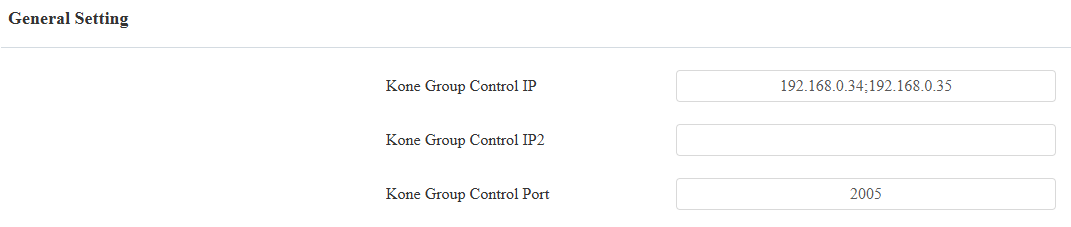
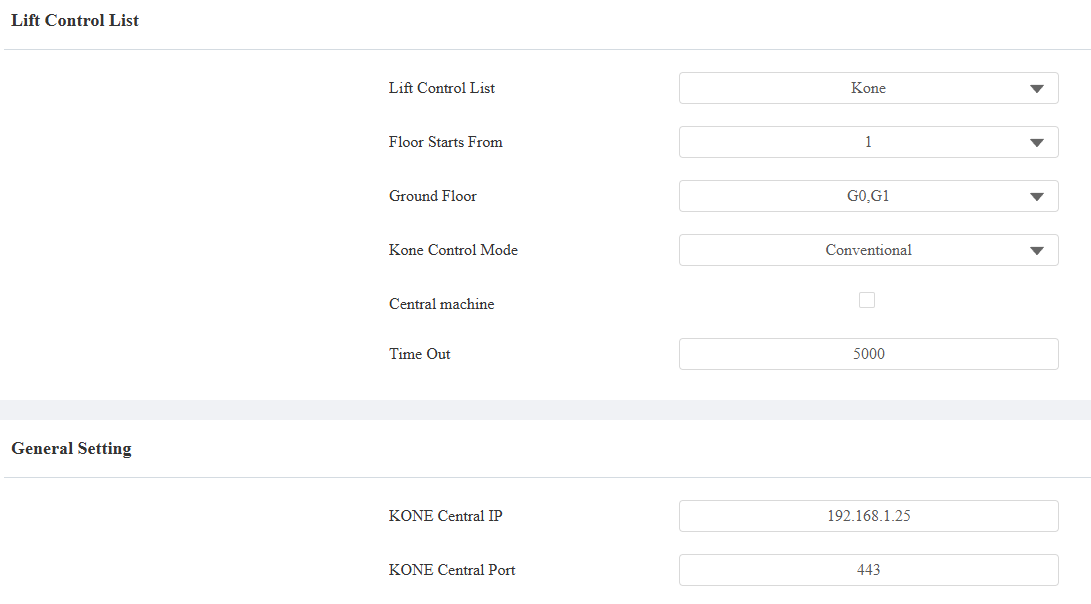
Fill in the KONE control panel’s IP address and port. You can enter three IPs for each group, separated by “;”.
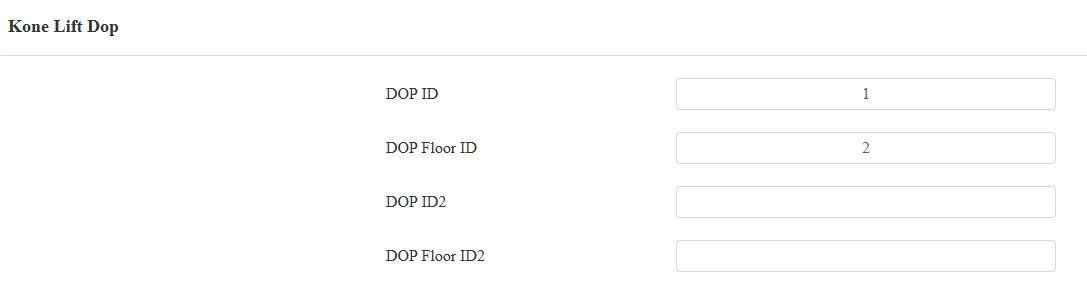
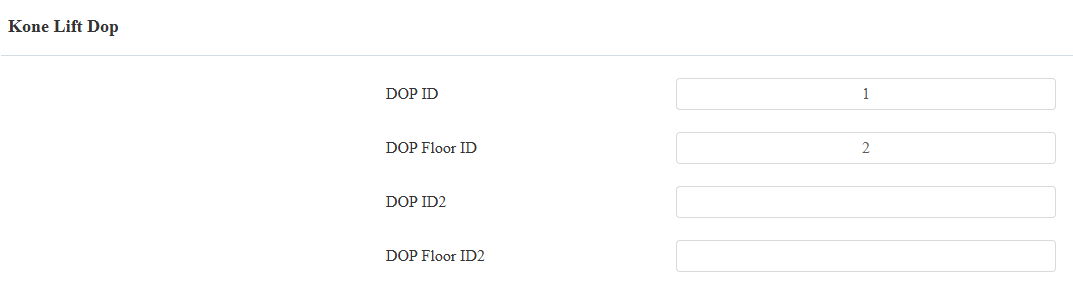
Fill in the DOP ID and Floor ID provided by KONE.
Select KONE Mask Type and click Import to upload the file. G1/G2 represents Group1/2.
DOP Default Online Mask for G1/G2: Set the default access permission of all DOPs when the central machine is connected to the lift control system.
DOP Default Offline Mask for G1/G2: Set the default access permission of all DOPs when the central machine is disconnected from the lift control system.
DOP Specific Online Mask for G1/G2: Set the default access permission of specific DOPs when the central machine is connected to the lift control system.
DOP Specific Offline Mask for G1/G2: Set the default access permission of specific DOPs when the central machine is disconnected from the lift control system.
Note
To obtain the configuration file, please contact the Akuvox tech team.

The connection status will update after a few seconds in the KONE Lift Status section.

Set HTTP API
Go to the Setting > HTTP API interface.
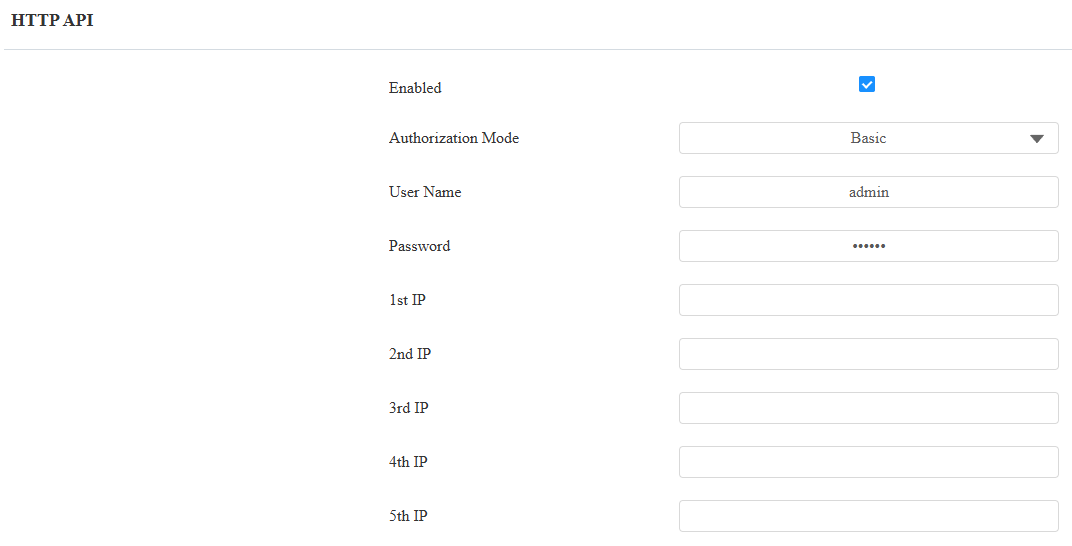
Enable the HTTP API feature and choose the desired authorization mode from None, Basic, and Digest.
Customize the username and password for authentication.
Scenario 1: Set Access Control Device(X915V2)
Set Lift Control
Go to the Device > Lift Control interface.
Select Kone as the lift control brand and select Traditional DCS as the control mode.
Set the start floor and ground floor. Do not check the central machine box.
Enter the IP and port of another X915V2 that is used as the central device.

Enter the username and password of the HTTP API authentication set in the central machine.
Assign Credentials to Users
Go to the Directory > User interface.
Click Add or
 to set up access methods for a new or an existing user.
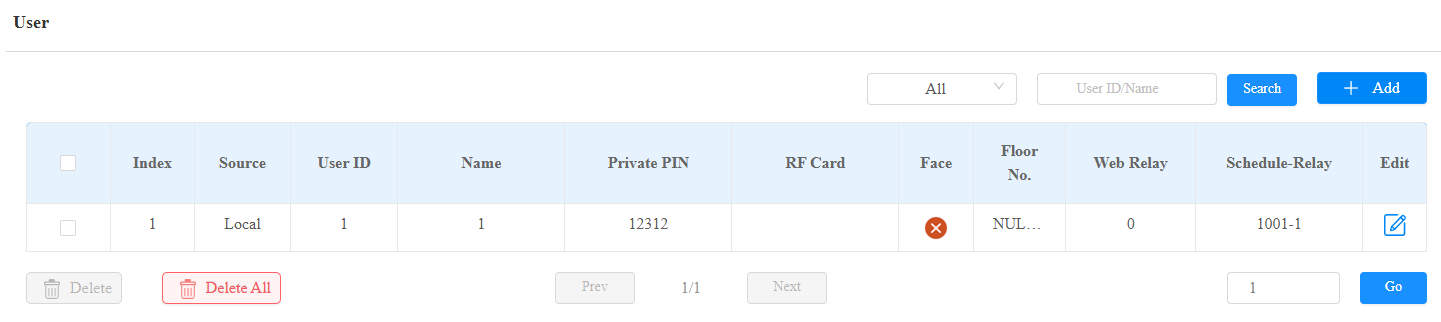
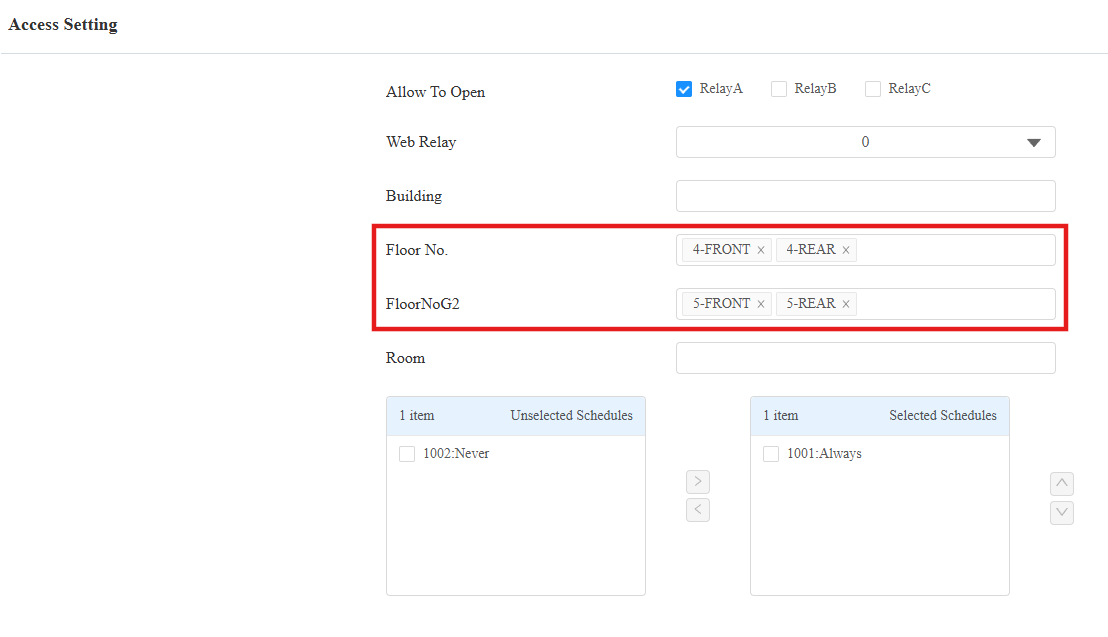
Scroll to the Access Setting part and choose the floor(s) of lift control group 1 and/or 2 accessible to the user.
After the configuration, users can use their credentials to unlock the DOP. The lift control button for the corresponding floor will be released. The user can press it to go to the desired floor.
Scenario 2: Set the Central Machine
After setting the central machine’s lift control and HTTP API features, you also need to turn off the device’s HTTP redirect if the access control device does not support sending the command in HTTPS format.
Go to X915V2’s Network > Advanced interface. Find the Web Server section.
Disable HTTP Redirect.

Scenario 2: Set Access Control Device
Take E16V2 with the version 216.30.10.134 as an example.
Set Lift Control
Go to the Device > Lift Control interface.
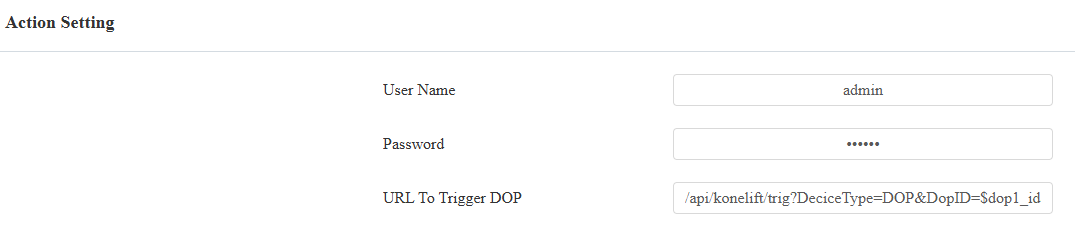
Select Akuvox in the Lift Control List.
Enter the IP address and port of the central machine. The default port is 443.

Enter the username and password of HTTP API authentication.
Enter the URL in the format:
For the first lift control group: /api/konelift/trig?DeciceType=DOP&DopID=$dop_id&DopFloorID=dop_floorid&Timeout=$timeout&LiftFloorNum=$floor
For the second lift control group: /api/konelift/trig?DeciceType=DOP&DopID2=$dop_id&DopFloorID2=dop_floorid&Timeout=$timeout&LiftFloorNum2=$floor
Field | Description |
|---|---|
DopID | Same as the DOP ID entered on the central machine’s web. |
DopFloorID | Same as the DOP Floor ID entered on the central machine’s web. |
Timeout | Same as the timeout value on the central machine’s web. |
LiftFloorNum | Accessible floors. |
For example, the URL can be:
/api/konelift/trig?DeciceType=DOP&DopID=1&DopFloorID=2&Timeout=5000&LiftFloorNum2=$floor
Note
The device will automatically retrieve the floors accessible to the user from the user settings, and you can use “$floor” in the URL instead of filling in the actual floors.
It will release the DOP with ID=1 and floor ID=2. Users can press the lift button within 5000ms.
Assign Credentials to Users
Go to the Directory > User interface.
Click Add or
to set up access methods for a new or an existing user.
Scroll to the Access Setting part and choose the floor(s) of lift control group 1 and/or 2 accessible to the user.
After the configuration, when the user uses the credential to unlock the DOP, the lift control button for their accessible floor(s) will be released. The user can press it to go to the desired floor.
Conventional Integration
This part illustrates device configurations in two scenarios.
Scenario 1: One X915V2 works as the central machine, and another as the access control device.
Scenario 2: The X915V2 works as the central machine, and other models work as the access control device.
Scenario 1: Set Central Machine
Set Lift Control
Use the device IP to log in to its web interface. The initial username and password are admin.
Go to the Device > Lift Control interface.
Select Kone as the lift control brand and select Conventional as the control mode.
Set the start floor and ground floor.
Check the Central machine box.
Set the timeout(5000~15000ms). It is 5000ms by default. It defines the time for users to press the lift button.
Fill in the Kone control panel’s IP address and port. You can enter three IPs for each group, separated by “;”.
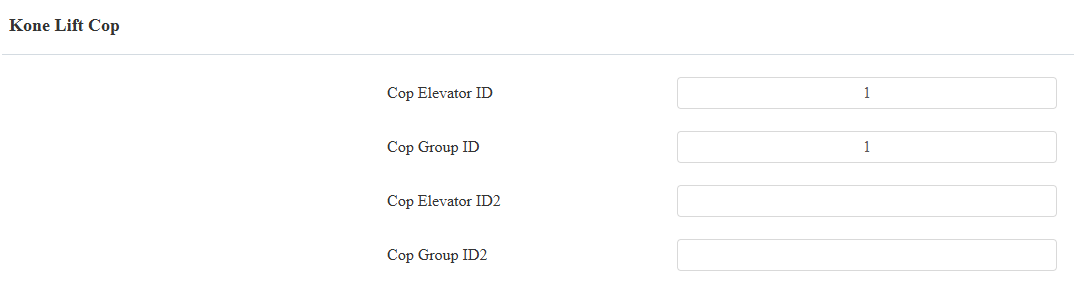
Fill in the COP Elevator ID and COP Group ID provided by the KONE company.
Select KONE Mask Type and click Import to upload the file. G1/G2 represents Group1/2.
COP Default Online Mask for G1/G2: Set the default access permission of all COPs when the central machine is connected to the lift control system.
COP Default Offline Mask for G1/G2: Set the default access permission of all COPs when the central machine is disconnected from the lift control system.
COP Specific Online Mask for G1/G2: Set the default access permission of specific COPs when the central machine is connected to the lift control system.
COP Specific Offline Mask for G1/G2: Set the default access permission of specific COPs when the central machine is disconnected from the lift control system.
Note
To obtain the configuration file, please contact the Akuvox tech team.
The connection status will update after a few seconds in the KONE Lift Status section.
Set HTTP API
Go to the Setting > HTTP API interface.
Enable the HTTP API feature and choose the desired authorization mode from None, Basic, and Digest.
Customize the username and password for authentication.
Scenario 1: Set Access Control Device(X915V2)
Set Lift Control
Go to the Device > Lift Control interface.
Select Kone as the lift control brand and select Traditional DCS as the control mode.
Set the start floor and ground floor. Do not check the central machine box.
Enter the IP and port of another X915V2 that is used as the central device.
Enter the username and password of the HTTP API authentication.
Assign Credentials to Users
Go to the Directory > User interface.
Click Add or
to set up access methods for a new or an existing user.
Scroll to the Access Setting part and choose the floor(s) of lift control group 1 and/or 2 accessible to the user.
After the configuration, users can use their credentials to unlock the COP. The lift control button for the corresponding floor will be released. The user can press it to go to the desired floor.
Scenario 2: Set Central Machine
After setting the central machine’s lift control and HTTP API features, you also need to turn off the device’s HTTP redirect if the access control device does not support sending the command in HTTPS format.
Go to X915V2’s Network > Advanced interface. Find the Web Server section.
Disable HTTP Redirect.
Scenario 2: Set Access Control Device
Take E16V2 with the version 216.30.10.134 as an example.
Set Lift Control
Go to the Device > Lift Control interface.
Select Akuvox in the Lift Control List.
Enter the IP address and port of the central machine. The default port is 443.
Enter the username and password of HTTP API authentication.
Enter the URL in the format:
For the first lift control group: /api/konelift/trig?DeciceType=COP&CopGroupID=$cop_groupid&CopElevatorID=$cop_liftid&Timeout=$timeout&LiftFloorNum=$floor
For the second lift control group: /api/konelift/trig?DeciceType=COP&CopGroupID2=$cop_groupid&CopElevatorID2=$cop_liftid&Timeout=$timeout&LiftFloorNum2=$floor
Field | Description |
|---|---|
CopGroupID | Same as the COP Group ID entered on the central machine’s web. |
CopElevatorID | Same as the COP Elevator ID entered on the central machine’s web. |
Timeout | Same as the timeout value on the central machine’s web. |
LiftFloorNum | Accessible floors. |
For example, the URL can be:
/api/konelift/trig?DeciceType=COP&CopGroupID=1&CopElevatorID=1&Timeout=5000&LiftFloorNum=$floor
Note
The device will automatically retrieve the floors accessible to the user from the user settings, and you can use “$floor” in the URL instead of filling in the actual floors.
It will release the COP with group ID=1 and lift ID=2. Users can press the lift button within 5000ms.
Assign Credentials to Users
Go to the Directory > User interface.
Click Add or
to set up access methods for a new or an existing user.
Scroll to the Access Setting part and choose the floor(s) of lift control group 1 and/or 2 accessible to the user.
After the configuration, when the user uses the credential to unlock the COP, the lift control button for their accessible floor(s) will be released. The user can press it to go to the desired floor.
Hybrid DCS Integration
This part illustrates device configurations in two scenarios.
Scenario 1: One X915V2 works as the central machine, and another as the access control device.
Scenario 2: The X915V2 works as the central machine, and other models work as the access control device.
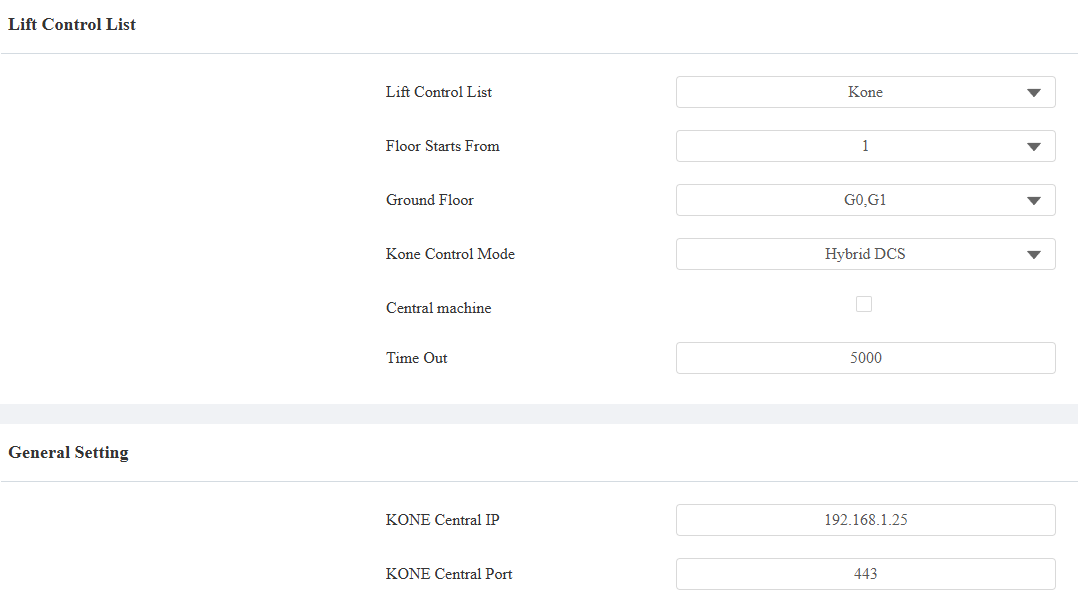
Scenario 1: Set Central Machine
Set Lift Control
Use the device IP to log in to its web interface. The initial username and password are admin.
Go to the Device > Lift Control interface.
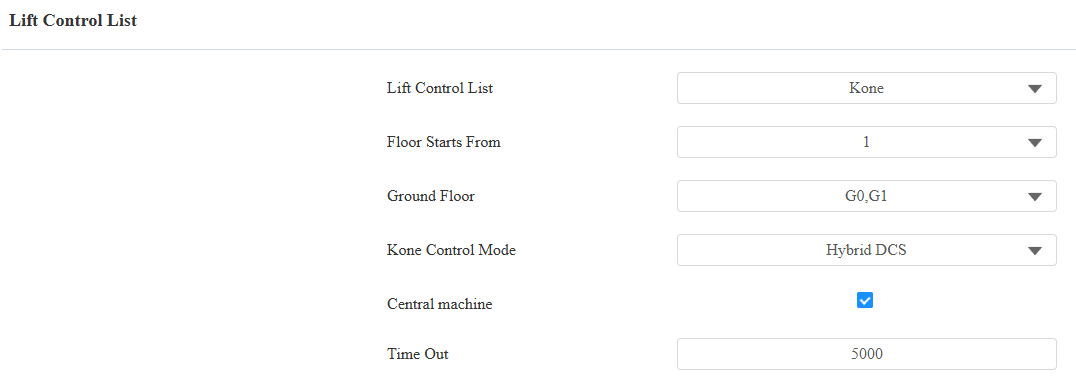
Select Kone as the lift control brand and select Hybrid DCS as the control mode.
Set the start floor and ground floor.
Check the Central machine box.
Set the timeout(5000~15000ms). It is 5000ms by default. It defines the time for users to press the lift button.
Fill in the Kone control panel’s IP address and port. You can enter three IPs for each group, separated by “;”.
Fill in the DOP ID and DOP Floor ID provided by the KONE company.
Fill in the COP Elevator ID and COP Group ID provided by the KONE company.
Select KONE Mask Type and click Import to upload the file. DOPs and COPs have both default and specific masks for online and offline scenarios, determining access permissions based on connection status to the lift control system. G1/G2 represents Group1/2.
Online: The central machine is connected to the lift control system.
Offline: The central machine is disconnected from the lift control system.
Note
To obtain the configuration file, please contact the Akuvox tech team.
The connection status will update after a few seconds in the KONE Lift Status section.
Set HTTP API
Go to the Setting > HTTP API interface.
Enable the HTTP API feature and choose the desired authorization mode from None, Basic, and Digest.
Customize the username and password for authentication.
Scenario 1: Set Access Control Device(X915V2)
Set Lift Control
Go to the Device > Lift Control interface.
Select Kone as the lift control brand and select Hybrid DCS as the control mode.
Set the start floor and ground floor. Do not check the central machine box.
Enter the IP and port of another X915V2 that is used as the central device.
Enter the username and password of the HTTP API authentication.
Assign Credentials to Users
Go to the Directory > User interface.
Click Add or
to set up access methods for a new or an existing user.
Scroll to the Access Setting part and choose the floor(s) of lift control group 1 and/or 2 accessible to the user.
After the configuration, users can use their credentials to unlock the COP or DOP. The lift control button for the corresponding floor will be released. The user can press it to go to the desired floor.
Scenario 2: Set Central Machine
After setting up the central machine’s lift control and HTTP API features, you also need to turn off the device’s HTTP redirect if the access control device does not support sending the command in HTTPS format.
Go to X915V2’s Network > Advanced interface. Find the Web Server section.
Disable HTTP Redirect.
Scenario 2: Set Access Control Device
Take E16V2 with the version 216.30.10.134 as an example.
Set Lift Control
Go to the Device > Lift Control interface.
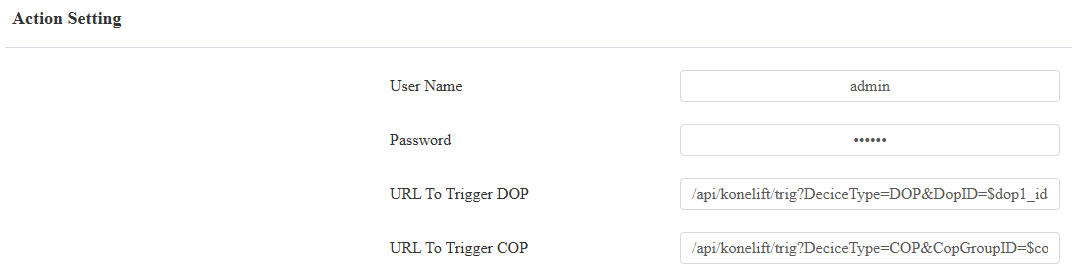
Select Akuvox in the Lift Control List.
Enter the IP address and port of the central machine. The default port is 443.
Enter the username and password of HTTP API authentication.
Enter the COP or DOP unlock URL. Please refer to the formats.
DOP | COP | |
|---|---|---|
The first lift control group | /api/konelift/trig?DeciceType=DOP&DopID=$dop_id&DopFloorID=$dop_floorid&Timeout=$timeout&LiftFloorNum=$floor | /api/konelift/trig?DeciceType=COP&CopGroupID=$cop_groupid&CopElevatorID=$cop_liftid&Timeout=$timeout&LiftFloorNum=$floor |
The second lift control group | /api/konelift/trig?DeciceType=DOP&DopID2=$dop_id&DopFloorID2=dop_floorid&Timeout=$timeout&LiftFloorNum2=$floor | /api/konelift/trig?DeciceType=COP&CopGroupID2=$cop_groupid&CopElevatorID2=$cop_liftid&Timeout=$timeout&LiftFloorNum2=$floor |
Note
The device will automatically retrieve the floors accessible to the user from the user settings, and you can use “$floor” in the URL instead of filling in the actual floors.
Assign Credentials to Users
Go to the Directory > User interface.
Click Add or
to set up access methods for a new or an existing user.
Scroll to the Access Setting part and choose the floor(s) of lift control group 1 and/or 2 accessible to the user.
After the configuration, when the user uses the credential to unlock the DOP or COP, the lift control button for their accessible floor(s) will be released. The user can press it to go to the desired floor.