About This Manual
This manual is intended for installers who need to manage single-family houses, residents, devices, remote maintenance services, and more on the MySmart server.
Update Time: September 2026
System Overview
Installers can conduct integrated management of residents, devices, relays, and remote maintenance services.
Installers using this platform will be able to:
Add, edit, and delete devices and residents in single-family house management.
Deploy and set up devices and relays for access control.
Check and upgrade device firmware for the residents.
Check and manage the MAC library.
Conduct remote operations such as auto-provisioning, device reboot, transmission type modification, and remote maintenance.
Download the related technical manual and get access to the Akuvox ticket system for technical support.
Login
Log in to the MySmart server using the account information obtained from your distributor.
Navigate to the server address in a browser.
Enter your username and password.
Click Login.
Note
Enter a verification code for login when your distributor enables two-factor authentication for you.
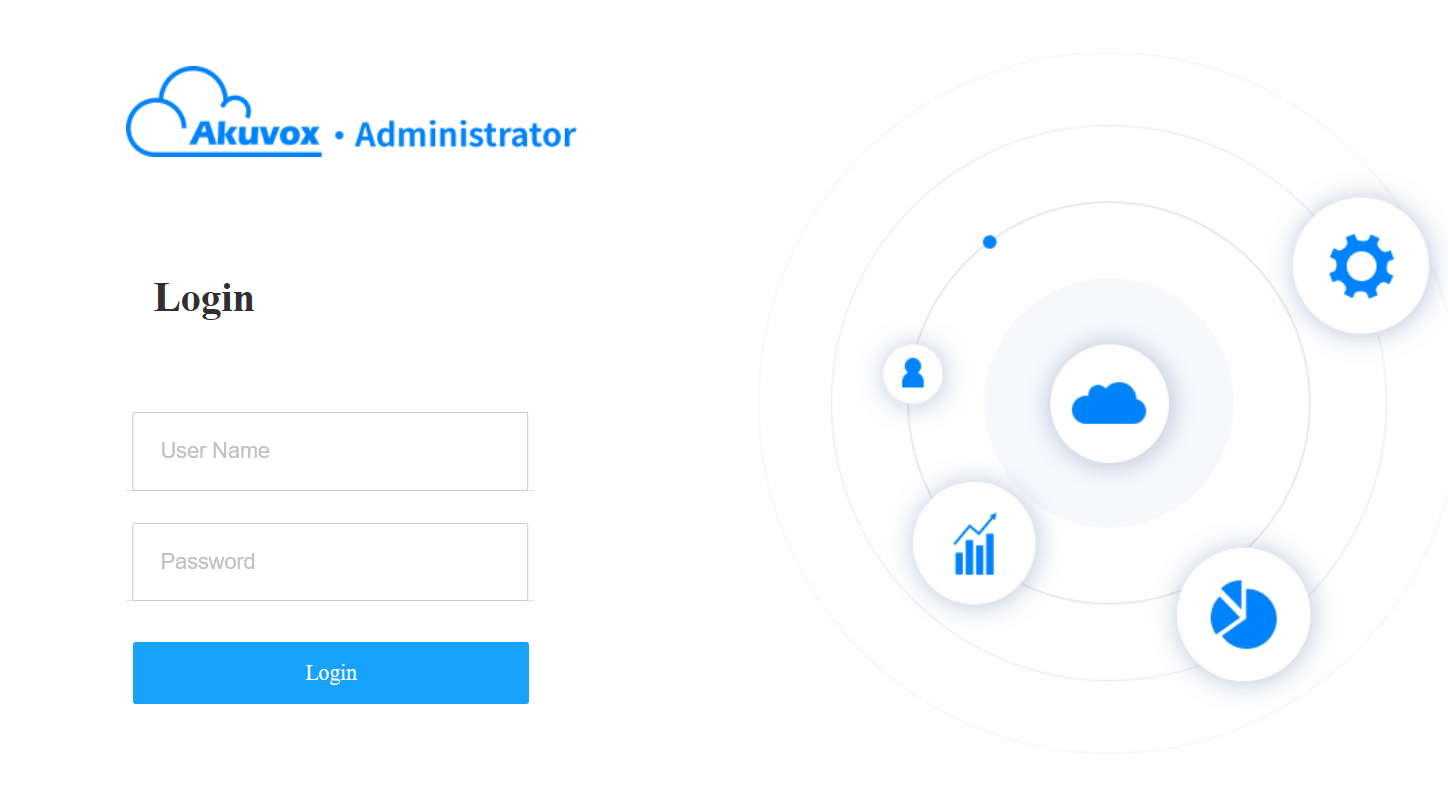
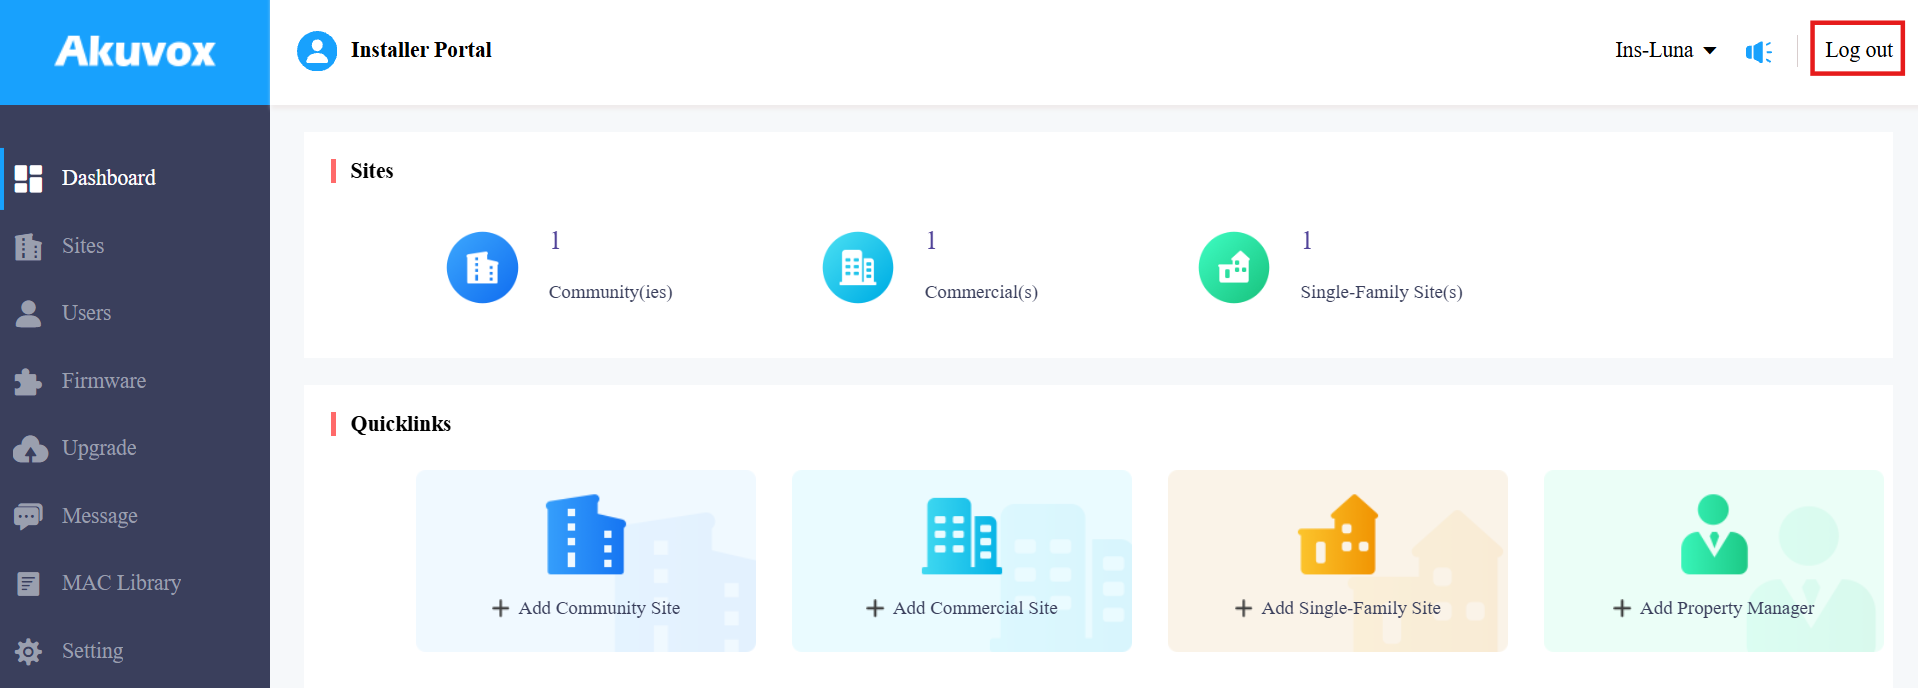
You can click Log out in the upper right corner to exit the system.
Email Confirmation
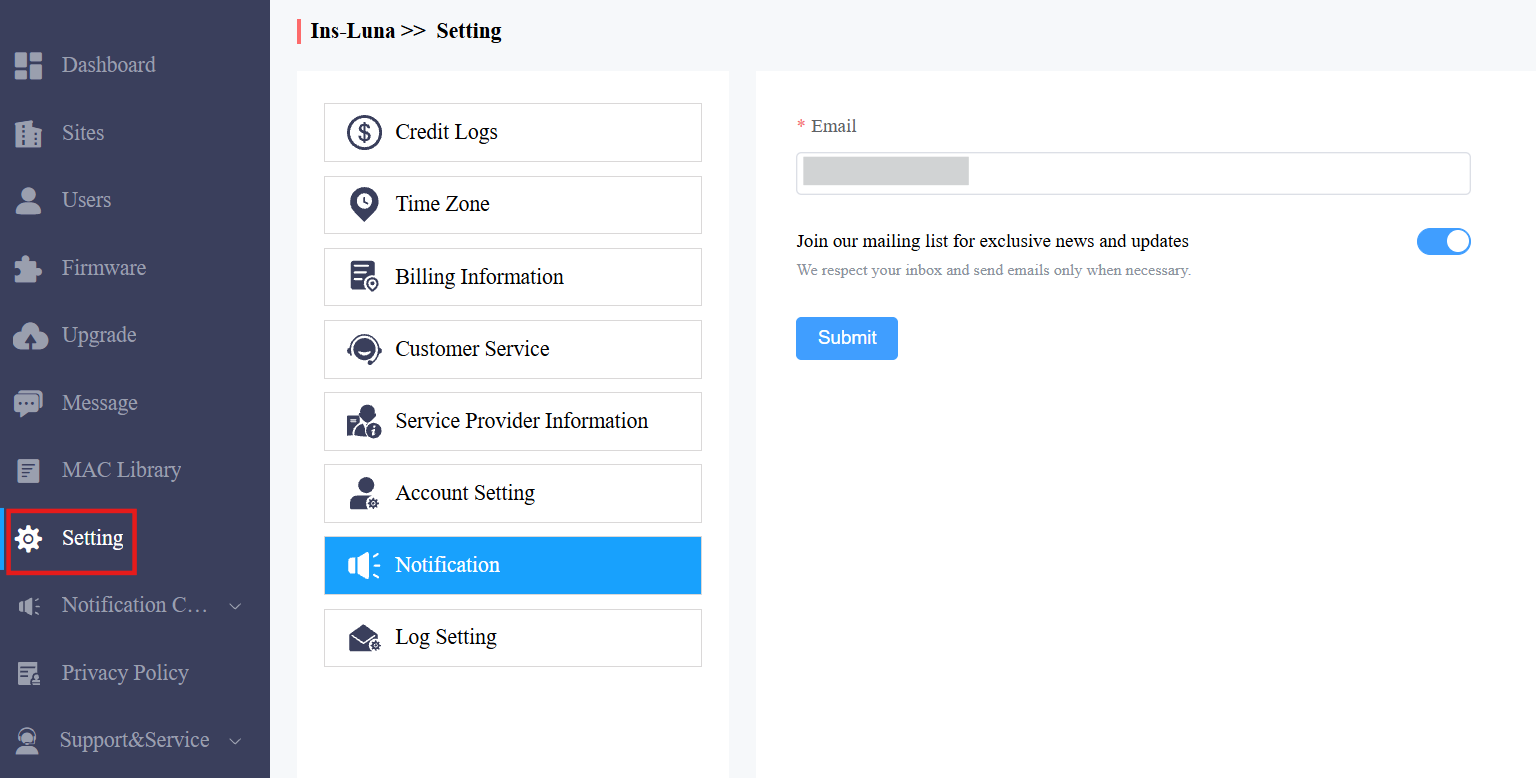
You are required to enter an email address when you log into the MySmart platform for the first time.
The email address is used to reset your MySmart login password when you forget it and to receive notifications from Akuvox.
You can change the email address and turn off the notification push on the Setting > Notification interface.
Prior to Management
You are advised to go through what is listed below before you start management.
Check if all of the device MAC addresses have already been registered by your distributor.
Check if your device is powered on and is connected to the internet, and make sure that the network is normal.
Check and make sure that your resident information and device information are correct.
Dashboard
The functional column allows you to manage sites, users, devices, and account settings in an organized manner.
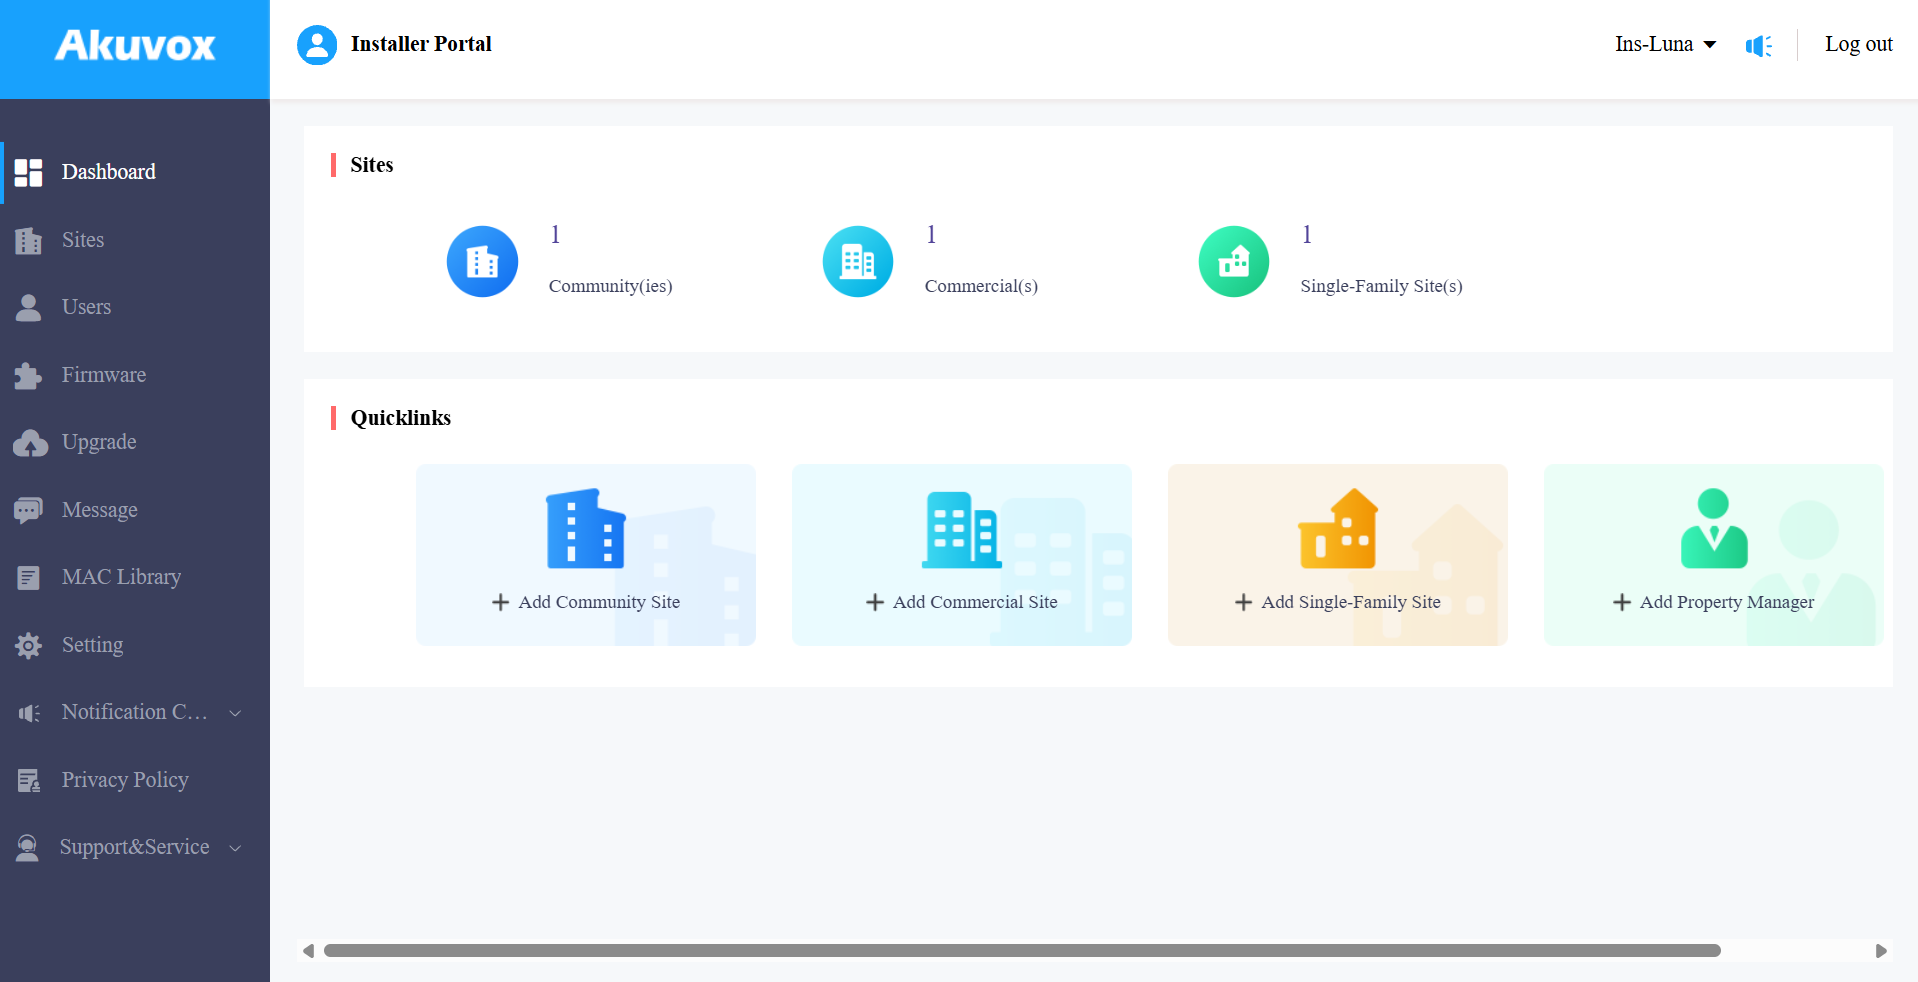
Module Description:
Modules | Description |
Dashboard | You can have quick access to create projects and property manager accounts, and a quick view of devices and MySmart App account status. |
Sites | Click to go into specific project management. |
Users | You can add, edit, and delete property managers and sub-installer accounts. |
Firmware | Check the available firmware versions and their information. |
Upgrade | Upgrade the firmware version for a specific device. |
Message | You can create messages and send them to target users. |
MAC Library | Check the device MAC registered by your distributor. You can remove the desired MAC. |
Setting | Set up time, account settings, etc. |
System Notification
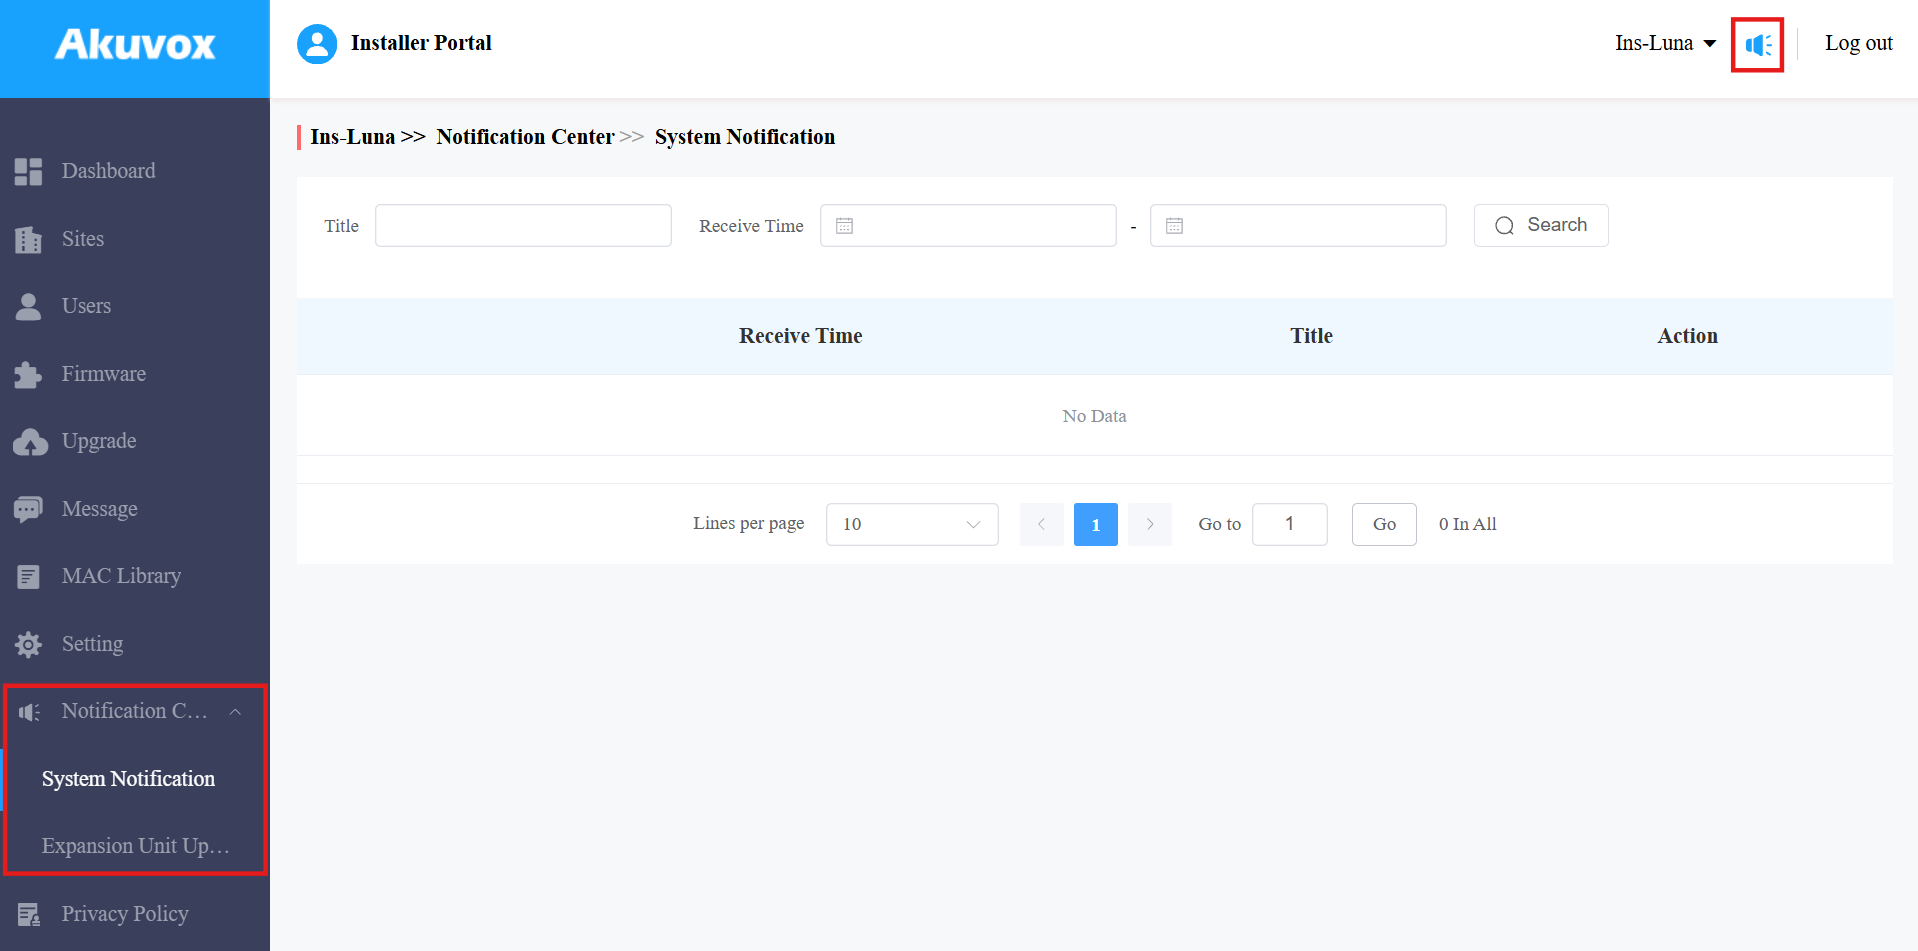
Akuvox will send you notifications of the server update and any changes that happen to the expansion unit(MD06/12).
You can click the notification icon in the upper-right corner to check the messages.
Or, click Notification Center on the left column.
Single-Family Sites Management
Add a User
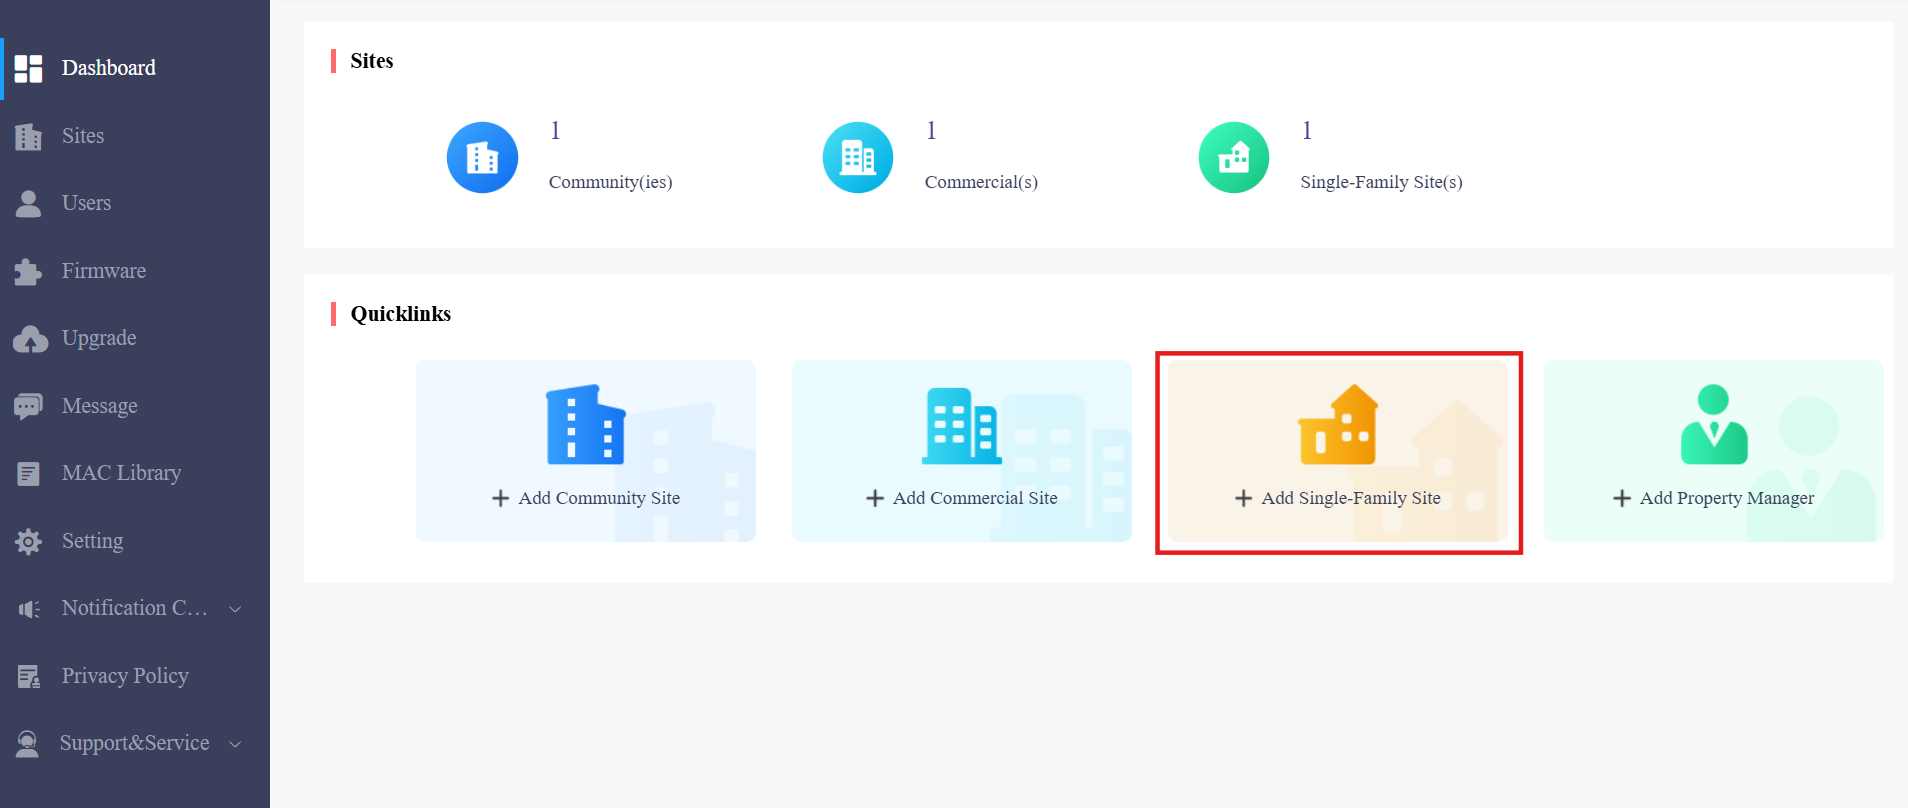
Create a single-family user account by clicking +Add Single-Family Site on the dashboard.
Set up the account settings. See the description of each item in the chart below.
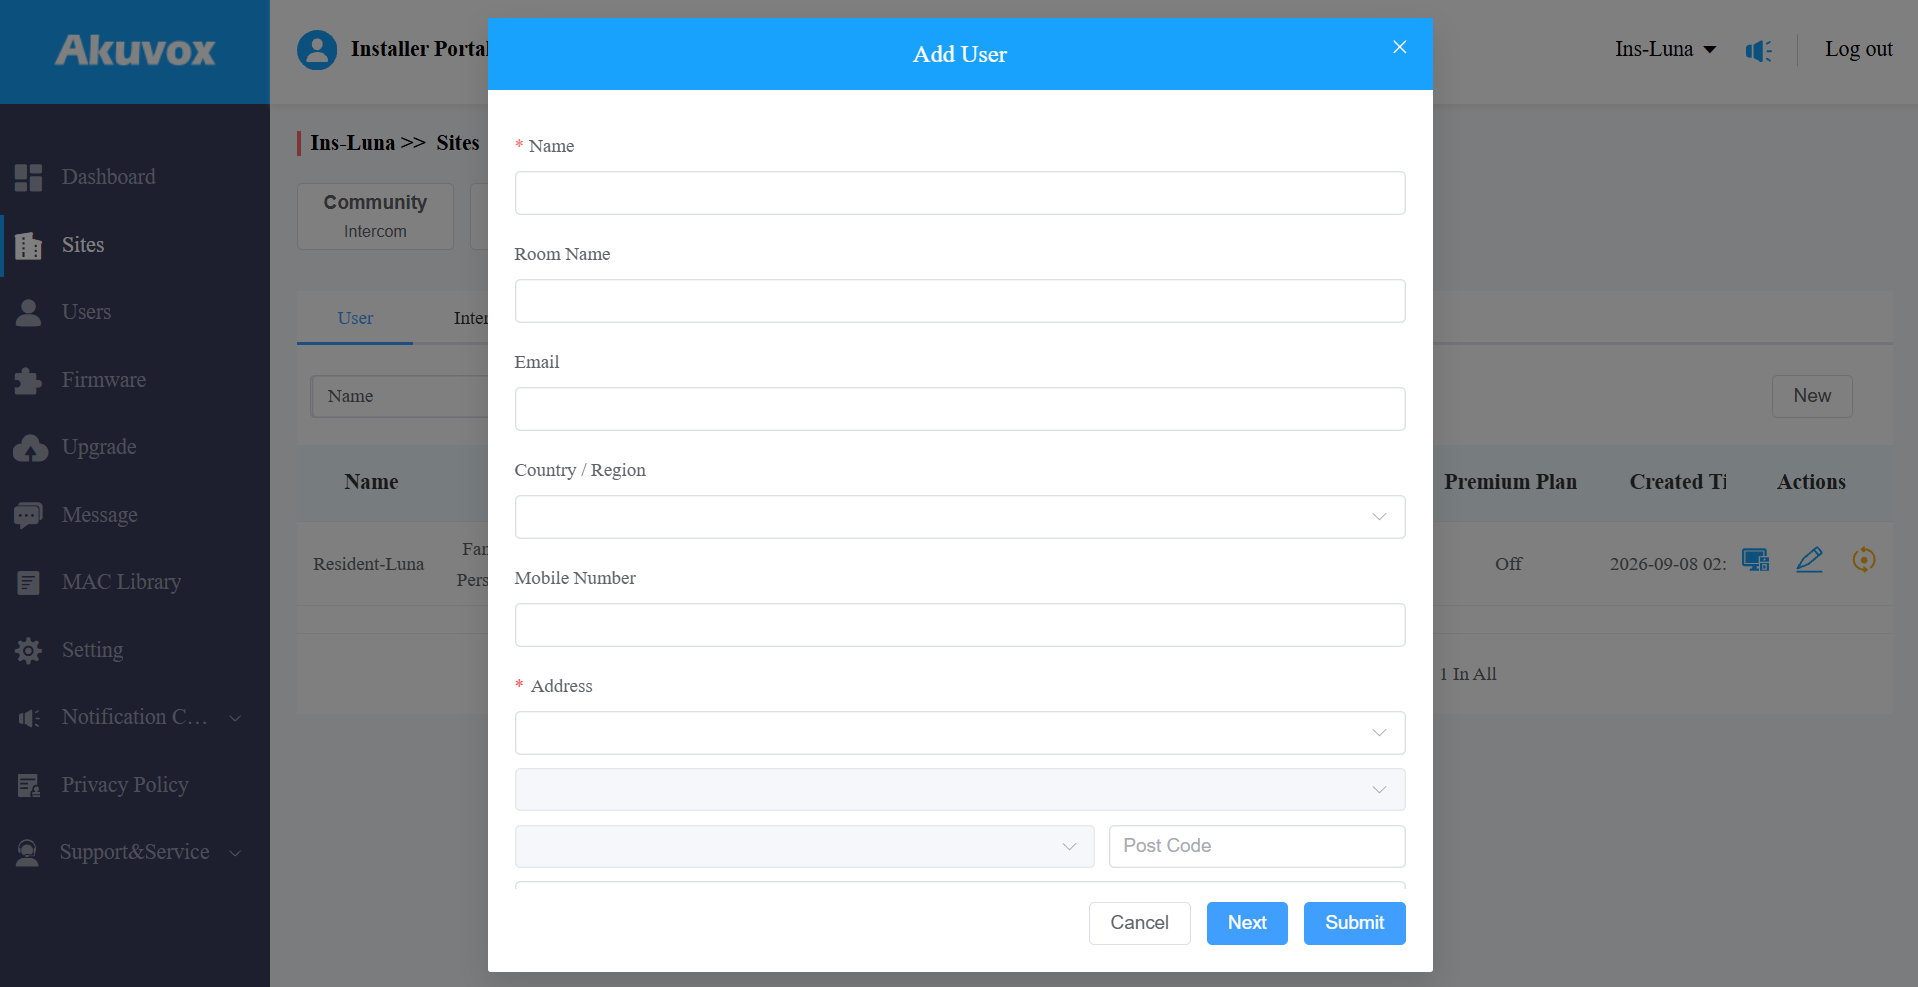
Filed Name | Description |
Name | Fill in the username. |
Room Name | Fill in the user’s house name provided by the user, or you can customize the room name, e.g., “Ryan’s Home”. |
Fill in the user’s email address. | |
Country/Region | Select the user's country or region. |
Mobile Number | Fill in the user’s mobile phone number. The area code will be displayed before the mobile number. |
Address | Fill in the user’s address, based on which the indoor monitor can access local weather conditions. The temperature and weather conditions will be displayed on the device's home screen. Click here to see the models that support displaying weather conditions and detailed configuration. |
SIP Call Or IP Call | Select IP Call if all of the user’s intercom devices are on the same LAN ( Local Area Network). If not, select SIP call. |
Time Zone | Select the time zone for the user. |
Language | Select the language of the emails notifying the user of the account information. The following languages are supported: English, Traditional Chinese, Simplified Chinese, Korean, Japanese, Turkish, Polish, Russian, Spanish, Bosnian, Danish, Vietnamese, French, Portuguese, German, Italian, Ukrainian, Hebrew, Persian, and Azerbaijani. |
Time Format | Select the time format for the user. |
Premium Plan | Premium Plan includes the third-party camera service. |
Click Submit to finish creating the account.
Add a Family Member Account
After a user account is created and activated, you can create family accounts at the request of users.
Click
 of specific users.
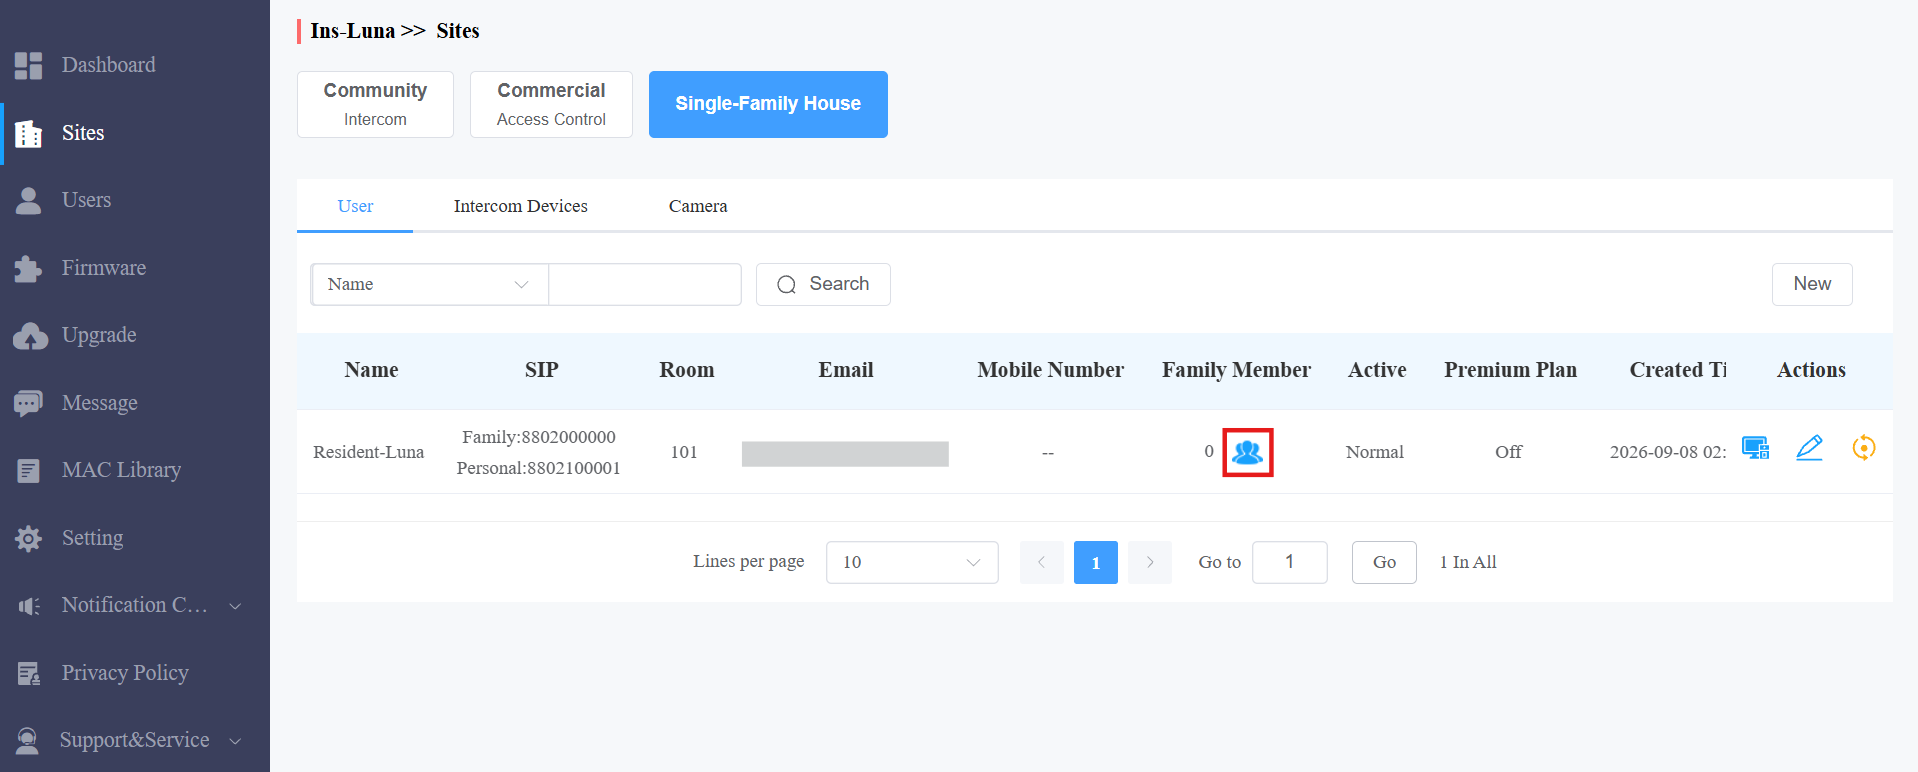
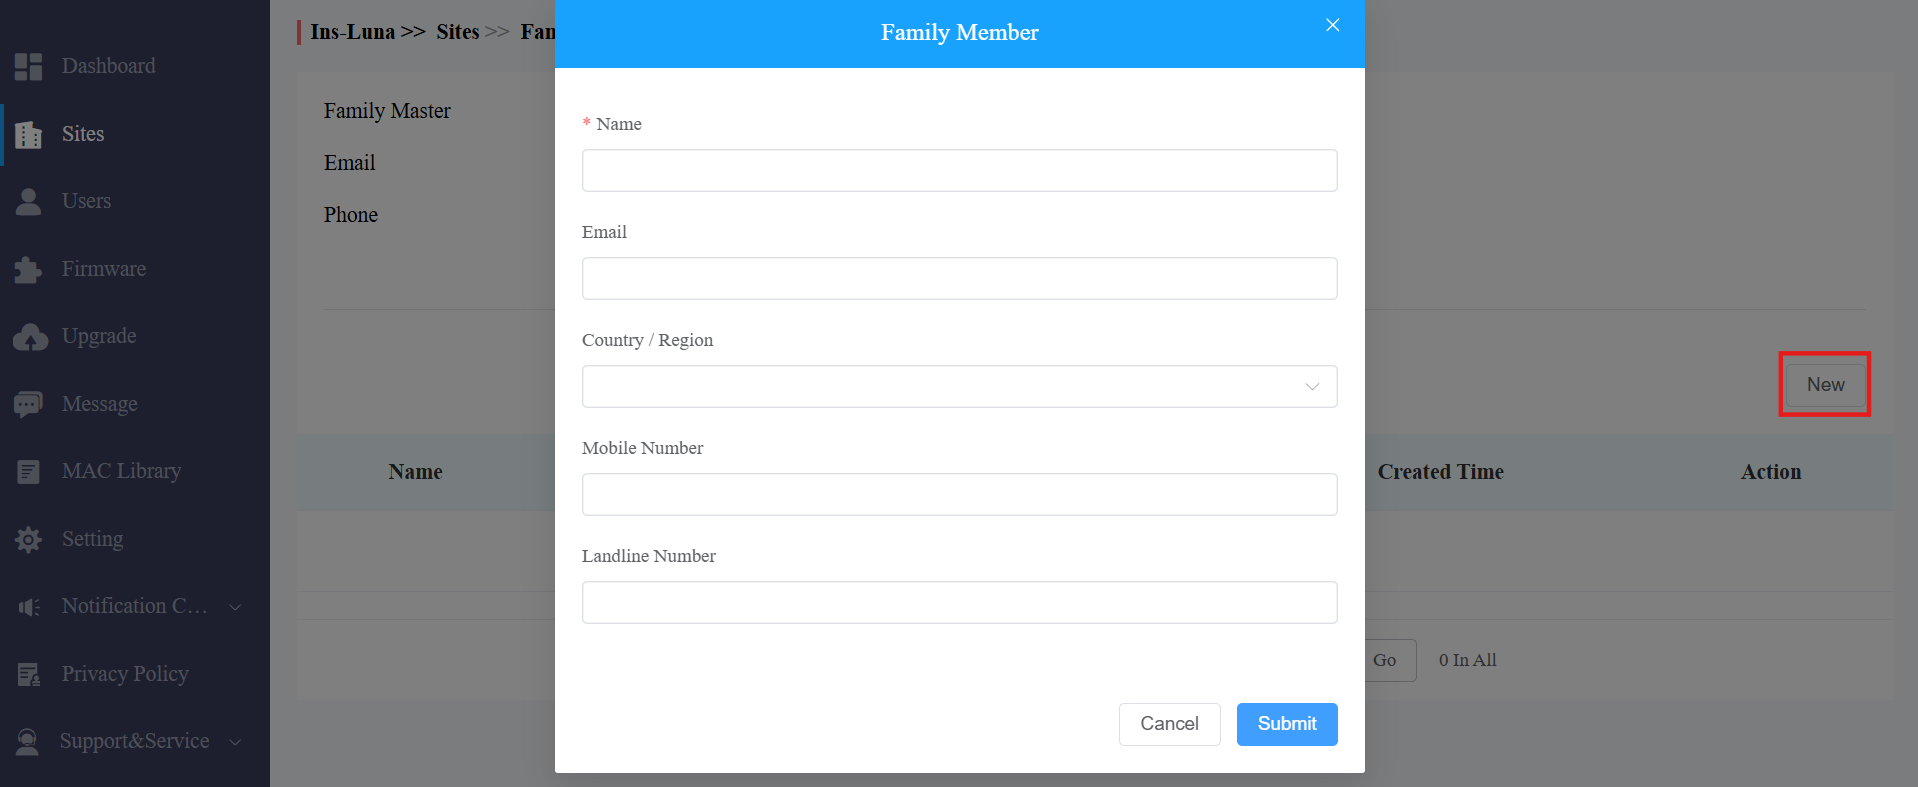
Click New, and fill in the family member account information.
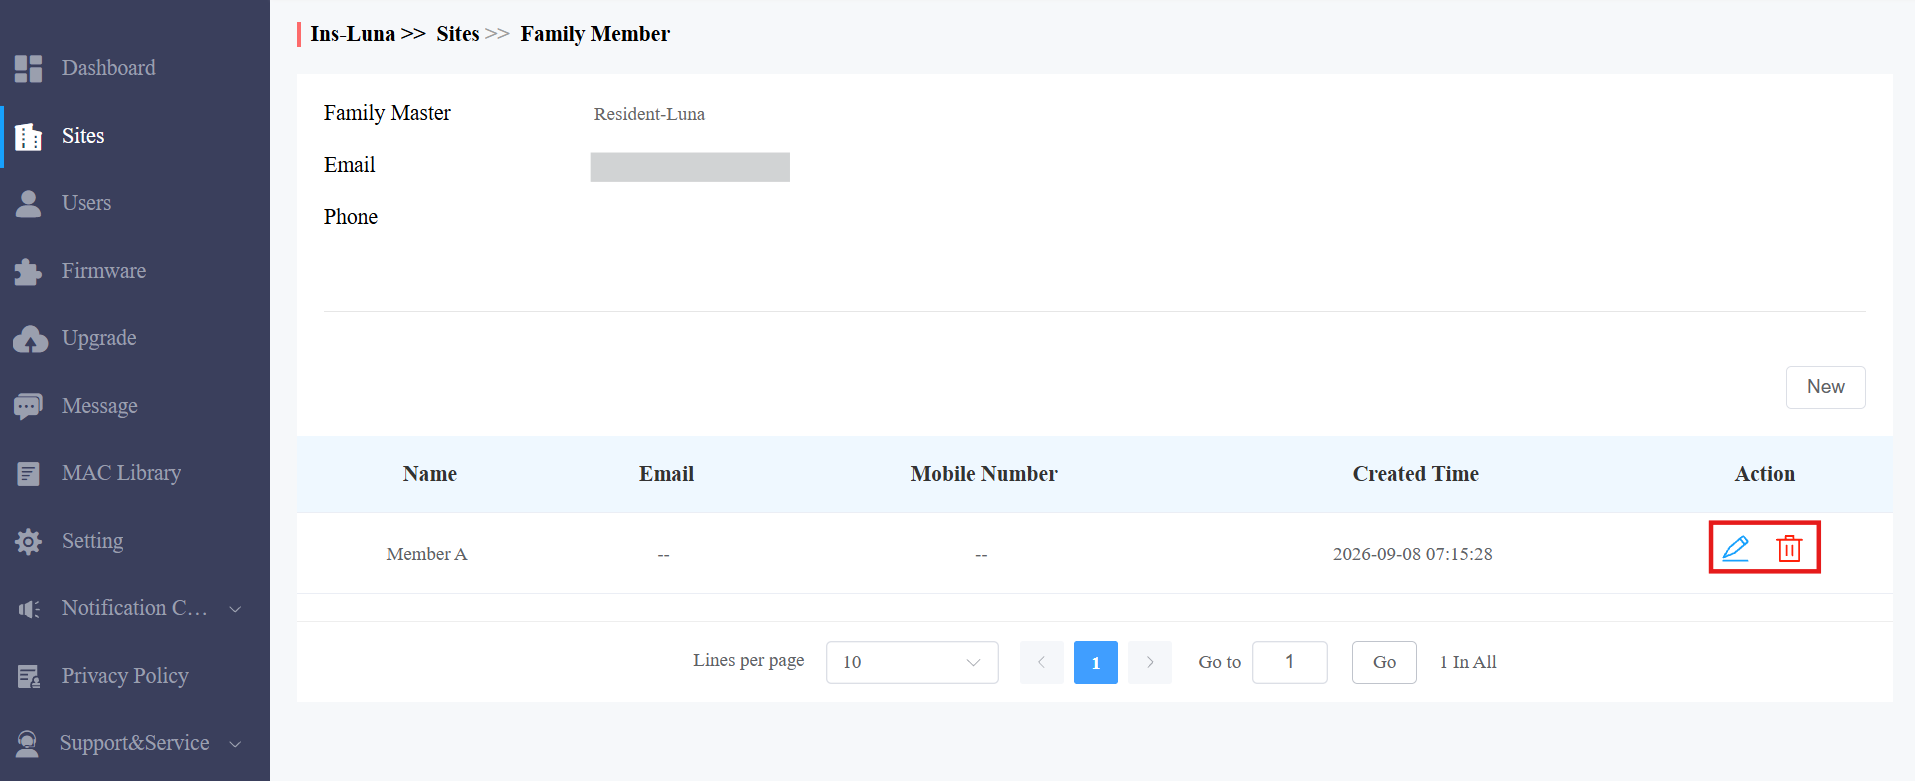
After creating the account, click  to modify it and
  to delete it.
Edit, Reset, and Delete User Accounts
When you are editing the user account information, you can not only search, edit, and delete the user account, but also reset the account password at the request of users.
Search for and find the user by Name, Email, Mobile Phone Number, Family SIP Number, or SIP number.
Do any of the following:
Click
 to reset the user's account, and click
  to modify the account's information.
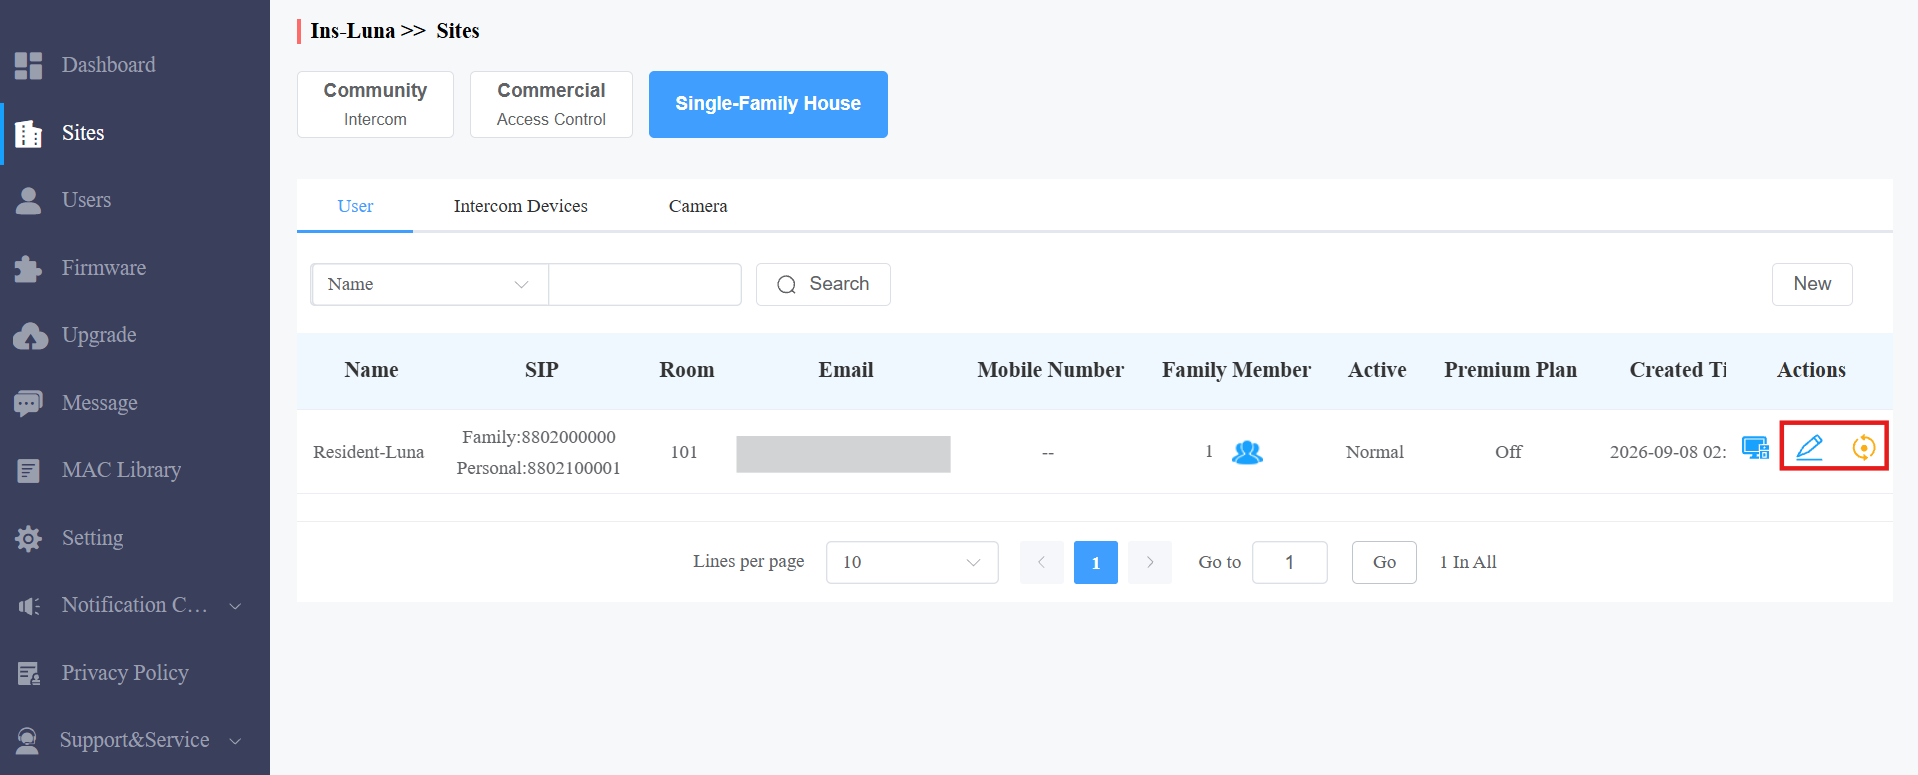
Once reset, some data will be deleted while some will not.
Data to be removed, including:
Family member accounts.
Emails, mobile numbers, and country/region.
Logs(audit logs excluded) and histories.
Messages and alarms, and
All access credentials.
Data to be kept includes:
Family master account status.
Audit logs.
Settings include call type, time zone, language, and premium plan feature.
Other changes include:
The user’s app changes to unregistered and needs to be reinitialized.
The user’s login credentials are reset, and the user will not receive the reset email.
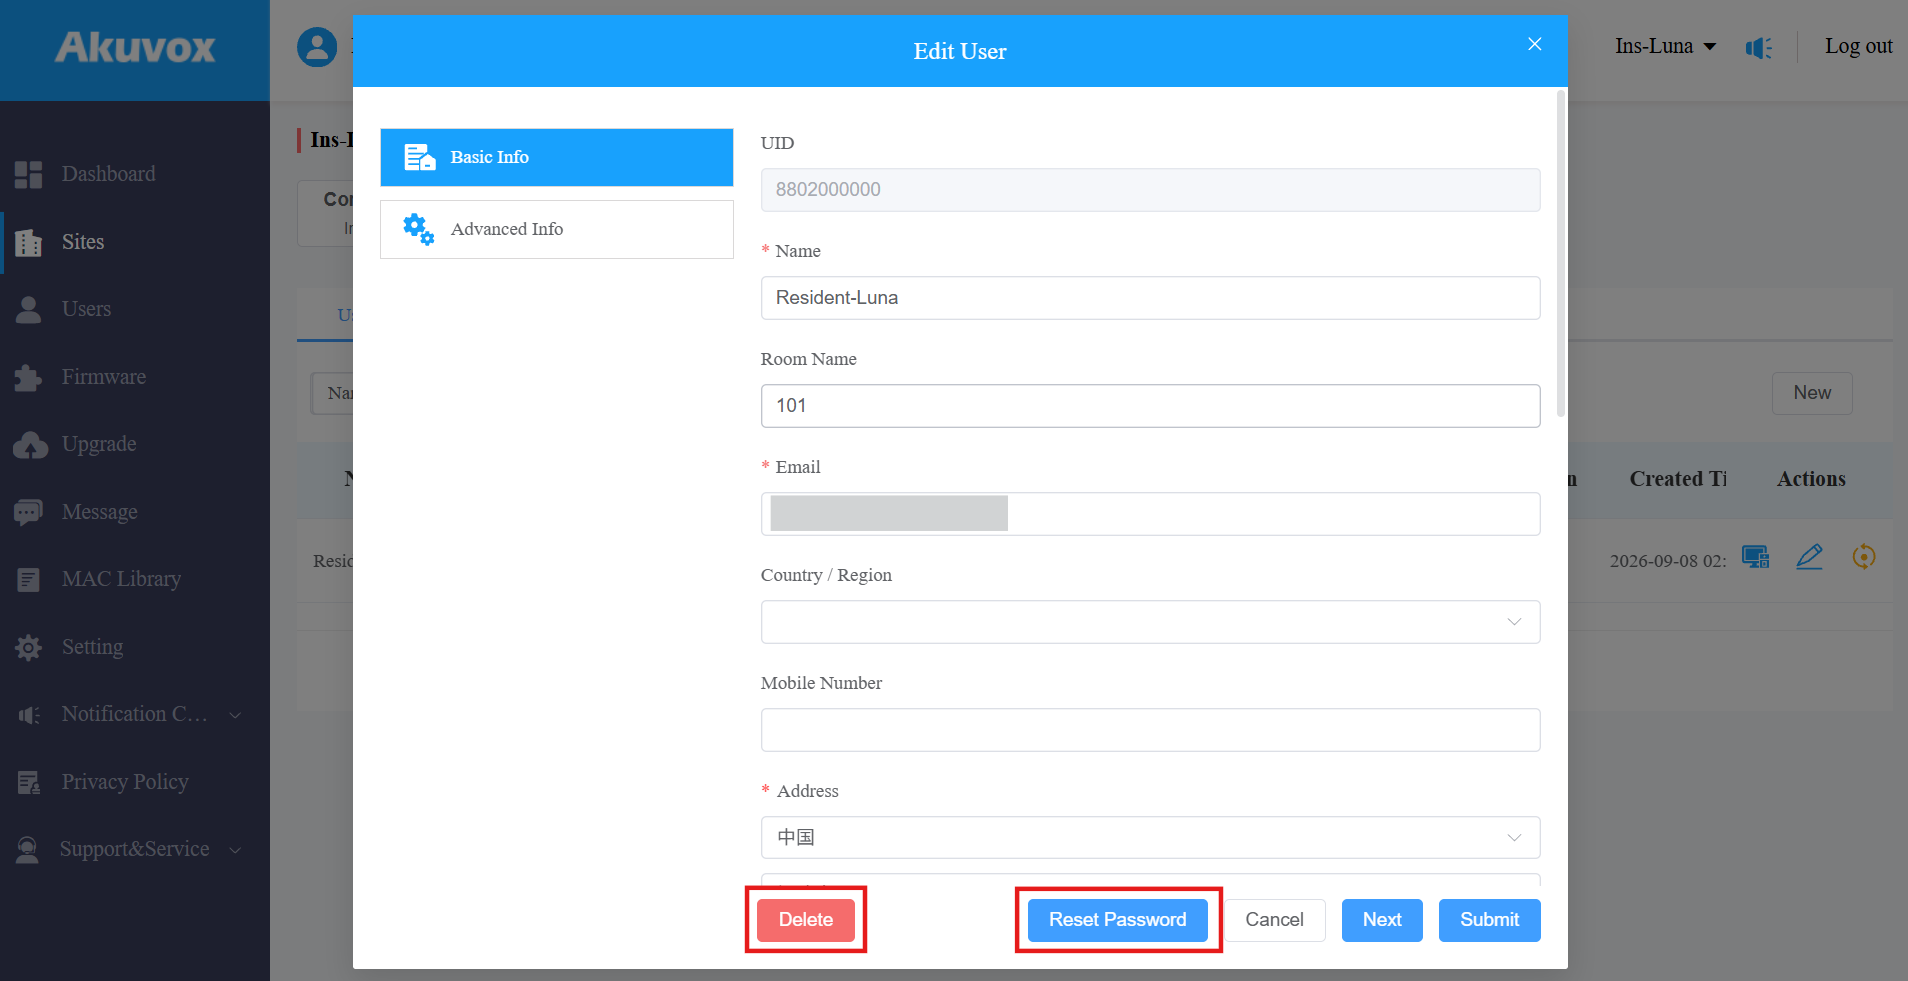
Scroll down the editing page, click on Delete to delete the user's account, and click on Reset Password to reset the account’s password.
Note
The user's time zone will be synchronized with the installer's time zone if the time zone is not selected.
You cannot edit the mobile phone number, email address, and area code of user accounts that have linked sites.
Device Management
After the user account is created, you can start adding the device(s) and third-party devices for the specific user. Make sure that all the intercom devices have been added to your distributor’s MAC library.
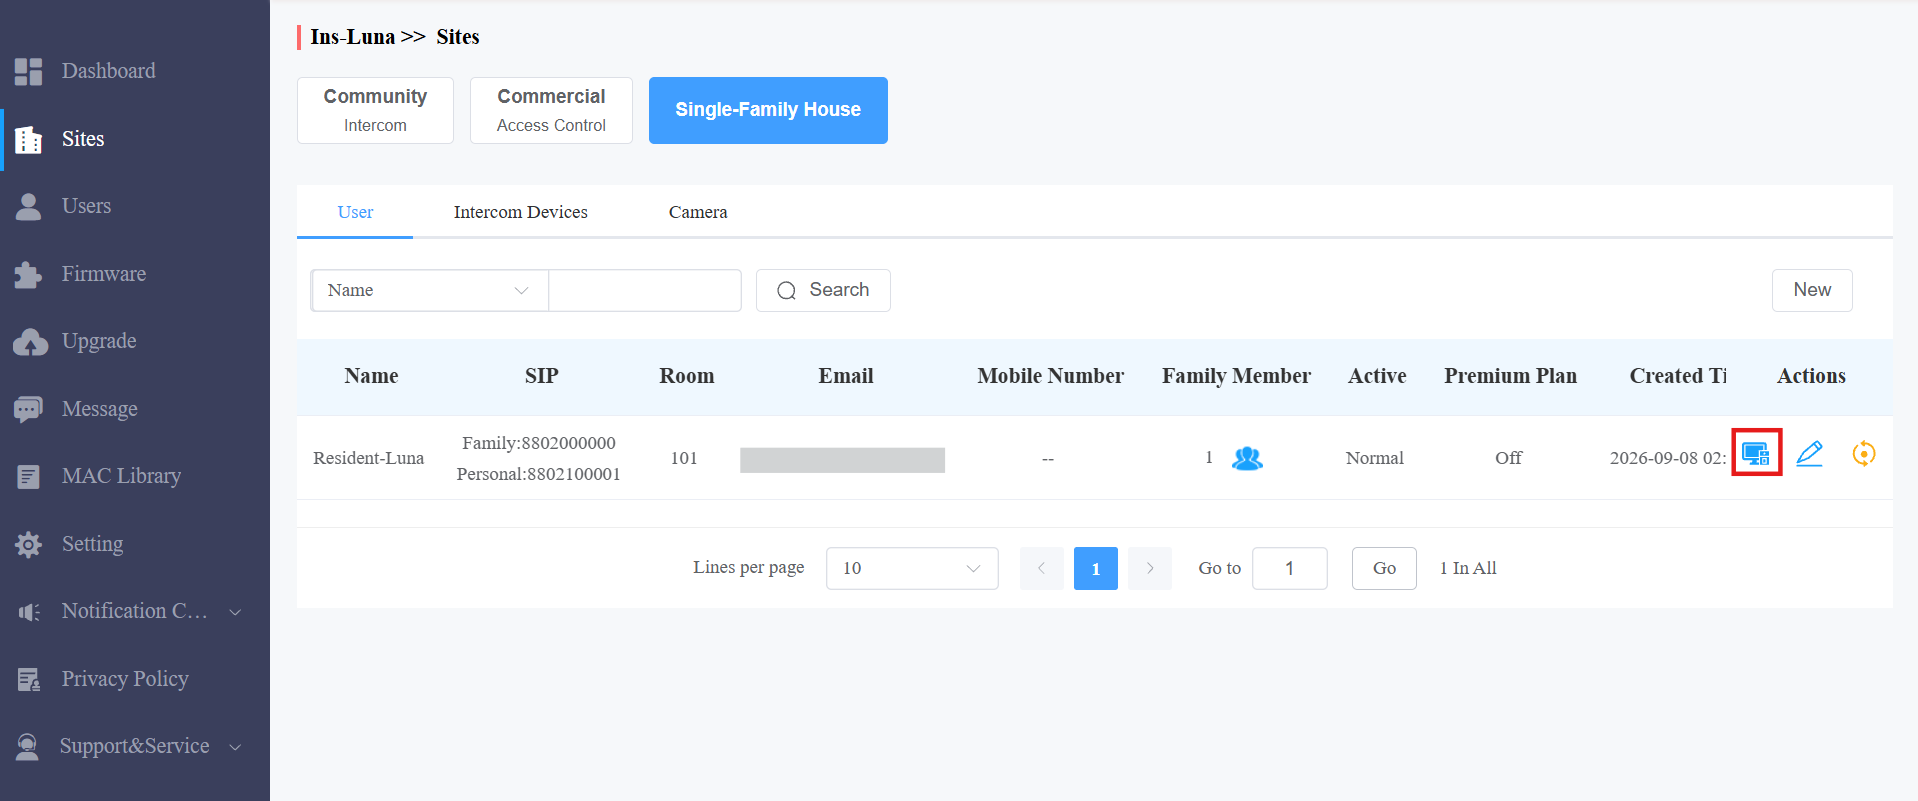
Click  of the target user.
Add Intercom Devices
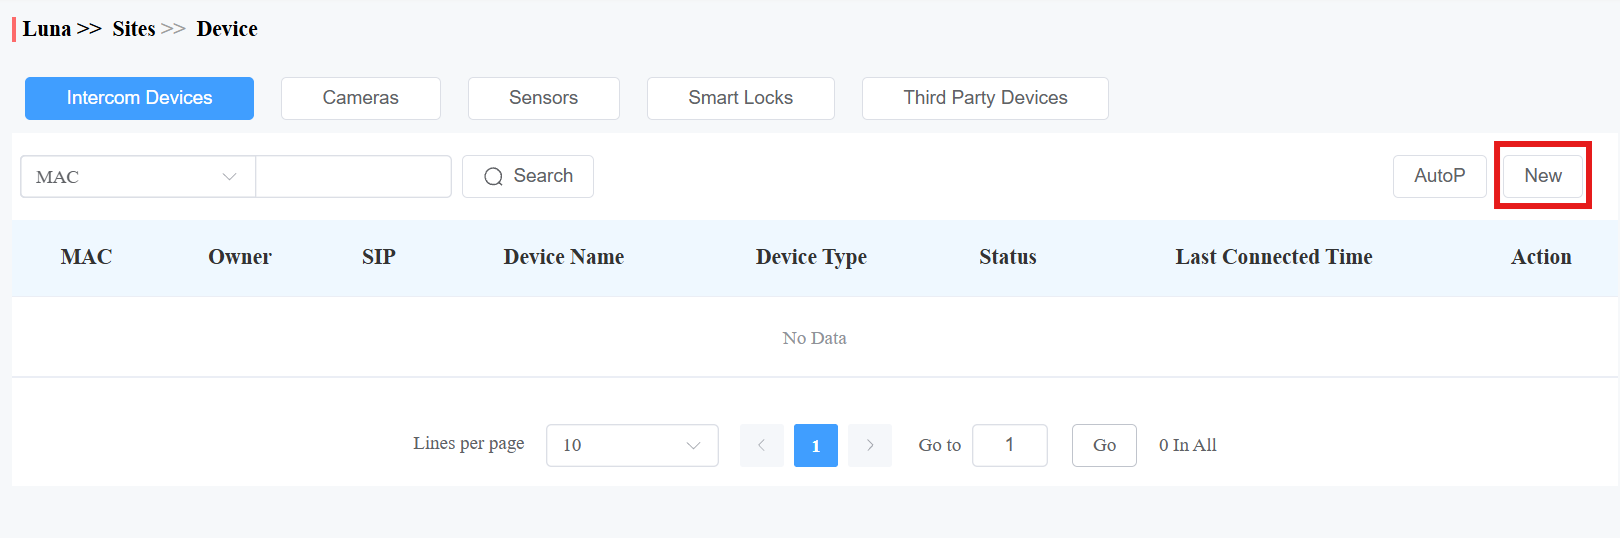
Click Intercom Devices and click New to add the device.
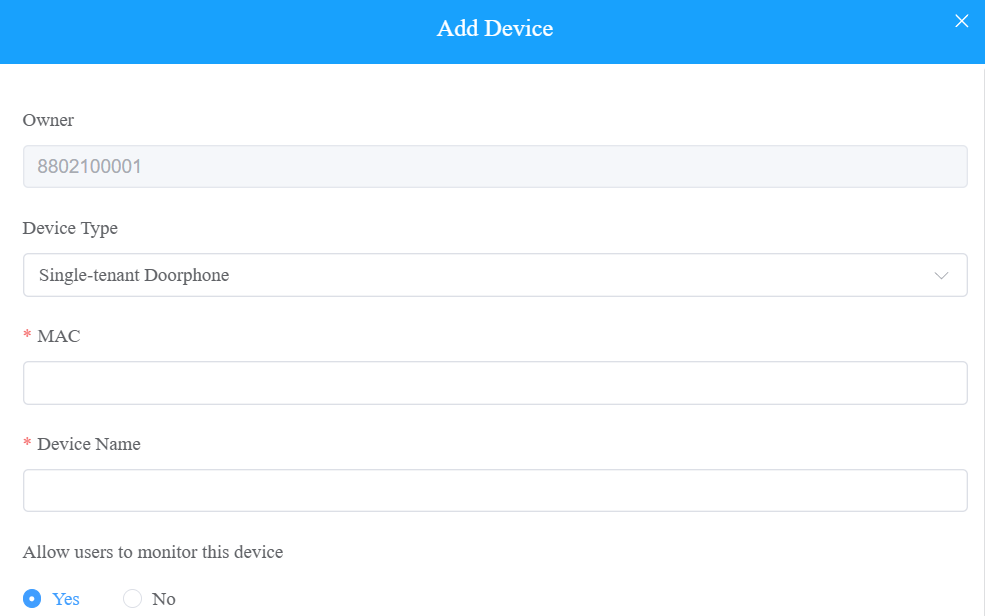
Regardless of what type of device, device type, MAC address, and device name need to be set up. | ||
No. | Field Name | Description |
1 | Device Type | Select the device type. |
2 | MAC | Type in the device's MAC address. |
3 | Device Name | Name the device to distinguish it from others. |
To add a door phone or an access control terminal, the following options should be additionally configured. | ||||||||||||||||||||||||||||||||||||||||||||||||||
1 | Allow user to monitor this device? |
| ||||||||||||||||||||||||||||||||||||||||||||||||
2 | Does the device have internet access? |
Note: Click here to view the detailed configuration of the call transfer feature. | ||||||||||||||||||||||||||||||||||||||||||||||||
3 | IP Address | When No is selected in Does the device have internet access, you need to enter the static IP address of the door phone so that its calls can be transferred. | ||||||||||||||||||||||||||||||||||||||||||||||||
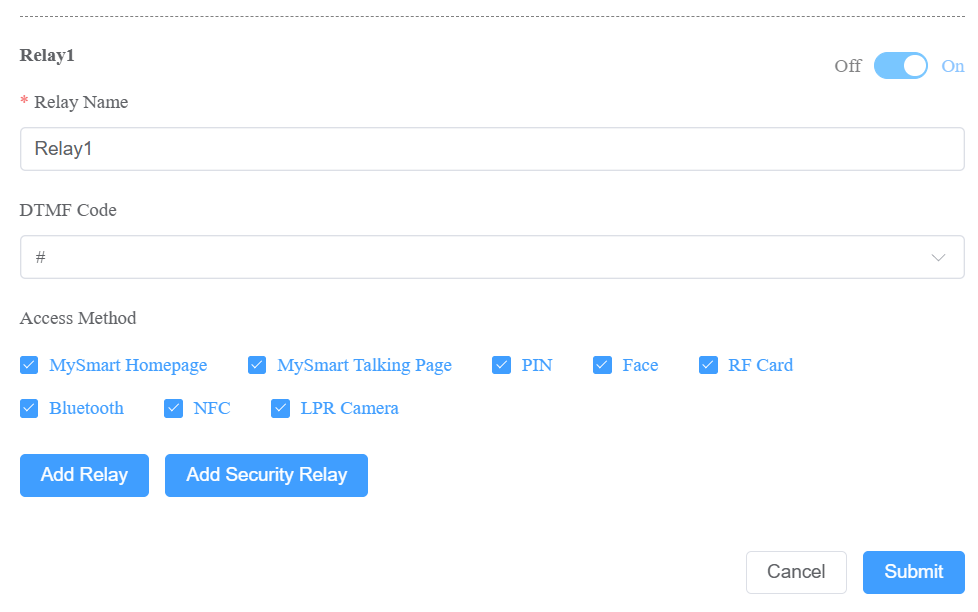
4 | Relay Name | Fill in the relay name, which can be the device location. | ||||||||||||||||||||||||||||||||||||||||||||||||
5 | DTMF Code | Enter the DTMF code for the door access. | ||||||||||||||||||||||||||||||||||||||||||||||||
6 | Access Method | Select specific unlock methods to trigger the desired relay. For example, if you select PIN in Unlock type for Relay1 and select RF Card for Relay2 when users enter PIN codes on the door phone, only Relay1 will be triggered, and vice versa. The following models with specific firmware versions or higher support this feature:
Note: If MySmart Homepage or MySmart Talking page is not checked, the corresponding icons will not appear on the app home page. | ||||||||||||||||||||||||||||||||||||||||||||||||
7 | Add Relay | You can add more relays if needed. | ||||||||||||||||||||||||||||||||||||||||||||||||
8 | Add Security Relay | Add the security relay if the door phone is connected to an Akuvox SR01 for the door unlock control. | ||||||||||||||||||||||||||||||||||||||||||||||||
To add an indoor monitor, the following options should be additionally configured. | ||
1 | Works Offline | When enabled, the device will transfer calls from offline door phones to the MySmart App. |
2 | Arming Function | When enabled, the arming icon will be available on users' MySmart Apps for arming and disarming. |
3 | Relay | Turn on or off the device's built-in relay and name the relay. When the relay is enabled, specify its function from Door, Light, or Other. |
4 | External Device | When the device is connected to an external relay controller, enable this option. Note: Please click here for the detailed external relay configuration. |
5 | External Device Type | Select the device type. Akuvox-MK485-G2R-8J8C V3.0 supports up to 8 relays, HF-8000 up to 4, and akubela RSAC-C1-R8 up to 16. |
6 | External Device Mode |
|
7 | IP Address | When Ethernet is selected as the external relay mode, enter the IP address. |
8 | Port | When Ethernet is selected as the external relay mode, enter the port. |
9 | Relay Name | Name the external relay to distinguish it from others. |
10 | Relay Function | Define the relay function according to the device connected to the relay. |
Add Third-Party Cameras
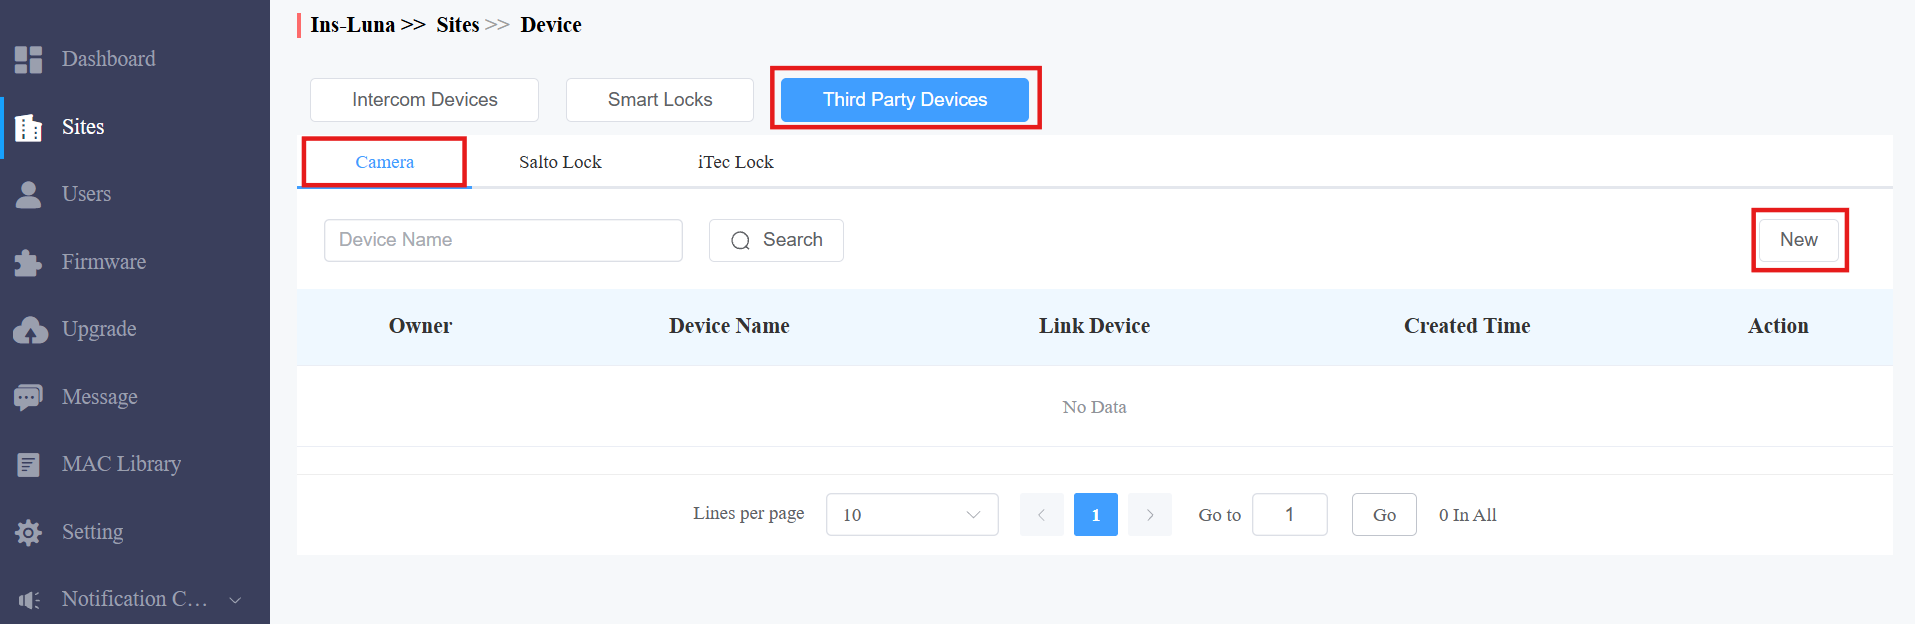
Click Third-Party Devices > New.
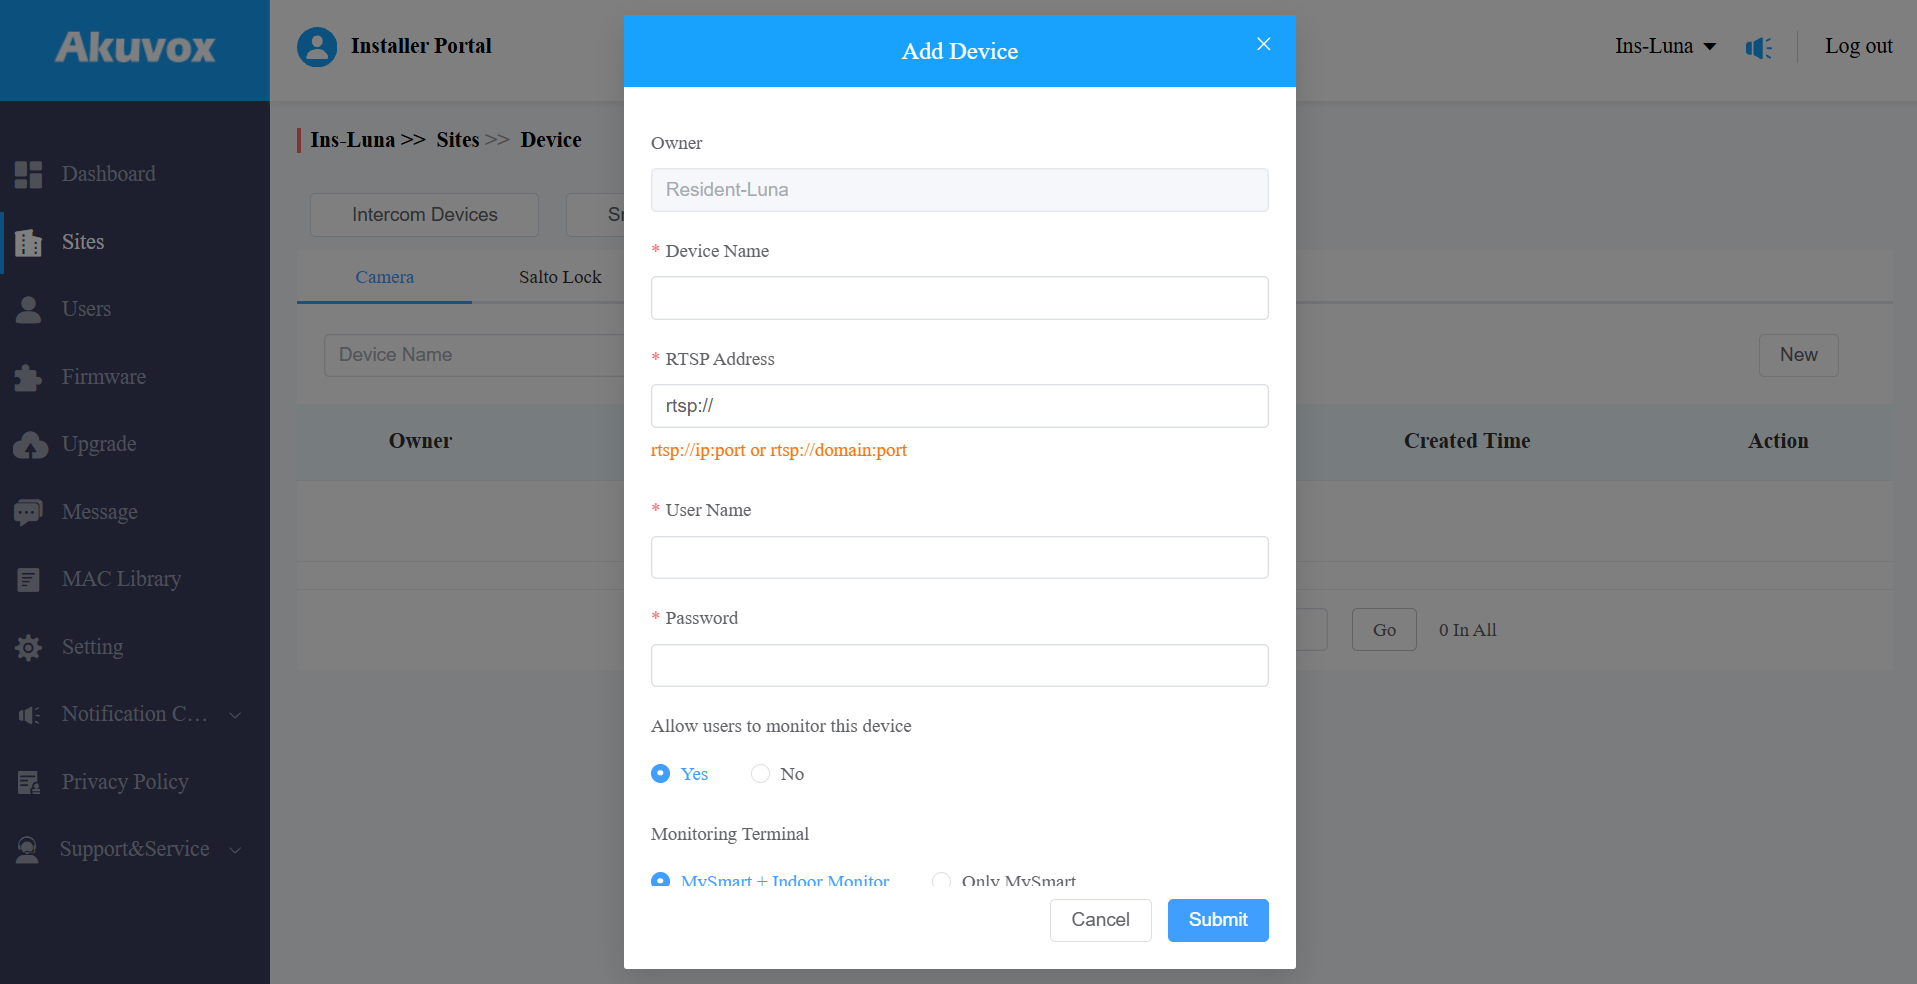
Enter the camera’s information.
Note
Click here to see the integrated camera brands.
Field Name | Description |
Owner | Display the owner of the camera. |
Device Name | Name the device to distinguish it from others. |
RTSP Address | Type in the third-party RTSP URL in the Format, e.g., rtsp://ip:port or rtsp://domain:port. It is used to obtain the camera image. Note: RTSP URL formats may vary by third-party camera manufacturers. |
User Name | Enter the authentication username provided by a third-party camera manufacturer. |
Password | Enter the authentication password provided by a third-party camera manufacturer. |
Allow users to monitor this device | Set whether users can view the monitoring stream through their indoor monitors and MySmart Apps. |
Monitoring Terminal | If Yes is selected for the Allow users to monitor this device option, specify through which devices users can monitor. |
Link Device | You can link third-party cameras with intercom devices. When they are linked, users can tap the door phone camera icon on the MySmart App, and then they can switch between the linked device and the third-party camera view. The third-party camera icon will not be displayed on the app. Note: When linking the camera with door phones, make sure they are on the same local network (LAN). |
Edit and Delete Akuvox Devices
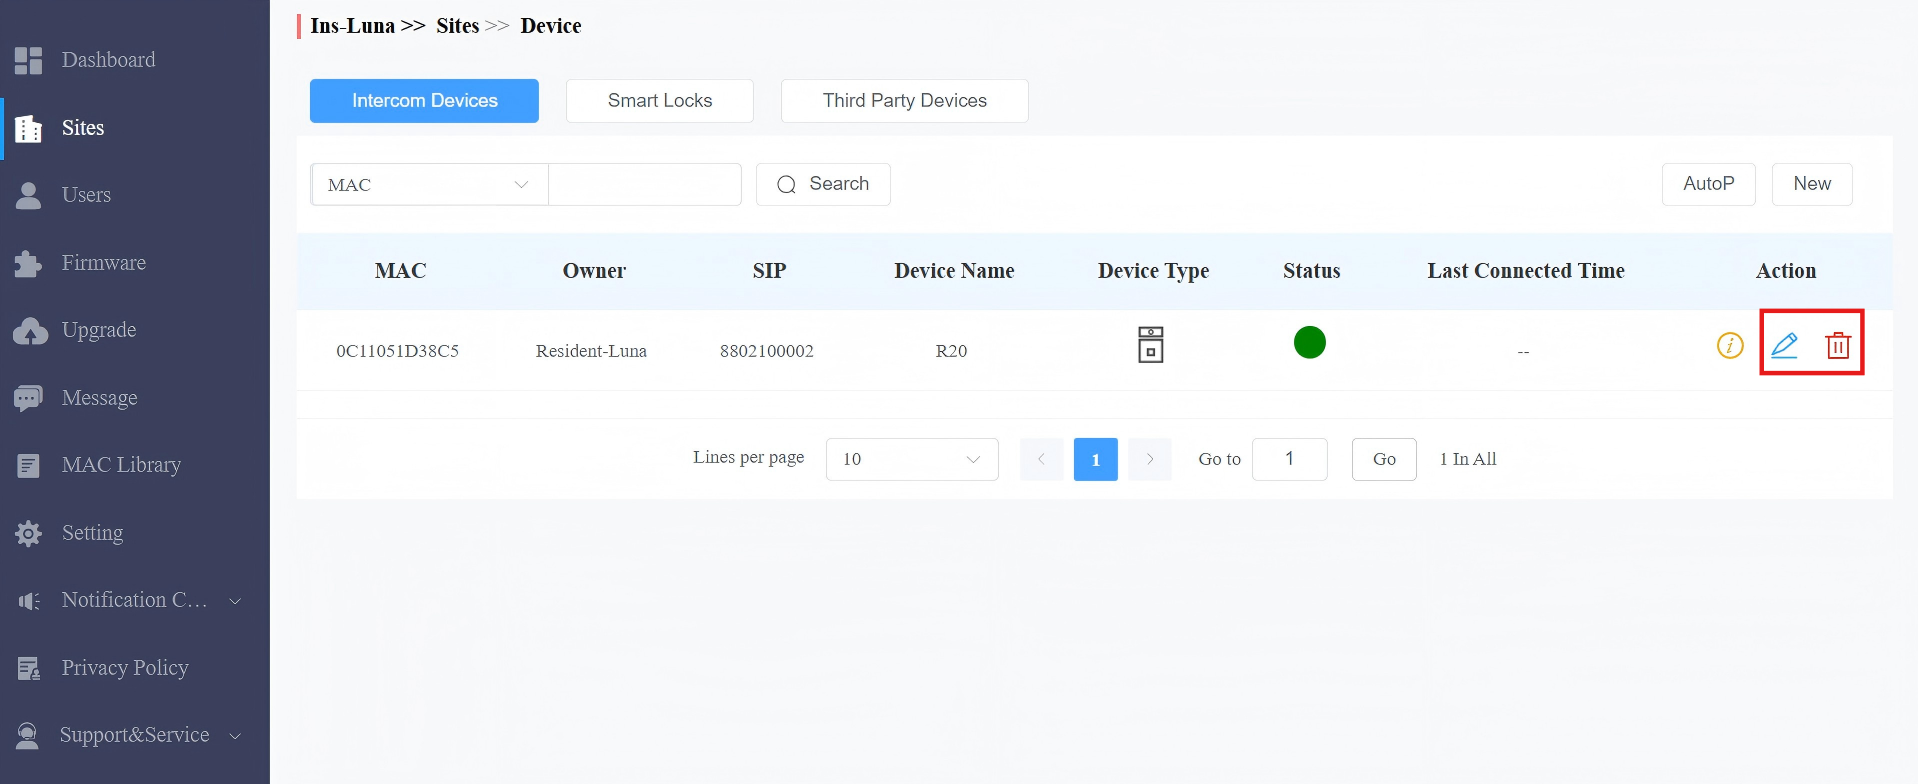
After adding devices, you can manage them by clicking of the target user.
Click  to edit the device's settings and click
 .png)
Batch AutoP for Akuvox Devices
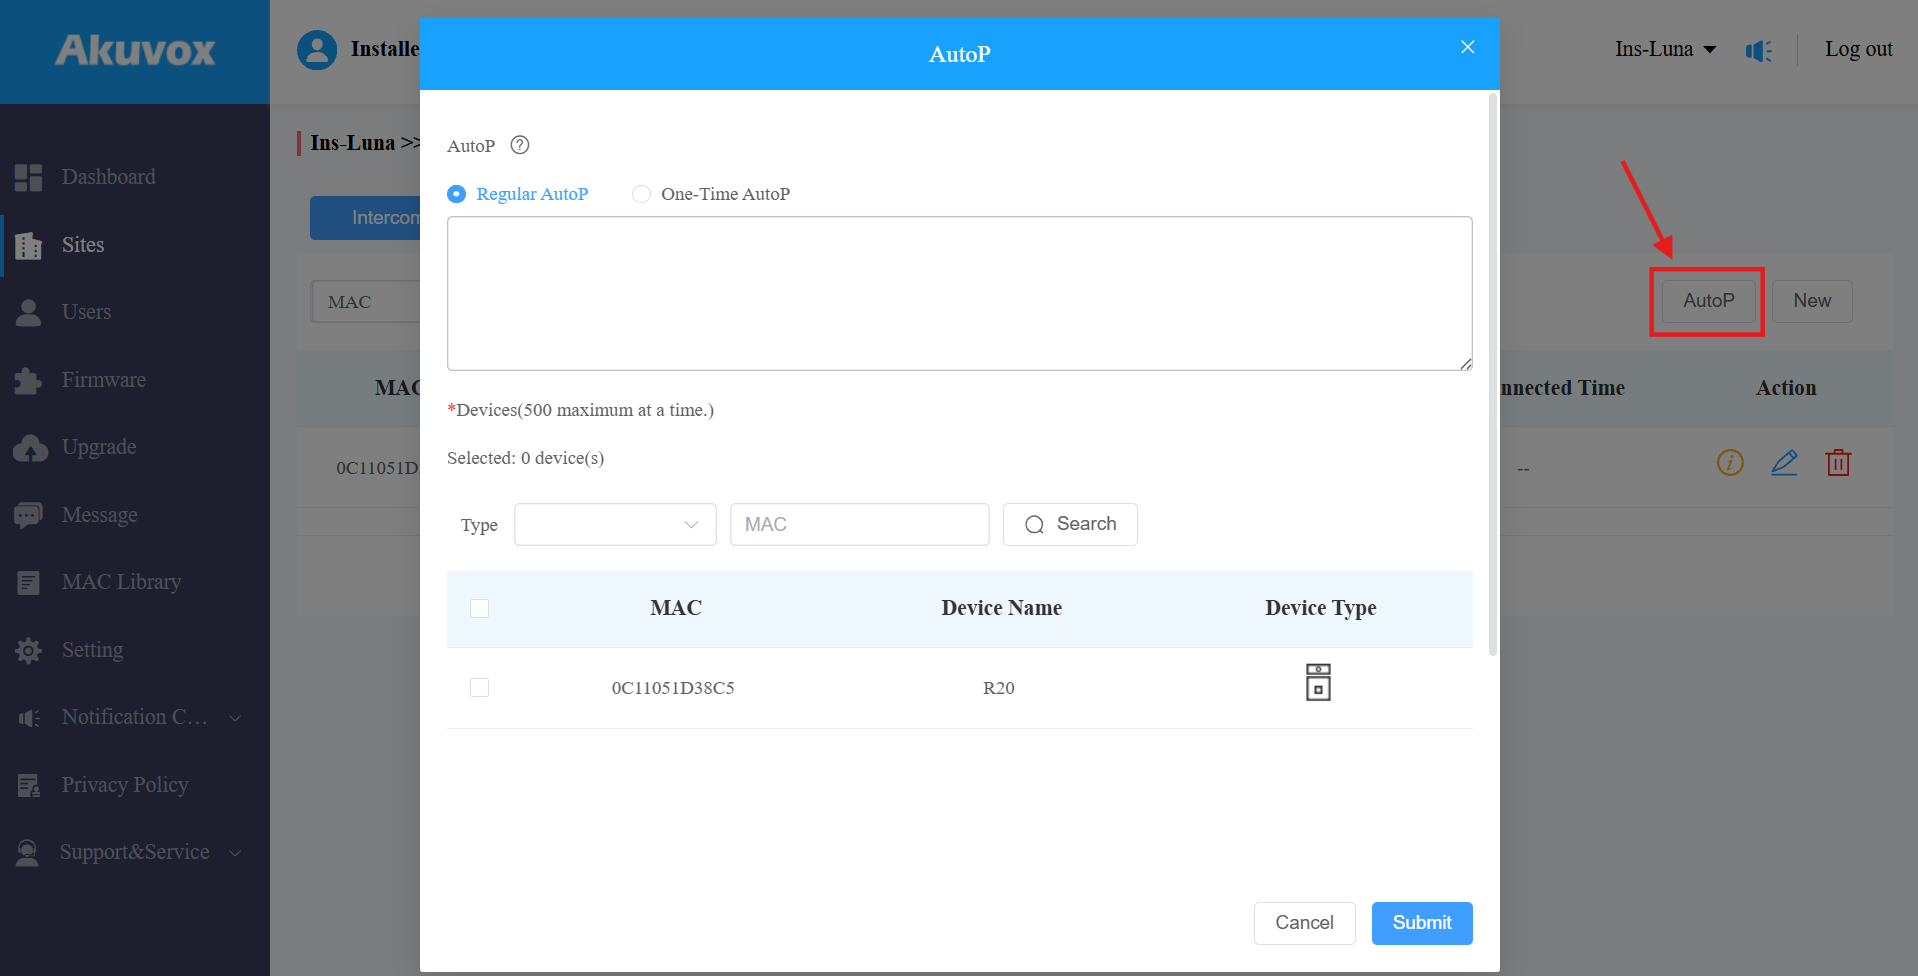
You configure the Akuvox devices remotely via auto-provisioning. You have two options: regular auto-provisioning or one-time auto-provisioning.
Click
 of the target user.
Click AutoP on the right. Select the AutoP type.
Regular AutoP: The configuration will always be valid.
One-Time AutoP: The configuration is only valid once.
Enter the AutoP command(s).
Search and select the devices to be provisioned, then click Submit. You can synchronize the commands to 500 devices at a time.
Note
Duplicate commands will not be retained.
One-time AutoP commands will not be valid once you reset the device(s), either for factory reset or configuration reset.
Remote Configuration and Maintenance
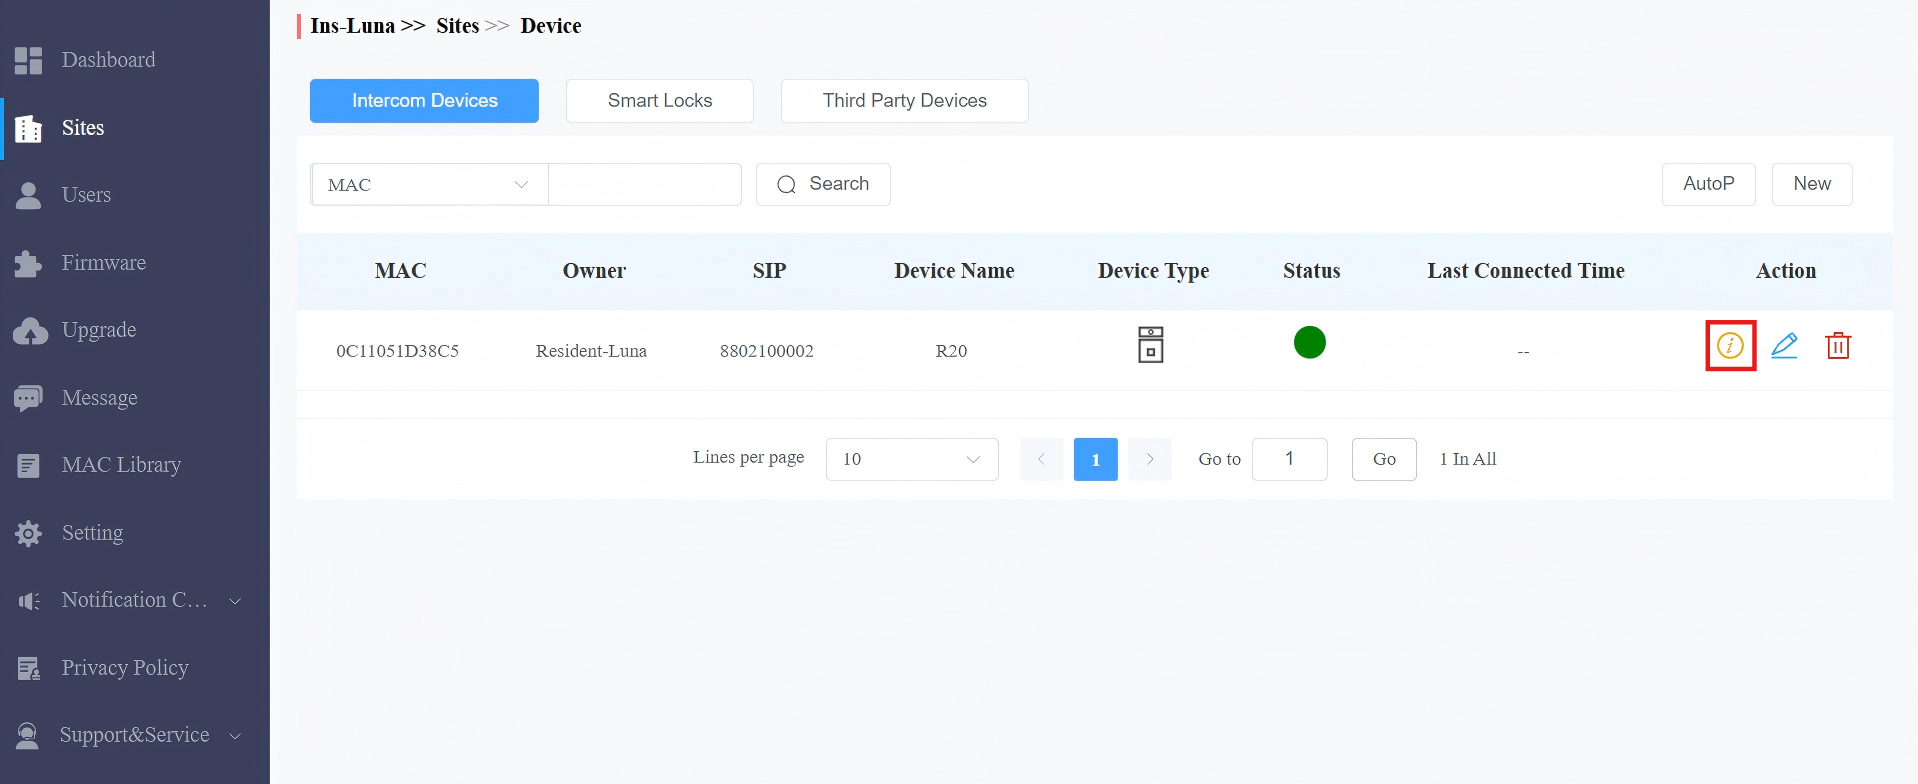
You can provide residents with remote maintenance in terms of device data transmission type configuration, device reboot, device web interface remote control, device provisioning, etc.
On the Sites module, click
 of the target user.
Click
 .
.
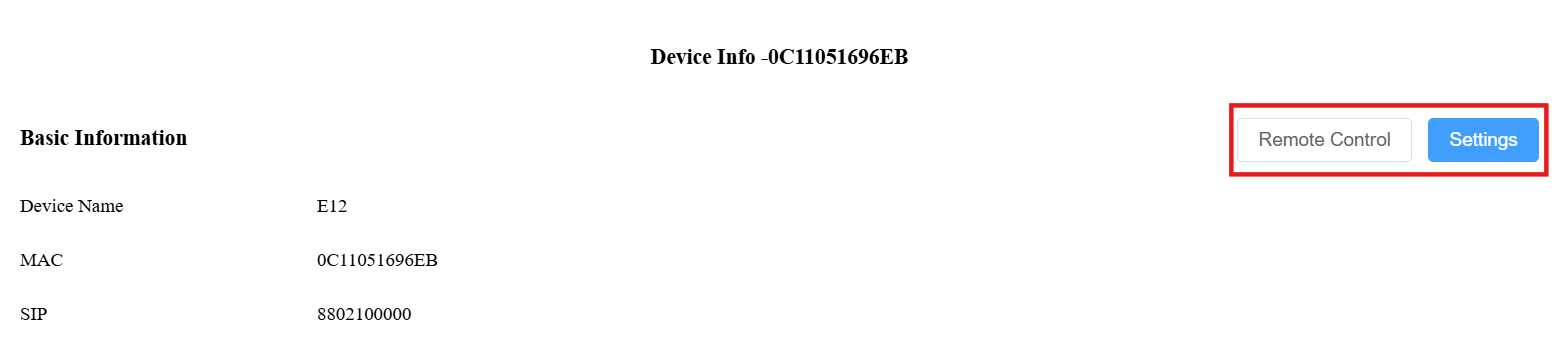
Click Remote Control to access the device's web settings.
Click Settings to set up the device further.
Note
If the device model is R20K or R20B and connected to an expansion module(MD06/MD12), a Push Button Setting option will be available for you to set up the expansion module.
Click here to view the details of setting up the expansion unit.
Reboot or reset the device.
Enter the commands for the auto-provisioning, then click on Submit.

Click One-Time Autop if you want the autop command(s) to be implemented only once.

Note
Duplicate commands will not be retained.
Firmware Management
You can check and update your device firmware version in the Firmware module and Upgrade module, respectively.
Check Firmware List
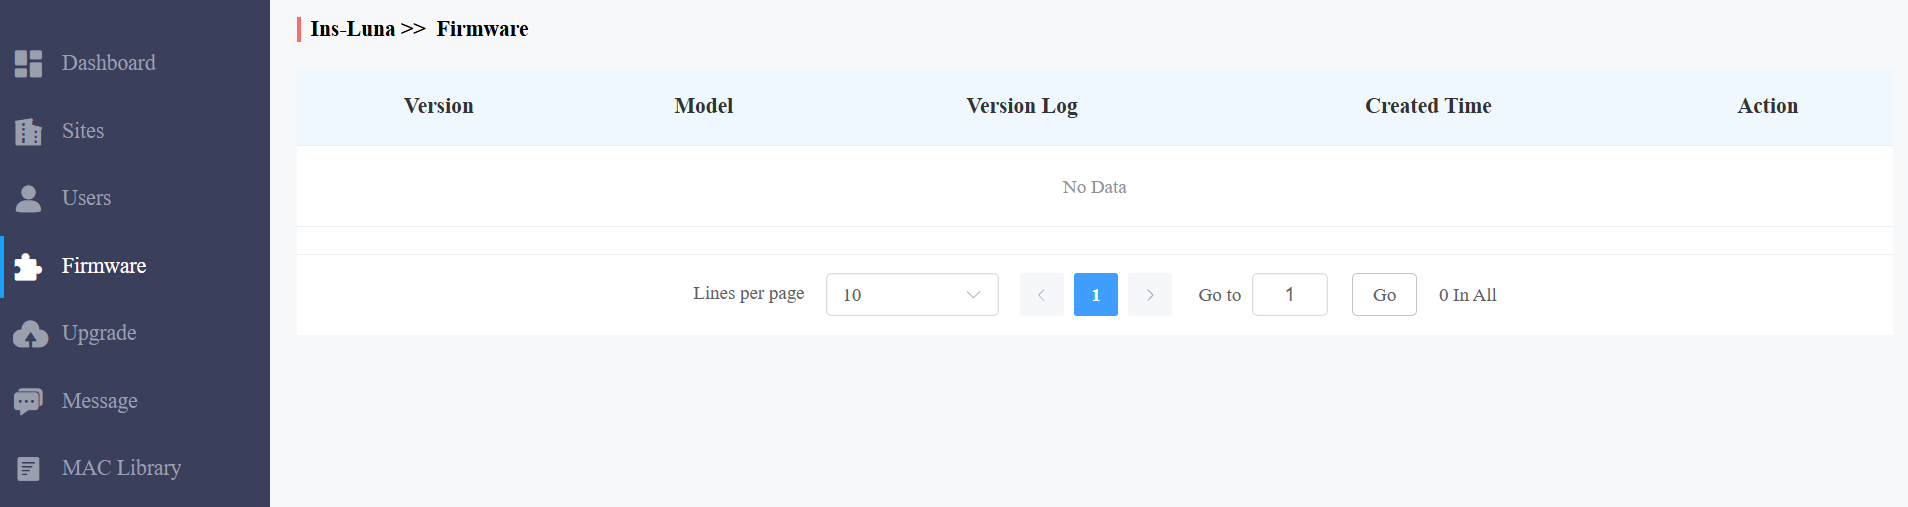
Before updating your device firmware, you can go to the Firmware module to check the latest firmware that is available for uploading.
Firmware List Description
Field Name | Description |
Version | Displays the firmware version number. |
Model | Displays the device model. |
Version Log | Generally displays remarks on the version. |
Created Time | Displays when the firmware is uploaded. |
Action | Click to check the detailed firmware information. |
Upgrade Firmware
You can upgrade the device firmware to the firmware version selected immediately or at a specific time.
On the Upgrade module, click New on the right.
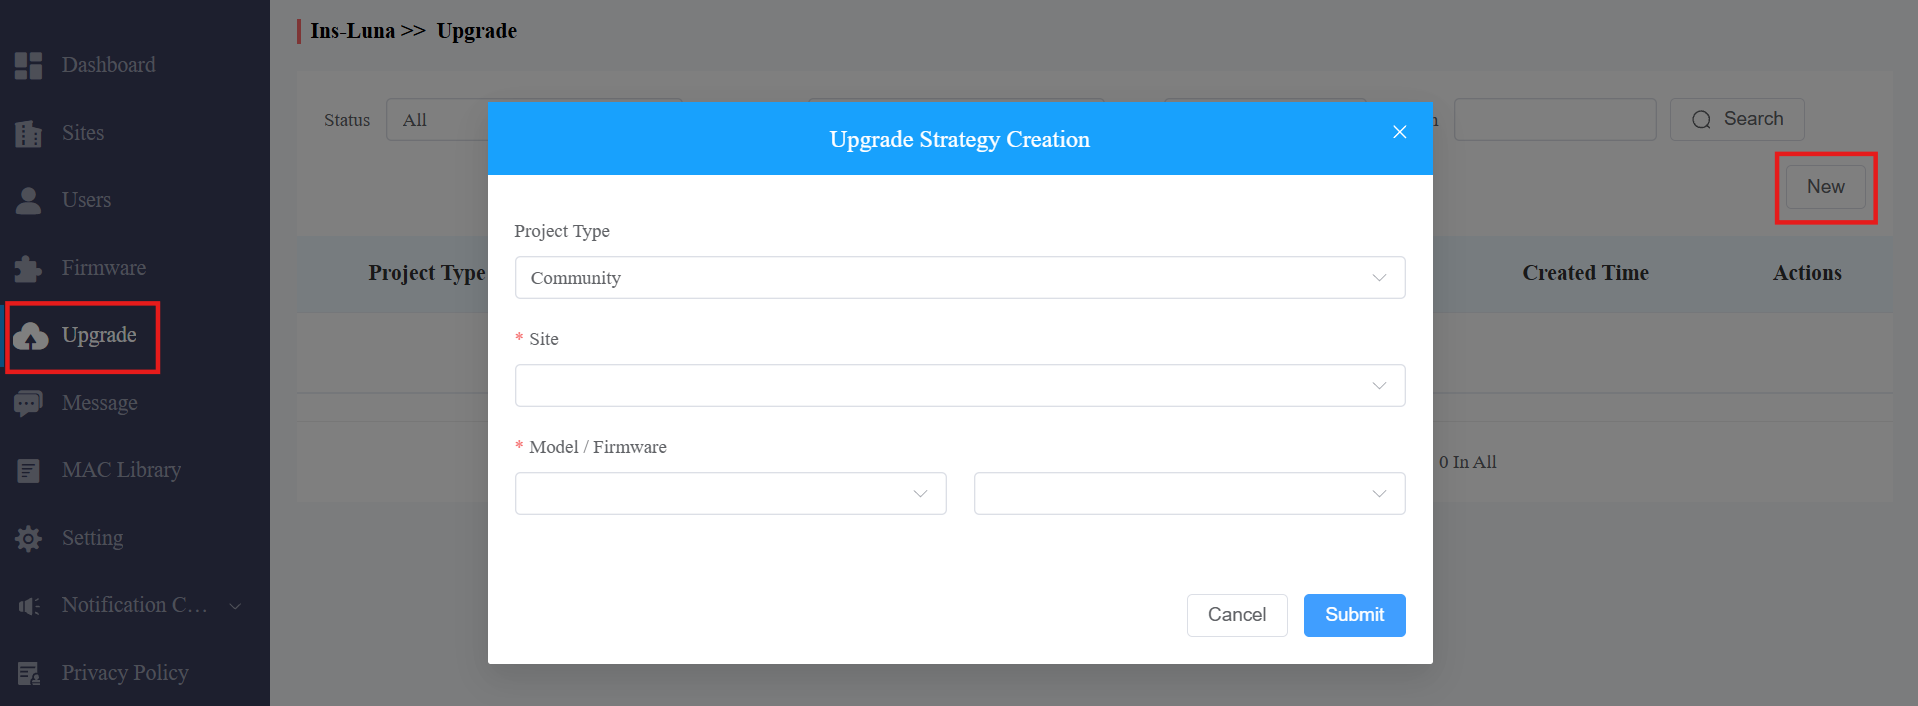
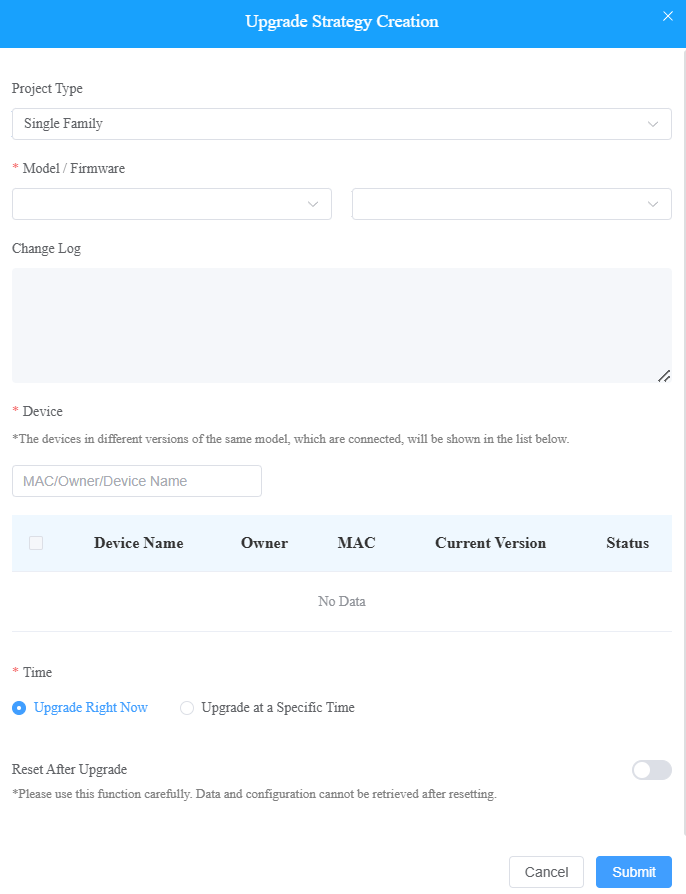
Select Single Family as the project type.
Select the firmware version and the device to be upgraded.
Select the time to upgrade the device.
You can check Reset After Upgrade to reset the device's configuration after the upgrade finishes.
Check/Edit Firmware Upgrade List
After you upgrade the device, you can check the device's upgrade status, modify the settings of devices in the pending status, and delete the specific upgrade record.
Check the upgrade records on the Upgrade module, and you can search for a specific record by defining the status(All, Pending, Executed, and Processing), project type, site, and version.
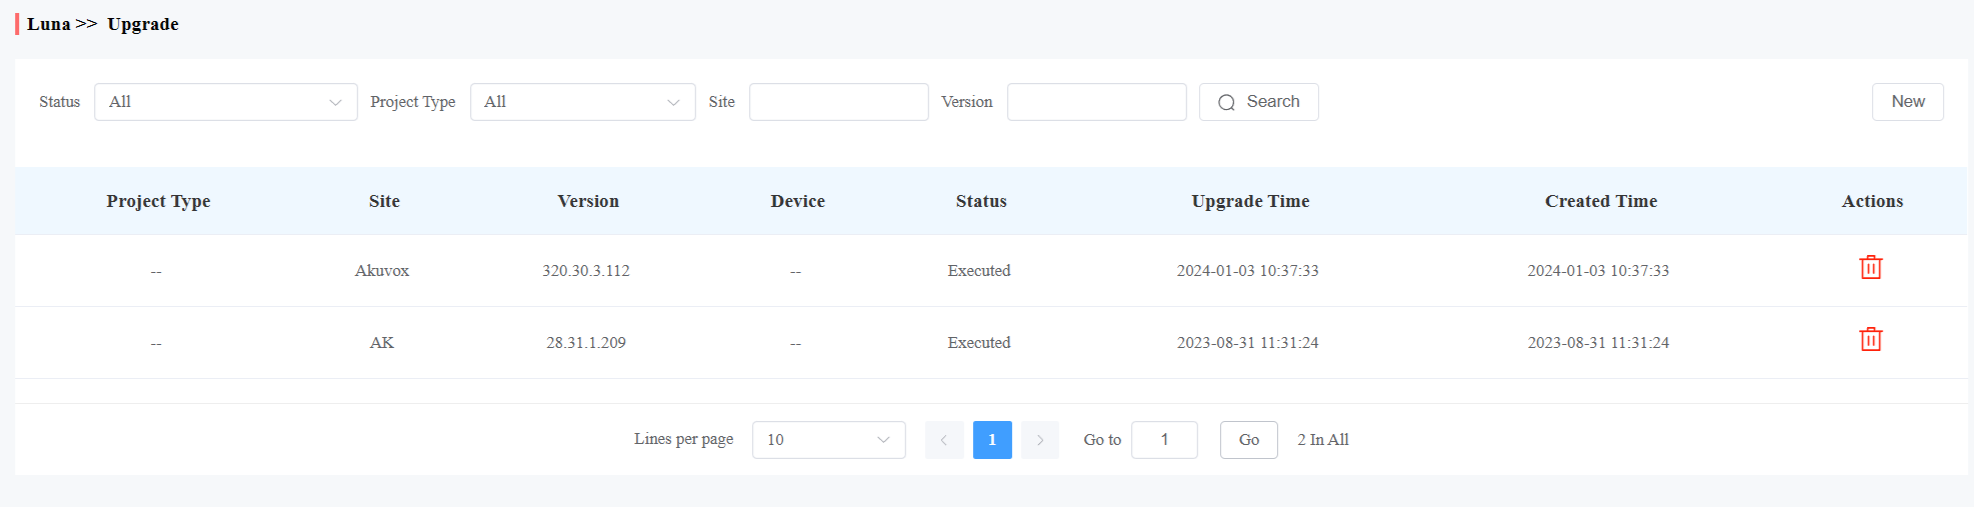
Update List Description
Field | Description |
Version | Displays the firmware version number in the update list. |
Device | Displays the device model in the update list. |
Status | Displays update status: “Pending” for the firmware that will be updated according to the update timing. “Executed” for the firmware that has finished updating, and “Processing” for the firmware that is being updated. |
Upgrade Time | Displays when the firmware is updated. |
Created Time | Displays when the update setting is created. |
Action | The action involves modifying the update setting and removing the update record. |
Note
After you initiate the specific firmware update, refresh the interface to update the firmware list.
Messages
The message module allows you to send messages to the users (residents) for notifications regarding the device and firmware management, etc.
Create and Send Messages
Click Message > New.
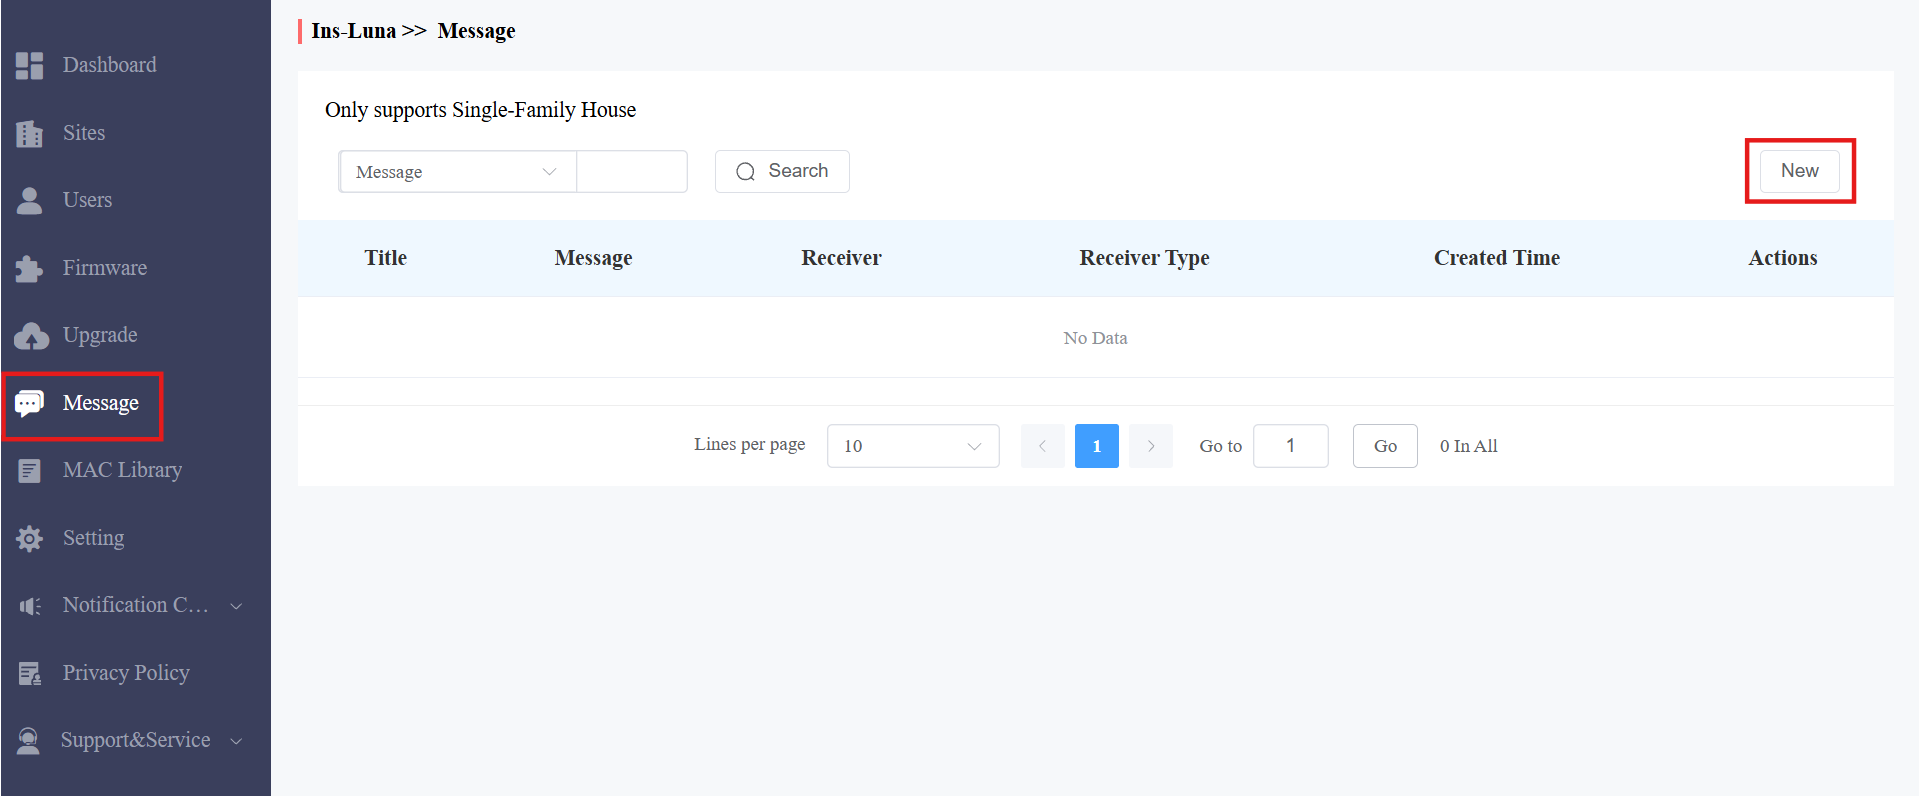
Enter the message and select the receiver(s).
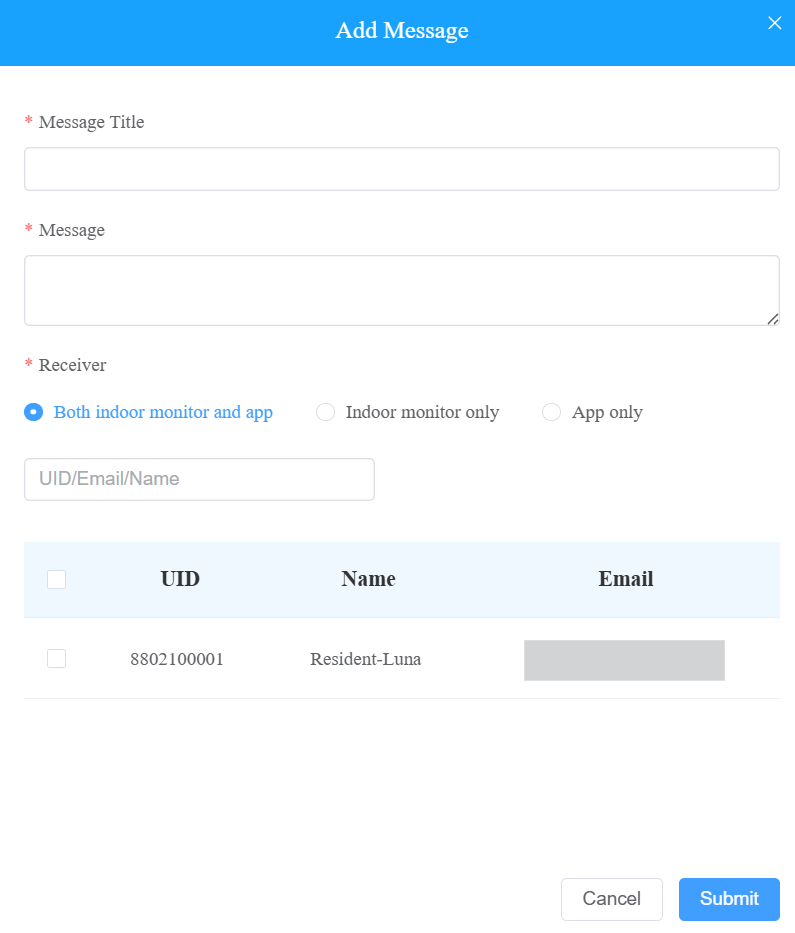
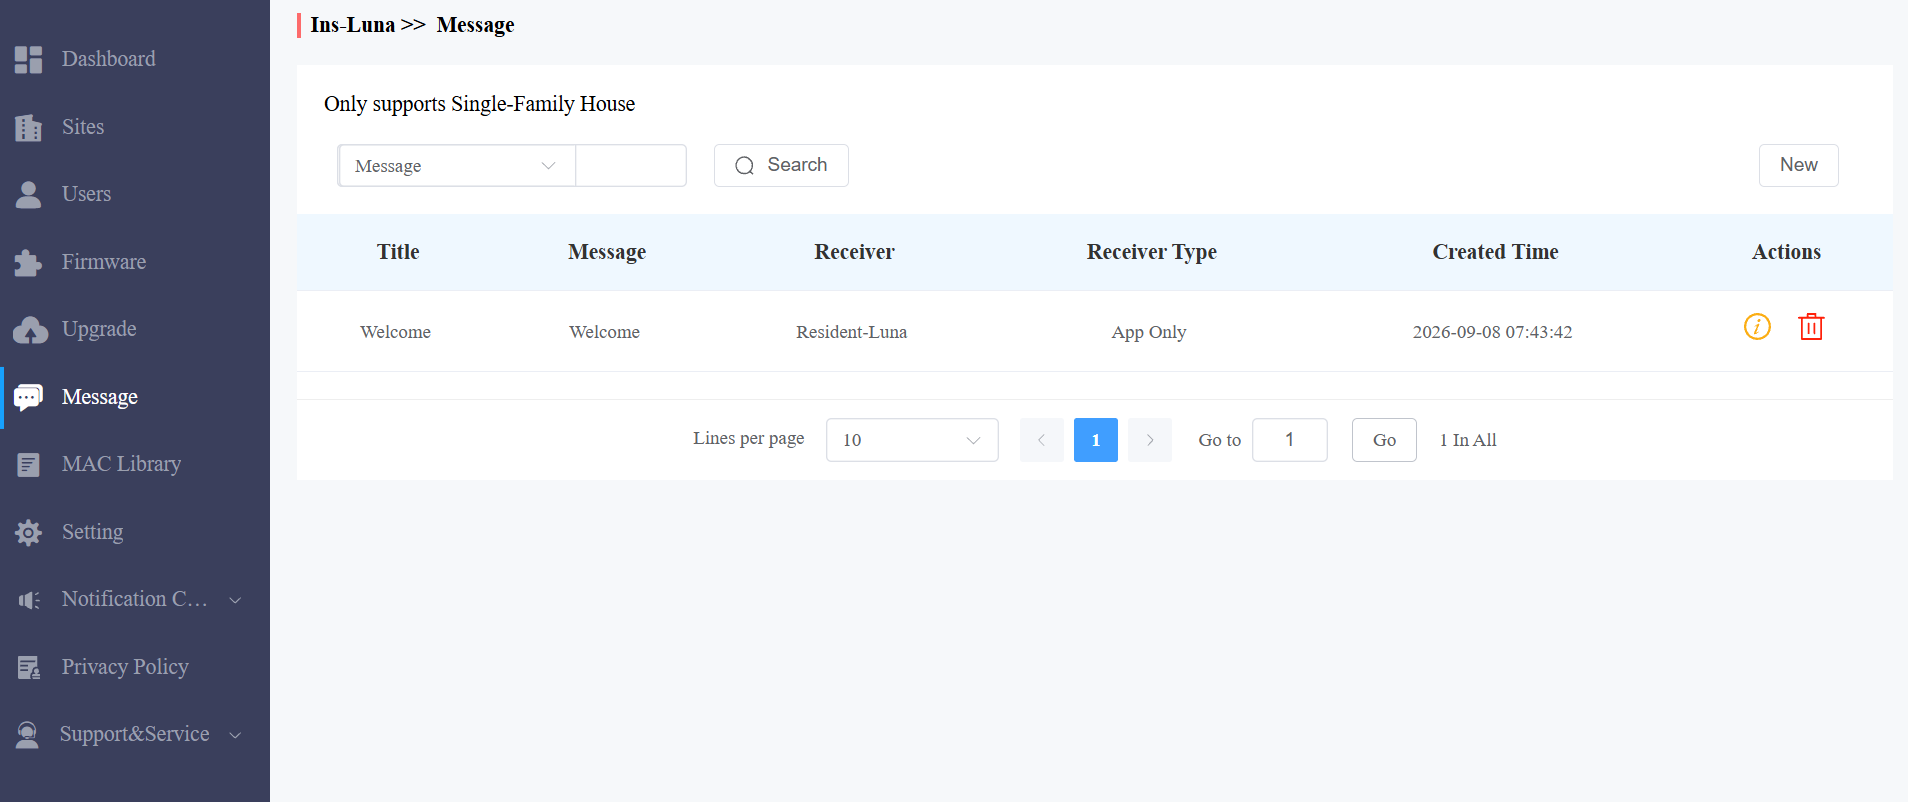
After creating and sending the messages, you can click  to view the details and click
  to delete them.
Log Control
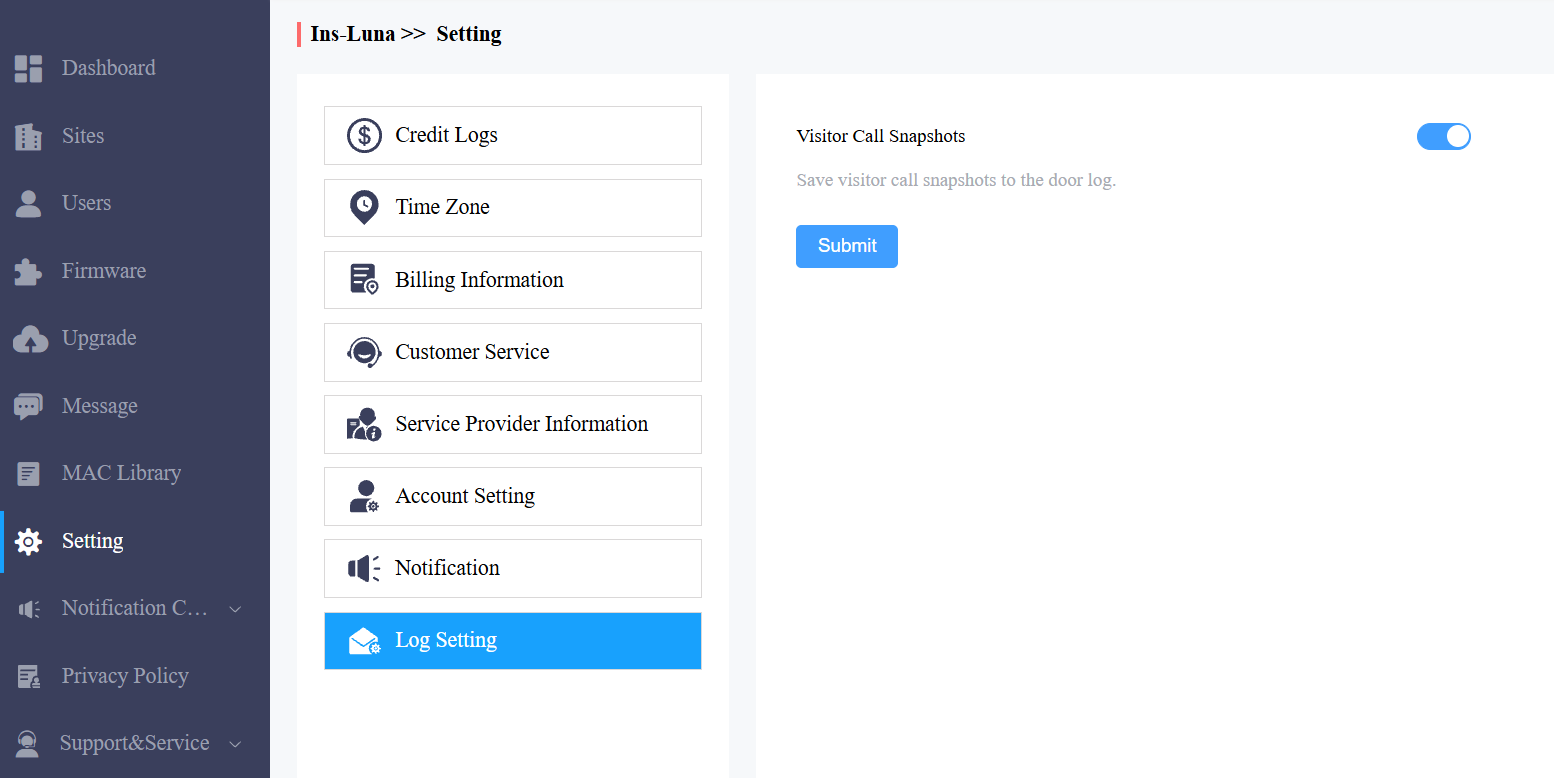
You can control whether to display captured images in door logs.
Click Setting > Log Setting. Enable/disable Visitor Call Snapshots. It is enabled by default.
Customer Service
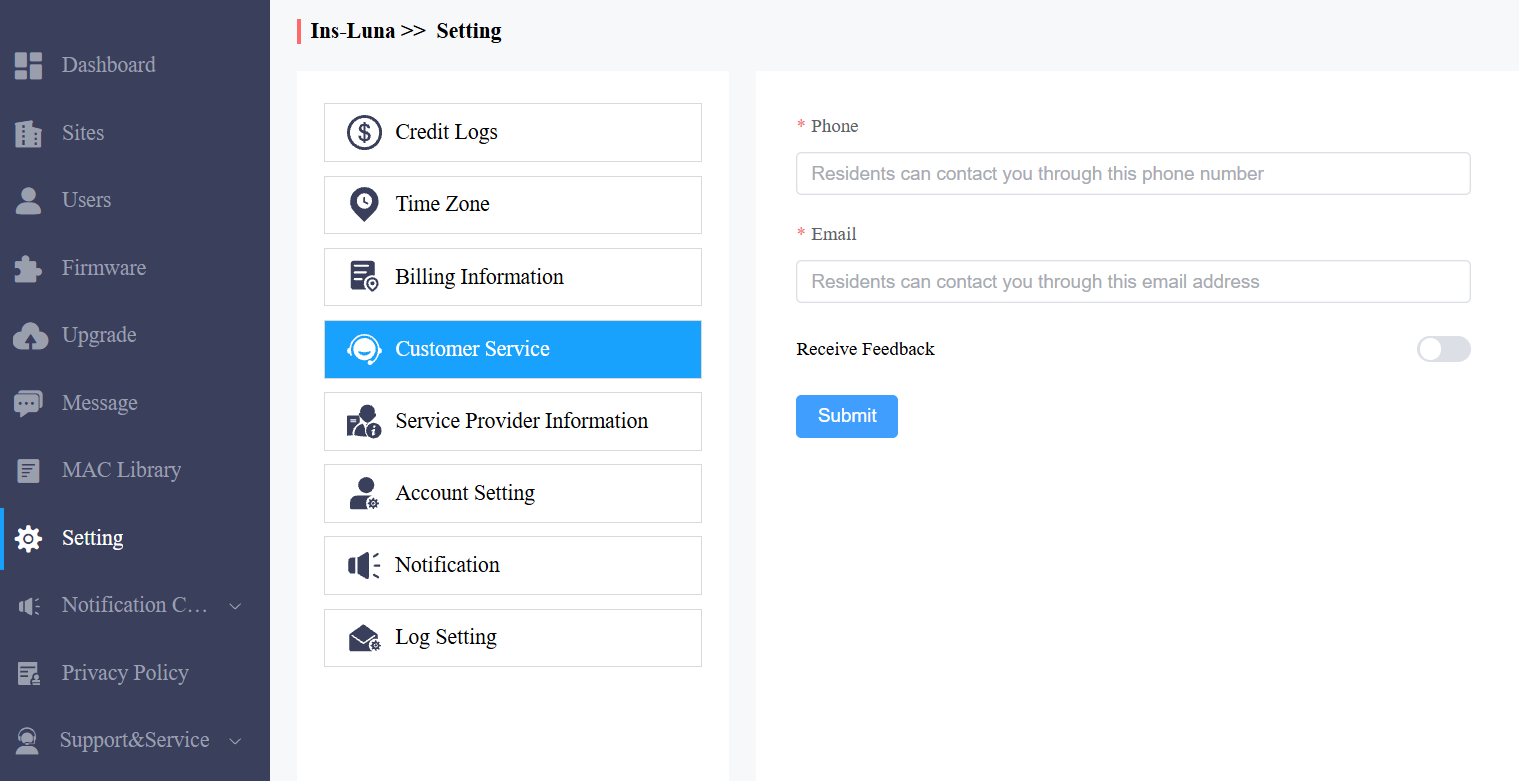
Customer service allows customers to contact you through the information you entered on the MySmart installer portal.
Click Setting and select Customer Service.
Enter or modify your phone number and email address.
Enable Receive Feedback if needed, and end users' feedback will be sent to the email address that you fill in.
Set Account Access Permission
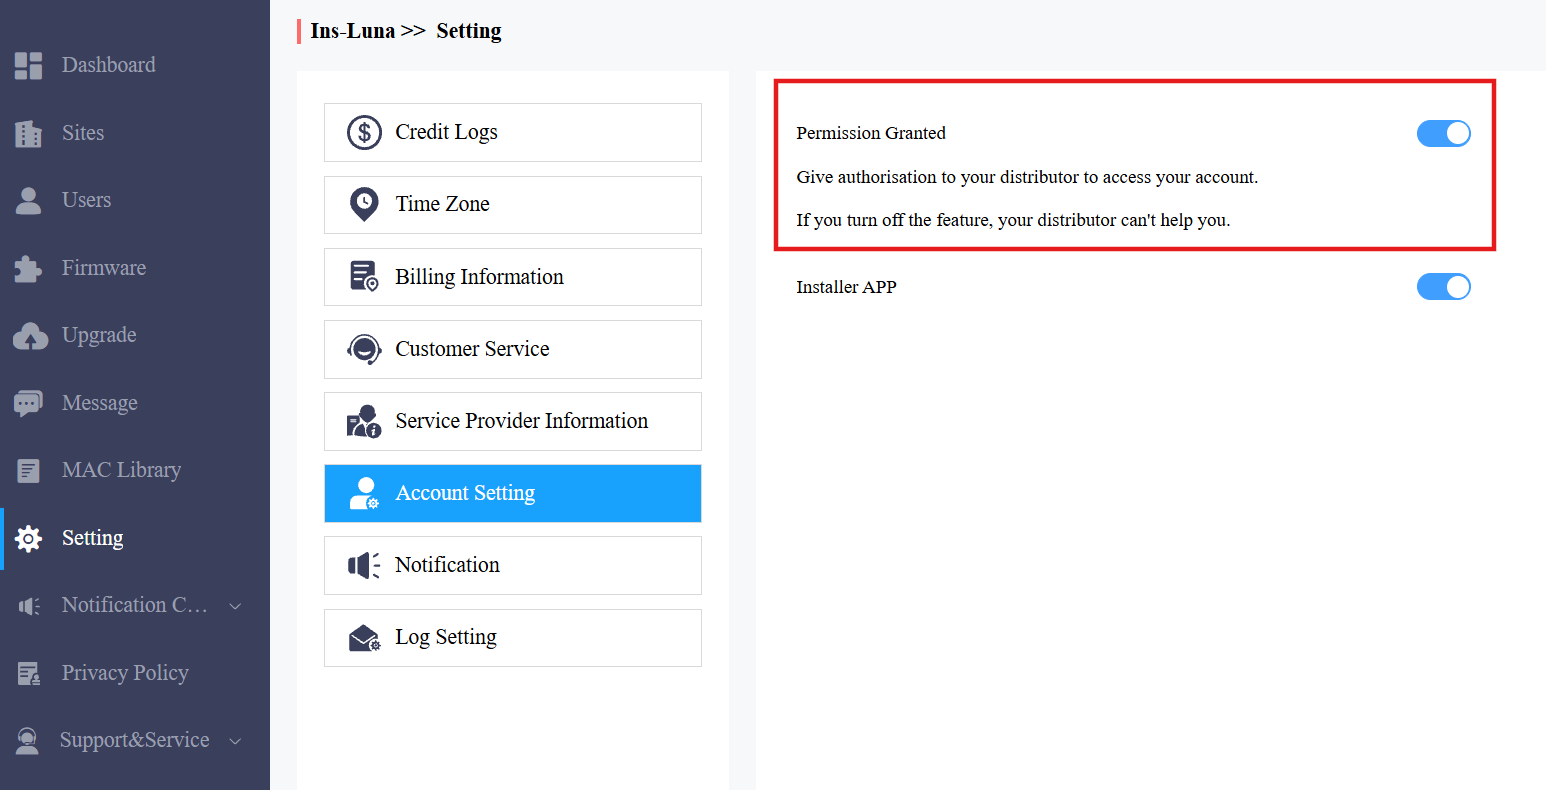
You can grant permission to your distributor to log in to your account without a password. With permission, distributors can switch to your account from their web portal to give you support or assistance. The account setting option will be displayed in the drop-down list once the distributor enables the account access feature. You can turn on or off the permission whenever you need.
Click Setting and select Account Setting.
Disable/enable the permission.
Note
The account setting will only appear once your distributor enables the account access feature. By default, the Permission Granted feature is turned on.
Privacy Policy
You will see the Privacy Policy window when you log into the platform for the first time.
The Privacy Policy tells you how the user data is collected, used, and protected.
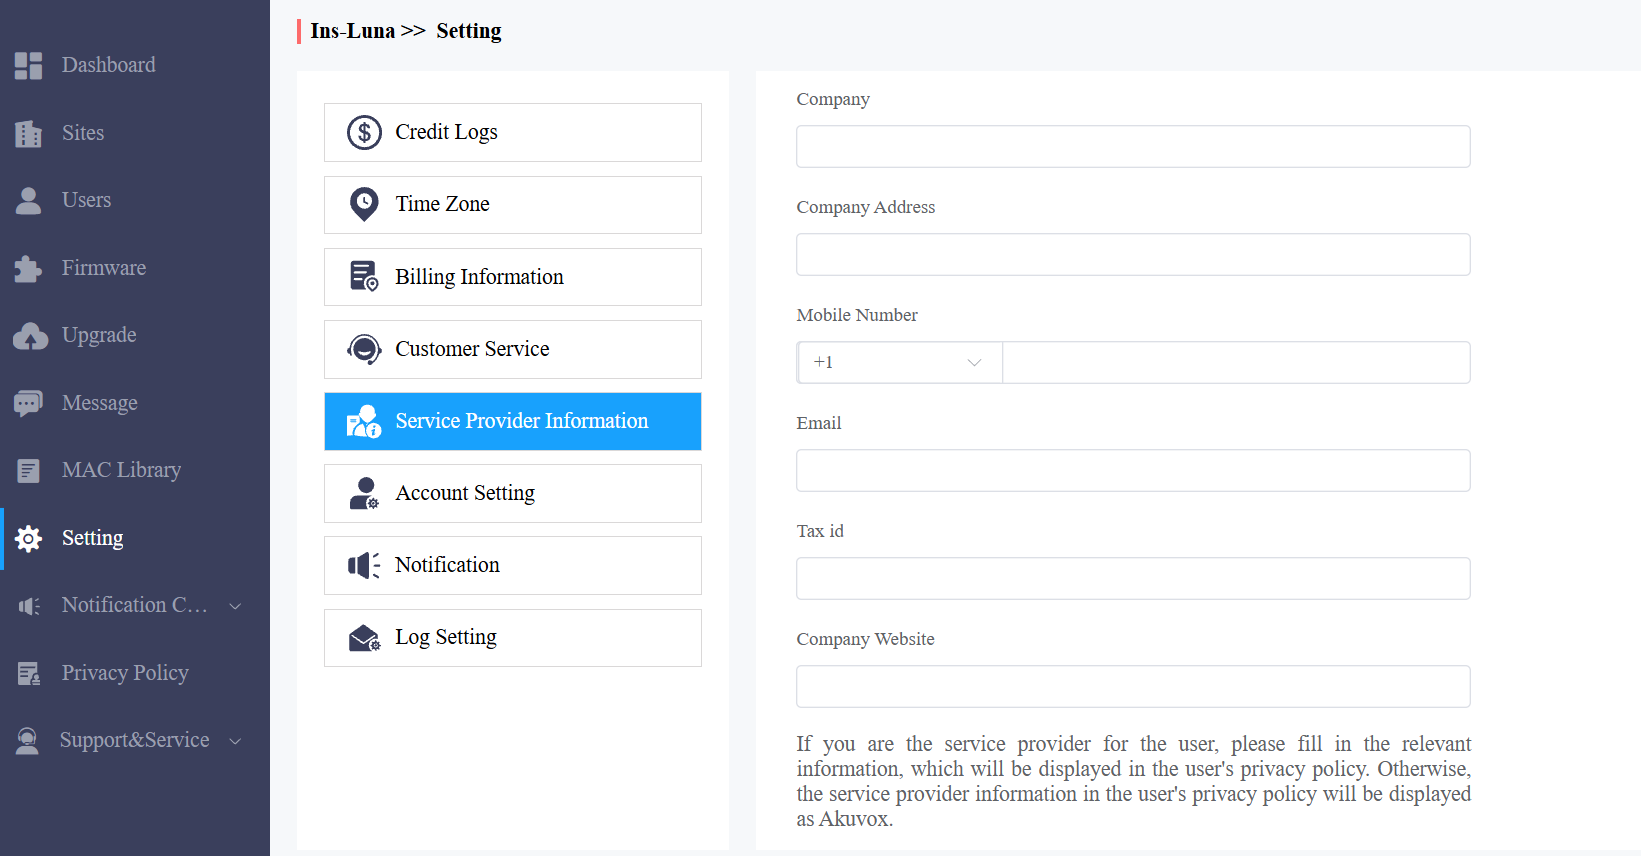
When you click Agree, you will be guided to the Service Provider Information interface to fill in your information. The information will be displayed in the privacy policy for end users. It is not mandatory to fill it out. Not filling it in will not affect your use of MySmart services.
When you click Disagree, you cannot log in to the MySmart platform.
Technical Support & Service
Support&Service module offers you a link to the Akuvox ticket system, in which you can not only get access to a variety of technical information, such as feature guides, FAQ, etc., but also log in to the system where you can raise your questions that will be taken care of by Akuvox technical support team.
View MySmart User Guide
Click Support&Service module.
Click Knowledge Base sub-module.
Click Product Manual and then Tool & Software.
Ticket System
Click Support&Service > Technical Support sub-module.
Click Go to Helpdesk to enter the Akuvox ticket system page.
Sign up and log in to the Akuvox ticket system for technical information and support.
CAP System
Click Support&Service > CAP sub-module for information about how to become a certified Akuvox Partner.
Sign up and log in to the Akuvox CAP system for sales and technical information and support.
Contact Us
For more information about the product, please visit us at www.akuvox.com, or feel free to contact us by
Sales email: sales@akuvox.com
Technical support email: support@akuvox.com
Telephone: +86-592-2133061 ext.7694/8162
We highly appreciate your feedback about our products.