Local Relay
Un relais local est une unité externe physiquement proche et directement connectée à l’interphone. Il permet au système d’interphone de déclencher des actions, comme déverrouiller une porte, en fonction des saisies ou des autorisations de l’utilisateur.
You can configure the relay switch(es) for the door access on the web Access Control > Relay > Relay interface.
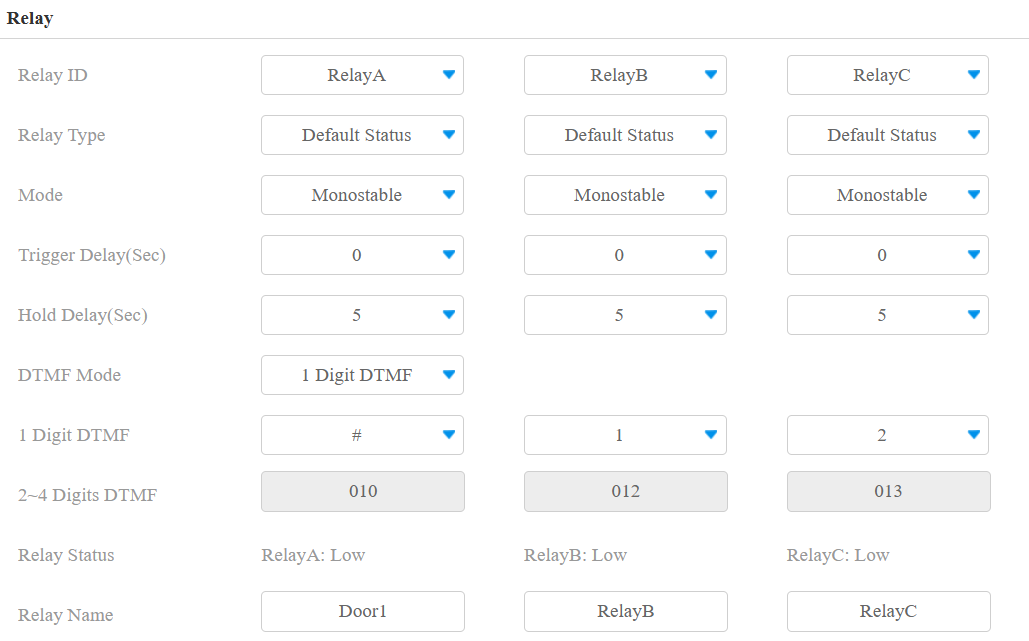
Relay ID: The specific relay for door access. Please note that R29Z/R29ZL has only one relay available.
Type: Determine the interpretation of the Relay Status regarding the state of the door:
Default State: A “Low” status in the Relay Status field indicates that the door is closed, while “High” indicates that it is opened.
Invert State: A “Low” status in the Relay Status field indicates an opened door, while “High” indicates a closed one.
Mode: Specify the conditions for automatically resetting the relay status.
Monostable: The relay status resets automatically within the relay delay time after activation.
Bistable: The relay status resets upon triggering the relay again.
Trigger Delay(Sec): Set the delay time before the relay triggers. For example, if set to 5 seconds, the relay activates 5 seconds after pressing the Unlock button.
Hold Delay(Sec): Determine how long the relay stays activated. For example, if set to 5 seconds, the relay remains to be opened for 5 seconds before closing.
DTMF Mode: Set the digits of the DTMF code.
1 Digit DTMF: Define the 1-digit DTMF code within the range(0-9 and *,#) when the DTMF Mode is set to 1-digit.
2-4 Digit DTMF: Set the DTMF code based on the number of digits selected in the DTMF Mode.
Relay Status: Indicate the states of the relay, which are normally opened and closed. By default, it shows low for normally closed(NC) and high for Normally Open(NO).
Relay Name: Assign a distinct name for identification purposes.
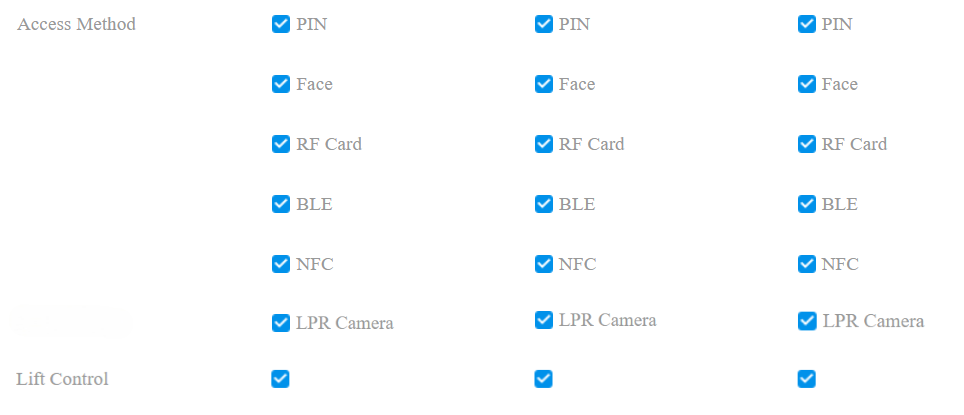
Access Method: Check the method(s) to trigger the relay.
Lift Control: Set whether to perform lift control when the specific relay is triggered.
Note
External devices connected to the relay require separate power adapters.
Web Relay
Un relais web dispose d’un serveur web intégré et peut être contrôlé via Internet ou un réseau local. L’appareil peut utiliser un relais web pour contrôler soit un relais local, soit un relais distant ailleurs sur le réseau.
Cliquez ici pour voir comment configurer le relais web.
To set up a web relay, go to Access Control > Web Relay interface.

Type: Determine the type of relay activated when employing door access methods for entry.
Disabled: Only activate the local relay.
Web Relay: Only activate the web relay.
Both: Activate both the local relay and web relay. Typically, the local relay is triggered first, followed by the web relay to execute their pre-configured actions.
IP Address: The web relay IP address provided by the web relay manufacturer.
User Name: The user name provided by the web relay manufacturer.
Password: The manufacturer-provided authentication key for the web relay. Authentication occurs via HTTP. Leaving the Password field blank indicates non-use of HTTP authentication. You can define the password using HTTP GET in the Web Relay Action field.
Web Relay Action: Configure the actions to be performed by the web relay upon triggering. Enter the manufacturer-provided URLs for various actions, with up to 50 commands.
NOTE
If the URL includes full HTTP content (e.g., http://admin:admin@192.168.1.2/state.xml?relayState=2), it doesn't rely on the IP address that you entered above. However, if the URL is simpler (e.g., "state.xml?relayState=2"), the relay uses the entered IP address.
Web Relay Key: Determine the methods to activate the web relay based on whether the DTMF code is filled.
- Filling with the configured DTMF code restricts activation to card swiping and DTMF.
- Leaving it blank enables all door-opening methods.
Web Relay Extension: Specify the intercom device and the methods it can use to activate the web relay during calls.
- When an intercom device’s IP/SIP is specified, only that device can trigger the web relay (except for via card swiping or DTMF) during calls.
- If left blank, all devices can trigger the relay during calls.
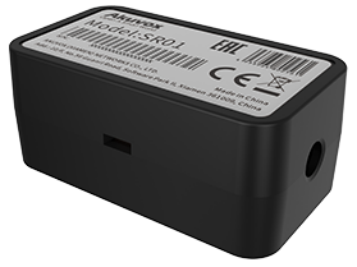
Security Relay
Le Relais de Sécurité, connu sous le nom d’Akuvox SR01, est un produit conçu pour renforcer la sécurité des accès en empêchant les tentatives d’effraction non autorisées. Installé à l’intérieur de la porte, il régule directement le mécanisme d’ouverture, garantissant que la porte reste sécurisée même en cas de dommage à l’appareil.
Cliquez ici pour voir comment configurer le relais de sécurité.
To set up the security relay, navigate to Access Control > Relay > Security Relay interface.
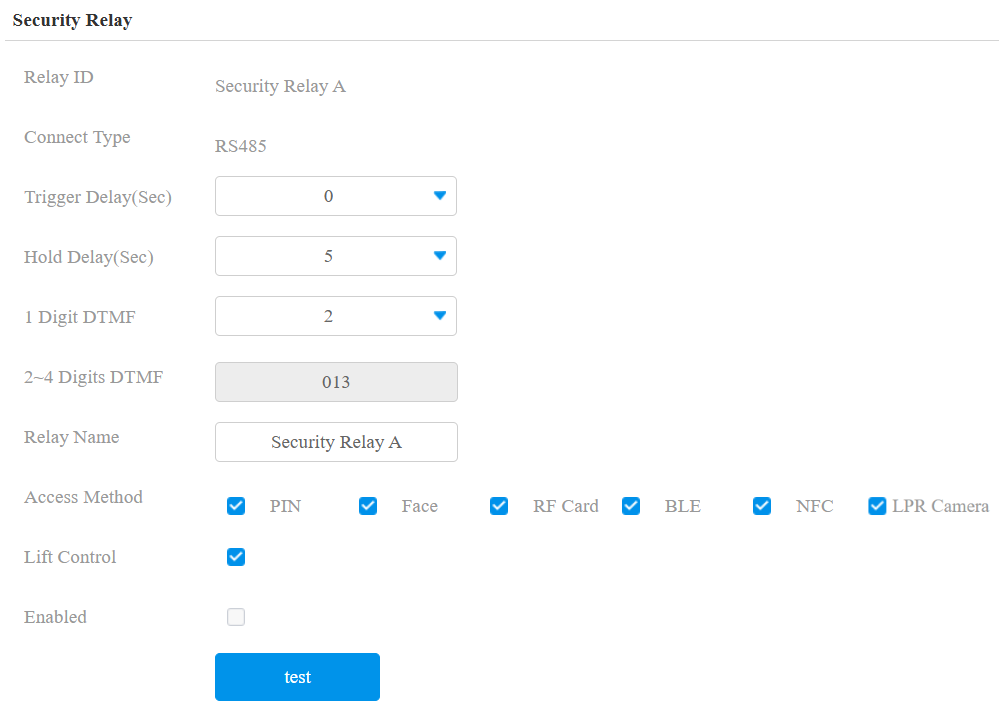
Connect Type: The security relay connects to the door phone using RS485 by default.
Trigger Delay (Sec): Set the delay time before the relay triggers. For example, if set to 5 seconds, the relay activates 5 seconds after pressing the Unlock button.
Hold Delay (Sec): Determine how long the relay stays activated. For example, if set to 5 seconds, the relay remains to be opened for 5 seconds before closing.
1 Digit DTMF: Define the 1-digit DTMF code within the range(0-9 and *,#) when the DTMF Mode in the Relay section above is set to 1-Digit.
2~4 Digits DTMF: Set the DTMF code based on the number of digits selected in the DTMF Mode.
Relay Name: Name the security relay. The name can be displayed in door-opening logs. When connecting to the SmartPlus Cloud, the Cloud server will automatically assign the relay name.
Access Method: Check the method(s) to trigger the security relay.
Lift Control: If enabled, the lift control will be activated along with the SR01 trigger.
Enabled: When using the SR01 via RS485, you need to set the RS485 mode to Others on the Device > RS485 interface.
Upgrade SR01
You can upgrade the Akuvox SR01 on the Device > RS485 interface.
SR01 Upgrade is available when the Apply RS485 Setting To option is set to Others.
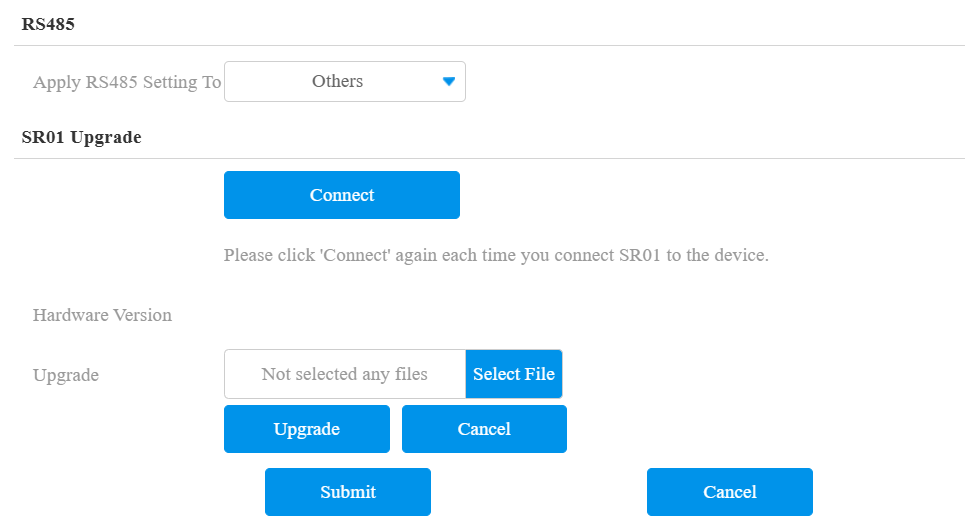
Connect: Ensure a successful connection between the device and the SR01 before the upgrade.
Hardware Version: The SR01 hardware version will display after a successful connection.
Select File: Click to upload the ROM file before clicking Upgrade.
Note
Click here to download the upgrade file.