Relay Switch Setting
You can configure the relay switch(es) and DTMF for the door access on the web Intercom > Relay interface.
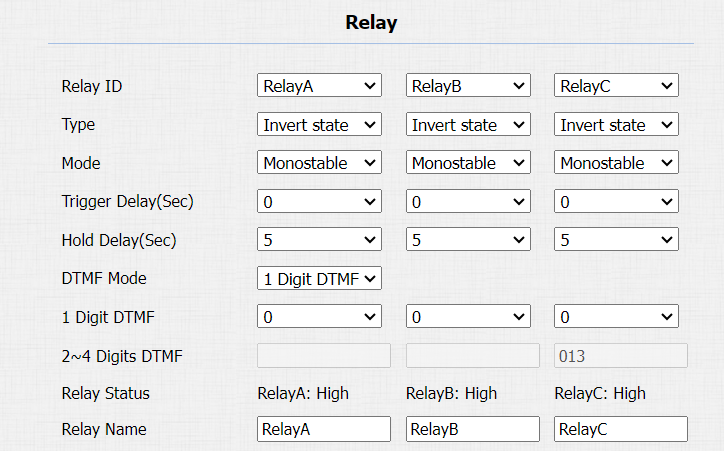
Parameter Set-up:
-
Type: if Default State is selected, Low in the Relay Status field means the door is closed, High means the door is opened. If Invert State is selected, High in the Relay Status field means the door is closed. Low means the door is opened.
-
Mode: there are two modes, Monostable and Bistable. If Monostable is selected, the relay status will be automatically reset within the relay delay time after the relay is triggered. If Bistable is selected, relay status will be reset after the relay is triggered again.
-
Trigger Delay (Sec): set the relay trigger delay timing (Ranging from 1-10 Sec). For example, if you set the delay time as 5 Sec. Then the relay will not be triggered until 5 seconds after you press unlock tab.
-
Hold Delay (Sec): set the relay hold delay timing (Ranging from 1-10 Sec). For example, if you set the hold delay time as 5 Sec. Then the relay will be delayed for 5 seconds after the door is unlocked.
-
DTMF Mode: select the number of DTMF digits for the door access control (Ranging from 1-4 digits) For example, you can select a 1-digit DTMF code or a 2-digit DTMF code, etc., according to your need.
-
1 Digit DTMF: set the 1-digit DTMF code within range from (0-9, *, and #).
-
2~4 Digits DTMF: set the DTMF code according to the DMTP Option. For example, you are required to set the 3-digit DTMF code if DTMF Mode is set as 3 digits.
-
Relay Status: relay status is low by default which means normally closed (NC). If the relay status is high, then it is in Normally Open status (NO).
-
Relay Name: name the relay switch according to your need. For example, you can name the relay switch according to where the relay switch is located for convenience.
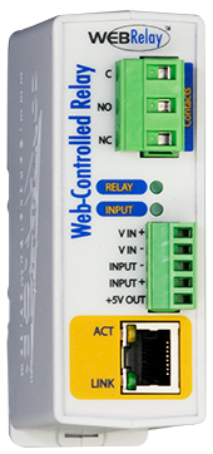
- Only the external devices connected to the relay switch need to be powered by powered adapters as the relay switch does not supply power.
- If DTMF mode is set as 1 Digit DTMF, you cannot edit the DTMF code in 2~4 Digits DTMF. And if you set DTMF mode from 2-4 in 2~4 Digits DTMF field, you cannot edit the DTMF code in the 1 Digit DTMF field.
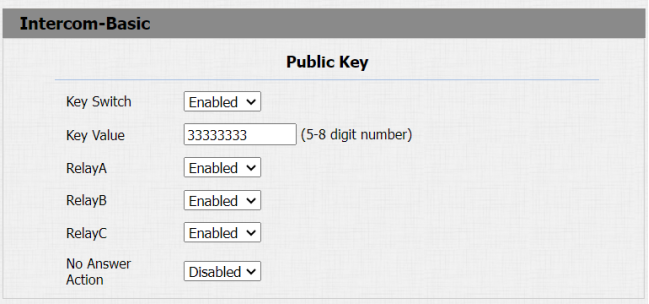
Select Speed Dial and Manager Dial Triggered Relay
This function is used to trigger a relay when you initiate the speed dial numbers or manager dial numbers. To do this configuration, you can go to Intercom > Basic > Public Key.
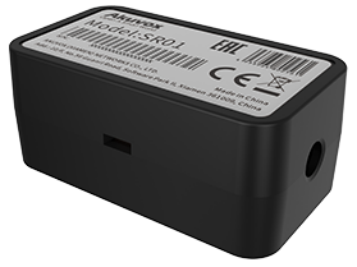
Security Relay Setting
The Security Relay, known as Akuvox SR01, is a product designed to bolster access security by preventing unauthorized forced entry attempts. Installed inside the door, it directly governs the door opening mechanism, ensuring that the door remains secure even in the event of damage to the device.
Click here to view how to set up the security relay.
To set up the security relay, navigate to Intercom > Relay > Security Relay.
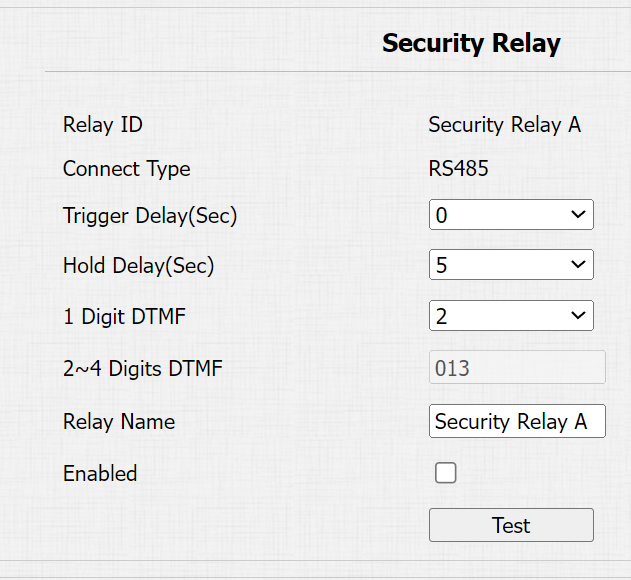
Parameter Set-up:
- Connect Type: select the connection type between the security relay and the door phone. You can select connection via the door phone Relay A Power Output or RS485.
- Trigger Delay (Sec): set the relay trigger delay timing (ranging from 1-10 Sec.) For example, if you set the delay time as 5 sec. then the relay will not be triggered until 5 seconds after you press Unlock tab. The default is 0 meaning triggering relay right after you press the unlock tab.
- Hold Delay (Sec): set the relay hold delay timing (ranging from 1-10 Sec.) For example, if you set the hold delay time as 5 Sec. then the relay will be delayed for 5 after the door is unlocked.
- 1 Digit DTMF: set the 1 digit DTMF code within range from ( 0-9 and *,#).
- 2~4 Digits DTMF: set the DTMF code according to the DMTP Option setting. For example, you are required to set the 3-digit DTMF code if DTMP Mode is set as 3- digits.
- Relay Name: give a name to the relay if needed. And relay name can be edited on the SmartPlus cloud and SDMC.
Web Relay Setting
A web relay has a built-in web server and can be controlled via the Internet or a local network. The device can use a web relay to either control a local relay, or a remote relay somewhere else on the network.
Click here to view how to set up web relay.
Web relay needs to be set up on the web Phone > WebRelay interface.
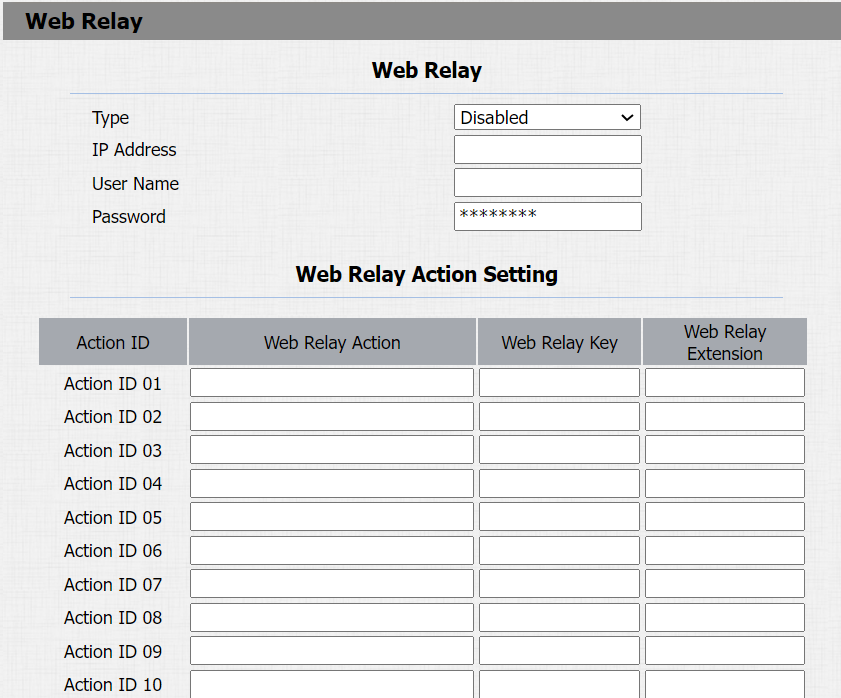
Parameter Set-up:
- Type: select among three options Disabled, WebRelay, and Both. Select Web relay to enable the web relay. Select Disable to disable the web relay. Select Both to enable both local relay and web relay.
- IP Address: the web relay IP address provided by the web relay manufacturer.
- User Name: the user name provided by the web relay manufacturer.
- Password: the password provided by the web relay manufacturer. The passwords are authenticated via HTTP and you can define the passwords using http get in Action.
- Web Relay Action: the specific web relay action command provided by the web manufacturer for different actions by the web relay. Without adding IP address, username, password, you can fill in the HTTP command in the web relay action. You can configure multiple web relays. See the HTTP command example below:
a.If you do not fill in IP address in the IP Address Field above, fill in a complete HTTP command.
For example, Http://admin:admin@192.168.1.2/state.xml?relayState=2. ( HTTP://:@IP address>/state.xml?relayState=2)
b. If you have already filled in the IP address above, fill in the omitted HTTP command, eg. state.xml?relayState=2. - Web Relay Key: it can be null or enter the configured DTMF code, when the door is unlocked via the DTMF code, the action command will be sent to the web relay automatically.
- Web Relay Extension: it can be null or enter the relay extension information, which can be a SIP account username of an intercom device such as an indoor monitor, so that the specific action command will be sent when unlock is performed on the intercom device.
Configure White List for Door Relay
In order to secure the door access via DTMF codes, you can set up the DTMF whitelist on the device web Intercom > Relay > Open Relay Via DTMF interface so that only the caller numbers you designated in the door phone can use the DTMF code to gain door access.
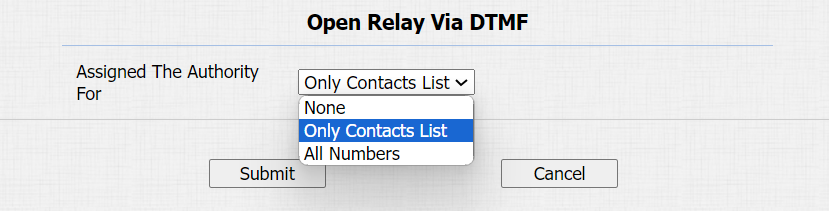
Parameter Set-up:
- Assigned The Authority For: select All numbers to allow all numbers for the DTMF door unlock; select None to deny all numbers for the DTMF door unlock; select Only Contacts List to only allow the contact number in your door phone.