Tamper Alarm
La función de alarma de manipulación impide que cualquiera retire el dispositivo sin permiso. Los dispositivos Akuvox soportan dos tipos de protección contra manipulaciones: detección de gravedad y detección de estado de botones.
Haz clic aquí para ver qué tipo soporta el dispositivo y conocer los detalles de la función.
Set it up on the System > Security > Tamper Alarm interface. Click Disarm to clear the alarm.

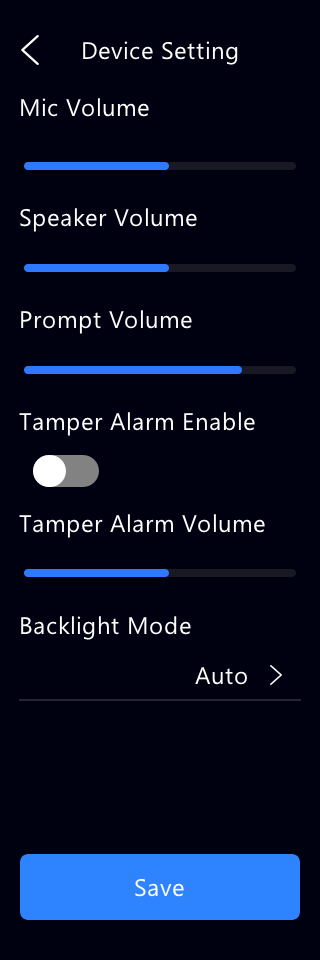
You can also enable/disable Tamper Alarm on the Setting > Device Setting screen.
Disarm Setting
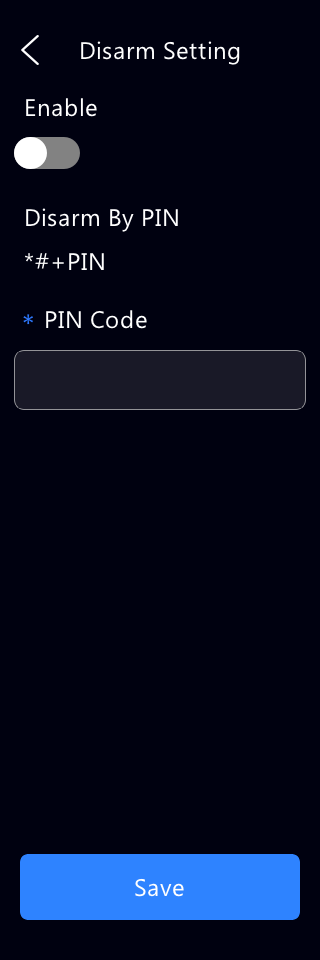
You can set the disarm code on the web System > Security > Disarm Setting interface.

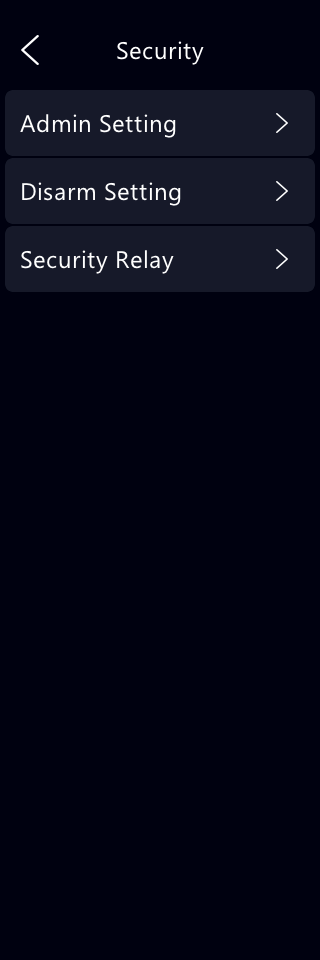
You can also set up the code on the Setting > Security > Disarm Setting screen.
Account Management
You can add user accounts to access the device's web interface and assign different access permissions to control the settings available to each account.
To set it up, go to the System > Security > Account Management interface. The default admin account cannot be deleted.
Click +Add to create a new account.

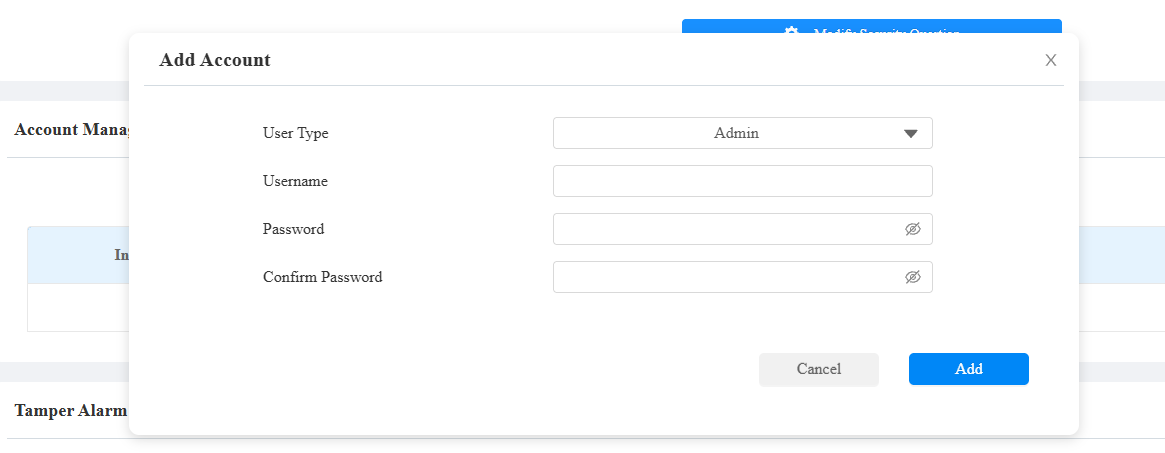
User Type: The account type.
Admin: The Admin account has full access to the device’s web settings.
User: The user account can only access the settings that are selected when the account is created.
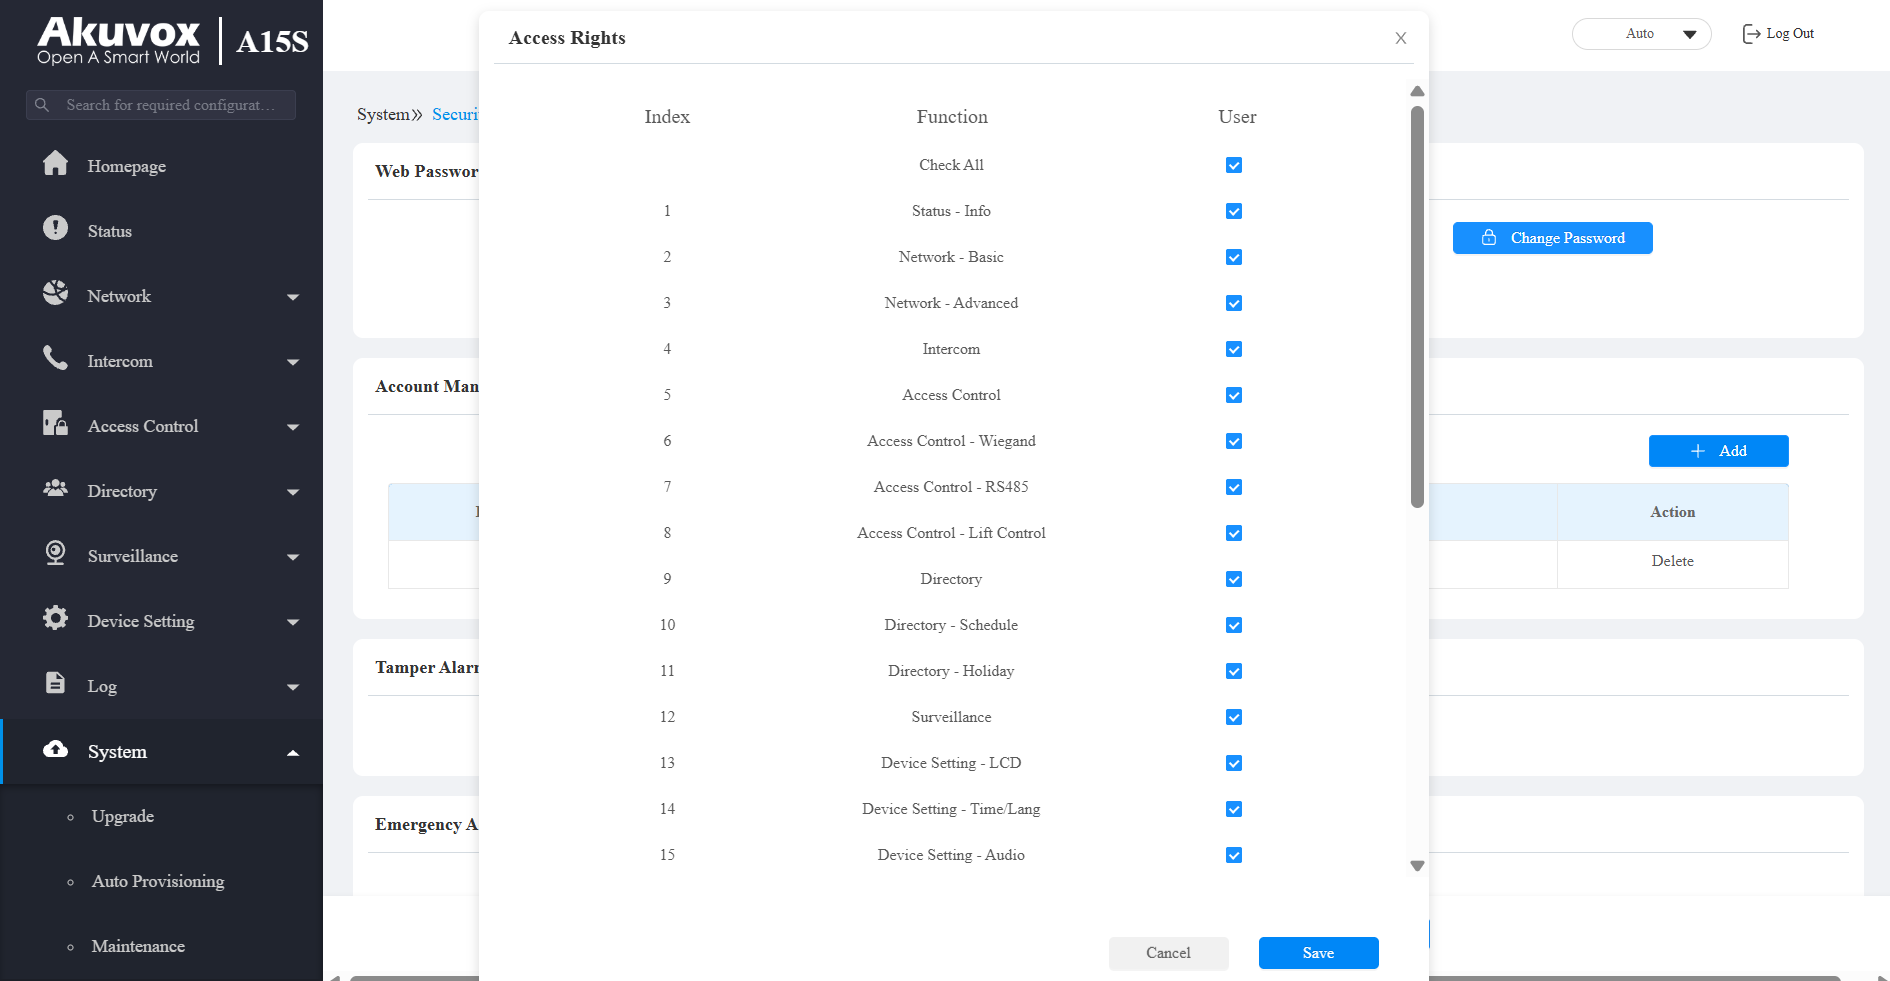
Username: The username used to log in to the device's web interface.
Password: The password used to log in to the device's web interface.
Client Certificate Setting
Los certificados garantizan la integridad de la comunicación y la privacidad. Para usar el protocolo SSL, necesitas subir los certificados adecuados para la verificación.
Web Server Certificate
It is a certificate sent to the client for authentication when the client requests an SSL connection with the Akuvox device. Please upload the certificates in accepted formats.
Upload the certificate on the System > Certificate interface.

Client Certificate
Configure the TLS settings and certificates used for secure SIP communication. You can specify the TLS version, configure server certificate verification, and manage the certificates required for SIP TLS connections.
Upload the certificate on the web System > Certificate interface.
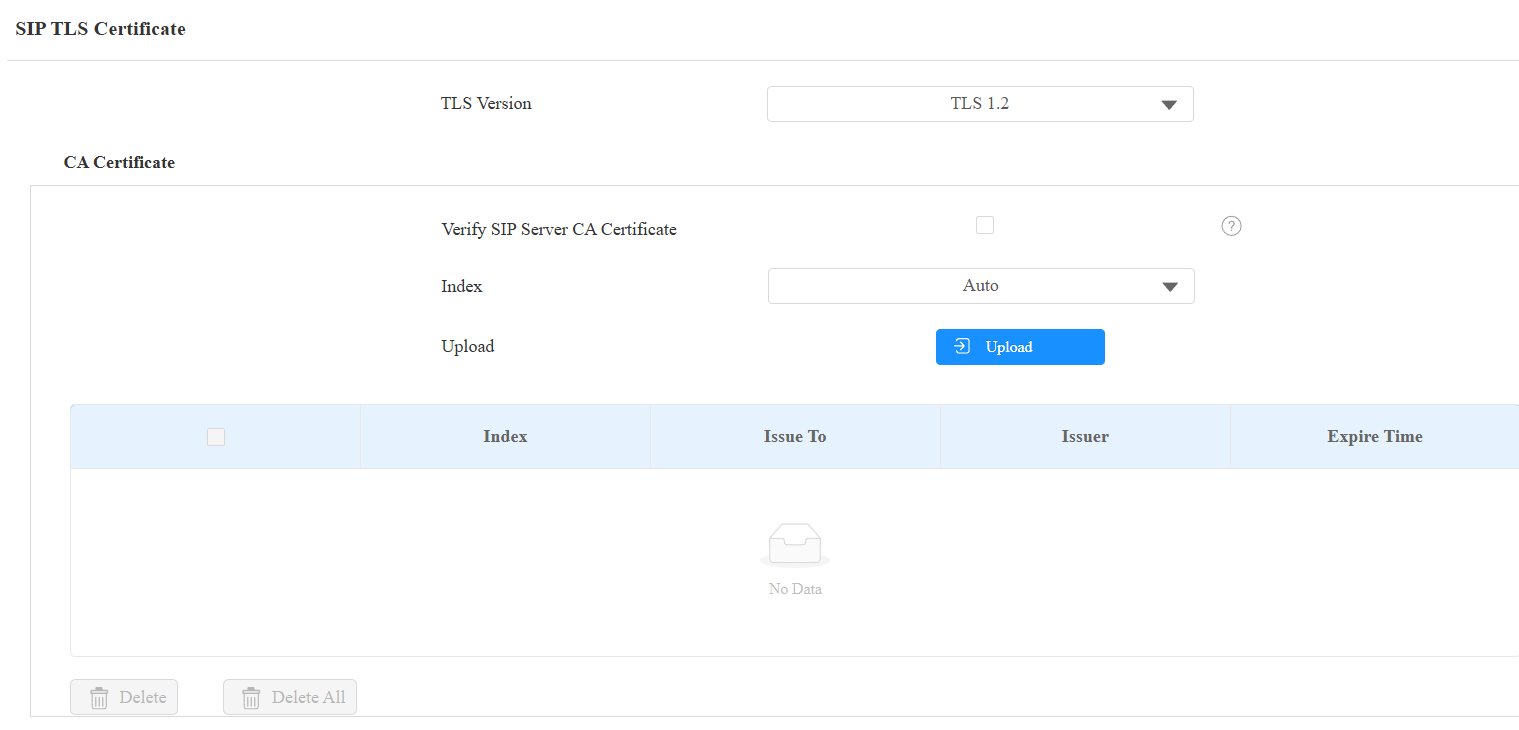

TLS Version: TLS 1.2 provides stronger security with modern encryption algorithms and is recommended for secure communication. TLS 1.0 is an outdated protocol with known vulnerabilities and should be avoided unless required for legacy compatibility.
Verify SIP Server CA Certificate: When enabled, the device verifies the SIP server certificate using the uploaded CA certificate before establishing a TLS connection. The connection will be rejected if the certificate is not trusted.
Index: Select the desired value from the drop-down list of Index. If you select Auto, the uploaded certificate will be displayed in numeric order. If you select a value from 1 to 10, the uploaded certificate will be displayed according to the number.
CA Certificate Upload: Supported formats: .pem, .der, .cer, .crt.
Client Certificate Upload: Supported formats: .pem, .cer, .crt.
Motion Detection
La detección de movimiento es una función que permite la vigilancia por vídeo sin supervisión y alarmas automáticas. Detecta cualquier cambio en la imagen capturada por la cámara, como que alguien pase o que se mueva la lente, y activa el sistema para realizar la acción adecuada.
Set up motion detection on the Surveillance > Motion interface.
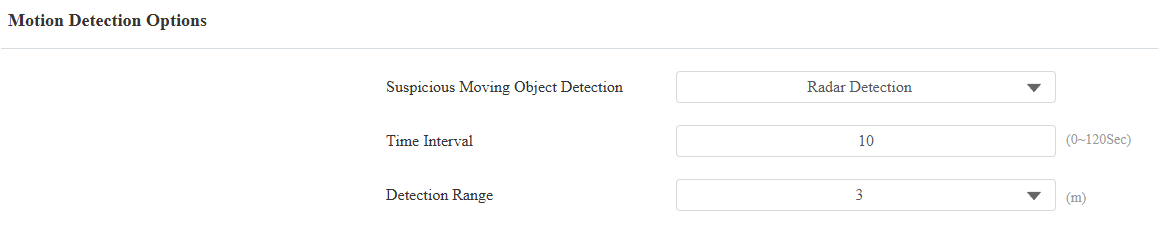
Suspicious Moving Object Detection: The feature uses the main camera for detection.
Disabled: Turn off the feature.
Video Detection: When the video camera detects moving objects, preset actions will be triggered. Focus on analyzing visual information captured through cameras.
Radar Detection: When the radar detects moving objects, preset actions will be triggered. It offers longer range and better detection in poor visibility conditions.
Video + Radar: Detect motion with the combination of the video camera and radar.
Time Interval: Determine how to delay and trigger motion detection.
Timing Interval between 1–3 seconds: Only need 1 detection during this interval to trigger actions.
Timing Interval > 3 seconds (e.g., 10 seconds): To perform actions, require a second detection within the final 3 seconds of the interval (e.g., between 7–10 seconds for a 10-second interval) after the first detection.
The default interval is 10 seconds.
Detection Accuracy: Not available for radar detection. The detection sensitivity. The higher the value, the greater the sensitivity. The default detection accuracy value is 3.
Detection Range: Set the distance within which radar detection is triggered. The range includes 1, 2, and 3 meters.
Detection Area: Click and hold the mouse button to select up to three detection areas. When motion is detected within these areas, preset actions will be carried out.
Action To Execute: Set the desired actions that occur when suspicious movement is detected.
FTP: Send a screenshot to the preconfigured FTP server.
Email: Send a screenshot to the preconfigured Email address.
SIP Call: Call the preset number upon the trigger.
HTTP: When triggered, the HTTP message can be captured and displayed in the corresponding packets. To utilize this feature, enable the HTTP server and enter the message content in the designated box below.
HTTP URL: Enter the HTTP message if selecting HTTP as the action to execute. The format is http://HTTP server’s IP/Message content.
Execute Relay: A relay can be unlocked with motion detection.
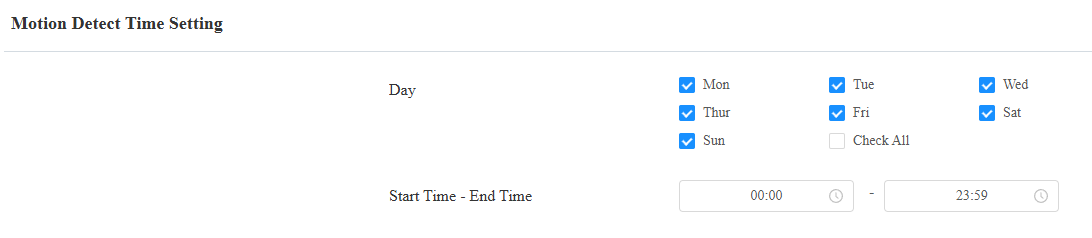
Scroll down, and you can set the motion detection schedule.
Security Notification
Una notificación de seguridad informa a los usuarios o al personal de seguridad de cualquier brecha o amenaza que detecte el dispositivo. Por ejemplo, si el dispositivo detecta algo inusual, el sistema envía una notificación a los usuarios o a la seguridad por correo electrónico, llamadas telefónicas u otros métodos.
To set up security notifications, go to Device Setting > Action interface.
Email Notification
Configura notificaciones por correo electrónico para recibir capturas de pantalla de movimientos inusuales del dispositivo.
Haz clic aquí para ver cómo configurar esta función.
Set it up in the Email Notification section.
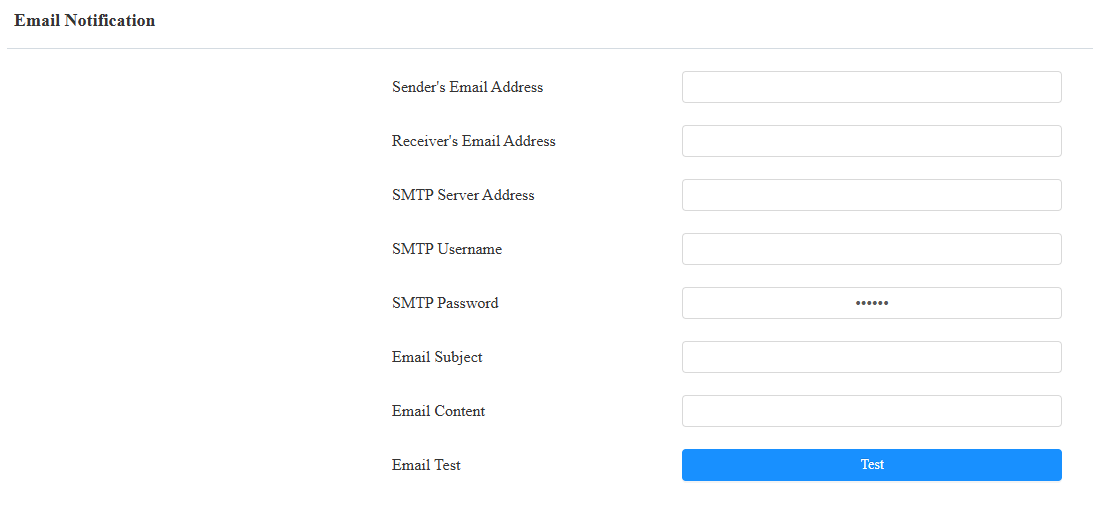
SMTP Server Address: The SMTP server address of the sender.
SMTP Username: The SMTP username is usually the same as the sender's email address.
SMTP Password: The password of the SMTP service is the same as the sender's email address.
FTP Notification
Para recibir notificaciones a través del servidor FTP, necesitas configurar la configuración FTP. El teléfono telefónico subirá una captura de pantalla a la carpeta FTP especificada si detecta algún movimiento inusual.
Haz clic aquí para ver los pasos de configuración.
Set it up in the FTP Notification section.
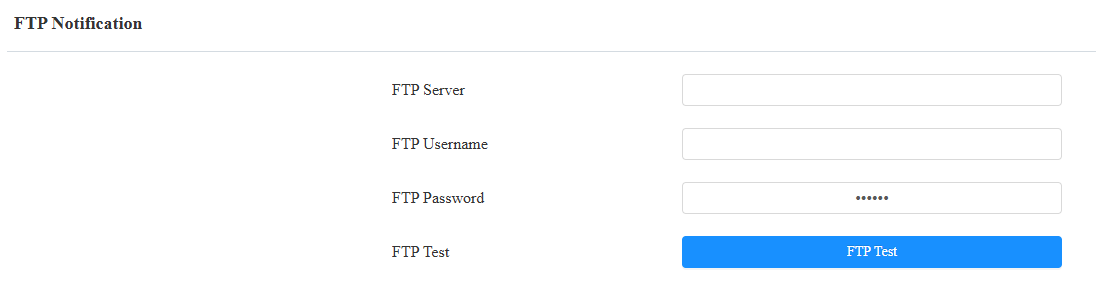
FTP Server: Set the address (URL) of the FTP server.
FTP Username: Enter the user name to access the FTP server.
FTP Password: Enter the password to access the FTP server.
SIP Call Notification
In addition to FTP and Email notification, the device can also make a SIP call when some feature action is triggered.
Set it up in the SIP Call Notification section.

Display Name: The name of the device displayed in the notification.
Action URL
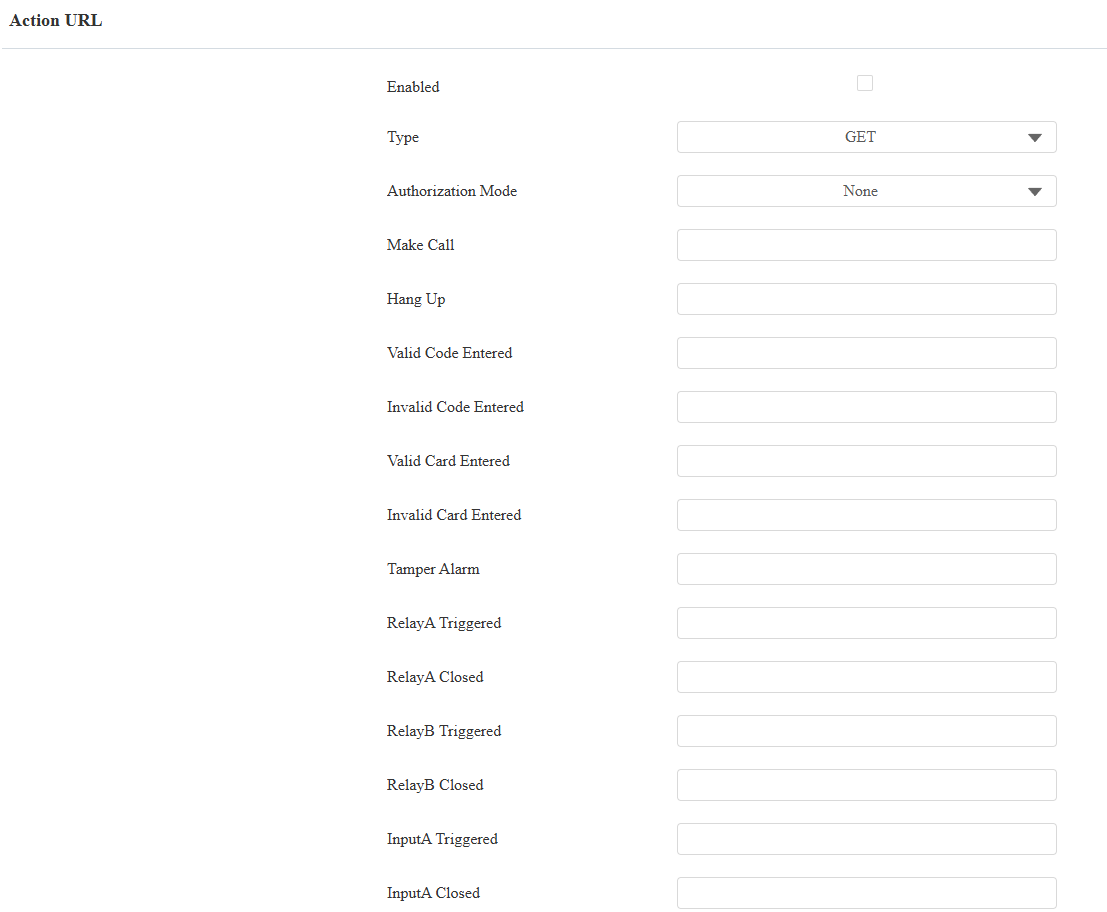
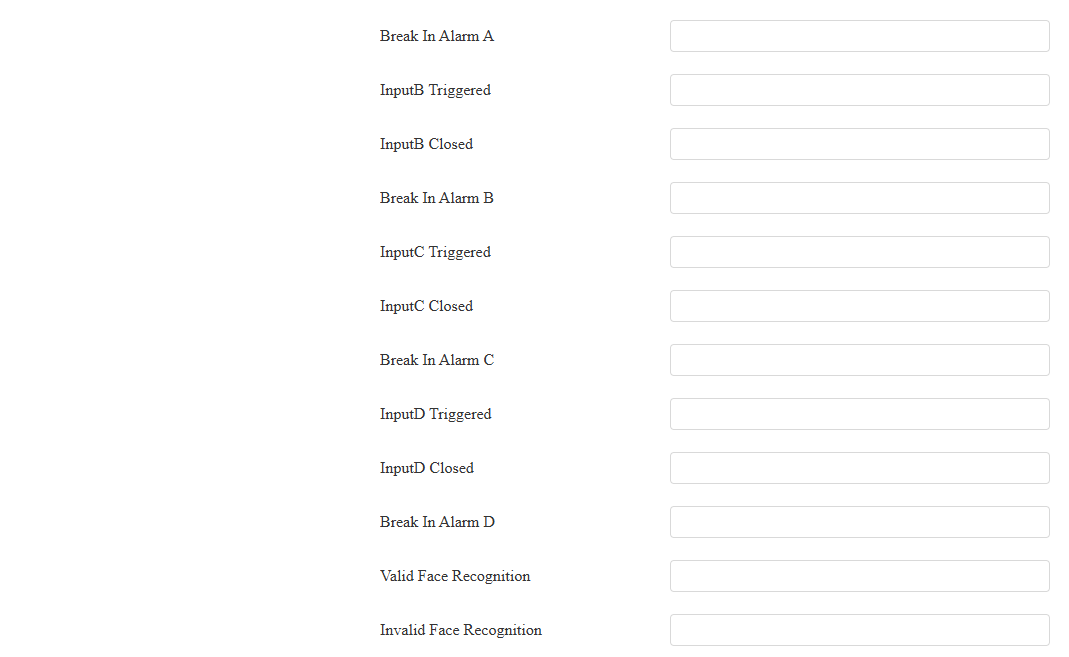
You can use the device to send specific HTTP URL commands to the HTTP server for certain actions. These actions will be triggered when the relay status, input status, PIN code, or RF card access changes.
Akuvox Action URL:
Event | Parameter format | Example |
Make Call | $remote | Http://server ip/Callnumber=$remote |
Hang Up | $remote | Http://server ip/Callnumber=$remote |
Valid Code Entered | $code | Http://server ip/validcode=$code |
Invalid Code Entered | $code | Http://server ip/invalidcode=$code |
Valid Card Entered | $card_sn | Http://server ip/validcard=$card_sn |
Invalid Card Entered | $card_sn | Http://server ip/invalidcard=$card_sn |
Tamper Alarm | $alarmstatus | Http://server ip/tampertri=$alarmstatus |
Relay Triggered | $relay1status | Http://server ip/ relaytrigger=$relay1status |
Relay Closed | $relay1status | Http://server ip/relayclose=$relay1status |
Input Triggered | $input1status | Http://server ip/inputtrigger=$input1status |
Input Closed | $input1status | Http://server ip/inputclose=$input1status |
Break-in Alarm | $input1status | Http://server ip/inputtrigger=$input1status |
Facial Recognition | $unlocktype | Http://serverip/unlocktype=$unlocktype |
For example: http://192.168.16.118/help.xml? mac=$mac:ip=$ip:model=$model:firmware=$firmware:card_sn=$card_sn
To set it up, go to the Device Setting > Action URL interface.
Voice Encryption
El Protocolo de Transporte en Tiempo Real Seguro (SRTP) es un protocolo derivado del Protocolo de Transporte en Tiempo Real (RTP). Mejora la seguridad de la transmisión de datos proporcionando cifrado, autenticación de mensajes, garantía de integridad y protección contra reproducciones.
Set it up on the web Intercom > Account interface.

Voice Encryption(SRTP): Choose Disabled, Optional, or Compulsory for SRTP. If Optional or Compulsory is selected, the voice during the call is encrypted, and you can grab the RTP packet to view it.
User Agent
El agente de usuario se utiliza con fines de identificación cuando analizas el paquete de datos SIP.
To set it up, navigate to the Intercom > Account > User Agent interface.

User Agent: Akuvox is by default.
Real-Time Monitoring
Esta función muestra el estado de la puerta cuando el dispositivo está conectado a SmartPlus Cloud. Los gestores de propiedades y los usuarios finales pueden comprobar el estado de la puerta respectivamente en la plataforma SmartPlus Property Manager y la aplicación SmartPlus. Debes especificar el(los) relé(s) o entrada(s) que aplican esta función. Clic
para ver la configuración detallada.
To set it up, go to System > Security > Real-Time Monitoring interface.

Apply Setting To:
None: Not display door status.
Input: The door is opened by triggering input.
Relay: The door is opened by triggering the relay.
Emergency Action
Esta función funciona con Akuvox SmartPlus Cloud. Mantiene la puerta abierta cuando ocurre una emergencia. Tienes que especificar la Entrada que aplica la característica.
Haz clic aquí para ver la configuración detallada de esta función.
To set it up, go to System > Security > Emergency Action interface. Select the Input(s) to be triggered.

Web Interface Automatic Log-out
Puedes configurar el tiempo automático de cierre de sesión de la interfaz web, requiriendo volver a iniciar sesión introduciendo el nombre de usuario y las contraseñas por motivos de seguridad o por comodidad de operación.
To set it up, go to System > Security > Session Time Out interface.

High Security Mode
El modo de alta seguridad está diseñado para mejorar la seguridad. Emplea cifrado en diversos aspectos, incluyendo el proceso de comunicación, comandos para abrir puertas, métodos de almacenamiento de contraseñas y más.
Enable it on the System > Security > High Security Mode interface.

Notas importantes
1. El modo de Alta Seguridad está desactivado por defecto cuando actualizas el dispositivo de una versión sin el modo a una que lo incluye. Pero si restableces el dispositivo a sus ajustes de fábrica, el modo está activado por defecto.
2. Este modo hace que las herramientas de la versión anterior sean incompatibles. Necesitas actualizarlos a las siguientes versiones o superiores para poder usarlos.
Gestor de PC: 1.2.0.0
Escáner IP: 2.2.0.0
Herramienta de actualización: 4.1.0.0
SDMC: 6.0.0.34
3. El formato HTTP compatible para disparar relés varía dependiendo de si el modo de alta seguridad está activado o desactivado.
Si el modo está activado, el dispositivo solo acepta los nuevos formatos HTTP que aparecen abajo para abrir puertas.
http://username:password@deviceIP/fcgi/OpenDoor?action=OpenDoor&DoorNum=1
http://deviceIP/fcgi/OpenDoor?action=OpenDoor&DoorNum=1
Si el modo está desactivado, el dispositivo puede usar tanto los formatos nuevos de arriba como el formato antiguo de abajo:
http://deviceIP/fcgi/do?action=OpenDoor&UserName=username&Password=password&DoorNum=1
4. No está permitido importar/exportar archivos de configuración en tgz. Formatea entre un dispositivo con el modo de alta seguridad y otro sin él. Para recibir ayuda con la transferencia de archivos, por favor contacte con el soporte técnico de Akuvot.