Akuvox door phones or access control terminals can be integrated with the License Plate Recognition(LPR) Camera for garage door opening.
To set up the integration, you assign license plate information to a user on the access device, then configure the camera to send plate data to the device via API. When the camera recognizes a plate that matches a plate enrolled on the device, the door opens automatically.
This integration follows 3 steps:
Enable the HTTP API on the access device.
Assign license plates to users.
Configure your camera to push plate data to the device.
Note
This integration works with cameras that support the POST method. Tested camera brands:
Milesight
March Networks
Aibase Color
Hikvision: CMIP7C44WLPR-32R
Model Compatibility
This integration is supported on the models and firmware versions below (or higher).
Model | Version | Model | Version |
|---|---|---|---|
X910 | 2910.30.11.28 | X912 | See note below |
X915 V2 | 2915.30.10.420 | X916 | 916.30.10.346 |
R29 | 29.30.10.404 | R28 V2 | 228.30.10.231 |
R25 | 25.30.10.117 | R20 | 320.30.11.30 |
E18 | 18.30.10.247 | E16 V2 | 216.30.10.208 |
A08 | 108.30.11.8 | A01/A02 | 101.30.10.206 |
A03 | 103.30.10.204 | A094 | 92.30.10.205 |
A095 | 95.30.10.110 | S539 | 539.30.10.403 |
A05 | 205.30.11.114 | E16 V3 | 416.30.11.206 |
E12V2 | 312.30.11.106 | WR01 | 1401.30.11.221 |
S532 | 532.30.10.336 | A15 | 1115.30.10.407 |
X912 version requirements:
On-Premise: 912.30.11.34 or later
SmartPlus Cloud: 912.30.11.107 or later
Hikvision LPR camera integration (X912 only): 912.30.12.114 or later, regardless of deployment type.
Not sure if your project is On-Premise or Cloud-managed? On-Premise projects are configured directly on the access device's local web interface. Cloud projects are managed and provisioned through SmartPlus/Smart Access Cloud.
Step 1: Enable HTTP API on the Access Device
Navigate to the device IP in a browser. Log in with the username and password (admin/admin by default).
Go to Setting > HTTP API.
Enable the feature and set the Authorization Mode to Allowlist.
Set a username and password (you'll enter these on the camera side later).
Enter the camera's IP address.
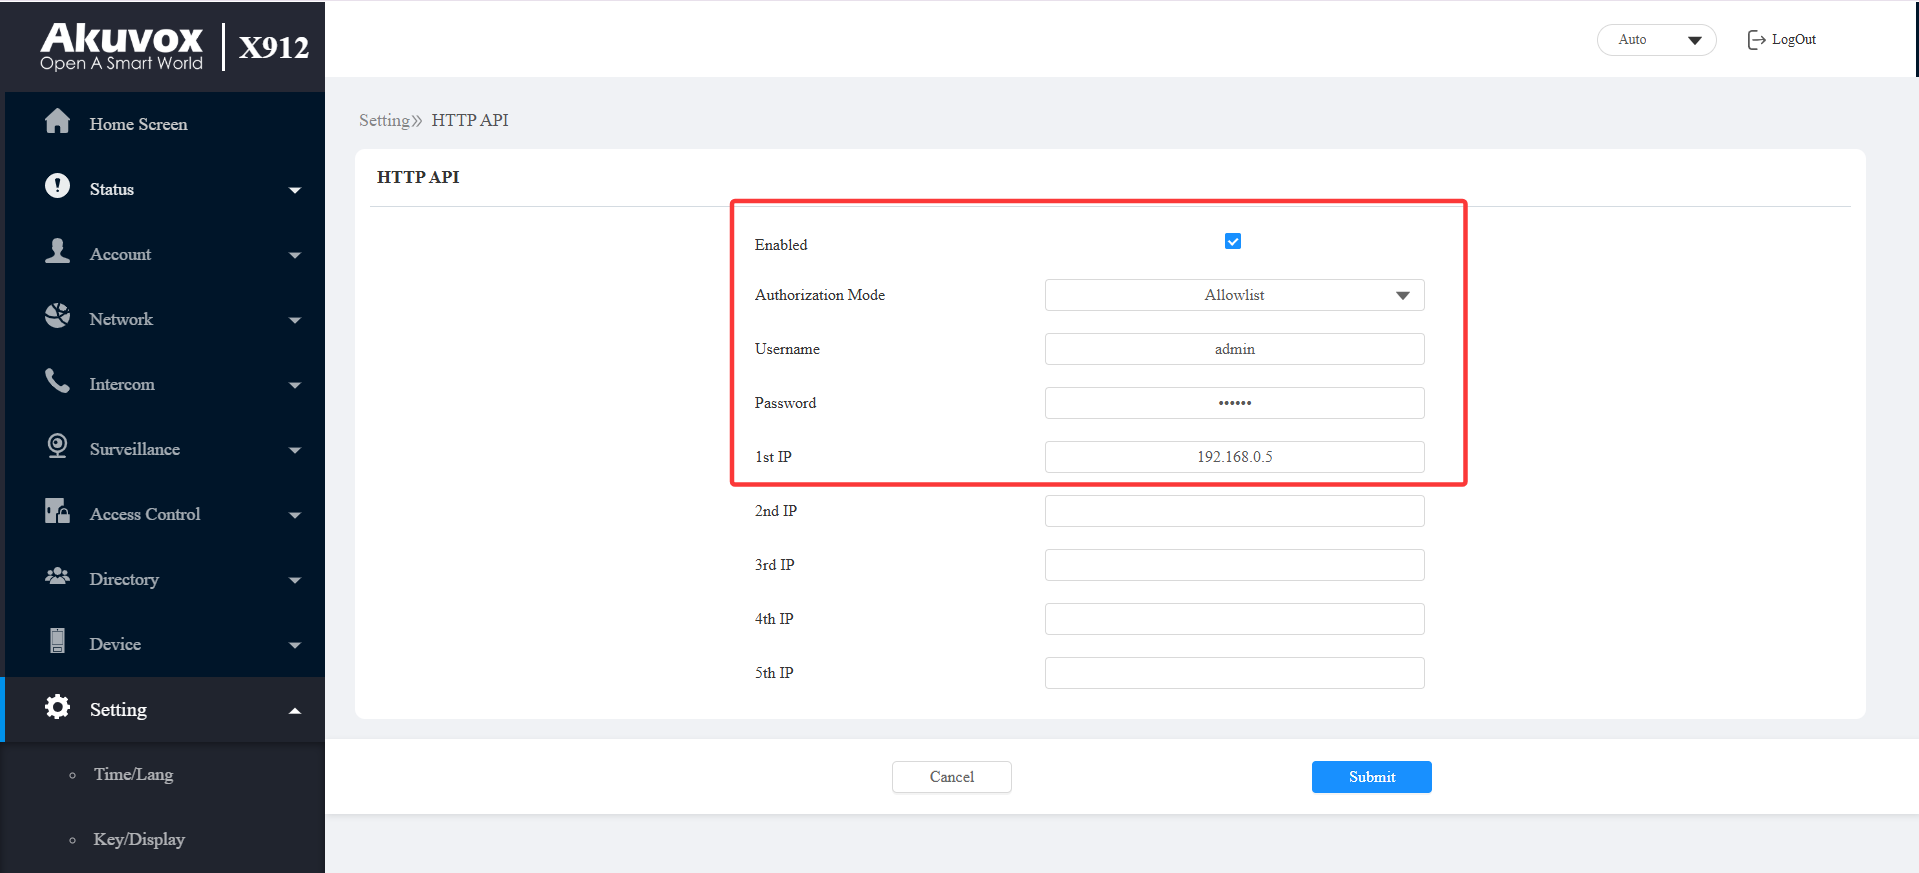
Click Submit.
Step 2: Assign License Plates to Users
You need to assign license plates to specific users for door opening.
For On-Premise Projects
See the Compatibility table above to confirm your device supports this feature.
Go to the Directory > User interface.
Click +Add to add a new user;
Click
 to edit an existing user.
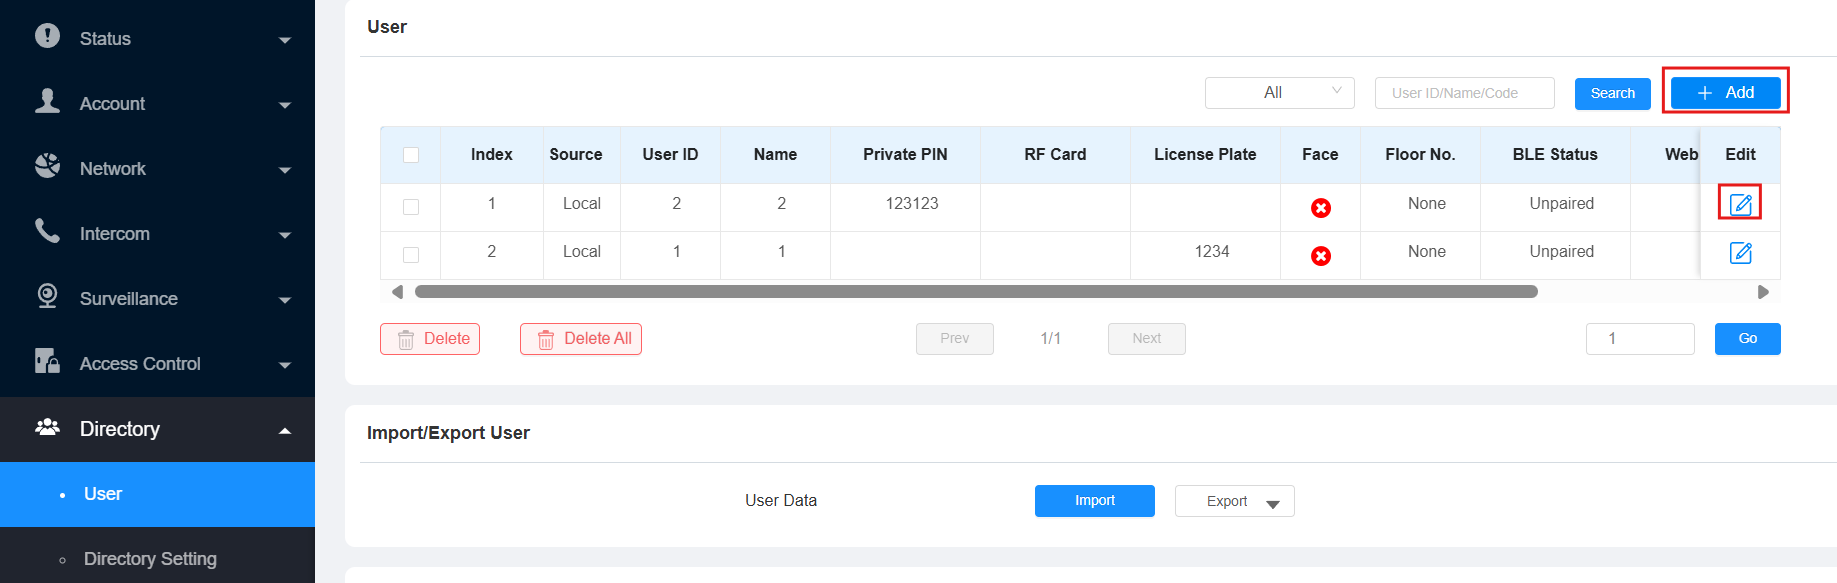
In the License Plate field, enter the plate information.
Click Add to add more — up to 5 per user.

Check the relay connected to the door lock and apply the schedule within which the user is allowed to open the door.
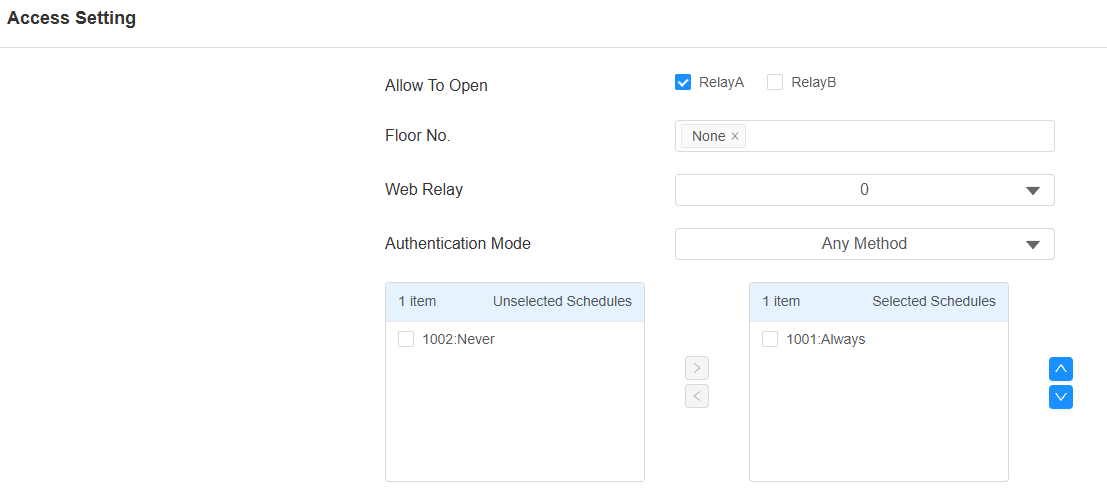
Click Submit to save the settings.
The door-opening log will be recorded on the Status > Access Log interface with License Plate as the access type.
For Cloud Projects
See the Compatibility table above to confirm your device supports this feature.
When the device is managed via SmartPlus/Smart Access Cloud, license plates are issued from the cloud instead of being entered locally on the device.
Depending on your project type, license plates can be added by:
New commercial projects (created after Oct 15, 2024).
Installers and project managers can add license plates via the Smart Access Property Management Portal.
Administrators can add license plates via the Smart Access Administrator Portal.
Community projects: Only property managers can add license plates via the SmartPlus Property Manager Portal.
Single-house projects: End users can add license plates via their SmartPlus App.
Step 3: Configure the Camera
Once the access device is set up, configure your camera to send plate data to it. Find your camera brand below and follow that section.
To set the camera, we need to use the following API.
Milesight Camera
Use the camera IP to log into its web interface.
Go to Setting > Data Transmission interface.
Check the Enable box and set the HTTP Method to Post.
Enter the User Name and Password that are set on the access device’s Setting > HTTP API interface.
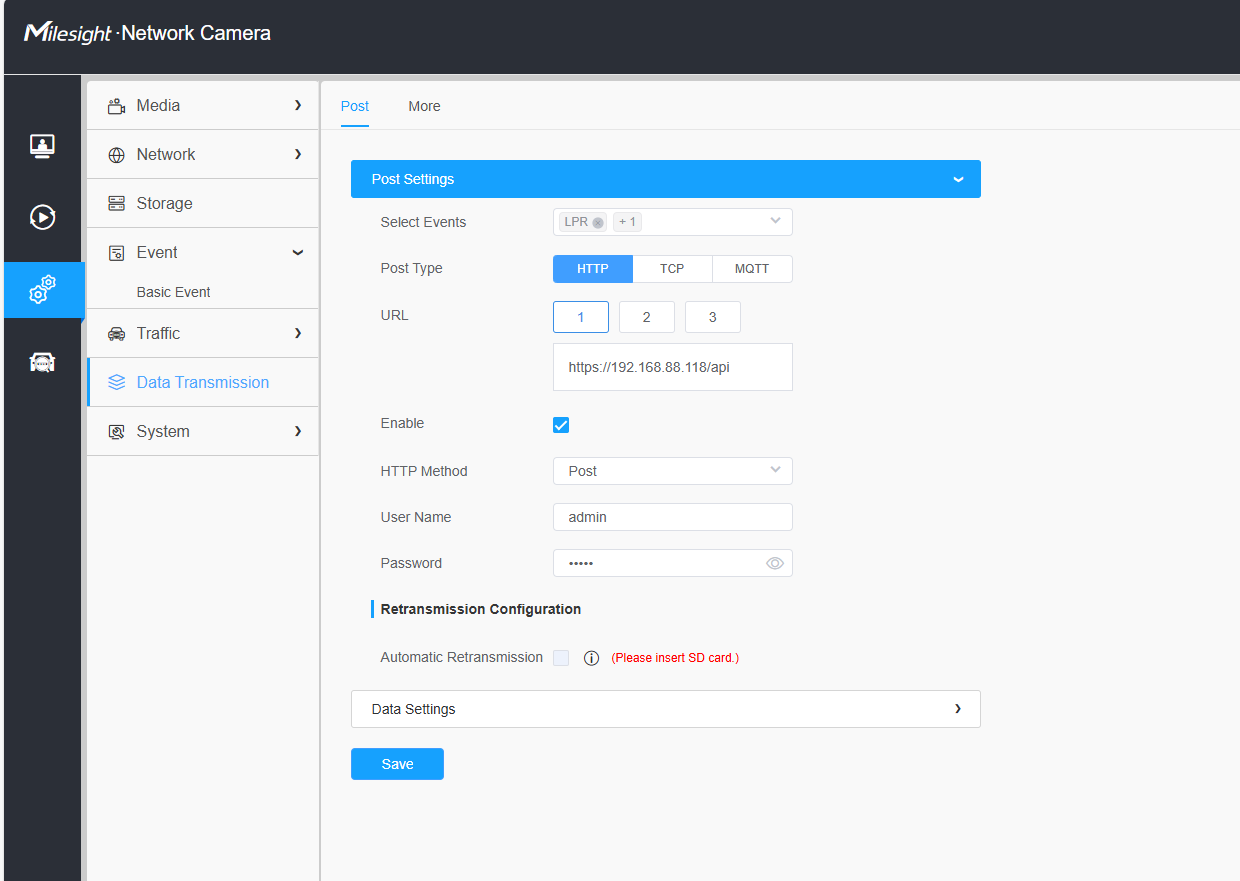
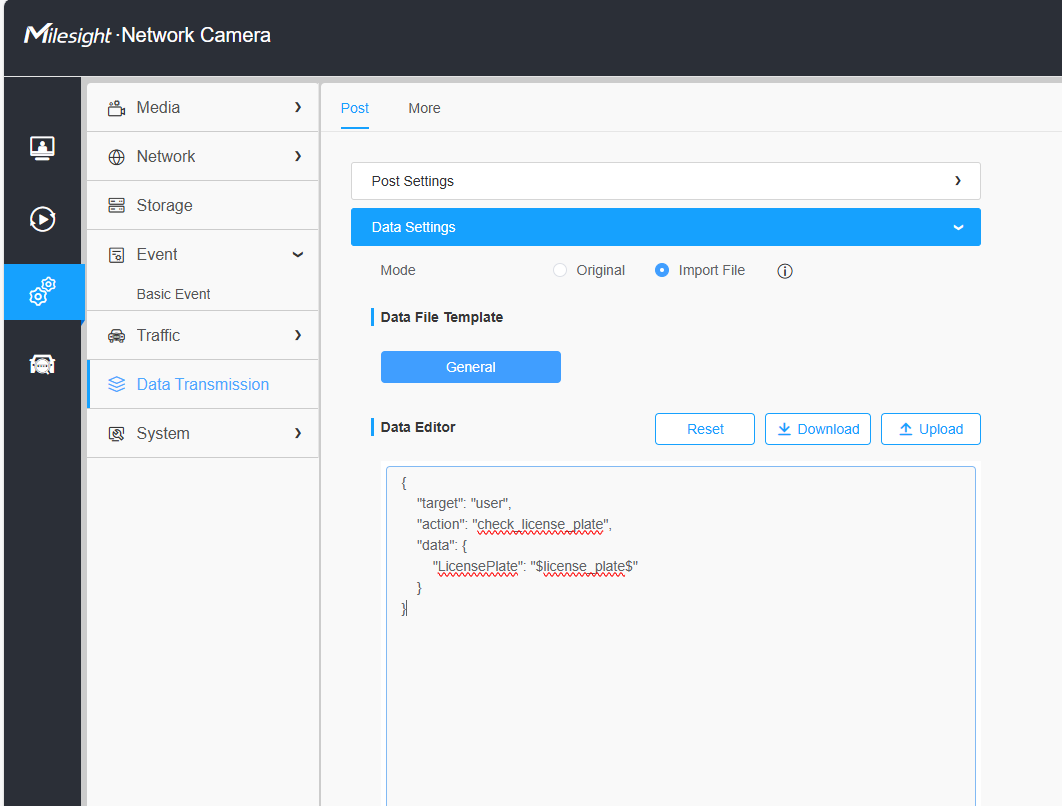
Click Data Settings to set up the API as shown.
{
    "target": "user",
    "action": "check_license_plate",
    "data": {
        "LicensePlate": "$license_plate$"
    }
}
March Networks Camera
Log in to the camera’s web interface.
Navigate to the Configuration, Applications, and then VaxALPR.
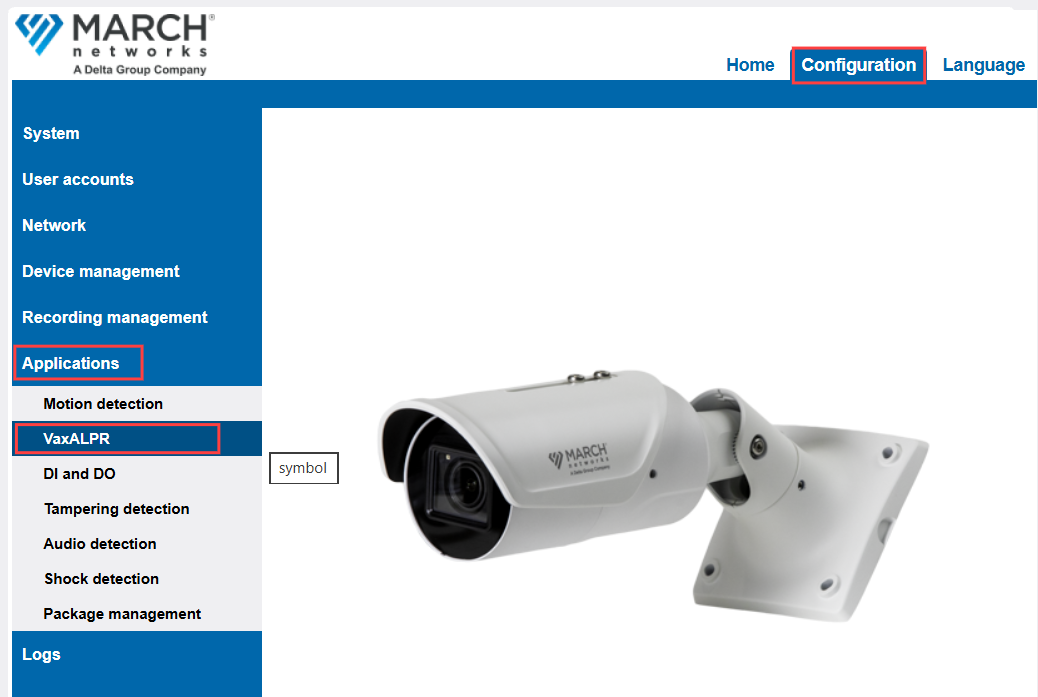
Go to the Reporting interface.
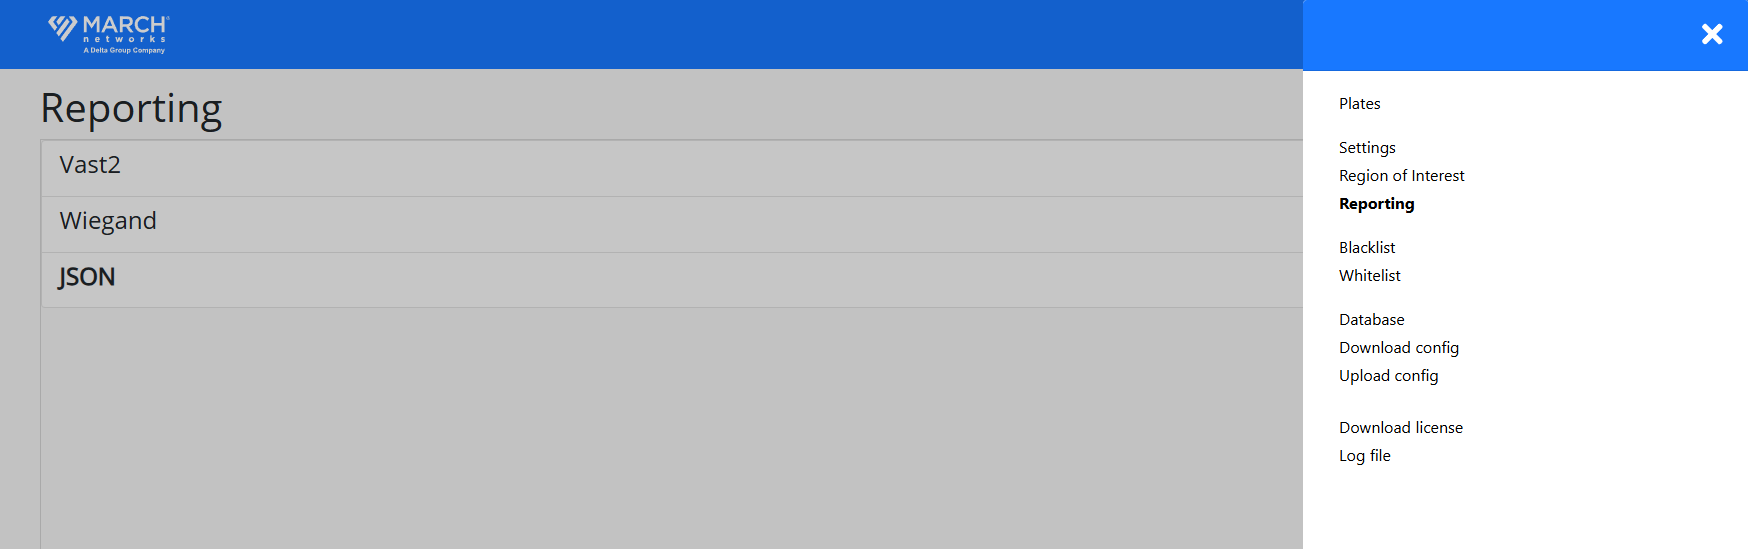
Show JSON Reporting.
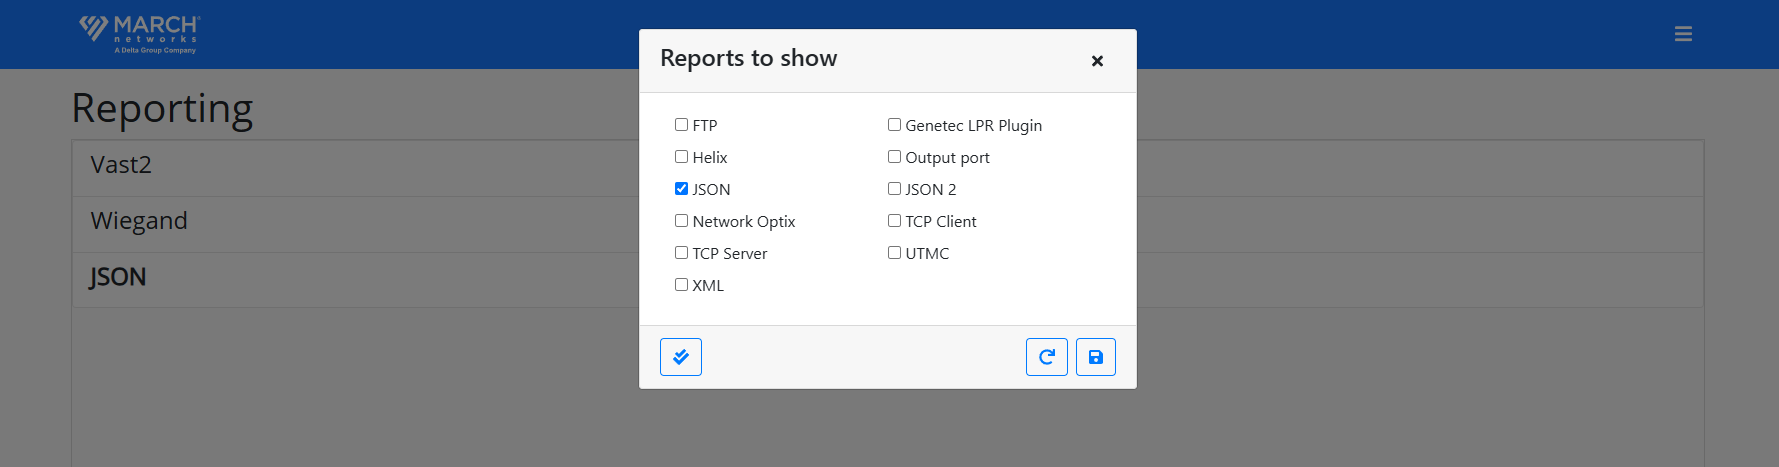
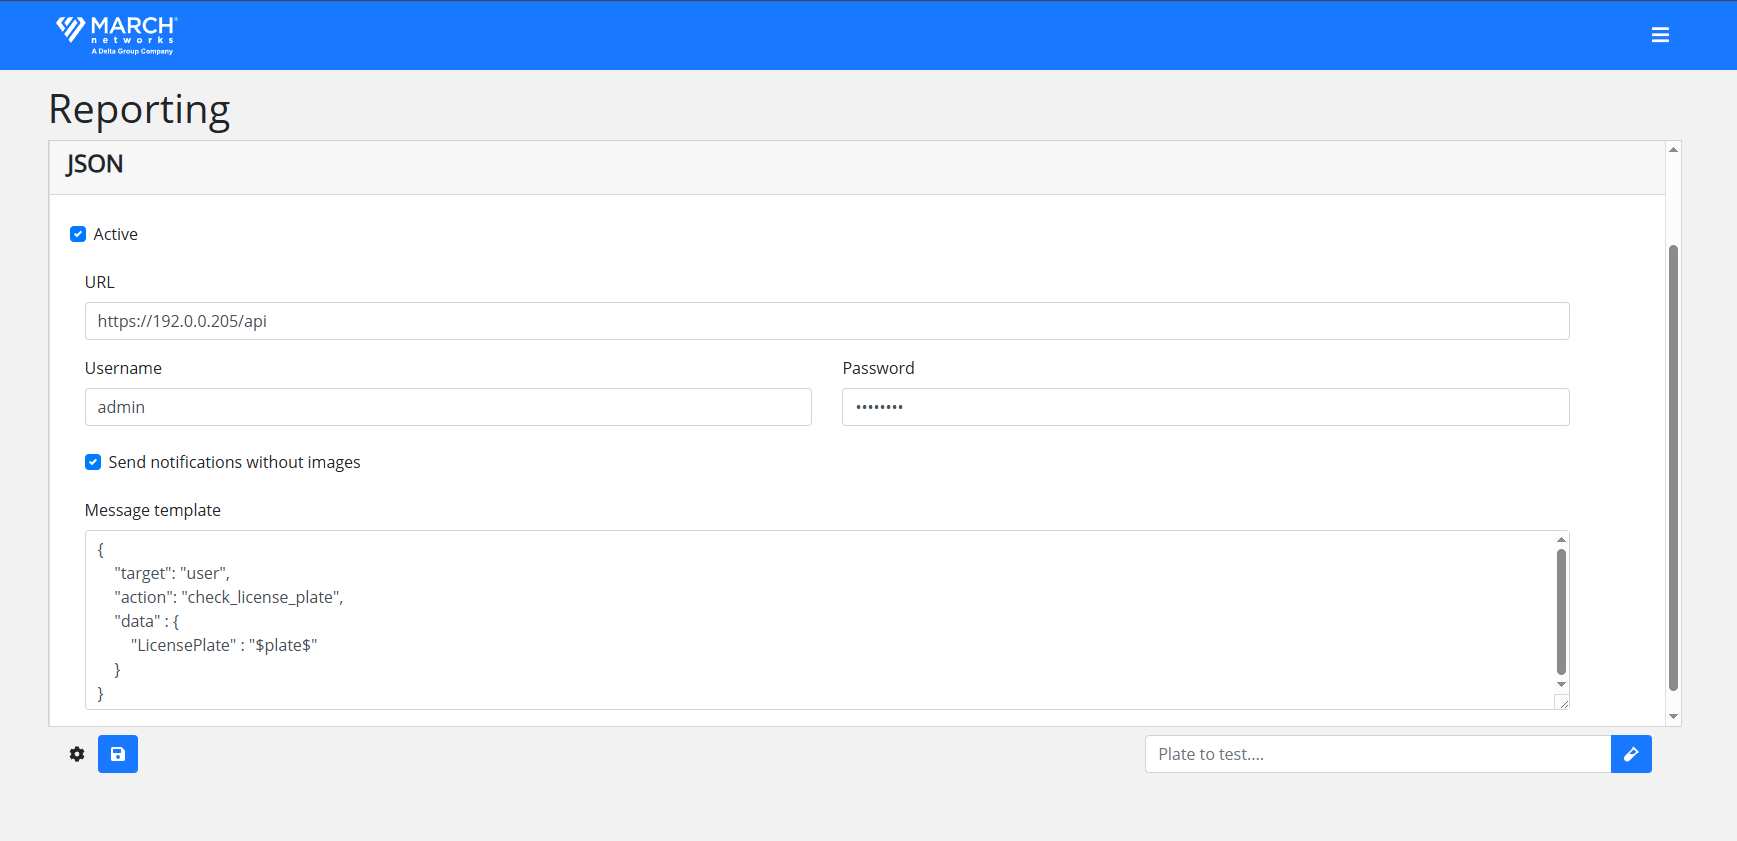
Adding the Akuvox API to March Networks within VaxALPR.
{
    "target": "user",
    "action": "check_license_plate",
    "data": {
        "LicensePlate": "$plate$"
    }
}
Aibase Color
Log in to the LPR camera’s web UI with its IP address.
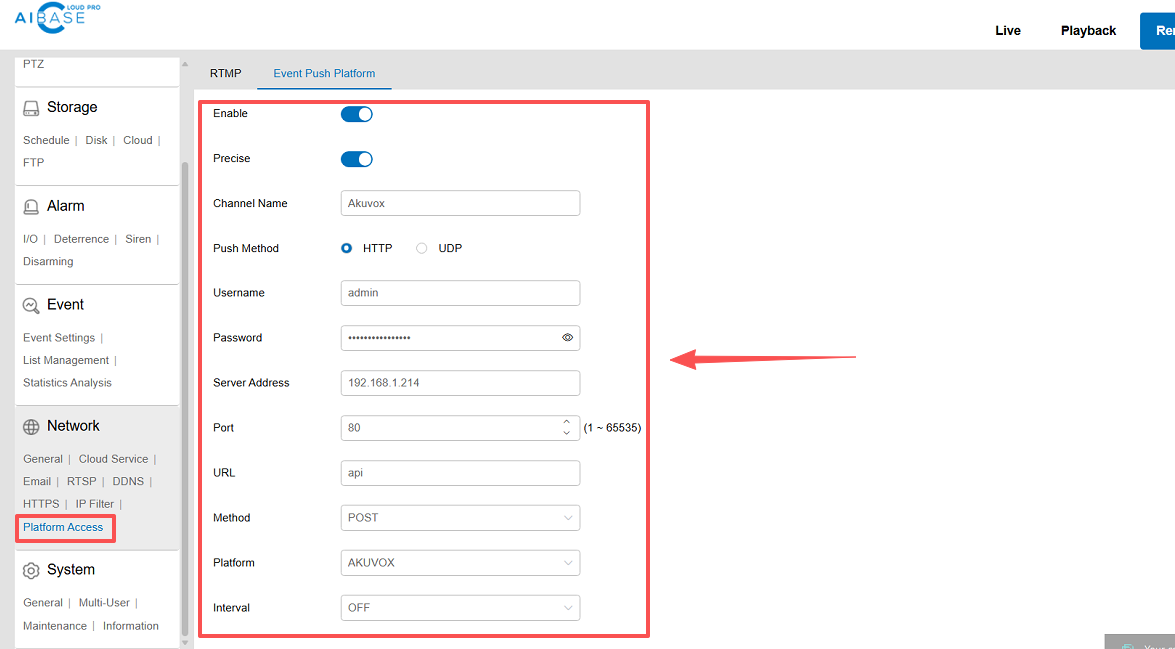
Navigate to the Remote Setting > Network > Platform Access > Event Push Platform interface.
Set it as follows.
a. Enable the switch.
b. Enable Precise.
c. Enter the channel name
d. Enter the Akuvox device username.
e. Enter the Akuvox device password.
f. Enter the Akuvox device IP address.
g. Enter port value: 80.
h. Enter api in the URL field.
i. Choose POST method.
j. Choose AKUVOX platform.
k. Set the Interval. You can choose one or more; it will affect how often the message is sent.
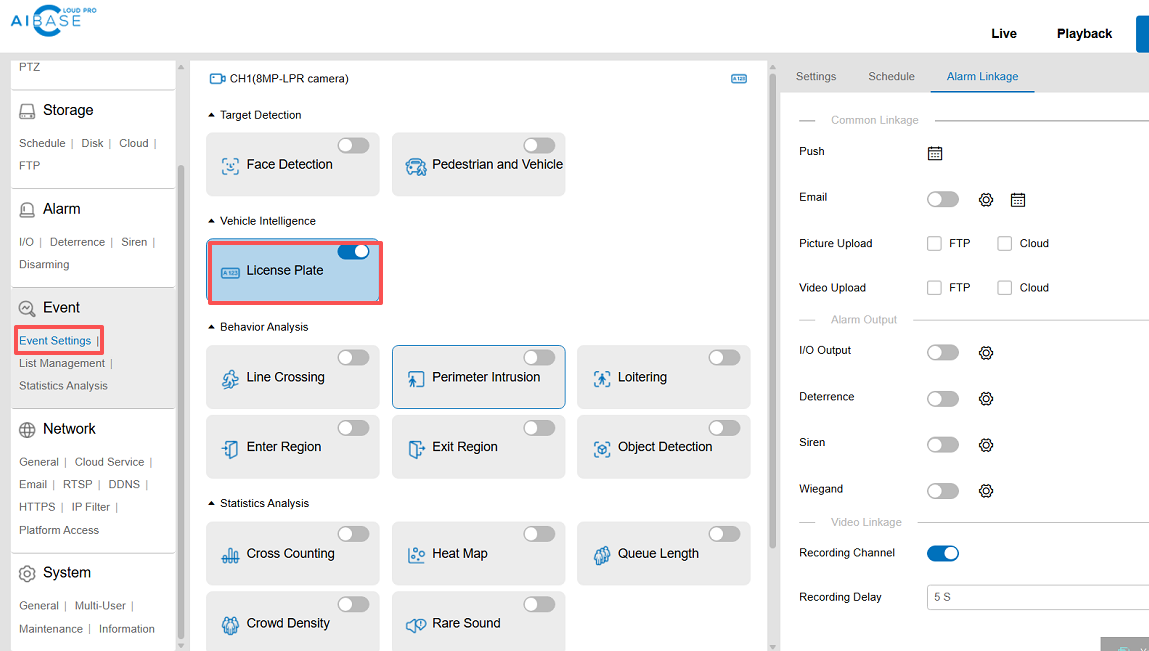
Enable the LPR function on the Event > Event Settings interface.
Check License Plate.
Hikvision Camera
This integration is supported only on the X912 with firmware version 912.30.12.114 or later.
Log in to the LPR camera’s web UI with its IP address.
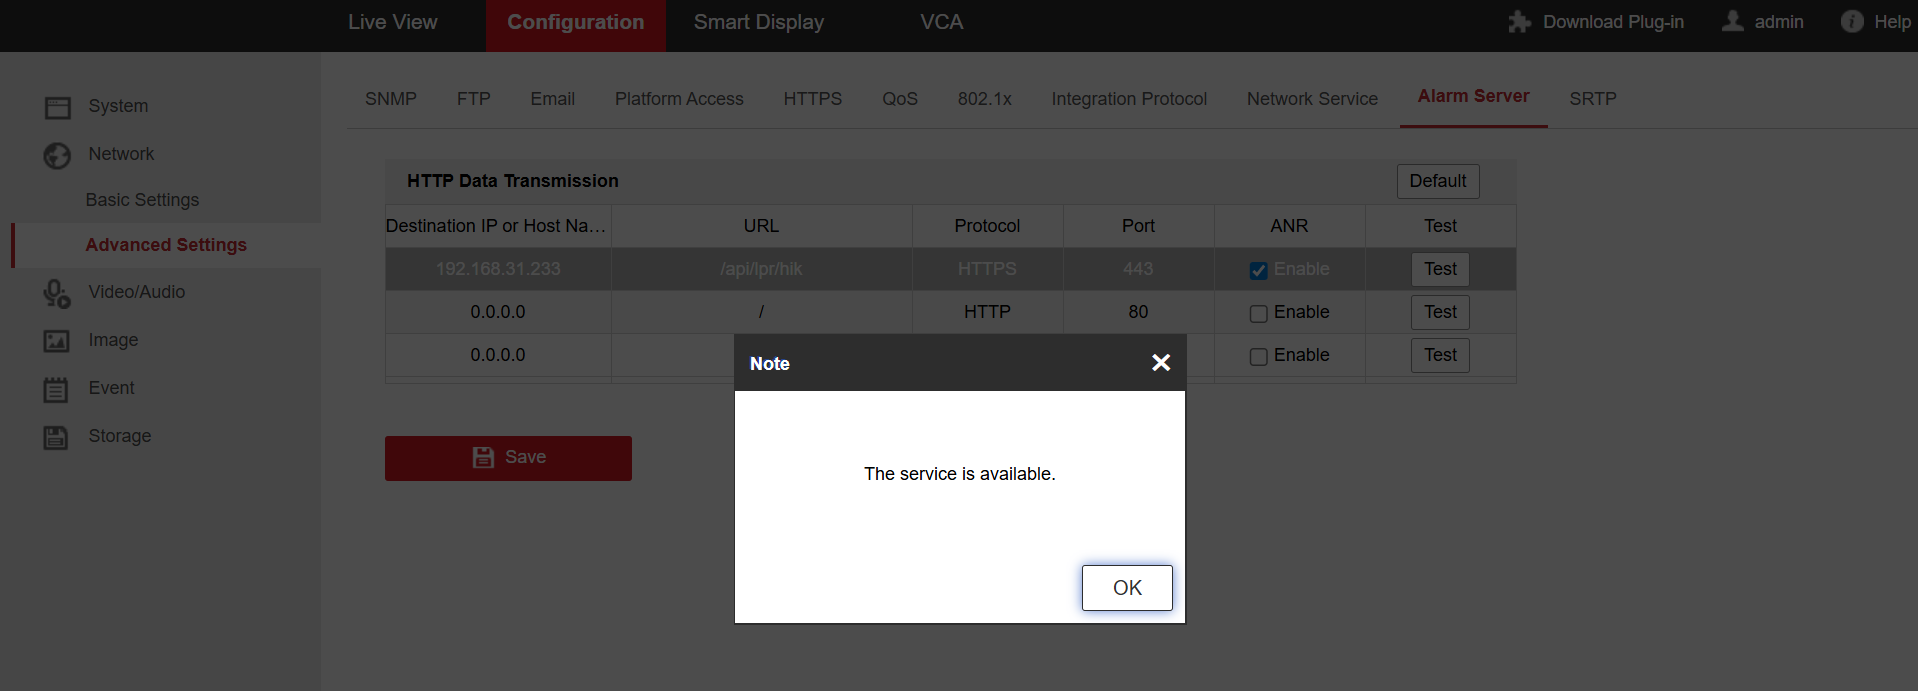
Navigate to Configuration > Network > Advanced Settings > Alarm Server.
.png)
Enter the X912’s IP address.
Enter the following URL.
/api/lpr/hikSelect the Protocol and enter the Port value. These must match the settings configured on the access device’s Network > Advanced interface.
Check the Enable box.
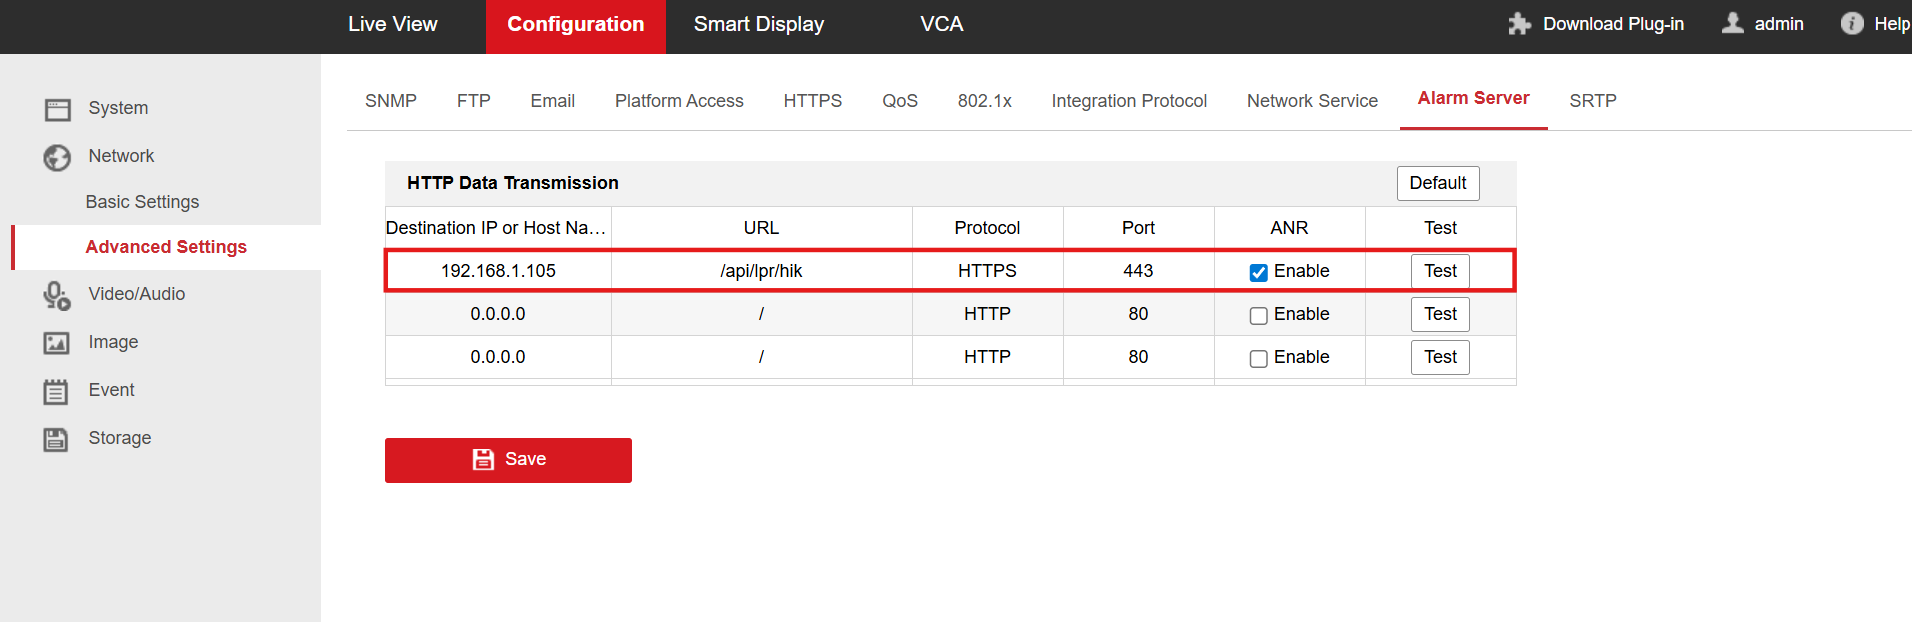
Save the configuration.
To verify the connection, click Test. A confirmation message will appear if the service is available.