This guide is a step-by-step configuration manual for the Akuvox SmartPlus Cloud Smart Parking feature, exclusively for property managers(PMs).
It covers the entire operational workflow, including feature activation, parking lot creation, rule configuration, vehicle/gate management, with clear definitions of all configuration rules, operation details, validation logic, and exception handling.
Before You Start
Before configuring Smart Parking, make sure:
The Smart Parking service has been activated for your project by your installer.
Your parking devices are running a supported firmware version.
All devices are properly connected to the network and added to the project.
Note
The feature availability may vary by region. Contact Akuvox for local support details.
Device Compatibility
Full Smart Parking management features are currently supported only on the R29 running version 29.30.10.712 or later.
Other supported models currently provide resident license plate recognition and UHF tag recognition features only.
Model | Version(or higher) | Model | Version(or higher) |
|---|---|---|---|
R28 V2 | 228.30.10.231 | R20 | 320.30.11.30 |
R25 | 25.30.10.117 | X915 V2 | 2915.30.10.420 |
X916 | 916.30.10.346 | X910 | 2910.30.11.28 |
X912 | 912.30.11.107 | E16 V2 | 216.30.10.208 |
E18 | 18.30.10.247 | A01/A02 | 101.30.10.206 |
A08 | 108.30.11.8 | A094 | 92.30.10.205 |
A03 | 103.30.10.204 | S539 | 539.30.10.403 |
A095 | 95.30.10.110 | S535 | 535.30.11.8 |
S538 | 538.30.10.705 |
Offline License Plate Recognition
Starting from version 29.30.10.714, the R29 supports offline license plate recognition and local vehicle access control.
When the device temporarily loses connection to the cloud, resident vehicles and emergency vehicles can still be recognized locally using cached data.
During offline operation:
Resident vehicles can enter and exit normally.
Emergency vehicles can enter and exit normally.
Visitor vehicle access is not supported.
Vehicle recognition logs generated during the offline period are automatically synchronized to the cloud after reconnection.
Vehicle Recognition Methods
Akuvox offers two main ways to identify vehicles and open gates.
Method 1: Use a third-party LPR(License Plate Recognition) camera to recognize the license plate of the vehicle.
Method 2: Use the Akuvox long-range card reader ACR-CPR12 to recognize the UHF card attached to the vehicle's windshield.
Please check which method is used in your project. If Method 2 is used, you need to enter both the license plate number and the UHF card number when managing vehicles. If Method 1 is used, only the license plate number is required.
Core Feature Overview
Smart Parking enables community vehicle access control, parking resource management, and operational data monitoring, with core capabilities including:
Automatic Vehicle Access: Supports license plate recognition via third-party LPR cameras and UHF card recognition via Akuvox ACR-CPR12 card readers.
Comprehensive Parking Lot Management: Create/edit parking lots, configure parking spaces, associate gate barriers, and manually mark vehicle exits.
Customizable Rules: Visitor parking duration/charging, U-turn restrictions, emergency vehicle access, and scheduled automatic access.
Vehicle Control: Add long-term/temporary vehicles, manage blocklist, record resident violations, and query access logs.
Data-driven Operations: Parking statistics, log export, automatic fee calculation, and real-time monitoring of visitor parking duration usage.
Vehicle Recognition Priority: If a vehicle has both a license plate and a UHF card configured, the platform sends only the UHF card code to the door phone. The device uses UHF card recognition and ignores the license plate.
To switch back to license plate recognition, delete the UHF card configuration for that vehicle. See Module 9 for steps.
Overall Configuration Workflow
You may follow this order to avoid functional abnormalities.
Step | Action | Where |
1 | Create a parking lot | Module 1 |
2 | Configure basic rules (visitor / U-turn / emergency / scheduled access) | Modules 4–7 |
3 | Associate gate devices | Module 8 |
4 | Add long-term and temporary vehicles | Module 9 |
5 | Daily operations (logs, violations, blocklist) | Modules 2, 3, 9 |
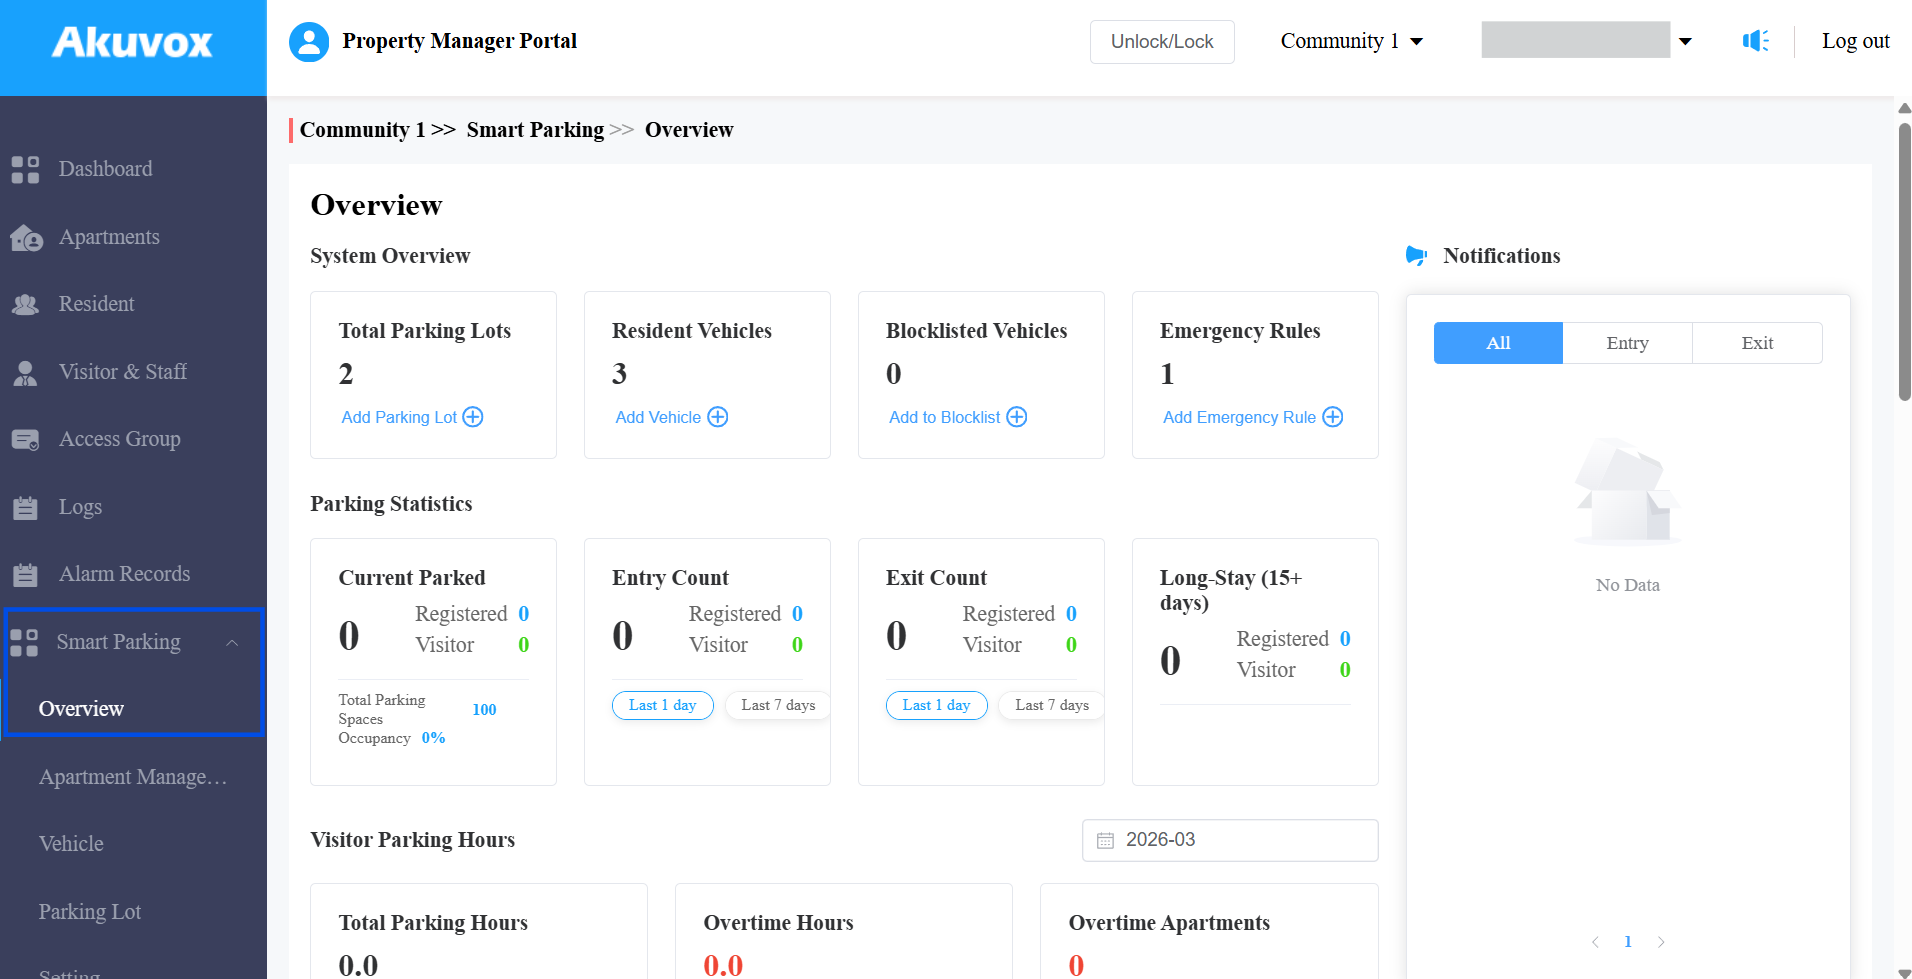
Smart Parking System Overview
The System Overview section provides you with a quick summary of the parking system status. It helps you understand the overall parking usage, vehicle activity, and exceptions without opening multiple pages.
From this section, you can also use shortcut buttons to quickly add parking resources or manage vehicles.
Module 1: Create a Parking Lot
Log in to the SmartPlus Cloud platform with your PM account.
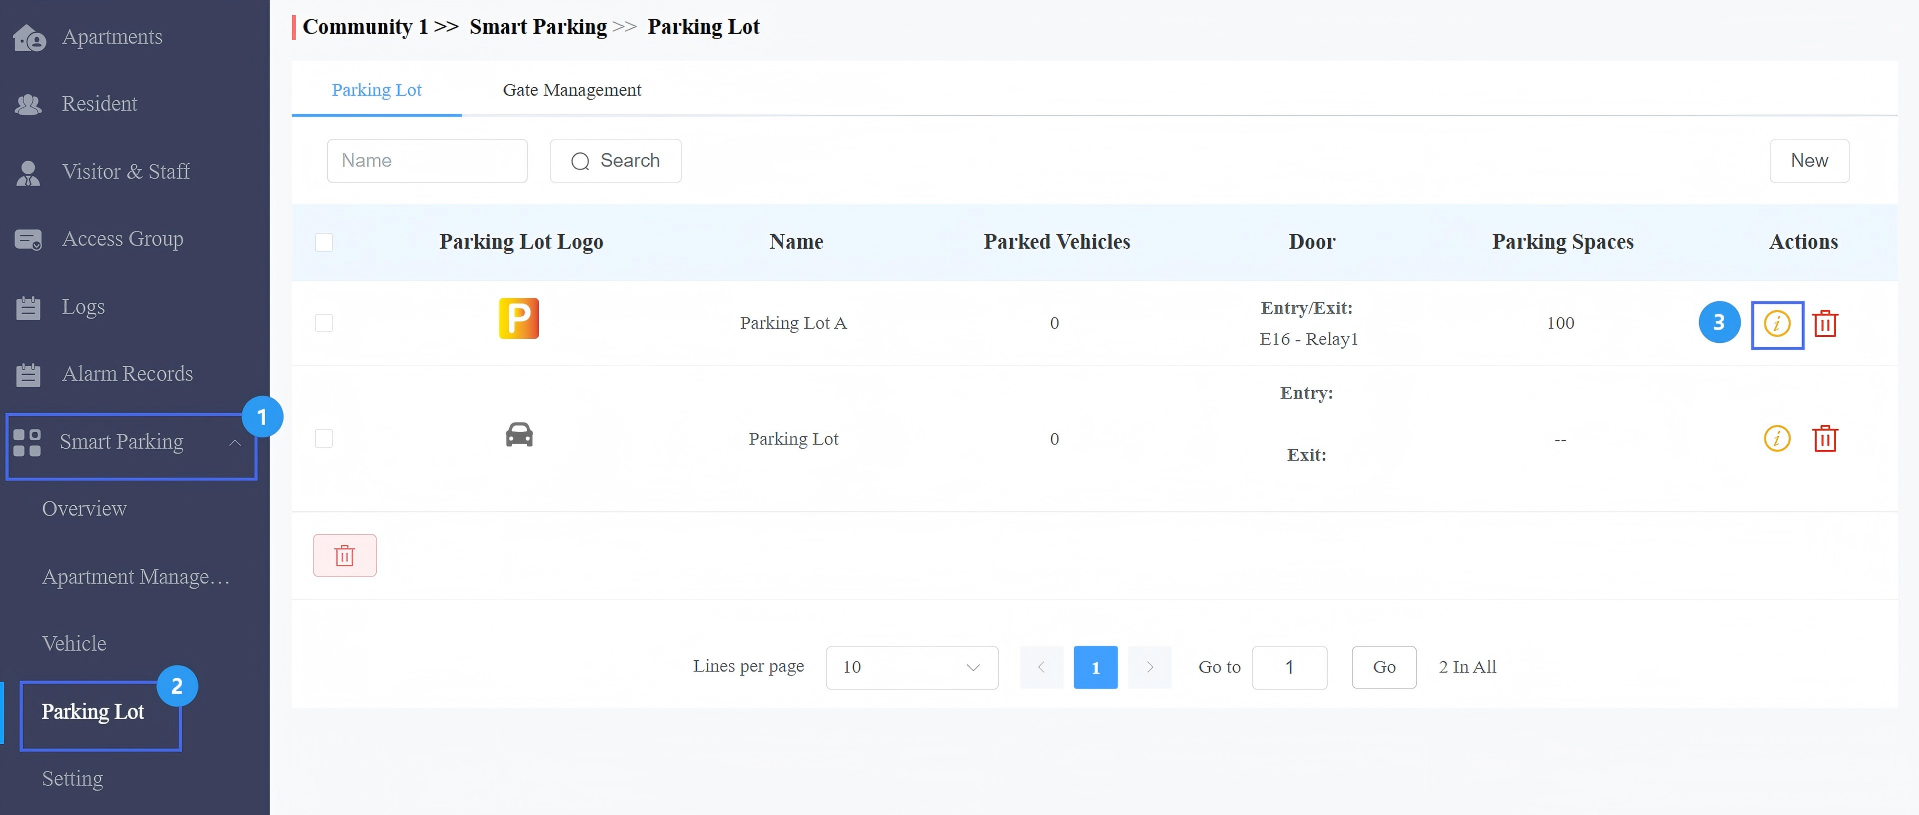
Click Smart Parking > Parking Lot in the left menu.
Click New on the right to create a new parking lot.

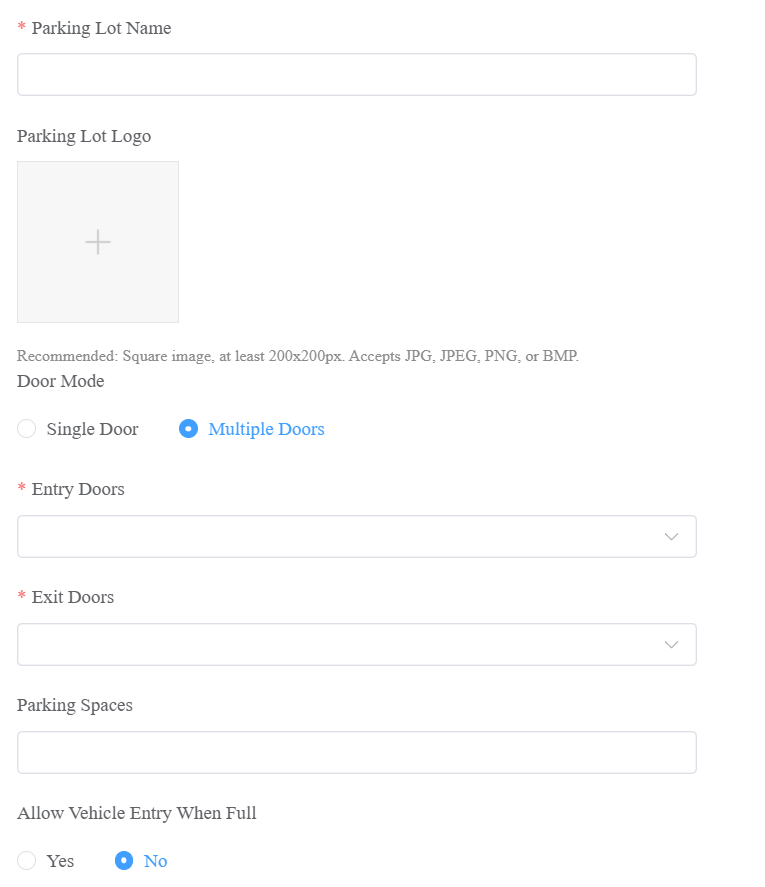
Name the parking lot.
[Optional]Upload the Parking Lot Logo. Requirements are a square image, ≥200x200px, supported formats: JPG/JPEG/PNG/BMP.
Select the Door Mode:
Single Door: The system automatically identifies the first vehicle recognition as Entry and the second as Exit.
Multiple Doors: Define which door is the entry and which is the exit.
[Optional]Configure Parking Spaces(0~65535). This determines the maximum number of vehicles allowed in a parking lot at the same time.
[Optional]Set whether to allow for vehicle entry when the parking lot is full. The default is No, which means that when the vehicle count reaches the limit, new vehicles cannot enter.
Click Submit.
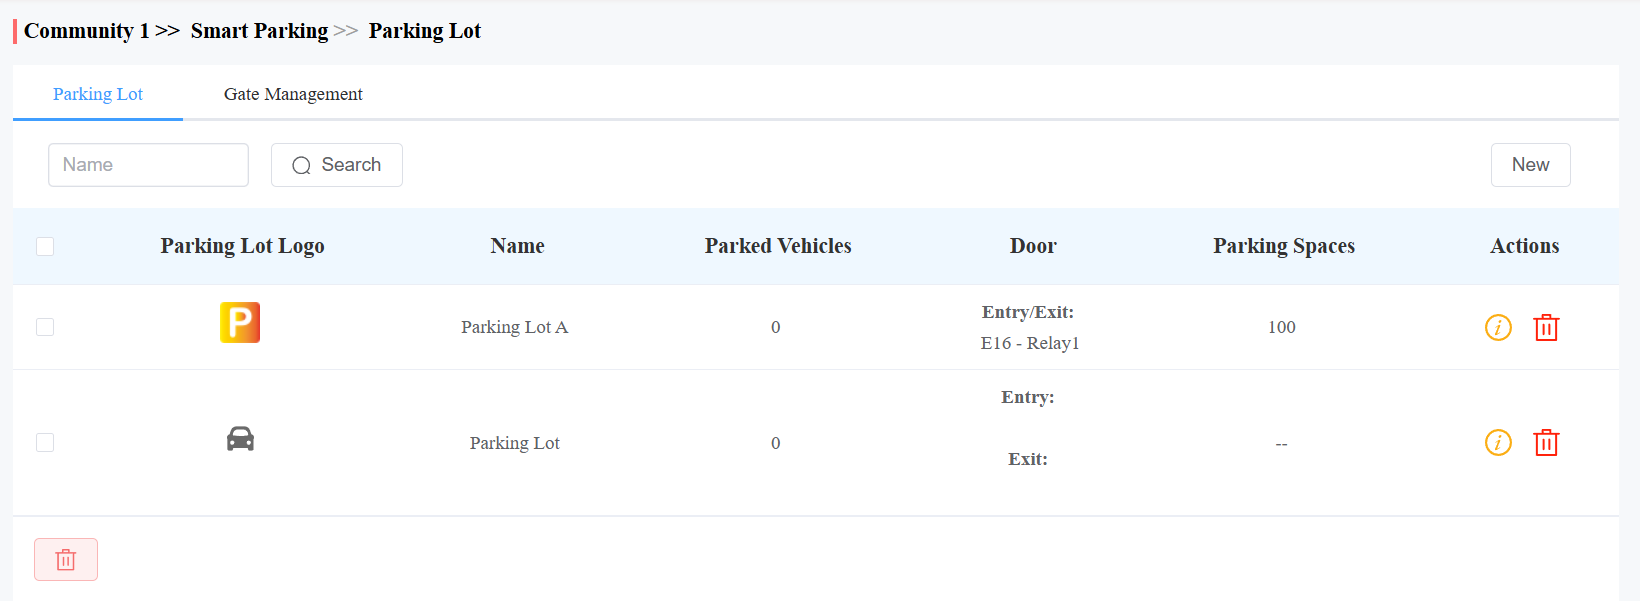
After creating the parking lot, you can view the number of parked vehicles.
Click
 to delete it.
Click
 to view more details and modify the settings.
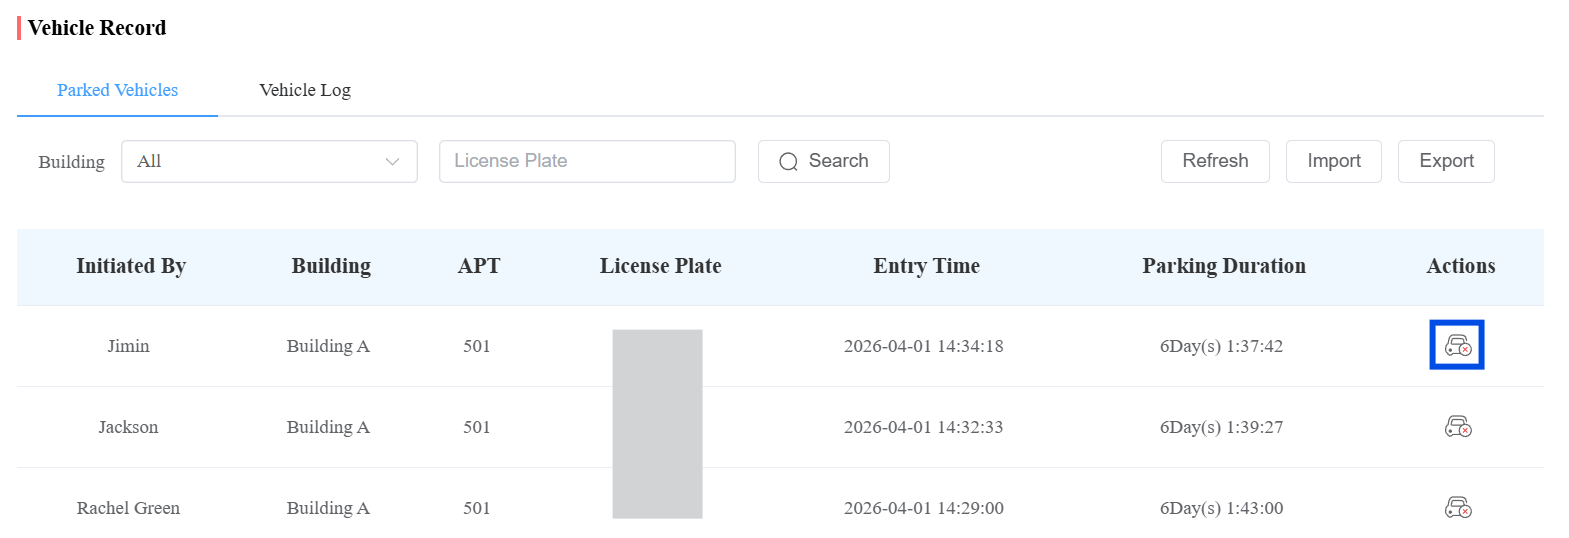
Module 2: Mark Vehicles Exited Manually
Manually mark the exit of vehicles for special scenarios (e.g., LPR camera recognition failure, vehicle manual exit) to ensure the accuracy of the platform’s parking space count and access records.
Caution
If you skip this step after a failed exit capture, the parking space count remains incorrect. This can cause the system to incorrectly block entry when it thinks the lot is full, even when spaces are actually available.
Click Smart Parking > Parking Lot.
Click
of the target parking lot.
Click
 in the Actions column to manually mark that the vehicle has left the parking lot.
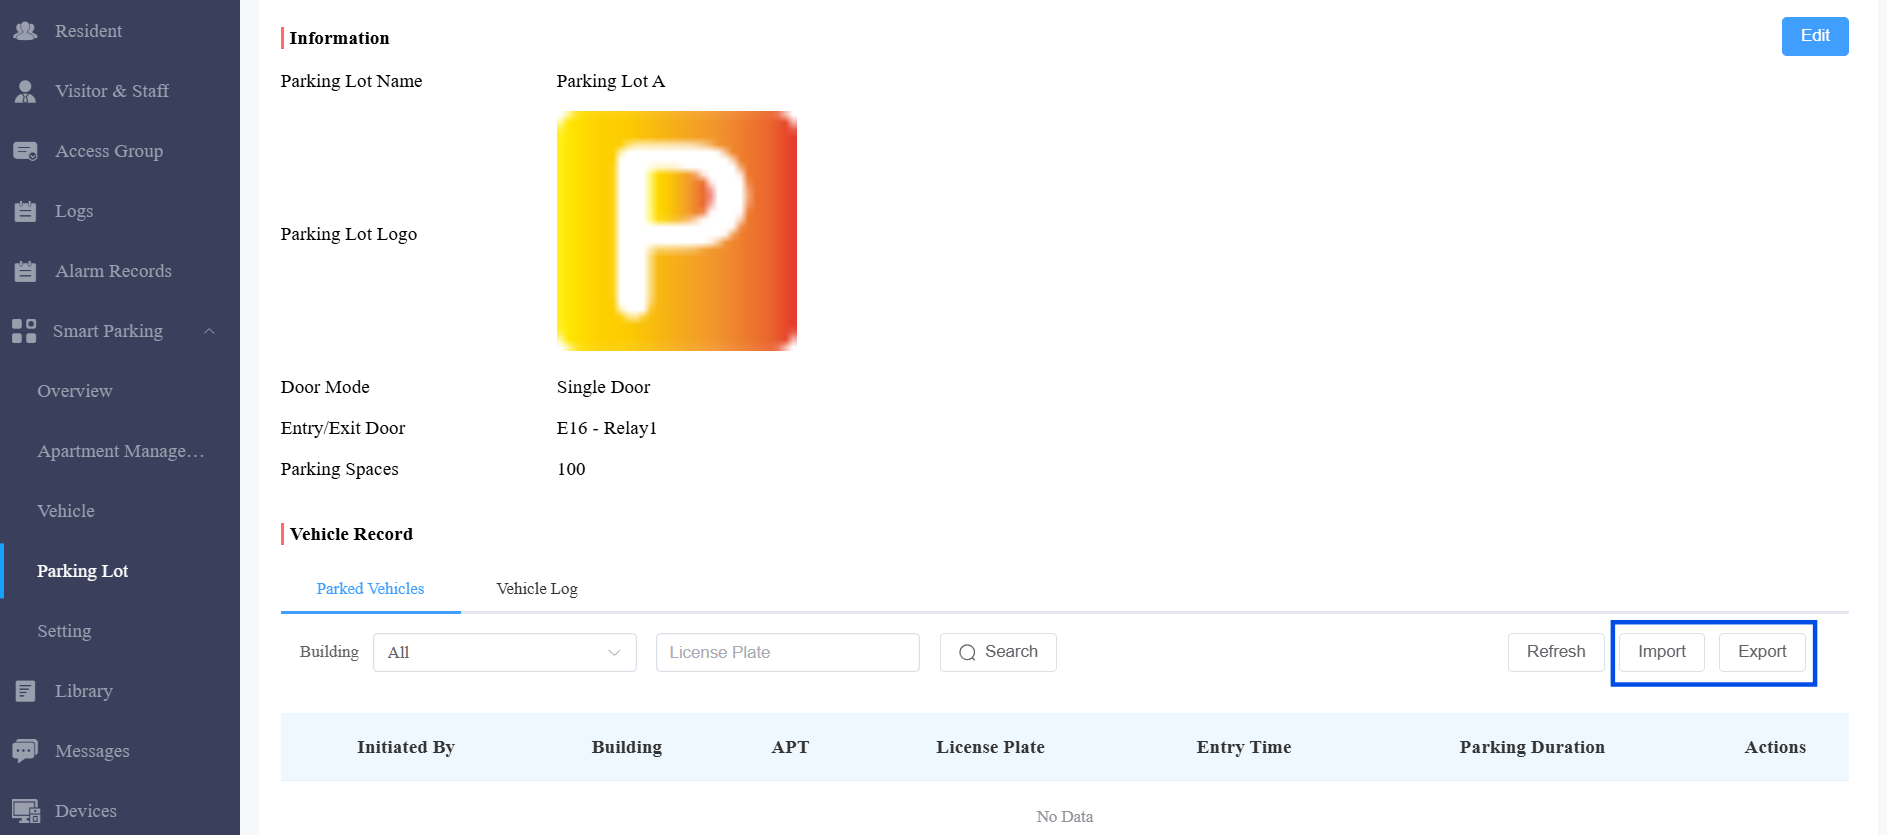
Module 3: View Vehicle Logs
Click Smart Parking > Parking Lot.
Click
of the target parking lot.Click Vehicle Log, where you can:
Check the vehicle entry/exit time and parking duration.
Click Import to upload vehicles already in the parking lot.
Click Export to download logs.
The import template:

Module 4: Visitor Parking Time Management
Visitor Parking Time defines how long visitor vehicles can park for free.
Why configure it:
Control visitor parking duration
Prevent long-term visitor parking abuse
Support automatic overtime charging
Improve parking turnover
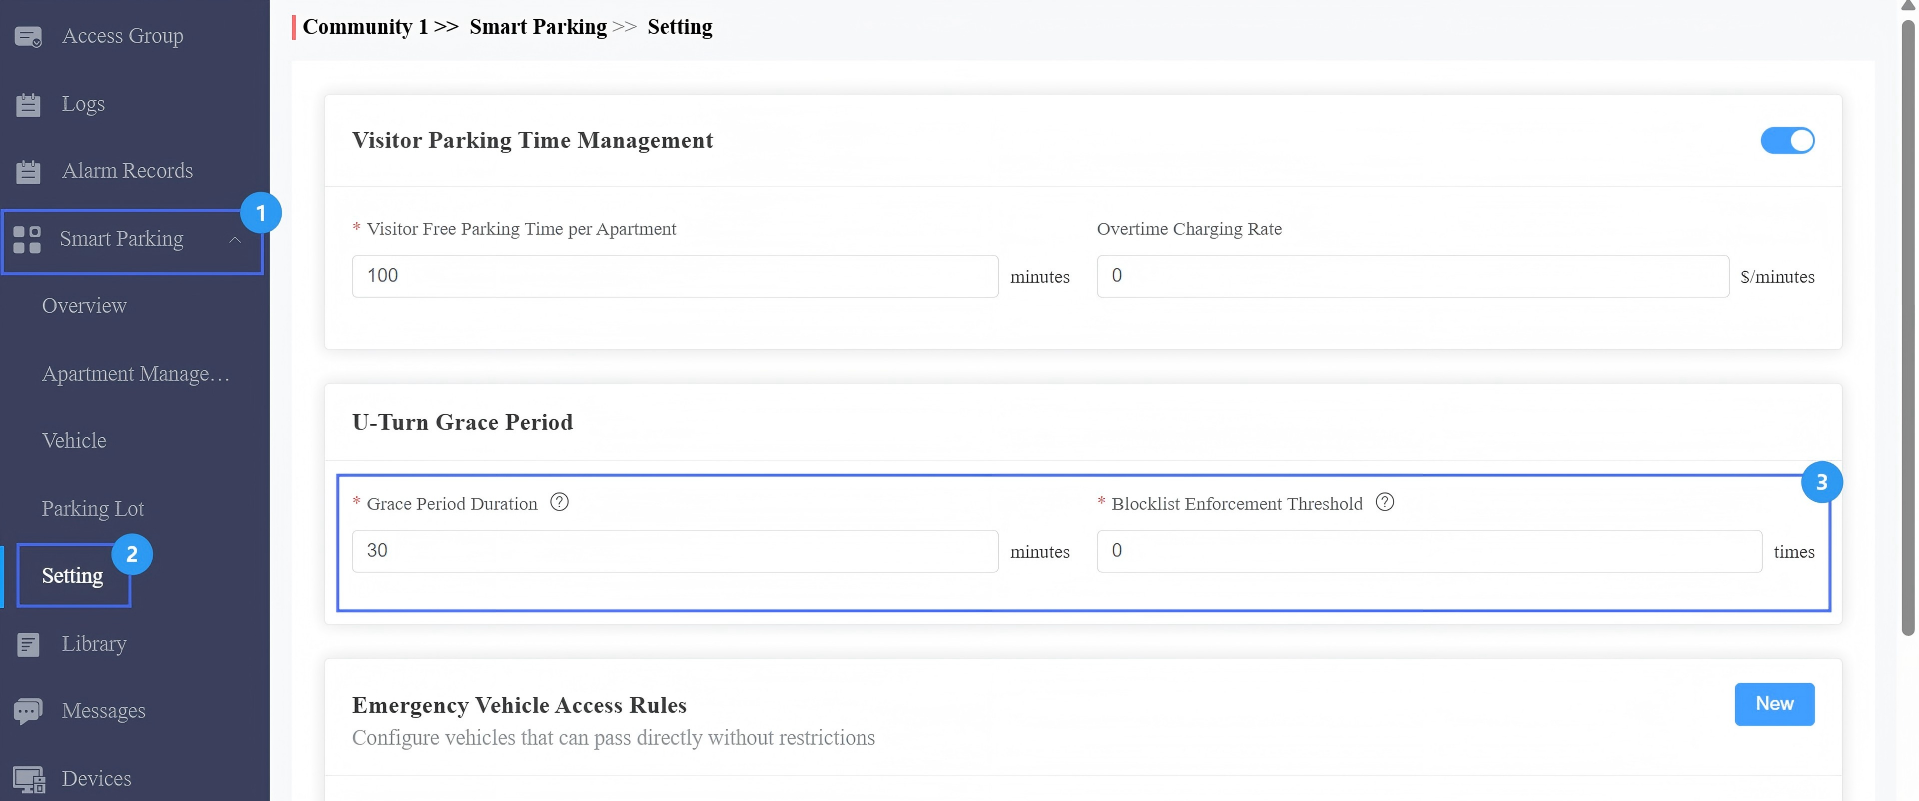
Enable Visitor Free Parking Time
Click Smart Parking > Setting.
Enable the feature.
Configure the Visitor Free Parking Time per Apartment(minutes per month)(0~65535 minutes) and Overtime Charging Rate(fee per minute).
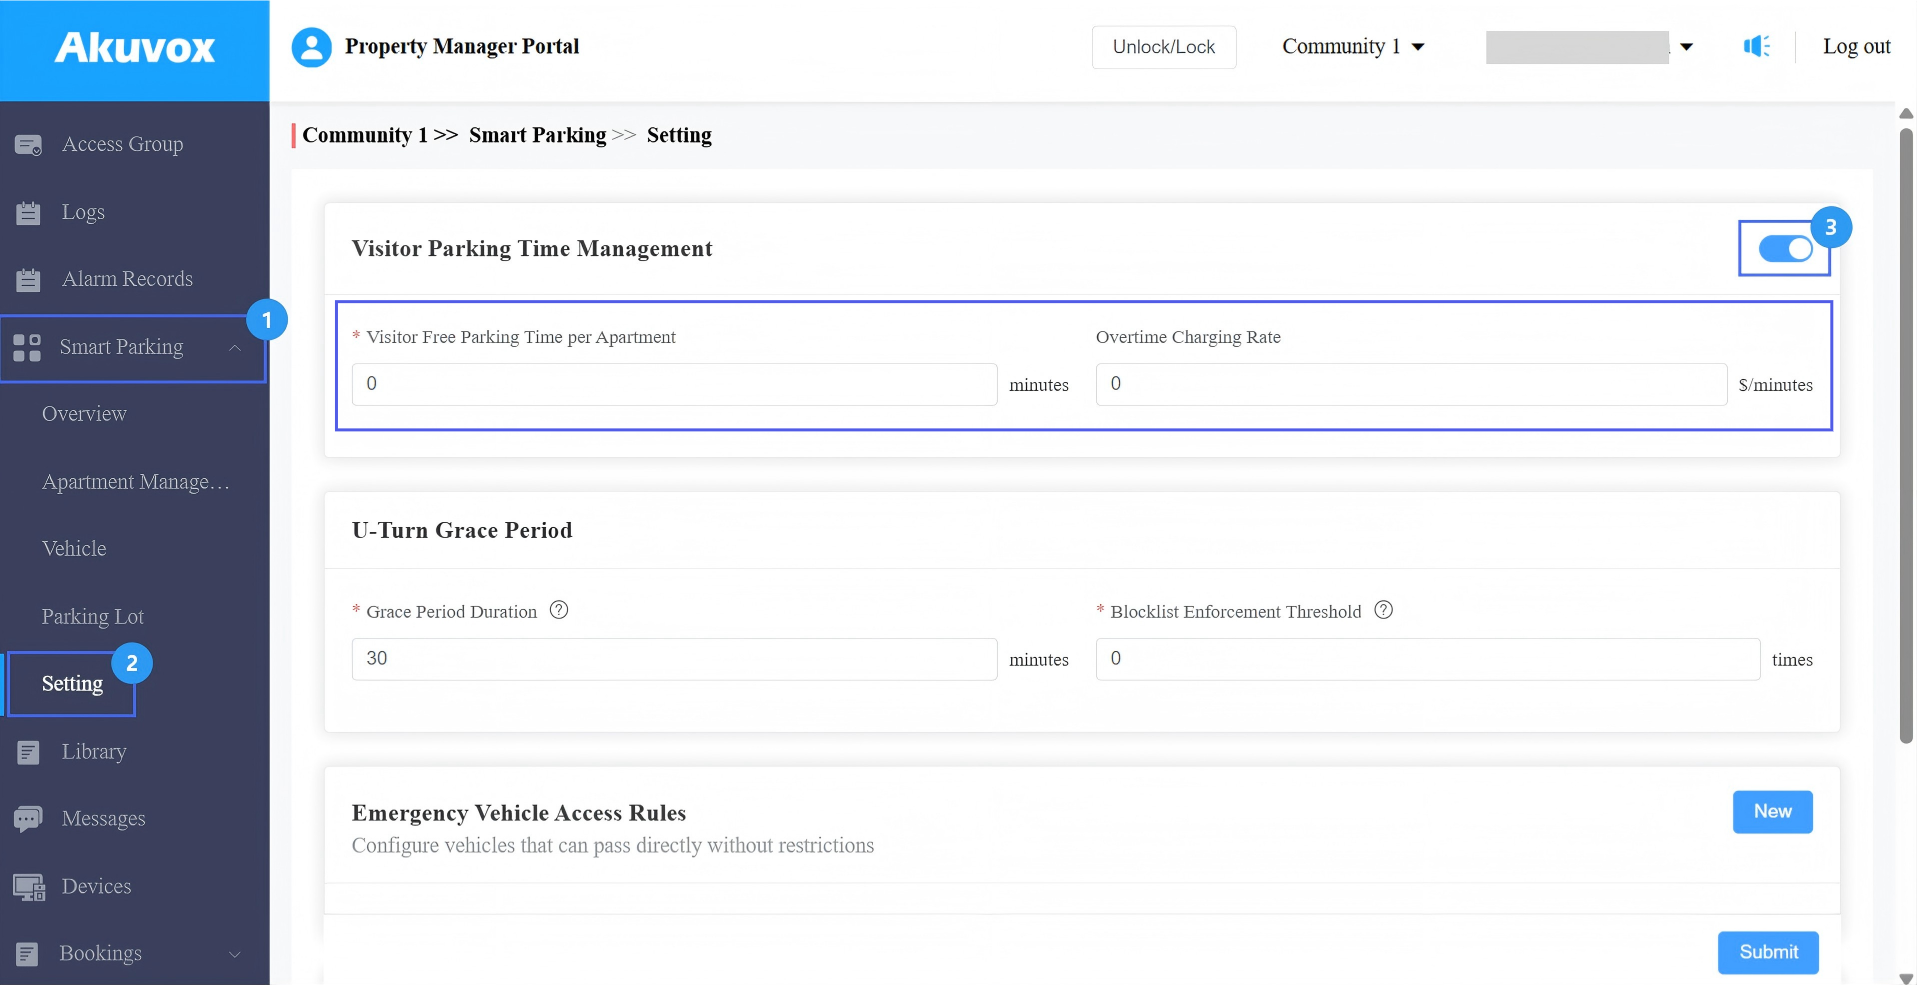
Submit the setting.
After the configuration, apartment visitor parking statistics become visible. Visitor overtime fees can be calculated automatically.
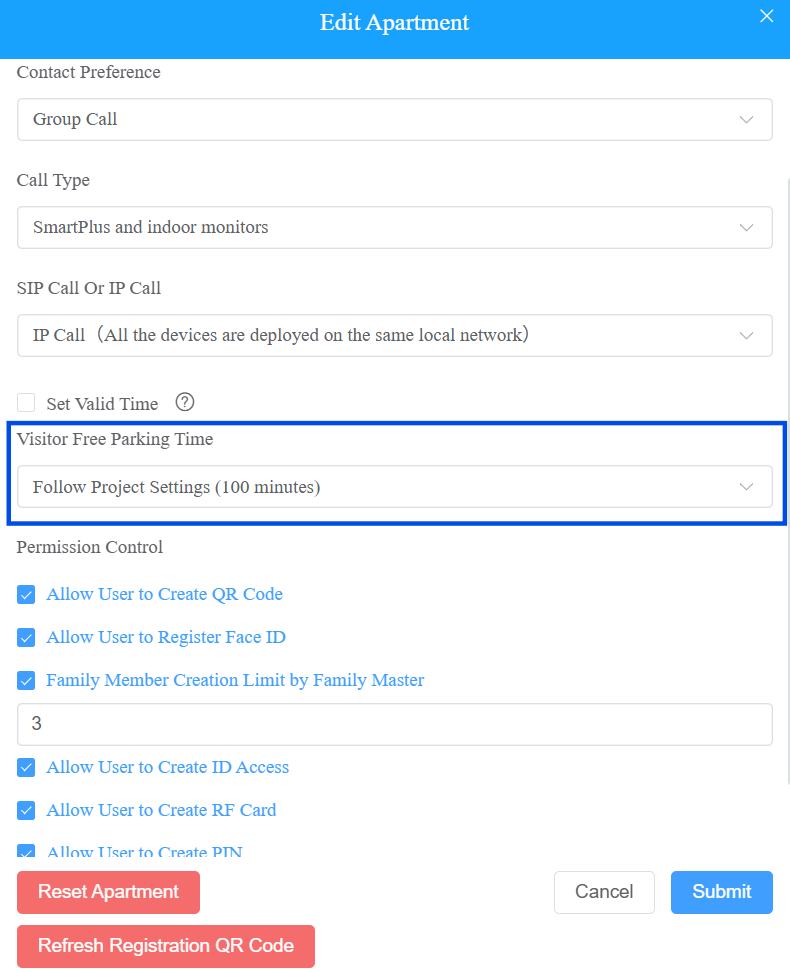
Apartment Visitor Parking Configuration
You can define visitor parking time per apartment.
Click Apartments.
Click
 of a specific apartment, or make a bulk configuration by checking apartments and clicking Batch Edit.
 Choose Follow Project Settings(Configured on the Smart Parking > Settings interface) or Custom.
If Custom is selected, specify the Visitor Free Parking Time(0~65535 minutes) for the apartment.
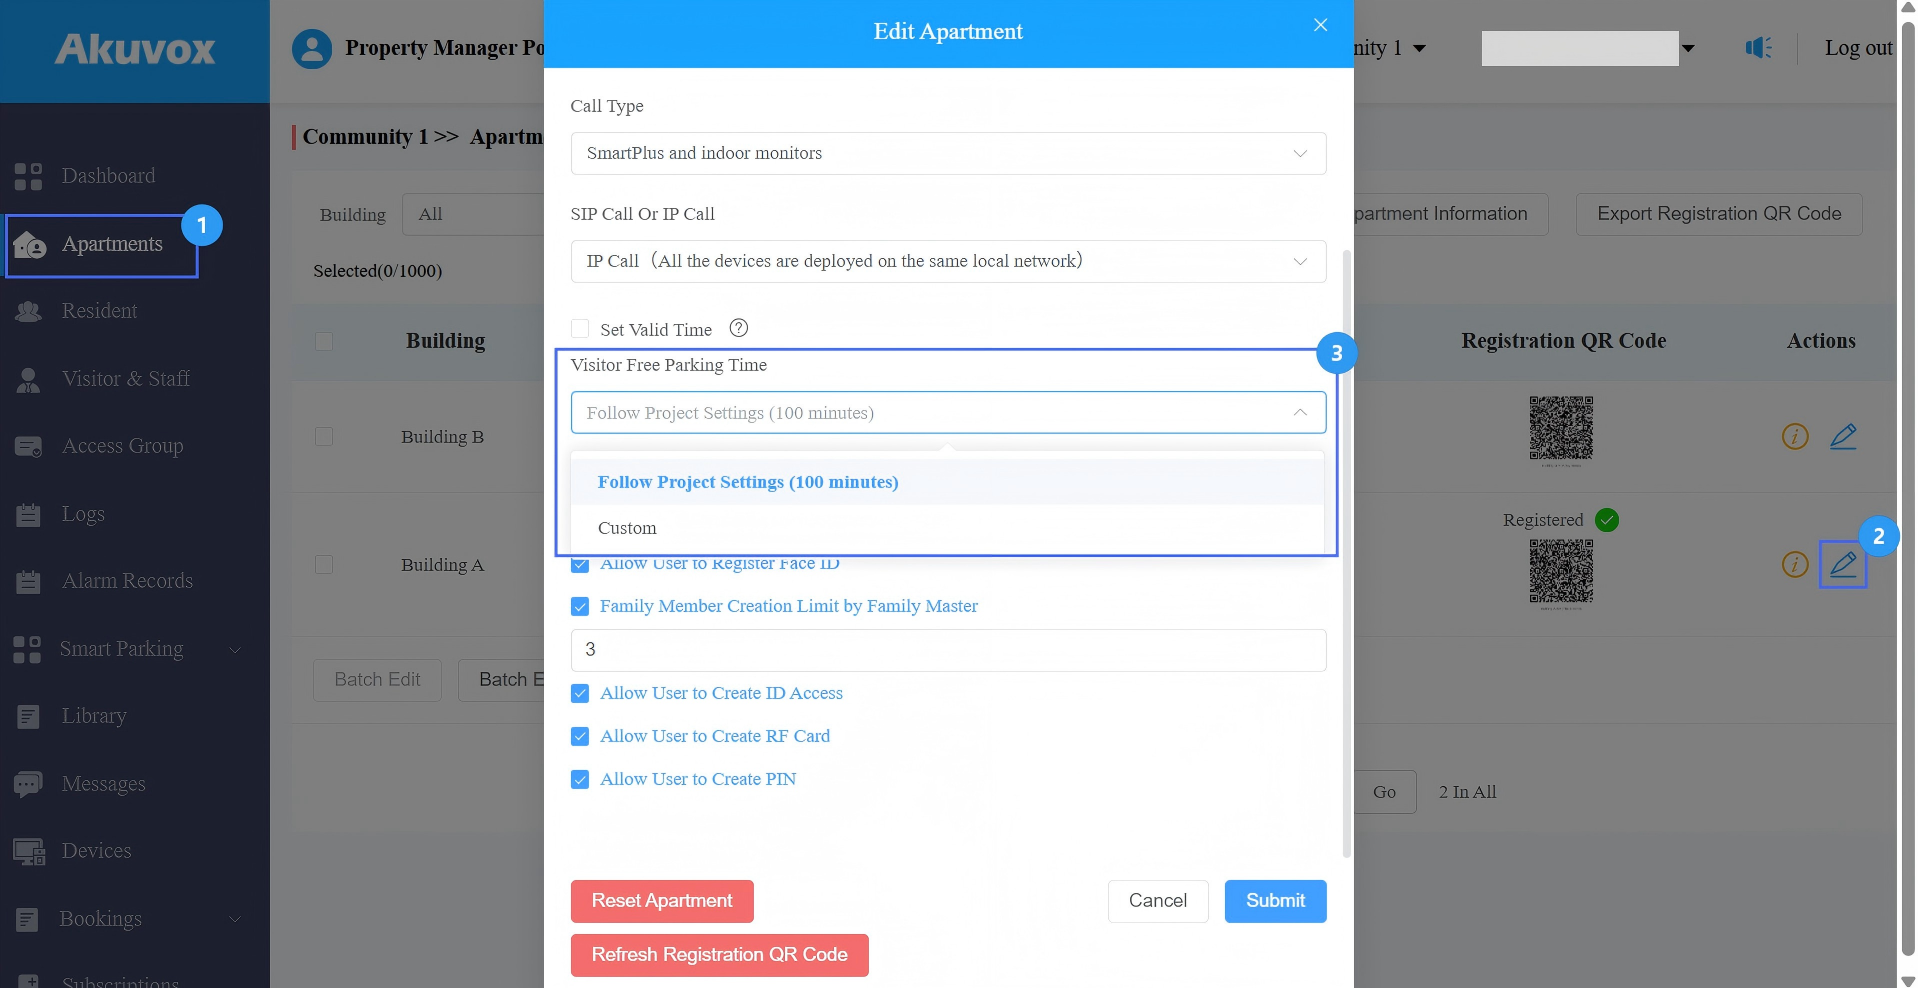
Submit the setting.
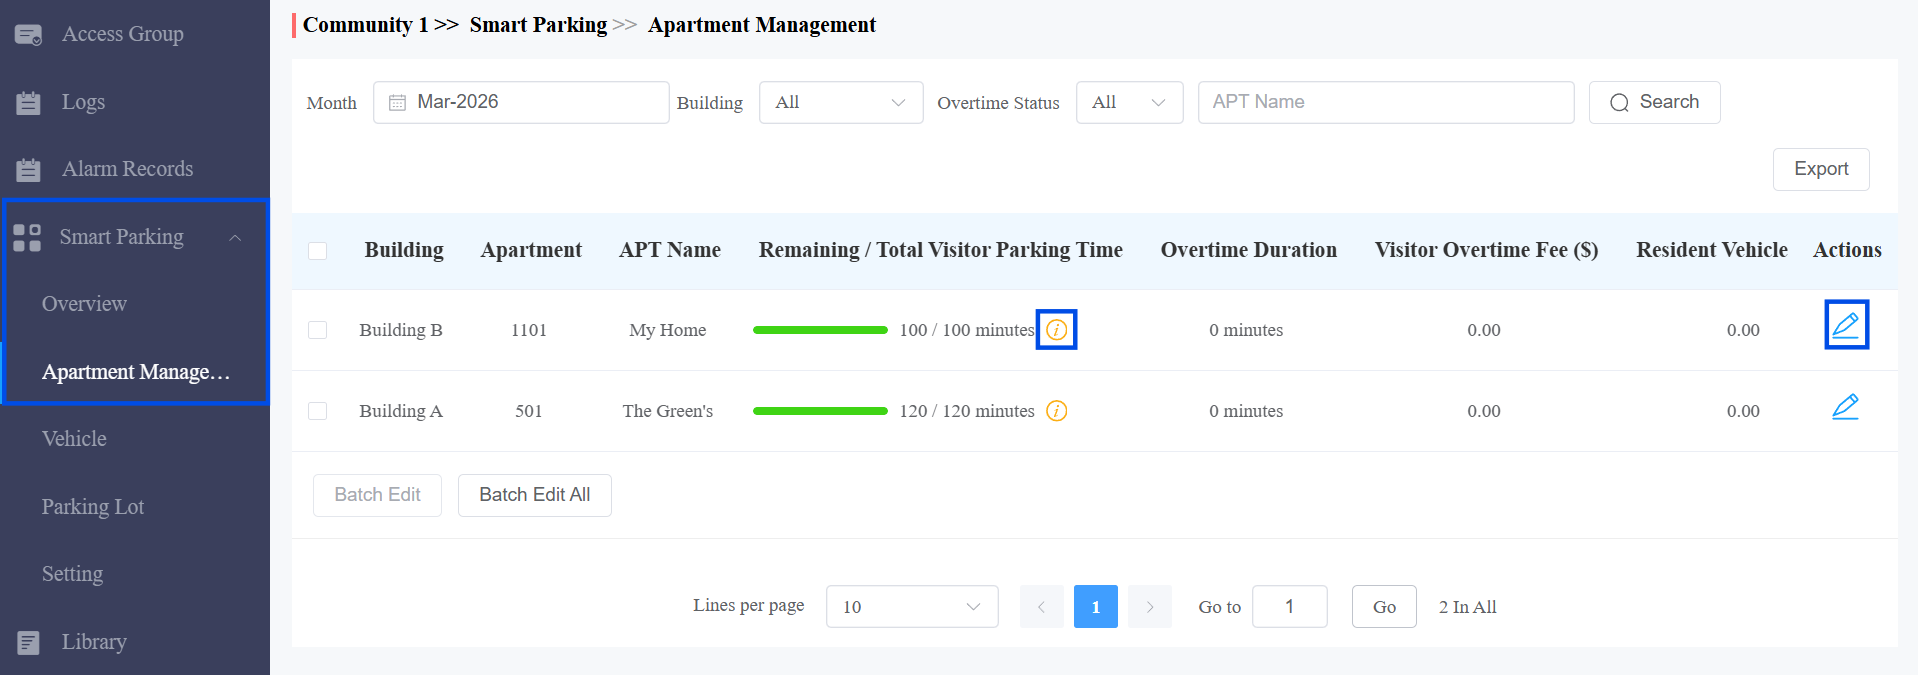
View Visitor Free Parking Time Usage
You can check the used/total visitor parking time on the Smart Parking > Apartment Management interface.
This section is available ONLY when the Visitor Free Parking Time feature is enabled.
You can click  to view the parking time using details, and click
  to modify the parking time.
Related Documentation
For detailed operation steps of visitor vehicle access, please refer to: Configure Visitor Vehicle Access to the Parking Lot.
Module 5: U-Turn Restrictions
This defines how long a vehicle can stay before exiting without being considered parked.
Example:
If grace period = 30 minutes:
Vehicle exits within 30 minutes → treated as a U-turn
Vehicle exits after 30 minutes → counted as parking
Click Smart Parking > Setting.
Configure the Grace Period Duration(0~65535). Setting it to 0 means no restrictions.
Configure the Blocklist Enforcement Threshold. This defines how many U-turn violations are allowed before restriction. For example, if it is set to 5, upon the 6th violation, the vehicle will be blocklisted.
Submit the setting.
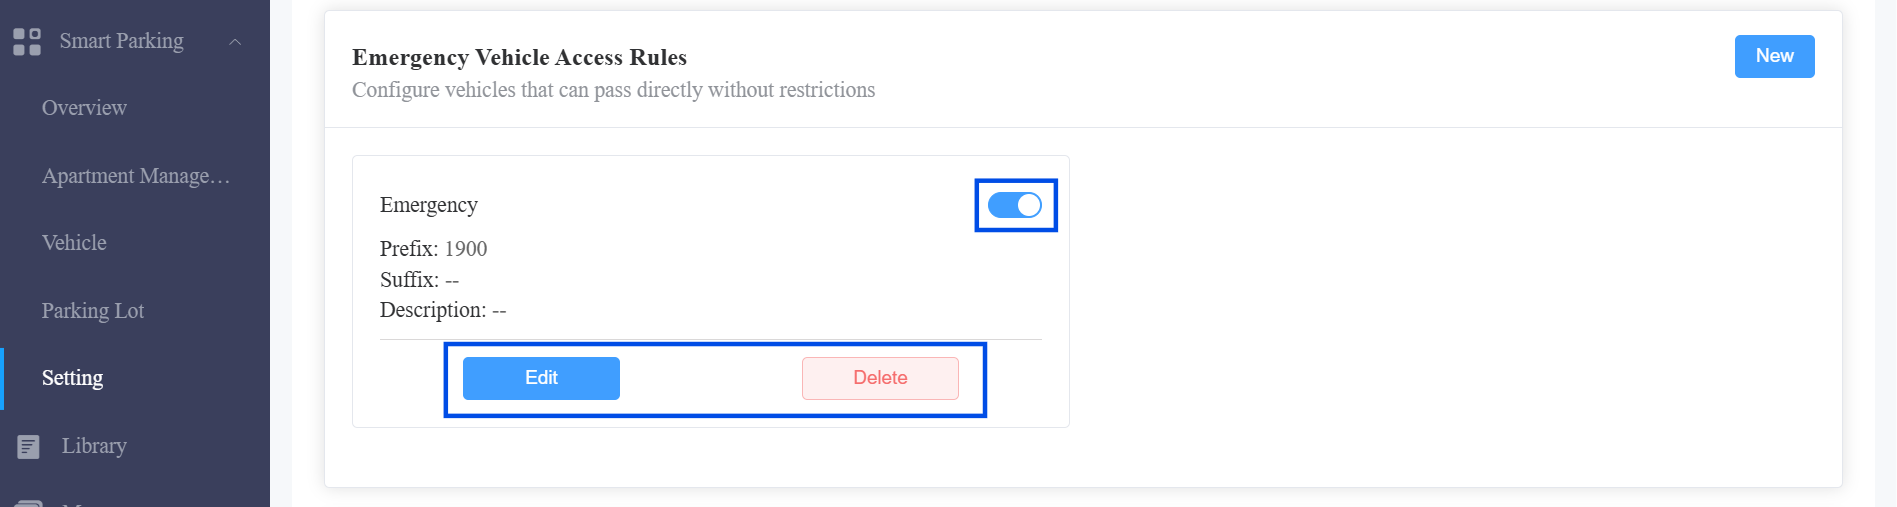
Module 6: Emergency Vehicle Access Rules
Emergency Vehicle Rules allow specific vehicles to enter at any time.
This ensures emergency access, avoids manual intervention, and improves safety response.
Click Smart Parking > Setting.
Click New in the Emergency Vehicle Access Rules section.
Enter the Rule Name.
Enter the Prefix and/or Suffix of the license plate.
Only Prefix → match prefix to enter
Only Suffix → match suffix to enter
Both → match both to enter
Enter the rule description as needed.
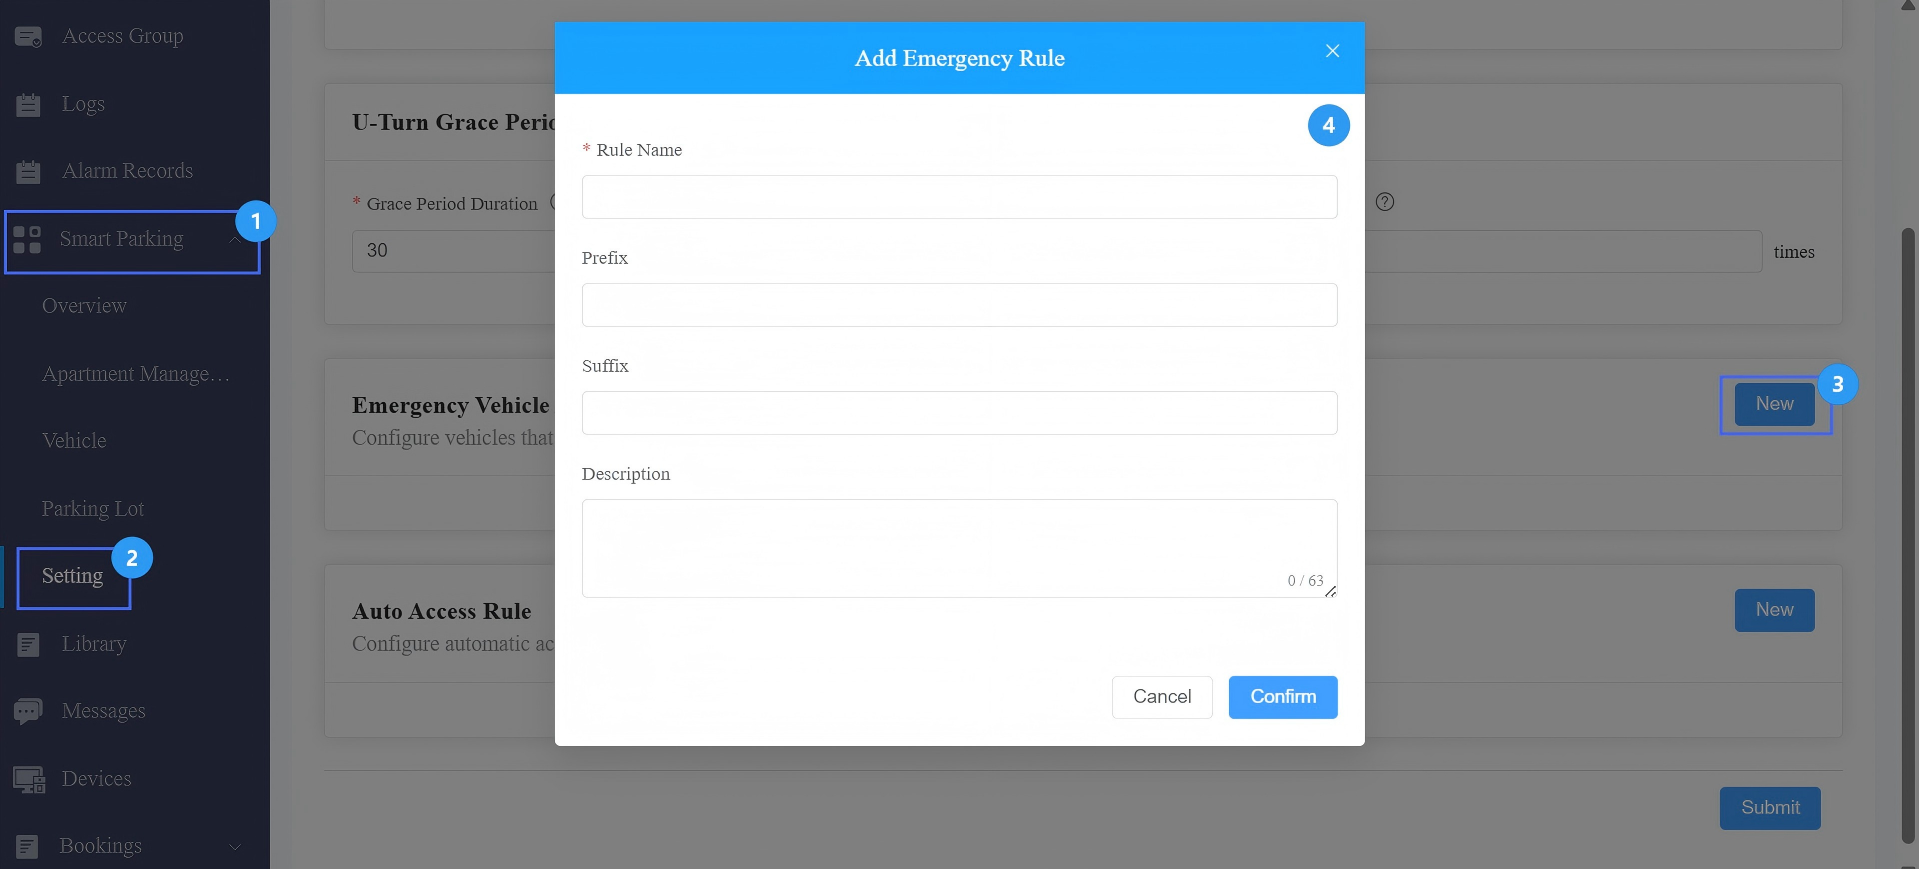
Submit the setting.
Note
Emergency vehicles override blocklist restrictions. This rule has the highest priority in the system.
Up to 20 rules supported.
After creating the rule, you can toggle the switch to enable/disable it, click Edit to modify it, and Delete to remove it.
Module 7: Auto Access Rules
Auto Access Rules allow all vehicles to enter automatically during a configured time window — no individual vehicle check is performed during that period. This is useful for open events or scheduled public access hours.
Click Smart Parking > Setting.
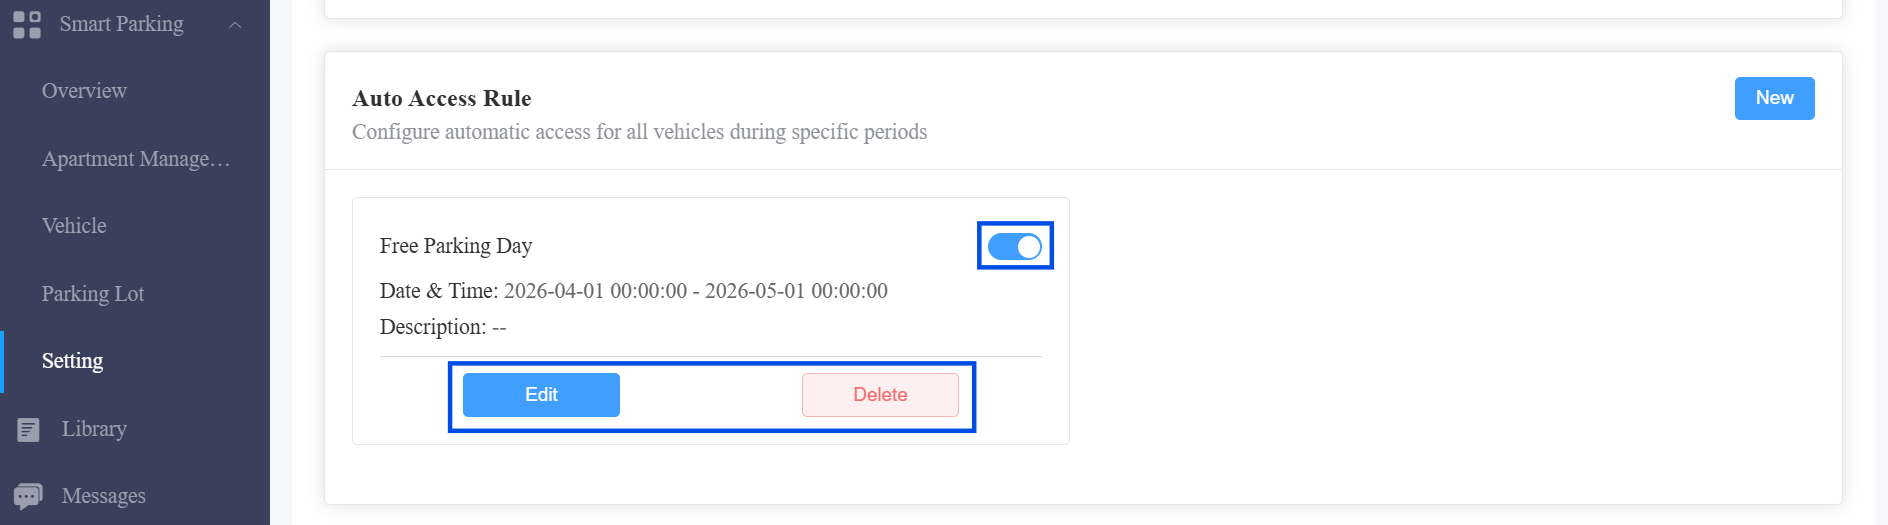
Click New in the Auto Access Rule section.
Enter the Configuration Name.
Specify the auto access time.
Enter the rule description as needed.
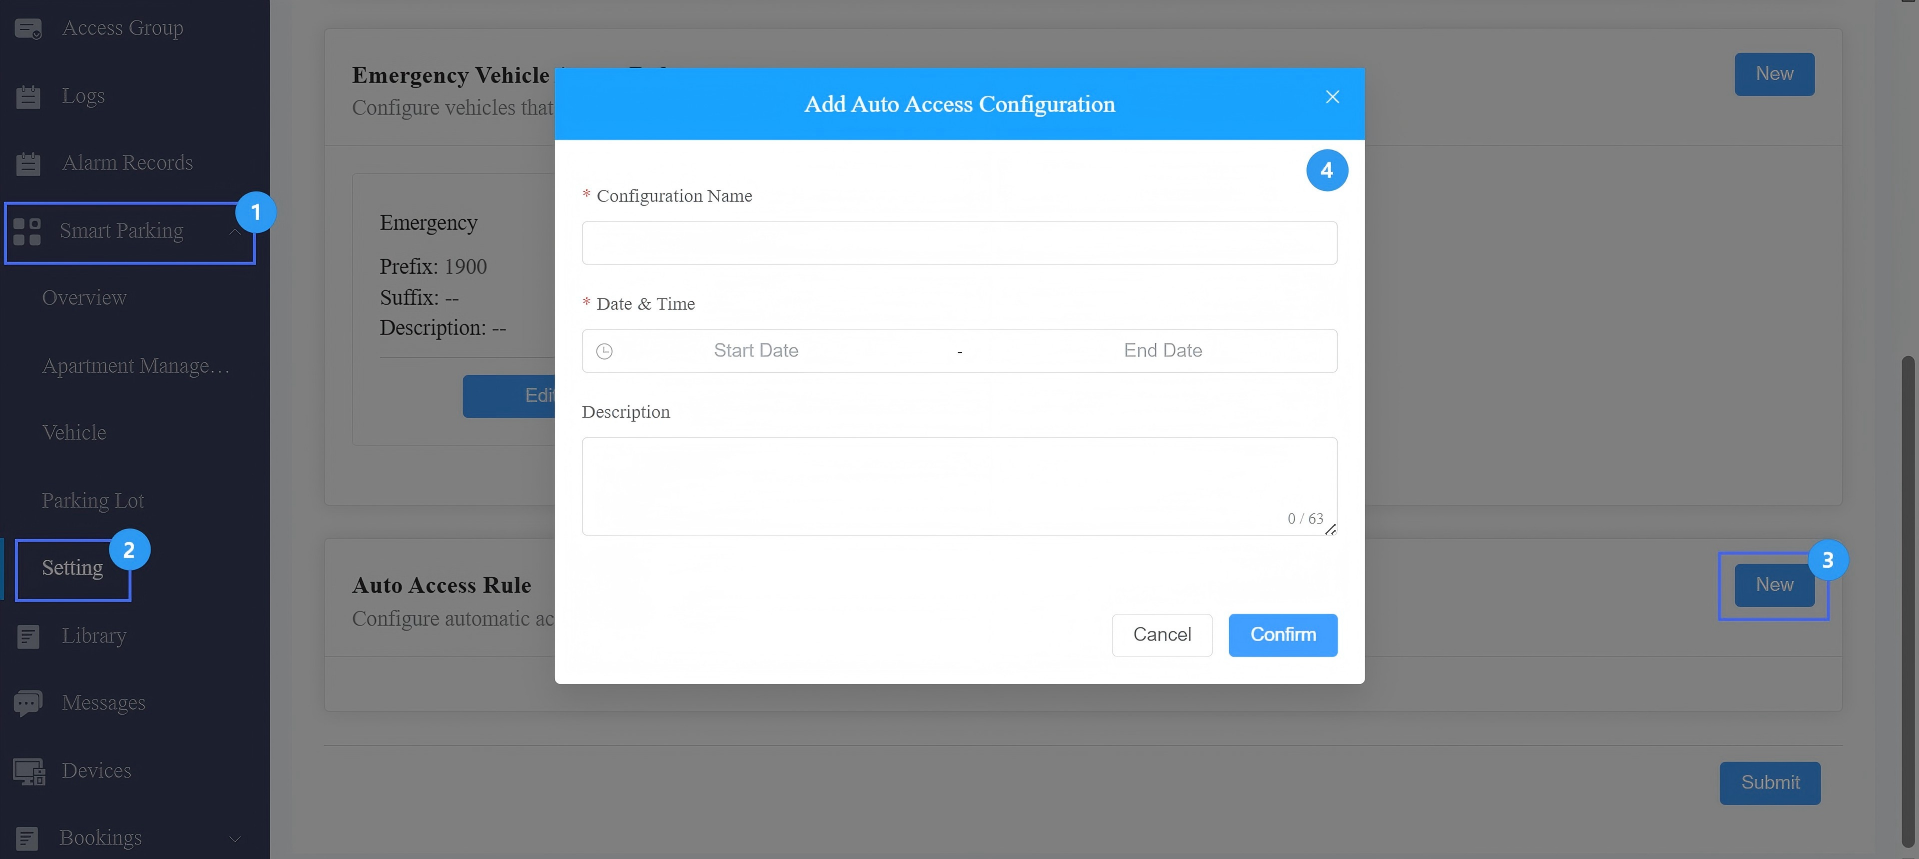
Submit the setting.
Note
Up to 20 rules supported.
After creating the rule, you can toggle the switch to enable/disable it, click Edit to modify it, and Delete to remove it.
Module 8: Gate Management
Gate Management is used to display entry/exit gate information for parking lots.
Click Smart Parking > Parking Lot > Gate Management > New.

Enter a unique Gate Number to distinguish the gate from others.
Choose the parking lot.
Enter the Gate Name, e.g., Exit Gate.
Select the Entrance/Exit Name from the list.
Associate the required equipment.
If Camera and/or Display Screen is checked, specify the device number.
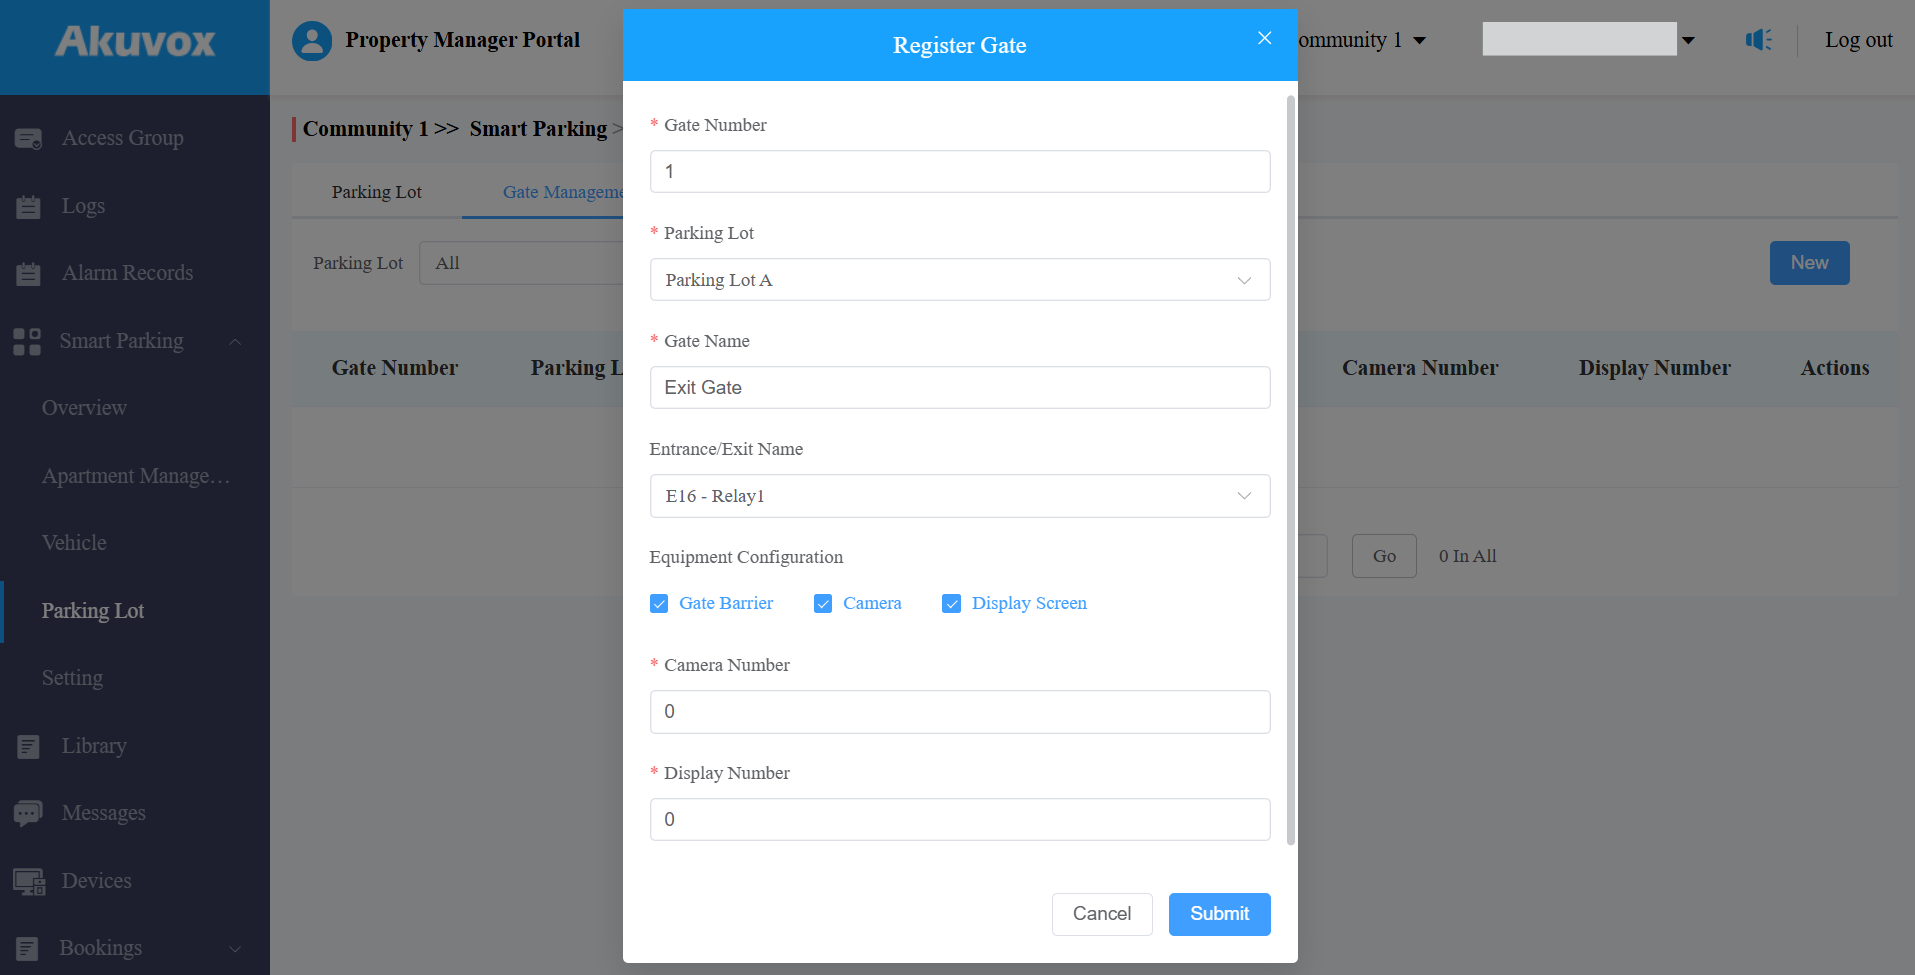
Submit the setting.
After creating a gate, click to modify the settings and
  to remove it.

Module 9: Vehicle Management
You can add vehicles, view entry records, configure monthly parking fees, and add remarks.
Add Vehicles
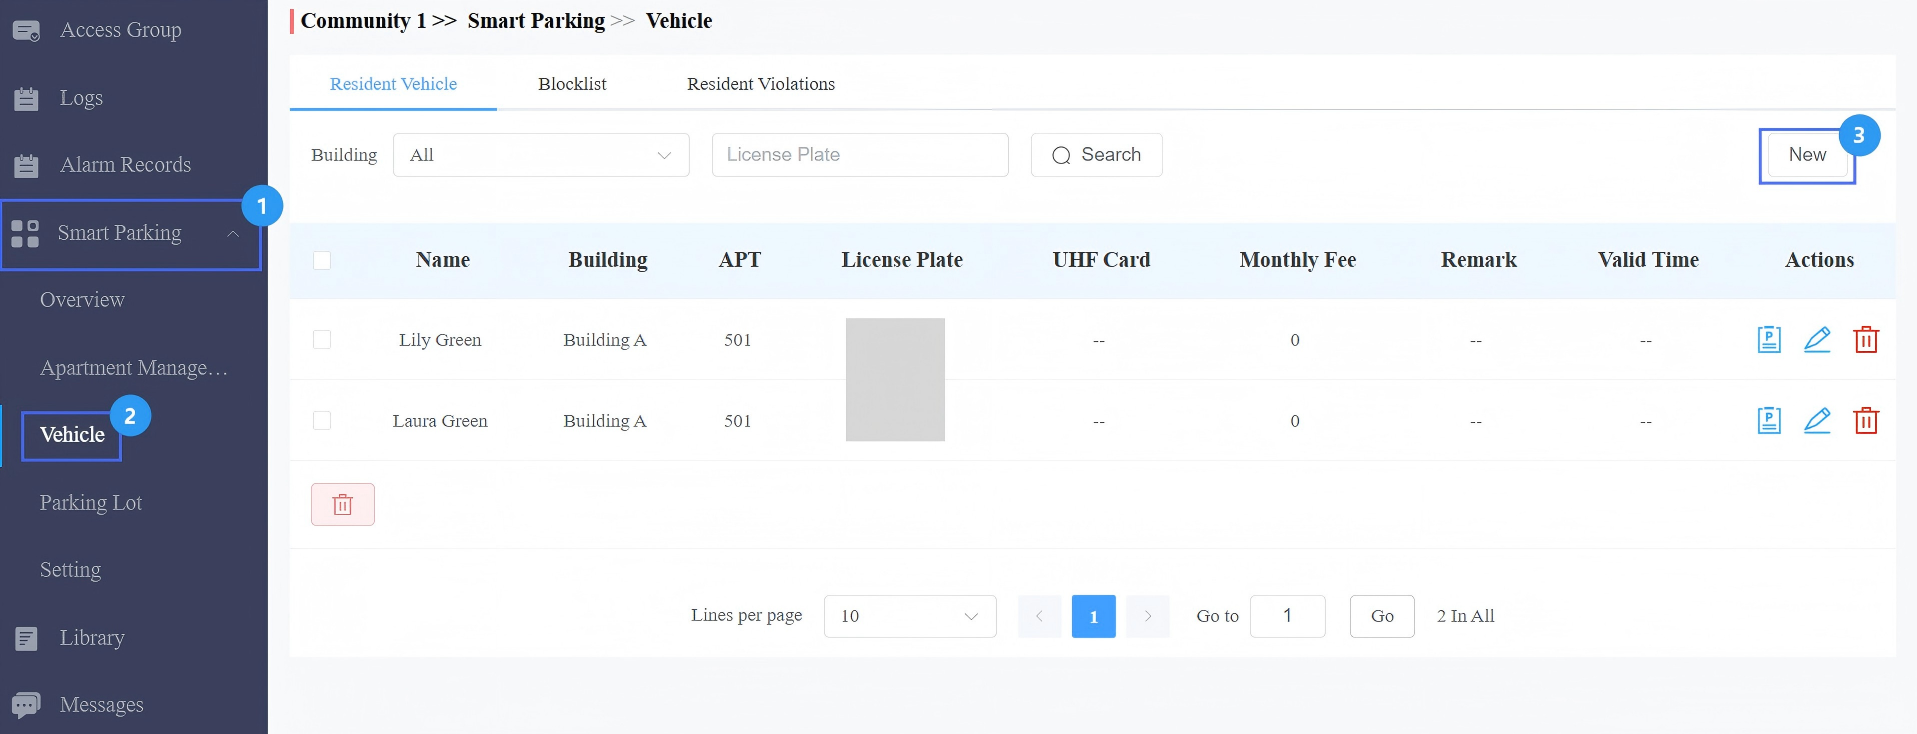
Click Smart Parking > Vehicle > New.
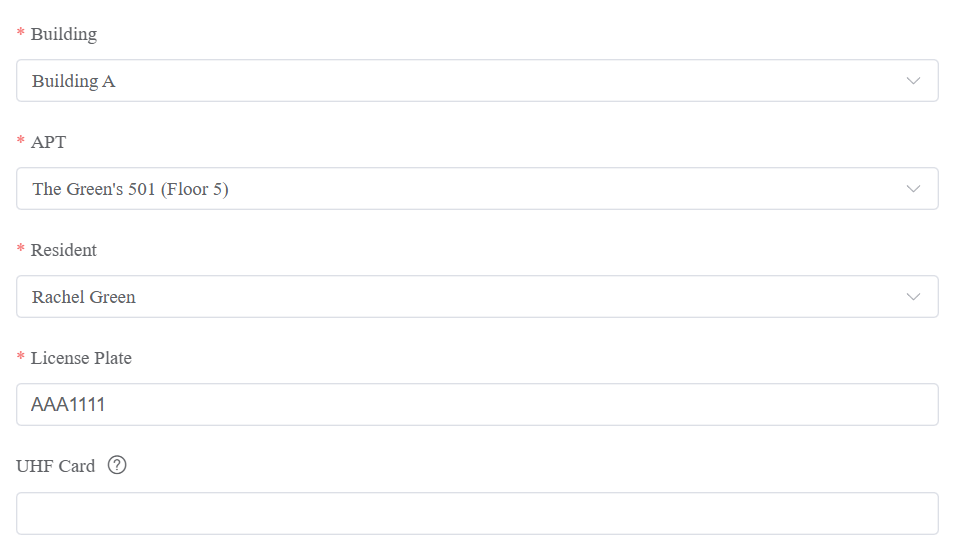
Select the building, apartment, and resident.
Configure the license plate and UHF card.
License Plate: Enter the number that the third-party LPR camera identifies.
UHF Card: Enter the card code that the Akuvox device ACR-CRP12 identifies.
If both are filled, the cloud will ONLY issue the UHF card code to the door phone.
Configure Long-term Vehicle. It is enabled by default. If disabled, set a period when the vehicle can enter and exit the parking lot.
Set the Monthly Fee for the resident.
Add remarks as needed.
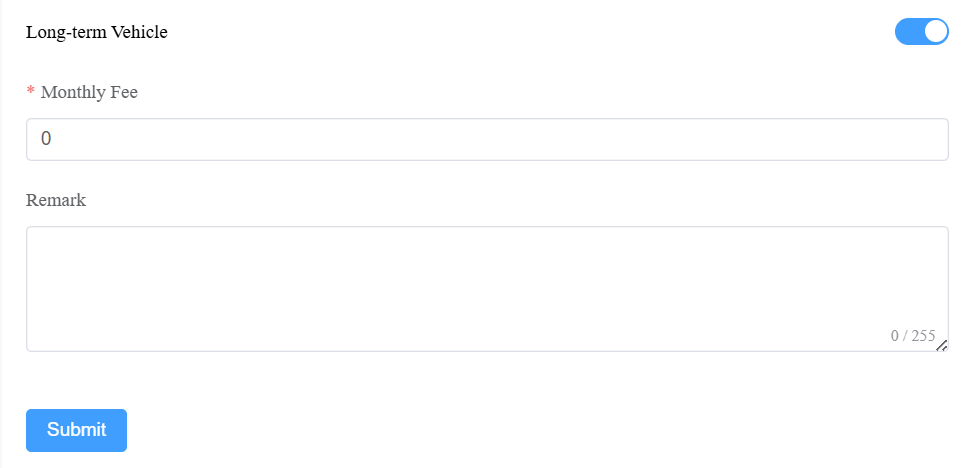
Submit the setting.
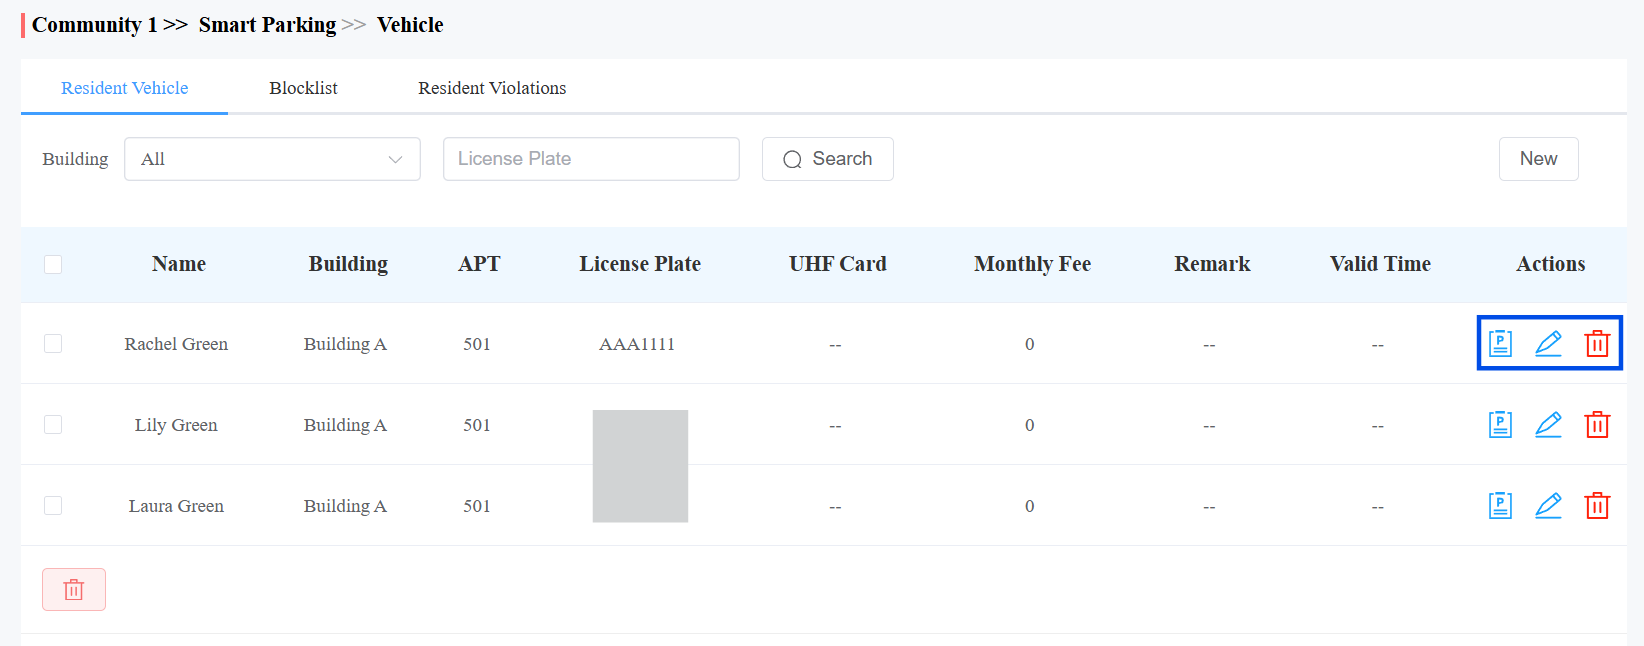
After adding the vehicle, you can click  to view its entry/exit logs, click
  to modify the setting, and
  to remove the vehicle.
Blocklist Management
Blocklisted vehicles can exit, but CANNOT enter the parking lot.
To blocklist a vehicle manually, click Smart Parking > Vehicle > Blocklist > New.
Enter the license plate.
Enter the reason as needed.
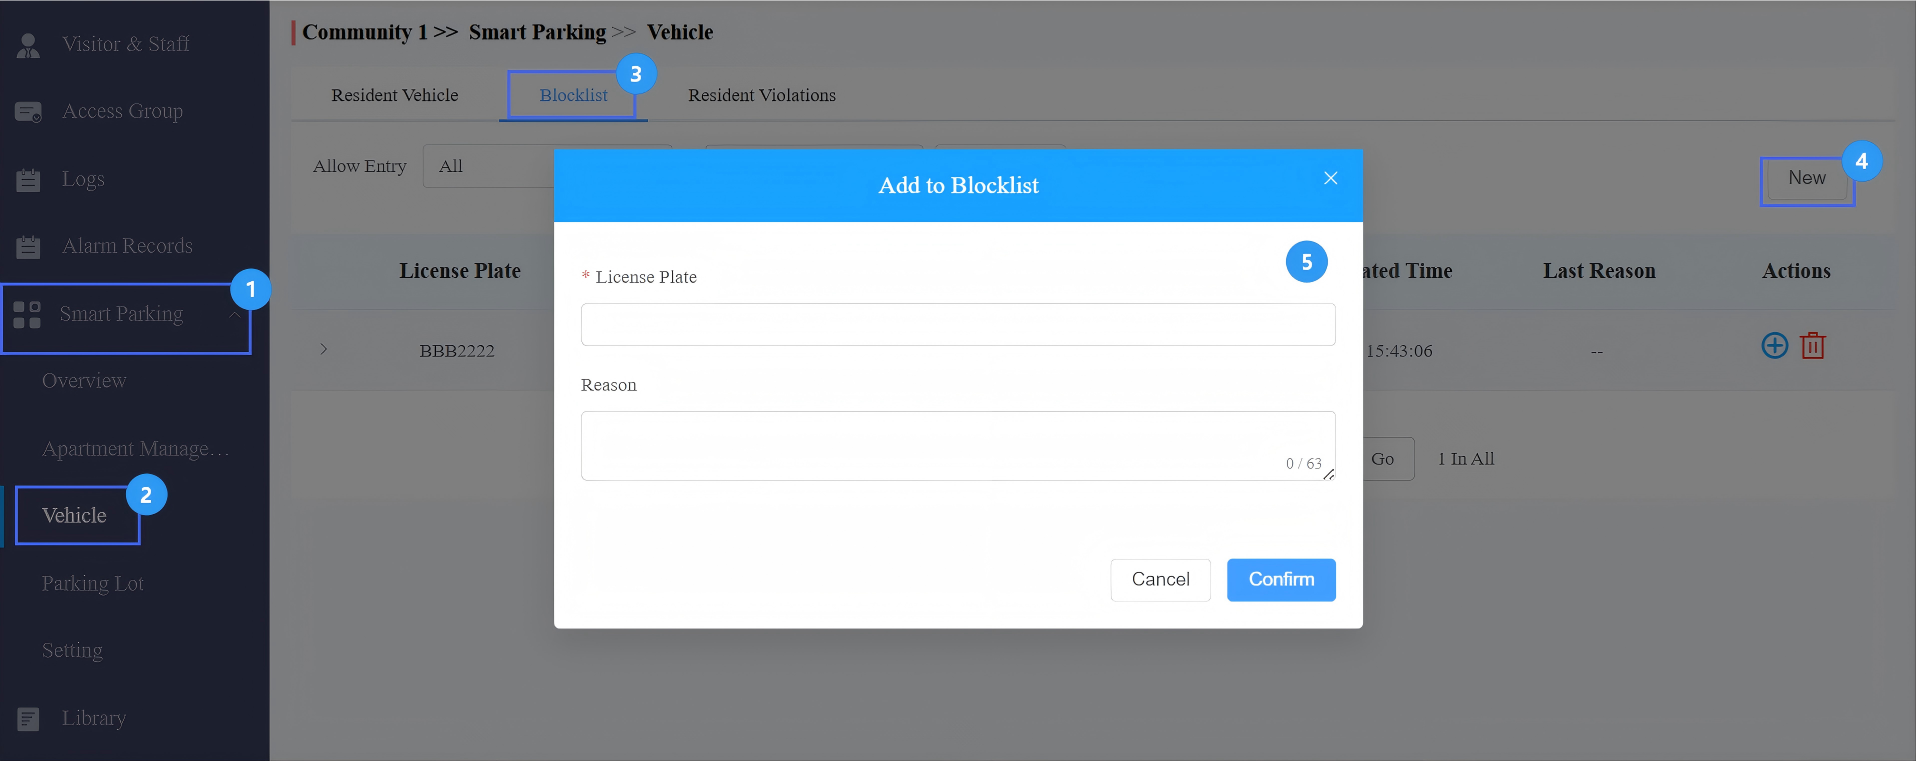
Submit the setting.
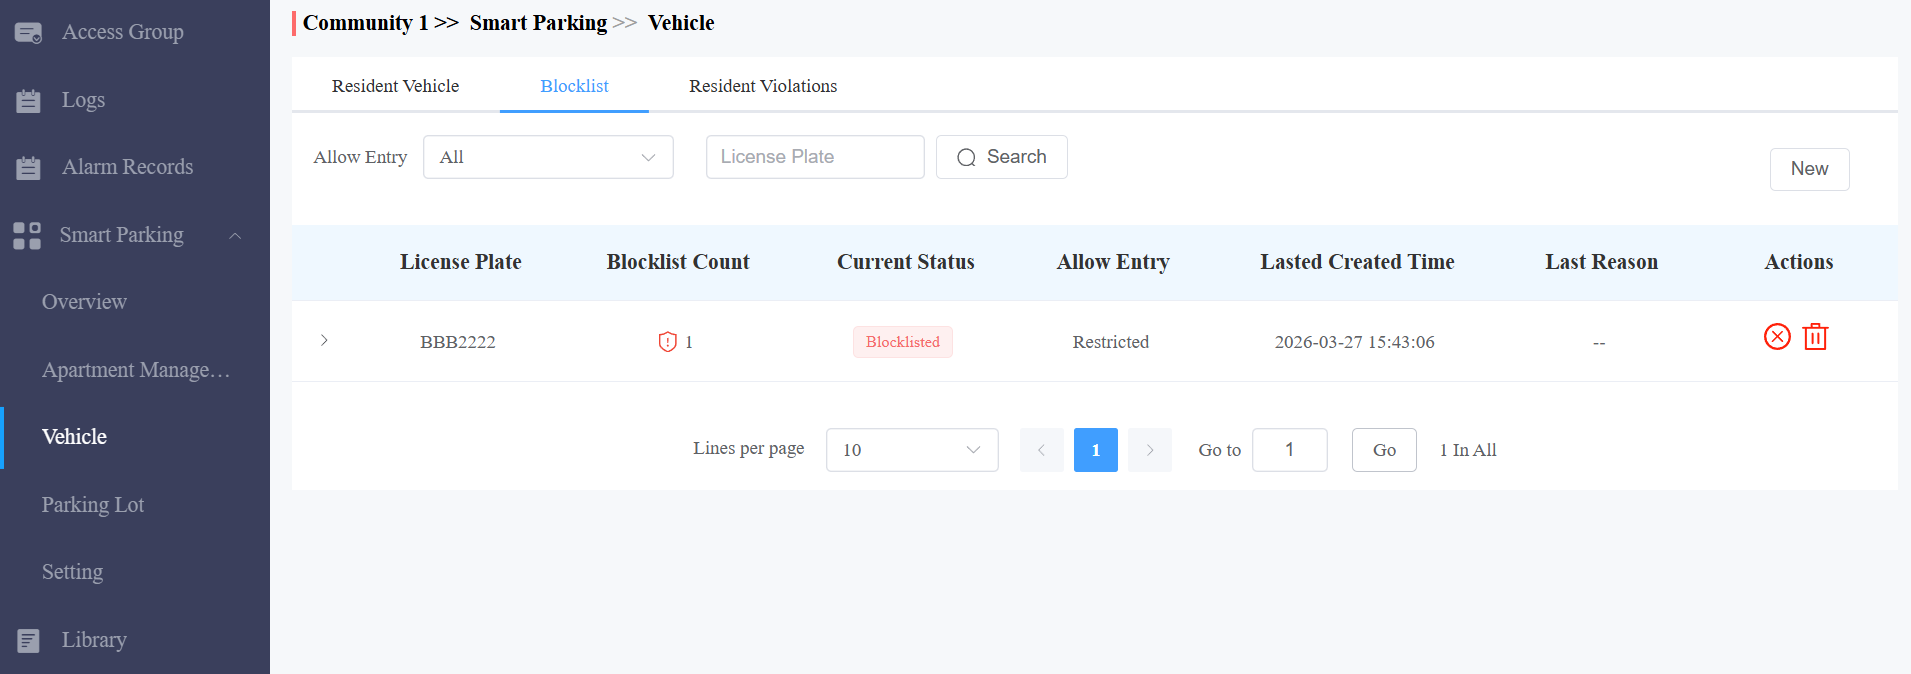
After adding the vehicle to the blocklist, it will display in the list.
To unblock, click  to remove it from the blocklist. Its Current Status will change to Removed, and the vehicle can enter the parking lot.
Note
In the following case, even if the vehicle is in the blocklist, it can still enter.
It was blocklisted only due to the U-turn timeout, and the number of U-turn violations was ≤ the configured threshold.
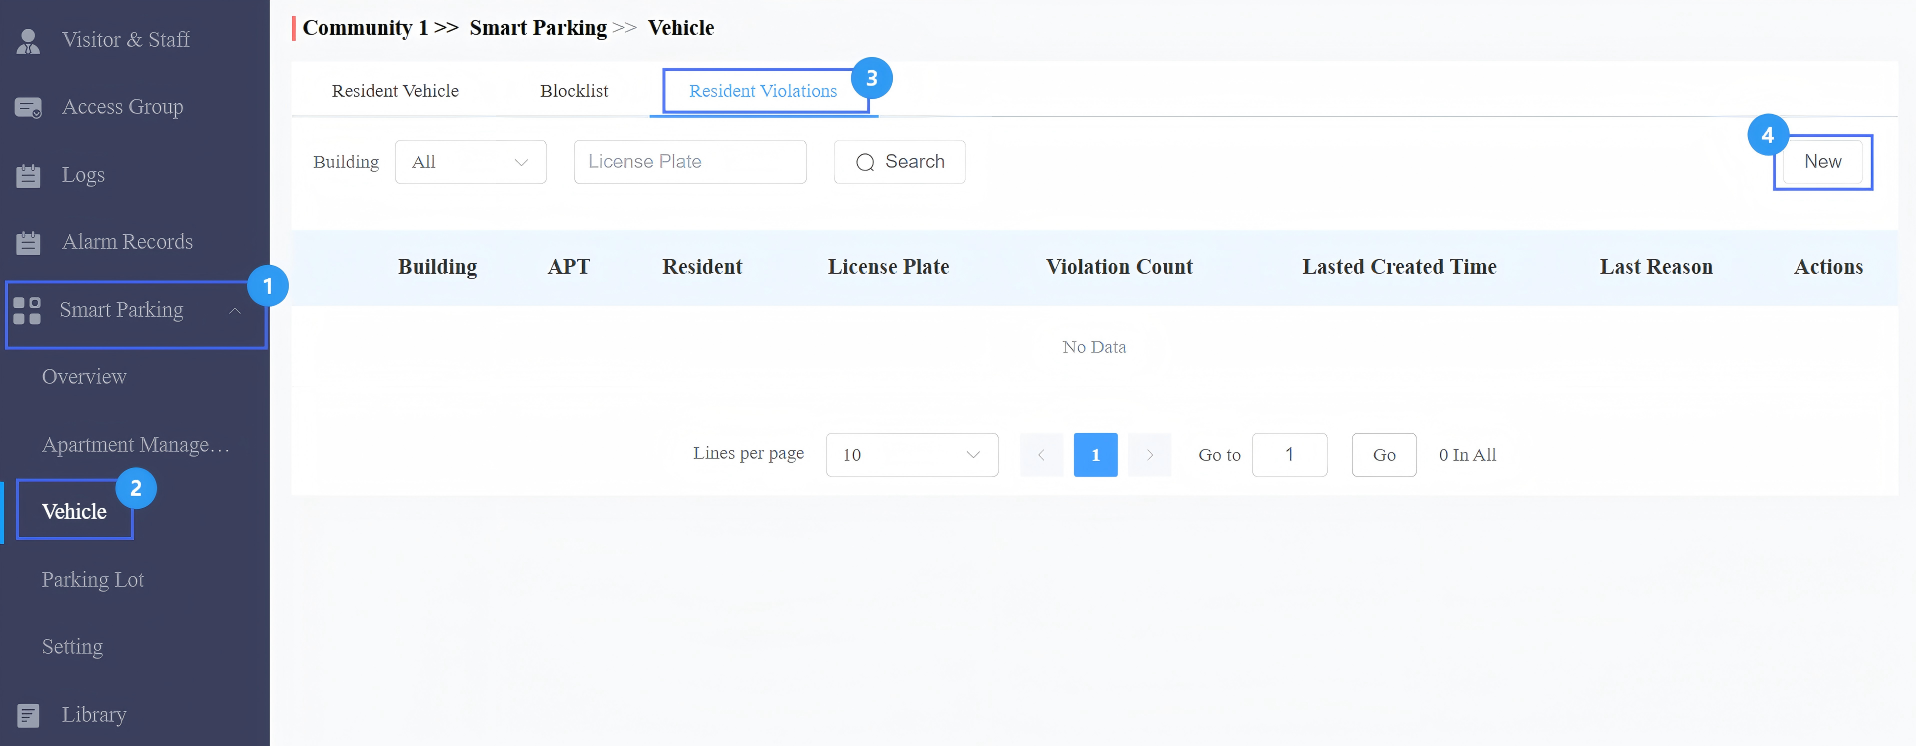
Resident Violation Management
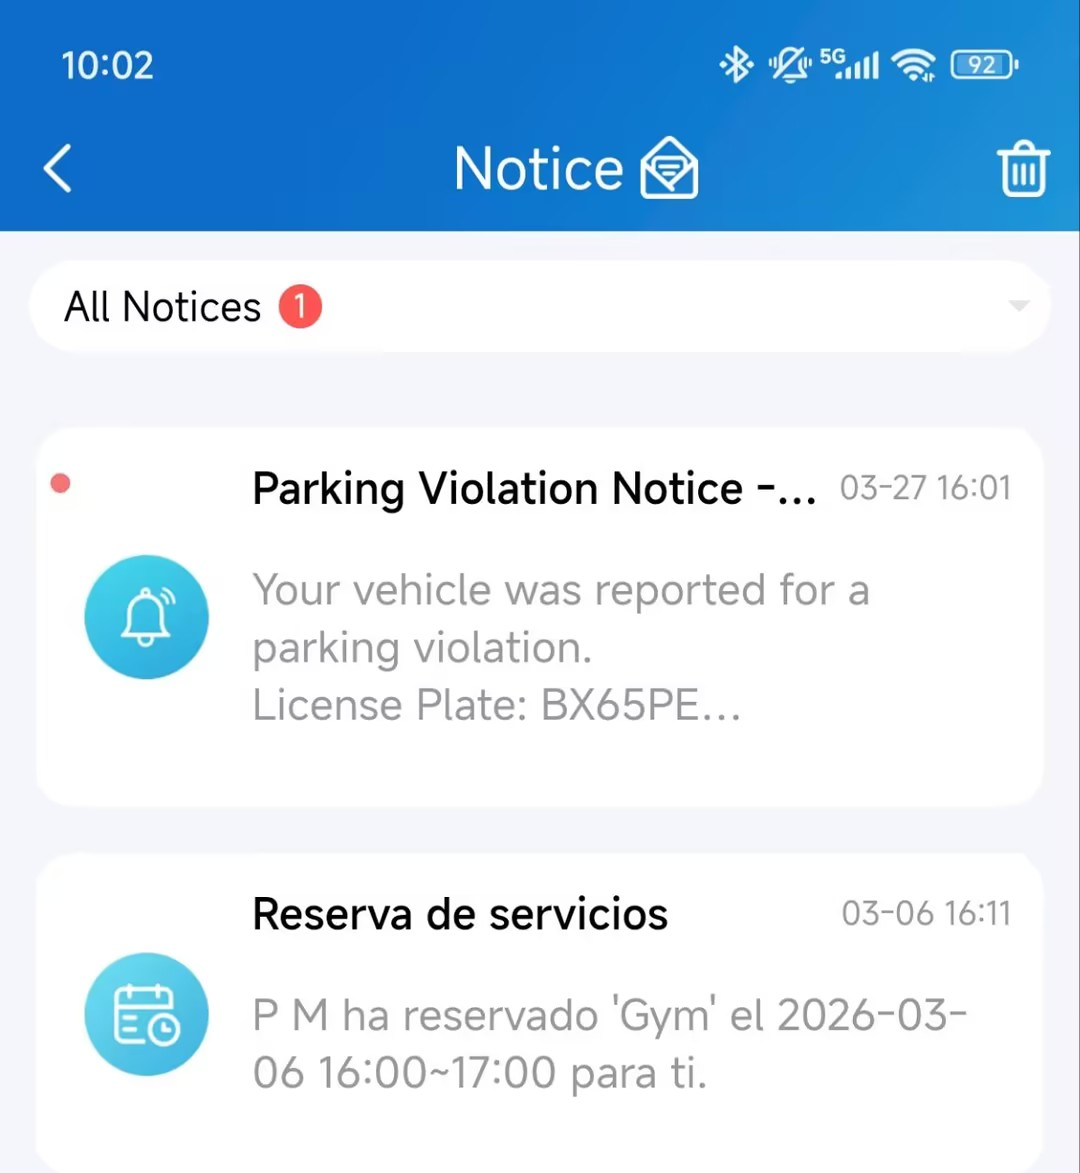
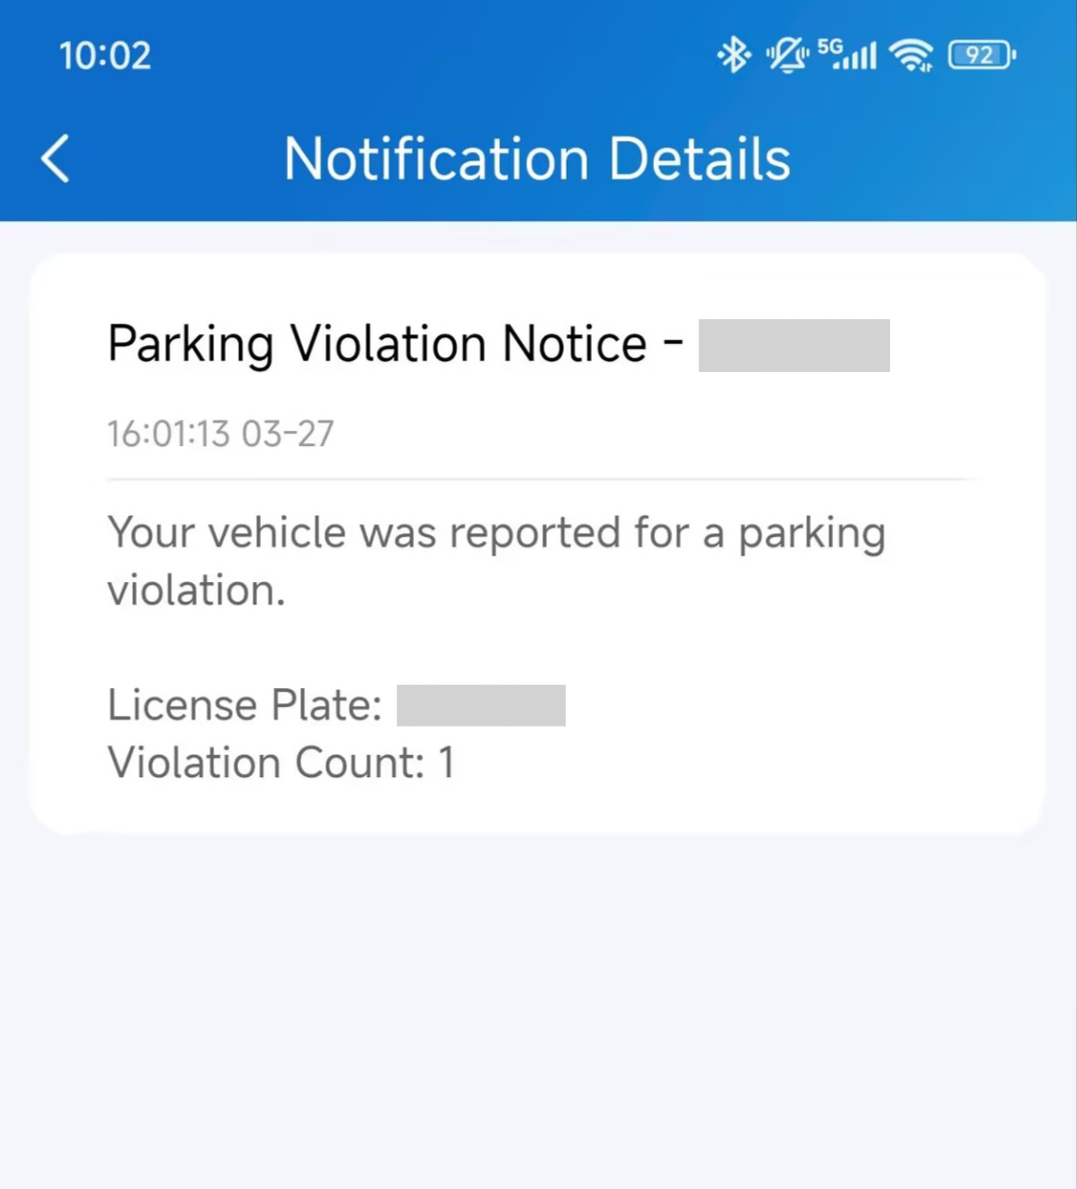
You can record resident vehicle violations and send notifications to the resident’s SmartPlus App.
Click Smart Parking > Vehicle > Resident Violations > New.
Select the building, apartment, resident, and license plate.
Enter the reason as needed.
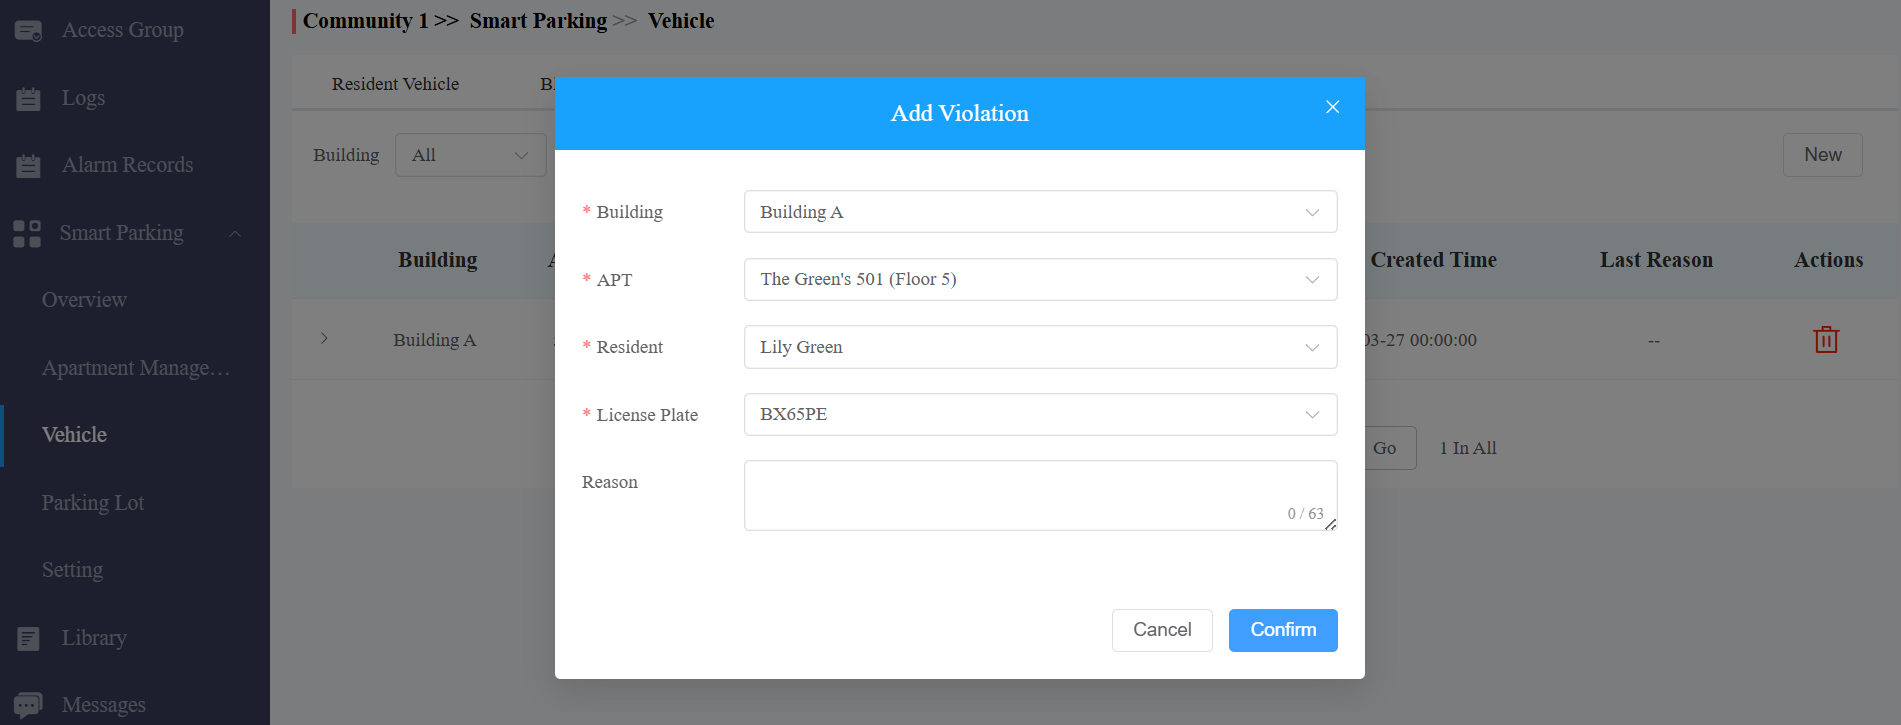
Submit the setting.
The resident will receive the notification.
Rule Priority Reference
When multiple rules are active at the same time, the system resolves conflicts using the following priority order. A higher-priority rule always overrides a lower one.
Priority | Rule | Behavior |
1 (Highest) | Emergency Vehicle Rule | Grants entry regardless of any other restriction, including blocklist status. |
2 | Blocklist Restriction | Blocks entry for non-emergency vehicles that are blocklisted. |
3 | Auto Access Rule | Grants entry to all vehicles during the configured time window, overriding standard vehicle checks. |
4 | Long-term / Temporary Vehicle | Standard vehicle access based on configured schedule and permissions. |
5 (Lowest) | Visitor Default | Visitor vehicles follow the parking duration and charging rules configured in Module 4. |