This manual is intended for both installers and project managers who need to manage commercial projects, including companies, personnel, and devices on the MySmart local server.
Update Time: September. 2026
System Overview
You can use this platform to:
Add, edit, and delete the companies, administrators, personnel accounts, devices, etc.
Deploy and set up devices and doors for access control.
Set up access groups and holiday schedules.
Set up access methods for visitors.
Set up attendance and smart parking.
Check various logs such as door logs, call history, and alarm records.
Login
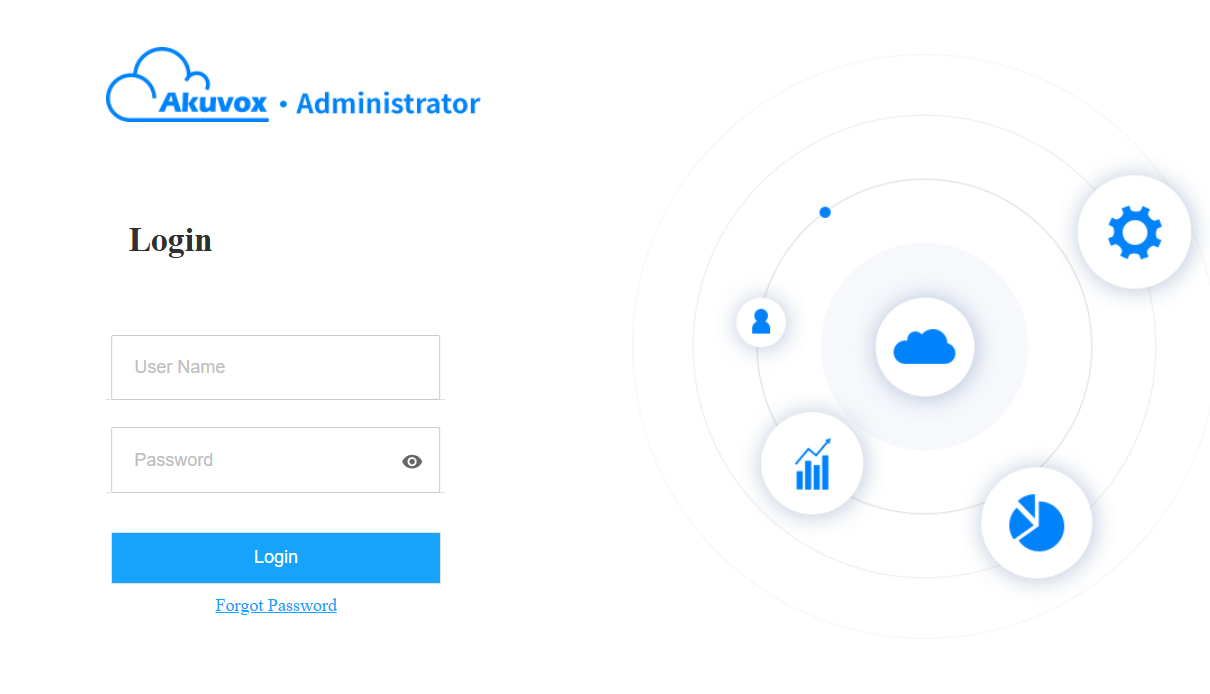
Log in to the MySmart platform with your account. For installers, the account is created by your distributor; for project managers, the account is created by your installer.
Navigate to the server address in your browser.
Enter your username and password.
Click Login.
Note
Enter the verification code sent to your email address for login when your distributors or installers enable Two-factor Authentication feature.
Log Out
You can click on Log out in the upper-right corner to exit the system.

Prior to Management
It is advised that you go through what is listed below before starting management.
Check if all device MAC addresses have already been registered by your distributor.
Check if the device is powered on and is connected to the internet, and make sure that the network is normal.
Check and make sure that the user information and device information are correct.
Dashboard
The project management dashboard gives you an overview of the commercial project
Installers can add devices, check device status, check PM number, and return to the installer web portal on the dashboard, but CANNOT perform emergency action.
PMs can switch between different projects by clicking the project name in the top menu.
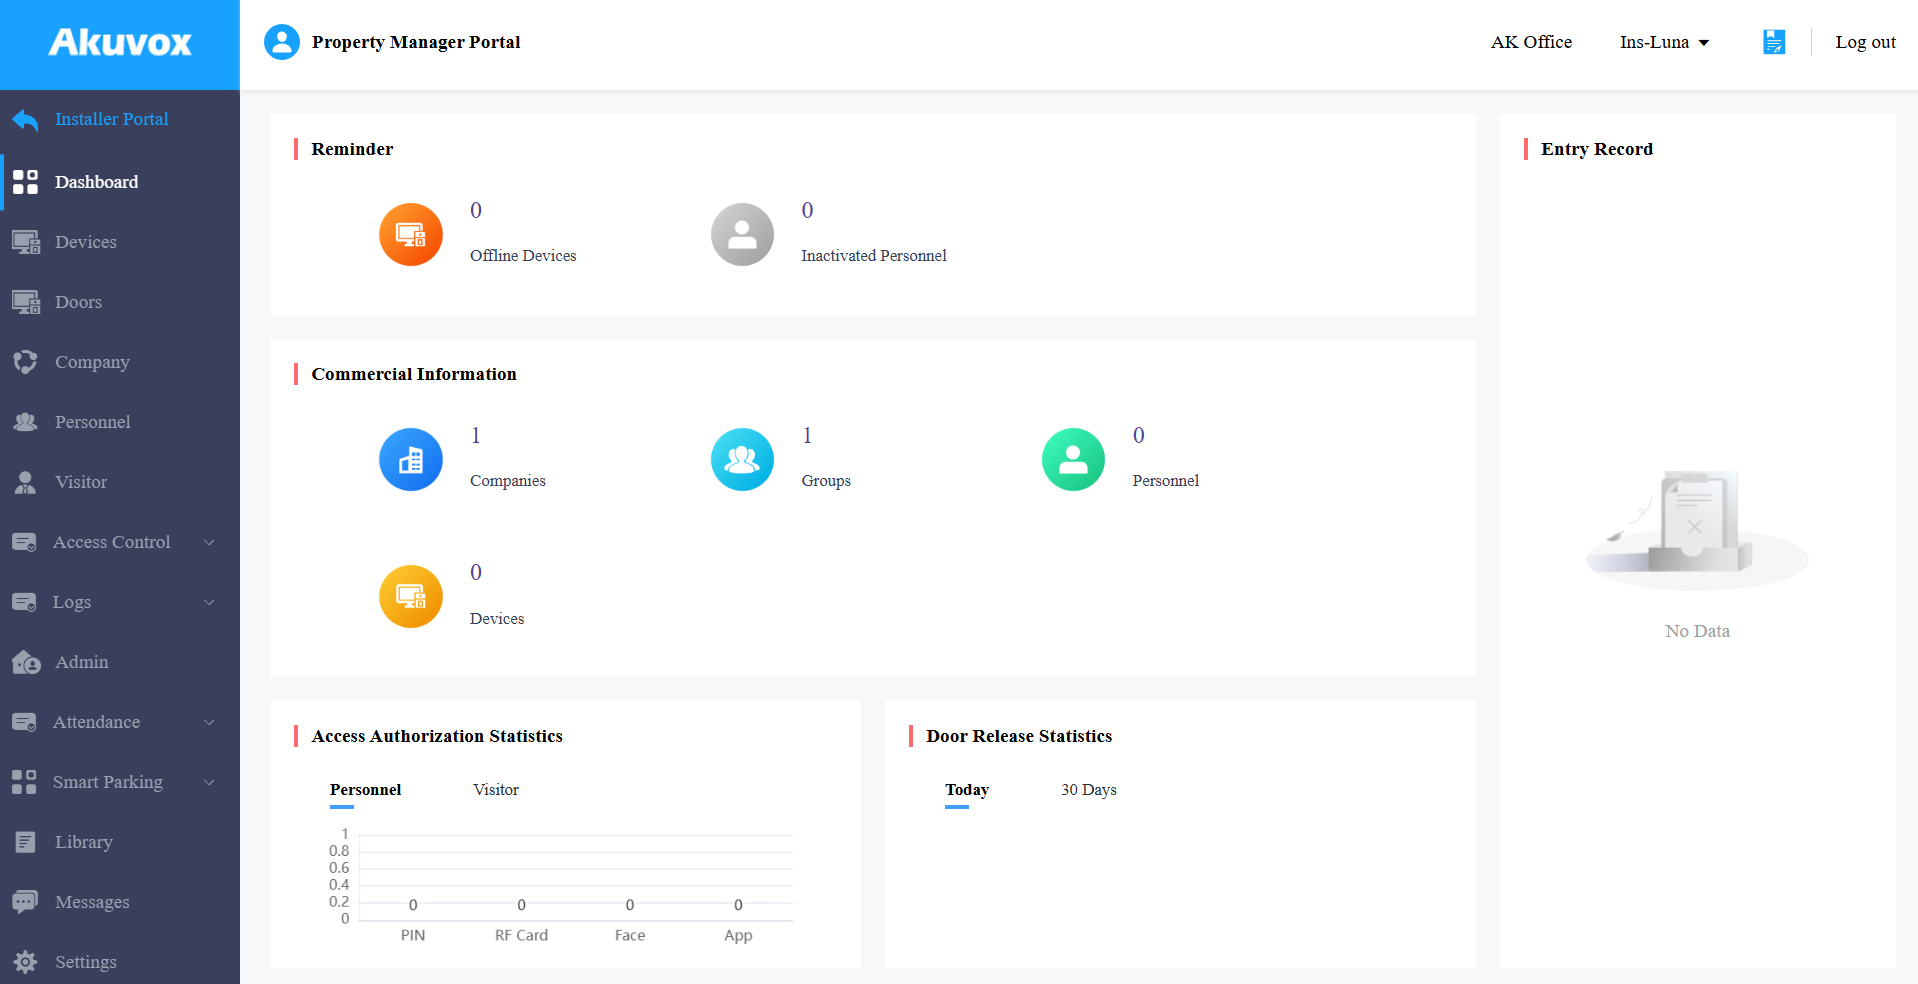
Left Menu Description:
Modules | Description |
Dashboard | Have a quick grasp of the project management portal. |
Devices | Manage devices. |
Doors | Manage doors. |
Company | Add new companies and edit existing companies by changing the company name, assigning doors, and checking the holiday schedule. |
Personnel | Manage personnel. |
Visitors | Manage visitor access permissions. |
Access Control | The module contains:
|
Logs | Check various logs, including door logs, call history, captured images, and alarm records. |
Admin | Manage administrator accounts. |
Report | Set up and manage muster reports and event reports. Muster reports are ONLY available for project managers. |
Attendance | Set up attendance points, check attendance reports, manage leaves, etc. |
Smart Parking | Register license plates and UHF tags for users, and manage parking lots. |
Library | The storage of PIN codes and RF cards for quick and integrated management. |
Messages | Create and send messages to specific personnel and devices. |
Settings | This module includes:
|
Wizard
Wizard guides you through adding devices, companies, administrators, groups, and personnel, and setting up access control and attendance. It will pop up when you log in to the platform. (For installer accounts, the Wizard will display when clicking  of the target project.)
If you want to check the guidance after closing it, click  in the upper-right corner.
Company Management
You can create multiple companies in a project.
Create Companies and Assign Doors
Click Company > New.
Name the company.
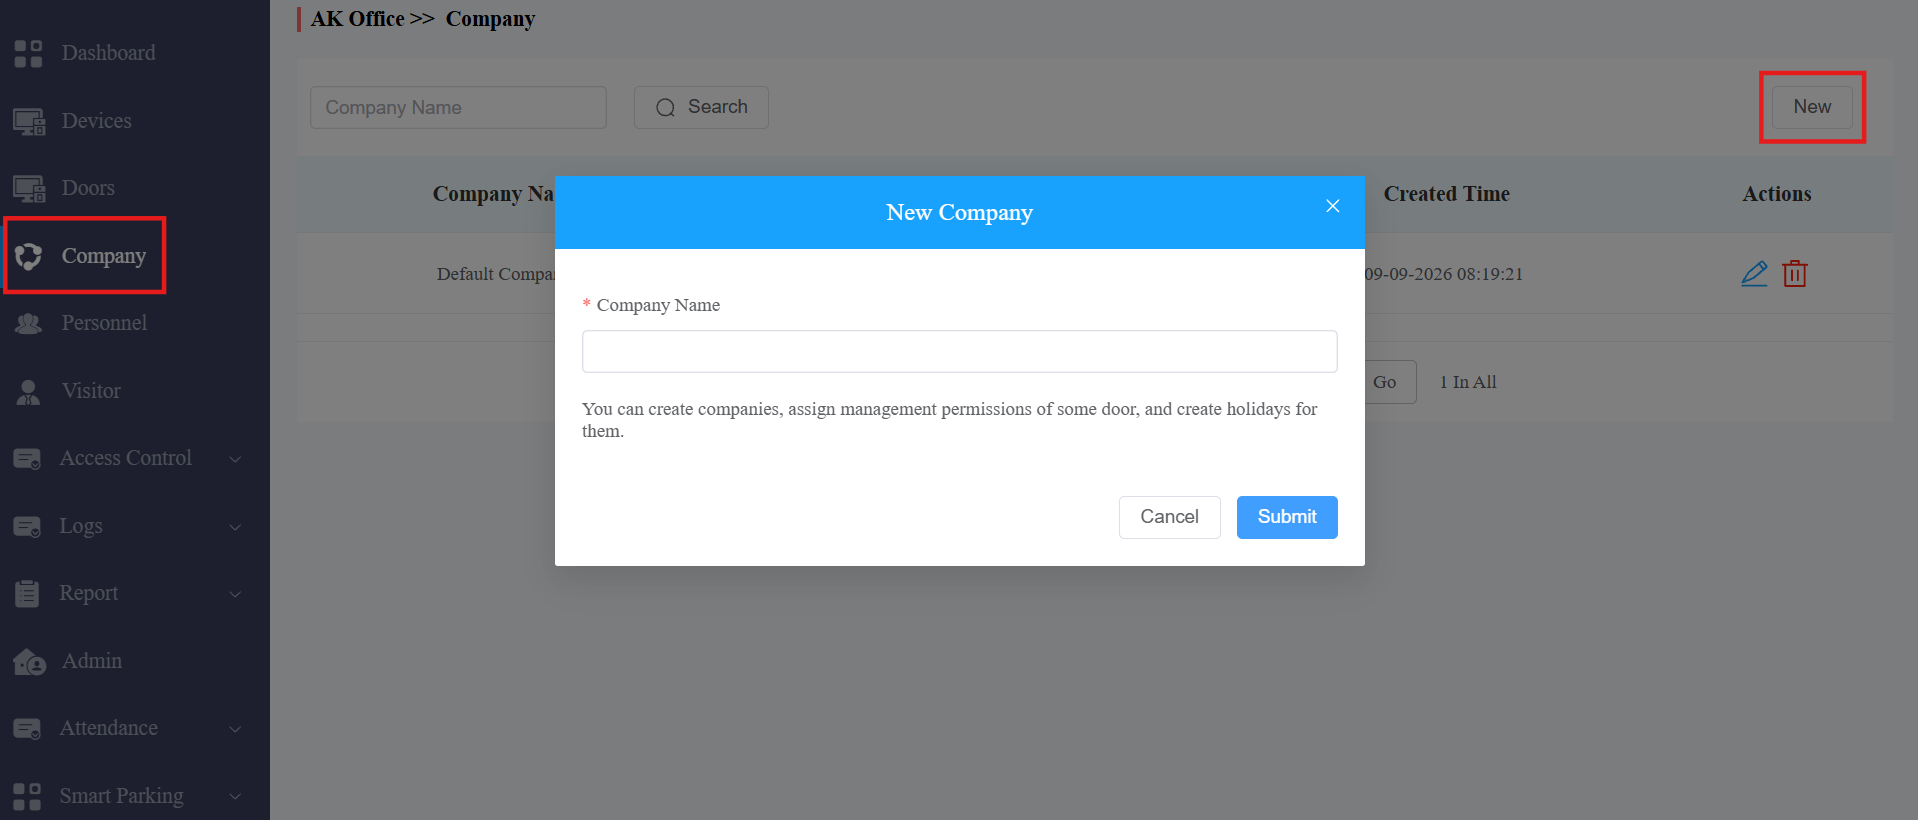
Assign doors to the company by checking them and toggling the switch to define them as private or public doors.
For instructions on adding doors, please refer to the Device Management chapter.
Select the building and floors that are accessible to the personnel in the company. This setting works with the Akuvox EC33 elevator control system.
Check the holiday schedule applied to the company that limits access during holidays.
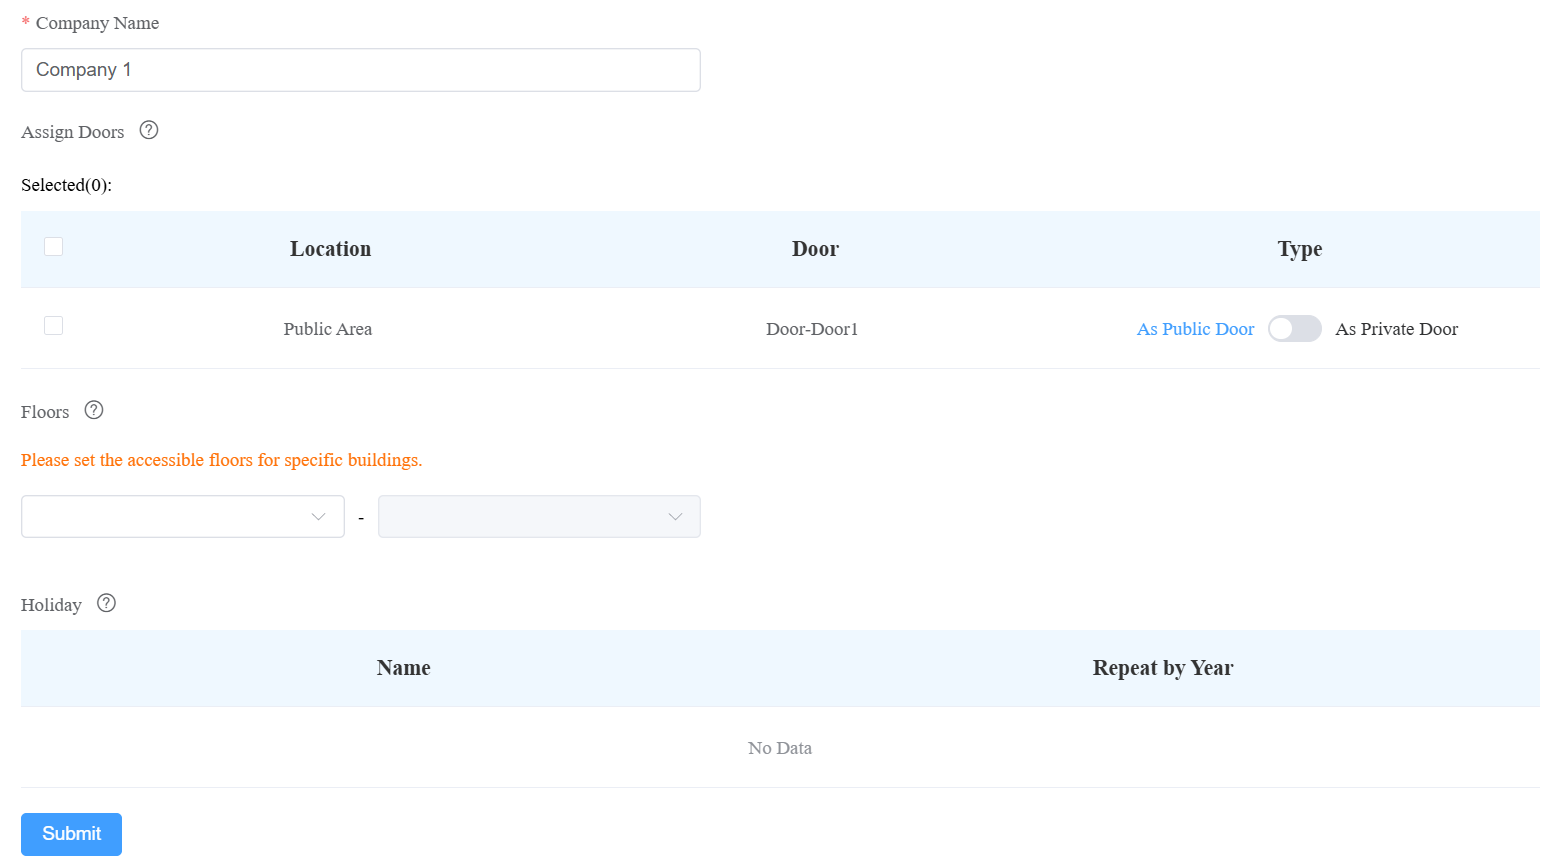
Submit the setting.
After adding the company, you can modify its settings by clicking  and delete it by clicking
  .
.
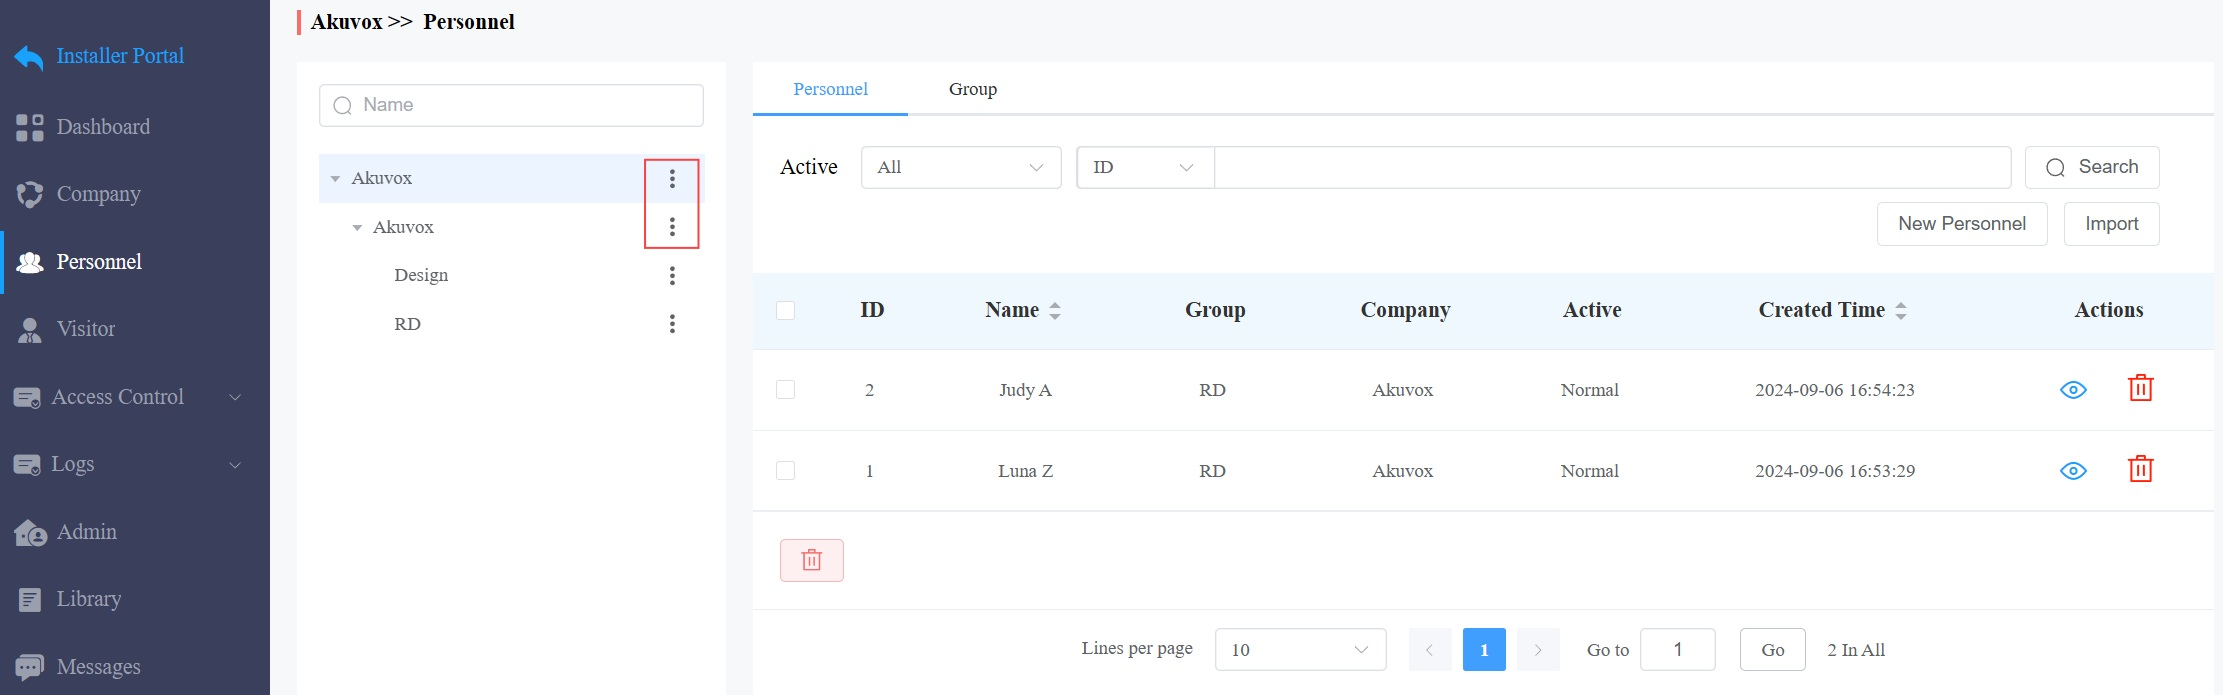
You can also set up the office structure on the Personnel module.
Click
 next to the project name. Then, click +New Company and enter the company’s name.
Click
next to the company name. You can rename the company, assign doors to it, view its holiday access control schedule by clicking Edit, add groups to it, and delete it.
Add/Edit Buildings
ONLY installers can add buildings.
Click Devices > +Add Building.
Name the building.
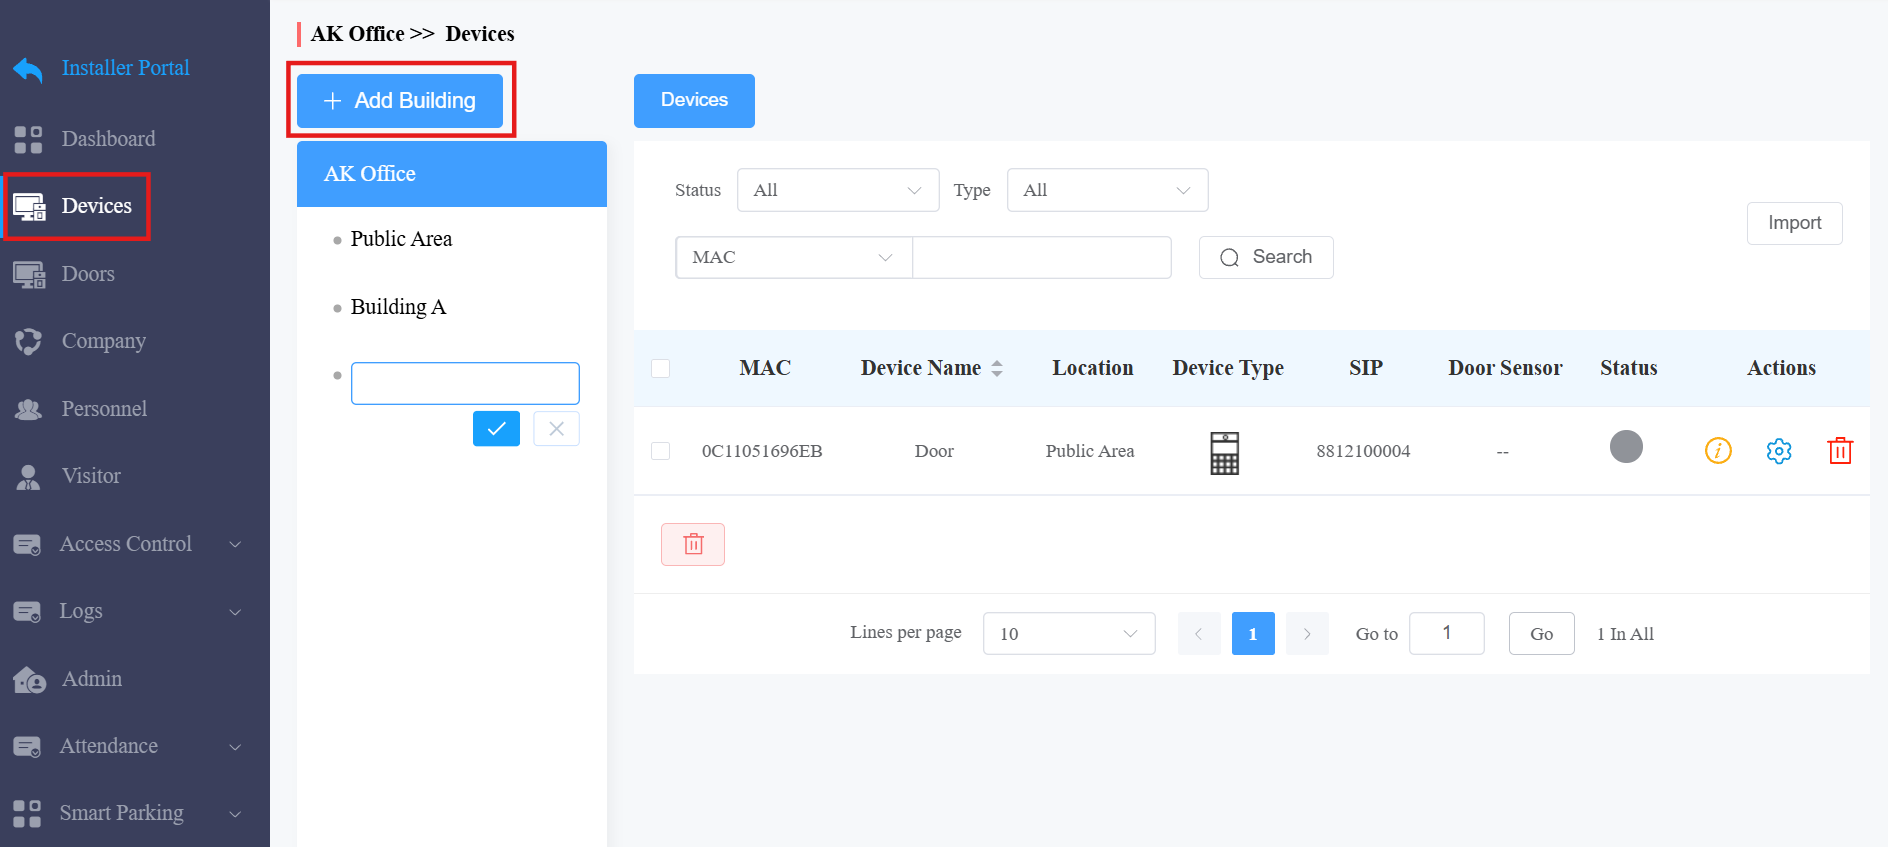
After adding the building, right-click to edit and delete it.
Add Groups in a Company
On the Personnel module, click
next to the desired company name and click +New Group. Or, click Group in the target company directory and click New Group.
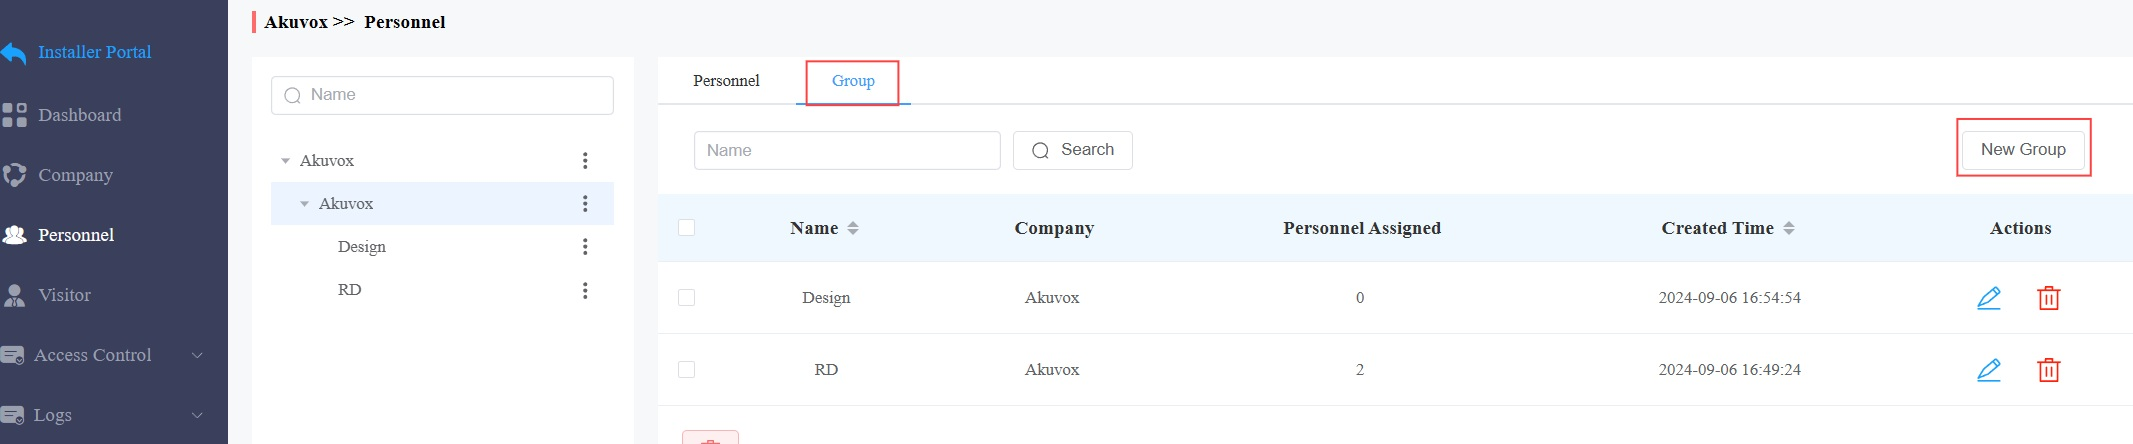
Enter the group name and select the company it belongs to.
Set the directory display on the door phone’s directory screen. Specific models support this feature. See the note below.
Do Not Display: Neither display the group nor the personnel in it.
Display as Group Only: The default option. Only display the group name. When selected, the first 10 personnel with the MySmart Intercom feature enabled will be called.
Display Personnel Only: Personnel will all be displayed, but not the group name.
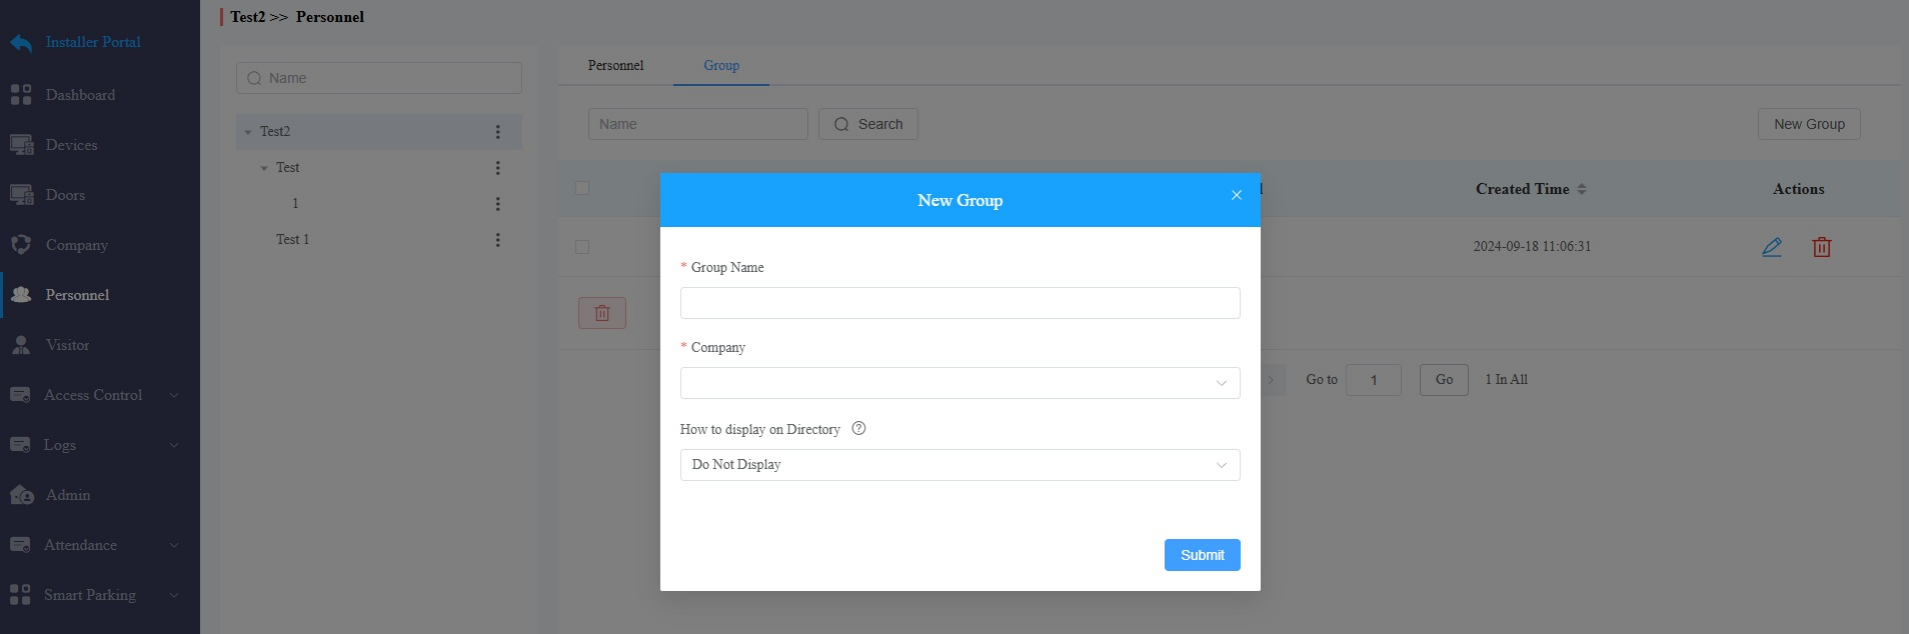
Click Submit.
Compatible models and versions(or higher):
X912: 912.30.11.49
X915 V2: 2915.30.10.211
X916: 916.30.10.222
S539: 539.30.10.231
S538: 538.30.10.705
S535: 535.30.10.233
S532: 532.30.10.211
R29: 29.30.10.314
R28V2: 228.30.10.231
E16V2: 216.30.10.208
E16V3: 416.30.11.206
E18: 18.30.11.136
Edit a Group
Click Personnel > Group.
Click
 to modify the group settings. See the description of each item in the chart below.
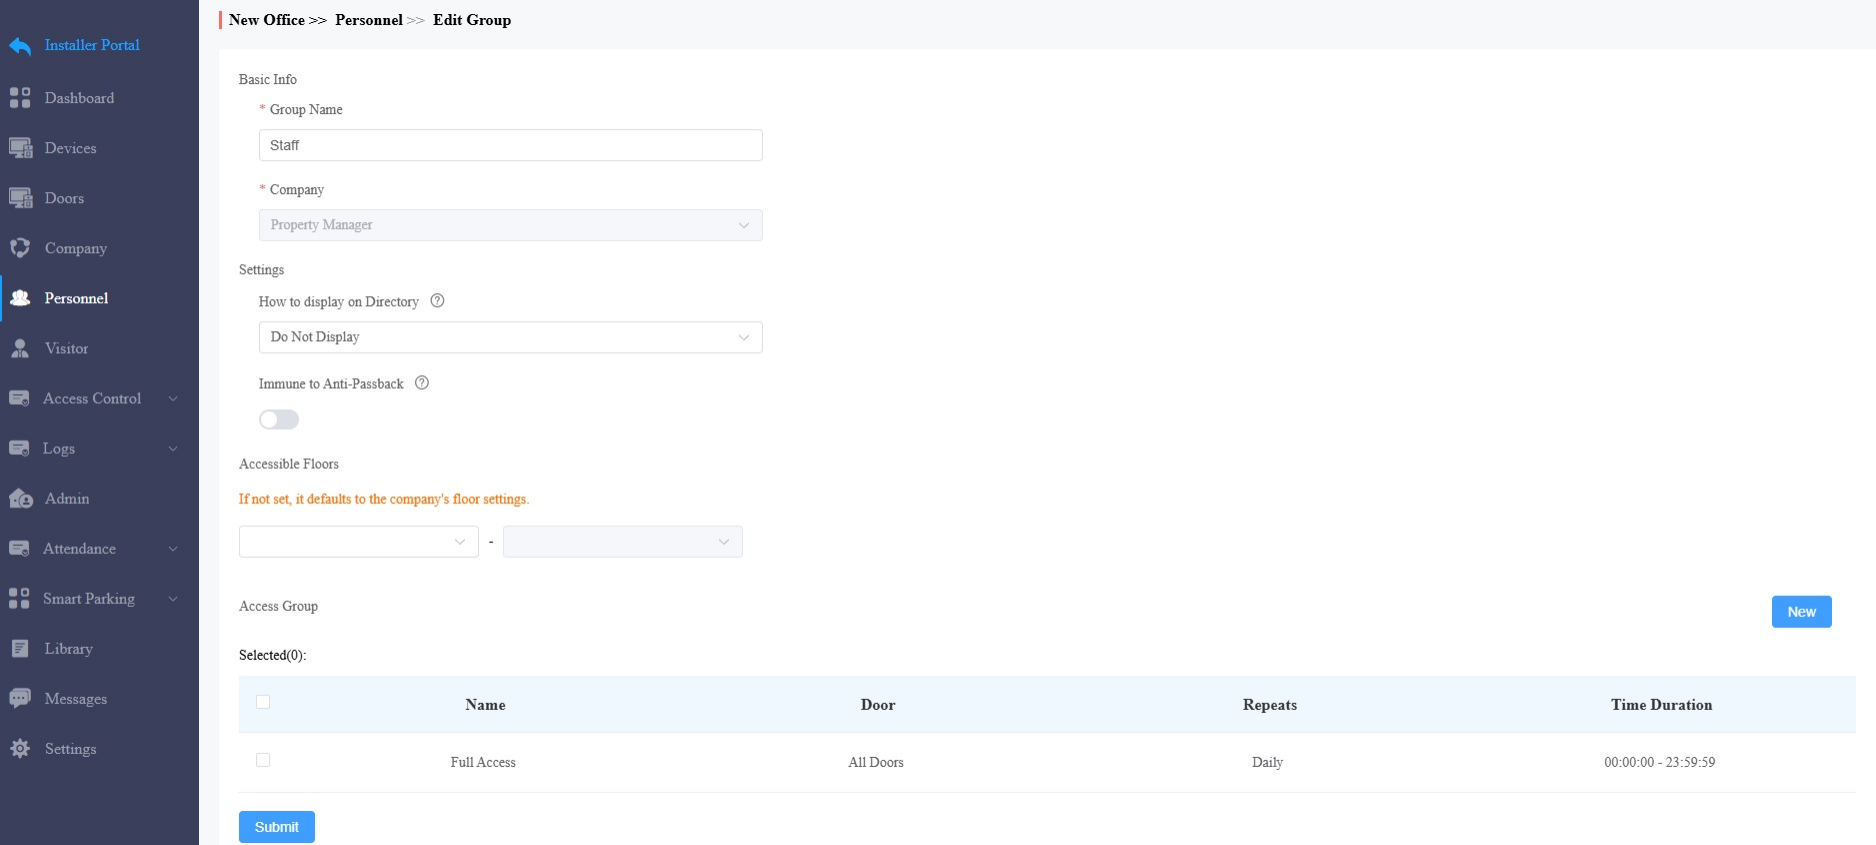
Settings | Description |
Group Name | Name the group. |
How to Display on Directory | Set the directory display.
Note: The following device models with specific firmware versions or higher support this feature:
|
Immune to Anti-passback | When enabled, the personnel in this group will not be limited to the anti-passback rules. |
Accessible Floors |
|
Access Group | Select the access control schedule. You can click New to create a new access group. |
Personnel Management
You can add personnel one by one or in a batch to a company.
Add Personnel One by One
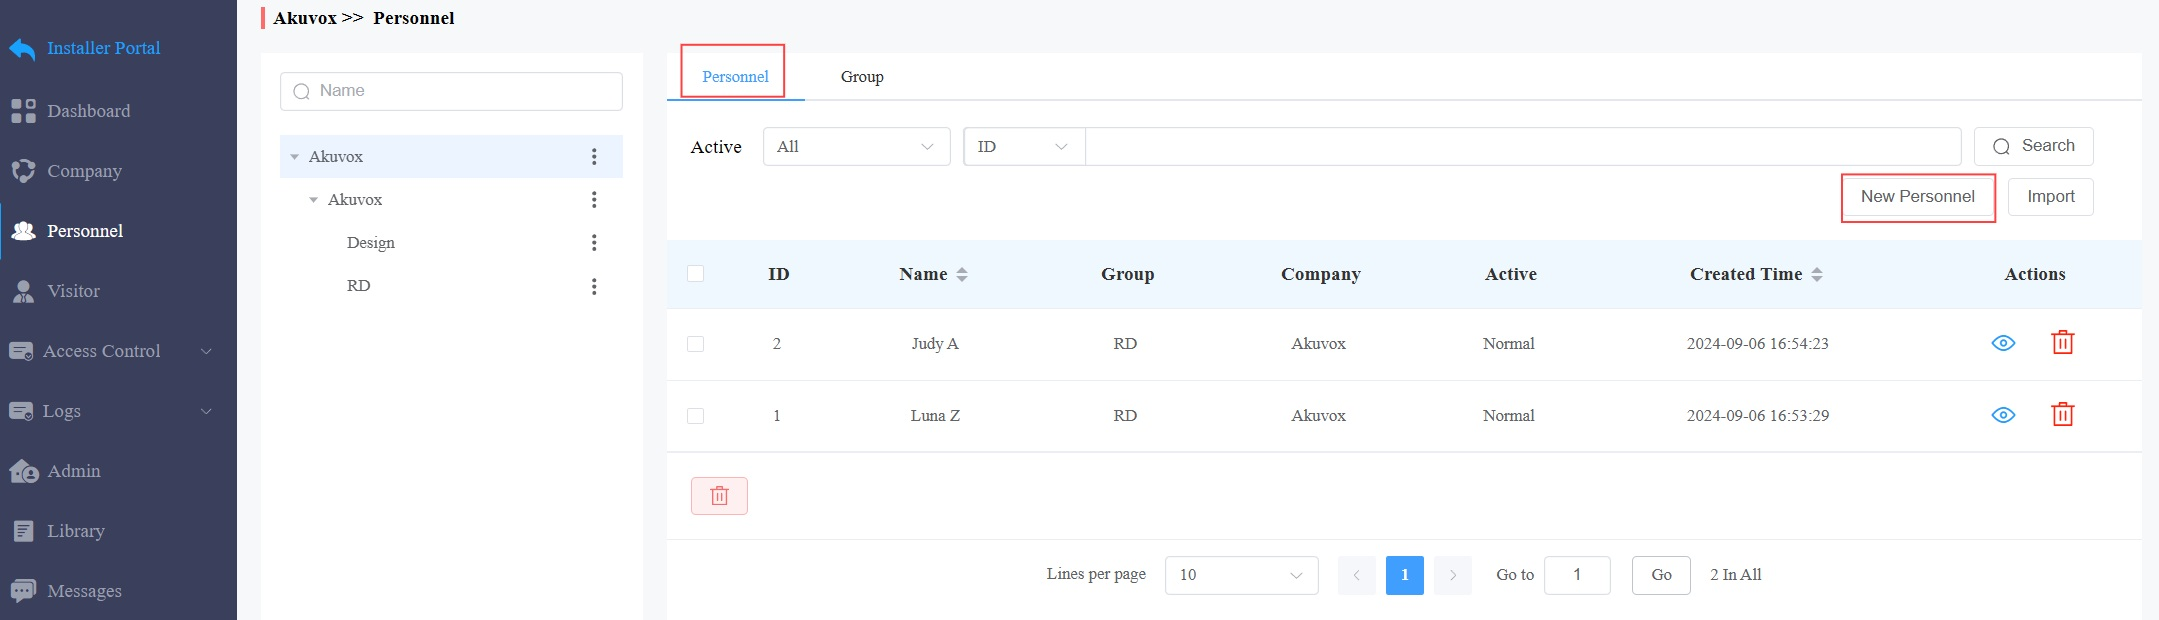
Click Personnel > New Personnel.
Enter the user information and set up permissions.
See descriptions of each item in the chart below.
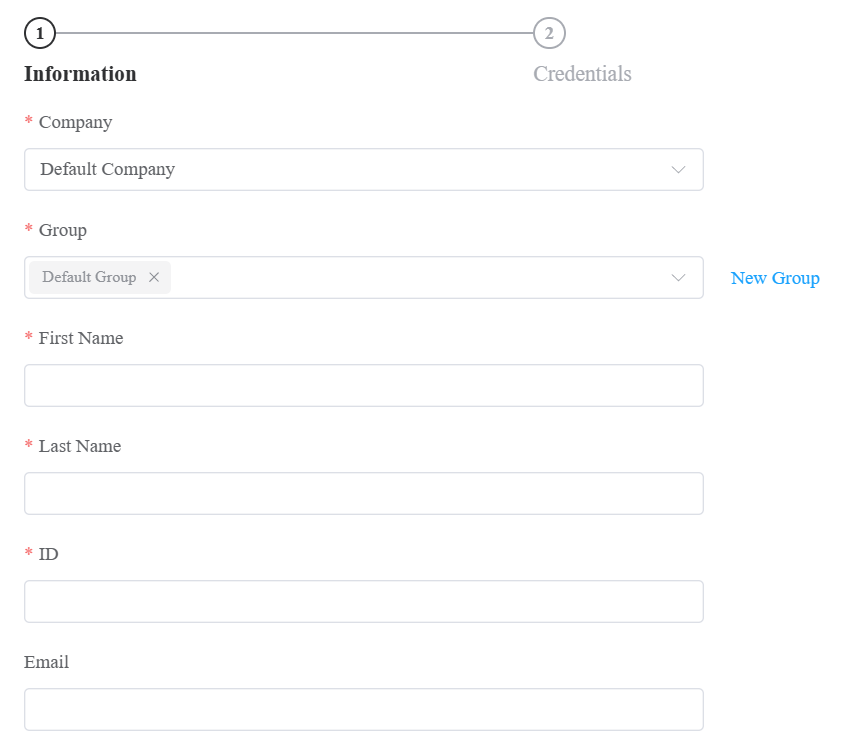
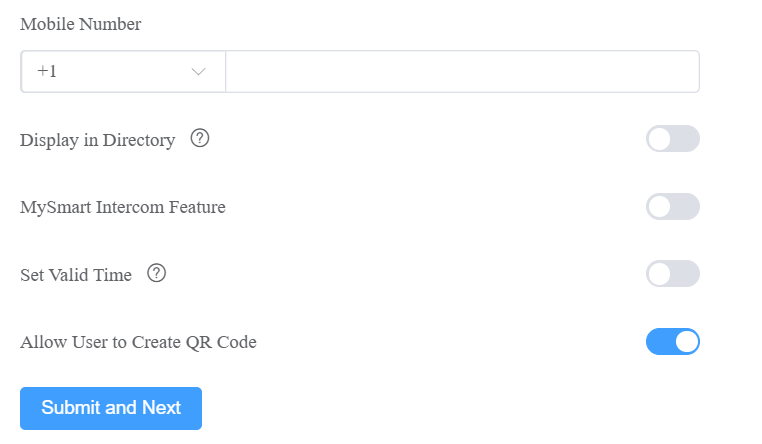
Item Name | Description |
|---|---|
Company | The company of the user. |
Group | Assign the user to a group. Or, click +New Group to create a new one. |
First Name/Last Name[The mandatory option] | The username. |
ID | Enter a unique ID number for the user. |
The user’s email address. MySmart App login credentials will be sent to the address if the user can use the MySmart Intercom Feature. | |
Mobile Number | The user’s mobile phone number. Select the right area code before entering the number. |
Display in Directory | Enabled by default. Set whether to display the user on the door phone’s directory list. |
Set Valid Time | Limit the user from opening doors and using the MySmart App beyond the specified time. This setting has the highest priority over other access permission settings. |
MySmart Intercom Feature | Disabled by default. If enabled, the user is allowed to use the intercom feature of the MySmart App. |
Allow Users to Create QR Code | Enabled by default. Set whether the user can create the temporary QR code with their MySmart Apps. |
Click Next to set up the user’s credentials. See description of each item in the chart below.
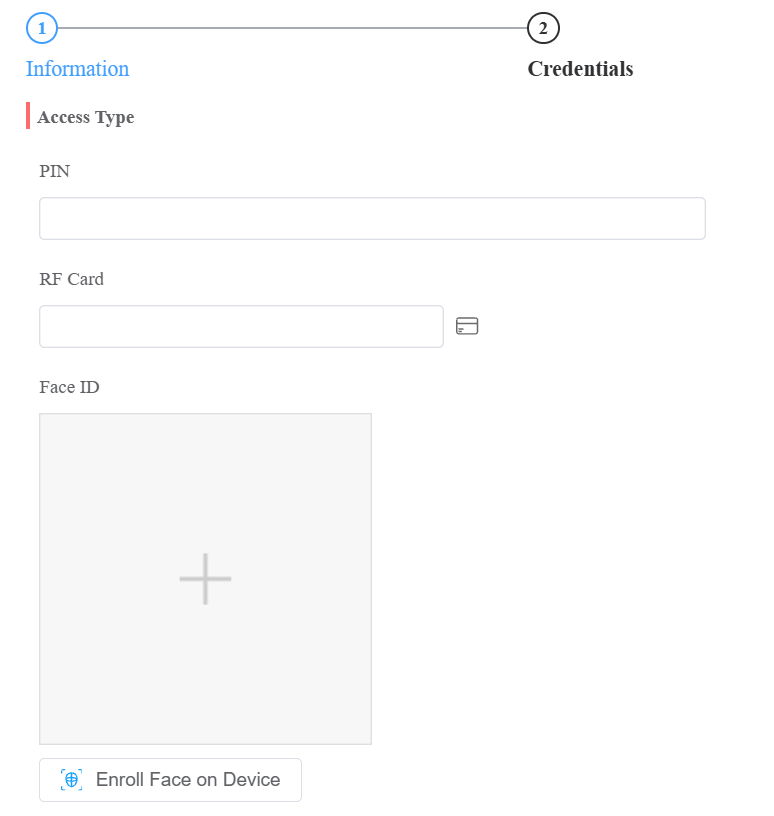
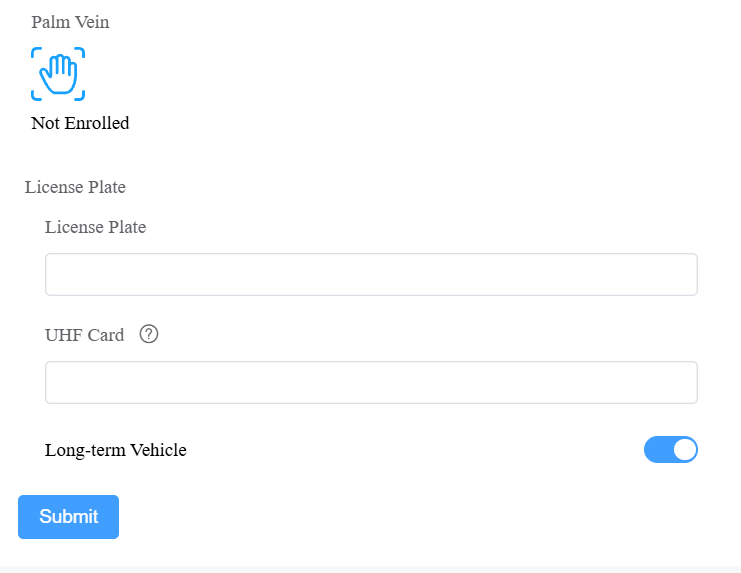
Item Name | Description |
|---|---|
PIN | 2~8-digit PIN code. |
RF Card | 1~16 characters that can contain 0~9 and A~F, or click the read card icon Select an online registration device from the dialog, then have the user swipe their card at that device. The card number is automatically populated in the form. |
Palm Vein | Click the palm vein icon to select a supported device and initiate enrollment. The device enters enrollment mode and prompts the user to complete the scan. Upon successful enrollment, the credential is uploaded to the cloud. |
Face ID | Upload a front-facing photo for facial recognition. To capture face data directly from a supported device, click Enroll Face on Device, select an online registration device from the dialog, then have the user complete enrollment at that device. |
License Plate | Enter the number that a third-party LPR camera can identify. |
UHF Card | Enter the card code that the Akuvox device ACR-CRP12 can identify. |
Long-Term Vehicle | It is enabled by default. If disabled, set when the vehicle can enter and exit the parking lot. |
 to register the card directly from a supported device.
 Note
The license plate is used for Smart Parking.
If you have filled in both the License Plate and the UHF Card, the server will ONLY issue the UHF card code to the door phone.
Click Submit.
Add Personnel in a Batch
You can import a batch of personnel data into a company for quick setup.
Click User > Personnel > Import.
Click Download Import Template.
Click Import Personnel to upload the file after editing it, and click Import Face Data to upload the face photos. Please follow the upload instructions in the pop-up window.
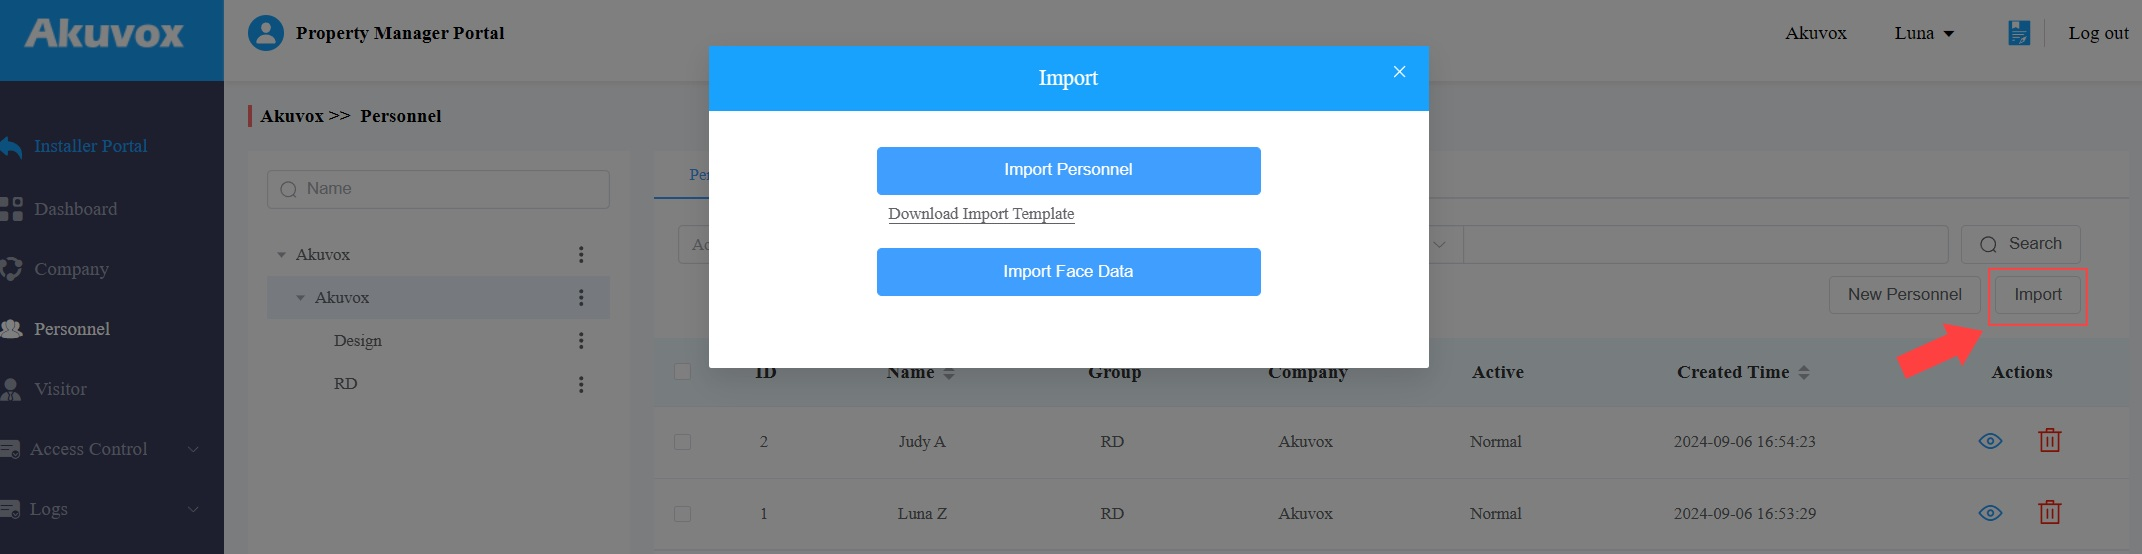
In the template, you can see the instructions by moving the mouse cursor to a specific column.
See the description of each item in the chart below.


Column Name | Description |
|---|---|
Company | The company of the personnel. |
Group | The group of personnel. |
First Name | The first name of the personnel. |
Last Name | The last name of the personnel. |
ID | Assign a unique ID to the personnel. |
The email address of the personnel that is used to receive MySmart App-related emails. | |
Mobile Number | The mobile phone number of the personnel. |
MySmart Intercom Feature | If enabled, the user is allowed to use the intercom feature of the MySmart App. 0: Disabled; 1: Enabled. |
Call Type | Set which devices can receive a call. For example, if you select 0, the MySmart App will receive the call first, then the indoor monitor or the guard phone. |
RF Card | The RF card code is used to open doors. If one user has multiple cards, separate the codes by “;”. |
PIN | The PIN code is used to open doors. The length should be between 2 to 8 digits. |
License Plate | Fill in the license plate information, multiple plate codes separated by ";". You can add up to 5 codes. |
UHF Card | Fill in the UHF card code, multiple plate codes separated by ";". You can add up to 5 codes. |
Access Group ID | Assign the access group ID to the user. |
Edit Personnel
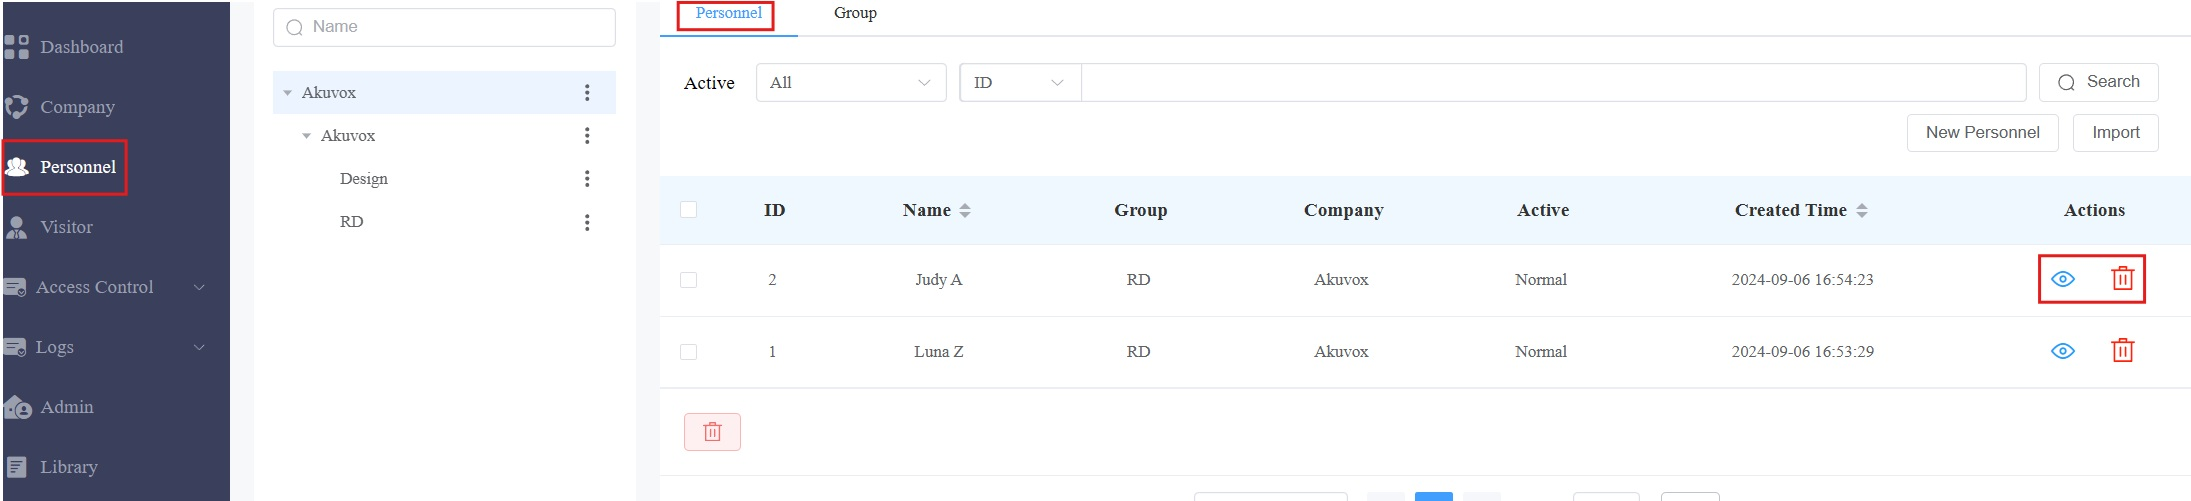
After adding the personnel, you can edit and delete them on the Personnel interface.
Click
 to delete the personnel.
Click
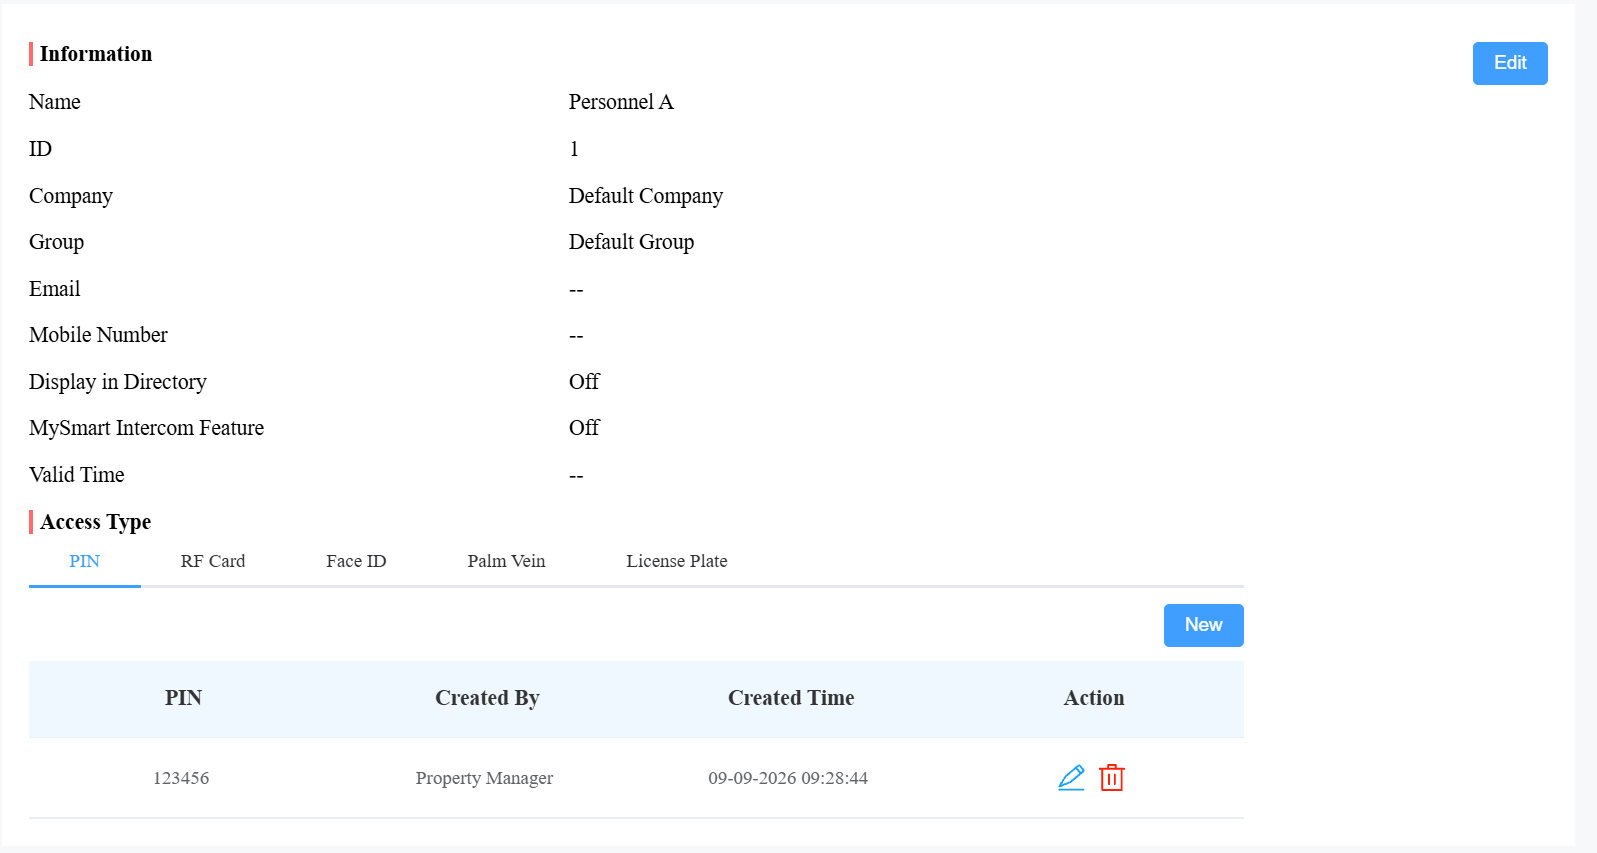
 to view and edit the personnel’s information.
On the information interface, click Edit to modify the account settings.
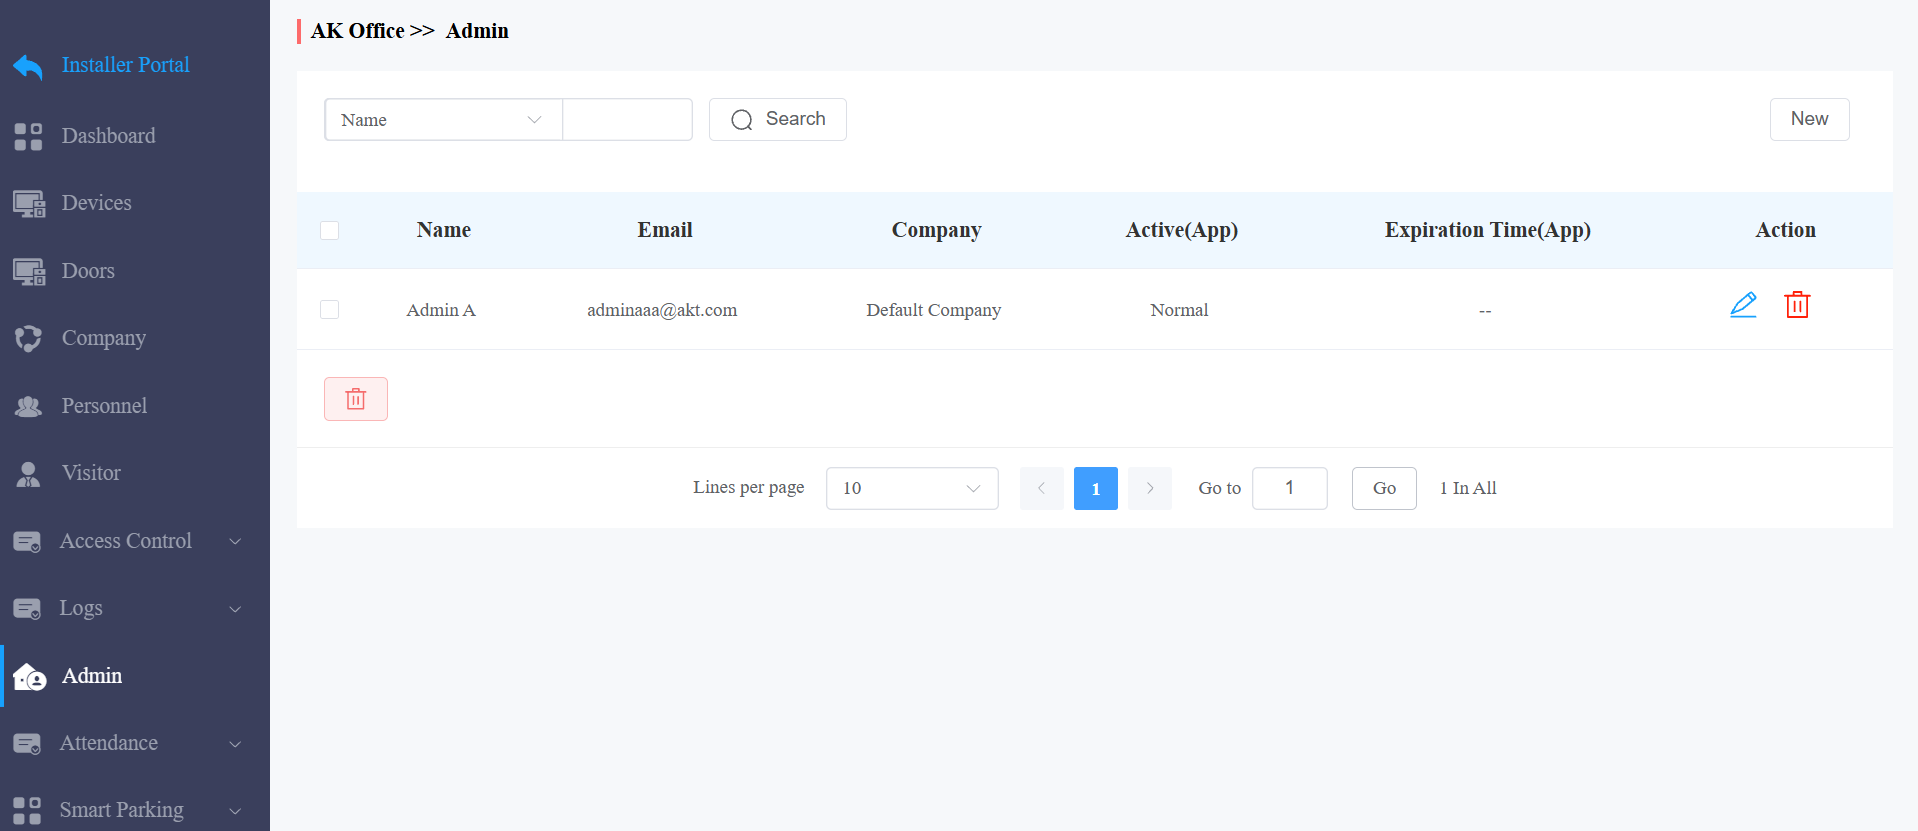
Administrator Management
You can create administrator accounts, with which users can log in to the MySmart Administrator platform to manage companies, personnel, access groups, etc.
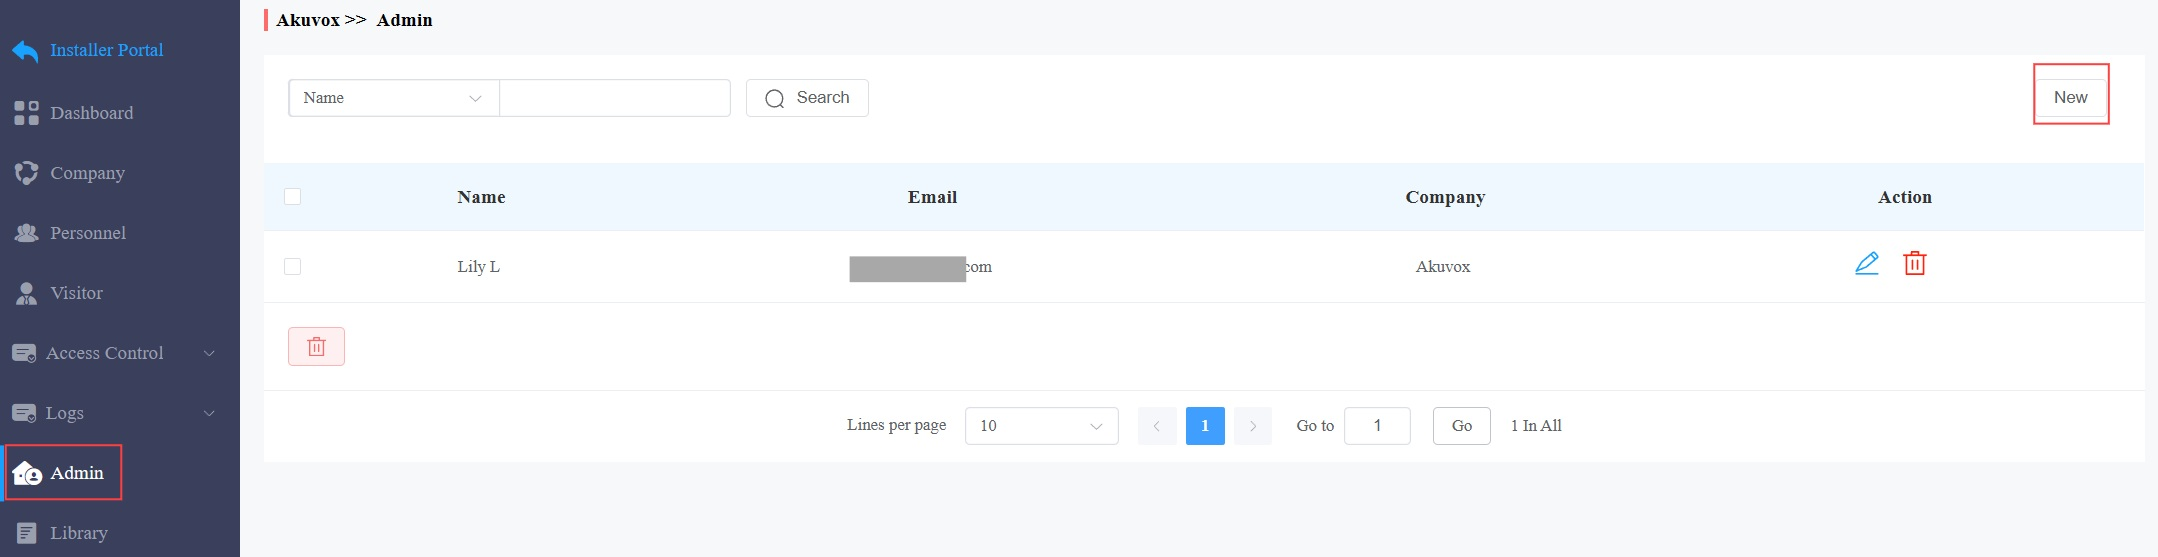
Add an Admin
Click Admin > New.
Set up the account. See the descriptions of each item in the chart below.
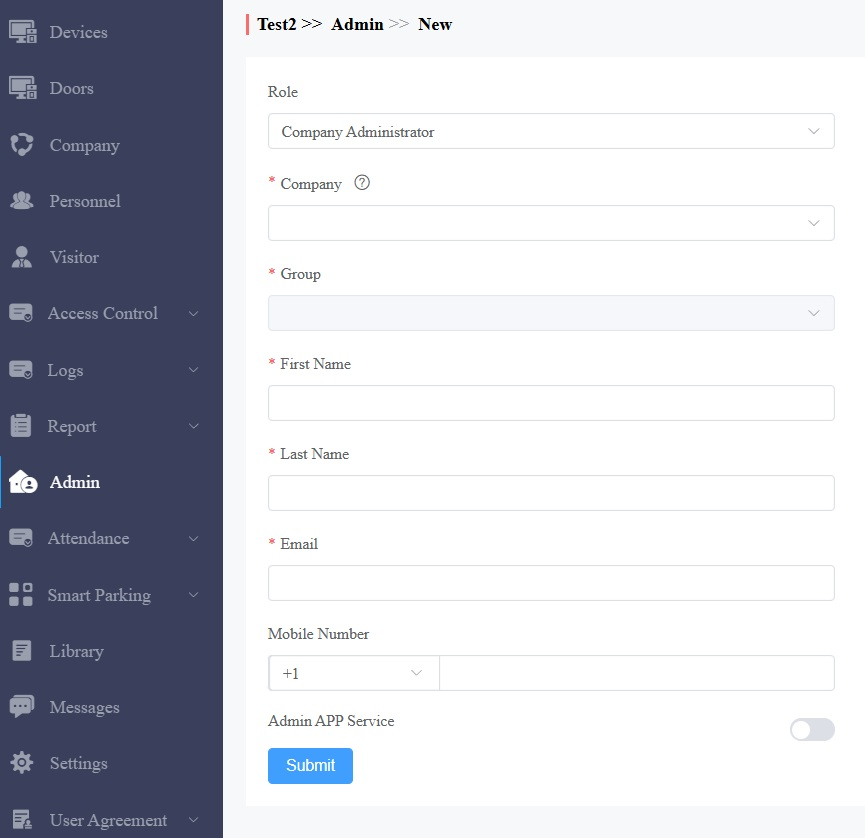
Item Description:
Item Name | Description |
|---|---|
Company | Select the company managed by the admin. |
Group | Select the group of the admin. |
First Name/Last Name | Enter the name of the admin. |
The email is used to log in to the MySmart Admin web portal and app. | |
Mobile Number | Enter the mobile phone number if the admin wants to use it for MySmart App login. Note: Select the right area code. Or the number will be ineffective. |
Admin App Service | Set whether the admin can use the MySmart App. |
Click Submit.
Edit an Admin Account
After adding the accounts, you can edit and delete them on the Admin interface.
Click
to delete the admin.Click
 to view and edit the admin’s information.
Device Management
You can manage Akuvox devices installed in specific companies.
Note
With the project manager account, you can view and edit the device’s settings but NOT add or delete a device.
With the installer account redirecting from the installer portal, you can add, edit and delete devices.
Add a Single Device
On the Devices module, click Public Area or select the desired building based on where the device is installed.
Click New on the right.
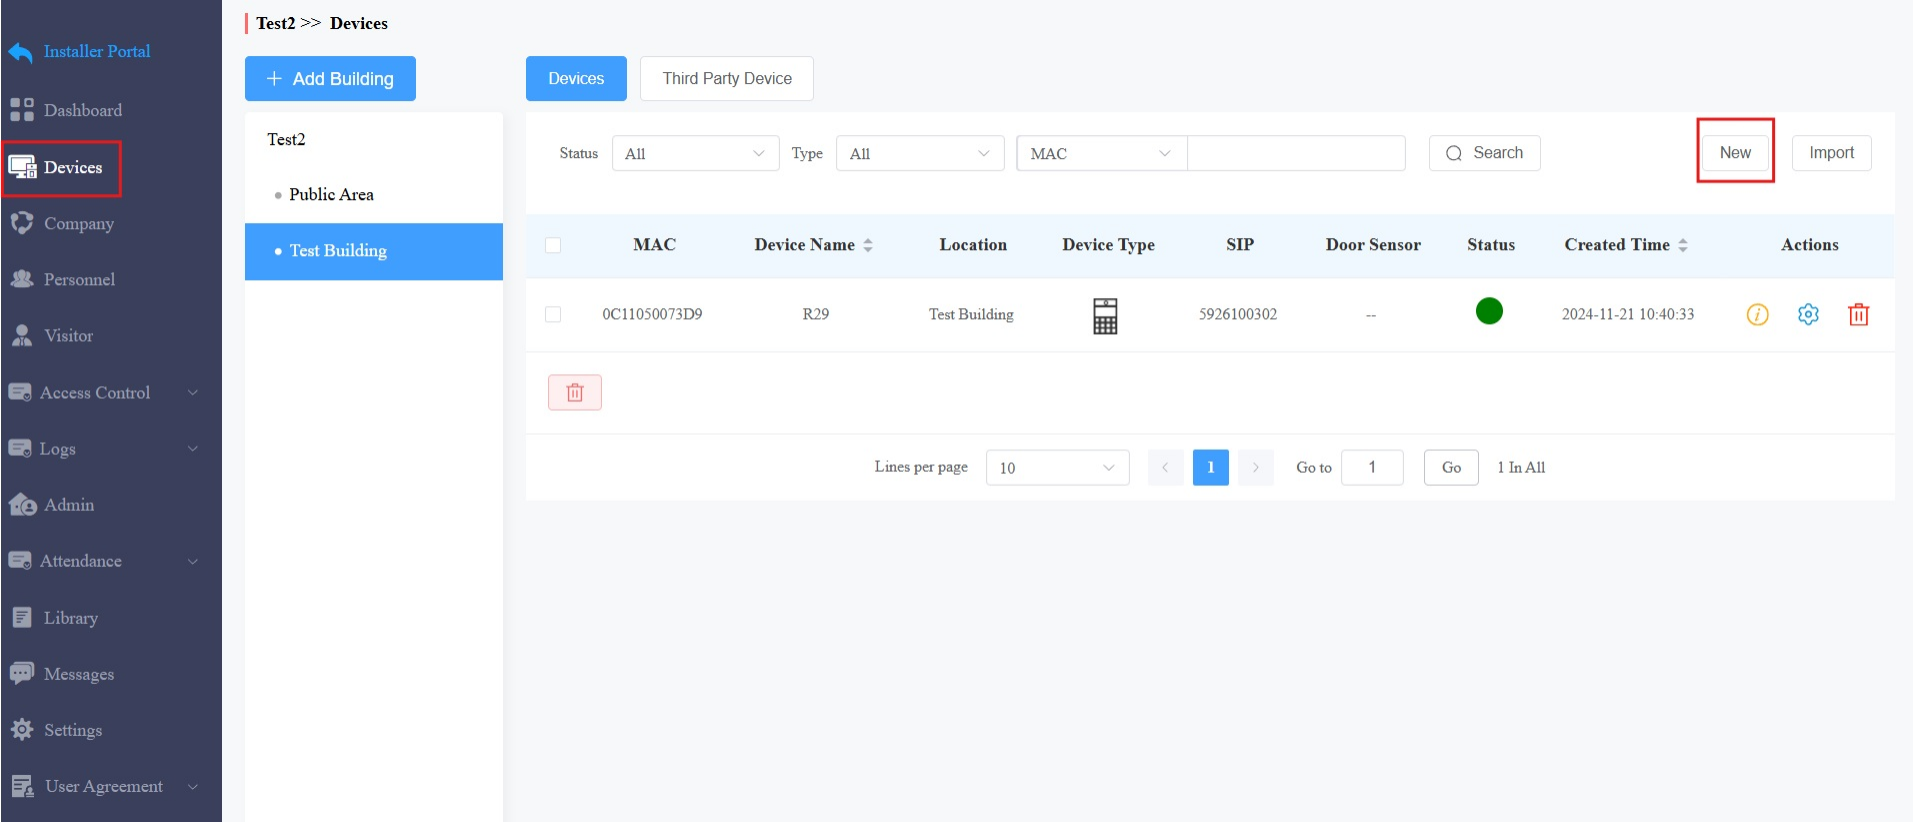
3. Enter the device’s information. See the description of each item in the chart below.
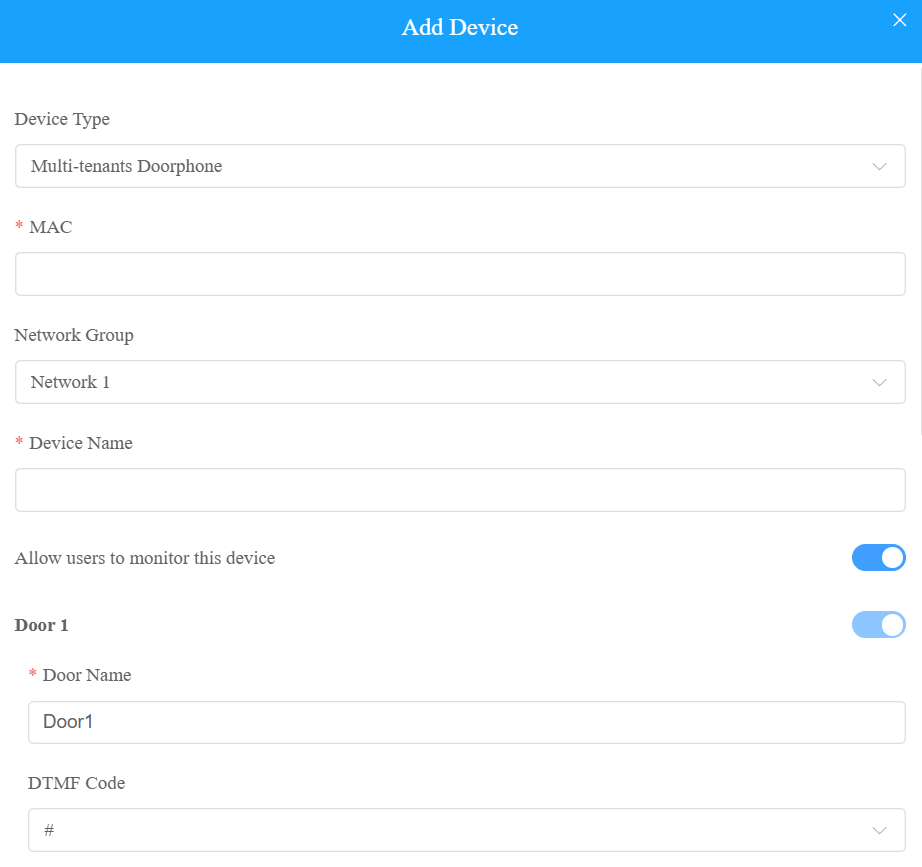
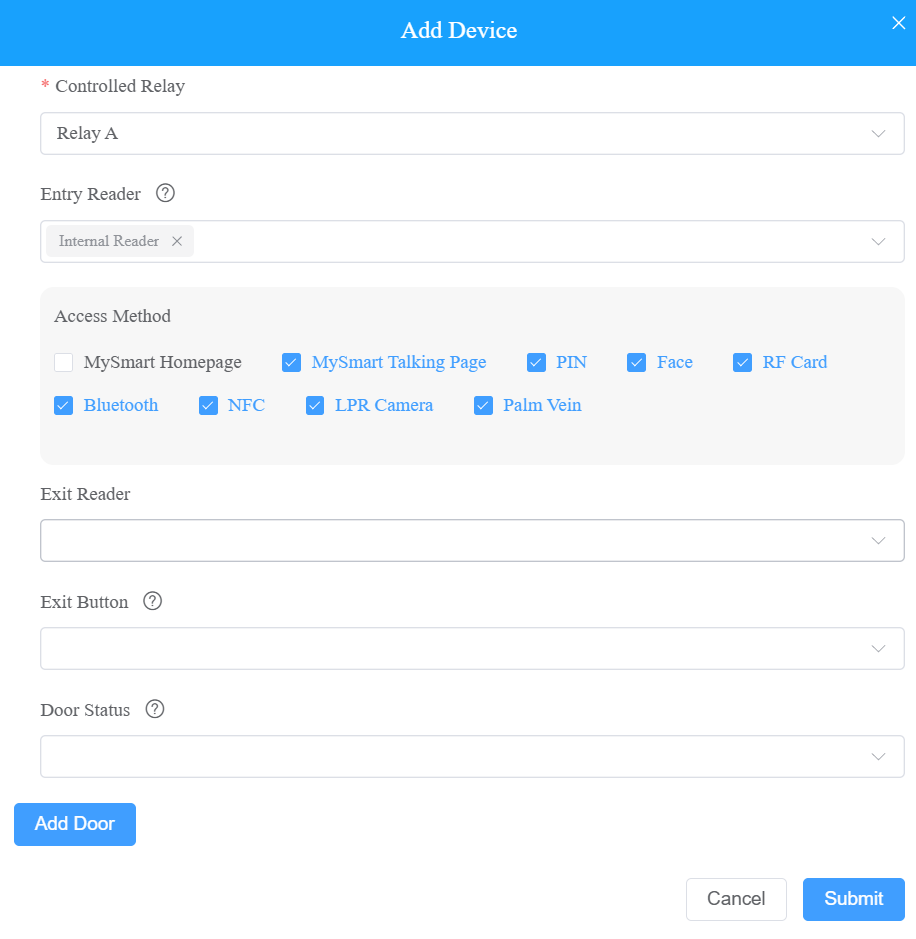
4. Click Submit to save the settings.
Regardless of what type of device it is, the device type, MAC address, network group, and device name need to be set up. | ||
No. | Field Name | Description |
1 | Device Type | Select your device type. |
2 | MAC | Type in the device's MAC address. |
3 | Network Group | Select the network group. You can select the same network group as that of other devices if the devices are deployed in the same local network. (In this case, communicate via IP) Note: Do not select the same network group if the device is not deployed with other devices in the same local area network(in this case, communicate via SIP). Otherwise, it will lead to communication failure. |
4 | Device Name | Name the device to distinguish it from others. |
To add a door phone or an access control terminal, the following options should be additionally configured. | ||||||||||||||||||||||||||||||||||||||||||||||
1 | Allow users to monitor this device |
| ||||||||||||||||||||||||||||||||||||||||||||
2 | Door Name | Enter the door name, which can be the device location. | ||||||||||||||||||||||||||||||||||||||||||||
3 | DTMF Code | Enter the DTMF code for the door access. | ||||||||||||||||||||||||||||||||||||||||||||
4 | Controlled Relay | Specify the relay that is connected to the door lock. For A095, select Door1~4 or AUX OUT1~4. | ||||||||||||||||||||||||||||||||||||||||||||
5 | Entry Reader | The reader controls the entry door.
NOTE: When the controlled relay is selected Door(A095), select the reader from Reader 1~8 since A095 has 8 reader interfaces that can be connected for Wiegand or RS485 feature. | ||||||||||||||||||||||||||||||||||||||||||||
6 | Exit Reader | The reader controls the exit door.
NOTE: When the controlled relay is selected Door(A095), select the reader from Reader 1~8 since A095 has 8 reader interfaces that can be connected for Wiegand or RS485 feature. | ||||||||||||||||||||||||||||||||||||||||||||
7 | Access Method | Available when Internal Reader is selected as the Entry Reader or the Exit Reader. Select specific unlock methods to open doors. For example, if you select PIN for Door 1 and select RF Card for Door 2, when users enter PIN codes on the door phone, only Door 1 will be opened, and vice versa. The following models with specific firmware versions or higher support this feature:
Note: If the MySmart Homepage or MySmart Talking page is not checked, the corresponding icons will not appear on the app home page. | ||||||||||||||||||||||||||||||||||||||||||||
8 | RS485_Address | Available when RS485 is selected as the Entry Reader/Exit Reader. Select the RS485 address ranging from 0 to 127. | ||||||||||||||||||||||||||||||||||||||||||||
9 | Exit Button | Input A ~ D: Select it when the input is connected to an exit button. Users can press it to open the door. NOTE: When the controlled relay is selected Door(A095), select from REX1~4 that corresponds to the label on the device. | ||||||||||||||||||||||||||||||||||||||||||||
10 | Door Status | Select the input port that is connected to a door sensor. It can be used to detect whether someone breaks in forcibly or if the door-opening time exceeds a limit.
| ||||||||||||||||||||||||||||||||||||||||||||
11 | Add Door | Add doors when the device is connected to more than one lock. | ||||||||||||||||||||||||||||||||||||||||||||
To add an indoor monitor/guard phone, the following options should be additionally configured. | ||
1 | Arming Function | When enabled, the arming icon will be available on users' MySmart Apps for arming and disarming. |
2 | Companies | Available when the device type is guard phone.
Note: R49 with version 49.30.10.43 or higher supports this feature. |
3 | Belongs To | You can link the device to a specific user.
|
4 | Relay | This option is for indoor monitors. Turn on or off the device's built-in relay and name the relay. |
Add Devices in a Batch
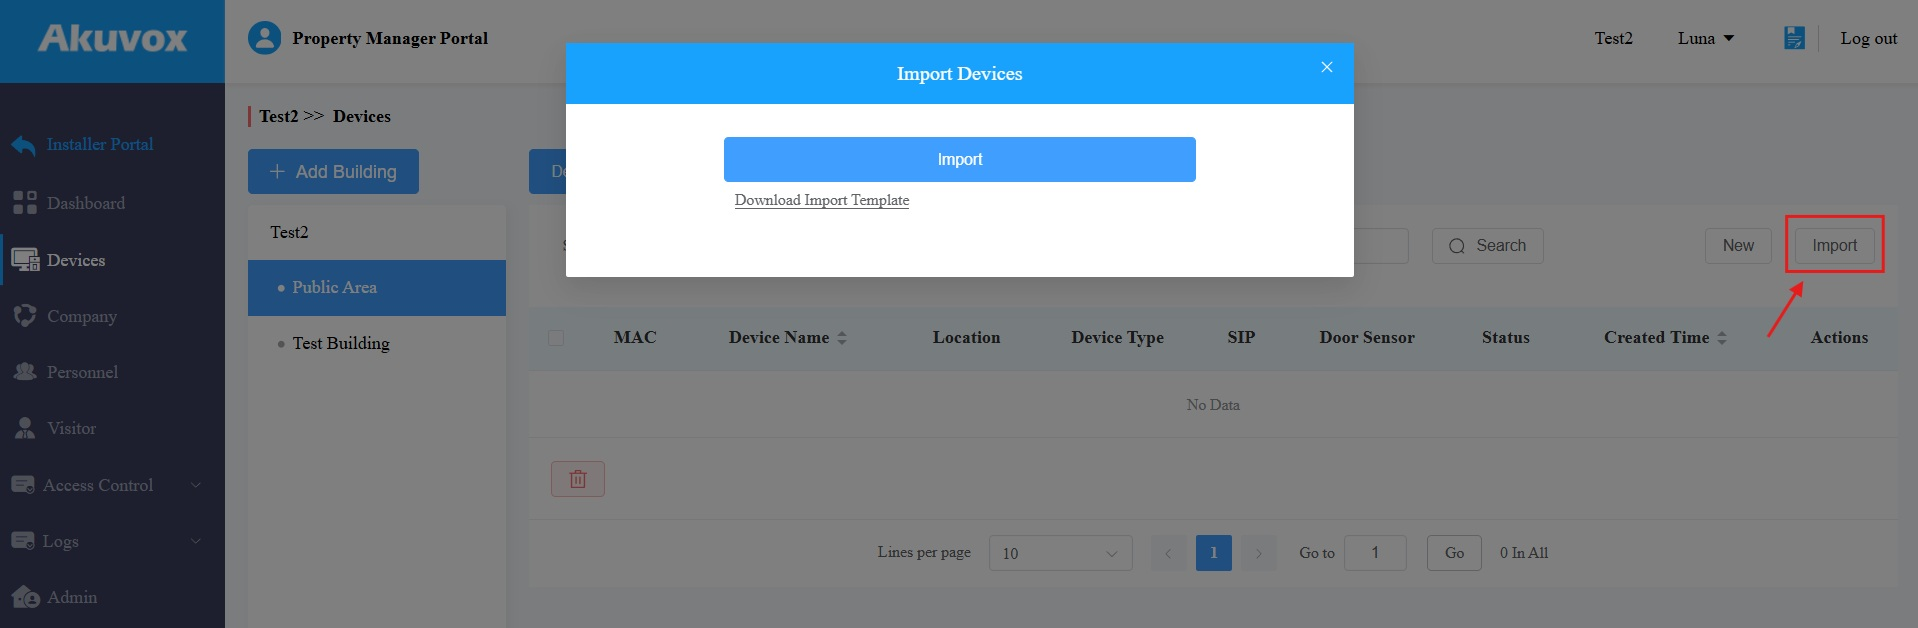
On the Devices module, click Public Area or select the desired building based on where the device is installed.
Click Import on the right.
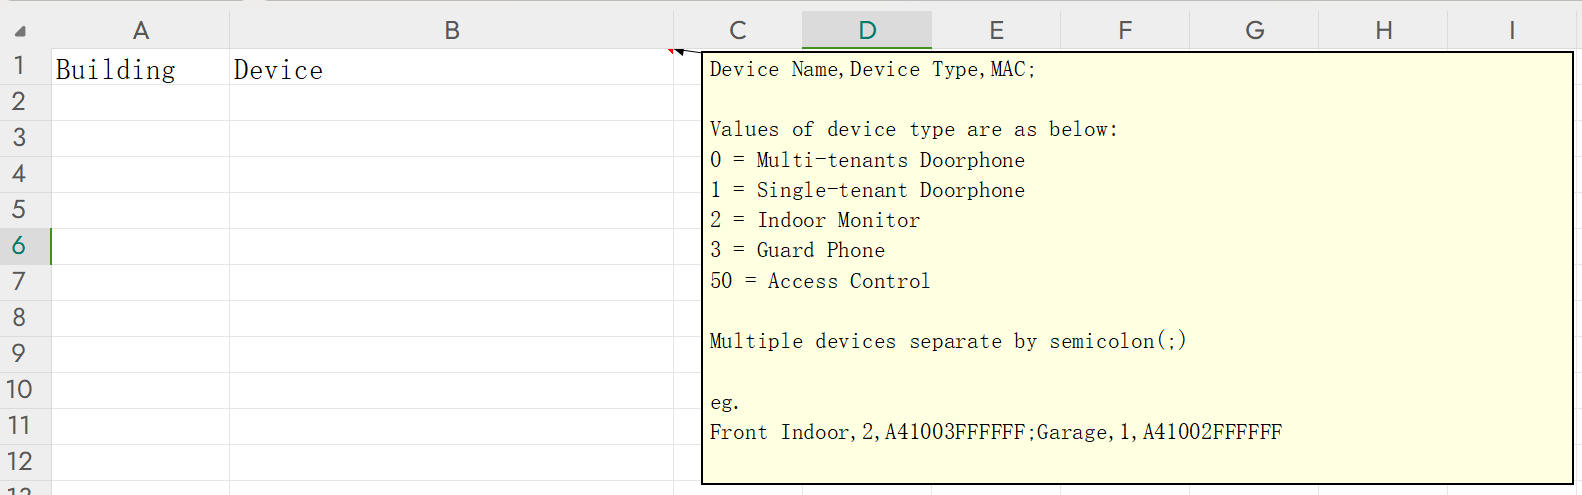
Download and open the template. Click Import after editing the file.
In the template, assign the device to a building and enter the device name, type, and MAC address as instructed.
Edit/Delete Devices
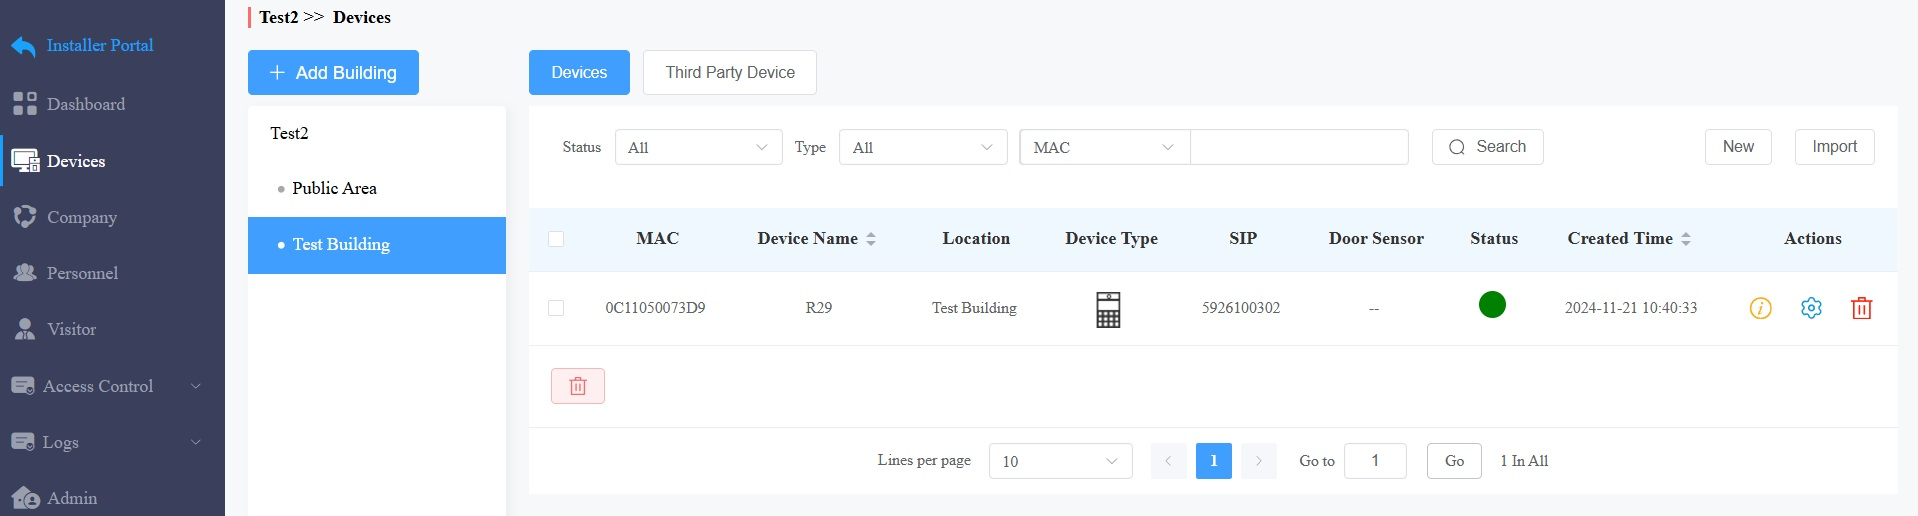
On the Devices module,
Click
 to view the device information.
Click
 to change the device’s settings. Please note that if you change the device’s MAC address, the related door logs, call histories, motion alerts, alarm records, and captures will be cleared.
Click
 to delete it.
Apart from the basic settings, including device name and network group, you can set up alarm settings.
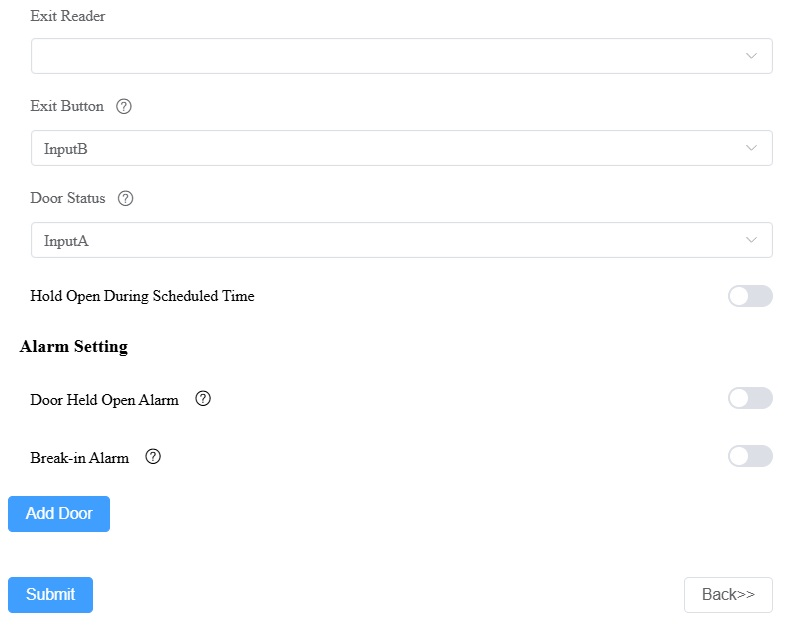
Door Held Open Alarm: Available when Door Status is configured. This feature allows the device to sound an alarm when the door-opening time exceeds a certain limit.
Door Opened Timeout: Set the door-opening time beyond which the alarm will be triggered.
Break-in Alarm: The feature allows the device to sound an alarm when the door is opened abnormally.
Note
Click here to view the models supporting the Break-in Alarm feature.
The following device models with specific firmwares or higher support the Door Held Open Alarm feature:
Model
Version
Model
Version
A08
108.30.10.108
R29
29.30.10.314
A01/A02
101.30.10.106
R28V2
228.30.10.218
A03
103.30.10.108
R25
25.30.10.117
A05V2
205.30.10.119
E18
18.30.10.236
A094
92.30.10.112
E16 V2
216.30.10.208
A095
95.30.10.125
E16 V3
416.30.11.206
X912
912.30.11.49
X910
2910.30.11.28
S532
532.30.10.211
X915 V2
2915.30.10.211
E12 V2
312.30.11.18
S535
535.30.10.233
X916
916.30.10.224
S539
539.30.10.249
S538
538.30.10.705
R20 V5
320.30.10.226
A15
1115.30.10.407
Device Remote Maintenance
You can manage devices remotely in terms of automatic provisioning(AutoP), reboot, reset, connection type selection, etc.
On the Devices module, clickof the target device. Or, click and click Settings.
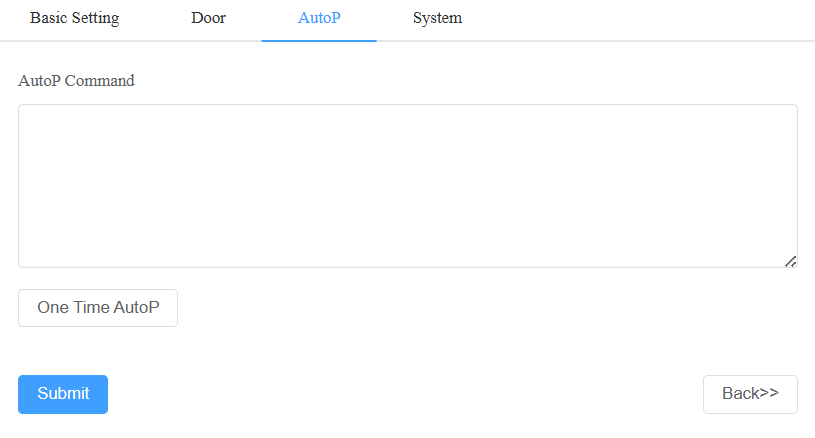
Click AutoP and enter the commands. Click One Time AutoP and enter the commands if you just want to implement the AutoP once.
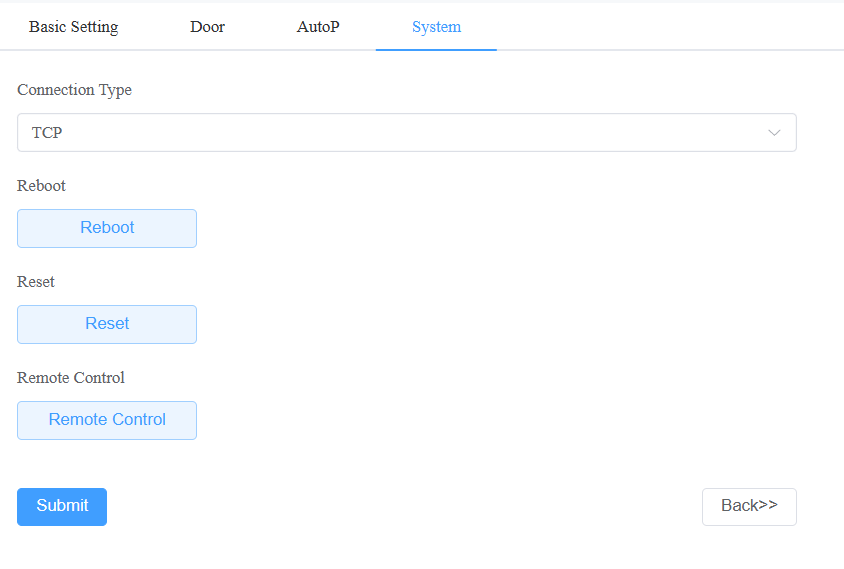
Click System, where you can select the connection type, reboot or reset the device, and access the device’s web interface by clicking Remote Control.
Note
The Auto-provisioning command can be exported out of the devices.
You can refer to the following templates:
Duplicate commands will not be retained.
Door Management
On the Doors module, you can check the added doors, their status, location, etc. You can search for a door by entering its name or MAC.
Lockdown
The lockdown feature keeps the door locked. It can be used to keep threats out in dangerous situations.
Doors under lockdown cannot be opened by common access methods, such as users’ credentials and the exit button.
Compatible models and versions(or higher):
Model
Version
Model
Version
R29
29.30.10.404
X910
2910.30.11.28
R28V2
228.30.10.231
X912
912.30.11.107
R25
25.30.10.117
X915V2
2915.30.10.420
R20
320.30.11.30
E16 V2
216.30.10.208
A08
108.30.11.8
E16 V3
416.30.11.206
A03
103.30.10.204
A01/A02
101.30.10.206
A095
95.30.10.125
A094
92.30.10.205
X916
916.30.10.508
S539
539.30.10.507
S538
538.30.10.705
S535
535.30.11.8
A05V2
205.30.11.114
E12V2
312.30.11.106
S532
532.30.10.336
E18
18.30.11.136
A15
1115.30.10.407
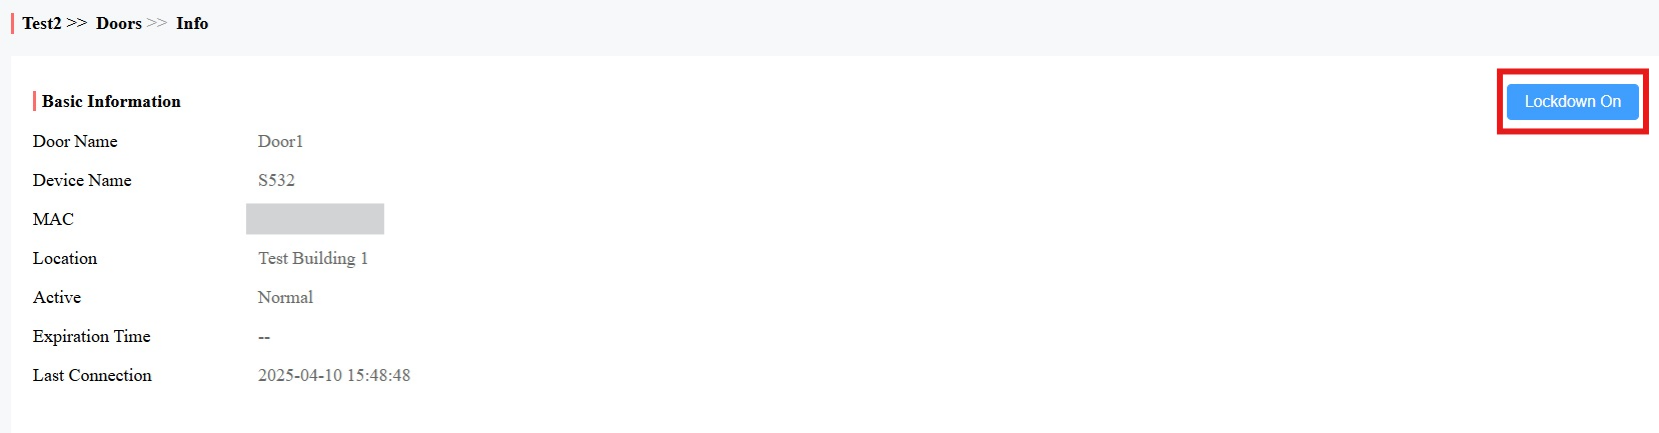
Click Lockdown at the top of any interface. This button is only available for PMs.
Click Lockdown On to lock all doors; click Lockdown Off to release all doors.
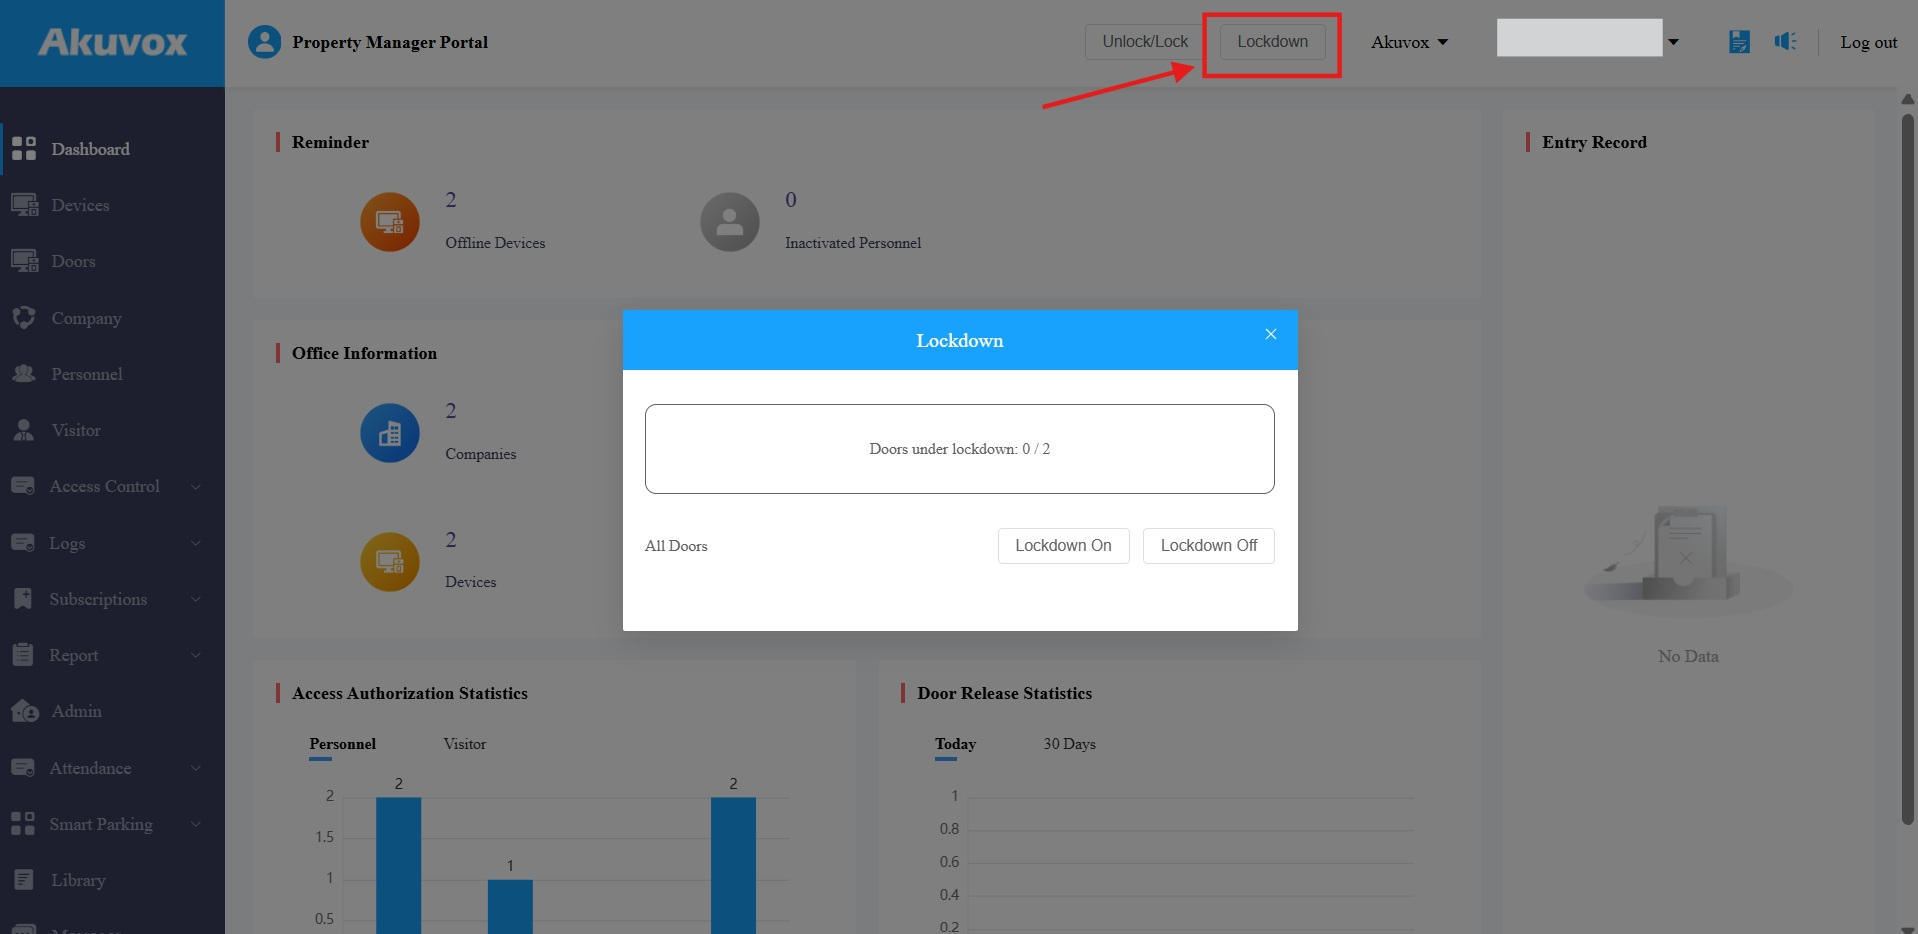
If users try to open doors when devices are in lockdown, devices with screens will display “Property Under Lock” and announce an alarm; devices without screens will shine a blue indicator light and announce an alarm.
Switch Lockdown for a Specific Door
You can check doors’ lockdown status and turn on/off lockdown for a specific door by clicking Doors on the left column.
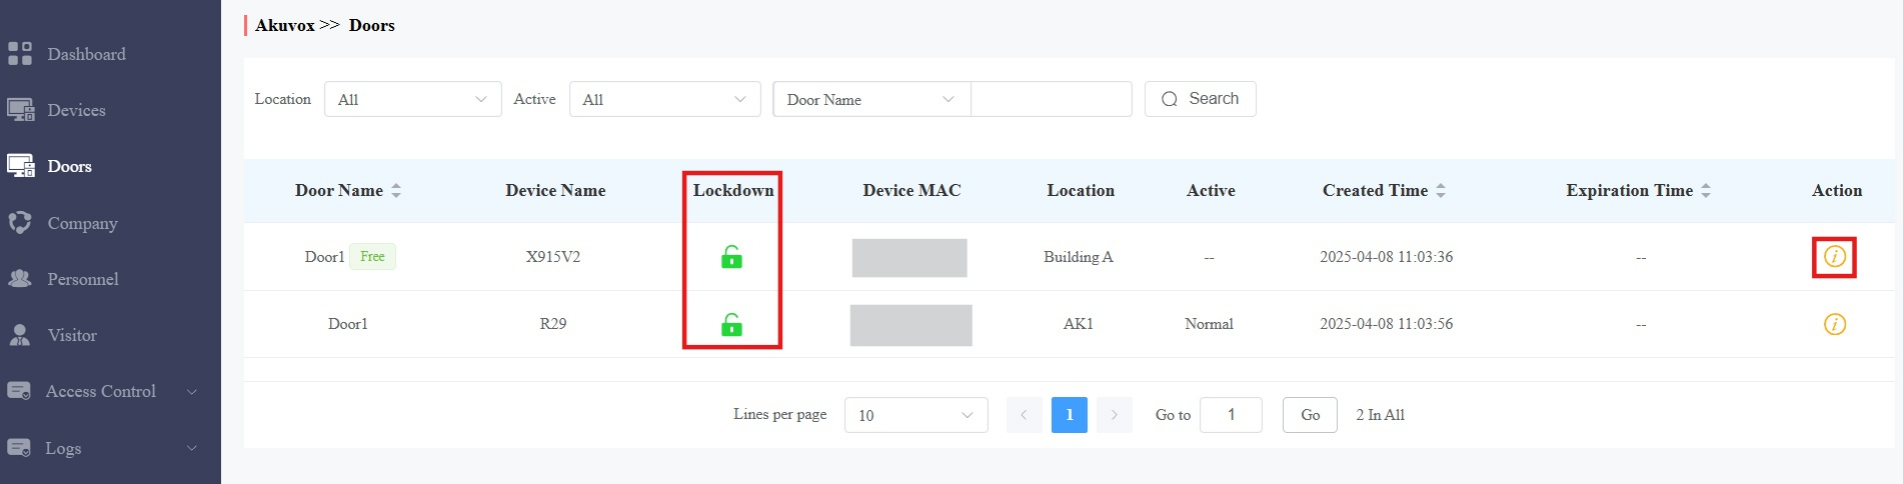
Lockdown: The green icon indicate the door is not in lockdown; the red is in lockdown.
Click  of the target door to turn on/off lockdown for it.
Access Group Management
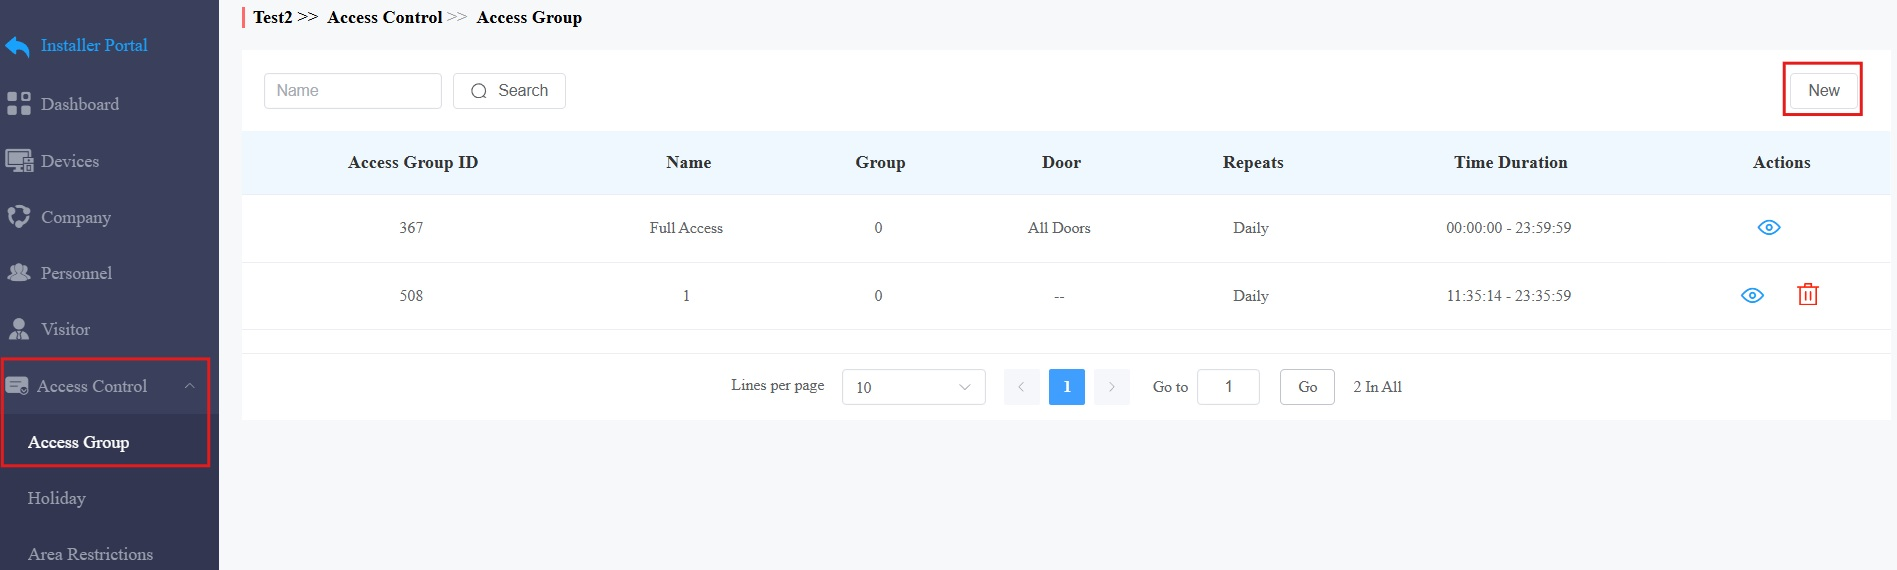
The Access Group module allows you to create an inventory of ready-made access control schedules, which can be readily pulled out and applied for the door access control, targeting specific groups and personnel.
Create an Access Group
Click Access Control > Access Group > +New.
You can click
 to view the details of the default access group generated by the system.
Select the company.
Name the access group and select the Repeats mode from Daily, Weekly, or Never. Daily and Weekly mean the schedule will repeat every day and week.
Specify the time within which users can open doors
Select the door(s) to be opened.
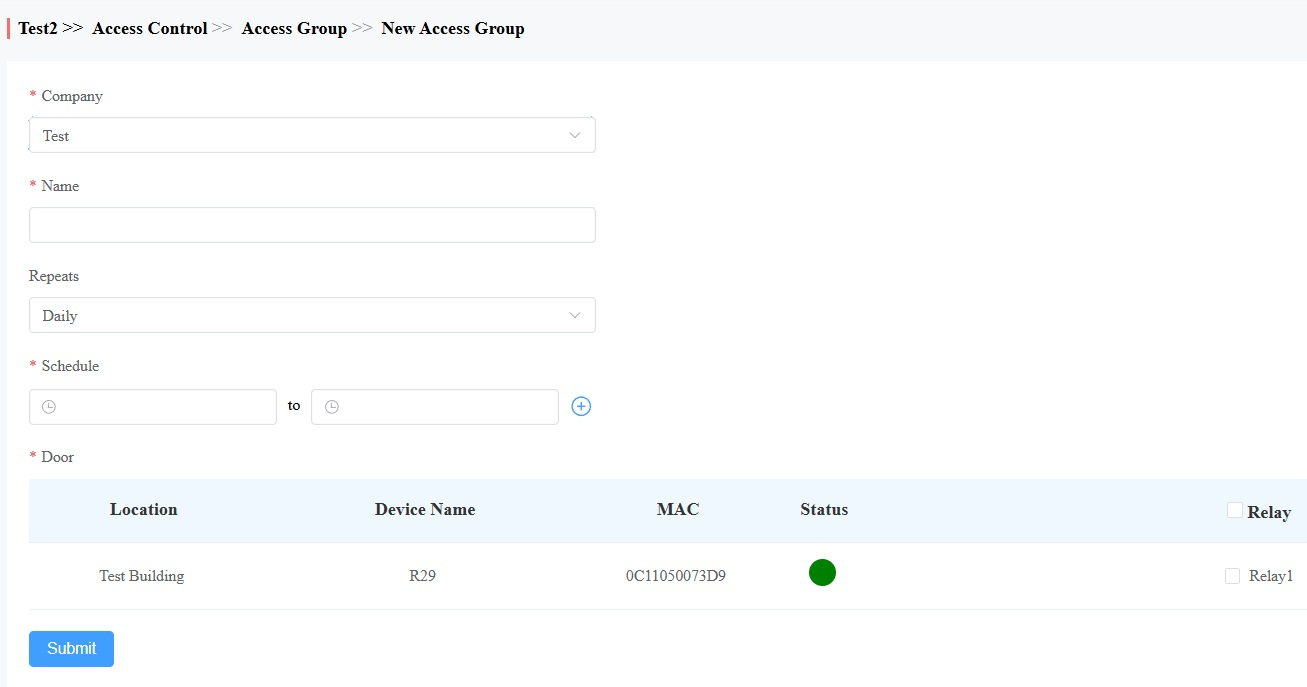
Submit the setting.
Edit/Delete Access Groups
The system-generated default group cannot be edited or deleted.
Click Access Control > Access Group.
Click
 to modify its settings; click
  to delete it.
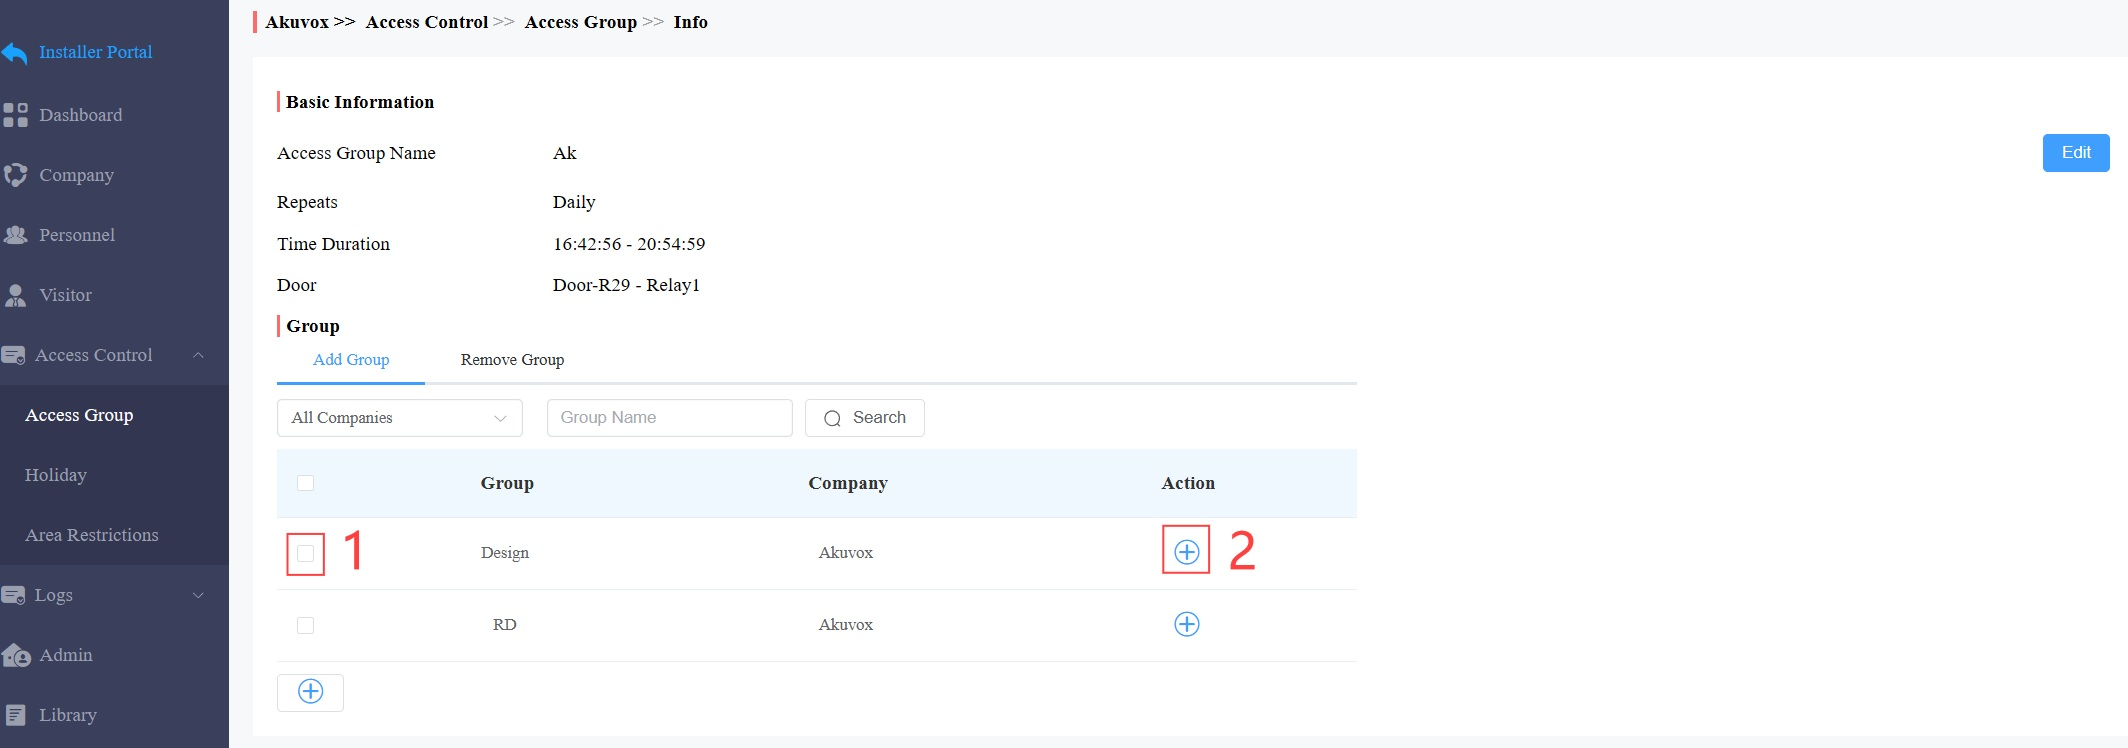
On the Access Group’s Info interface, you can:
apply the schedule to specific groups by checking the groups and clicking
 . You can quickly find the desired group by narrowing the search scope by selecting the specific company and entering the group name.
 remove the schedule that applies to the group by checking the group and clicking
 .
.
Holiday Access Control
You can define the holidays when personnel cannot open doors to enhance access control security.
Compatible models and versions(or higher):
Model
Version
Model
Version
X910
2910.30.11.28
R20V5.0
320.30.10.223
X912
912.30.11.49
R25
25.30.10.117
X915V2
2915.30.10.211
R29
29.30.10.314
X916
916.30.10.222
R28V2
228.30.10.218
S532
532.30.10.211
A08
108.30.10.108
S535
535.30.10.233
A01/A02
101.30.10.106
E18
18.30.10.236
A03
103.30.10.108
E16V2
216.30.10.208
E16V3
416.30.11.206
A094
92.30.10.112
A05V2
205.30.10.119
E12V2
312.30.11.18
A095
95.30.10.125
S538
538.30.10.705
S539
539.30.10.249
A15
1115.30.10.407
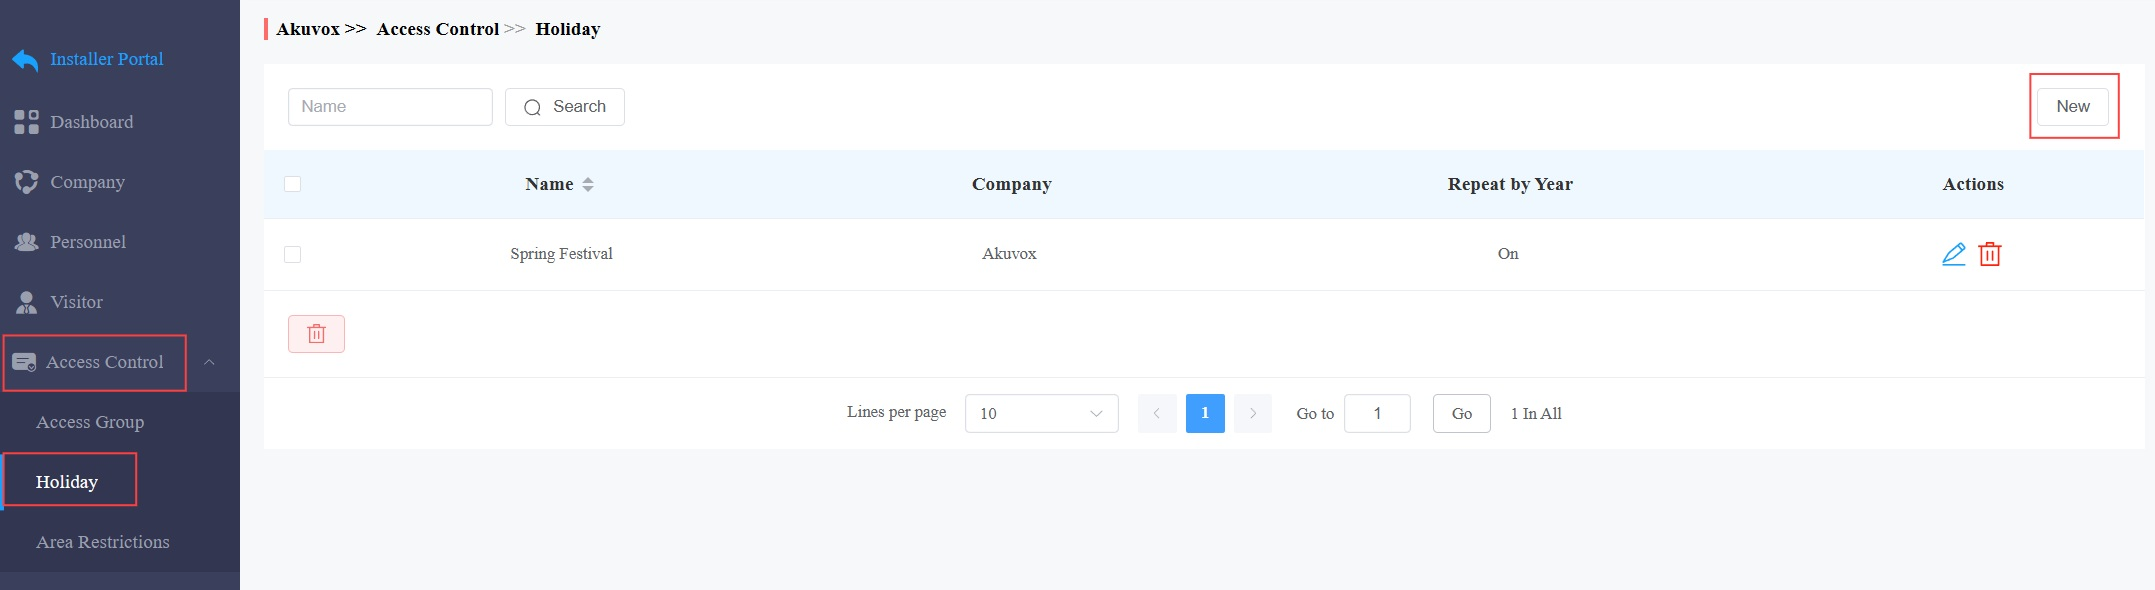
Click Access Control > Holiday > New.
Select the company that adopts the schedule.
Enter the holiday name.
You can set the Working Hours to allow authorized personnel to open doors. When enabled, specify the time.
You can enable Repeat by Year to repeat the schedule every year.
Select the year and day(s) of the holiday schedule.
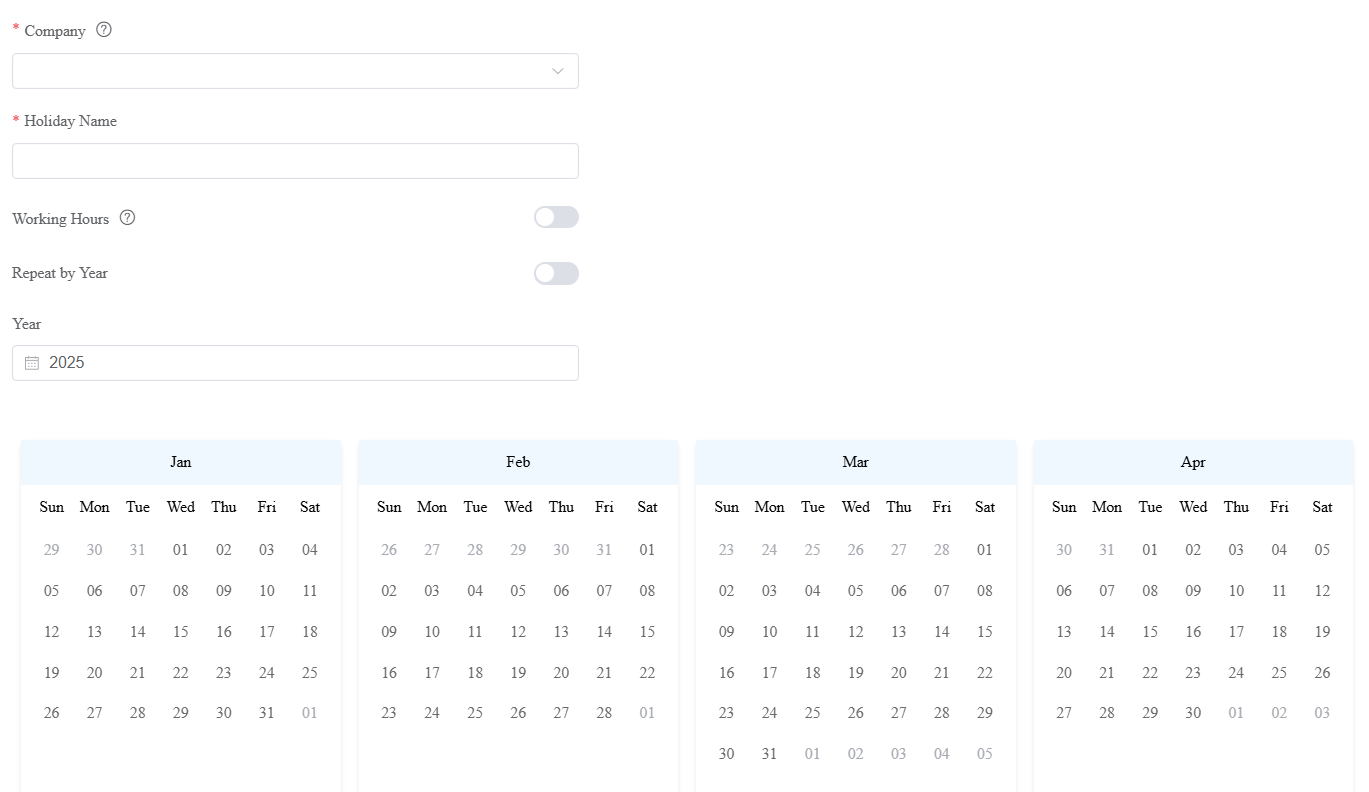
Click Submit.
Area Restrictions
This feature strictly controls users’ entry and exit. Users can only enter and exit the specific area through the designated doors.
Compatible models and versions(or higher):
Model
Version
Model
Version
A08
108.30.10.108
R29
29.30.10.314
A01/A02
101.30.10.106
R28V2
228.30.10.218
A03
103.30.10.108
R25
25.30.10.117
A05V2
205.30.10.119
S539
539.30.10.231
A094
92.30.10.112
S535
535.30.10.233
A095
95.30.10.125
S532
532.30.10.211
X910
2910.30.11.28
E18
18.30.10.236
X912
912.30.11.49
E16V2
216.30.10.208
X915V2
2915.30.10.211
E16V3
416.30.11.206
X916
916.30.10.222
E12V2
312.30.11.18
S538
538.30.10.705
R20V5
320.30.10.226
A15
1115.30.10.407
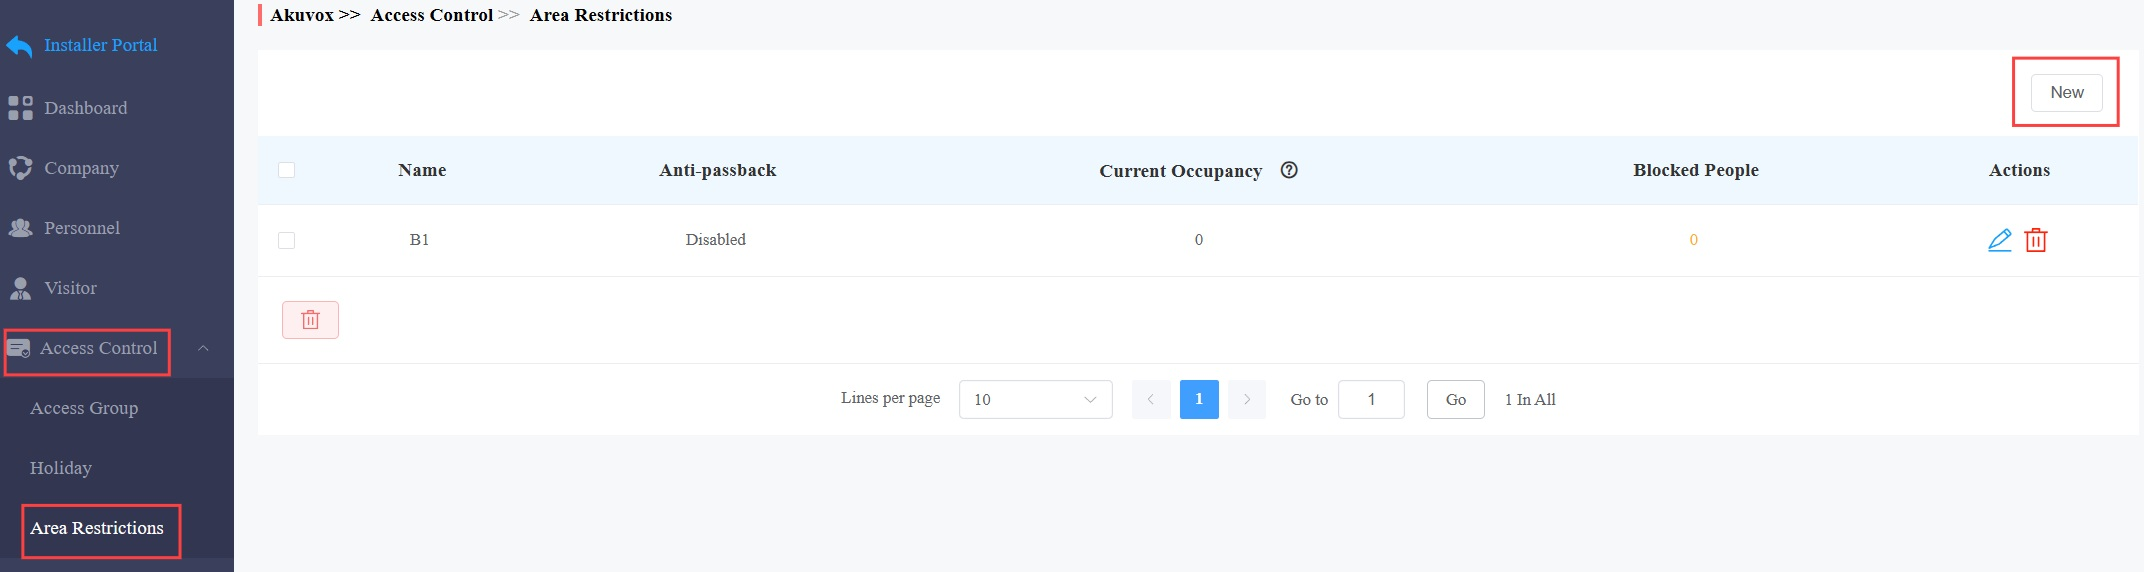
Click Access Control > Area Restrictions > New.
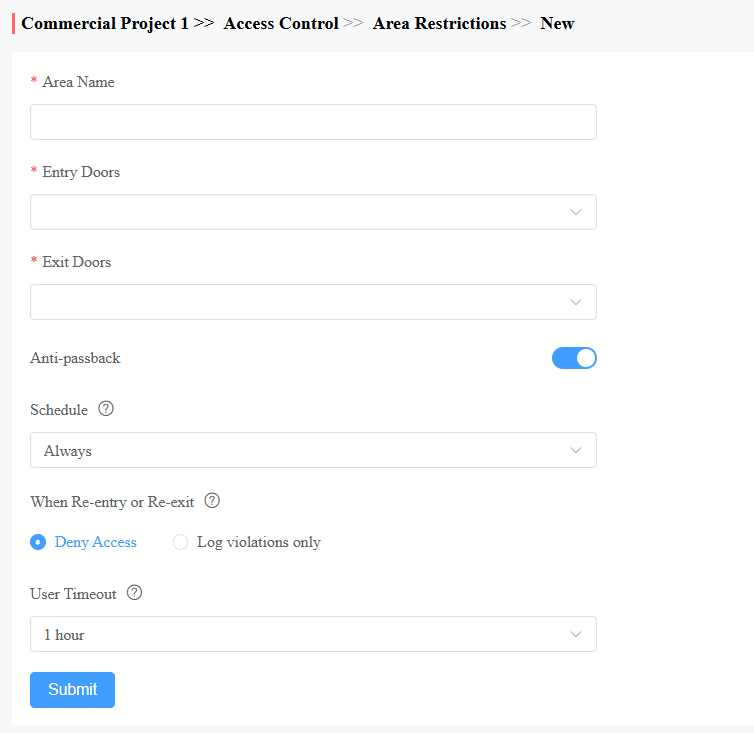
Enter the area name.
Select the entry and exit doors. With anti-passback disabled, there is no strict control over users exiting through the exit door. Users can exit through the entry door.
When the anti-passback feature is enabled, users must first enter and then exit the area through designated doors.
Note
Anti-passback also prohibits users from entering the area by following others. Users can only use their credentials to open the entry and exit doors once respectively.
For example, if the user follows someone else through the door, the next time he/she cannot swipe his/her card to open the Entry/Exit door.
a. Set the time when the anti-passback feature is effective.
b. Select the action taken by the door phone when the user tries to open the same entry or exit door twice.
-Deny Access: The user cannot open the door.
-Log violations only: The door can be opened, and the door opening will be recorded in the door log.
Set the User Timeout within which users cannot open the same door twice. Only after the time limit can users open the door again.
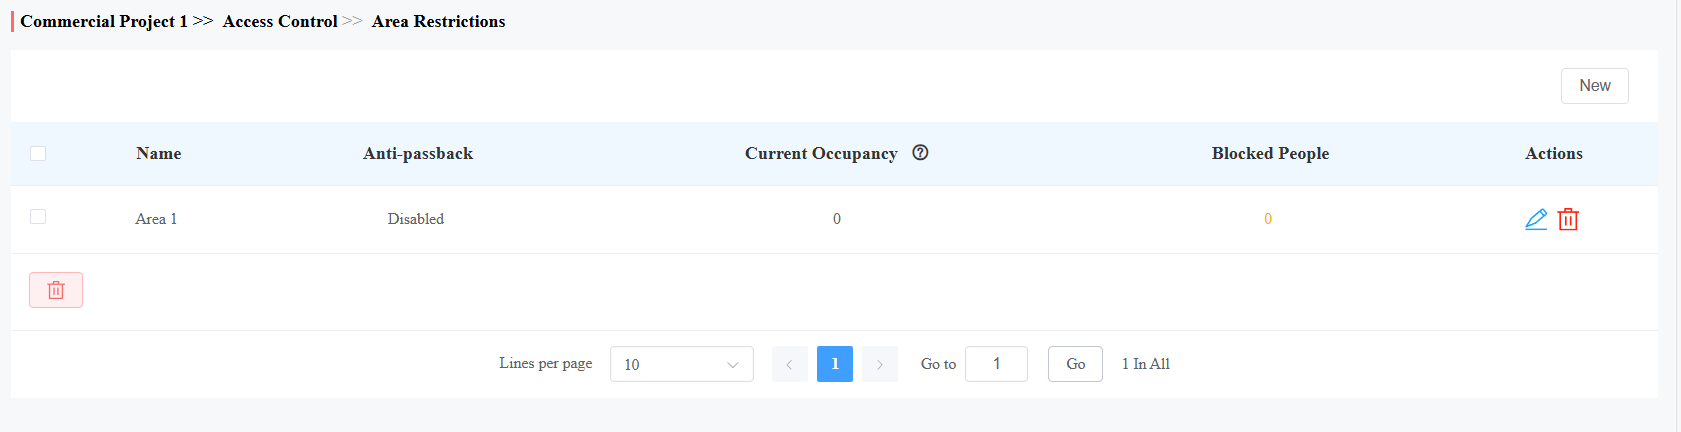
After creating the area restriction rule, you can check the current occupancy and blocked people.
Current Occupancy: Display the number of personnel entering the area, only effective when the anti-passback feature is enabled.
Blocked People: Display the number of personnel and couriers who are denied access in the area. It is only effective when the anti-passback feature is enabled and Deny Access is selected as the action for When Re-entry or Re-exit.
Attendance
With this feature, you can:
set up independent attendance for each company;
designate specific device relays as the attendance points;
flexibly make timetables and schedule shifts;
record leaves and attendance easily.
Select Attendance Points
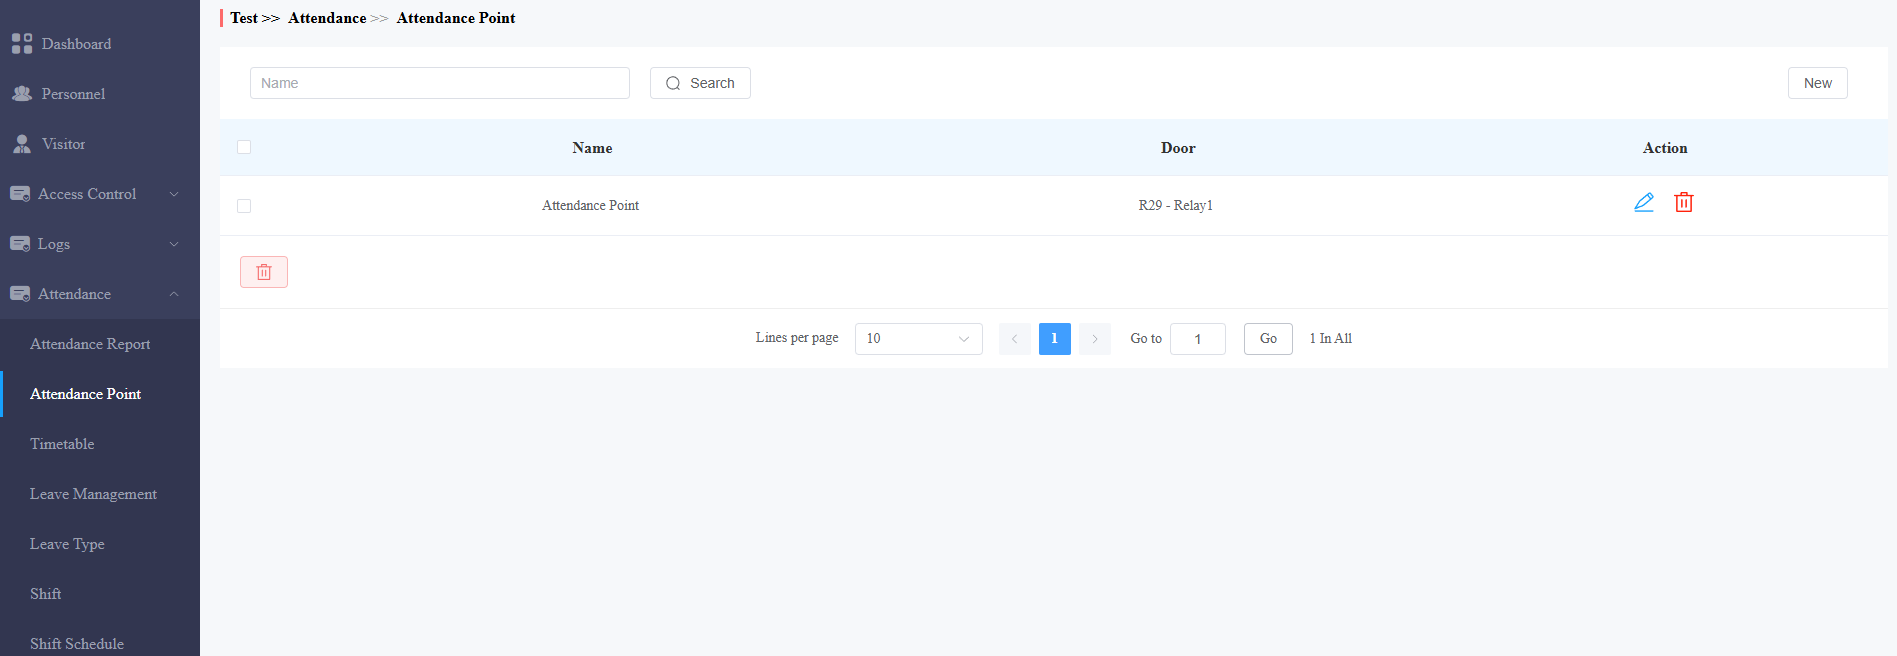
You can select specific relays of door phones/access control terminals as the attendance points. Every successful relay trigger means a clock-in/out.
On the Attendance > Attendance Point module, click New on the right.
Name the attendance point.
Select the door phone’s relay.
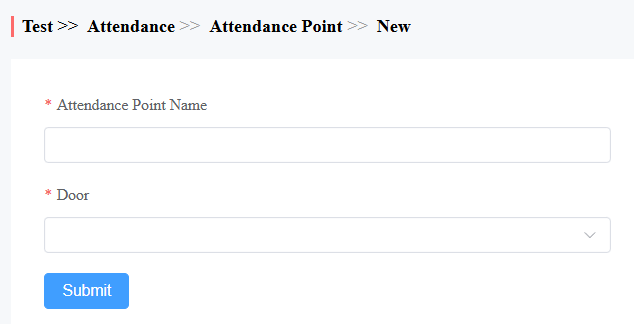
Click Submit.
Set up Timetables
There are two timetable modes, fixed and flexible. You can choose the mode based on the company’s working schedule.
On the Attendance > Timetable module, click New on the right.
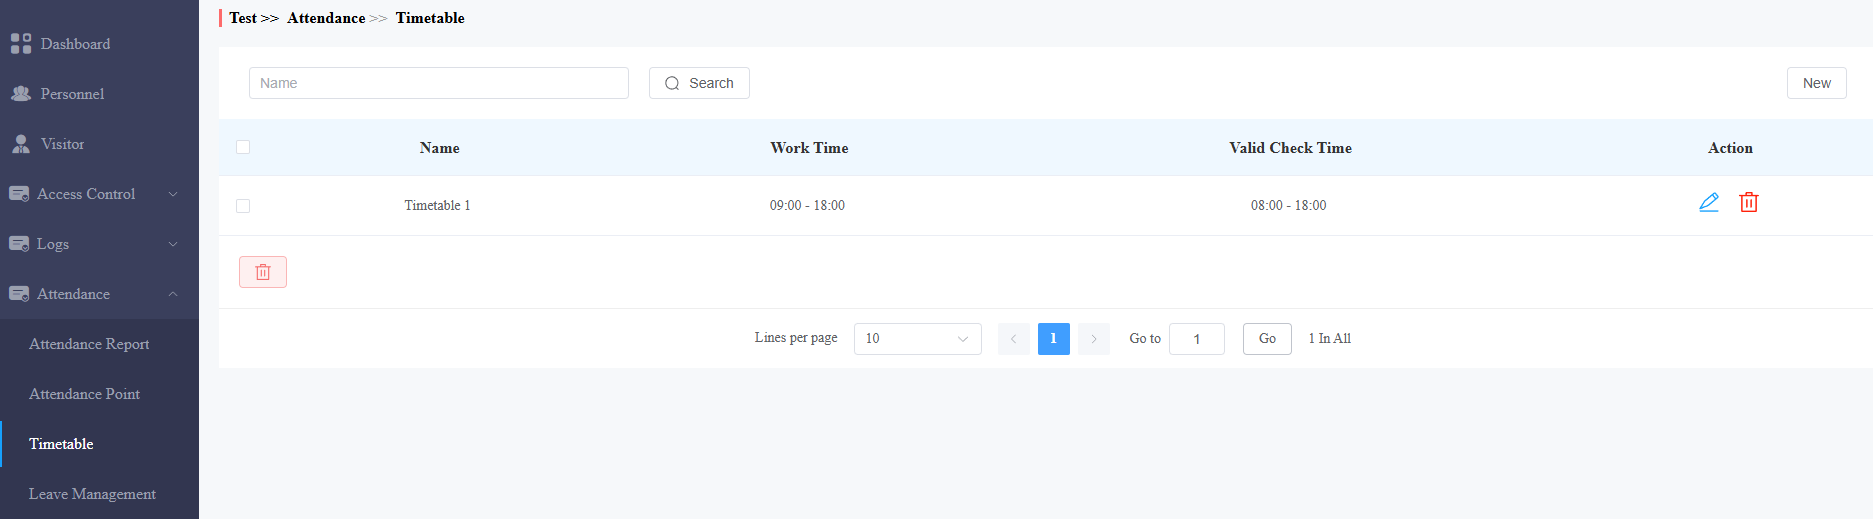
Name the timetable.
Select the timetable template type:
Fixed: Employees commute at fixed times like a 9-to-5.
Flexible - Free: Employees work a certain number of hours without clocking in and out at fixed times.
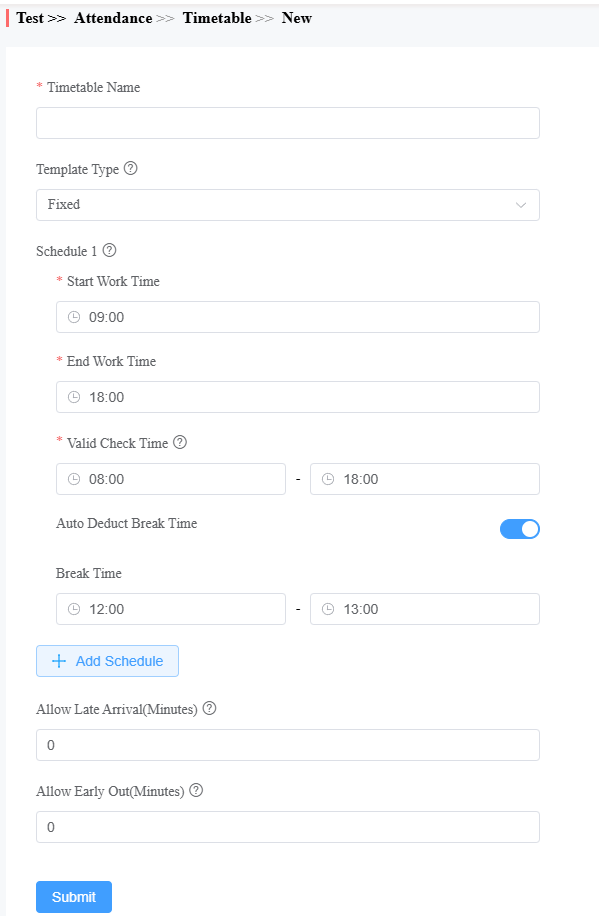
Fixed Timetable | |
|---|---|
Item Name | Description |
Schedule 1-3 | You can specify up to three working periods. The working hours can span over two days, such as from 6:00 p.m. to 7:00 a.m. the next day. |
Valid Check Time | Employees can only clock in/out within this period. |
Auto Deduct Break Time | When enabled, you can specify a break time. When calculating the total working hours of employees, the system automatically subtracts the break time. |
Allow Late Arrival(Minutes) | If late arrivals are allowed in the company, specify the time. Employees will not be recorded as tardy in the attendance report if the time they are late does not exceed this limit. |
Allow Early Out(Minutes) | If early out is allowed in the company, specify the time. Employees will not be recorded as leaving early in the attendance report if the time they leave early does not exceed this limit. |
Example: If you set the start time to 8:00 a.m., the end time to 5:00 p.m., the valid check time from 7:00 a.m. to 6:00 p.m., and the break time from 12:00 p.m. to 1:00 p.m. Employees can only clock in after 7:00 a.m. and out before 6:00 p.m. They can have a lunch break from 12:00 p.m. to 1:00 p.m. | |
Flexible - Free | |
Item Name | Description |
Working Hours Per Day | Specify the working hours of employees. |
Start Time of Timetable | Specify the time after which employees can clock in. |
Multiple In/Out | You can enable this feature for employees who frequently enter and exit the company.
|
Example: If you set the working hours to 8 hours, and the start time to 7:00 a.m. Employees can clock in after 7:00 a.m. and cannot start clocking out until 3:00 p.m. Otherwise, they will be recorded as early leave. | |
Set up Shifts
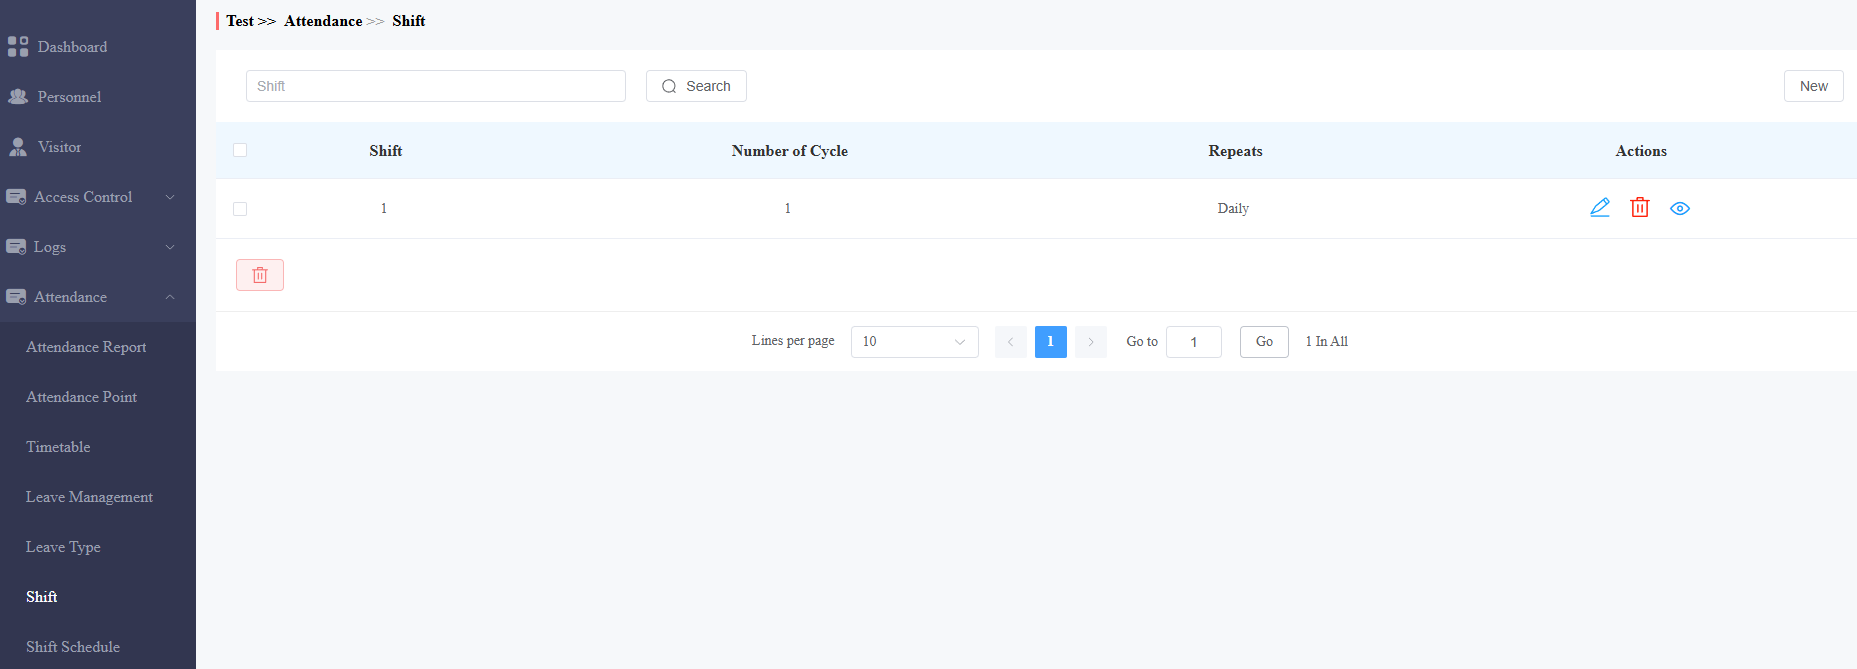
You can decide how to repeat the timetables in one day, a week, or a month by setting up shifts.
On the Attendance > Shift module, click New on the right.
Select the repeat mode.
Daily: The timetable is effective immediately.
Weekly: Arrange timetables for a week.
Monthly: Arrange timetables for a month.
Select the Number of Cycle. You can select 31 days, 52 weeks, or 12 months.
Click the desired timetable. The blue background color indicates it is chosen.
Click the desired date and the timetable name will display.
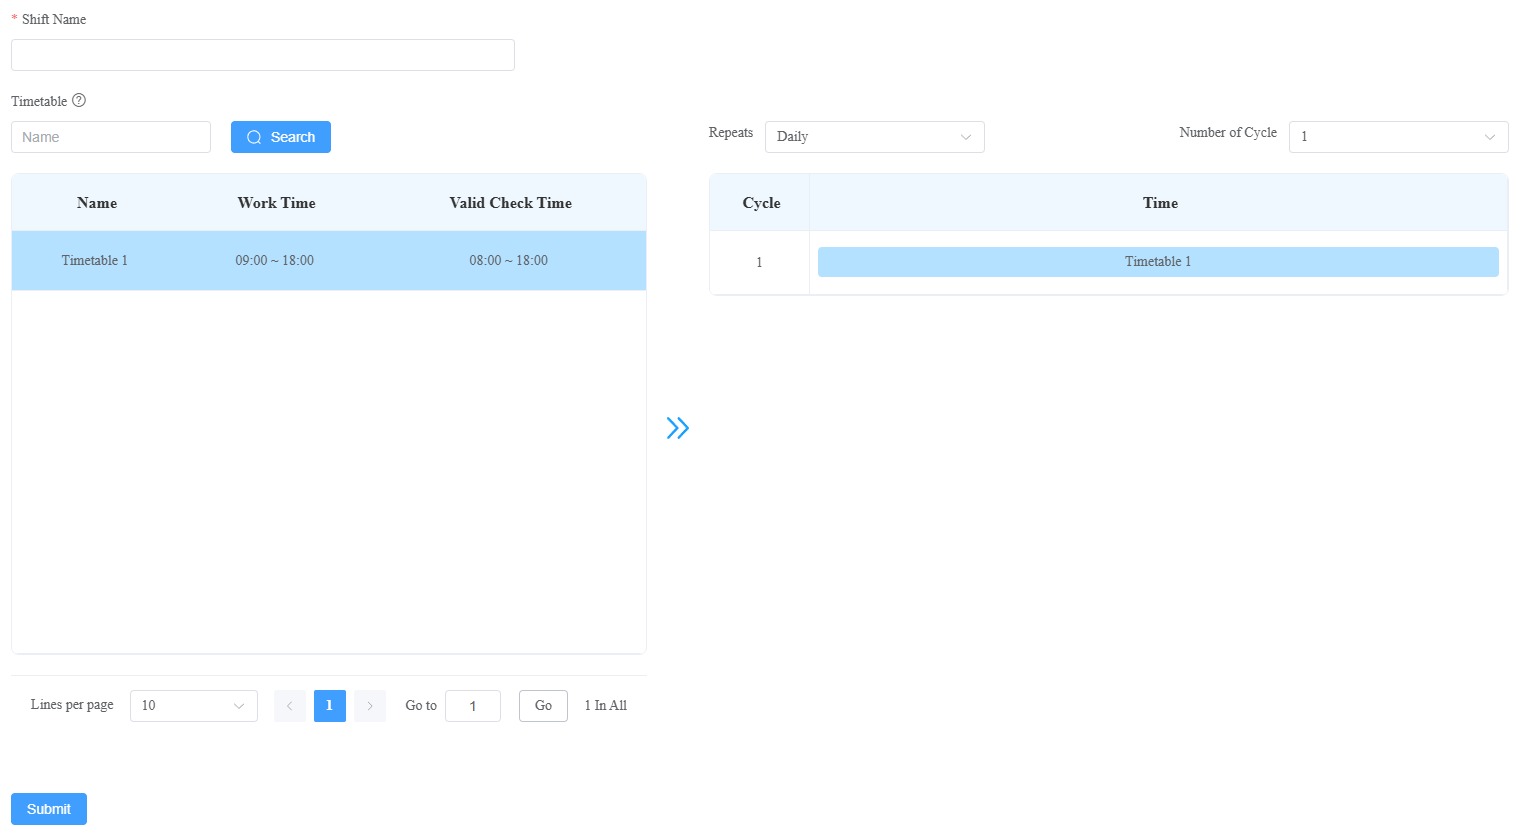
Click Submit.
Arrange Shifts to Personnel
You can arrange the configured shifts for personnel.
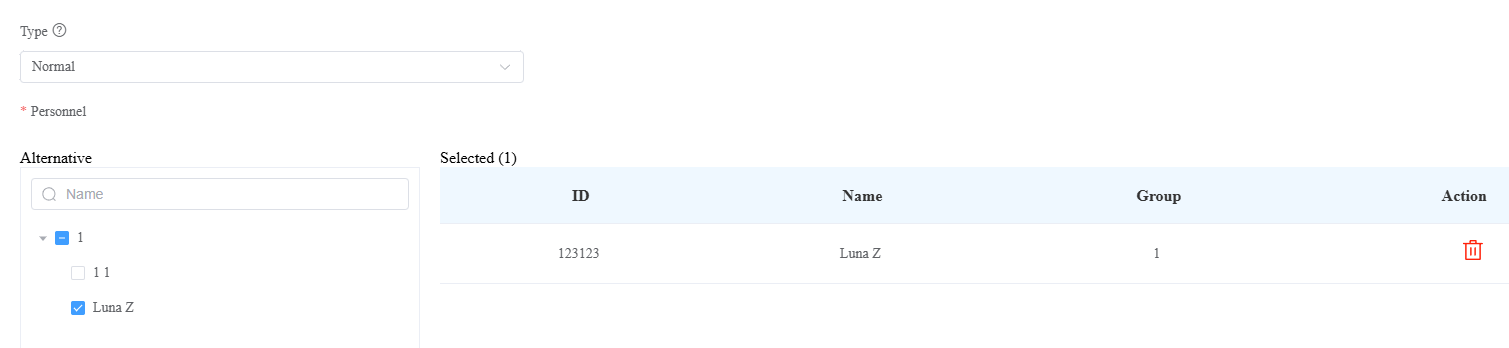
On the Attendance > Shift Schedule interface, click New.
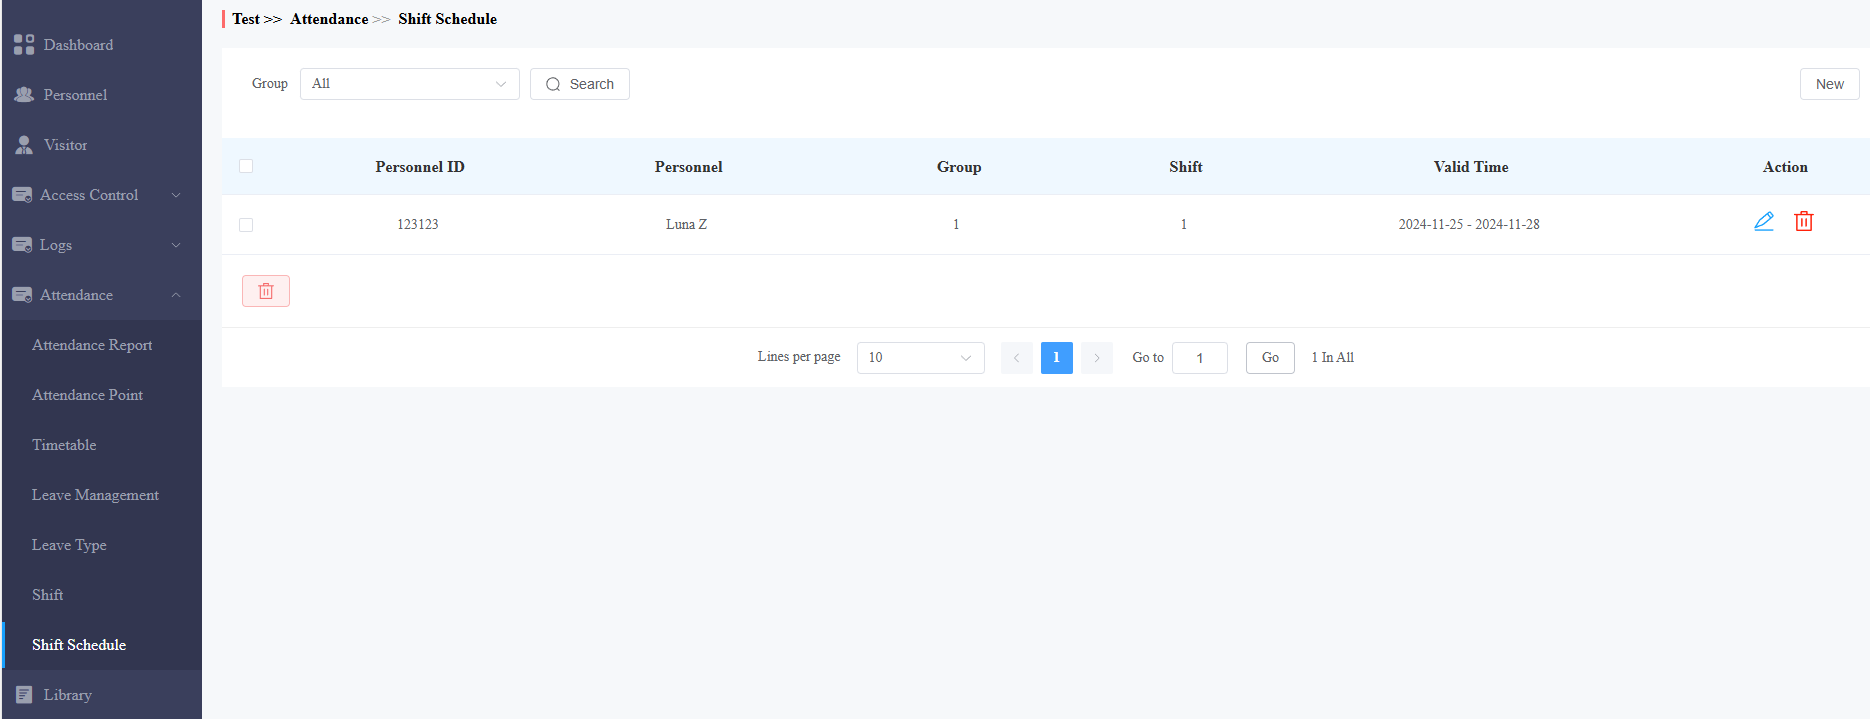
Select the shift type. The temporary type has higher priority over the normal. It can be chosen when arranging for personnel to work overtime temporarily.
Select the personnel.
Select the shift. You can click
 to view the shift.
Select the Valid Time within which the shift schedule is effective.
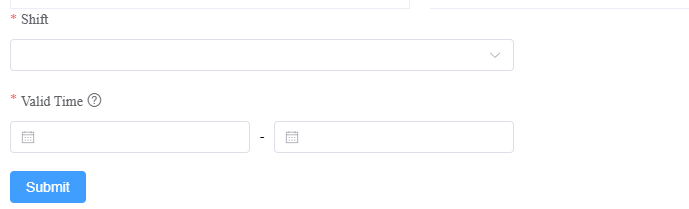
Click Submit.
After arranging shifts, you can modify or delete them by clicking and
and respectively.

Manage Leave Type
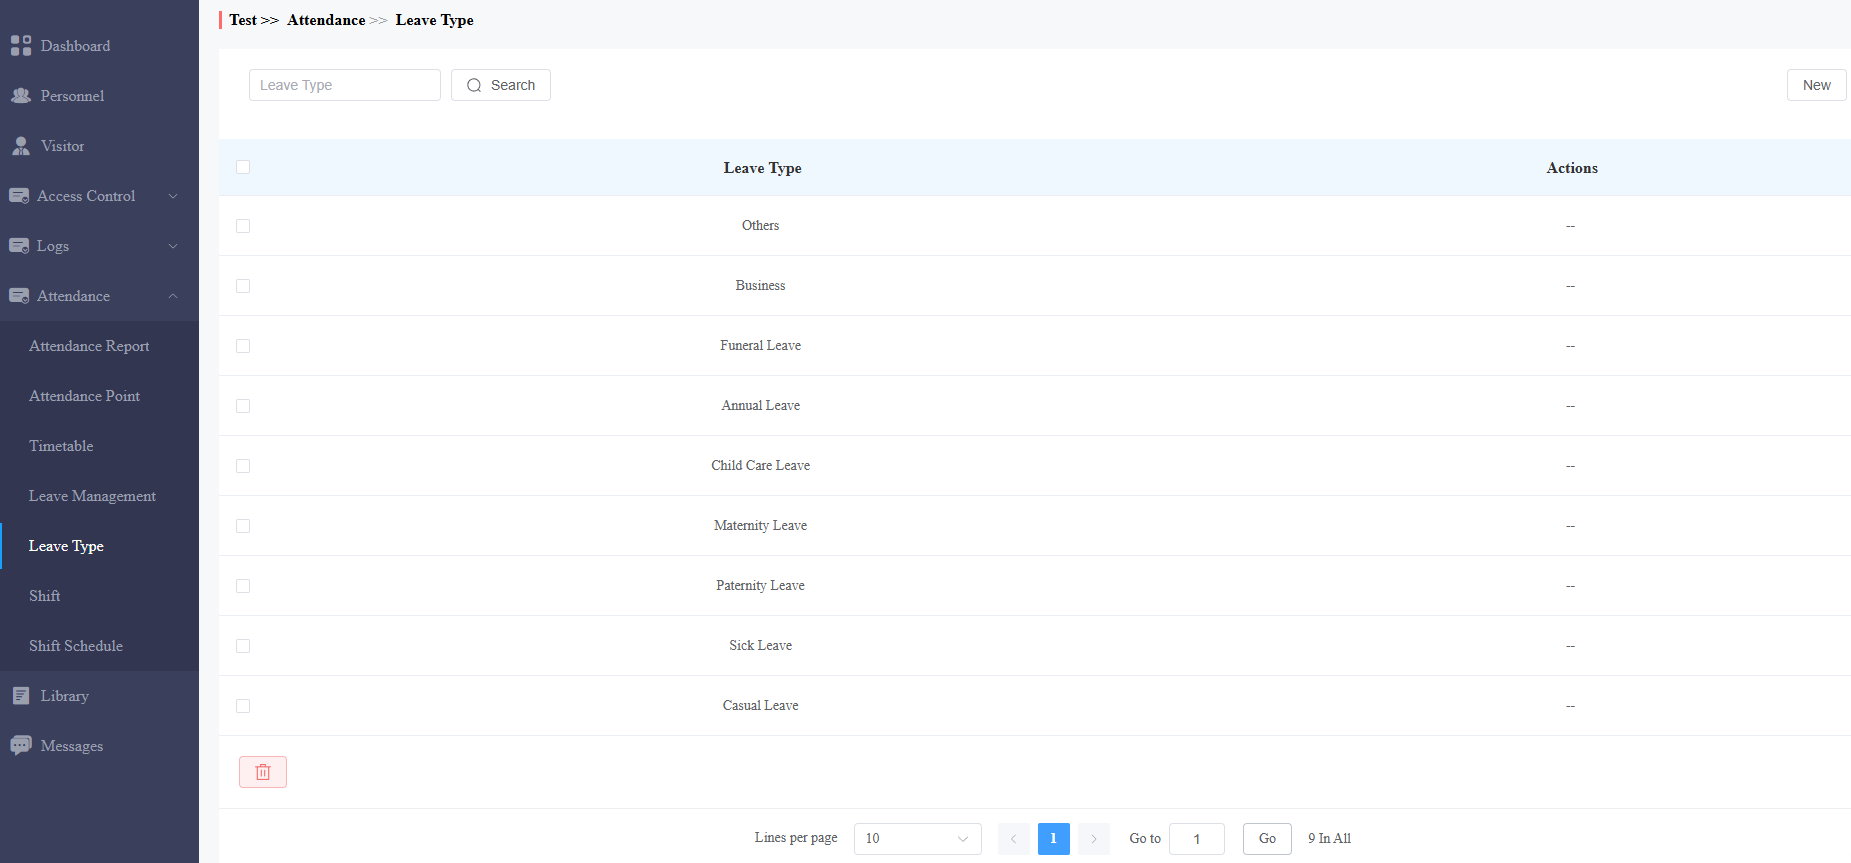
You can add, edit, and delete various leave types for leave management.
On the Attendance > Leave Type module, you can check the system-generated leave types that cannot be modified or deleted.
Click New to add a new one.
Name the leave type.
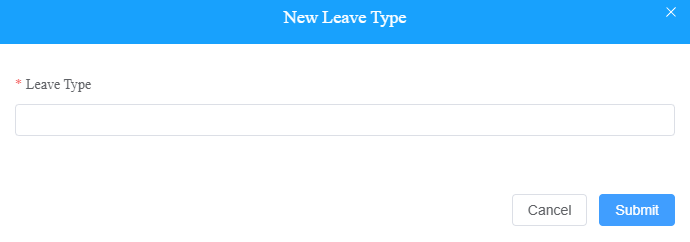
Click Submit.
Manage Leaves
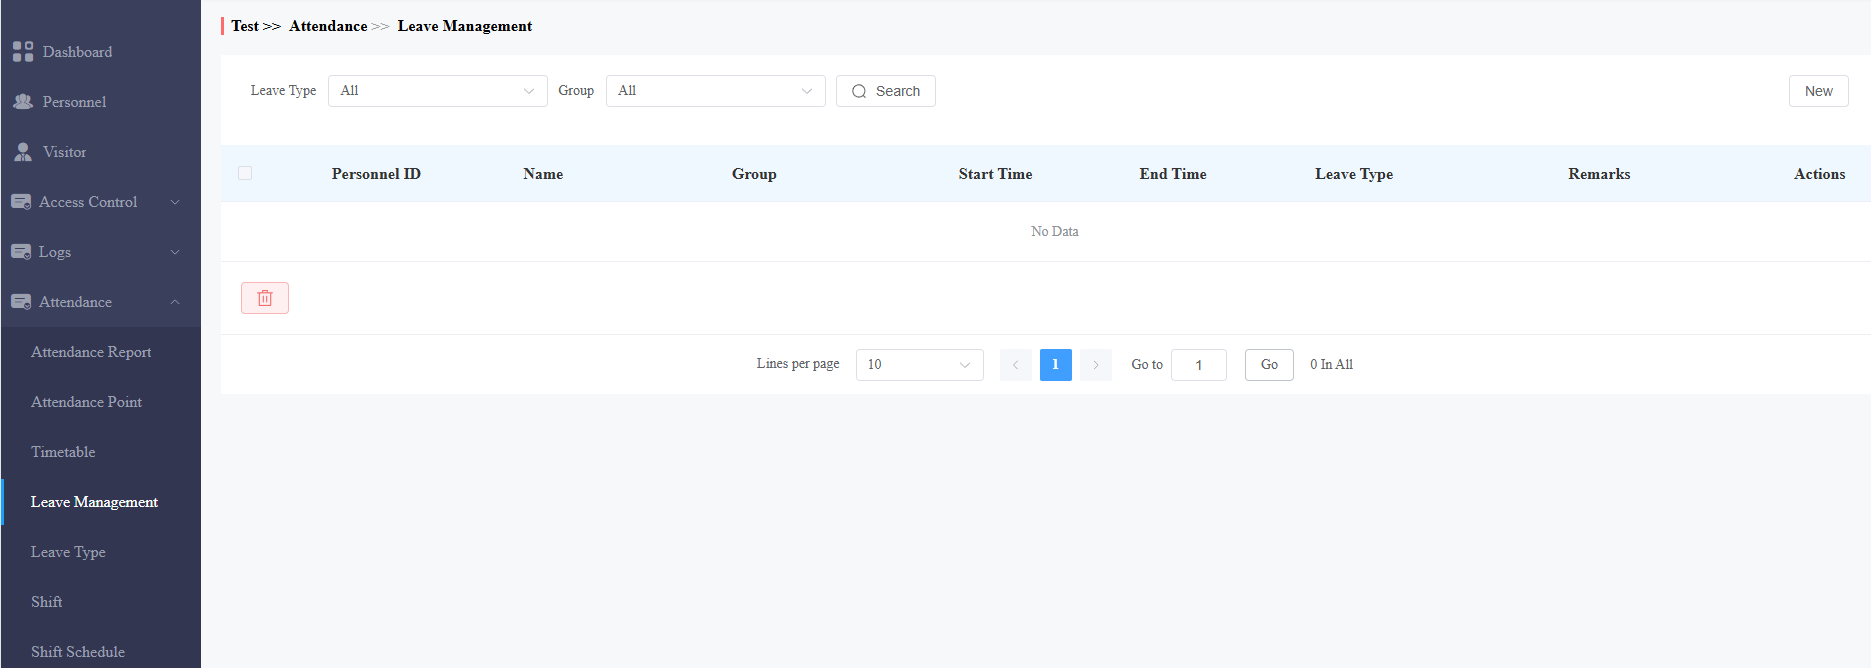
You can manage leaves and check leave reports on the Attendance > Leave Management module.
Click New on the right.
Search for or select the personnel.
Select the Leave Type.
Set the Leave Time.
You can add some remarks to the leave.
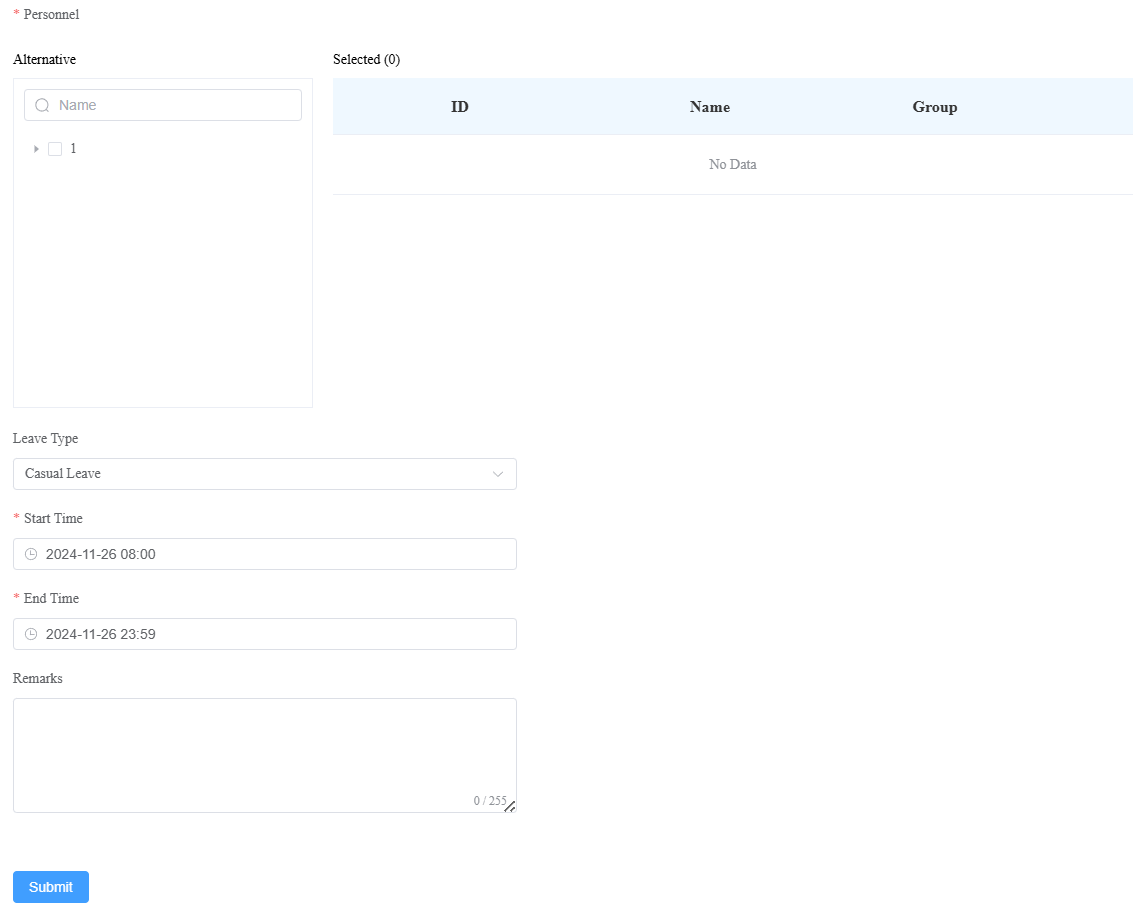
Click Submit.
Check and Export Attendance Reports
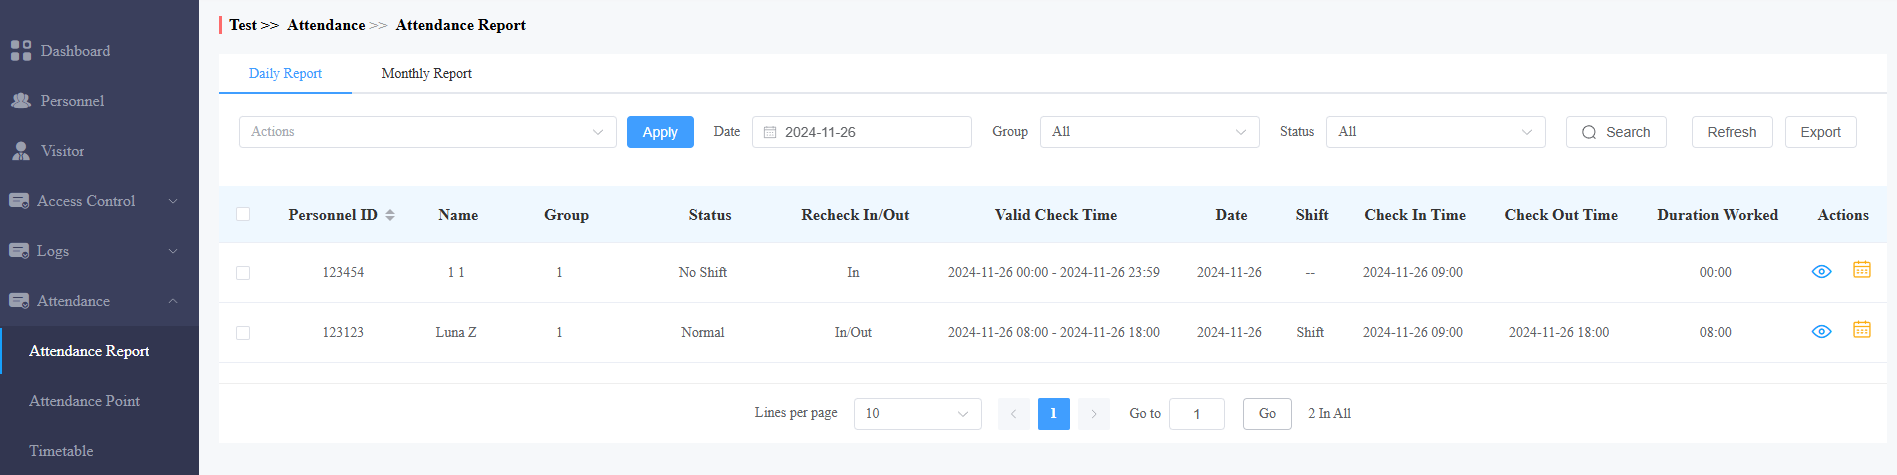
New attendance records are generated during off-peak hours each day and updated each time attendance changes.
On the Attendance > Attendance Report module, you can check the latest daily or monthly reports by clicking Refresh on the right.
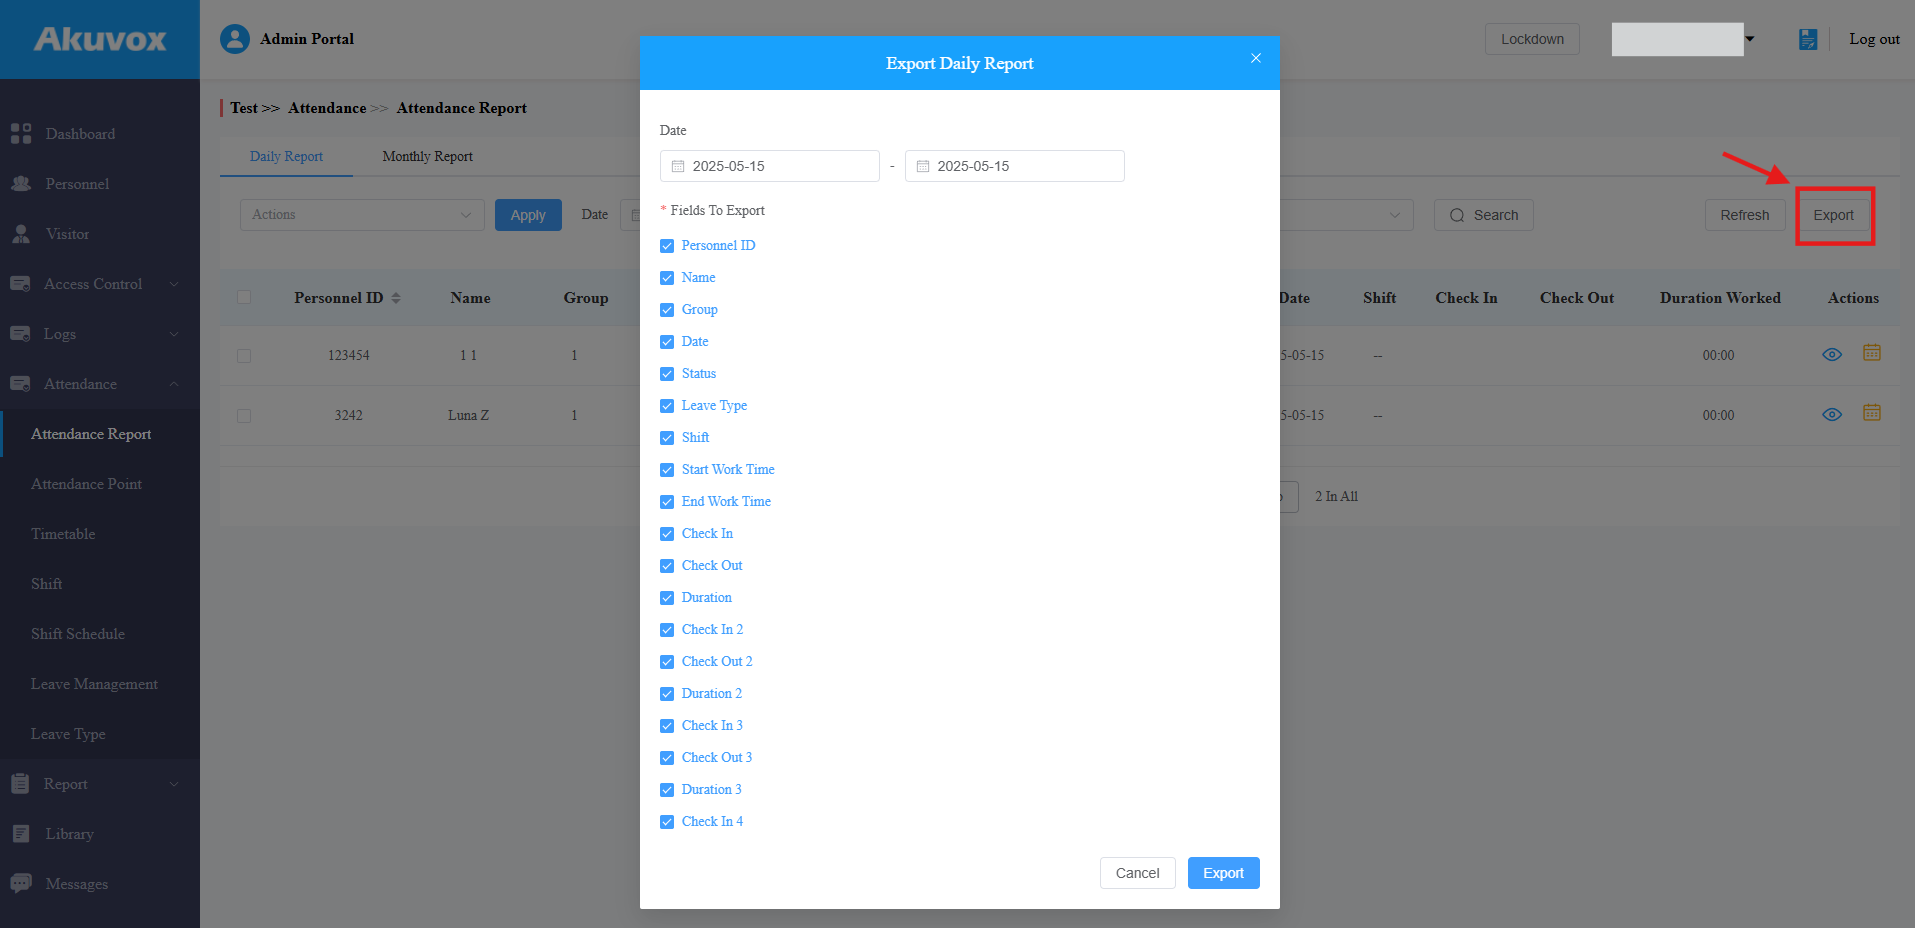
Click Export on the right to download the report. You can select items to be exported and define the period.
Daily | |
|---|---|
Item Names | Description |
Personnel ID | Display the personnel ID. |
Name | Display the personnel's name. |
Group | Display the group of personnel. |
Status | Display the following status: Normal, Absent, Late, Leave Early, Ask For Leave, Holiday, and/or No Shift. |
Recheck In/Out | Display the attendance correction records. See details in the Attendance Correction section. |
Valid Check Time | Display the period within which employees should clock in/out. |
Date | Display the date. |
Shift | Display the shift name. |
Check In Time | Display the clock-in time. |
Check Out Time | Display the clock-out time. |
Duration Worked | Display the working time precisely to minutes. 10:00 means 10 hours. |
Actions |
|
 : Click to view the monthly report in a graphical form.
Monthly | |
|---|---|
Item Names | Description |
Personnel ID | Display the personnel ID. |
Name | Display the personnel's name. |
Group | Display the group of personnel. |
Month | Display the month. |
Duration Worked | Display the working time precisely to the minute. 10:00 means 10 hours. |
Over Time | Display the overtime precisely to minutes. -10:00 means 10 hours. |
Late | Display the times of being late. |
Absent | Display the times of being absent. |
Ask For Leave | Display the times of asking for leave. |
Actions |
|
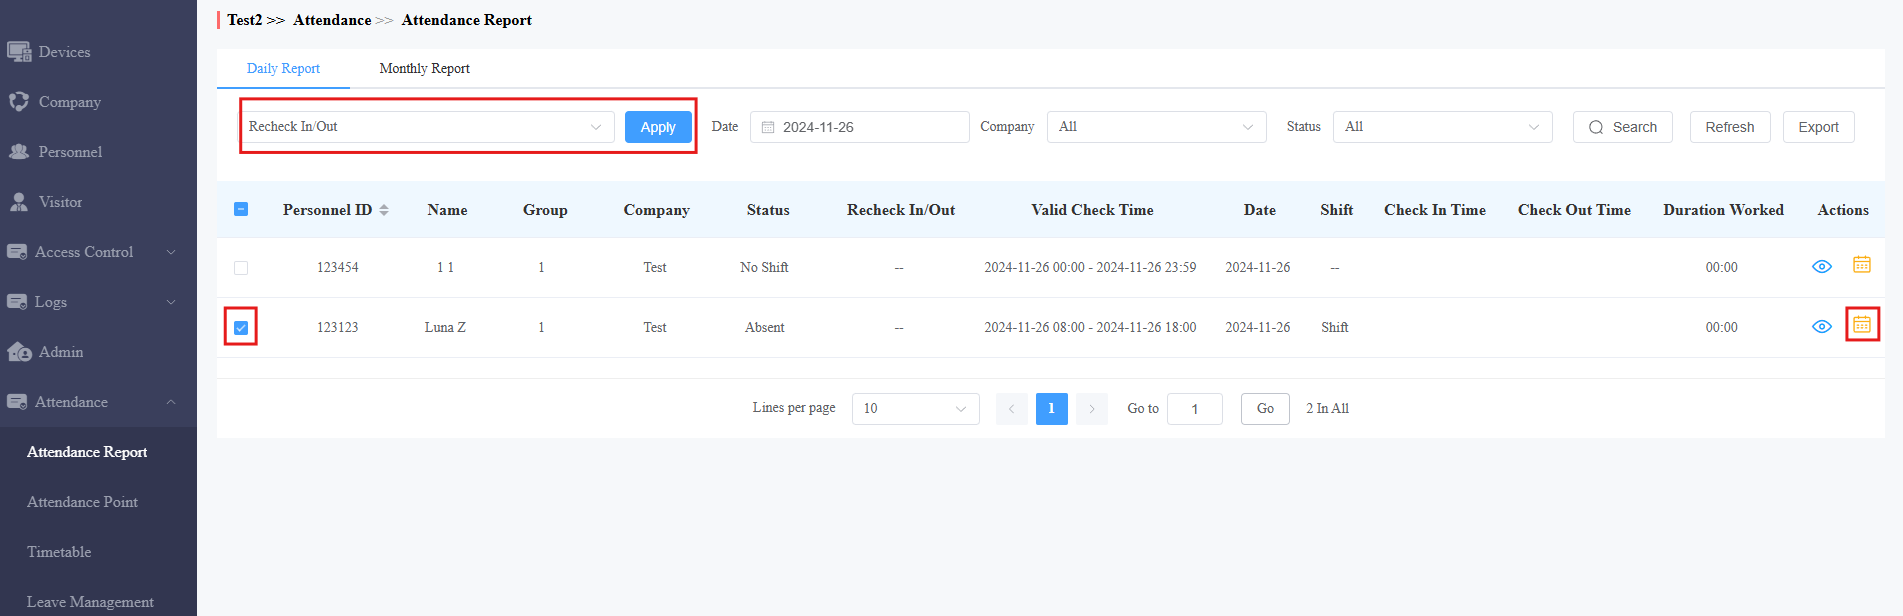
Attendance Correction
When employees work on time but forget to clock in/out, you can correct the attendance for them.
In this case, the Status column will display Absent, and the Recheck In/Out column display “—”.
Check a log and select Recheck In/Out in the action box.
Click Apply. Or, you can click
 of the target log.
Correct clock-in and/or clock-out.
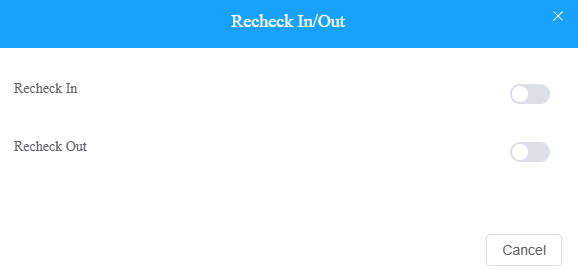
Click Submit. The Status will change to Normal.
Visitor Management
You can set up access credentials for visitors and delivery personnel.
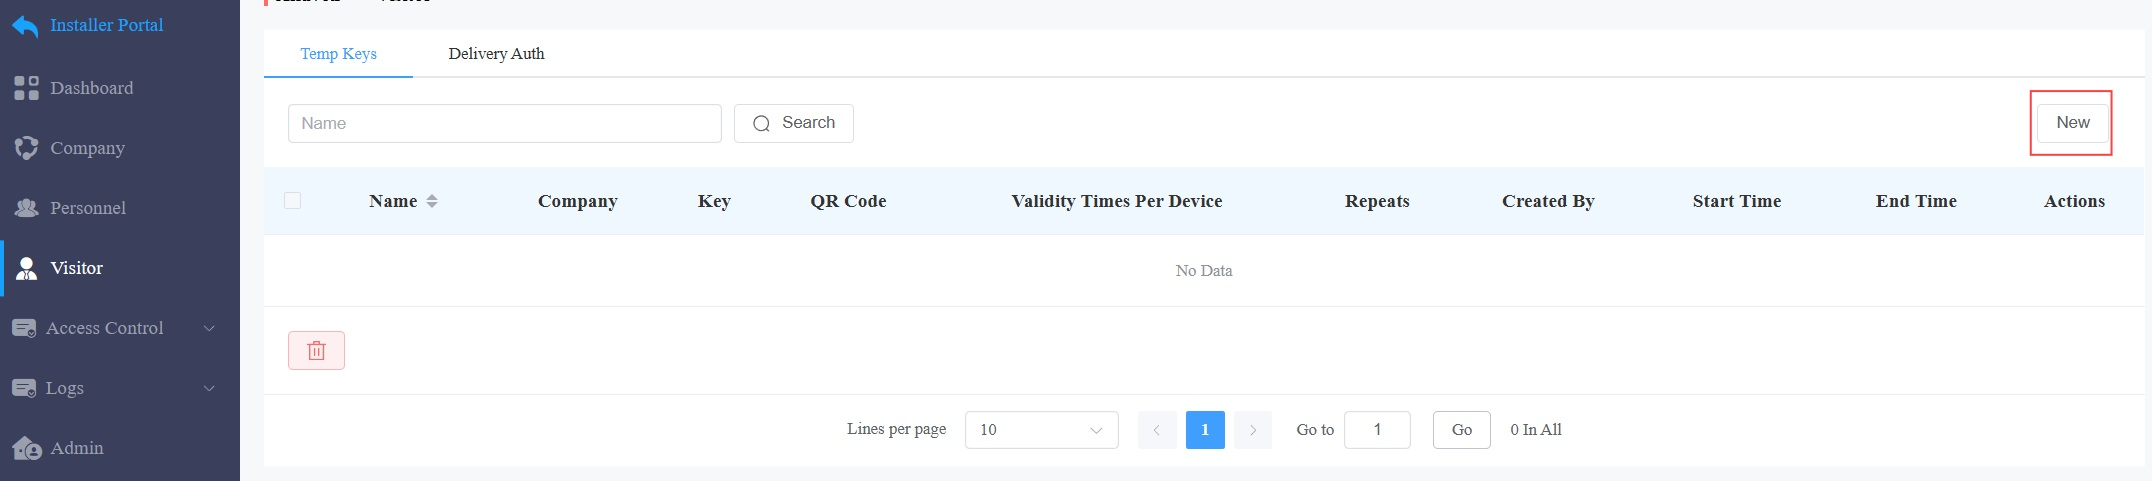
Access Credentials for Visitors
You can create temporary PIN codes along with QR codes for visitors, set the time when the credentials are valid, and select the door to be opened.
Click Visitor > New.
Select the company and enter the visitor’s name.
[Optional]Set a unique ID for the visitor.
Specify the time within which visitors can open doors by selecting the Repeats mode from Daily, Weekly, or Never. Daily and Weekly means the schedule will repeat every day and week.
Set the Validity Times Per Device when you select the Never Repeats mode.
For example, if you enter 1 and check three door phones, the visitor can use the credential to open doors three times.
In other words, the validity times of credentials = Validity Times Per Device x The number of door phones selected.
Enter the visitor’s email address in the Delivery Method to receive the temporary key.
Check the door(s) to be opened by the visitor.
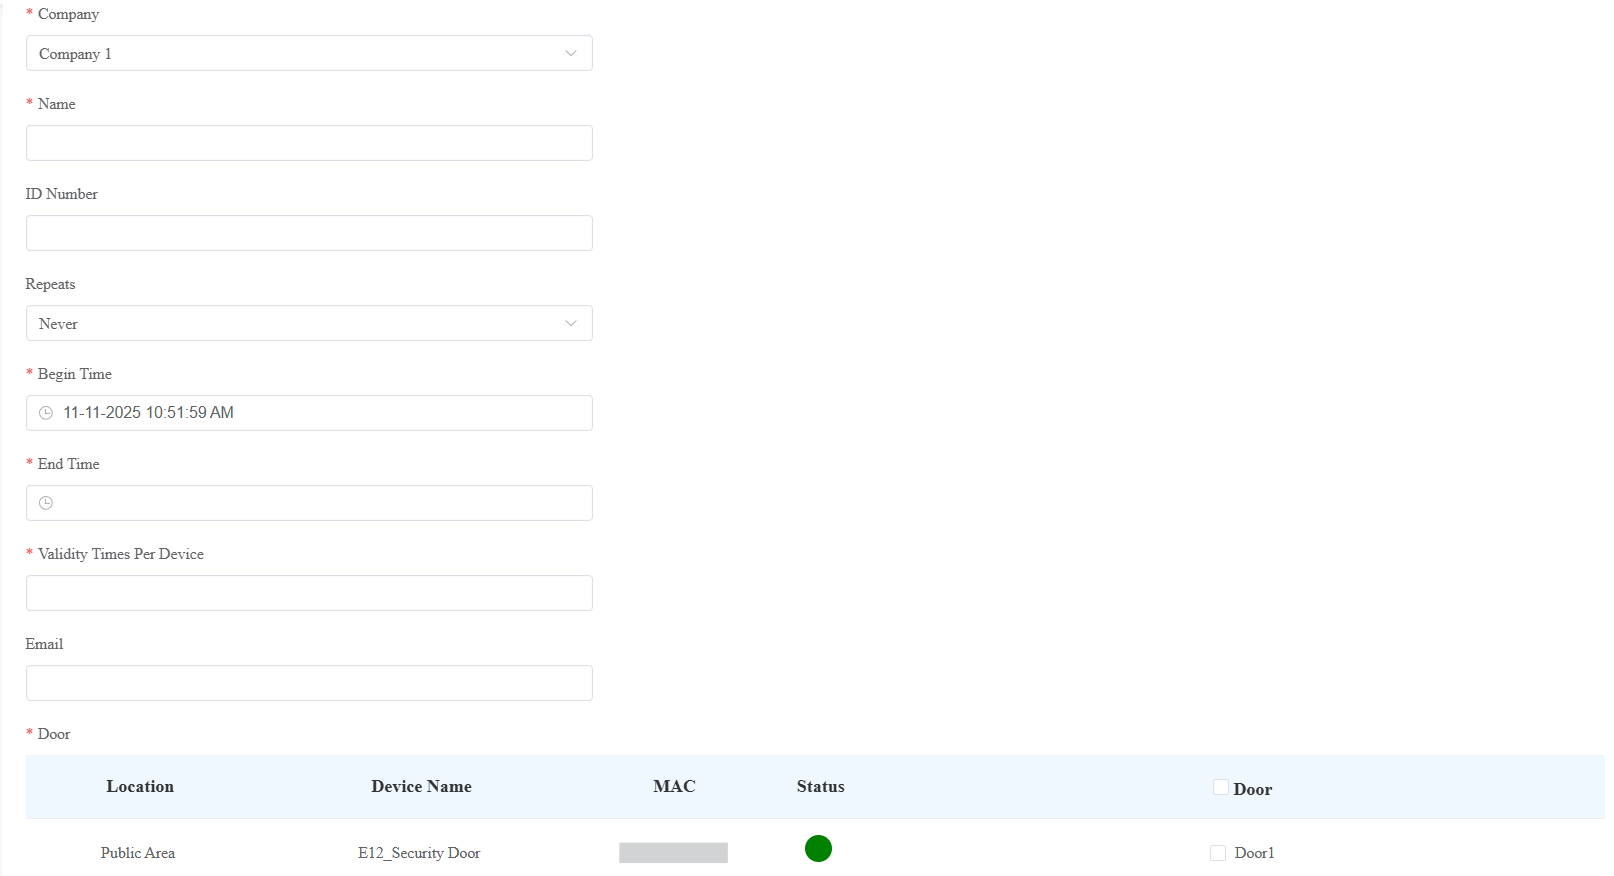
Click Submit.
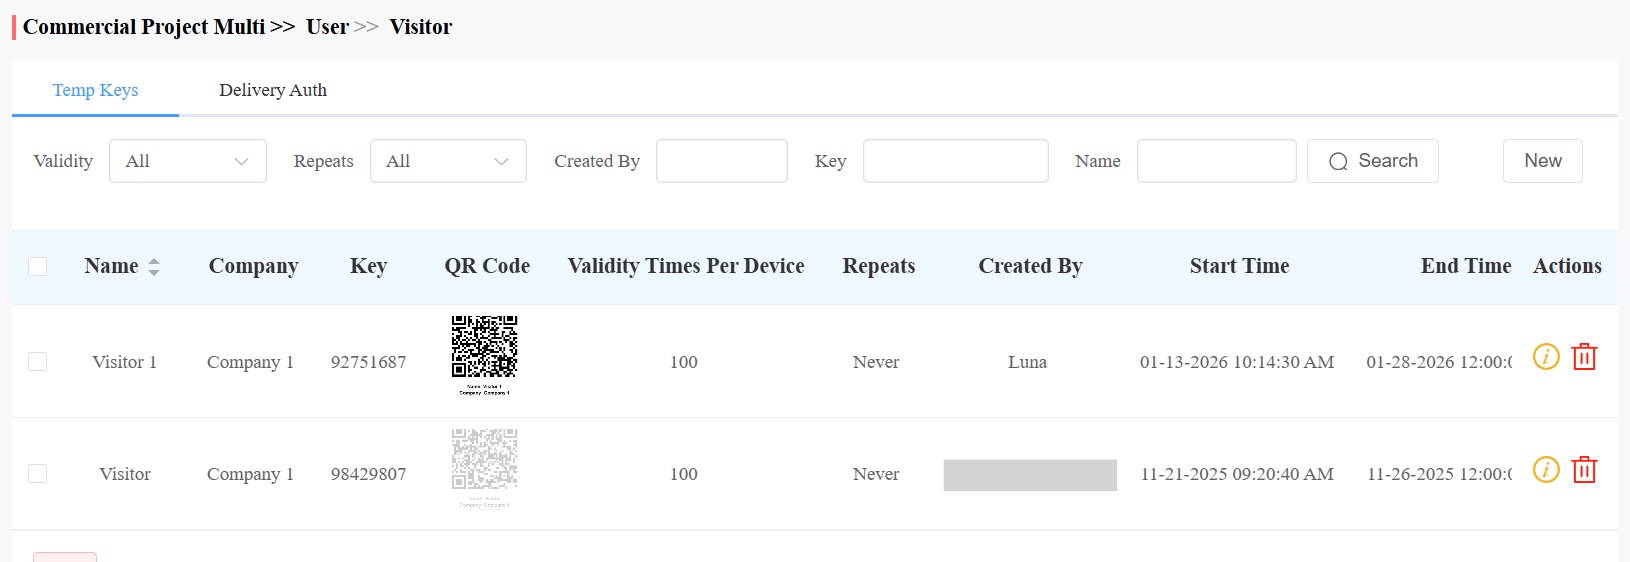
After creating the temp key, you can
check its details by clicking
 and delete it by clicking
 .
.search for the desired key by its validity, repeat mode, who created the key, key value, and visitor name.
print it out for the visitor. The QR code is generated with the visitor's name, the visited company, and the key.
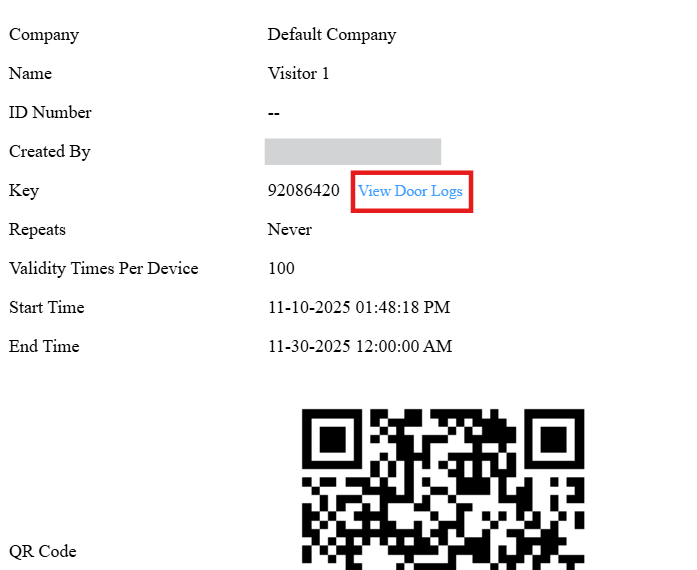
On the temp key’s information interface, you can click View Door Logs to check the door-opening record.
Access Credentials for Delivery Personnel
You can create PIN codes and RF card credentials for delivery personnel, with which they can access the designated place, such as a package room.
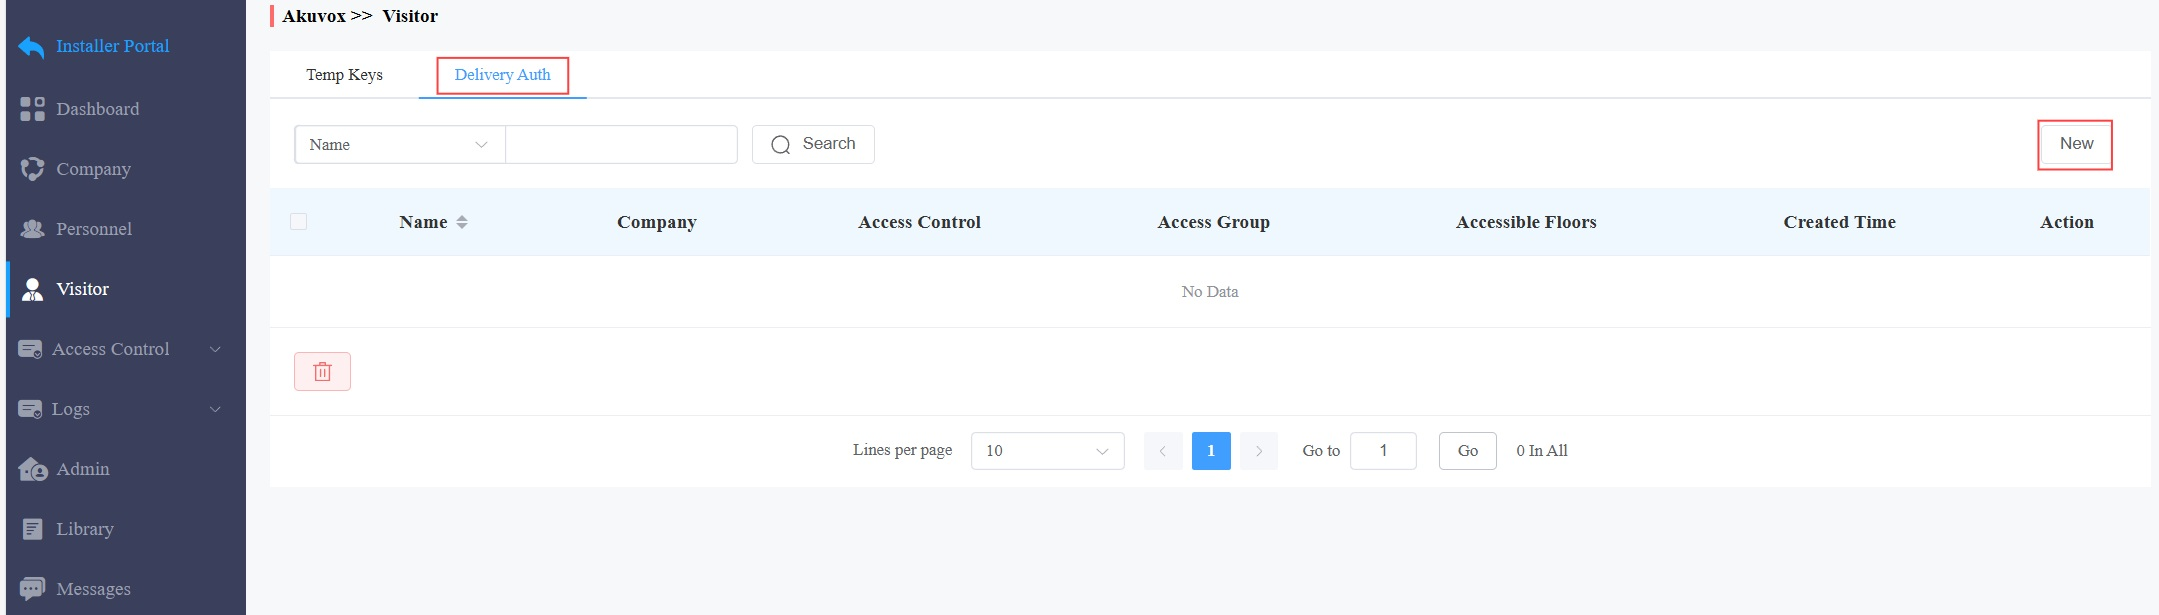
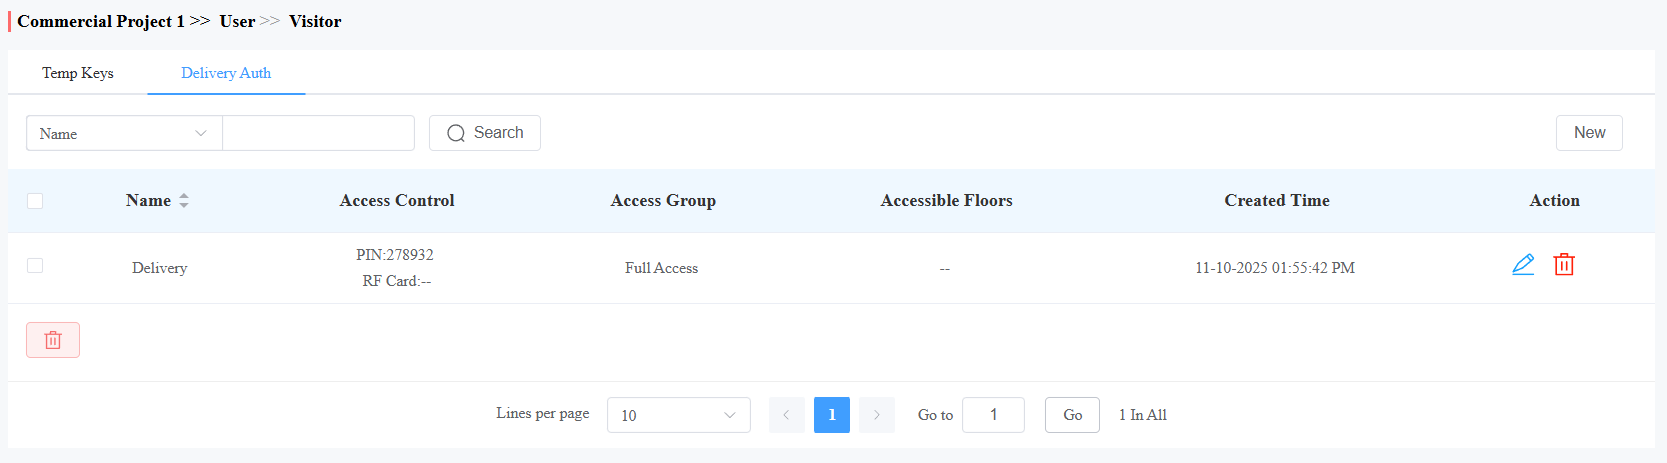
Click Visitor > Delivery Auth > New.
Select the company and enter the deliveryman’s name.
Enter the PIN code and/or the RF card code. The PIN code should be within 2 to 8 digits, not starting with “9”.
Set the accessible floors. The deliveryman can take lifts to the specified floors using access control credentials. You can select 10 floors in a building at a maximum.
Check the schedule for when the deliveryman can open the door. You can also click New to create a new schedule.
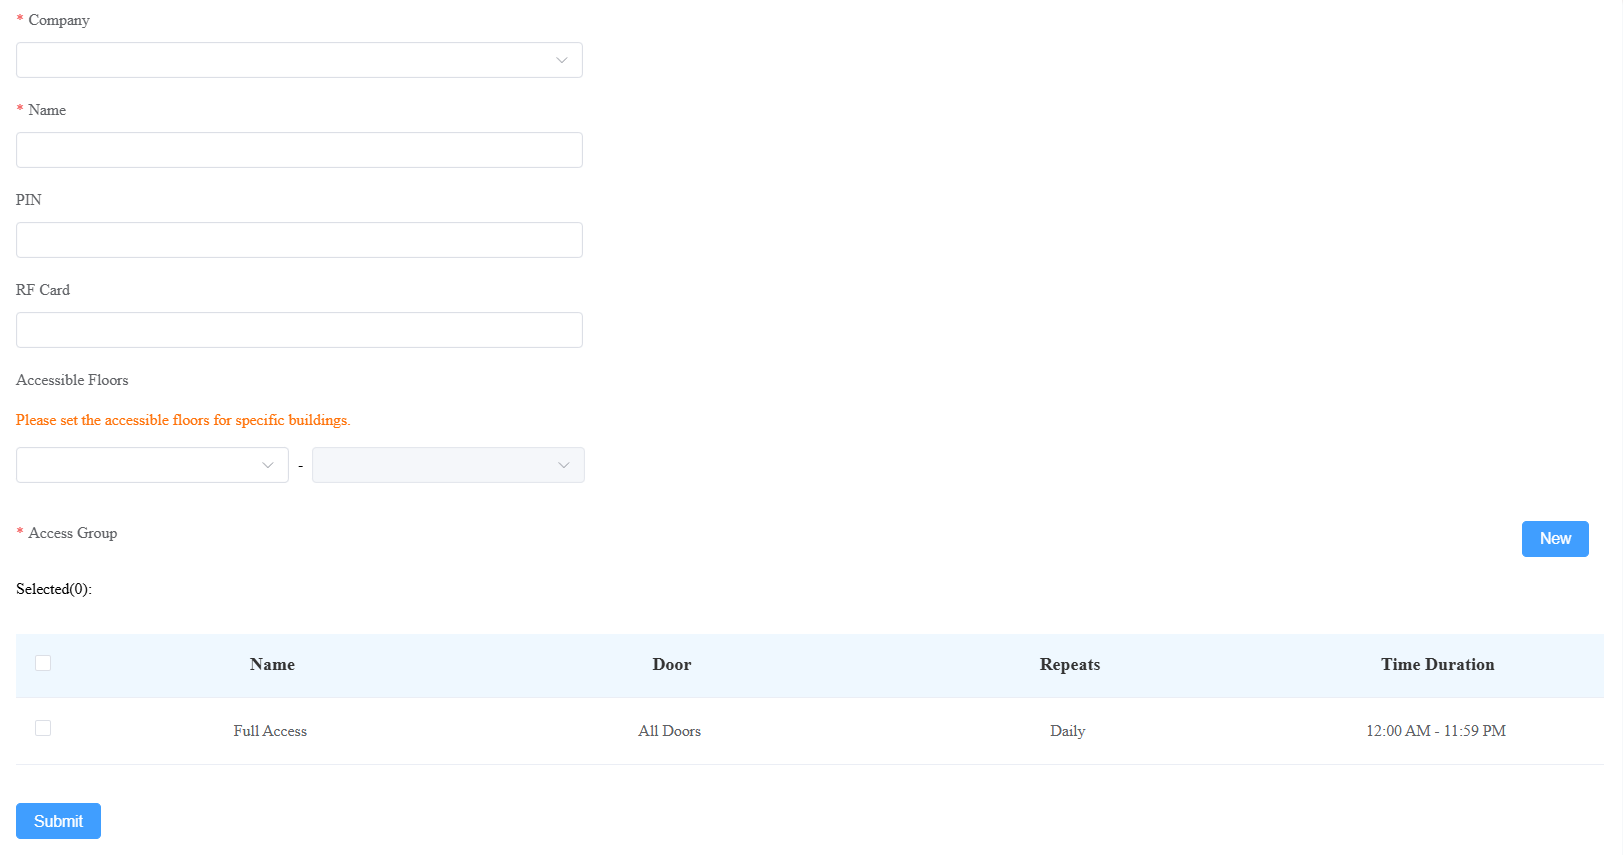
Click Submit.
After creating the credential, you can modify it by clicking and delete it by clicking.
Muster Report
The muster report is used during emergencies, such as evacuations, to account for personnel. It tracks who is present during an evacuation and identifies missing people.
ONLY project managers have permission to set this feature up.
Set up a Muster Report
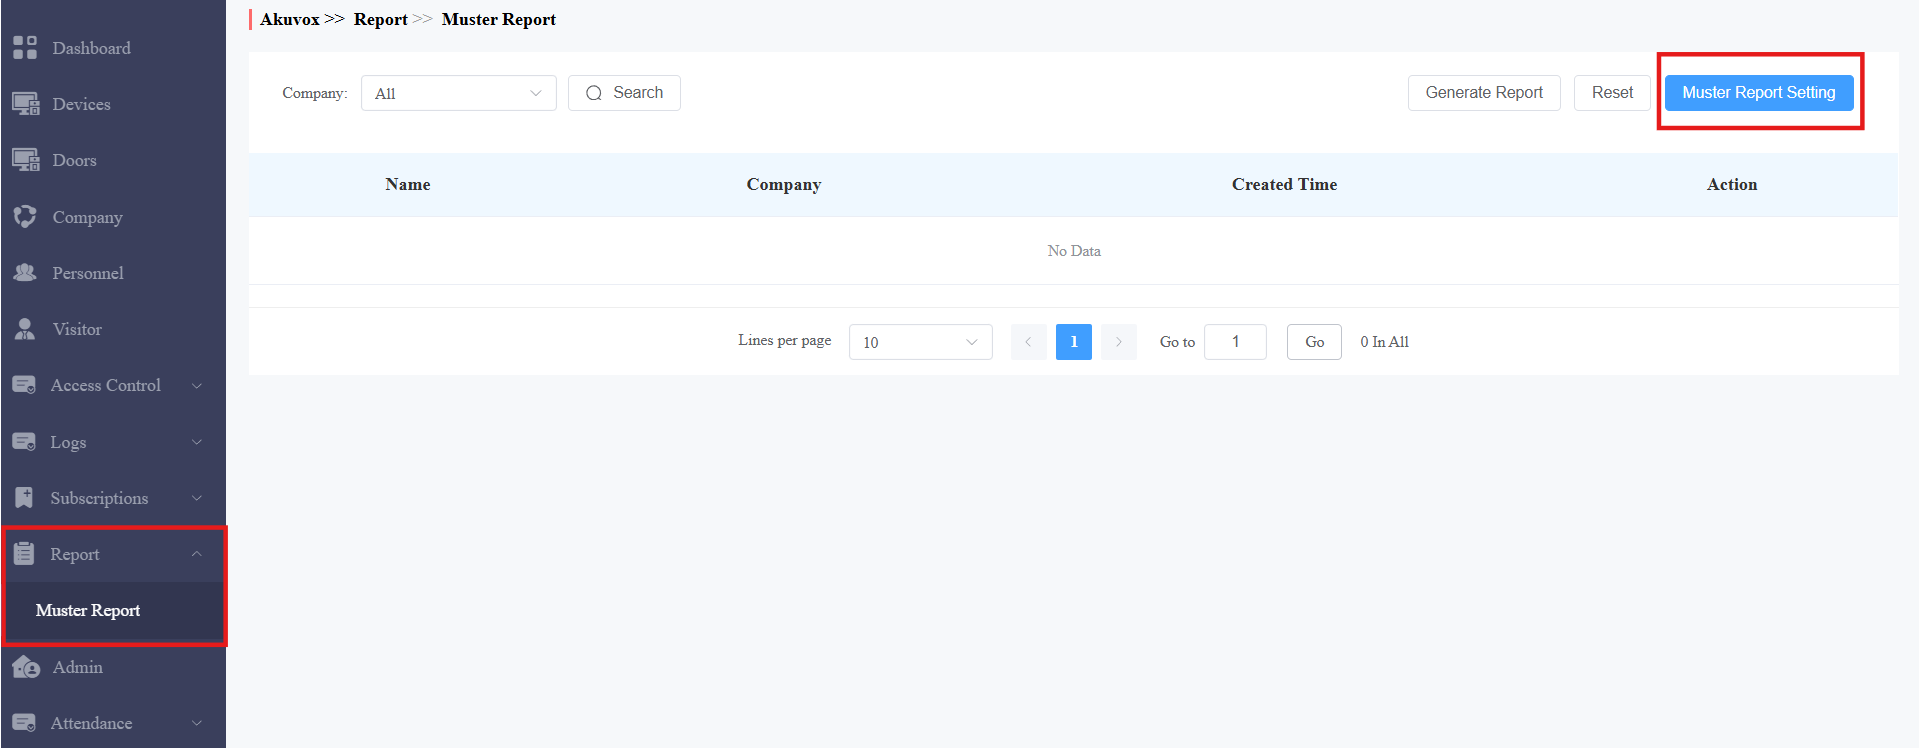
Click Report > Muster Report on the left column.
Click Muster Report Setting on the right.
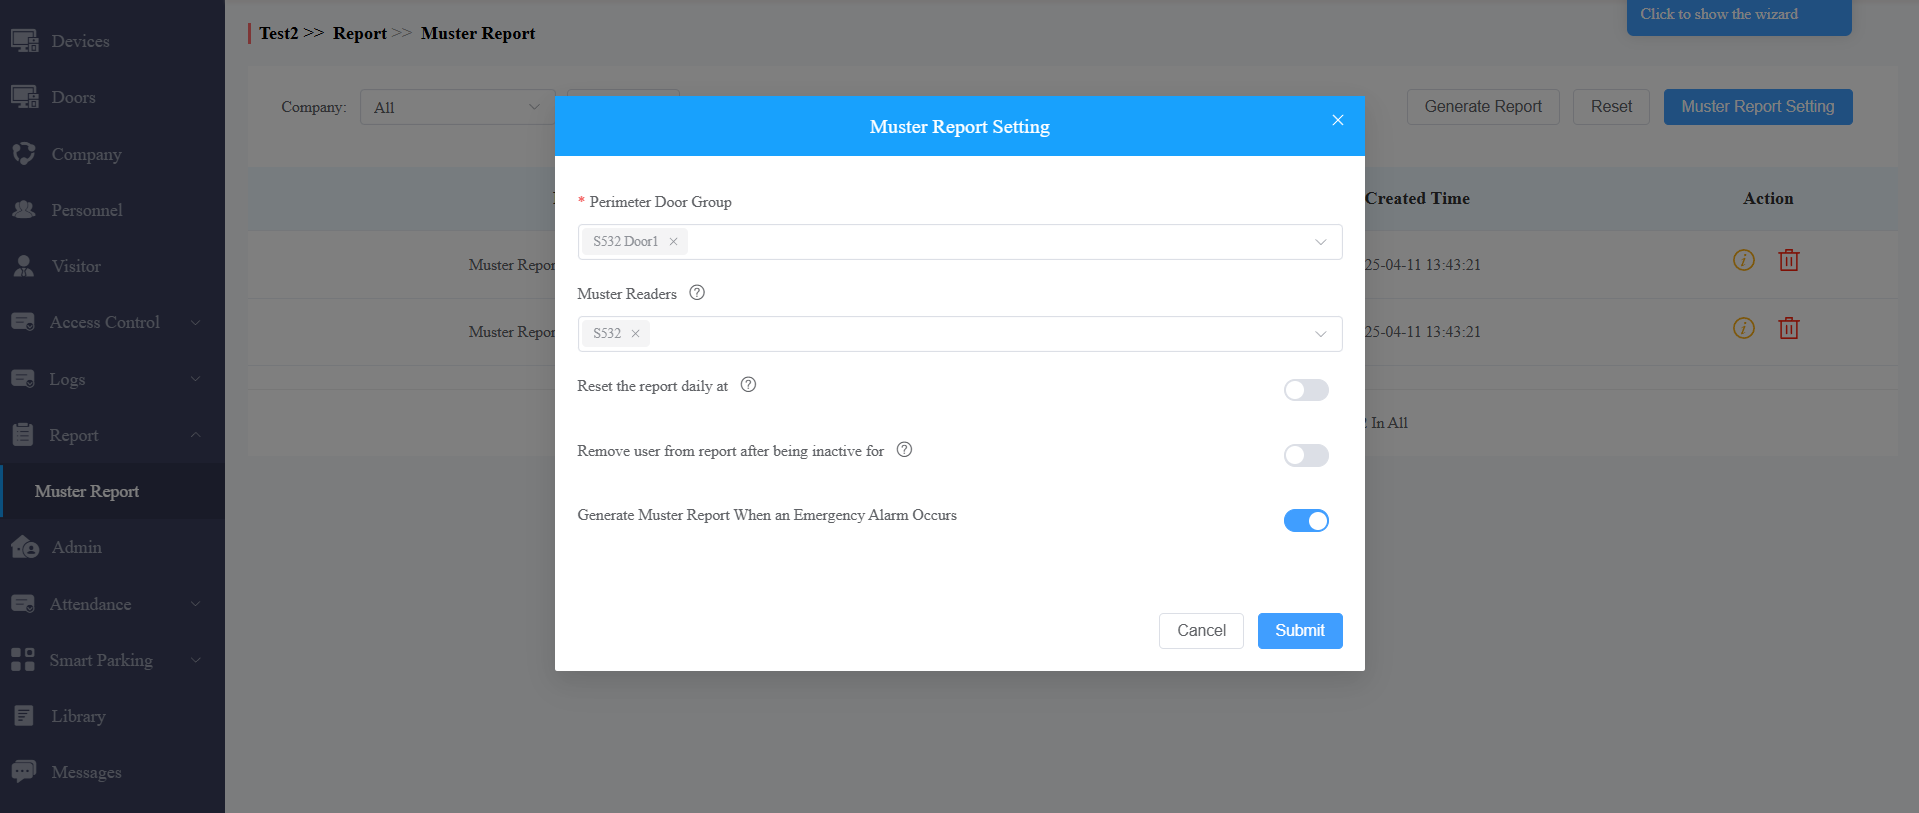
Set up the following settings.
Perimeter Door Group: Used to define personnel within the area. You can select up to 20 doors. Options include all available doors within the project. When a person enters through one of these doors using card access or other entry methods but does not exit, they are considered to be still inside the area. Such individuals will be accounted for during the muster check.
Muster Readers: Serve as designated assembly points where personnel check in with their credentials such as swiping cards. You can select up to 5 devices.
Note
Click here to check models and versions that support working as the muster reader.
Reset the report daily at: If enabled, the report will be reset at the selected time.
Remove user from report after being inactive for: If enabled, personnel who haven’t swiped their cards for a set time will be removed from the report.
Generate Muster Report When an Emergency Alarm Occurs: Enabled by default. When the emergency alarm happens, the system will generate reports automatically for all companies.
Generate Reports
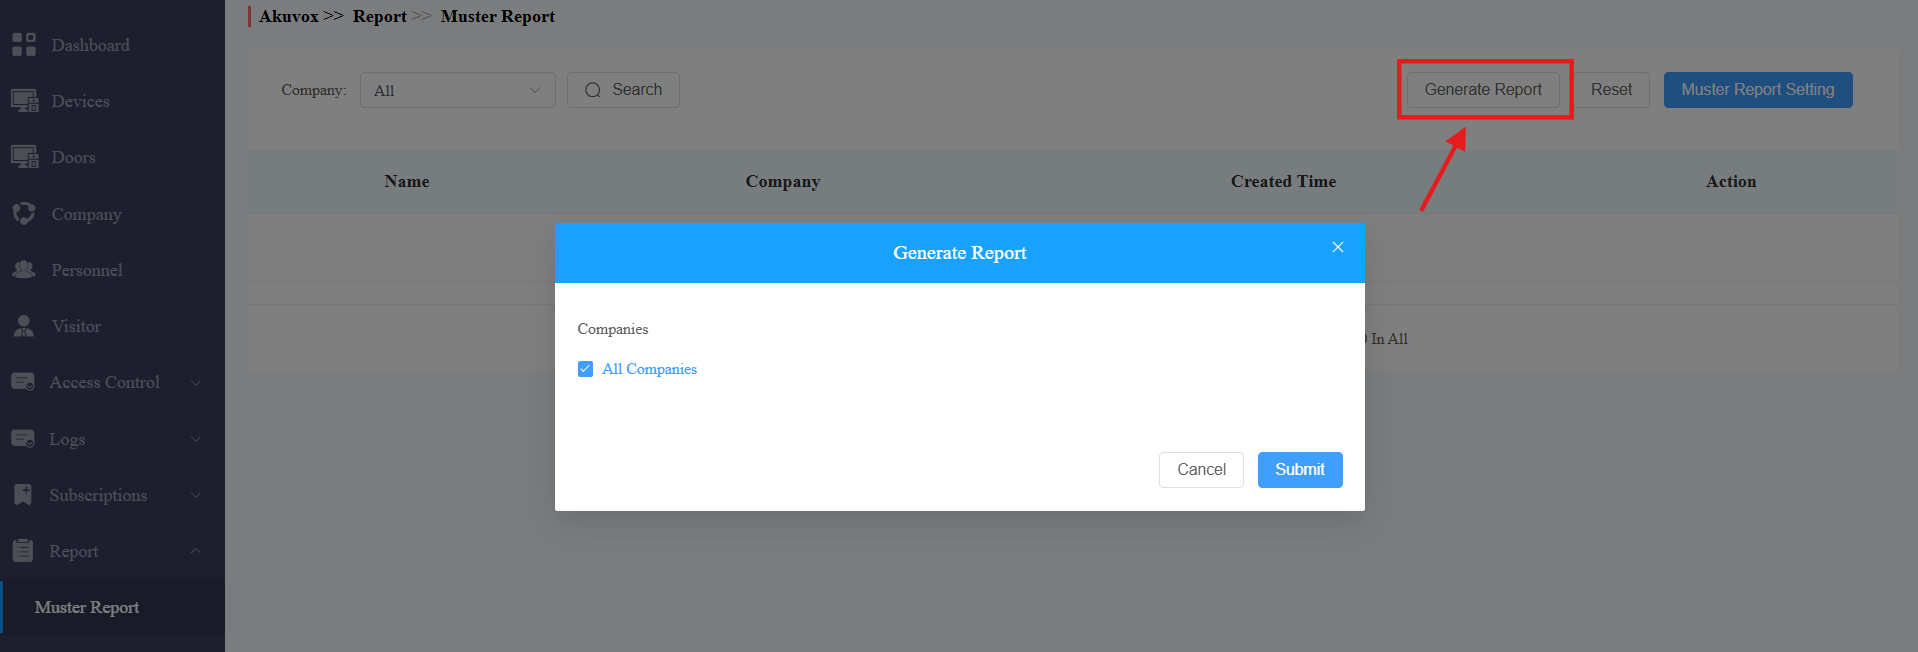
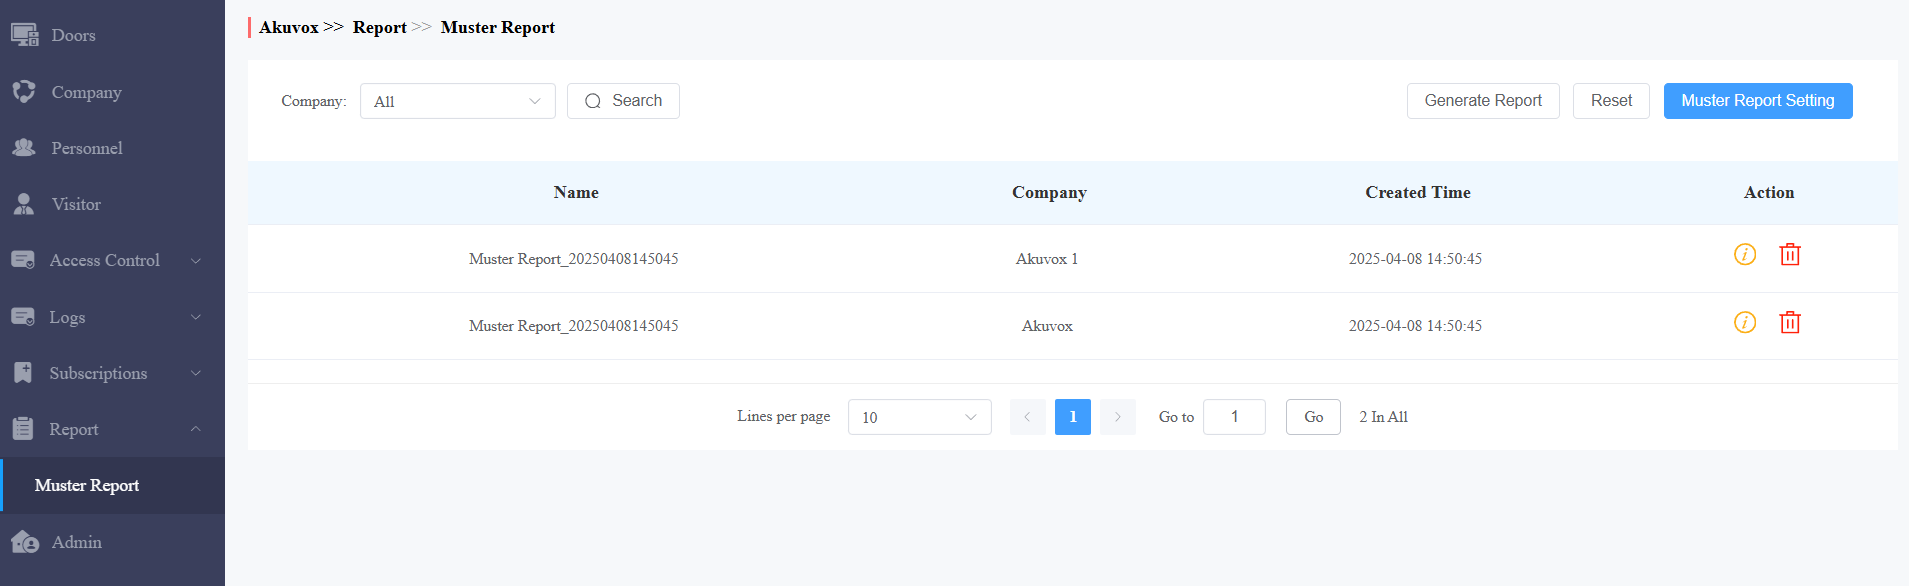
Atfer setting up the muster report, click Generate Report and select companies.
Uncheck All Companies to select specific companies that use the report.
View Reports
After muster reports are generated, you can click  to view the report details and click
  to remove it.
See the description of each item on the Info interface in the chart below.
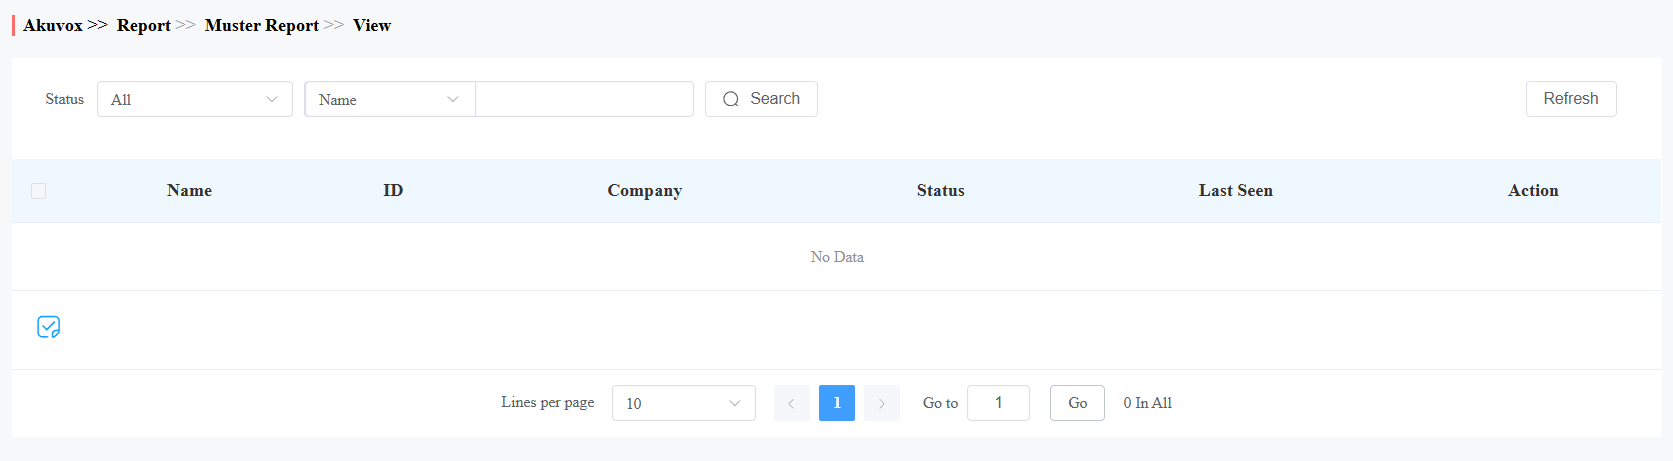
Item Name | Descriptions |
|---|---|
Name | The personnel name. |
ID | The personnel ID. |
Company | The company of the personnel. |
Status |
|
Last Seen | The latest door that the person enters through. |
Action | Click |
 to manually check in for the person.
Smart Parking
The smart parking module allows you to register license plates or UHF cards for users. Users can drive in/out with doors open automatically.
Furthermore, you can manage parking lots by viewing the number of parked vehicles and their parking duration on the cloud, conveniently tracking what happens.
License Plate Management
The license plates are identified by third-party LPR cameras for door opening. Click here to view the detailed configuration.
The UHF cards are identified by the Akuvox long-range access card reader ACR-CRP12 for door opening. Click here to view the detailed configuration.
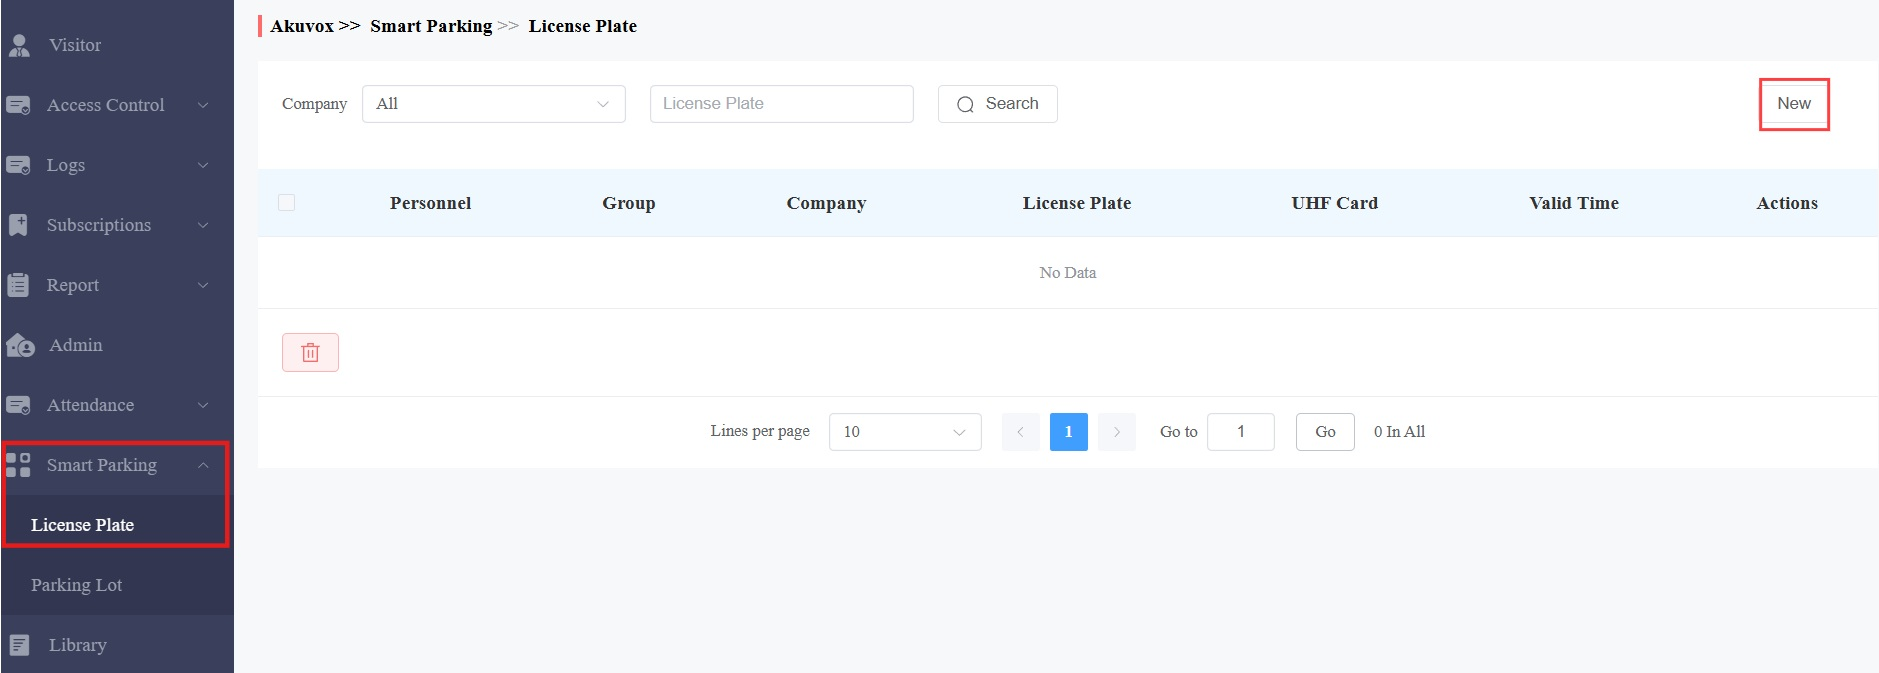
Click Smart Parking > License Plate > New.
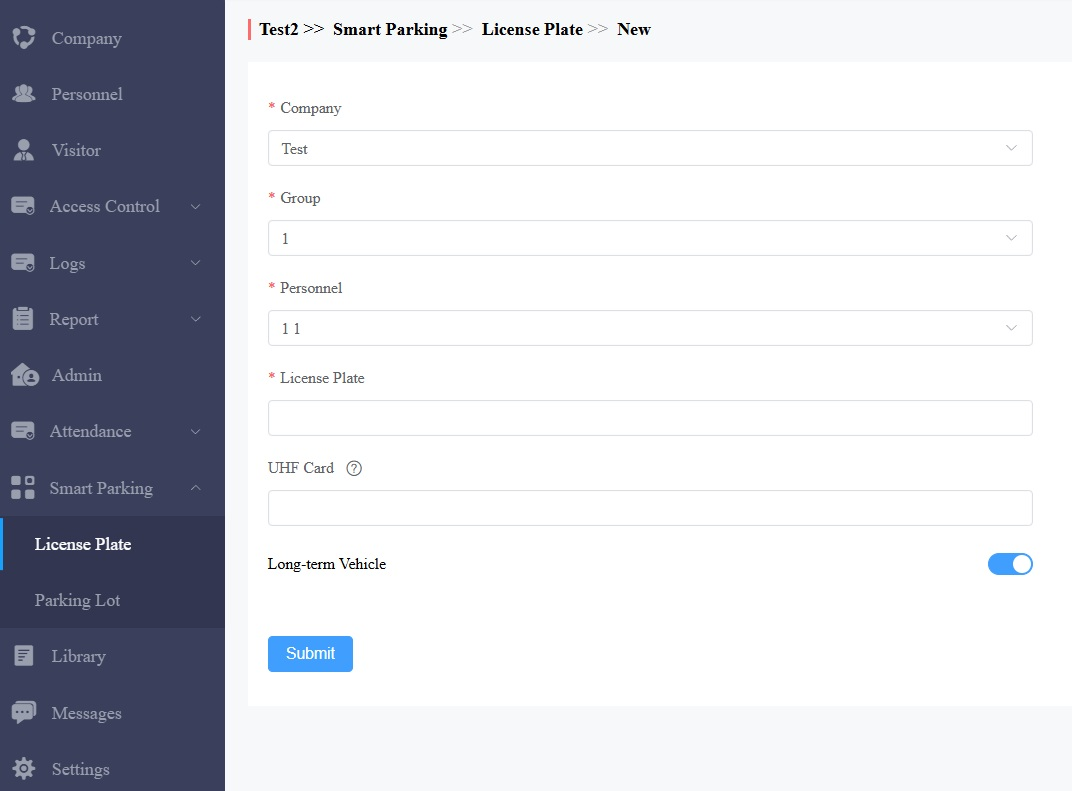
Select the company, group, and personnel.
Enter the license plate information.
Enter the UHF card code if it is used. If you have filled in both the license plate and the UHF card, the server will ONLY issue the latter to the door phone.
Enable/disable Long-term Vehicle. It is enabled by default. If disabled, specify when the vehicle can enter or
exit the parking lot.
Note
You can also add license plate information when adding or editing personnel.
Parking Lot Management
You can set up parking lots and conveniently track the number of parked vehicles and their parking durations.
Create a Parking Lot
Log in to the cloud with your account.
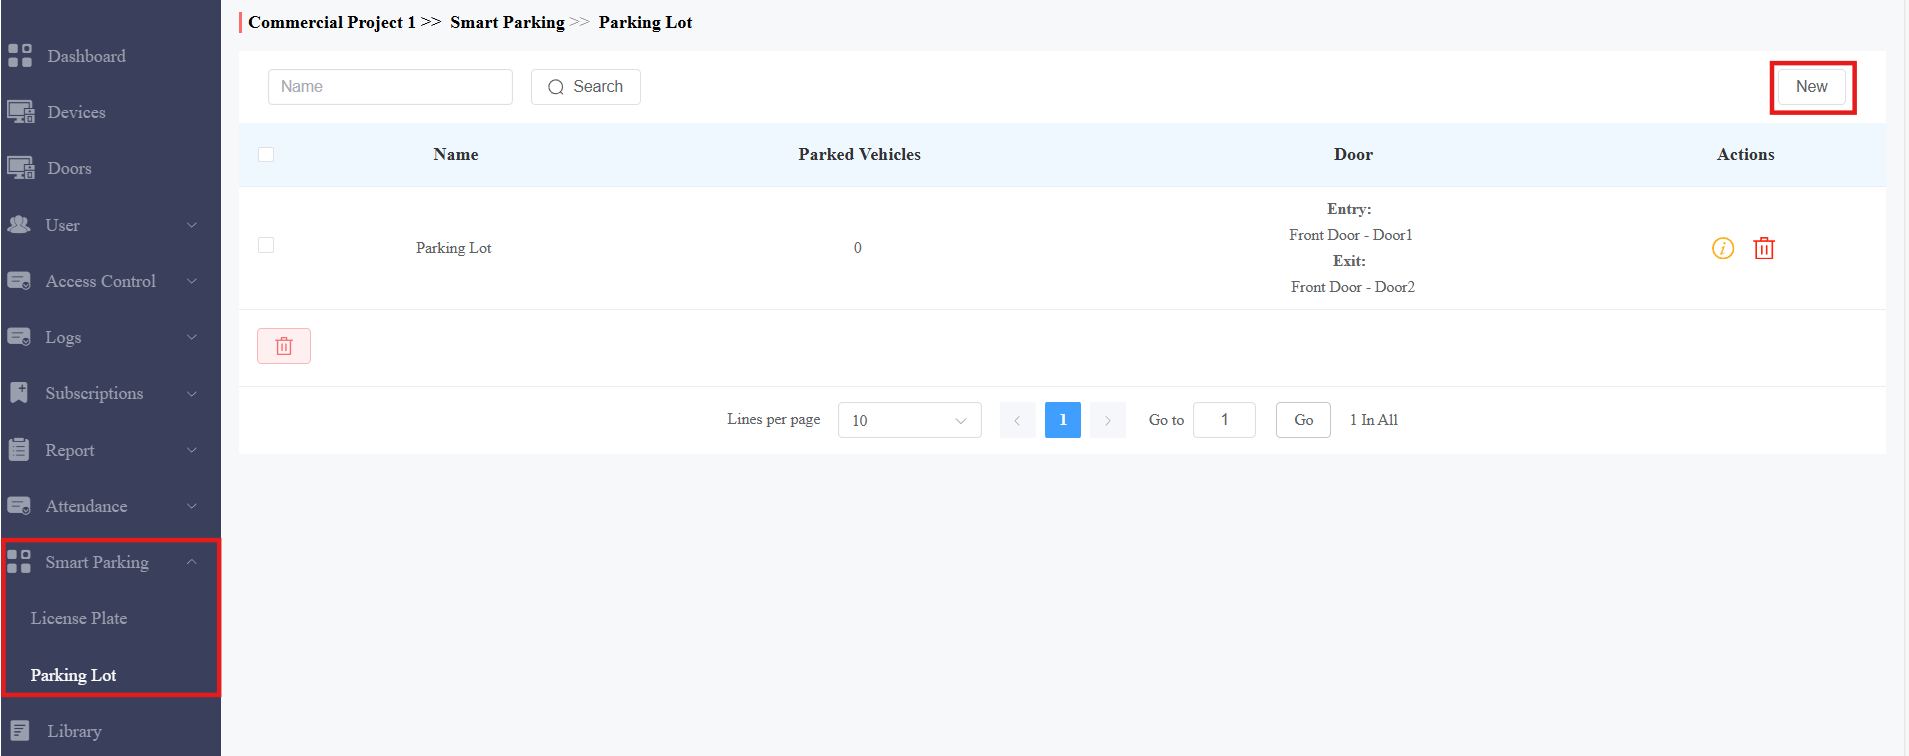
Click Smart Parking > Parking Lot in the left column.
Click New on the right to create a new parking lot.
Name the parking lot.
[Optional]Upload the Parking Lot Logo. Requirements are a square image, ≥200x200px, supported formats: JPG/JPEG/PNG/BMP.
Select the Door Mode:
Single Door: For example, the cloud will record the first recognition as “Entry” and the second as “Exit”.
Multiple Doors: Define which door is the entry and which is the exit.
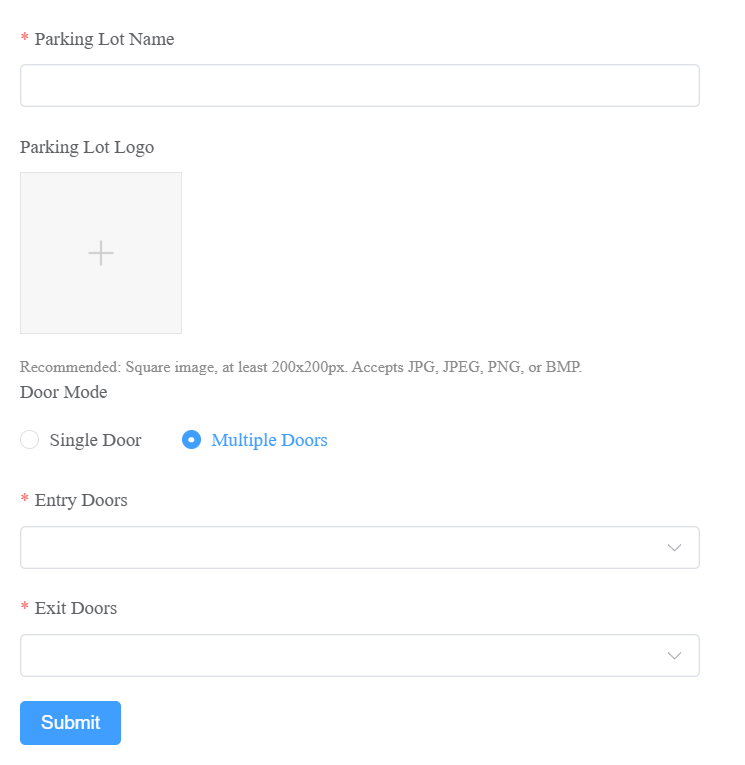
Click Submit.
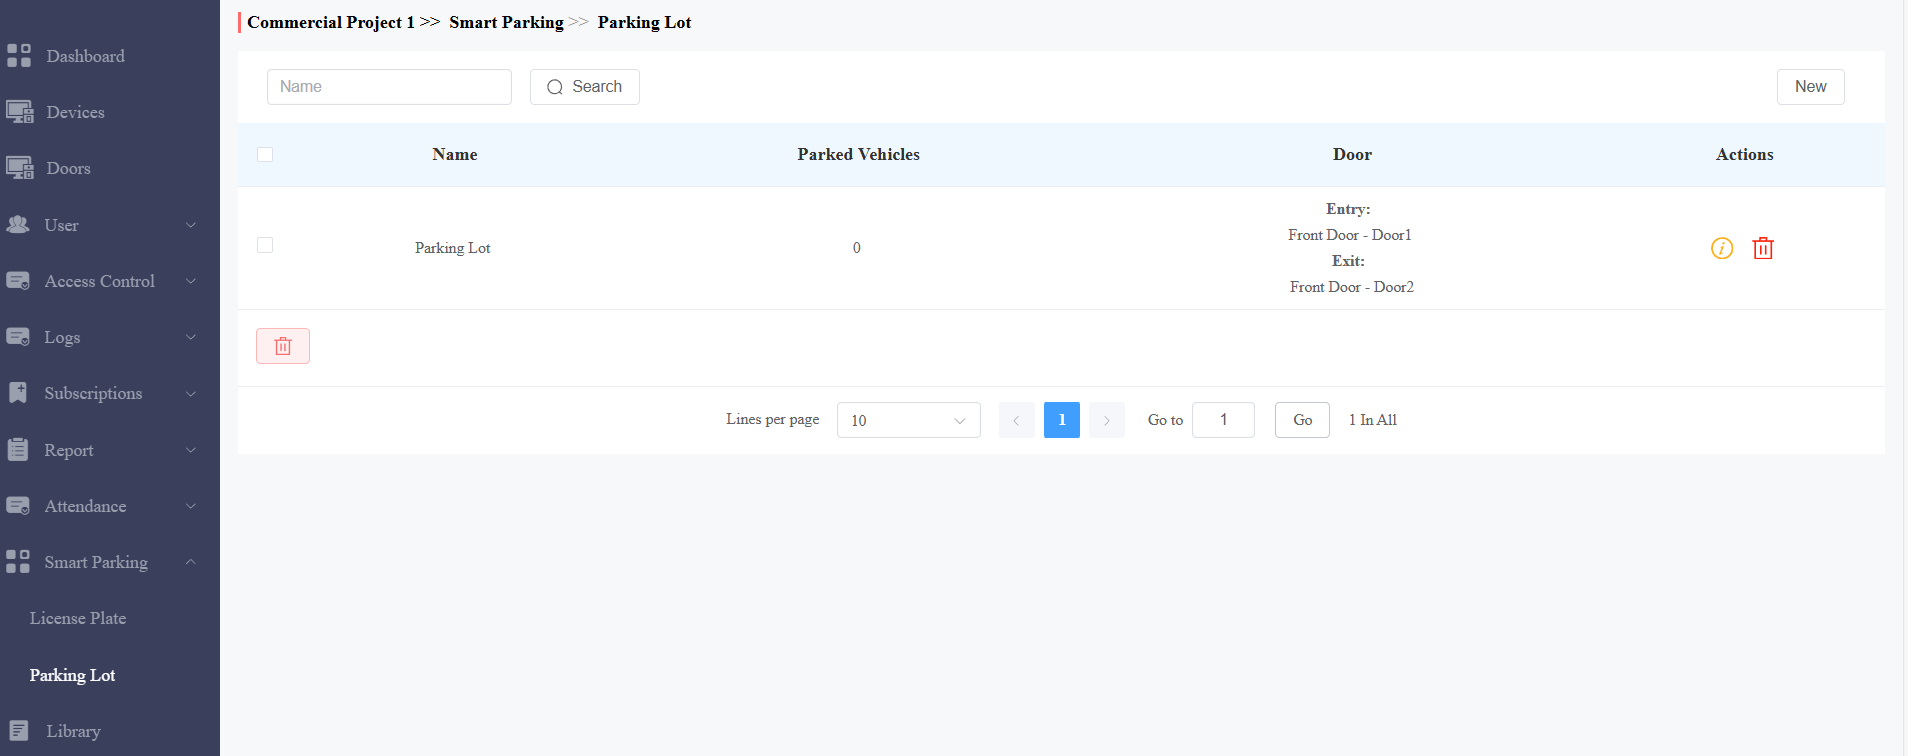
After creating the parking lot, you can view the number of parked vehicles.
Click
 to delete it.
Click
 to view more details and modify the settings.
Mark Vehicles Exited Manually
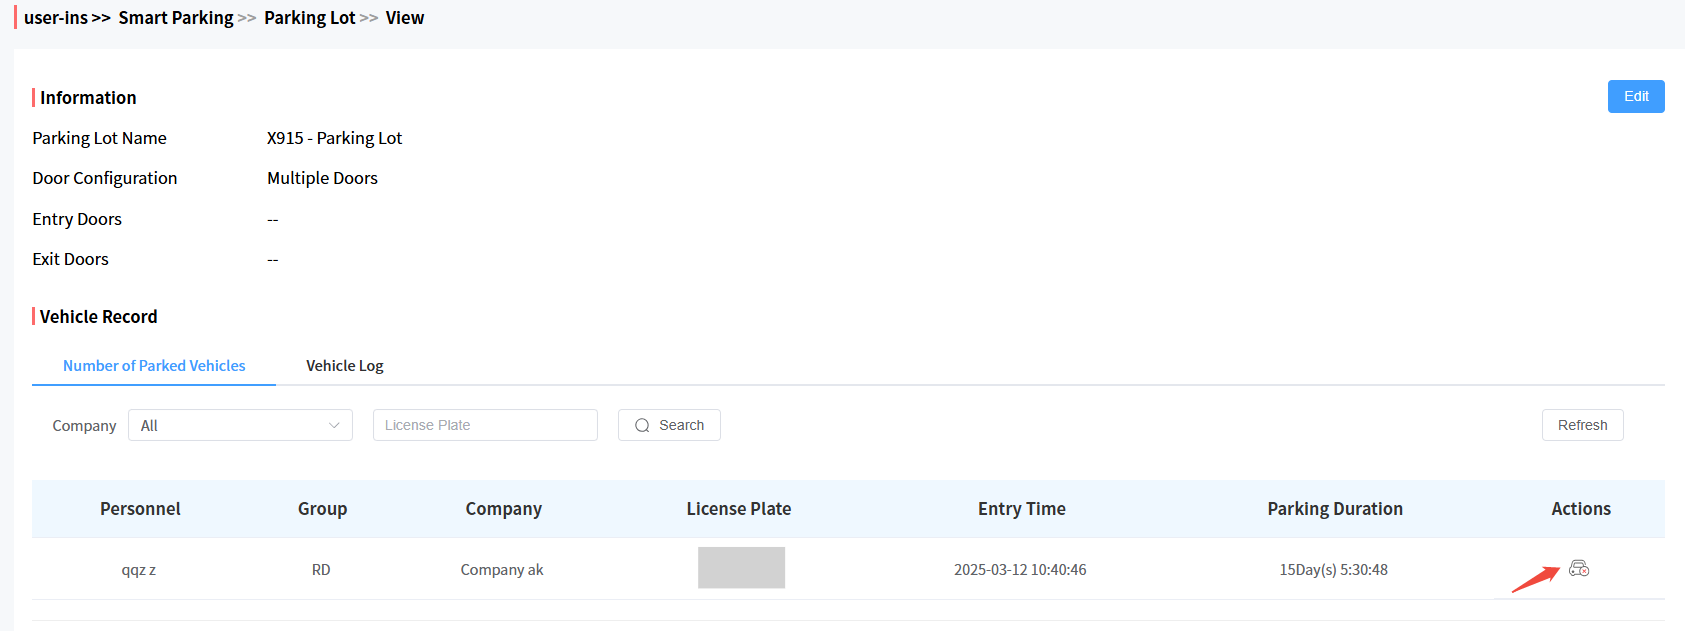
Click Smart Parking > Parking Lot.
Click
of the target parking lot.
Click
 in the Actions column to manually mark that the vehicle has left the parking lot.
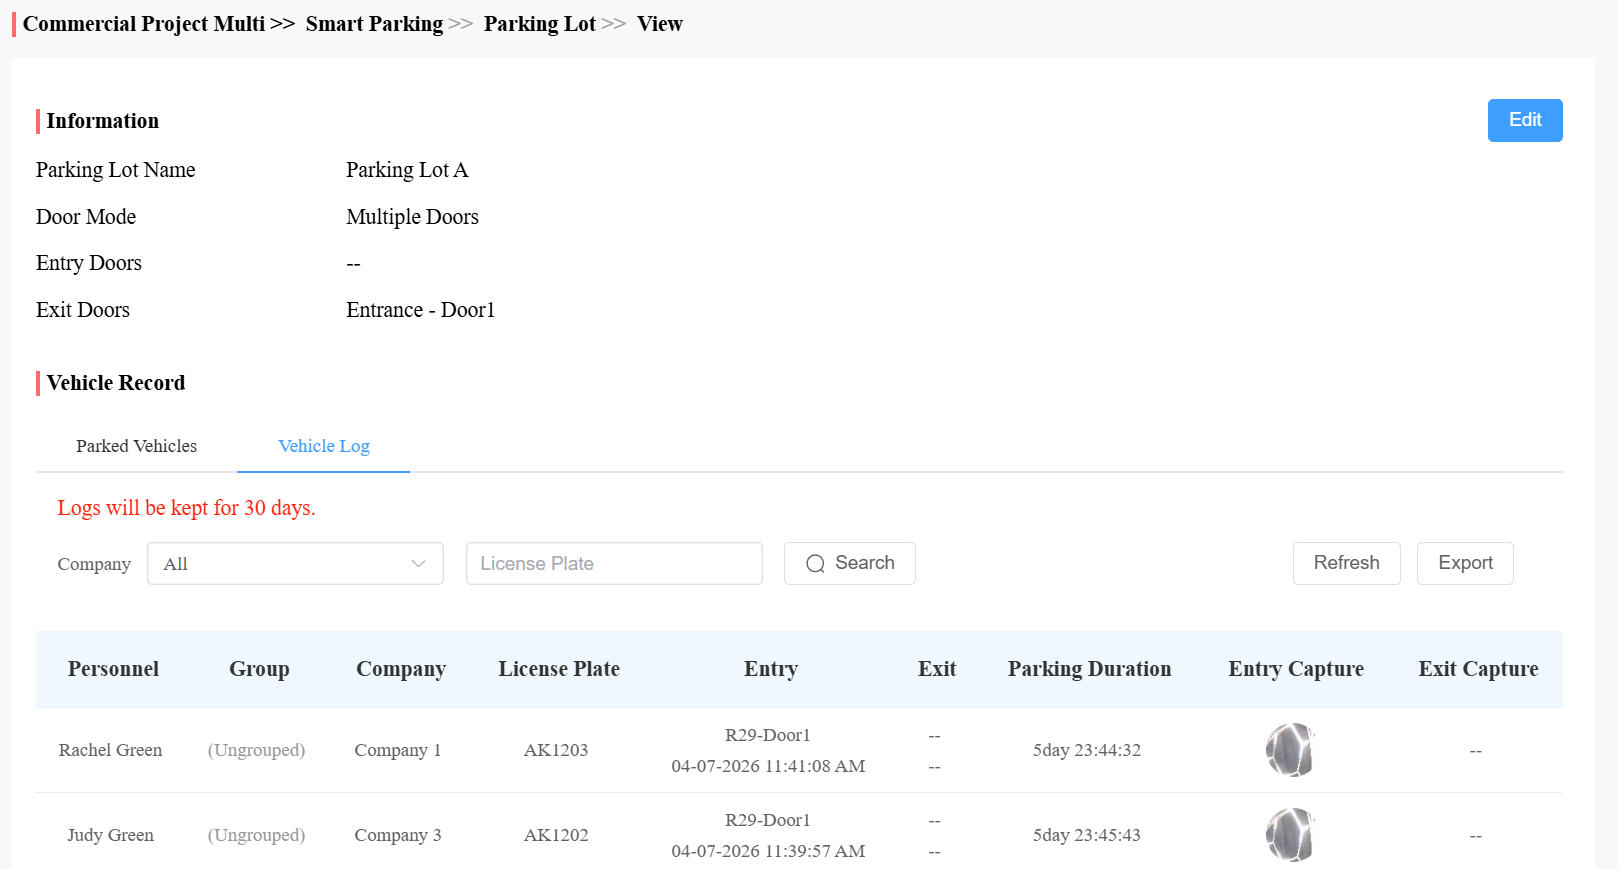
View Vehicle Logs
Click Smart Parking > Parking Lot.
Click
of the target parking lot.Click Vehicle Log, where you can:
Check the vehicle entry/exit time and parking duration.
Click the image in the Entry and Exit Capture columns to view the snapshots.
Click Export to download logs.
Logs
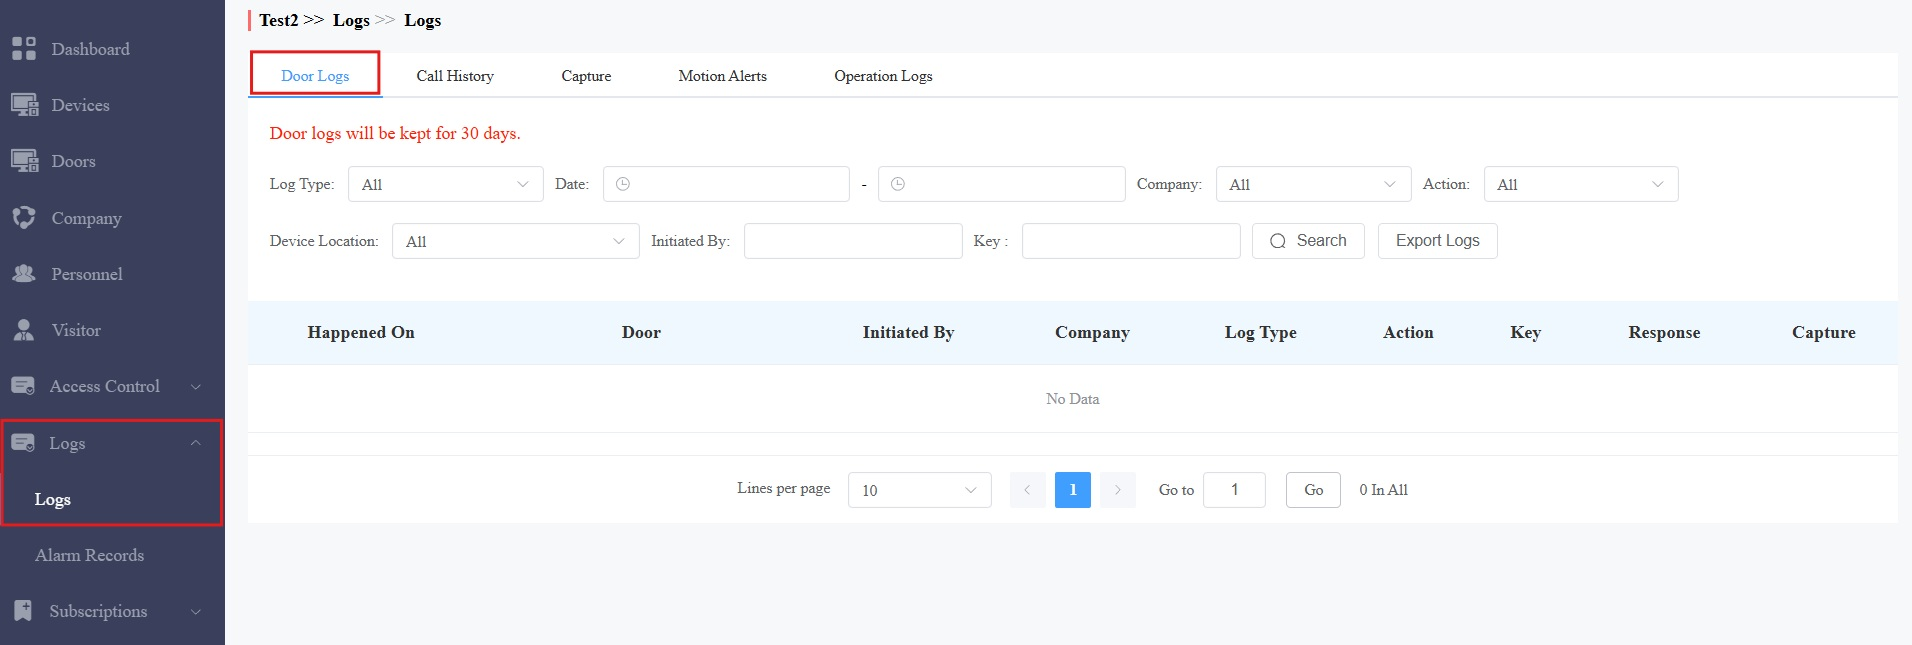
You can check door logs, call history, images captured, alarm logs, and door opened timeout logs in the Logs module.
Door Logs
Door logs have 7 types. You can narrow your log check by the specific time range with parameters: Device Name, Initiated by, Action, Key, Company, and Response(Success, Failed, or Offline) for the targeted search.
All: Display all door logs.
Call: Display the SIP/IP-based calls initiated on the door phone, indicating when, where, and to whom the calls are made.
Door Release: Display when, where, and by whom the door openings are made (be it failure or success).
Entry: Display the valid door-opening records of entering without disobeying the area restriction rules.
Exit: Display the valid door-opening records of the exit without disobeying the area restriction rules.
Entry Violation: Display the door-opening records of entries that violate the area restriction rules.
Exit Violation: Display the door-opening records of exits that violate the area restriction rules.
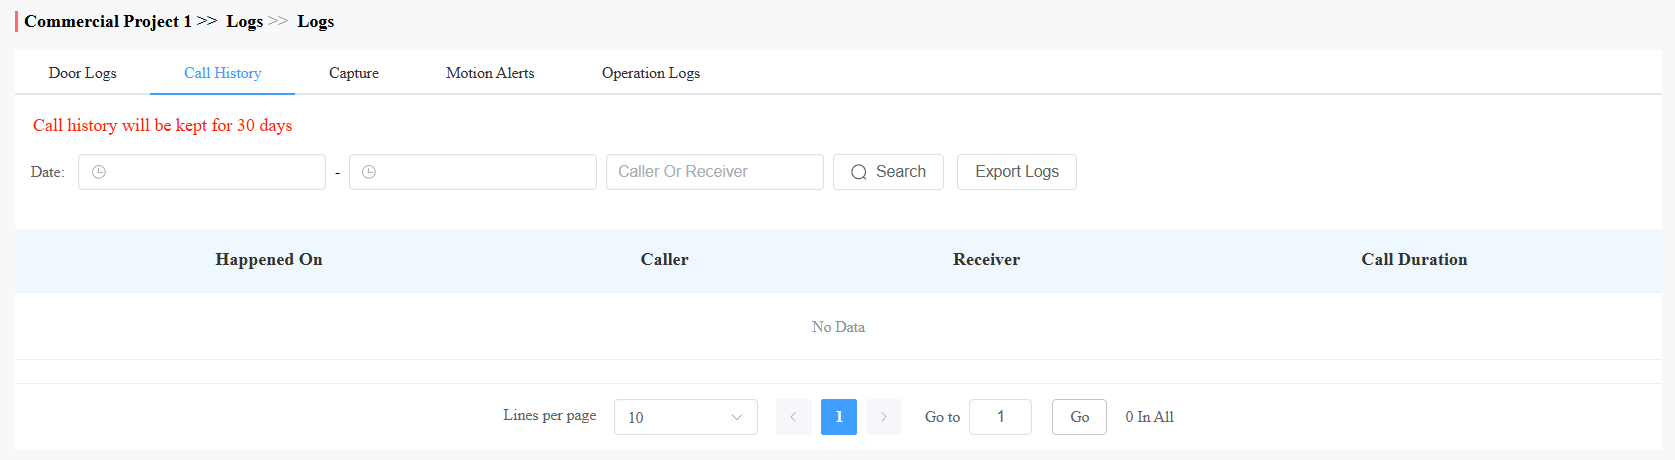
Call Logs
You can check when and by whom the SIP calls are made and received. Moreover, you can set the time range or enter the caller or receiver to check the targeted call information.
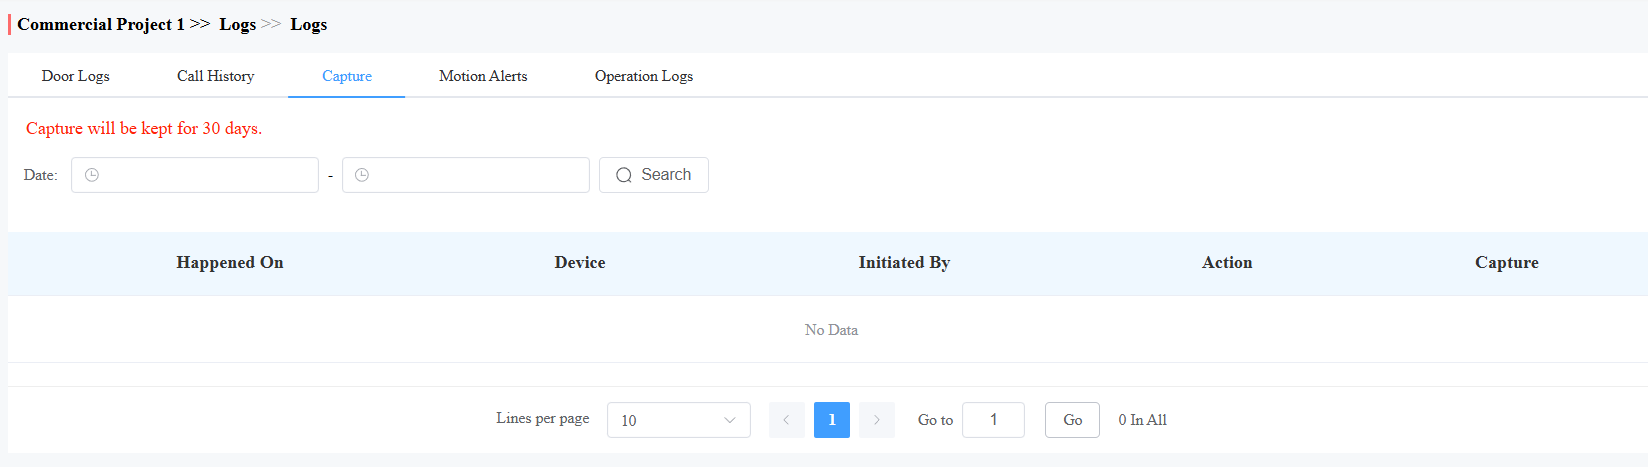
Captured Images
Image capturing is either initiated manually by users or by the project manager. You can check when, where, how, and by whom the images are captured. You can click the image in the Capture column to see a larger picture.
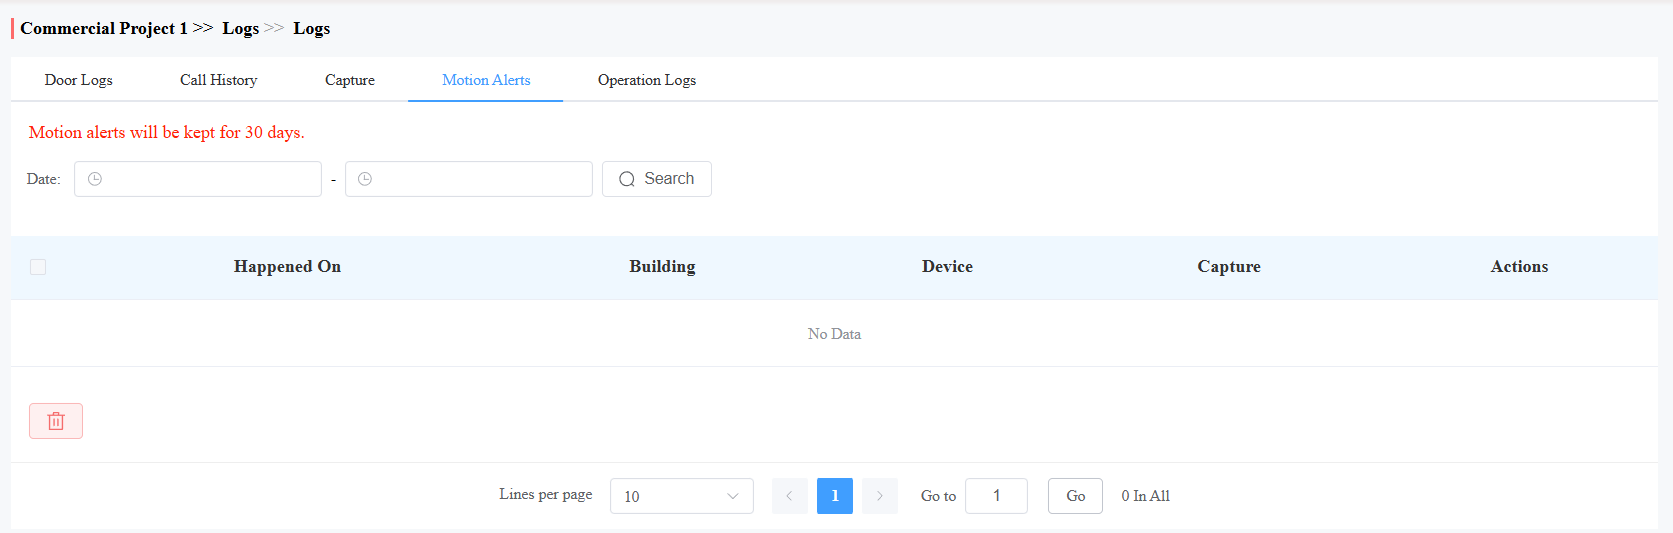
Motion Alerts
Motion alerts allow you to check the captured image of people whose movement has triggered the motion detection in the door phones (door phones with motion detection function).
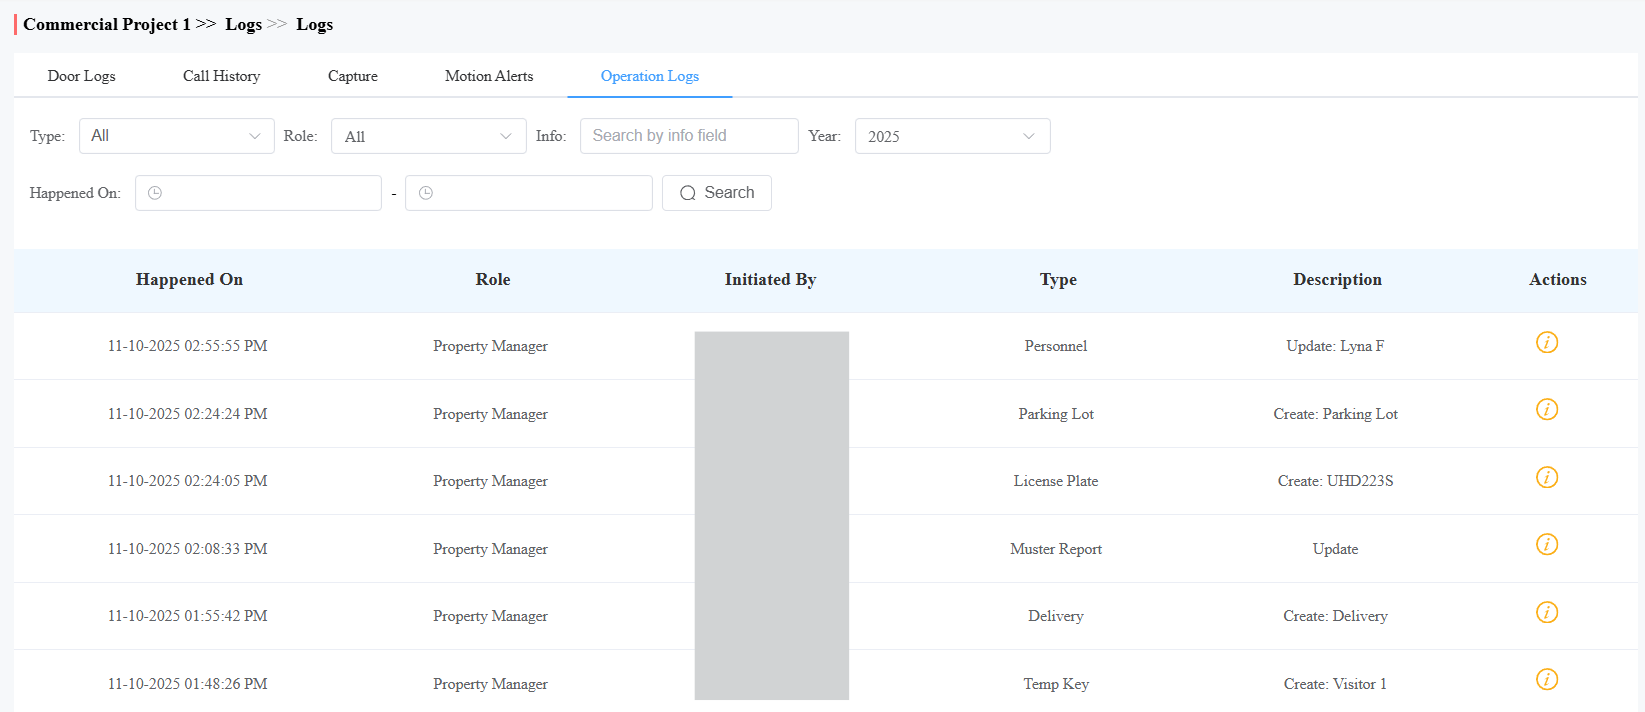
Operation Logs
You can check who has made configurations in the project on the cloud.
Alarm Records
You can check various alarm records on the Logs > Alarm Records module.
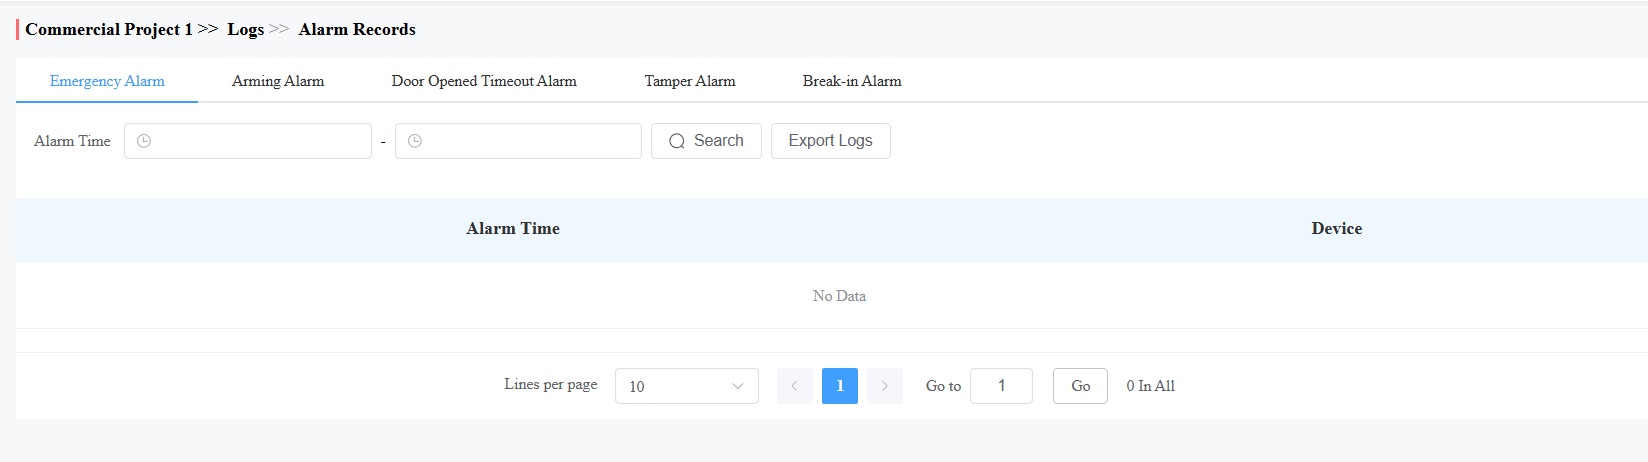
Emergency Alarm
The emergency alarm is recorded when the emergency unlock occurs.
Narrow the search by entering a specific time.
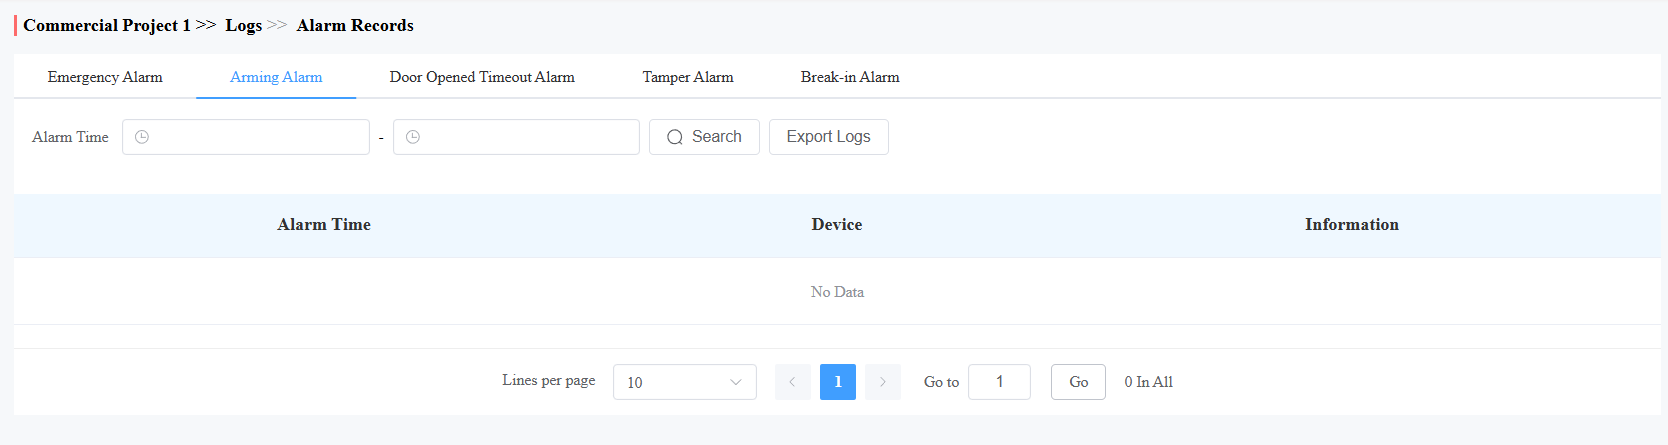
Arming Alarms
The alarm is recorded when indoor monitors trigger the arming alarms. Narrow the search by entering a specific time.
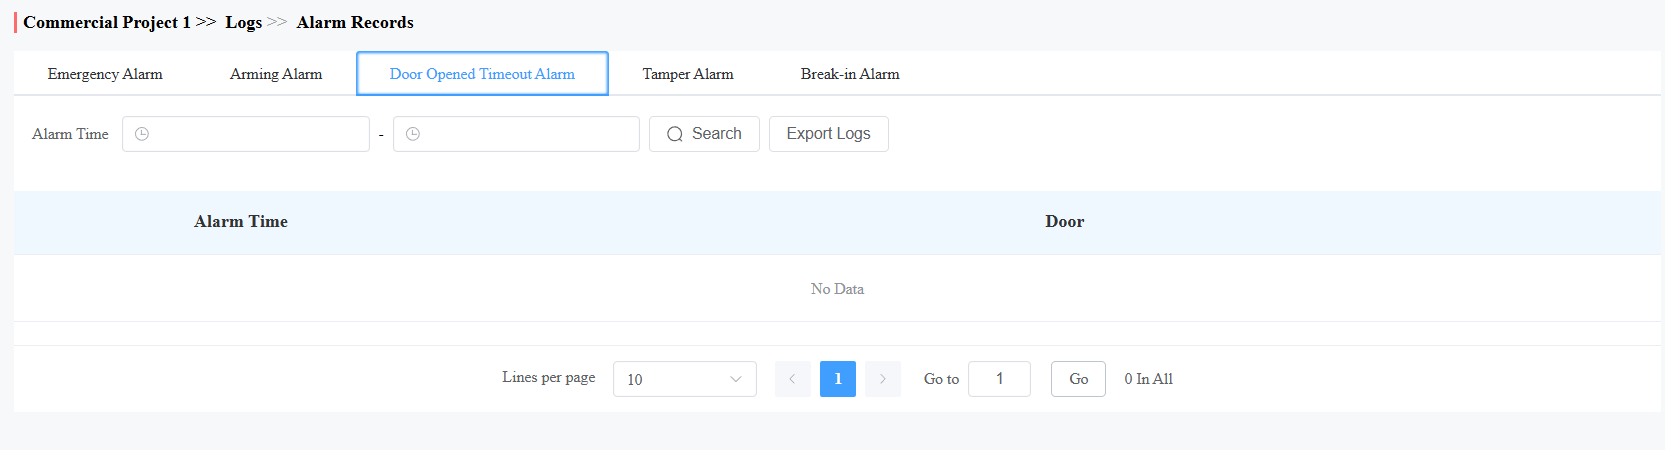
Door Opened Timeout Logs
When the door-opening time exceeds a certain limit, the alarm will be triggered and recorded.
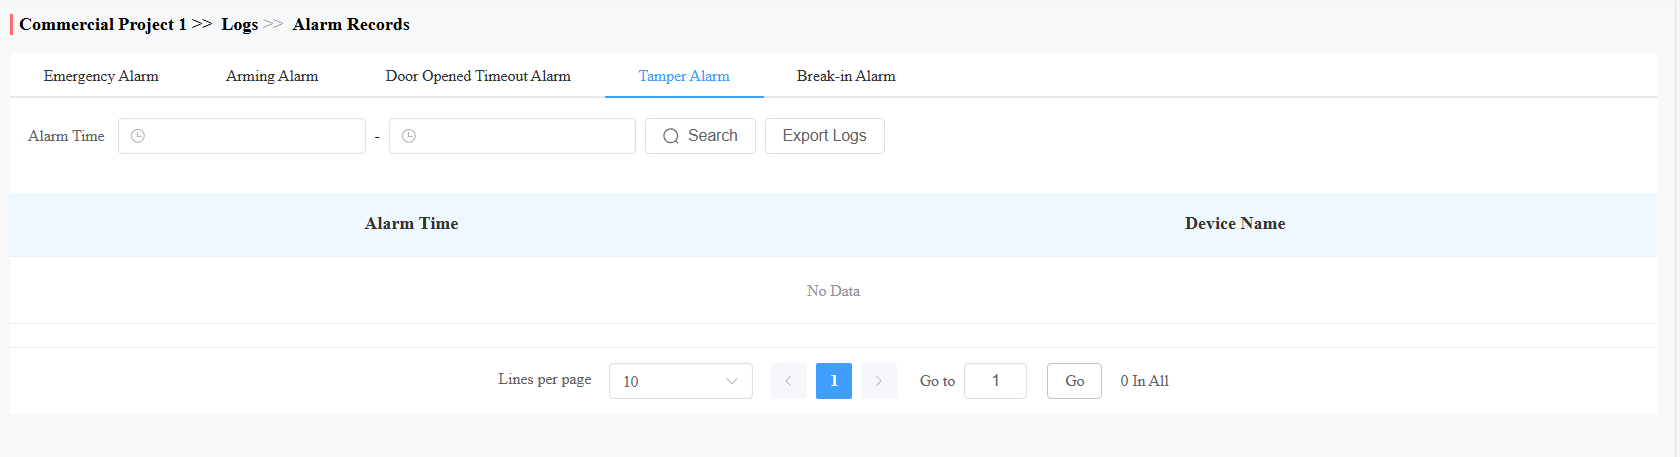
Tamper Alarm
When the device’s tamper alarm is triggered, the alarm will be recorded on the cloud.
Compatible models and versions(or higher):
Model
Version
Model
Version
R20
320.30.11.30
A08
108.30.11.8
R25
25.30.10.117
A01/A02
101.30.10.206
R28
228.30.10.213
A03
103.30.10.204
R29
29.30.10.404
A094
92.30.10.205
X915V2
2915.30.10.420
A095
95.30.10.110
X912
912.30.11.107
E16 V2
216.30.10.208
E12V2
312.30.11.18
E16 V3
416.30.11.206
X916
916.30.10.508
S539
539.30.10.507
S538
538.30.10.705
S535
535.30.11.8
A05V2
205.30.11.114
S532
532.30.10.336
E18
18.30.11.136
A15
1115.30.10.407
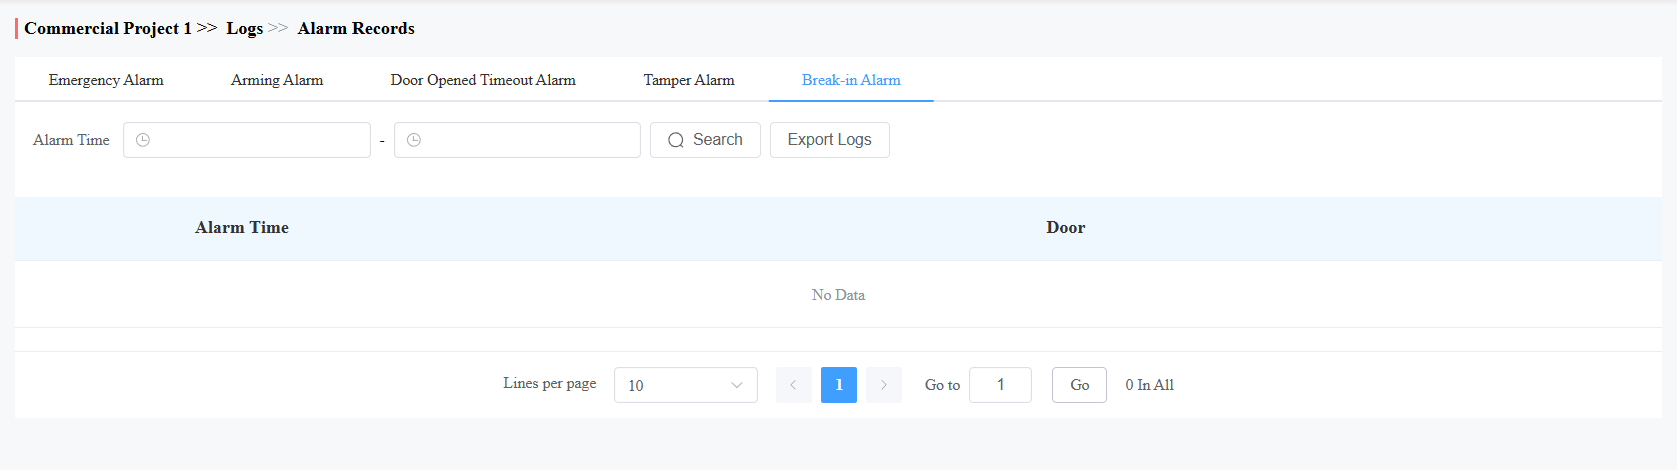
Break-in Alarm
When someone forcibly opens doors, the break-in alarm will be triggered and recorded on the cloud.
Messages
You can create, send, and check messages.
You can create one-time messages or reusable message templates for your convenience.
Click Messages > New.
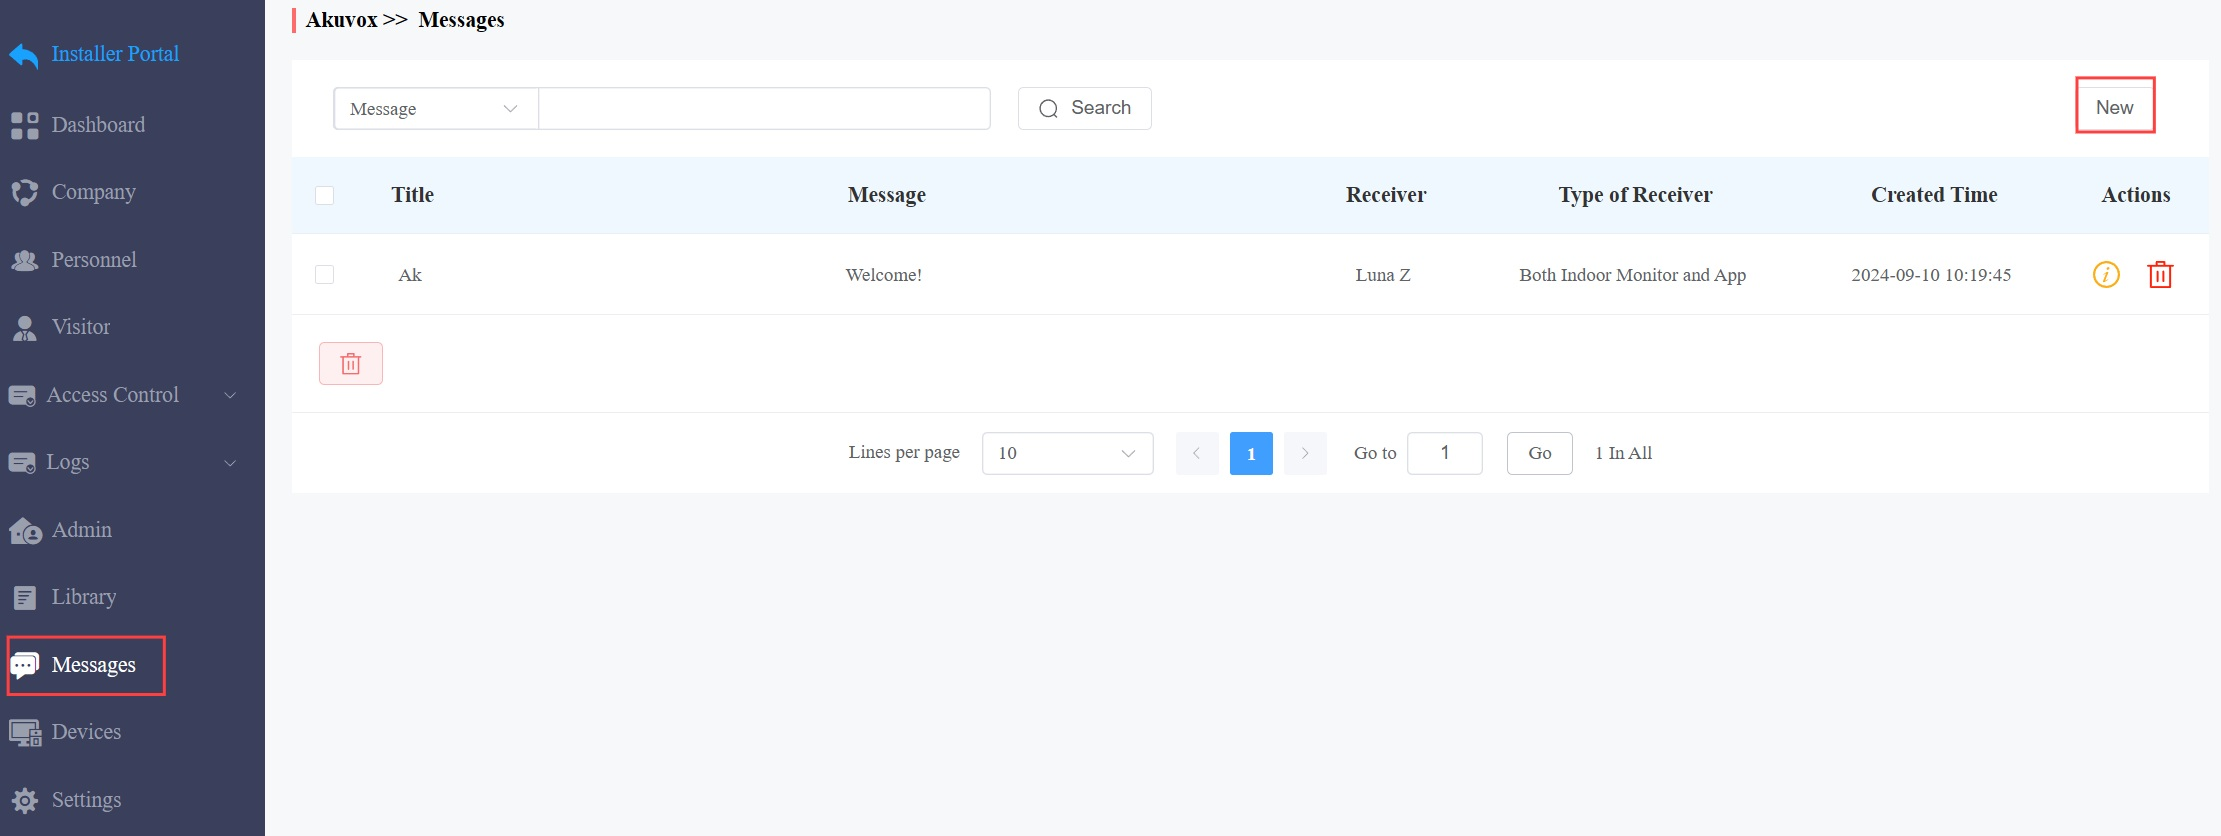
Enter the message title and content directly to create one-time messages. Select the receiver type.
To create reusable message template(s), you can click Add a Template and enter the template name, title, and content.
You can edit or delete the template after creating it.
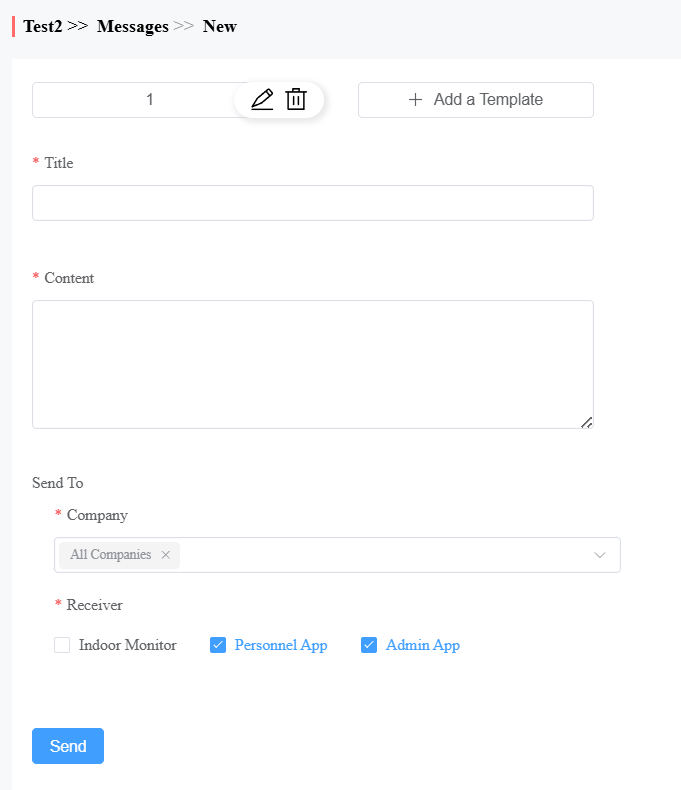
3. Click Send.
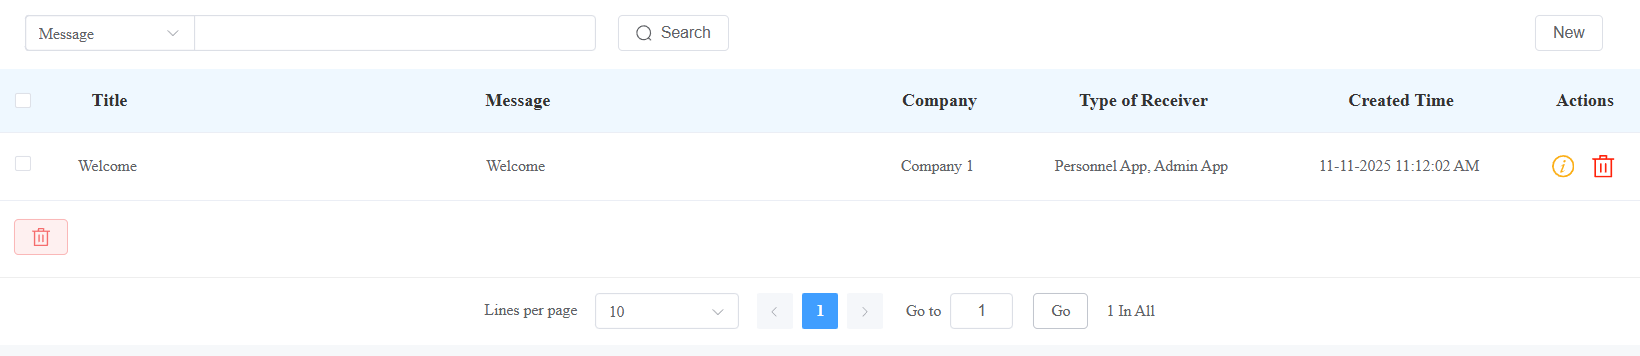
After the message is created, you can click  to check the message details and click to remove it.
Library
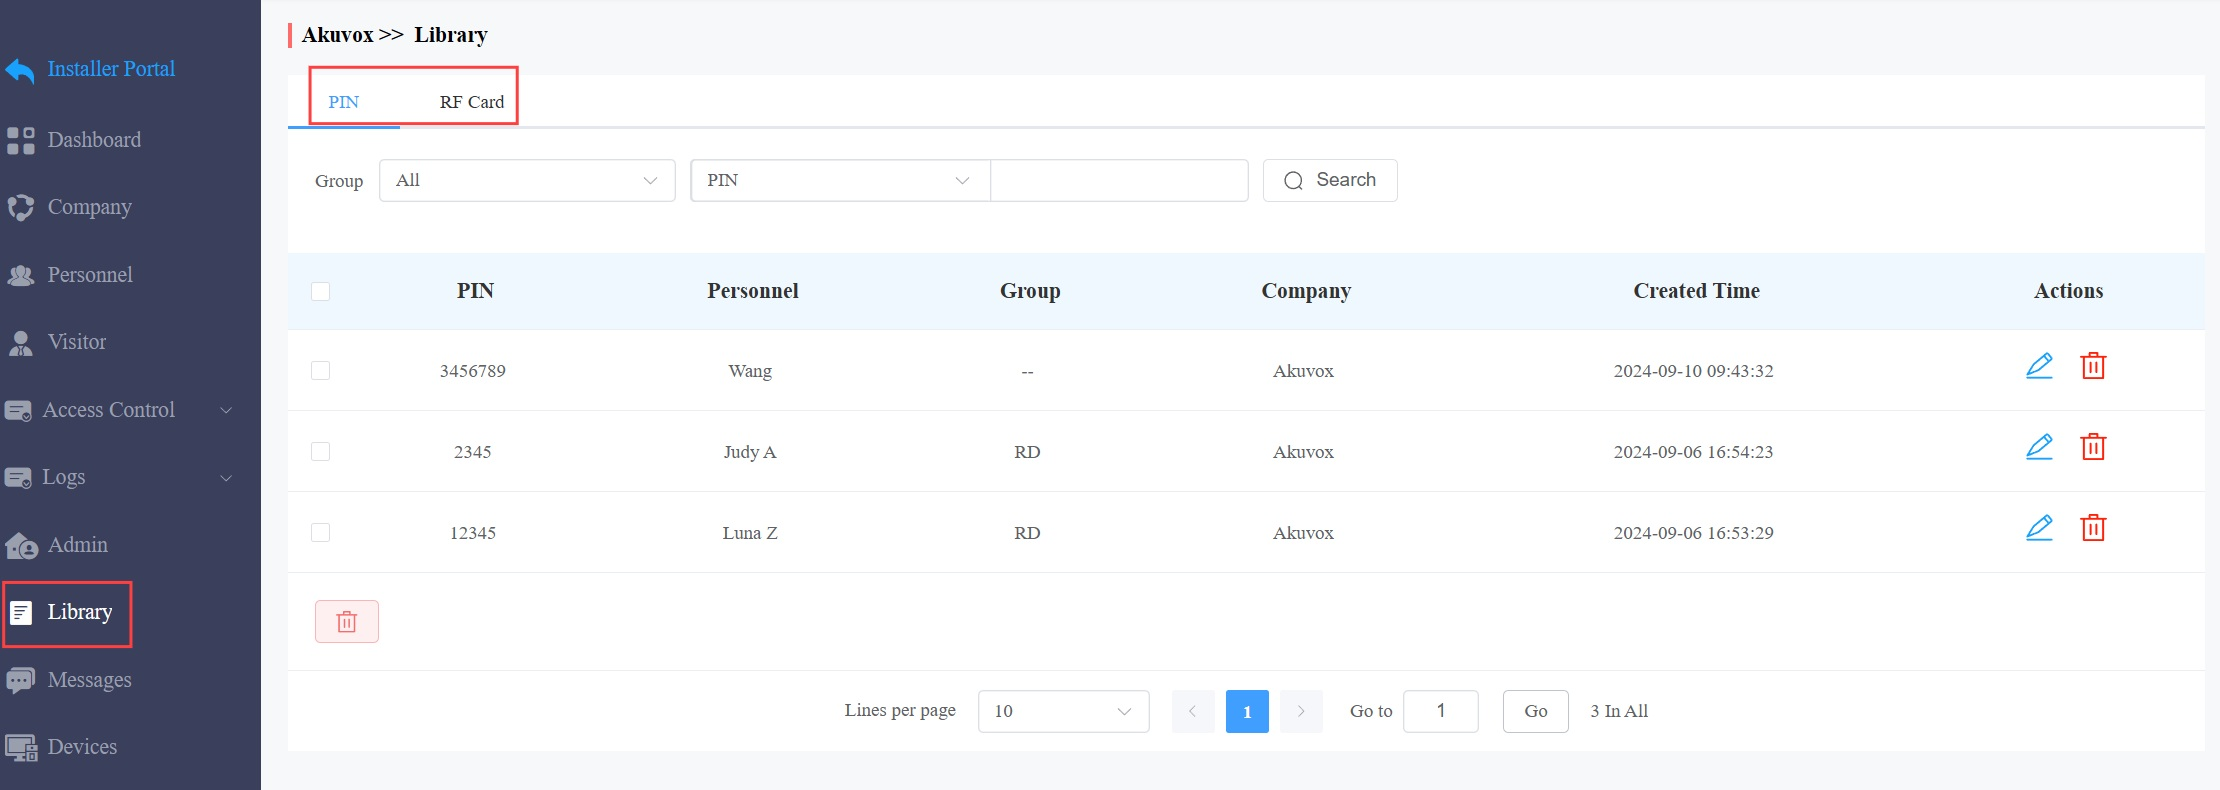
You can check, modify, and delete all types of created PIN codes and RF Cards conveniently at one stop.
On the Library module, clickto modify the PIN code or RF card code. Clickto remove the code.
Settings
Settings include the basic settings(project name, address, permissions, emergency unlock, etc), time settings, and motion detection settings.
Basic Settings
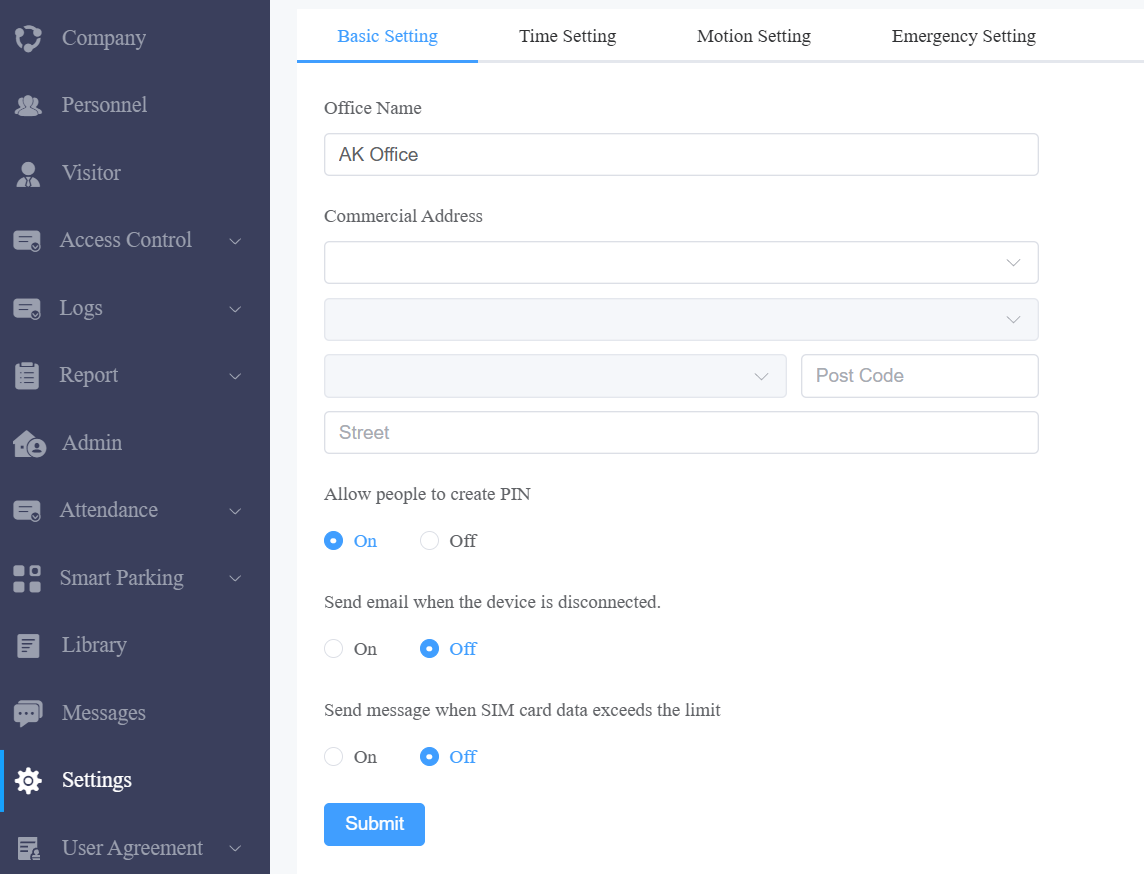
See the description of each item in the chart below.
Item Name | Description |
|---|---|
Office Name | Name the project. |
Commercial Address | The site address. |
Allow people to create PIN. | Set whether users can create PIN codes on their MySmart Apps. |
Send email when the device is disconnected. | Set whether to receive email notifications when devices are offline. |
Send message when SIM card data exceeds the limit. | Set whether to receive email notifications when door phones with LTE function exceed the (SIM card) data package limit. |
Emergency Action
You can make all doors open or close automatically or manually during emergencies. For example, the doors can be opened automatically once an emergency alarm is triggered on any one of the door phones during a fire emergency so that people can be quickly evacuated to a safer place. Also, you can open all the doors manually.
Note
With the installer accounts, you can ONLY configure the Emergency Scenario feature but not perform the action.
With the project manager account, you can click the Unlock/Lock button to open or close all doors manually.
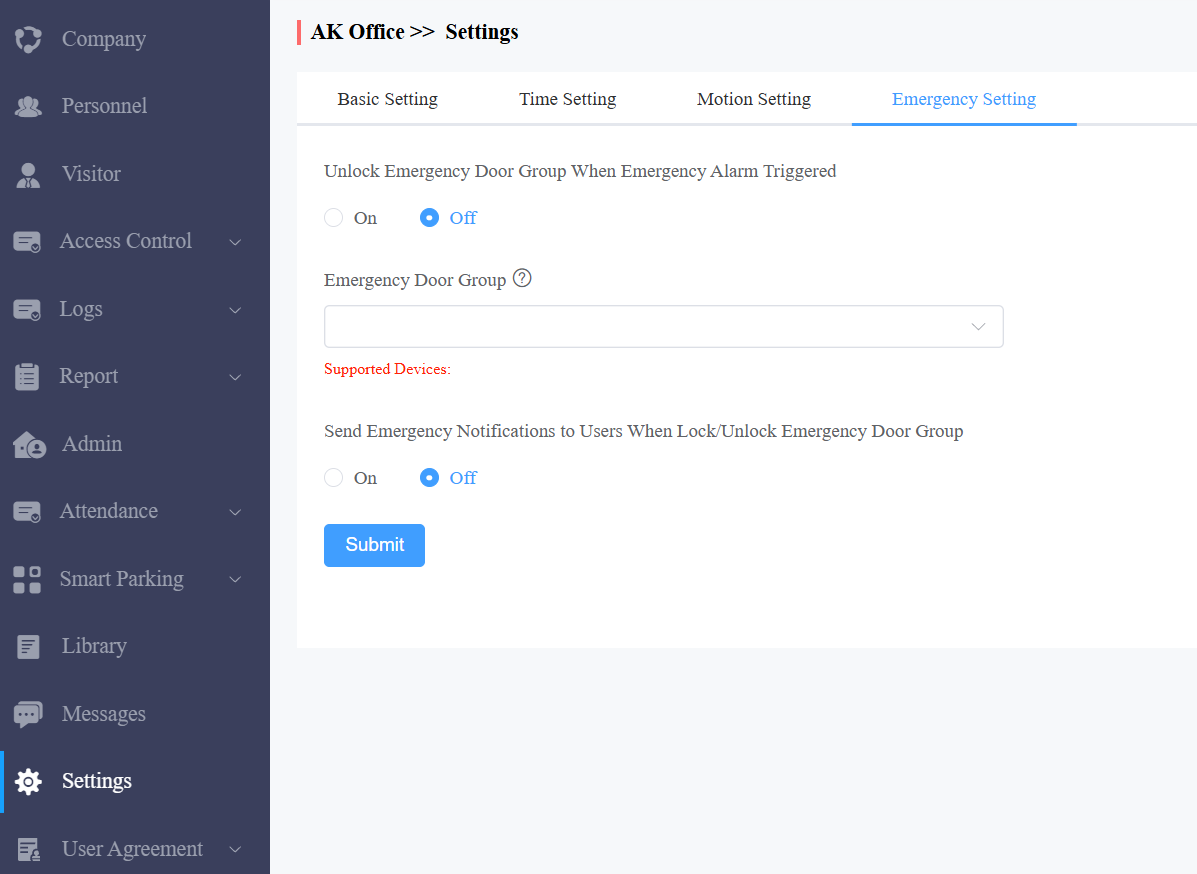
Go to Settings > Emergency Setting. Select automatic door unlock or manual unlock.
Select On to open doors automatically when an emergency occurs.
Select Off to open doors manually on the SmartPlus web portal. You can click Unlock/Lock near the top of any interface to open or close the doors manually.
Set Emergency Door Group. You can select All Doors or specific doors to open during an emergency.
Select whether to send notifications to users' MySmart Apps and indoor monitors. When enabled, both devices will push a notification when the emergency unlock happens.
Time Settings
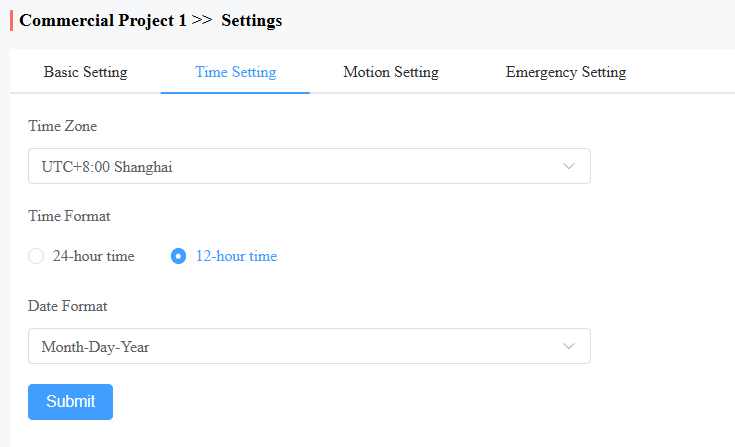
You configure and modify the time setting based on the site’s location and time zone.
Go to Settings > Time Settings.
Motion Detection
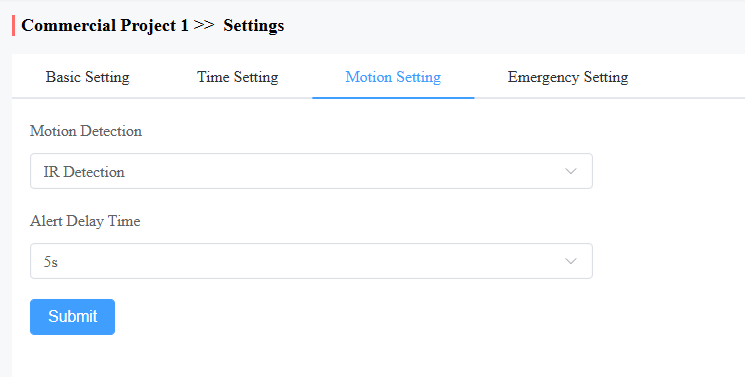
You can enable/disable motion detection, but also set up the device's motion detection type and alert trigger delay.
Go to Settings > Motion Setting.
Set the motion detection:
Disable: Turn off the function.
IR Detection: When the infrared sensor detects moving objects, alerts will be triggered.
Video Detection: When the video camera detects moving objects, alerts will be triggered.
Set the Alert Delay Time from 5 to 60 seconds.
Privacy Policy
You will see the Privacy Policy and Terms of Service window when you log into the platform for the first time.
The Privacy Policy tells you how the user data is collected, used, and protected.
The Terms of Service outline the rules and guidelines for using the MySmart service.
Only when you click Agree can you log into the MySmart platform.
Contact Us
For more information about the product, please visit us at www.akuvox.com, or feel free to contact us by
Sales email: sales@akuvox.com
Technical support email: support@akuvox.com
Telephone: +86-592-2133061 ext.7694/8162
We highly appreciate your feedback about our products.