Unlock by Public PIN Code
Existen dos tipos de códigos PIN para el acceso a puertas: público y privado. Un PIN privado es único para cada usuario, mientras que el público es compartido por los residentes del mismo edificio o complejo. Puedes crear y modificar tanto los códigos PIN públicos como privados.
Set it up on the web Access Control > PIN Setting > Public Key interface.

PIN Code: Set 5 to 8 digits for opening doors. The default is 33333333.
User-specific Access Methods
The private PIN code, RF card, face, and license plate settings should be assigned to a particular user for door opening.
When adding a user, you can also customize settings such as defining the door access schedule to determine when the code is valid and specifying which relay to open.
To add a user, go to Directory > User interface and click +Add.

User ID: The unique identification number assigned to the user.
Name: The name of this user.
Unlock by Private PIN
Users can open doors by entering their private PINs on the keypad.
On the Directory > User > +Add interface, scroll to the Private PIN section.

Code: Set a 2-8 digit PIN code solely for the use of this user. Each user can only be assigned a single PIN code.
You can enable/disable the use of the private PIN code on the web Access Control > PIN Setting > Private PIN interface. It is enabled by default.

Unlock by QR Code
The device supports scanning on-premise-generated and SmartPlus Cloud-generated QR codes.
On the Directory > User > +Add interface, scroll to the Private PIN section. Click the QR code icon .
Click Generate to generate the QR code with an 8-digit PIN.
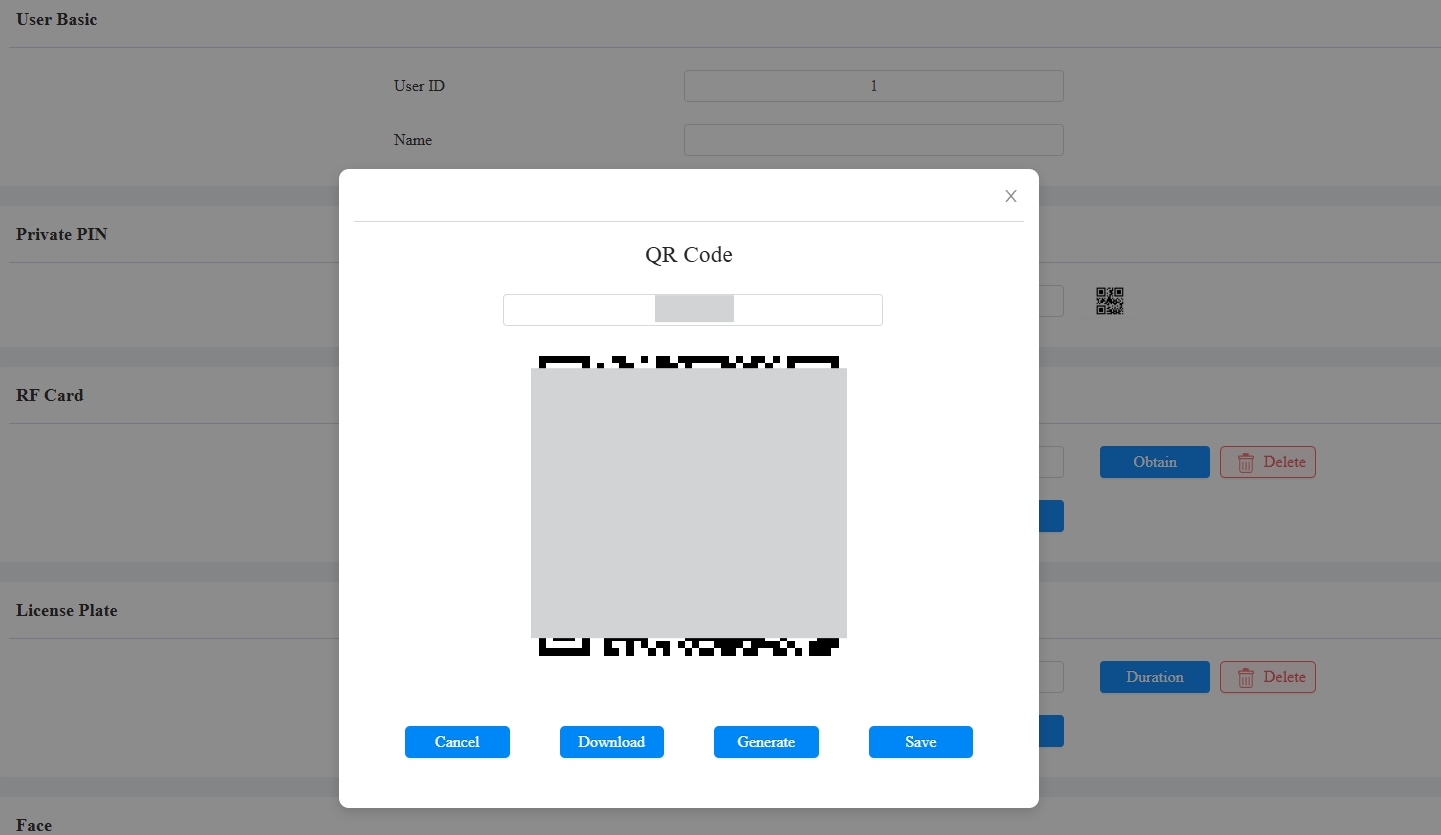
Cancel: Click to return to the user editing interface. The QR code and the PIN code will not be saved.
Download: Click to save the QR code to your PC.
Generate: Click to generate another QR code and PIN code.
Save: Click to return to the user editing interface and save the codes.
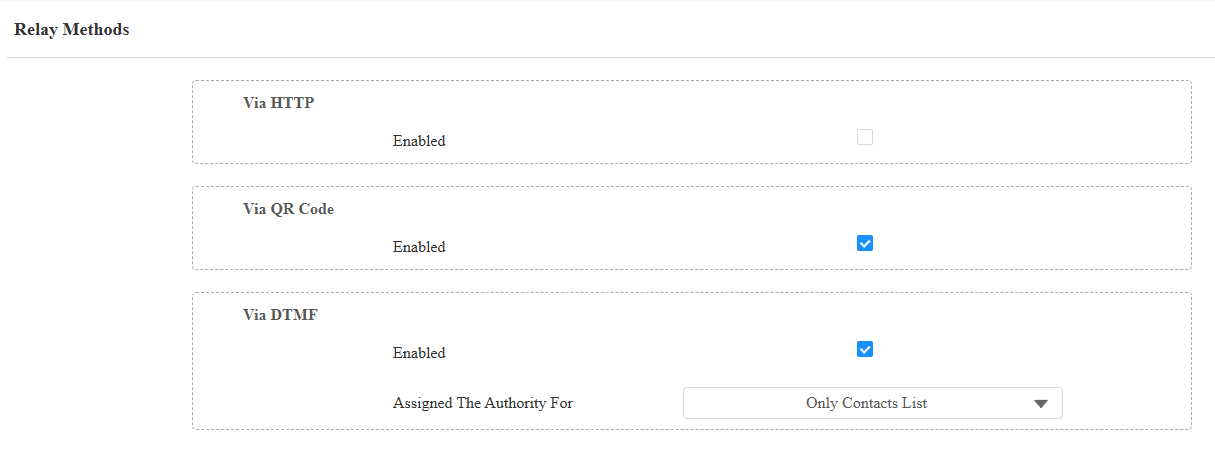
You enable or disable the use of QR code on the Access Control > Relay > Open Relay Methods interface.
It is enabled by default.
Unlock by RF Card
On the Directory > User > +Add interface, scroll to the RF Card section.

Code: The card number that the card reader reads.
Note:
Each user can have a maximum of 5 cards added.
The device allows adding 5,000 users.
RF cards operating at 13.56 MHz frequencies are compatible with the device for access.
You can enable and disable the use of RF cards on the Access Control > Card Setting interface.

RF Card Code Format
Para integrar el acceso a la puerta de la tarjeta RF con el sistema de intercomunicación de terceros, necesitas que el formato del código de la tarjeta RF coincida con el que utiliza el sistema de terceros.
To set it up, go to Access Control > Card Setting > RFID interface.

IC Card Display Mode: Set the card number format from the provided options.
Unlock by License Plate
Akuvox ofrece dos formas principales de identificar vehículos y abrir puertas.
Utiliza una cámara LPR (Reconocimiento de Matrículas) de terceros para reconocer la matrícula del vehículo.
Utiliza el lector de tarjetas de largo alcance Akuvox ACR-CPR12 para reconocer la tarjeta UHF acoplada al parabrisas del vehículo.
To assign the license plate to a user, find the License Plate part on the Directory > User > +Add interface.

Add: A user can have up to 5 license plates.
Duration: Enable/disable Long-term Vehicle. It is enabled by default. If disabled, specify when the vehicle can enter or exit the parking lot.
Unlock by Facial Recognition
On the Directory > User > +Add interface, scroll to the Face section. Click Import to upload the picture and Reset to remove it.

Import: Click to upload the face picture.
Obtain: Click to start enrolling a face on the device side.
Reset: Click to remove the registered face image.
Note
Support Format: jpg, png. Size: a maximum of 2 MB.
Facial Recognition Settings
El teléfono telefónico te permite ajustar la precisión del reconocimiento facial, los intervalos de reconocimiento y más para mejorar la experiencia del usuario.
To set it up, go to the Access Control > Face Setting interface.
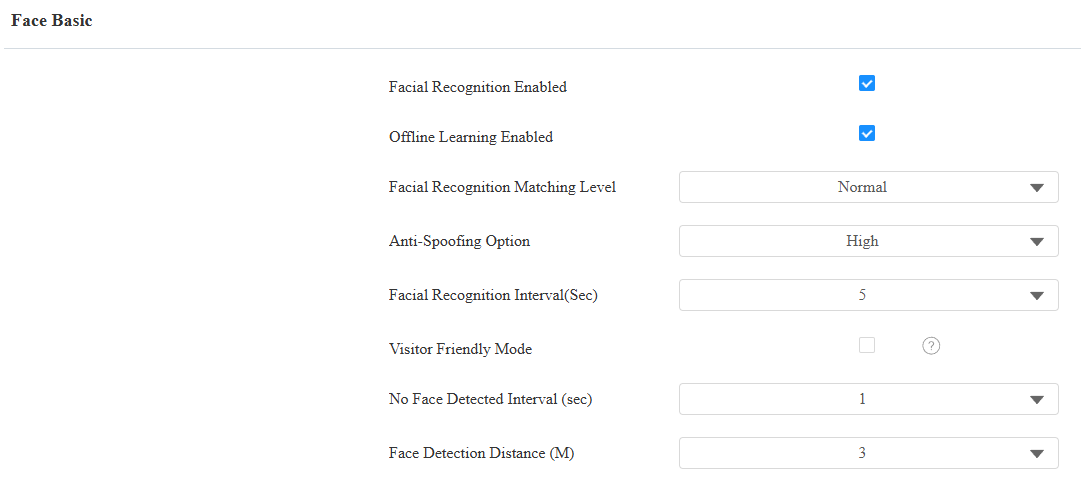
Facial Recognition Enabled: Enable/disable the facial recognition function.
Offline Learning Enabled: Facial recognition accuracy improves as the number of facial recognition increases.
Facial Recognition Matching Level: Determine how strict the facial recognition system is in comparing a person’s face with uploaded face data. Each level allows a different degree of difference or face covering (excluding the mouth area) to pass the recognition.
- Low: Allow slight differences from the uploaded face data, with little face coverage.
- Highest: Require the face to be identical to the uploaded one, with minimal or no covering.
- The other two levels are in between.
Anti-Spoofing Option: Set how strict the system is in preventing fake faces.
- Close: Disable the facial anti-spoofing function. Facial verification can be passed using non-living substitutes for an authorized person's face, such as a photo.
- Highest: The system cannot be fooled by any non-living substitutes for an authorized person's face.
- The other three levels are in between.
Facial Recognition Interval(Sec): Adjust the time interval between each facial recognition attempt, ranging from 1 to 8 seconds.
Visitor Friendly Mode: Set whether to give auditory or visual prompts when recognition fails. Disabled by default.
No Face Detected Interval(Sec): Adjust the time interval between each detection, ranging from 1 to 8 seconds.
Face Detection Distance(M): Adjust the detection distance, ranging from 1 to 3 meters.
Unlock by Bluetooth
The device supports opening the door via Bluetooth-enabled My MobileKey or SmartPlus App. Users can either open the door with the apps in their pockets or wave their phones towards the device as they get closer to the door.
Note
Before using Bluetooth to open doors, you need to enable the Bluetooth function on the Access Control > BLE interface.
Unlock via My MobileKey
On the Directory > User > +Add interface, scroll to the BLE Setting section.

Authentication Code: Click Generate to generate a 6-digit verification code.
Bluetooth Unlock Settings
Set up the Bluetooth-unlock feature on the Access Control > BLE interface.
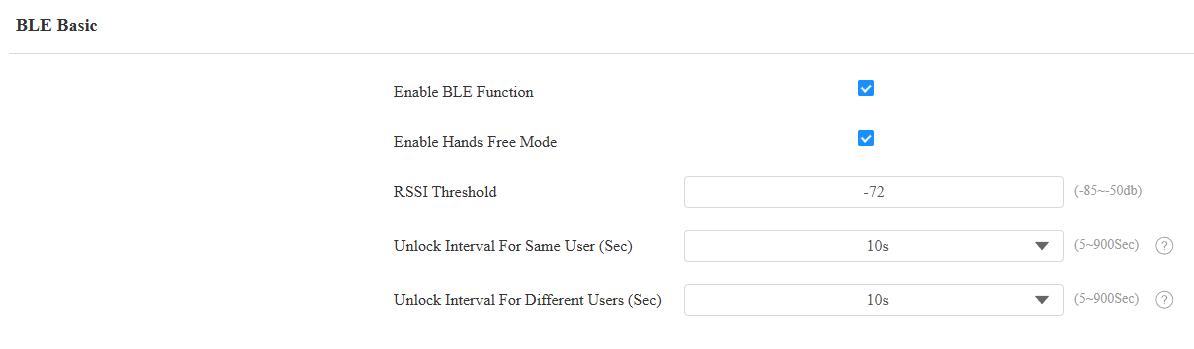
Enable Hands Free Mode: If enabled, users can gain door access hands-free. If disabled, users have to wave their hands near the device to open doors.
RSSI Threshold: Set the received signal strength. Higher values indicate stronger signal strength, making it easier to receive the Bluetooth signal.
Unlock Interval For Same User(Sec): Set the time interval between consecutive Bluetooth door access attempts for the same user.
Unlock Interval For Different Users(Sec): Set the time interval between consecutive Bluetooth door access attempts for different users.
Note
To learn about detailed configuration steps of different Bluetooth-based access methods, you can click the following articles.
Access Setting
You can customize access settings, such as defining the door access schedule to determine when the code is valid and specifying which relay to open.
On the Directory > User > +Add interface, scroll to the Access Setting section.
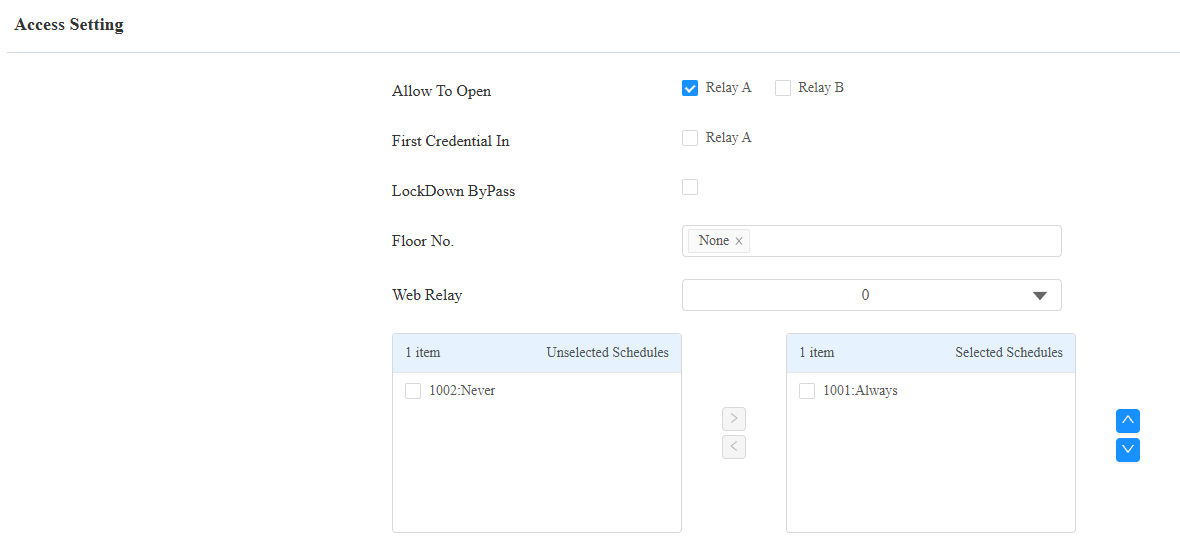
Allow To Open: Enable the door to be opened.
First Credential In: This decides whether the user can keep the door open during the scheduled time after activating it.
Lockdown Bypass: This decides whether the user can open the door when the door is locked during the scheduled time.
Floor No. : Specify the accessible floor(s) to the user via the elevator.
Web Relay: Specify the ID of the web relay action commands that you’ve configured on the Web Relay interface. A default value of 0 indicates that the web relay will not be triggered.
Schedule: Grant the user access to open designated doors during preset periods by relocating the desired schedule(s) from the left box to the right one. Besides custom schedules, there are 2 default options:
Always: Allows door opening without limitations on door open counts during the valid period.
Never: Prohibits door opening.
Import/Export User Data
El teléfono de entrada permite que los datos de usuario o el control de acceso se compartan entre los teléfonos Akuvox mediante importación y exportación, mientras que también puedes exportar los datos faciales desde el teléfono y luego importarlos a un dispositivo de terceros.
Haz clic aquí para ver cómo importar y exportar datos de usuario entre teléfonos puerta Akuvox.
To set it up, go to the Directory > User interface. The device supports up to 5,000 users.

Import: The supported format is TGZ.
Export: The supported format is CSV or XML.
Unlock by NFC
NFC (Comunicación por Campo Cercano) es una forma popular de acceso a puertas. Utiliza ondas de radio para la interacción de transmisión de datos. El dispositivo puede desbloquearse mediante NFC. Puedes mantener el móvil más cerca del dispositivo para acceder a la puerta.
To set it up, go to the Access Control > Card Setting > Card Type interface.

Note
The NFC feature is not available on iPhones.
Click here to view how to open doors via NFC.
Mifare Card
El dispositivo puede leer tarjetas Mifare cifradas para mayor seguridad. Cuando esta función está activada, lee los datos en los sectores y bloques designados de las tarjetas, no el UID.
Haz clic aquí para ver los detalles sobre cifrar y leer las tarjetas Mifare.
To set it up, go to Access Control > Card Setting > Mifare Card Encryption interface.

Classic:
Sector/Block: Specify the location where encrypted card data is stored. A Mifare card has 16 sectors (numbered 0 to 15), and each sector has 4 blocks (numbered 0 to 3).
Block Key: Set a password to access the data stored in the predefined sector/block.
Plus: You can set up three choices. This means you can use three types of Mifare Plus cards. When swiping a card, as long as one of the choices matches its SL key, the card code in the block you specified will be output.
Block: Specify the block(s) to be read.
SL1: The key number within 32 bits.
SL3: The key number within 32 bits.
DESFire:
App ID: A 6-digit hexadecimal number
File ID: The ID of the encrypted file of the app, which can be a number from 0 to 16.
Crypto: The encryption method.
Key: The file key.
Key Index: The index number for the key, which can be a number from 0 to 11.
Unlock by DTMF Code
La señalización multifrecuencia de doble tono (DTMF) es una forma de enviar señales a través de líneas telefónicas utilizando diferentes bandas de voz y frecuencia. Los usuarios pueden utilizar la función DTMF para desbloquear la puerta para los visitantes durante una llamada escribiendo el código DTMF en el teclado suave o tocando la pestaña de desbloqueo con el código DTMF en pantalla.
To configure DTMF codes, go to Access Control > Relay interface.
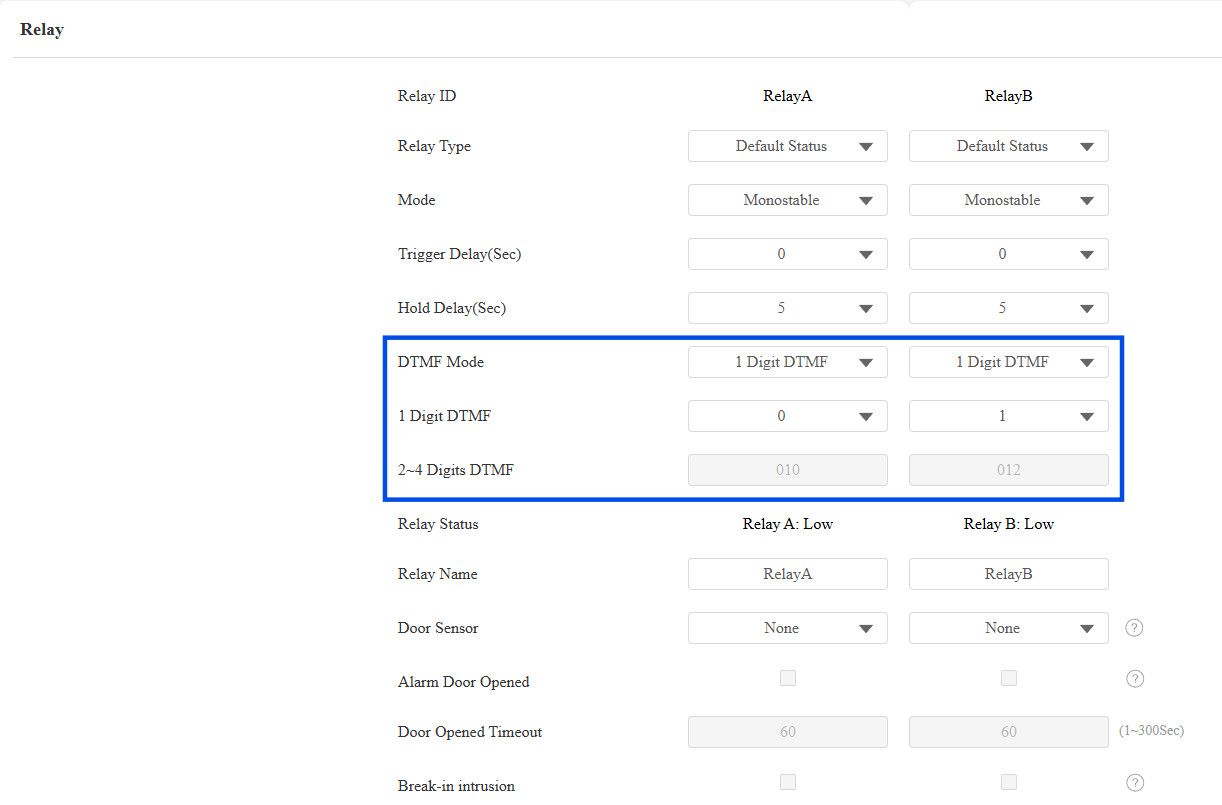
DTMF Mode: Set the number of digits for the DTMF code.
1 Digit DTMF: Define the 1-digit DTMF code within the range(0-9 and *,#) when the DTMF Mode is set to 1-digit.
2-4 Digit DTMF: Set the DTMF code based on the number of digits selected in the DTMF Mode.
Note
To open the door with DTMF, the intercom devices that send and receive the unlock command must use the same mode and code. Otherwise, the DTMF unlock may fail. See here for the detailed DTMF configuration steps.
DTMF White List
To secure door access via DTMF codes, you can set up the DTMF whitelist on the device web Access Control > Relay > Relay Methods interface so that only the caller numbers you designated in the device can use the DTMF code to gain door access.
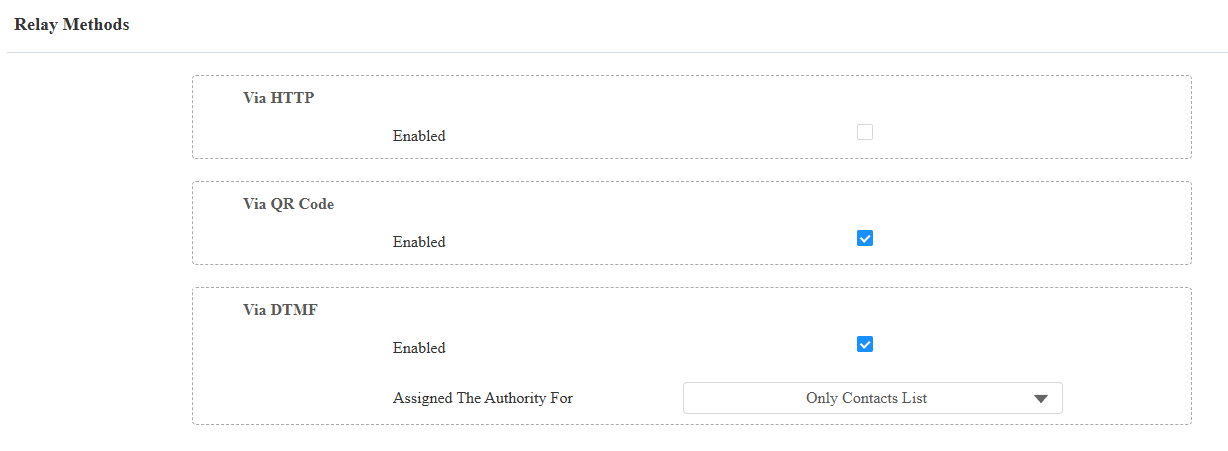
Assigned The Authority For: Specify the contacts authorized to open doors via DTMF:
Only Contacts List: Doors can be opened by numbers added to the device's contact list and pressing the push button.
All Numbers: Any numbers can unlock using DTMF.
DTMF Data Transmission
Para lograr el acceso a la puerta mediante código DTMF u otras aplicaciones, es necesario configurar correctamente DTMF para establecer una transmisión de datos basada en DTMF entre el dispositivo y otros dispositivos de intercomunicación.
Diferencias entre tipos de DTMF:
Inband | Las señales DTMF se transmiten dentro del mismo canal de audio que los datos de voz. Implementación simple, pero puede producirse distorsión de señal con códecs altamente comprimidos (por ejemplo, G.729). |
RFC2833 | Transmite DTMF como paquetes de eventos especiales a través de RTP (Protocolo de Transporte en Tiempo Real), conocido como transmisión fuera de banda. Fiable y no afectado por códecs. |
Información | Envía señales DTMF a través del canal de señalización SIP (Protocolo de Inicio de Sesión). Separado de la transmisión de voz, asegurando la calidad del audio. |
Info+Inband | Combina métodos de Info e Inband. |
Info+RFC2833 | Combina métodos de información y RFC2833. |
Info+Inband+RFC2833 | Los tres métodos se utilizan simultáneamente. |
Set it up on the Intercom > Account > DTMF interface.

Type: Select from the following options: Inband, RFC2833, Info, Info+Inband, Info+RFC2833, based on the specific DTMF transmission type of the third-party device to be matched with as the party for receiving signal data.
How to Notify DTMF: Select Disabled, DTMF, DTMF-Relay, or Telephone-Event according to the specific type adopted by the third-party device. You are required to set it up only when the third-party device to be matched with adopts Info mode.
Payload: Set the payload according to the specific data transmission payload agreed on between the sender and receiver during the data transmission.
Unlock by HTTP Commands
El dispositivo soporta desbloqueo remoto de puertas mediante un comando HTTP. Simplemente habilita esta función e introduce el comando HTTP (URL) para el dispositivo. Esto activará el relé y abrirá la puerta, incluso si los usuarios están lejos del dispositivo.
Set it up on the Access Control > Relay > Open Relay Methods interface.
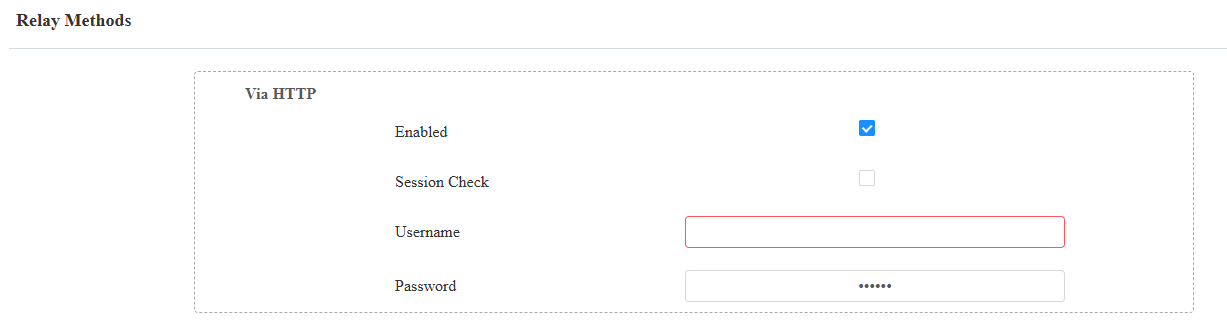
Session Check: Enable to enhance data transmission security.
Username: Set a username for authentication in HTTP command URLs.
Password: Set a password for authentication in HTTP command URLs.
Tip
Here is an HTTP command URL example for relay triggering.

Note
The HTTP format for relay triggering varies depending on whether the device's high secure mode is enabled. Please refer to this how-to guide Opening the Door via HTTP Command for more information.
Unlock by Exit Button
Cuando los usuarios necesitan abrir la puerta desde dentro pulsando el botón de Salida, tienes que configurar el terminal de Entrada que coincida con el botón de Salida para activar el relé de acceso a la puerta.
Haz clic aquí para ver el vídeo instructivo.
To set it up, navigate to the Access Control > Input interface.
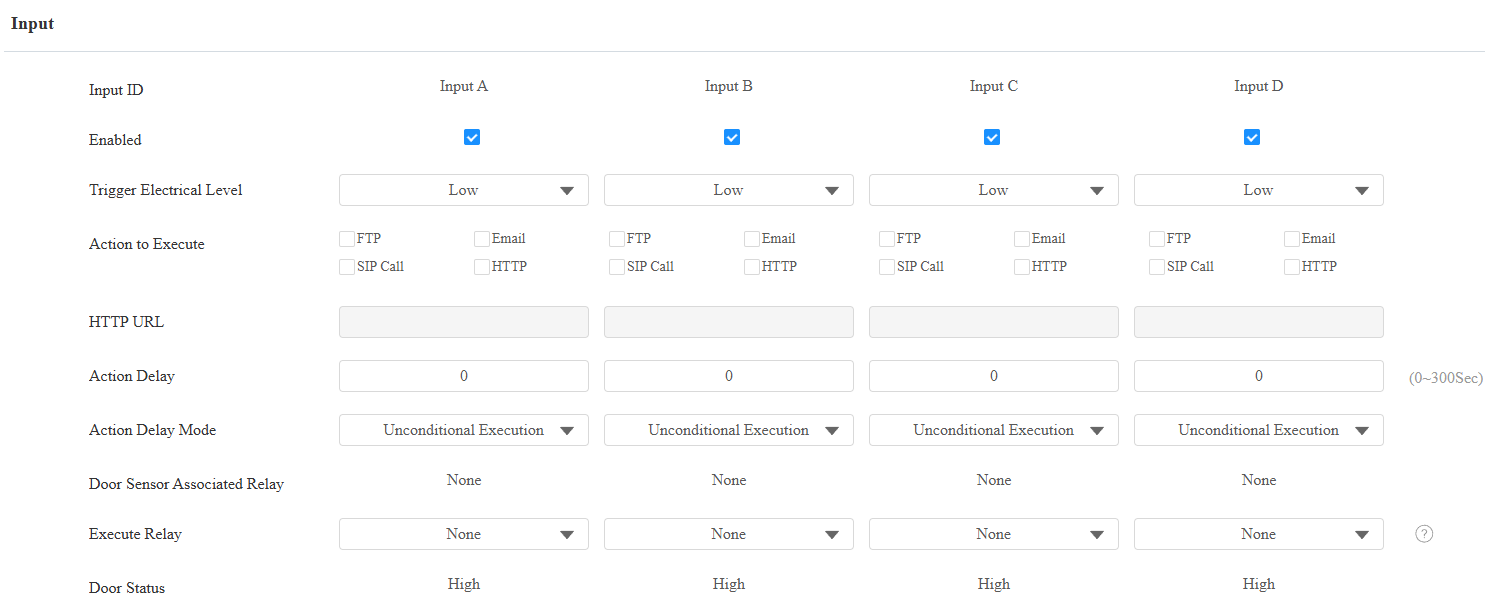
Enabled: To use a specific input interface.
Trigger Electrical Level: Set the input interface to trigger at a low or high electrical level.
Action To Execute: Set the desired actions that occur when the specific Input interface is triggered.
FTP: Send a screenshot to the preconfigured FTP server.
Email: Send a screenshot to the preconfigured Email address.
SIP Call: Call the preset number upon the trigger.
HTTP: When triggered, the HTTP message can be captured and displayed in the corresponding packets. To utilize this feature, enable the HTTP server and enter the message content in the designated box below.
HTTP URL: Enter the HTTP message if selecting HTTP as the action to execute. The format is http://HTTP server’s IP/Message content.
Action Delay: Specify how many seconds to delay executing the preconfigured actions.
Action Delay Mode:
Unconditional Execution: The action will be carried out when the input is triggered.
Execute If Input Still Triggered: The action will be carried out when the input stays triggered. For example, if the door stays open after triggering the input, an action such as an email will be sent to notify the receiver.
Door Sensor Associated Relay: This indicates the Relay bound to the Input when the Input is configured as a Door Sensor. Displays None when the Input is not associated with any Relay.
Execute Relay: Specify the relay to be activated on input trigger. This is incompatible with the break-in intrusion feature. The same input cannot work for both the door sensor and push exit button.
Door Status: Display the status of the input signal.