Unlock By Public PIN
Il existe deux types de codes PIN pour l’accès aux portes : public et privé. Un code PIN privé est unique à chaque utilisateur, tandis que le code public est partagé par les résidents du même bâtiment ou complexe. Vous pouvez créer et modifier à la fois les codes PIN publics et privés.
To set up the public PIN code, go to Intercom > PIN Setting > Public PIN interface.
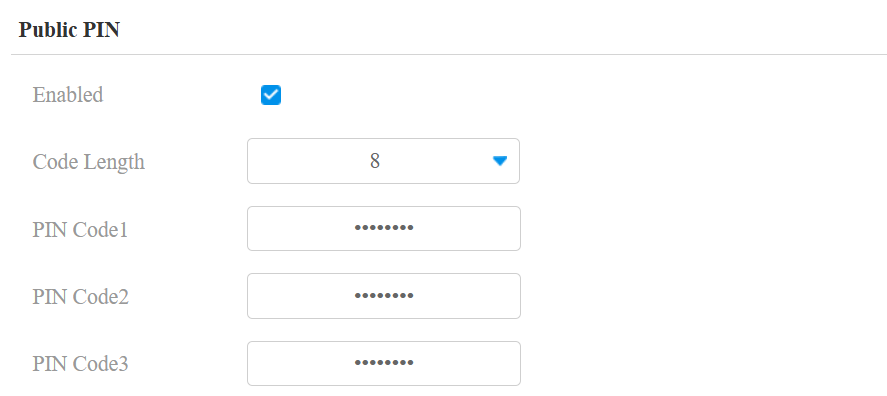
Code Length: Set the code length ranging from 4 to 8.
PIN Code 1/2/3: Set the desired PIN code to open the door.
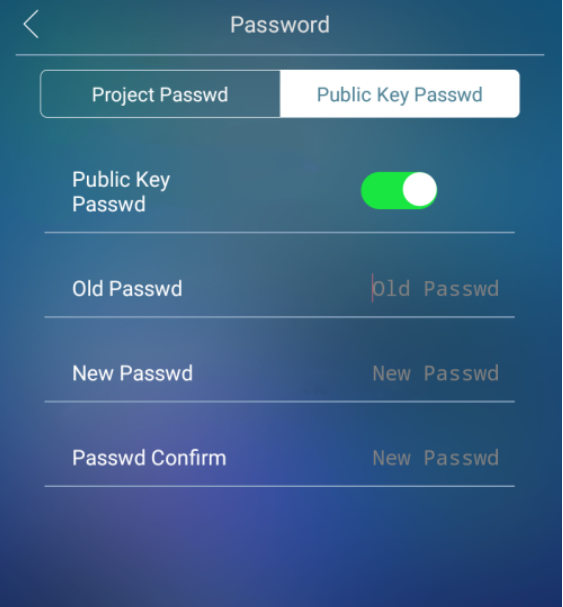
You can also set up the public PIN on the device Setting > Password > Public Key Password screen.
User-specific Access Methods
The private PIN code, RF card, Bkey, and facial recognition settings should be assigned to a particular user for door opening.
When adding a user, you can also customize settings such as defining the door access schedule to determine when the code is valid and specifying which relay to open.
To add a user, go to Directory > User interface and click +Add. You can also set up a user on the device Setting > User screen.
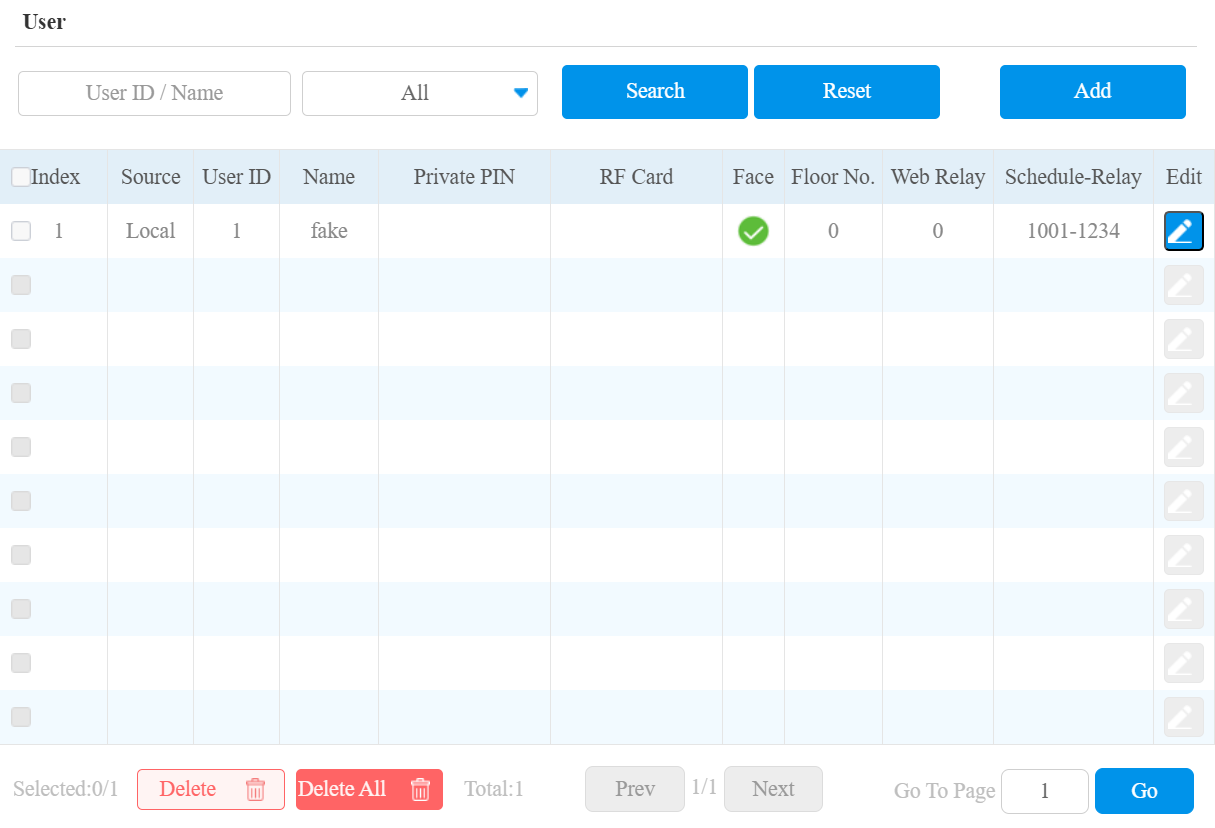

User ID: The unique identification number assigned to the user.
Name: The name of this user.
Unlock by Private PIN Code
On the Directory > User > +Add interface, find the Private PIN section.

Code: Set a 2-8 digit PIN code solely for the use of this user. Each user can only be assigned a single PIN code.
You can set the PIN mode on the Intercom > PIN Setting > Private PIN interface.

Authorization PIN:
PIN: Solely enter the PIN code for door access.
APT#+PIN: Enter the Apartment Number first before entering the PIN code for the door access. Apartment Number can only be applicable when the device is connected to the Akuvox SmartPlus Cloud.
Unlock by RF Card/Bkey
On the Directory > User > +Add interface, find the RF Card & Bkey section.
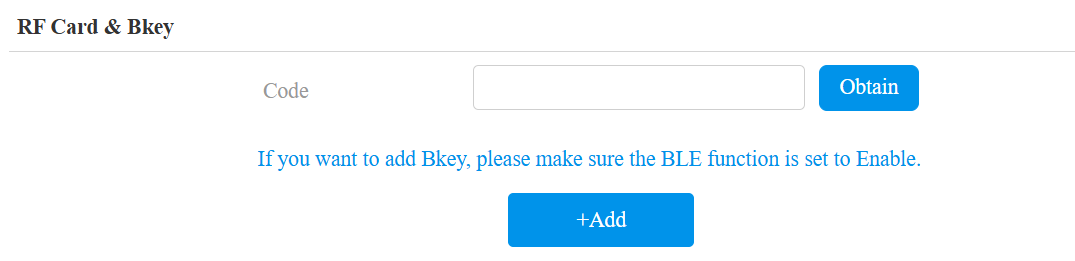
Code: The card code or Bkey code that the device reads.
Note
Click here to view the detailed steps of configuring Bkey.
RF cards operating at 13.56 MHz and 125 KHz frequencies are compatible with the device for access.
Each user can have a maximum of 5 cards added.
The device allows to add 20,000 users.
RF Card Code Format
Pour intégrer l’accès à la porte de la carte RF avec le système d’interphone tiers, il faut faire correspondre le format de code de la carte RF à celui utilisé par le système tiers.
To set it up, go to Access Control > Card Setting > RFID interface.

RFID Display Mode: Set the card format for the IC card from the provided options. The default is 8HN.
ID Card Display Mode: Set the card format for the ID card from the provided options. The default is 8HN.
Unlock by License Plate
Akuvox propose deux moyens principaux d’identifier les véhicules et d’ouvrir les portails.
Utilisez une caméra LPR (Reconnaissance des plaques d’immatriculation) tierce pour reconnaître la plaque d’immatriculation du véhicule.
Utilisez le lecteur de cartes longue portée Akuvox ACR-CPR12 pour reconnaître la carte UHF fixée au pare-brise du véhicule.
To assign the license plate to a user, find the License Plate part on the Directory > User > +Add interface.

Add: A user can have up to 5 license plates.
Duration: Enable/disable Long-term Vehicle. It is enabled by default. If disabled, specify when the vehicle can enter or exit the parking lot.
Unlock by Facial Recognition
On the Directory > User > +Add interface, find the Face section.

Status: Indicate whether the user's face photo has been uploaded successfully.
Photo: Upload a photo complying with the following requirements:
The photo must be in JPG or PNG format.
The photo must be at least 250 x 250 pixels and no more than 2MB in size.
The photo must be clear and not blurred.
The photo should include a full face with a front view and open eyes.
Avoid shadows on the face or background in the photo.
Facial Recognition Settings
Le téléphone de porte vous permet d’ajuster la précision de la reconnaissance faciale, les intervalles de reconnaissance, et plus encore pour améliorer l’expérience utilisateur.
Set it up on the Intercom > Face Settings interface.
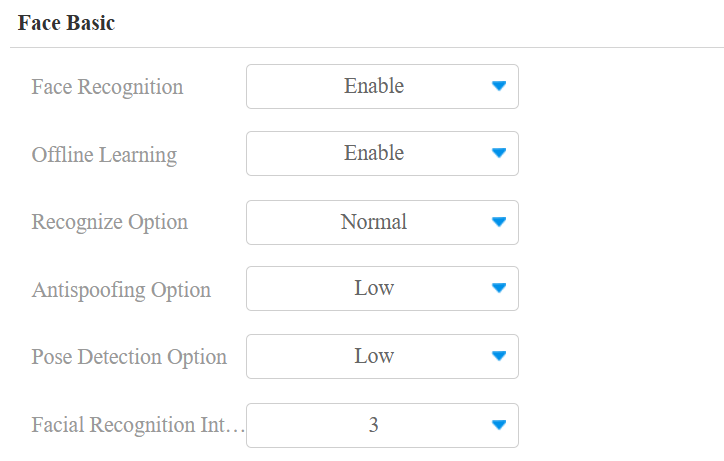
Face Recognition: Enable/disable the facial recognition function.
Offline Learning: Facial recognition accuracy improves as the number of facial recognition increases.
Recognize Option: Determine how strict the facial recognition system is in comparing a person’s face with uploaded face data. Each level allows a different degree of difference or face covering (excluding the mouth area) to pass the recognition.
Low: Allow slight differences from the uploaded face data, with little face coverage.
Highest: Require the face to be identical to the uploaded one, with minimal or no covering.
The other two levels are in between.
Antispoofing Option: Set how strict the system is in preventing fake faces.
Close: Disable the facial anti-spoofing function. Facial verification can be passed using non-living substitutes for an authorized person's face, such as a photo.
Highest: The system cannot be fooled by any non-living substitutes for an authorized person's face.
The other three levels are in between.
Pose Detection Option: Set the pose detection level from Close, Low, Normal, and High. The higher the level is, the more accurate the detection is. Users will be prompted to “please face the camera directly” when they do not face the camera.
Facial Recognition Interval: Adjust the time interval between each facial recognition attempt, ranging from 1 to 8 seconds.
Access Setting
You can customize access settings, such as defining the door access schedule to determine when the code is valid and specifying which relay to open.
On the Directory > User > +Add interface, scroll to the Access Setting section.
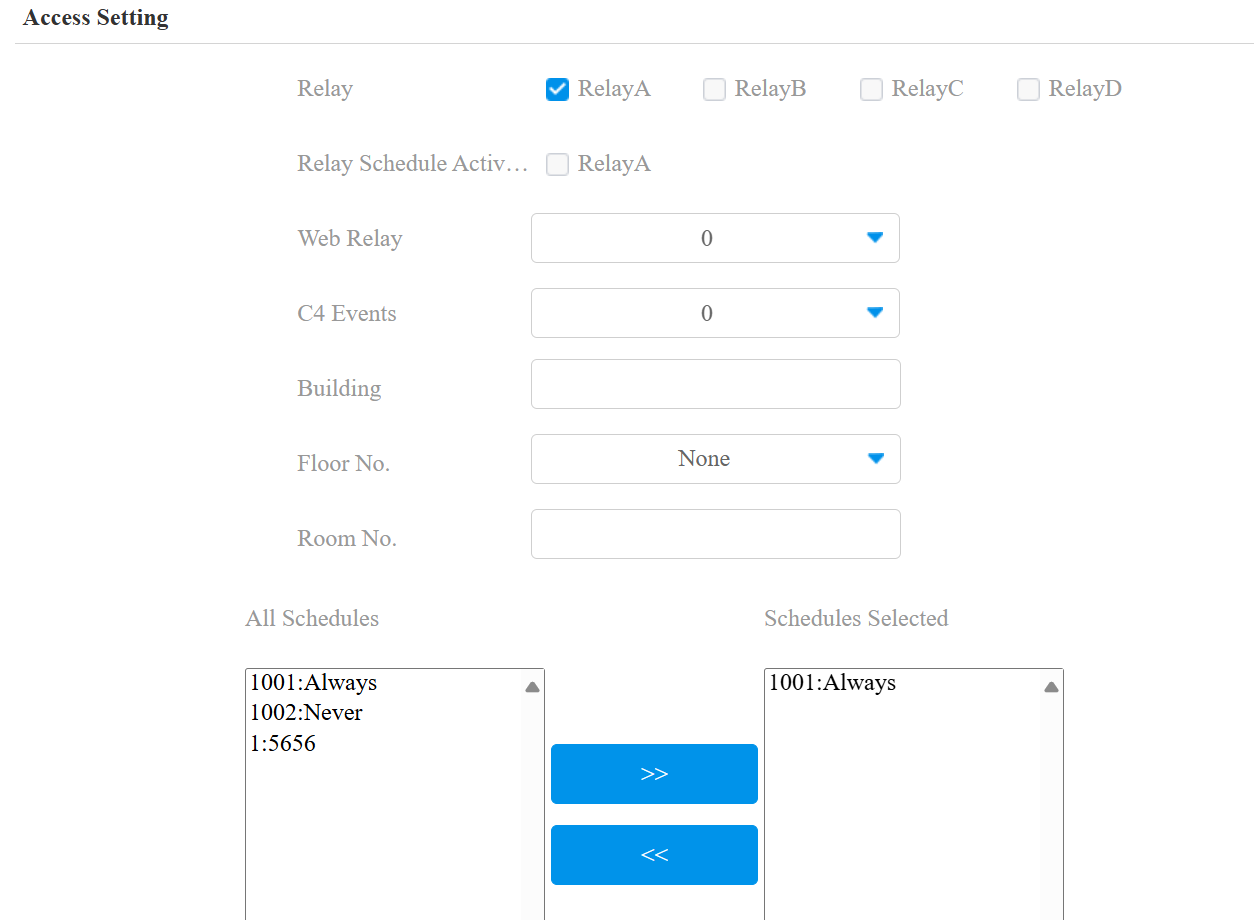
Relay: Specify the relay that can be unlocked by the user’s credentials.
Relay Schedule Activation Permission: This decides whether the user can keep the relay open during the scheduled time after activating it.
Web Relay: Specify the ID of the web relay action commands that you’ve configured on the Web Relay interface. A default value of 0 indicates that the web relay will not be triggered.
C4 Events: When the device integrates with C4 devices, select the C4 event(s). When users use their credentials, the events will be triggered. You may refer to the manual Akuvox Integration with Control4 to learn the integration steps.
Building: Specify the building the user lives in.
Floor No.: Specify the accessible floor(s) to the user via the elevator.
Room No.: Enter the user’s room number.
Schedule: Grant the user access to open designated doors during preset periods by relocating the desired schedule(s) from the left box to the right one. Besides custom schedules, there are 2 default options:
Always: Allows door opening without limitations on door open counts during the valid period.
Never: Prohibits door opening.
Import/Export User Data
Le téléphone de porte prend en charge le partage des données utilisateur du contrôle d’accès entre les téléphones Akuvox via importation et exportation, tandis que vous pouvez également exporter les données faciales du téléphone de porte puis les importer sur un appareil tiers.
Cliquez ici pour voir comment importer et exporter les données utilisateur entre les téléphones portes Akuvos.
You can import and export user data for quick setup on the Directory > User interface.
The import/export file format can be .XML or .CSV.

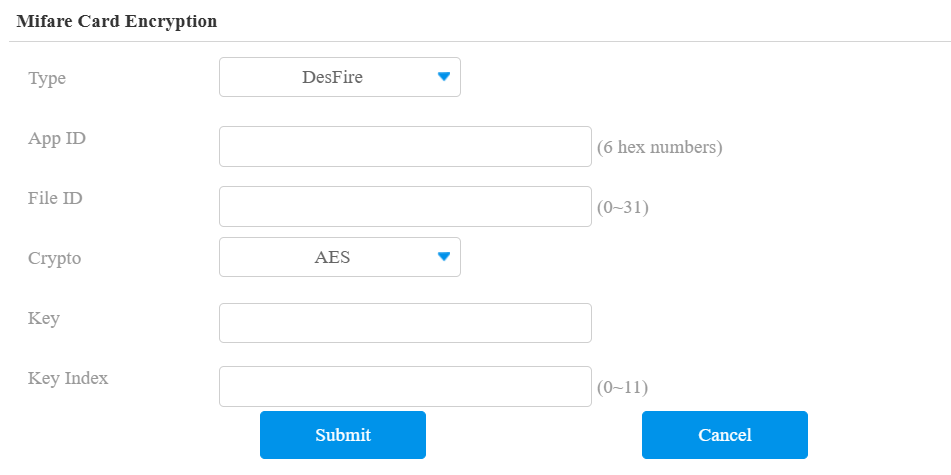
Mifare Card Encryption
L’appareil peut lire les cartes Mifare chiffrées pour une plus grande sécurité. Lorsque cette fonction est activée, elle lit les données dans les secteurs et blocs désignés des cartes, et non l’UID.
Cliquez ici pour voir les détails du chiffrement et de la lecture des cartes Mifare.
To configure the Mifare card, navigate to the web Intercom > Card Setting interface.
Classic:
Sector/Block: Specify the location where encrypted card data is stored. A Mifare card has 16 sectors (numbered 0 to 15), and each sector has 4 blocks (numbered 0 to 3).
Block Key: Set a password to access the data stored in the predefined sector/block.
Plus: You can set up three choices. This means you can use three types of Mifare Plus cards. When swiping a card, as long as one of the choices matches its SL key, the card code in the block you specified will be output.
Block: Specify the block(s) to be read.
SL3: The key number within 32 bits.
DESFire:
App ID: A 6-digit hexadecimal number
File ID: The ID of the encrypted file of the app, which can be a number from 0 to 31.
Crypto: The encryption method, either AES or DES.
Key: The file key.
Key Index: The index number for the key, which can be a number from 0 to 11.
Unlock by HTTP Command
L’appareil prend en compte le déverrouillage à distance de la porte via une commande HTTP. Il suffit d’activer cette fonctionnalité et d’entrer la commande HTTP (URL) pour l’appareil. Cela déclenchera le relais et ouvrira la porte, même si les utilisateurs sont loin de l’appareil.
Set it up on the Intercom > Relay > Open Relay Via HTTP interface.

Session Check: When enabled, the HTTP unlock requires logging into the device’s web interface. Or, the door opening may fail.
Username: Set a username for authentication in HTTP command URLs.
Password: Set a password for authentication in HTTP command URLs.
Tip
Here is an HTTP command URL example:

Note
The HTTP format for relay triggering varies depending on whether the door phone's high secure mode is enabled. Please refer to this how-to guide Opening the Door via HTTP Command for more information.
Unlock by DTMF Code
La signalisation multifréquence à double ton (DTMF) est un moyen d’envoyer des signaux sur des lignes téléphoniques en utilisant différentes bandes de fréquences vocaux. Les utilisateurs peuvent utiliser la fonction DTMF pour déverrouiller la porte aux visiteurs pendant un appel en tapant soit le code DTMF sur le clavier logiciel, soit en tapotant l’onglet de déverrouillage avec le code DTMF à l’écran.
Set it up on the Intercom > Relay interface.
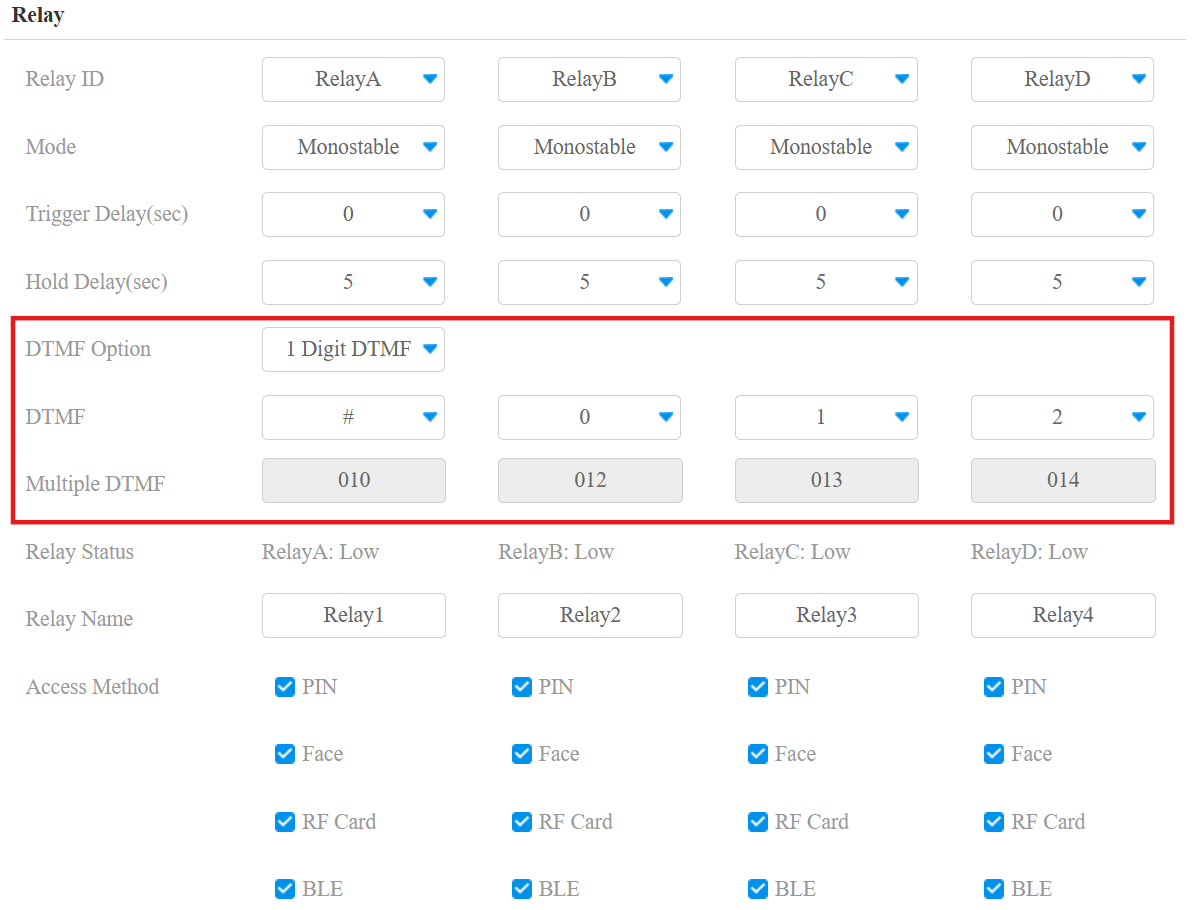
DTMF Option: Set the number of digits for the DTMF code.
1 Digit DTMF: Define the 1-digit DTMF code within the range (0-9 and *,#) when the DTMF Mode is set to 1-digit.
Multiple DTMF: Set the DTMF code based on the number of digits selected in the DTMF Mode.
DTMF Data Transmission
Pour accéder à la porte via le code DTMF ou d’autres applications, vous devez configurer correctement le DTMF afin d’établir une transmission de données basée sur DTMF entre l’appareil et d’autres dispositifs d’interphone.
Différences de type DTMF :
Inband | Les signaux DTMF sont transmis dans le même canal audio que les données vocales. Implémentation simple mais une distorsion du signal peut survenir avec des codecs très compressés (par exemple, G.729). |
RFC2833 | Transmet DTMF sous forme de paquets d’événements spéciaux via RTP (Real-Time Transport Protocol), appelé transmission hors bande. Fiable et non affecté par les codecs. |
Info | Envoie des signaux DTMF via le canal de signalisation SIP (Session Initiation Protocol). Séparé de la transmission vocale, garantissant la qualité audio. |
Info+Inband | Combine les méthodes Info et Inband. |
Info+RFC2833 | Combine à la fois les méthodes d’information et RFC2833. |
Info+Inband+RFC2833 | Les trois méthodes sont utilisées simultanément. |
Set it up on the Account > Advanced > DTMF interface.

Type: Select from the available options based on the specific DTMF transmission type of the third-party device to be matched with as the party for receiving signal data.
How to Notify DTMF: Select Disabled, DTMF, DTMF-Relay, or Telephone-Event according to the specific type adopted by the third-party device. You are required to set it up only when the third-party device to be matched with adopts Info mode.
DTMF Payload: Set the payload according to the specific data transmission payload agreed on between the sender and receiver during the data transmission.
Note
To open the door with DTMF, the intercom devices that send and receive the unlock command must use the same mode and code. Otherwise, the DTMF unlock may fail. See here for the detailed DTMF configuration steps.
DTMF Whitelist
To secure door access via DTMF codes, you can set up the DTMF whitelist on the device web Intercom > Relay > Open Relay via DTMF interface so that only the caller numbers you designated in the door phone can use the DTMF code to gain door access.

Access Phone Numbers: Specify the contacts authorized to open doors via DTMF:
None: No numbers can unlock doors using DTMF.
Phonebook Numbers: Only numbers added to the door phone's contact list can unlock via DTMF.
All Numbers: Any numbers can unlock using DTMF.
Unlock by Exit Button
Lorsque les utilisateurs doivent ouvrir la porte de l’intérieur en appuyant sur le bouton Sortir, il faut configurer le terminal d’entrée correspondant au bouton Sortie pour activer le relais d’accès à la porte.
Cliquez ici pour regarder la vidéo d’instructions.
Set it up on the Intercom > Input interface.
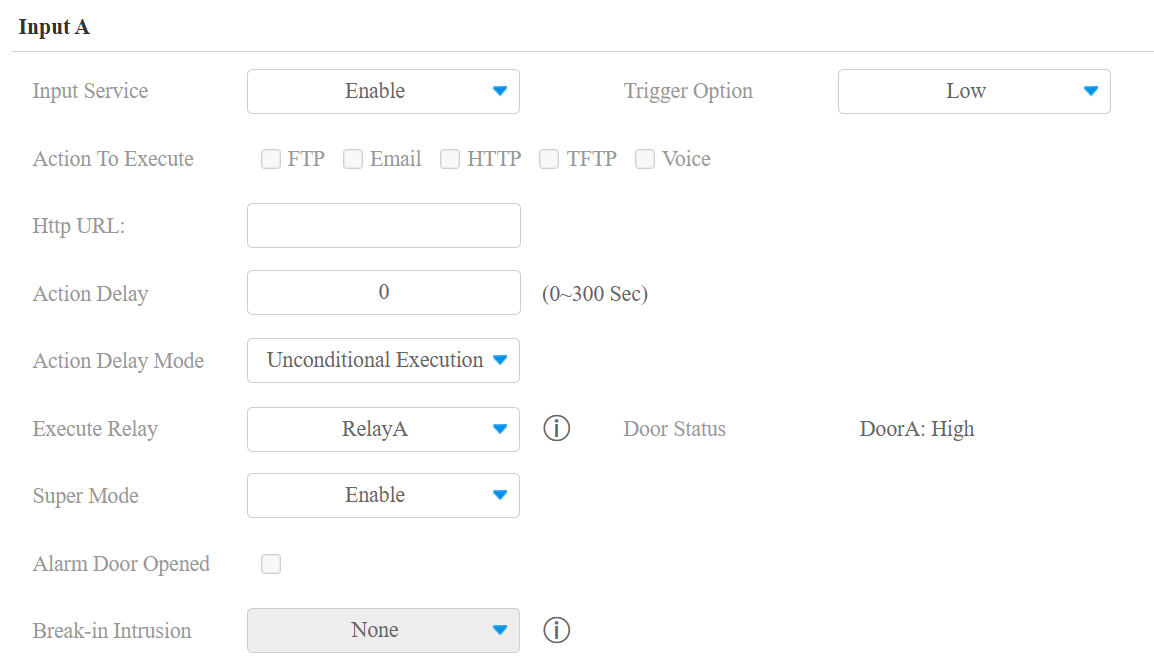
Input Service: To use a specific input interface.
Trigger Option: Set the input interface to trigger at low or high electrical level.
Action To Execute: Set the desired actions that occur when the specific Input interface is triggered.
FTP: Send a screenshot to the preconfigured FTP server.
Email: Send a screenshot to the preconfigured Email address.
HTTP: When triggered, the HTTP message can be captured and displayed in the corresponding packets. To utilize this feature, enable the HTTP server and enter the message content in the designated box below.
TFTP: Send a screenshot to the preconfigured TFTP server.
Voice: When triggered, the door phone will play the customized prompt instead of the default one.
TIP:
To enable the custom audio prompt, upload the audio file at Device>Import/Export>Upload Tone.
HTTP URL: Enter the HTTP message if selecting HTTP as the action to execute. The format is http://HTTP server’s IP/Message content.
Action Delay: Specify how many seconds to delay executing the preconfigured actions.
Action Delay Mode:
Unconditional Execution: The action will be carried out when the input is triggered.
Execute If Input Still Triggered: The action will be carried out when the input stays triggered. For example, if the door stays open after triggering input, an action such as an email will be sent to notify the receiver.
Execute Relay: Specify the relay to be triggered by the actions.
Super Mode: When enabled, the administrator will be able to open the door using an RF card even when the door phone breaks down or malfunctions.
Alarm Door Opened: If enabled, an alarm will be triggered when the door-opening time exceeds a limit.
Door Opened Timeout: The door-opening time limit.
Break-in Intrusion: Activate an alarm when the door is forcibly or illegally opened. Once triggered, the alarm can only be turned off by checking this option. Click here to learn more about this feature. It is incompatible with the Execute Relay feature.
Door Status: Display the status of the input signal.
Unlock by QR Code
Vous pouvez utiliser un code QR pour déverrouiller la porte avec le téléphone portier. Cette méthode nécessite le service cloud Akuvox SmartPlus. Vous devez activer cette fonctionnalité avant de l’utiliser.
Set it up on the Intercom > Relay > Open Relay via QR Code interface.

Note
The function should work with the Akuvox SmartPlus cloud. Please click here to view the configuration details.
Unlock by Reception Tab
Le bouton Réception est un onglet sur l’écran d’accueil qui permet aux résidents et visiteurs de contacter la réceptionniste ou le gardien de sécurité du bâtiment. Ils peuvent appuyer sur ce bouton pour demander de l’aide ou accéder à la porte.
To configure a reception tab, go to Intercom > Key/Display > Reception Action In Intercom interface.
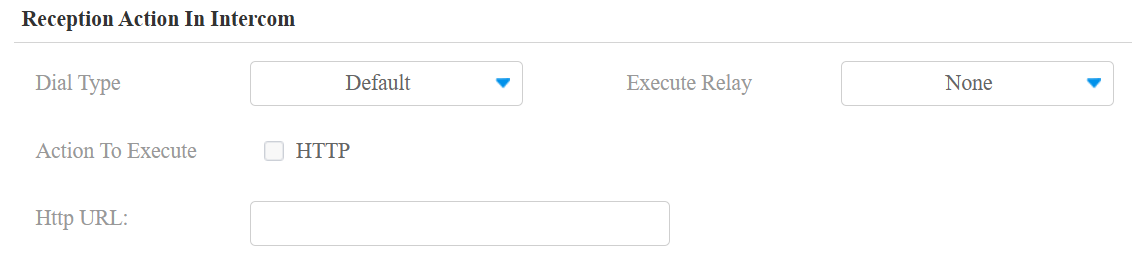
Dial Type: Select the registered SIP account to make calls with receptionists or security guards. Selecting Default will use Account 1 for the calls.
Execute Relay: Specify the relay(s) to be triggered by the Reception tab.
Action To Execute: When checked and the HTTP URL is entered in the box below, press the Reception tab that triggers the desired action.
HTTP URL: Enter the HTTP command URL. Here is an example of relay triggering:

Note
The HTTP format for relay triggering varies depending on whether the door phone's high secure mode is enabled. Please refer to this how-to guide Opening the Door via HTTP Command for more information.
Unlock by Bluetooth
L’application SmartPlus compatible Bluetooth permet aux utilisateurs d’entrer sans toucher l’appareil. Ils peuvent ouvrir la porte avec l’application dans leur poche ou agiter leur téléphone vers le téléphone à mesure qu’ils s’approchent.
Cette fonctionnalité nécessite que l’appareil soit connecté au SmartPlus Cloud.
Set it up on the web Intercom > BLE interface.
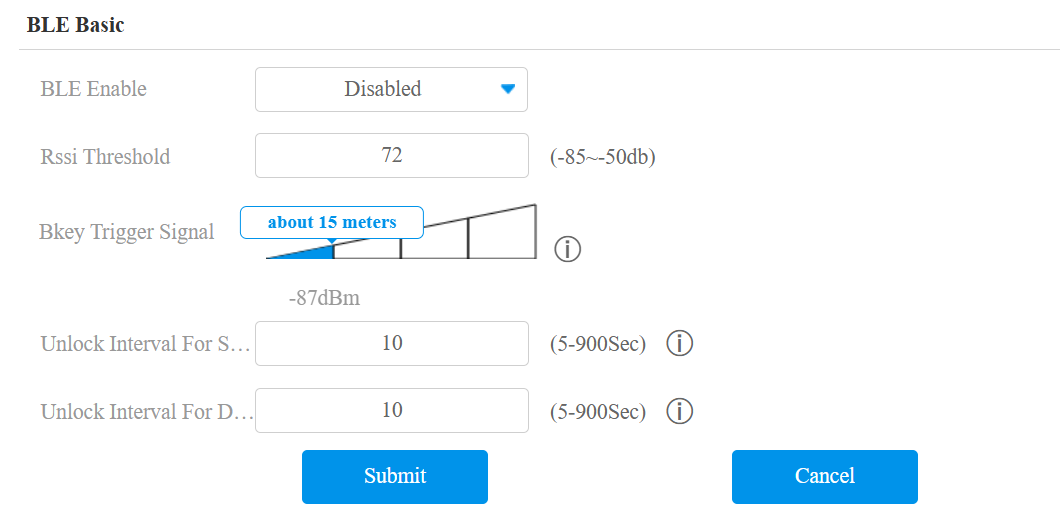
RSSI Threshold: Set the received signal strength. Higher values indicate stronger signal strength, making it easier to receive the Bluetooth signal.
Bkey Trigger Signal: There are four ranges that determine the Bkey trigger distance from 1 to 15 meters.
Unlock Interval For Same User(Sec): Set the time interval between consecutive Bluetooth door access attempts for the same user.
Unlock Interval For Different Users(Sec): Set the time interval between consecutive Bluetooth door access attempts for different users.
Note
To learn about detailed configuration steps of different Bluetooth-based access methods, you can click the following articles.